The castle now has light and dark sides, but it still doesn’t look realistic. What is missing are the cast shadows. Cast shadows occur when one surface blocks light that would otherwise illuminate another surface. Cast shadows are generally darker than other shadows on an object, because they receive less fill light. Fill light comes from the sky, the atmosphere, and other objects in the environment that reflect light onto the dark side. Without fill light, objects would be black on the dark side—a lighting situation almost never seen except in outer space. Fill light should never be brighter than the main source of illumination.
Create a new layer at the top of the Form group, name it CastShadows, and set the blending mode to Multiply. The castle entrance is blocking the light that would fall on the wall behind it, so begin by drawing the cast shadow from the main entrance. You’ll eyeball the length of the cast shadows as opposed to plotting them, so use your judgment as to what looks realistic.
Select the Lasso tool, and add softness by setting Feather to 3 px in the options bar. You’ll occasionally see razor-sharp cast shadows on a clear sunlit day, but it’s more natural looking to take the edge off shadows. To draw the shape of the entranceway’s cast shadow, do the following (Figure 6-28):
1. Using the position of the main light source as a reference, begin drawing from the top edge of the entrance where it meets the wall. Press the Option/Alt key to turn the Lasso tool temporarily into the Polygonal Lasso tool. The top edge of the shadow matches the direction of the light. Draw the shadow extending out on the wall to a reasonable distance. Click, and then draw a straight line to the ground; click again, and draw the edge of the shadow back to the base of the entrance.
2. Release the Option/Alt key, and lift the cursor. The selection appears.
3. Command+Option+click/Ctrl+Alt+click in the LowerWallDark layer thumbnail to trim the shadow to align with the edge of the entrance. Using the Gradient tool, click the corner where the structures meet, and drag out beyond the edge of the shadow.
4. Cast shadows tend to be darkest at the source of the shadow. By starting the gradient in the corner and dragging out, you make the shadow lighter away from the wall casting it.
Figure 6-28: Draw the shadow for the castle entrance, and fill it using the Gradient tool.

Next, you’ll create the shadow for the right-front bastion. Select the Rectangular Marquee tool, and feather it 3 pixels. Follow this procedure (Figure 6-29):
1. Command+click/Ctrl+click the layer thumbnail for the LowerWallLight layer to load that selection.
2. With the Rectangular Marquee tool, Shift+Option/Shift+Alt and drag over the area of the selection to the left of the right bastion. Doing so selects only the area that the marquee intersects. This shadow isn’t as long as the one for the entranceway because the bastion doesn’t project out from the wall as far as the entrance.
3. Use the Gradient tool to create the shadow.
Figure 6-29: Drawing the shadow for the right front bastion
Using Selections to Cast Shaped Shadows
You should look for opportunities to use the forms in the structure to cast shaped shadows. For instance, the upper-left inner wall is mostly in shadow from the wall to the right of it, whereas the topmost section is illuminated. Because the wall casting the shadow has crenellations, the blocky forms should be evident in the shadow. You can add a shaped shadow to the opposite wall by following these steps (Figure 6-30):
1. Load the UpperWallDark layer selection, and marquee Shift+Option/Shift+Alt around the right dark wall to isolate it. Choose Select Transform Selection. Control+right-click/right-click, and select Distort from the pop-up menu.
2. Distort the shape into position on the left light wall by clicking the control points of the Distort tool and moving them as shown. Press Return/Enter to accept the distortion.
3. Choose Select Modify Feather, and feather the selection 3 pixels to soften the edge. Manually add to the bottom of the selection to cover the lower part of the wall that isn’t selected.
4. Shift+Option+Command+click/Shift+Alt+Ctrl+click the layer thumbnail for UpperWallLight to intersect with the existing selection and confine it to that wall. Use the Gradient tool to create the cast shadow.
Figure 6-30: Using the forms in the structure to create shaped cast shadows
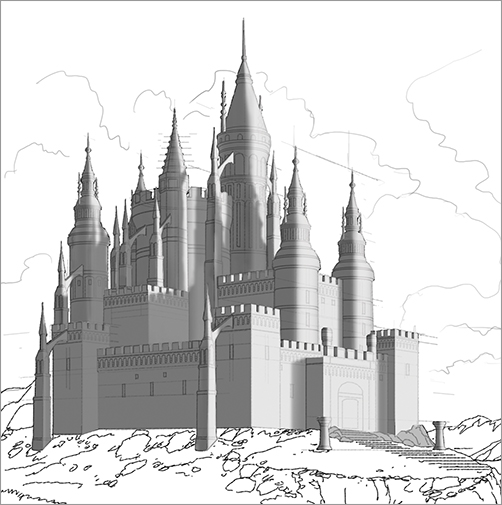
Continue creating the rest of the cast shadows on your own. When you’re finished, the cast shadows should look like Figure 6-31.
Figure 6-31: Cast shadows completed
Layer Masks
One problem remains with the cast shadows: they aren’t dark enough. Why? Because the illumination from the LightSide layer is still on, and this lightens the cast shadows. You need to turn off the illumination in the shadowed areas to achieve the correct tonal density. Doing so requires a technique called layer masks that you haven’t used before. You’ll use a layer mask on the LightSide layer to block it wherever cast shadows occur.
Layer Masks vs. Mask-loading Layers
Layer masks and mask-loading layers are two different beasts, and they’re easy to confuse. Layer masks is an official Photoshop term referring to a special mask attached to a layer that stops part of that layer from showing through, much like a stencil.
Mask-loading layers is a term I coined to refer to layers where I park masks for reuse. In the past, I kept masks in the alpha channels. Whenever I wanted to use this stockpile of masks, I had to go to the Channels tab, Command+click/Ctrl+click the channel to load a selection, and then go back to the Layers panel to use it. Having masks accessible in the Layers panel is much easier, and you can find them on the fly by Command+right-clicking/Ctrl+right-clicking in the composition.
To apply the layer mask, follow this process:
1. Command+click/Ctrl+click the thumbnail for the CastShadows layer to load the selection.
2. Anything not selected is masked off, so you need to choose Select Inverse or Shift+Command+I/Shift+Ctrl+I to invert the selection.
3. Select the LightSide layer, and, at the bottom of the Layers panel, click the Add Layer Mask icon ![]() .
.
Voilà! The cast shadows are instantly darker because the layer mask prevents the LightSide layer from showing through. Notice how the LightSide layer now has a second thumbnail of the layer mask to the right of it ![]() . The linked chain between the two icons signifies that you can move the layer, and the mask will move with it. If you need to move either of them independently, you can click the chain to unlink the layer and the layer mask. If you rework the cast shadows, you should delete the layer mask and redo it so that the cast shadows and layer mask always match.
. The linked chain between the two icons signifies that you can move the layer, and the mask will move with it. If you need to move either of them independently, you can click the chain to unlink the layer and the layer mask. If you rework the cast shadows, you should delete the layer mask and redo it so that the cast shadows and layer mask always match.
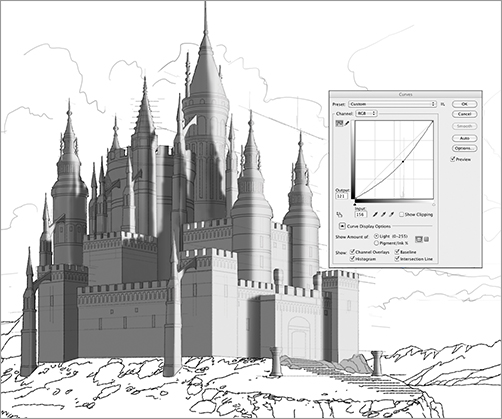
The cast shadows should be even darker. Select all, and then press Command+M/Ctrl+M to open the Curves dialog box. Click and pull down the middle of the curve to make the cast shadows the darkest tone on the castle. The final cast shadows should resemble Figure 6-32.
Figure 6-32: Apply a layer mask, and darken the cast shadows using the Curves dialog box.