
You now have the plate toned with warm and cool layers, but it doesn’t have the sparkle of life that lit windows provide. Adding this will involve some handwork; but rest assured, you won’t have to place every window individually.
The Window Bank
Find a photo of an illuminated building at night, and copy a selection of the windows. Paste them into a new layer just above BlueMultiply, and call it WindowBank. While working on this project, I kept a file open as the repository for any sections of photos I might reuse. If you want lit windows to insert without searching for a photo reference, open the file CityBits.psd on the DVD, copy the layer WindowBits, and paste it into the WindowBank layer.
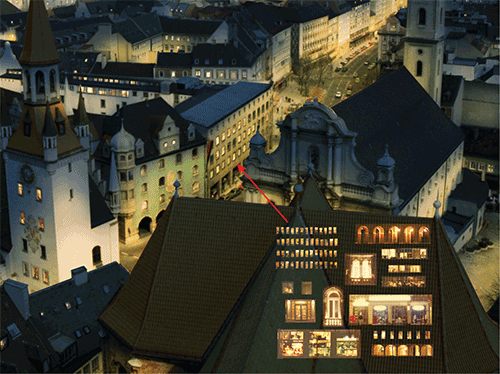
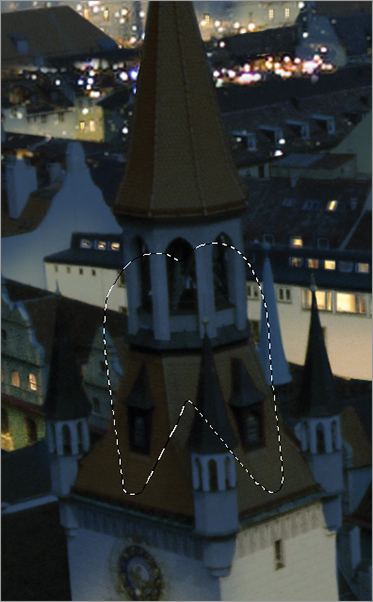
Move all the windows out of the way by placing them on the foreground rooftop. Copy one window, and paste it above WindowBank into a new layer called Windows, and then set the layer blending mode to Screen. You can now light the buildings by distorting the lit window to cover any unlit window. The temptation will be to use the same window over and over again. But going back to the window bank and choosing a new, slightly different window will add realism through randomization (Figure 11-19).
Figure 11-19: Using the Window Bank to populate the city with windows
You can also distort a group of lit windows into place across the face of a building, but be careful to match the placement of the original windows from the daytime scene. After you have the windows in place, you can add more variety by making a selection from the layer and painting into the windows.
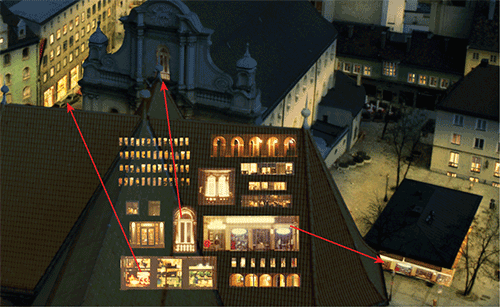
Create a new layer above Windows, and name it Storefront. Add some lit storefronts on the ground floor of the buildings in the main shopping area. You can take them from any nighttime photo of a commercial district, or use the examples in my window bank. Distort and edit the reference to fit the storefront shapes. The square building to the right of the church looks like a food stand, so place some lit windows around the outside. Finally, add a lit balcony to the church (Figure 11-20). When you’re finished adding lights to the window, turn off the visibility on the WindowBank layer. You can always turn it on again if you decide to add more windows.
Figure 11-20: Add lit storefronts and a balcony.
Adding the Distant Lights of the City
When you look across a large, sprawling city at night from a high vantage point, you see millions of dazzling lights in the background. I don’t have any night shots of Munich, but I live just outside of New York City, and I have some night shots from the top of the Empire State Building. You can use my reference shots to add background lights to this scene.
Create a new layer above the Storefronts layer, and rename it CityLights. Go back to the CityBits.psd file, and copy NightCity1 from the file. Paste it into the new layer, and set the blending mode to Screen. Move the top edge of the lights to rest below the mountains. This immediately adds depth and grandeur to the scene (Figure 11-21).
Figure 11-21: Add background city lights.
Using a Layer Mask to Edit the Lights
Because these lights are from another city, you’ll need to add a layer mask to make the lights conform to this project. Select the CityLights layer mask, and load the Towers+ChurchFront selection. Paint into the layer mask with black to block any lights that appear on top of the towers. Load in the RoofTops selection from the MaskHoldingLayers group, and paint into the selection to stop the lights from showing on rooftops. Now, paint into the layer mask to get the lights to line up with the streets on the plate. Block out any lights that look out of place, such as those bleeding into the foreground retail area. You can be very loose while painting your mask; if you make a mistake, paint over it with white, and the lights will show through again.
Figure 11-22 shows the loose treatment for the layer mask for CityLights.
Figure 11-22: Layer mask for the CityLights layer

Using the CityBits.psd file or your own city lights reference, add more background lights. It would be difficult to hand-place all the lights throughout the city, but photographs offer natural randomization that you can control with the layer mask; you can then specifically place lights where needed (Figure 11-23).
Figure 11-23: City lights finished
Lighting Up the Towers
Towers in old cities are often illuminated at night. Let’s add lights to both the foreground towers. For the left tower, add two spotlights mounted on the roof to light up the tower steeple. With the Lasso tool set to a 6-pixel feather, draw the inverted cone shape of the light falling on each side (Figure 11-24).
Figure 11-24: Draw the shape of spotlight falling on the tower.
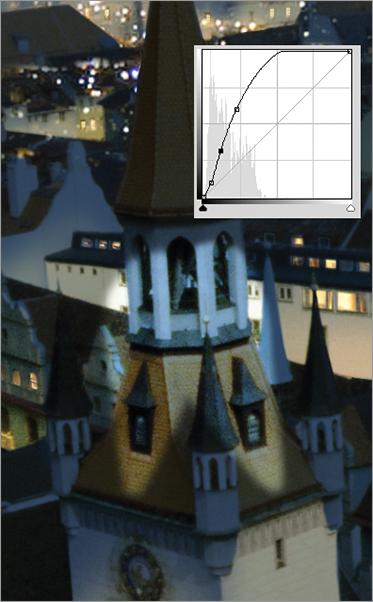
Create a new Curves adjustment layer above the StreetOverlay layer. You want to work with all of the existing corrections applied and this curve correction applied on top of them. Pull the midtones up very high while retaining the dark details on the tower (Figure 11-25).
Figure 11-25: Adjustment layer curve for lighting the tower
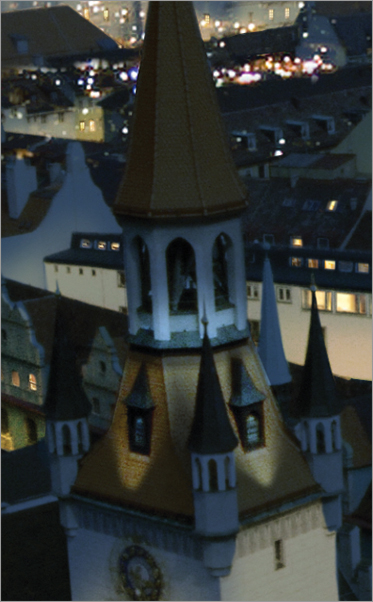
The light wouldn’t extend beyond the side of the tower or light up the front small spire. Paint black into the layer mask for the Curves adjustment layer to confine the correction. Next, soften the top of the light beam at the top of the tower (Figure 11-26).
Figure 11-26: Edit the layer mask
Paint into the Curves layer mask to show light climbing up the clock tower. Also, lighten the front of the foreground church to separate it from the building in front of it. The layer mask for the two towers and the church front should look like Figure 11-27.
Figure 11-27: Layer mask for the towers and the church front

Top Additions with a Paint Layer
Start a new layer on top of the Curves adjustment layer you just created, and name it PaintLayer. Paint some spotlights on the left tower steeple to provide a source for the beams. The clock tower would benefit from an illuminated clock face, so either paint that in or copy the clock face out of the CityBits.psd file. Distort the clock face to appear on the side of the tower. You can warm up the light on the towers and church front by painting into the StreetOverlay layer (Figure 11-28).
Figure 11-28: Towers and church front with adjustments added

Light Flares
Small light flares enhance the realism of a night scene. I never use Photoshop’s Lens Flare filter for the purpose it was intended for, because its effects are so recognizable and overused. However, prepared in a special way, it’s very effective for adding small flares and glows.
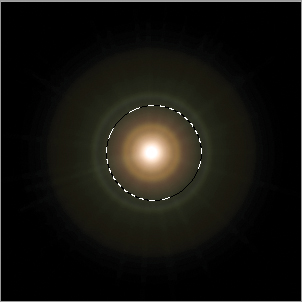
Start a new Photoshop file that’s 300 × 300 pixels, and fill it with black. Choose Filter Render Lens Flare, and select the first option, 50-300mm Zoom. Center the cursor exactly in the middle of the preview so that none of the little light elements go off to the side, and set Brightness to 100. Click OK, and you have a rendered lens flare.
Open Curves, and raise the white point by 25 points to get a brighter center. Still in the Curves dialog, select Green from the Channels drop-down menu, and pull the middle of the green curve up to lessen the bright red. Click OK to accept the curve adjustment. Select all, and apply a gaussian blur of 2 pixels to get rid of the spiky detail. Marquee around the flare while excluding the outer ring, and feather the edge by 10 pixels (Figure 11-29).
Figure 11-29: Lens flare for glows
Copy and paste the flare into a new layer. Rename the layer Flares, and set the blending mode to Screen. You’ll use this glow over and over to give your city sparkle. This is one instance when you can reuse a reference to your heart’s content.
Marquee copy+drag the lens flare to copy it to different locations on the Flares layer. Look in the street with the main retail area, and drag the flare over one of the streetlights. It’s too large, so scale it down to 10% of the original size. Using the scaled-down flare, Option/Alt+move to copy it many times to cover every streetlight. As you move away from the foreground, you’ll need to scale down the glow to fit the light. Because the flare is blurry, you don’t need to be concerned with losing sharpness. However, should it start to look too soft, go back to the original flare, copy it, and scale it to size.
Like tinsel on a Christmas tree, many tiny flares will add pizzazz to the scene. Every car headlight should have one. You can add random flares to brighten up an otherwise dull area. Because buildings often have exterior lights mounted on their sides, let your imagination dictate where you want more sparkle. For instance, you can add a flare to indicate the source of light on the clock tower as well as the front of the church.
Add a new layer named TopGlows above the Flares layer and set the blending mode to Screen. Manually paint a streak of white in front of every headlight to show where the light is pooling on the street, and paint a light beneath every streetlight (Figure 11-30). You can paint in more light in the courtyards and distant street on the TopGlows layer to add atmosphere.
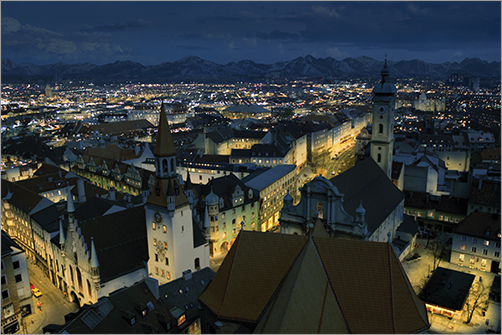
Figure 11-30: Lens flares and glows added
