
Chapter Six. Shooting Landscape Photos Like a Pro: Yet Even More Tips for Creating Stunning Scenic Images
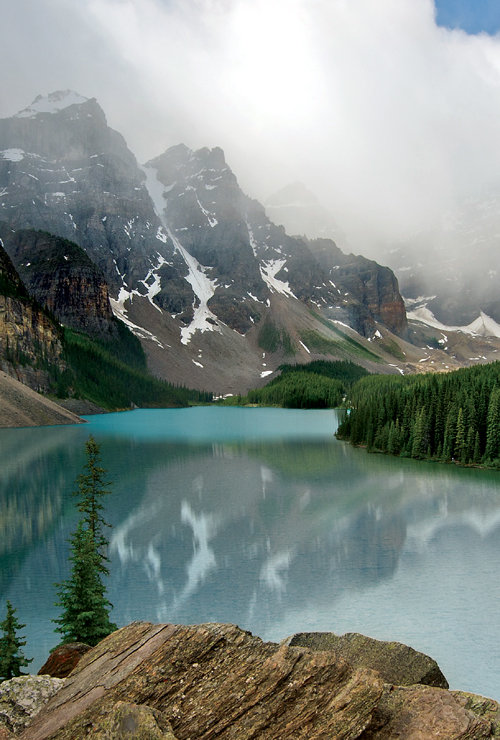
SHUTTER SPEED: 1/400 SEC F-STOP: F/8 ISO: 200 FOCAL LENGTH: 14MM PHOTOGRAPHER: SCOTT KELBY

I think one of the most appealing things about being a landscape photographer is not only are you coming back with amazing photos, but you get to experience some of the best of what nature has to offer while you’re doing it. I’ll never forget this one time I was shooting in Montana’s Glacier National Park. I got up around 4:15 a.m., so I could head out early and be in position for a dawn shoot. When I reached the lake overview, it was still pitch dark, and I remember setting up my tripod and watching it blow right over in the freezing wind that whipped off the lake. I just laughed and set it right back up, attached my camera gear to the ballhead, and realized that I’d better not let go of the rig or it, too, might blow over. I didn’t want to give up my spot, because I had a pretty good vantage point (at least it looked like a good one in the dim moonlight). So, there I stood, out in the freezing, bitter cold, where each gust of wind was like a thousand knives jabbing right through me. I’m standing there shivering in the piercing cold, and then it started to rain. Not snow. Nope, that would have been pretty. It was rain. A driving rain that felt like a massive army of Lilliputians were firing their tiny arrows at me, but I just stood there in the bone-chilling cold like a wet, frozen statue, with my cracked, frostbitten fingers barely able to grip my tripod. I silently prayed for the sweet mercy of death to come upon me and relieve me of this frigid hostile misery. It was just then when I looked over and saw another photographer, who had just set up his tripod about 14 feet from me, slip on the ice that had formed on the overlook. I stood there and watched as he and his tripod, expensive camera and all, slid down the side of the embankment. I could hear him moaning for help, but I just couldn’t stop smiling as I looked over and saw his Tamrac camera bag still up on the overlook beside me. I nearly pulled a muscle as I tossed his gear-laden bag into my rented SUV and quickly drove away, thinking to myself, “Man, this is what it’s all about.”
You Don’t Need Fast Lenses for Landscapes
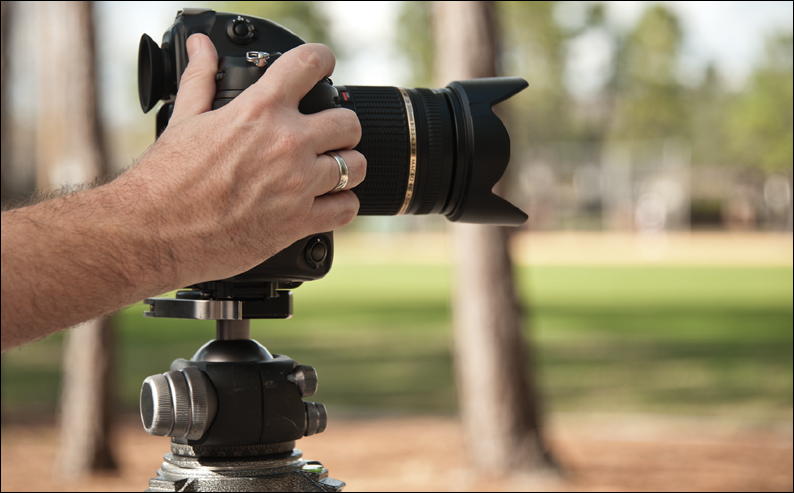
I’ve talked with a lot of folks over the years who think they need to buy really fast glass for shooting landscapes (lenses that shoot at apertures like f/2.8 or f/4). But, when it comes to shooting landscapes, this is the last place you’ll get to take advantage of those fast apertures. In fact, you’ll more likely be shooting at f/16 or f/22, which just about every lens out there already has. Plus, you’ll hopefully be shooting on a tripod most, if not all, of the time, so your shutter can go as slow as it needs to go to make a proper exposure. Keep these things in mind when you’re buying your next landscape lens, and you might be able to save quite a few bucks.
Three More Tips for Silky Waterfalls & Streams
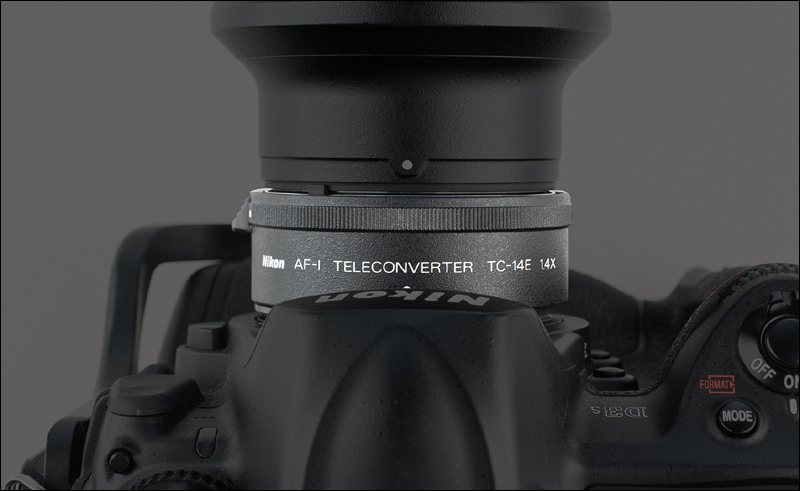
Back in volume 1 of this book series, I talked about setting your f-stop to f/22 to help you get a silky water effect when you’re shooting waterfalls or steams. But, what if you set your camera to f/22 and you want the water to be even silkier? Here are three more things you can do to slow down your shutter speed even more (which is the secret to silky water—the slower your shutter speed, the silkier the water): (1) Add either a 1.4x, or ideally a 2x, teleconverter to your lens. These magnify the distance of your lens so you can get in a little tighter, but the tradeoff is you lose either 1 or 2 stops of light. Normally, you might think that’s bad (and normally it is), but if you actually want to lose a stop or two of light, which we do because it makes the shutter speed longer, then it’s a big win for shooting waterfalls and streams. (A big “Thanks!” to my buddy Moose Peterson for this tip.) (2) Use your lowest possible ISO (for example, some Nikons let you go below their native [cleanest] ISO setting of 200 to settings called Lo 0.3 or Lo 1, which are kind of like using ISO 100 and make your shutter speed slow down. Again, this is exactly what we want. You’ll lose a tiny bit of sharpness and contrast at Lo 1, but you’ll wind up with a slower shutter speed, which is good). And lastly, (3) put a polarizing filter on your lens. These are used to cut reflections in water and windows and stuff like that, and they’re also used to darken the sky. But, for our purposes they do something equally important—they make us lose a couple stops of light, which (say it with me) slows our shutter speed even more and is exactly what we need to get really smooth, silky water. Add these three tips to your bag of silky water tricks.
Long Exposure B&W, Part 1 (the Accessories)
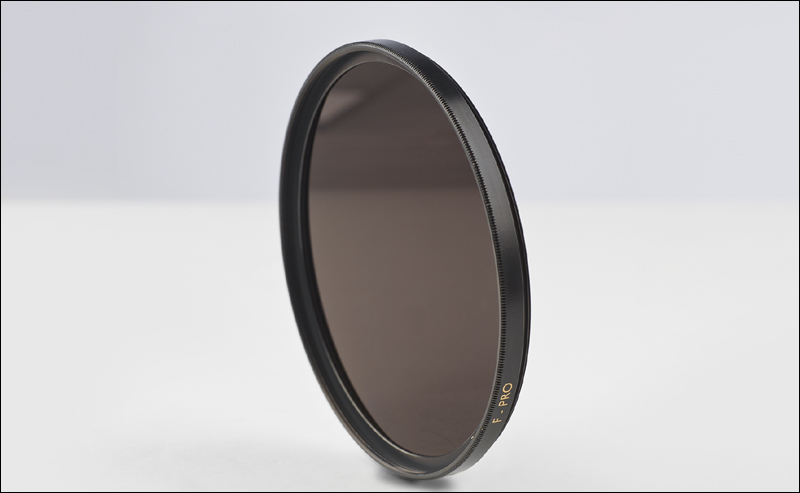
Although this is a four-part technique, don’t let that scare you out of trying it—it’s very simple to do. To make images like this, which are often taken during daylight, your camera’s shutter has to stay open quite a long time, which would normally make your image a white, blown-out mess. So, what’s the trick? You’ll need a neutral density (ND) filter, which darkens the scene (by like 8 to 10 stops of light), so you can shoot long exposures like this in broad daylight (don’t put it on your camera yet, though—you’ll see why in a minute). Because your shutter will be open for literally minutes at a time, you’re going to need to shoot on a tripod. But, you’ll also need one other piece of gear: a cable release (a cord that attaches to your camera to fire the shutter button, so you don’t move the camera by pressing the button with your finger. They make wireless shutter releases for many cameras—it just depends on your camera model).
Long Exposure B&W, Part 2 (the Settings)
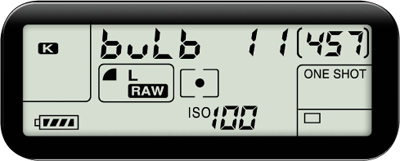
Now you’ll need to set up your camera to take the long-exposure images. The first step is to set your camera to manual mode (don’t worry—even if you’ve never shot in manual mode, you’ll be able to do this). Next, set your shutter speed to a setting called “bulb” mode. When your shutter speed is set to bulb mode, your shutter will stay open as long as you hold down the button on your cable release (which you’ll need to do to create these long exposures). In some cases, you’ll be holding this button down for minutes at a time, but luckily, most cable releases these days come with a lock slider. So, once you press-and-hold the shutter button on the cable release, you can turn on the lock, so you don’t have to worry about standing there holding the button down for a long time, or worry about your thumb slipping off the button and ending your exposure early. Also, because your shutter will be open for a while, you want to make sure you’re shooting at the cleanest possible ISO (this will keep you from having too much noise appear in your image). On most Nikon DSLRs, that’s 200 ISO, and on most Canon DSLRs, that’s 100 ISO. Lastly, choose an f-stop that will put everything in focus (ideal for landscape shots like this). I generally shoot these at f/11. So, just to recap: we picked up an ND filter (but didn’t put it on our lens yet), our camera is on a sturdy tripod, we attached a cable release to our camera (or we’re using a wireless release), we’ve switched to manual mode and set the shutter speed to “bulb,” we’ve set our camera to shoot at the cleanest possible ISO, and we set our f-stop to f/11. Okay, we’re not done yet, but we’re getting close.
Long Exposure B&W, Part 3, (the Setup)

The reason I had you wait to put your ND filter on your lens is this: it will make things so dark, your lens won’t be able to see anything to focus on, so we set the focus before we put the filter on. Here’s how: (1) First, aim your camera at the scene you want to shoot and compose your photo just the way you want it. Then, (2) press your shutter button halfway down to set your autofocus. Now, (3) on the barrel of your lens, switch your focus to Manual. That way, your focus won’t get messed up once you put the filter on. With your focus set, go ahead and attach your ND filter to your lens. And, believe it or not, there’s something else that could ruin your long exposure—light sneaking in through your viewfinder. Some DSLRs actually have a little switch that puts a cover over the viewfinder, but if your doesn’t, but put a small piece of black gaffer’s tape over it (we use gaffer’s tape, because it comes off easily when you’re done, without removing the finish from your camera, lens, or almost anything you’d want to stick it to).
Long Exposure B&W, Part 4 (the Shot)
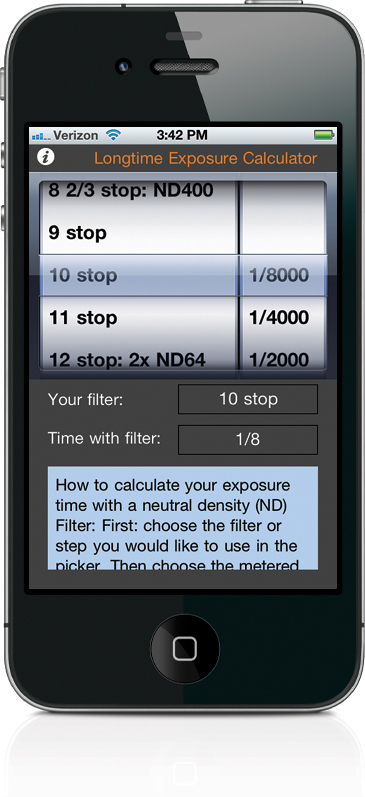
Everything’s set and ready to go—it’s time to take your shot. There’s just one question kind of hanging out there: How long do you keep that shutter button held down to make a proper exposure? Well, of course, you could just experiment with different amounts of time, and after a few tries, you’ll get it figured out, but there’s a faster way: If you have an iPhone, go to the App Store and download the free LongTime Exposure Calculator app, which does all the math for you. You tell it which kind of filter you’re using (8-stop, 10-stop, and so on), and it tells you how long to keep the shutter open. If you don’t have an iPhone, you’re not out of luck. Photographer Alex Wise created a free handy chart in PDF format, which you can download and print out (and keep in your camera bag), and it tells you how long to leave your shutter open for various ND filters (here’s the short link to it: http://bit.ly/tKs1aj). Once you know how long to leave that shutter open, you’re ready to shoot. So, press-and-hold the cable release button, lock it into place, and then just release the lock at the time you calculated using the app, the free PDF chart, or by just figuring it out using your watch. That’s it. (Note: To see how I convert the image to black and white, check out the video I created for you. You can find it on the book’s companion website.)
Keeping Your Gear Dry Outdoors
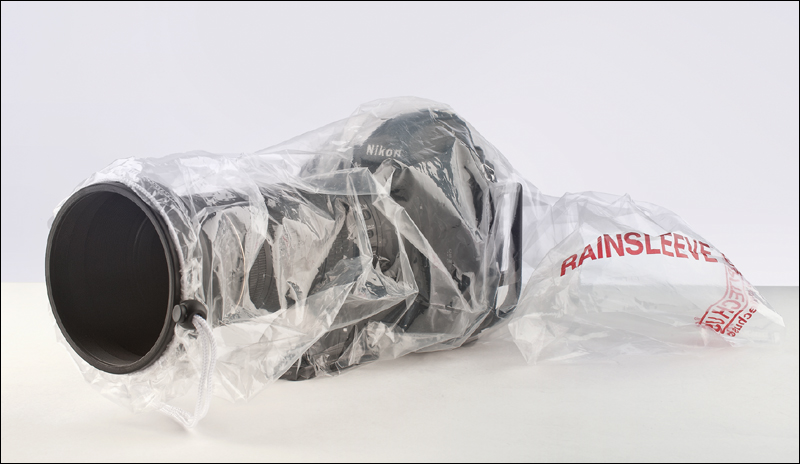
You can buy all sorts of sophisticated rain covers if you wind up shooting in rainy weather quite a bit (take a look at Think Tank Photo’s Hydrophobia® covers, which are awesome, but expensive), but the problem is that if the weather unexpectedly turns bad, chances are you might not have a rain cover with you (if you have a small camera bag, it probably won’t fit). That’s why I keep a package of OP/TECH Rainsleeves in my camera bag at all times. They’re not fancy, but they’re small enough to always have with you in your camera bag (and they work with lenses up to 18" long). Plus, they’re cheap as anything—you can get a pack of two for around $6. I’ve had to use them before, and they do a pretty decent job for those times you get caught by surprise.
Use Grid Lines to Get Straight Horizon Lines
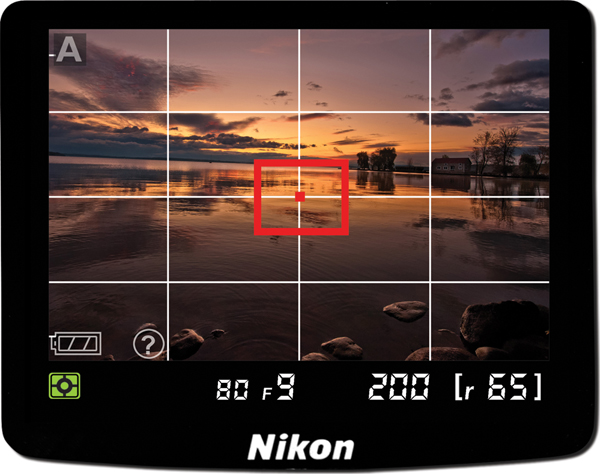
There’s nothing worse than a crooked horizon line, and back in the first volume of this book series, I talked about using a double level that fits into your hot shoe mount on the top of your camera as one way to make sure your camera is level. If you don’t feel like buying one of those, here’s something that can help: Turn on your camera’s Grid lines. Depending on your camera, these might already be on by default, but if not, when you turn them on, it adds horizontal and vertical lines to your viewfinder, which can be really handy in lining up your horizon line (I use this quite a bit—I just put one of the horizontal lines right along the horizon and I can see right in the viewfinder if my horizon line is straight). On Nikon DSLRs, to turn this feature on, go under the Custom Settings menu, under Shooting/Display, and choose Viewfinder Grid Display. Toggle the menu to On and click the OK button. (Note: This feature is not available on Nikon D3 series cameras.) On Canon DSLRs, go the Set-up 2 tab, under Live View/Movie Shooting Settings, and turn Grid Display On.
Instant Duotones for Landscape Images
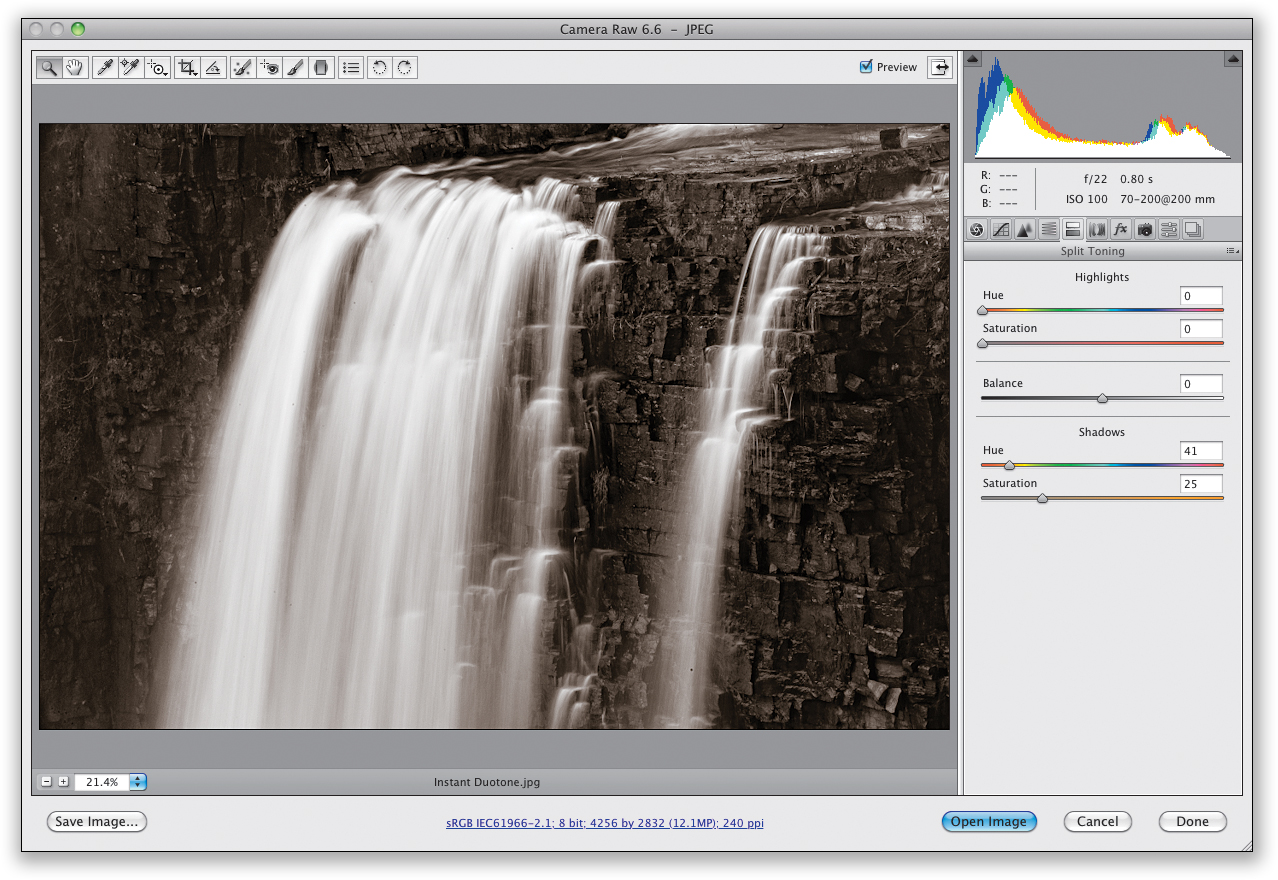
If there’s one place where duotone effects look great, it’s on landscape images (they can work great for some portraits, too, but I always felt they were born for landscapes). They’ve always been kind of a pain to create, which is why I’ve felt photographers don’t use them more often. But, I’ve got a technique for people who use Photoshop’s Camera Raw or Lightroom that is so simple, you’ll be creating great looking duotones in literally seconds. The first step is to convert the image to black and white. In Camera Raw (PS), go to the HSL/Grayscale panel and turn on the Convert to Grayscale checkbox. In Lightroom, in the Develop module, just press the letter V on your keyboard. Now, go to the Split Toning panel, but don’t touch the Highlights sliders at all. Instead, go to the Shadows section and increase the Saturation amount to 25. Next, drag the Hue slider over to somewhere between 25 and 45 (that’s usually where I stay for my own work, but you can choose any Hue setting you’d like—just drag the slider to choose a different hue) and you’re done. That’s it. Done. Finis. Really.
Amplifying Size in Your Landscape Images
This is an old trick we use to give our landscape images a real sense of size and scope. It’s going to sound amazingly easy, but it happens to work amazingly well. The trick is to first use a wide-angle lens, then position yourself so there’s something right in your foreground (a rock or a series of rocks, a small tree, a flower, etc.), and then you get in nice and close to it. When you take the shot, it makes it look as though there’s a lot of distance between that rock and objects in the background, and it gives your images this huge sense of scope, even though the rock and background objects may only be 100 feet apart. Try it the next time you’re out, and you’ll be surprised at the “bigness” this brings to your landscape images.
Need a Darker Sky? Lower the Brightness
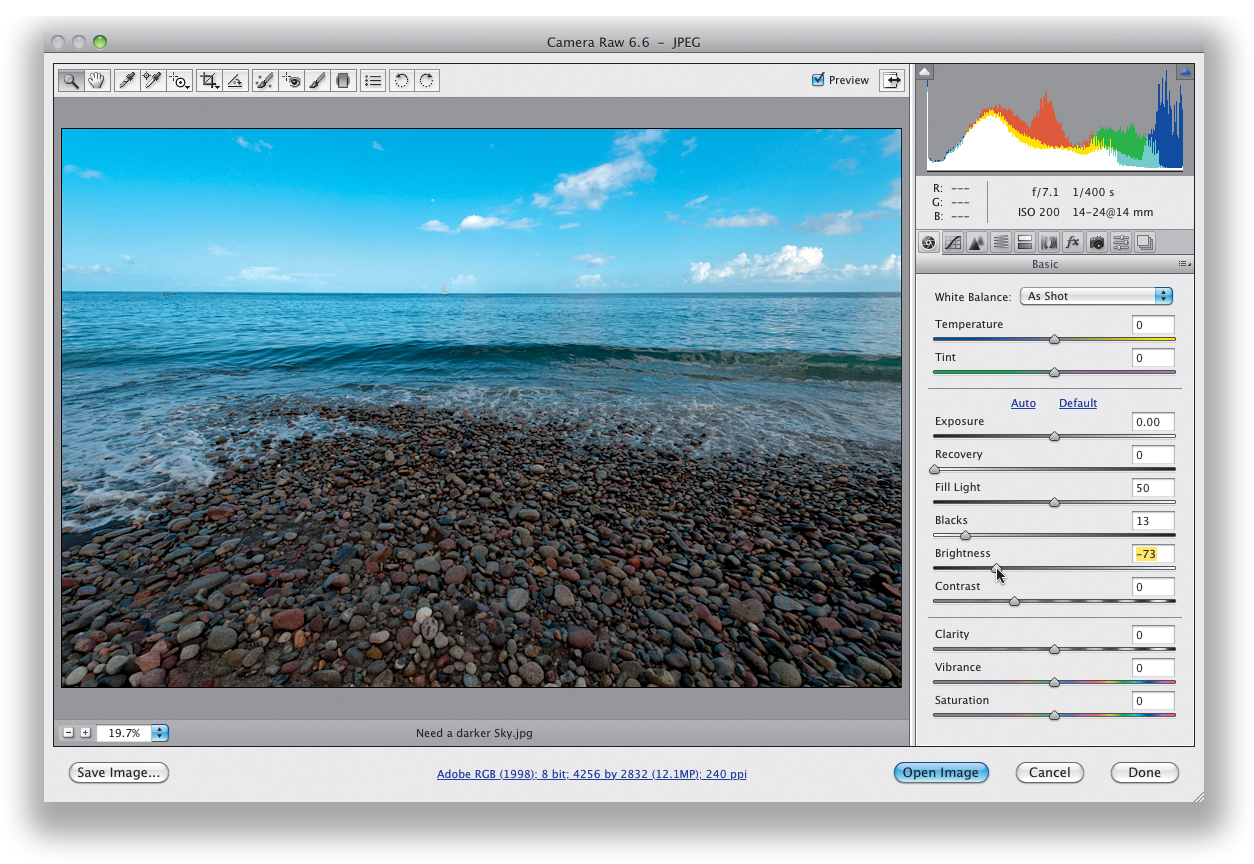
If I think the sky in a shot I’ve taken looks too light or too bright, I immediately know what to do—lower the Brightness. This essentially lowers the midtones, and it turns light blue skies into deep, rich blue skies fast. You can do this in Photoshop (or Photoshop Elements) with Camera Raw or in Lightroom’s Develop module: just drag the Brightness slider to the left and watch the sky as you drag. If things get too dark, increase the Fill Light slider a bit until it looks right again. If you have to increase the Fill Light so much that the photo looks washed out, just increase the Blacks a little until it balances out. That’ll do the trick! If you don’t want to use Camera Raw or Lightroom to darken your skies (even though it’s the easiest and most powerful way), you can lower your image’s midtones by using Photoshop’s Levels command (Command-L [PC: Ctrl-L]): just drag the center Input Levels slider (the gray triangle right below the center of the histogram in the Levels dialog) to the right. That’ll darken the sky for ya. If everything else gets too dark, now it gets kinda tricky, which is why I recommend doing all this in Camera Raw (or Lightroom). By the way, you don’t have to have shot in RAW to use Camera Raw—it edits TIFF and JPEG images, as well. From Adobe Bridge, click on the TIFF or JPEG image and press Command-R (PC: Ctrl-R) to open the image in Camera Raw. From the Elements Editor, choose Open (PC: Open As) from the File menu, click on the TIFF or JPEG, then choose Camera Raw from the Format (PC: Open As) pop-up menu, and click Open. Now, you can edit away. Note: If you’re using the Lightroom 4 public beta (or, presumably, the “real” Lightroom 4 when it comes out), the Brightness slider is gone, so you’ll have to use Exposure.
Shoot Before a Storm or Right After It
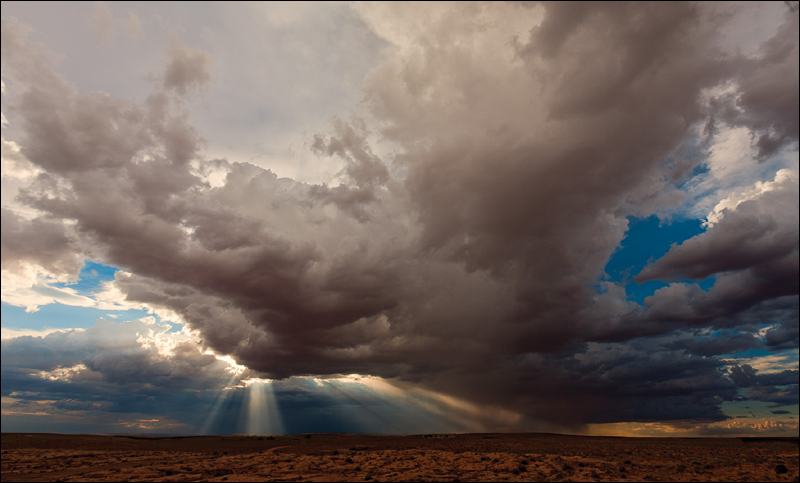
If you missed shooting your landscape photos around dawn or dusk (the two times of day when the absolute best light for shooting landscapes appears), you might still have an opportunity to create a really dramatic image if you see a storm rolling in or out of your area. That’s because right before a storm, or right after one, you’ll often find some really dramatic skies and enough cloud cover to create some really great light (rather than the harsh afternoon light we’re usually saddled with). Interesting atmospheric stuff like this really looks great in photographs, so keep an eye out for these bonus shooting opportunities during the day (just play it very safe and avoid shooting in thunderstorms or anything dangerous. Remember, we’re not on assignment for National Geographic. If we miss “the shot,” it’s not like we’re going to miss getting the cover that issue. So, just play it safe at all times).
Doing Time-Lapse Photography
Time-lapse photography is great for showing things like a complete sunrise or sunset, or cloud movement across the sky, or stars moving across the night sky—basically, the progression of time throughout a landscape in a fraction of the time that has actually transpired (you shoot lots of still frames and then you turn those into a video). I explained how to set this up back in volume 3 of this book series, and even did a video on how to put all your shots together into a movie. But, here are two tips for when you’re shooting time-lapse: (1) switch to manual mode (so your exposure doesn’t change), and (2) don’t use Auto White Balance (so it doesn’t change, either).
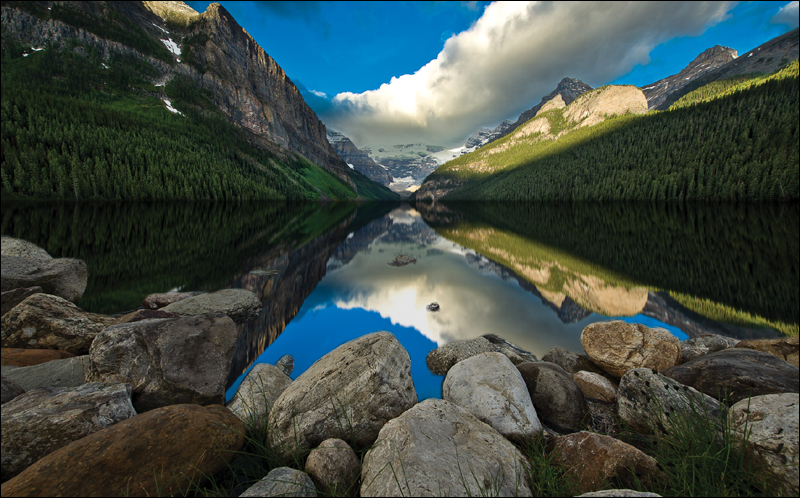
Seek Out Still Water for Reflections
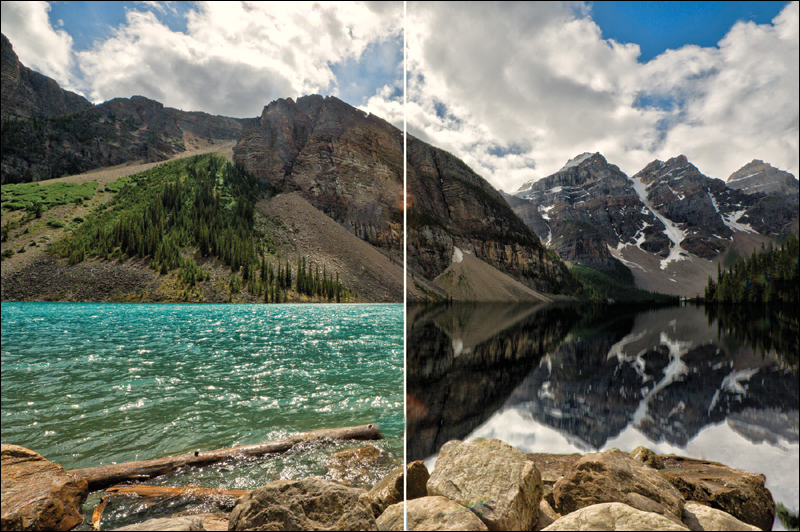
If you’re shooting a charming little harbor, or a nearby lake, nothing looks lamer than choppy water. It almost doesn’t even matter how amazing the surrounding scenery looks—if the water is choppy or has lots of little waves, it really hurts the overall image. That’s why when we find a lake or harbor with still, glassy water, that alone almost makes the shot (thanks to the glassy reflections it creates). So, keep your eyes peeled for that glassy water while you’re searching out your landscape shooting locations, and you’ll already be halfway to creating a great shot. Now, your best bet for finding still water is first thing in the morning, right after sunrise, before the winds pick up. If there’s going to be a time of day that you’re most likely to have that glassy water, with gorgeous reflections, it’s morning, so you need to set your alarm to get up really early. Not only will you have a better chance of getting still water, but you’ll also be shooting in some of the best-quality light of the day—if you’re shooting near dawn or in the half hour or so after dawn. Also, if you do get up early, make sure you bring along your travel tripod—in lower light, you’ll need something to hold your camera steady, or you’ll come back with a series of the blurriest, still-water shots in great light ever!
Tip for Shooting Those Low-Angle Landscapes
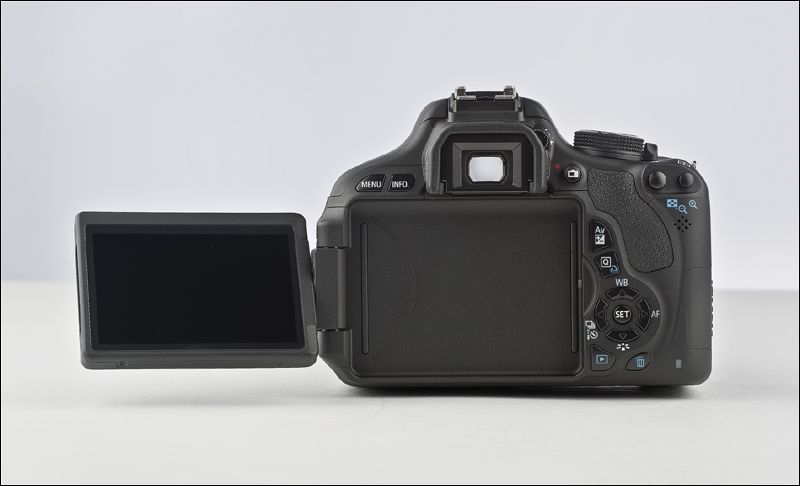
One of the big tricks for creating really impactful landscape shots is to shoot from a really, really low angle (you spread out your tripod legs, so your camera sits less than one foot from the ground) using a wide-angle lens—it gives your images a larger-than-life look. However, comfortably composing your landscape photos can really be a pain when you’re down low like that (which is precisely why so few photographers are actually willing to do it, which is also precisely why your shots will stand out if you do). If you think you’re going to be doing a lot of shooting like this, you can save your back (and keep your pants from getting wet and dirty during dawn shoots) by buying a DSLR camera that has a swing-out LCD screen. These are becoming very popular for shooting video with DSLRs, and they’re ideal for shooting these low landscapes. Just switch your camera to live view shooting mode (so you see the live image on your LCD before you’ve taken the shot—kind of like you would with a point-and-shoot camera), then tip the swing-out screen up toward you, so you can clearly see what the camera is seeing and use that to help you compose the shot. You can even shoot with your LCD in that same position. Believe me—your pants and your back will thank me.
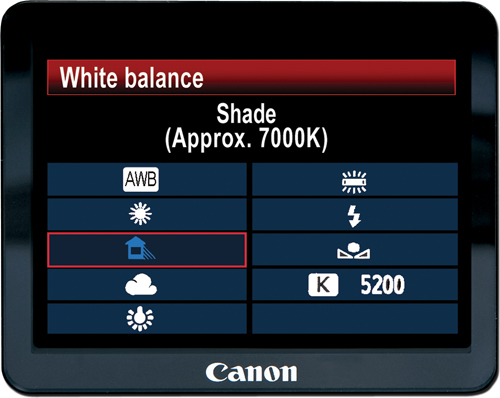
Make Your Cloudy White Balance Even Warmer

When I’m shooting landscapes, I generally set my camera’s white balance to Cloudy to give my images a warmer look. However, if things start getting really overcast, the warm look I get from Cloudy almost disappears and my images look a bit cold again. So, I switch my white balance to Shade and that often does the trick, but sometimes the Shade preset looks too warm and yellow. In those cases, I just tweak my Cloudy white balance preset, so it’s a little warmer. Luckily, this is really easy to do. On a Nikon, go to the Shooting menu, and choose White Balance. Scroll down to Cloudy and press the right arrow on the multi-selector. This brings up a color grid with your current white balance appearing as a dot in the center of the grid (shown above). To make your Cloudy preset warmer (Nikon calls this “fine tuning your white balance”), just use the multi-selector to move that little center dot over to the right toward A (amber; or diagonally down and to the right corner to add a little magenta in there, too). Now, press the OK button and you’ve created a warmer version of the Cloudy white balance. To return to the regular Cloudy preset, just choose it from the White Balance menu again. On a Canon, press the white balance selection button and then choose Cloudy. To make the Cloudy preset warmer (Canon calls this “White Balance Correction”), under the Shooting 2 tab, choose WB SHIFT/BKT, and then press the Set button. A color grid will appear on your LCD with your current white balance appearing as a dot in the center of the grid. Use the multi-controller on the back of your camera to move that little center dot over to the right a bit toward A (amber; or diagonally down and to the right corner to add a little magenta in there, too), then press the Set button.
The Landscape Image Post-Processing Secret

I had been looking at the work of a few of my favorite landscape photographers a few years back and all their images seemed to have a particularly vibrant look to them—one that I wasn’t able to easily reproduce in Photoshop (and I like to think I’m pretty decent in Photoshop). I finally asked one of them about it, and I was pulled over to the side and told about this plug-in and, in particular, a specific filter in this plug-in and a filter preset that a lot of these photographers were using to get “that look.” Of course, I’ve been using it ever since I learned about it, and it’s one of today’s landscape photographers’ secret weapons for making really warm, yet totally vibrant-looking, images. The plug-in is Nik Software’s Color Efex Pro and the filter within that plug-in is called Brilliance/Warmth. It does an amazing job—once you click on it, click on the little pages icon to its right, and then choose the 06–Warm Colors preset. You can also tweak it with the sliders on the right and save it as a new preset. Nik Software lets you download a 15-day free trial of the Color Efex Pro plug-in, so you should at the very least give it a try. (By the way, I don’t get any kickbacks or commissions whether you buy the plug-in or not. I’m just telling you about it because I use it, a lot of landscape photographers use it, and I think you’ll totally fall in love with it. Then it can be your “secret weapon.”)
What Helped My Landscape Photos the Most

If I had to pick one single thing that helped my landscape photography improve the most, it was realizing that our job is to compose to remove distracting things from our images. One thing in particular to keep an eye out for is branches that extend into your image—either from the top, bottom, or sides of your frame. These are scene killers and you should go out of your way to avoid them when you’re out shooting. Rocks make a nice foreground. Branches don’t, so avoid them like the plague when you’re composing your shots. When I teach landscape workshops, we do in-class critiques of students’ shots from the week (we do them “blind” without mentioning the student’s name), and the one thing we wind up pointing out the most are those little distracting things like power lines, plants, branches, and other little scene stealers. Often, all they would have to do is move one foot to the left or right, or point their camera two inches up or down, and it would eliminate the problem. But, you have to be aware of the problem in the first place to start avoiding that stuff. Take a look through your own landscape images and see if you can find distracting stuff in the background or along the edges of your image. Now, imagine how much better and cleaner they would look if that stuff weren’t there. Your job is to compose to keep that stuff from being in your frame in the first place. When you become hyper-aware of that stuff and work to keep your background and edges clean and simple, I guarantee your work will move up a big notch.