Chapter Eight. Shooting Sports Like a Pro: How to Get Professional Results from Your Next Sports Shoot
SHUTTER SPEED: 1/125 SEC F-STOP: F/14 ISO: 200 FOCAL LENGTH: 24MM PHOTOGRAPHER: SCOTT KELBY

I know that these chapter intros are just here for a mental break, and they’re not actually supposed to provide any useful information whatsoever, and I think I’ve done a fairly good job of living up to that lofty goal so far. However, I’m very passionate about shooting sports, and this is the only place I have to pass on a warning that is actually based in truth (or at least as based in truth as that movie The Perfect Storm was). Anyway, if you are a serious fan of college or pro sports, I want to tell you up front that you will rue the day you actually shoot on the field, because you will never, ever, ever, in a bazillion years even consider going back into the stands like a regular fan again. You will be literally ruined for life. Here’s why: you get spoiled down on the field of play. It’s a different game down there. It’s not like what you see on television. You see, on TV, when you see a cornerback and a wide receiver jawboning back and forth before the snap, you figure they’re trash talking. Talking smack. Occasionally, they are, but you know what they’re mostly talking about? Nine times out of 10, they’re talking about the gear the photographers on the sidelines are using. I was shooting an NFL game in Atlanta once, and I set up right near the line of scrimmage, and I heard the receiver say to the cornerback, “Dude, is he really trying to shoot this with a 200mm lens?” And the cornerback said, “I looked during the last time out—he’s got a 1.4 tele-extender on there.” Then, the WR said, “Did he have VR turned on?” The corner said, “ Yup.” Then, the WR said, “Dude, it’s a day game. You know he’s got to be at ![]() of a second or higher” and just then the quarterback called an audible and yelled “Get me close to that guy with the 400mm f/2.8—I want to see if it’s the new model with the nano coating.” This goes on all game long, game after game, city after city. The players call it “camera smack” and just because you don’t hear about it on TV, doesn’t mean it’s not happening.
of a second or higher” and just then the quarterback called an audible and yelled “Get me close to that guy with the 400mm f/2.8—I want to see if it’s the new model with the nano coating.” This goes on all game long, game after game, city after city. The players call it “camera smack” and just because you don’t hear about it on TV, doesn’t mean it’s not happening.
A Tip and a Secret on Panning
If you want to show motion in a sports photo, the trick (which I covered in volume 1 of this book series) is to use a very slow shutter speed (like ![]() of a second or slower), while shooting in continuous shooting (burst) mode, and then pan right along with the athlete so most, if not all, of the athlete will be in focus, but the background will be totally blurred (it really creates a sense of speed). I have another tip and a secret to add to that. First, the tip: when you’re panning, swivel your hips as you pan (don’t just twist at the waist), and you’ll get much smoother results. So, while you’re swiveling, shoot a burst of shots, in continuous shooting (burst) mode, so you get a string of shots as you pan. This will make a difference, but here’s something you don’t hear pros talk about very often: if you take a burst of 30 shots as you pan with an athlete (or a car, if you’re shooting motorsports), only expect one of those to actually have your subject in focus. The thing to keep in mind is you only need that one! I’ve gotten so many emails from people just getting into sports photography, and they’ve written things like,“I’ve got all these blurry, out-of-focus shots and only one out of 20 is in focus” and I write back to them, “Then you’re doing it just right!” Now, are there working pros out there that, in a panning string of 30 shots, have three or more photos in focus? Absolutely! But how many of those do they send in to their magazine editor, or wind up in their portfolio? One. So now you know, if you see a bunch of blurry panning shots, but you see that one in the bunch that’s right on the money, you’re gold, baby, gold!
of a second or slower), while shooting in continuous shooting (burst) mode, and then pan right along with the athlete so most, if not all, of the athlete will be in focus, but the background will be totally blurred (it really creates a sense of speed). I have another tip and a secret to add to that. First, the tip: when you’re panning, swivel your hips as you pan (don’t just twist at the waist), and you’ll get much smoother results. So, while you’re swiveling, shoot a burst of shots, in continuous shooting (burst) mode, so you get a string of shots as you pan. This will make a difference, but here’s something you don’t hear pros talk about very often: if you take a burst of 30 shots as you pan with an athlete (or a car, if you’re shooting motorsports), only expect one of those to actually have your subject in focus. The thing to keep in mind is you only need that one! I’ve gotten so many emails from people just getting into sports photography, and they’ve written things like,“I’ve got all these blurry, out-of-focus shots and only one out of 20 is in focus” and I write back to them, “Then you’re doing it just right!” Now, are there working pros out there that, in a panning string of 30 shots, have three or more photos in focus? Absolutely! But how many of those do they send in to their magazine editor, or wind up in their portfolio? One. So now you know, if you see a bunch of blurry panning shots, but you see that one in the bunch that’s right on the money, you’re gold, baby, gold!
Finding the Right Shutter Speed for Panning
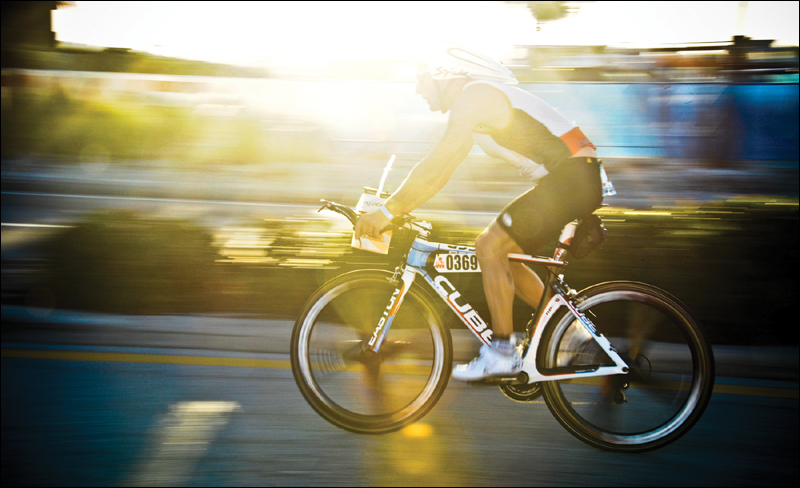
I have a lot of people ask me, “What’s the right shutter speed for panning?” when shooting a subject like a runner, or cyclist, or racecar, etc. I hate to answer with a “that depends,” but it kind of depends. I generally like to pan with my shutter speed at or below ![]() of a second with a long lens (like 200mm or longer). However, if you use a wide-angle lens,
of a second with a long lens (like 200mm or longer). However, if you use a wide-angle lens, ![]() of a second won’t be slow enough—you’ll have to go much slower with your shutter speed when shooting with a 24mm, 18mm, or wider because of the lack of lens compression. You just won’t see the motion like you do with a longer lens, so you’ll have to back it way down to maybe ¼ of a second or less.
of a second won’t be slow enough—you’ll have to go much slower with your shutter speed when shooting with a 24mm, 18mm, or wider because of the lack of lens compression. You just won’t see the motion like you do with a longer lens, so you’ll have to back it way down to maybe ¼ of a second or less.
Freezing Motion Trick for Motorsports
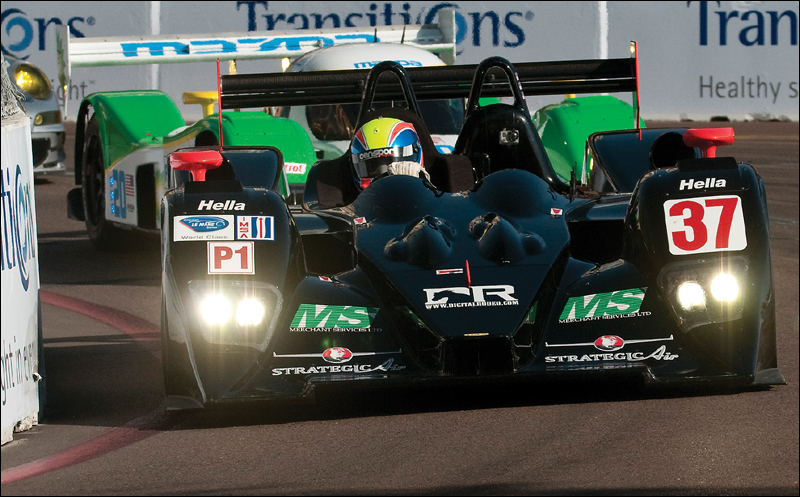
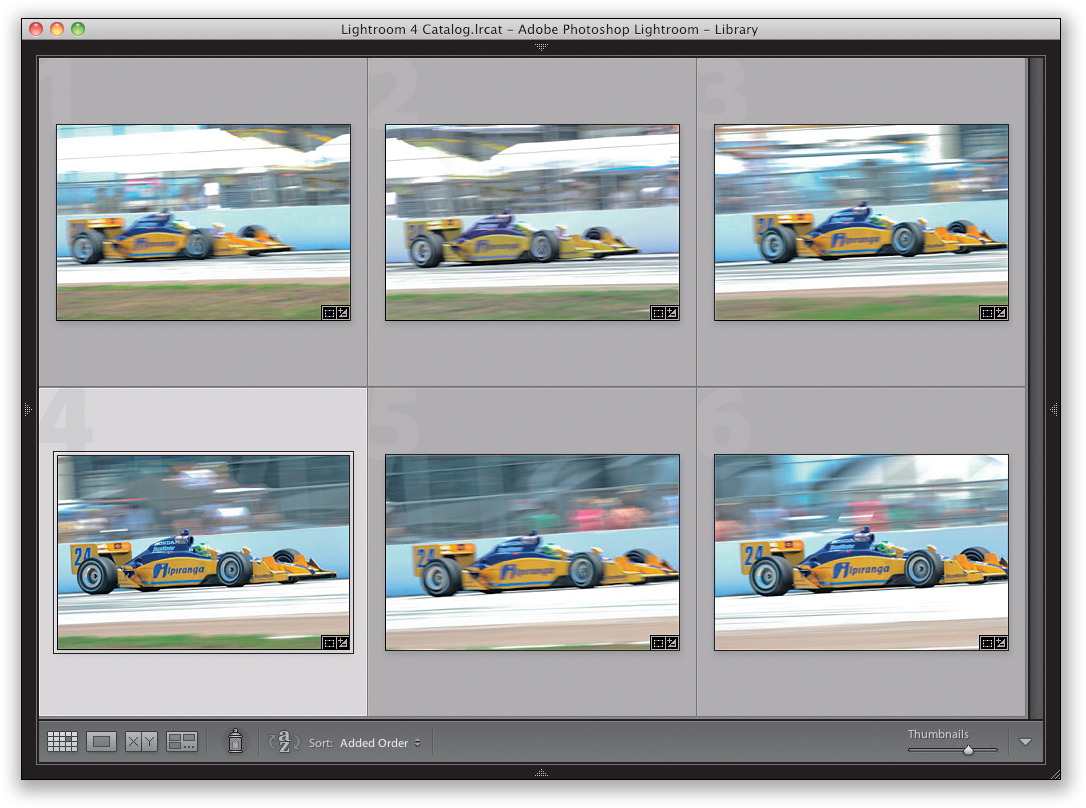
Back in volume 3 of this book series, I talked about shooting with a slow shutter speed for motorsports so you can see the wheels moving, which shows motion and speed (otherwise, if you freeze the motion, it looks like the car is sitting there parked on the track). However, there is one great situation where you can shoot at really high shutter speeds when shooting car racing (so you’re pretty much guaranteed a super-sharp shot), and that is when you position yourself so the cars are coming almost straight at you. If you can’t really see the sides of the wheels, you can’t tell that they’re not spinning (as shown above), so you can be sure you’ll get lots of in-focus, super-sharp shots. Once you’re in position, switch your camera to aperture priority mode, then shoot wide open at the lowest numbered f-stop your lens will allow (like f/4 or f/2.8), then (and this is key) focus your camera on the driver’s helmet. If the helmet’s sharp, the rest will be sharp. By the way, you don’t actually need super-high shutter speeds to freeze the action if it’s coming right at you—![]() of a second will usually do the trick.
of a second will usually do the trick.
Your Problems Start at Night or Indoors
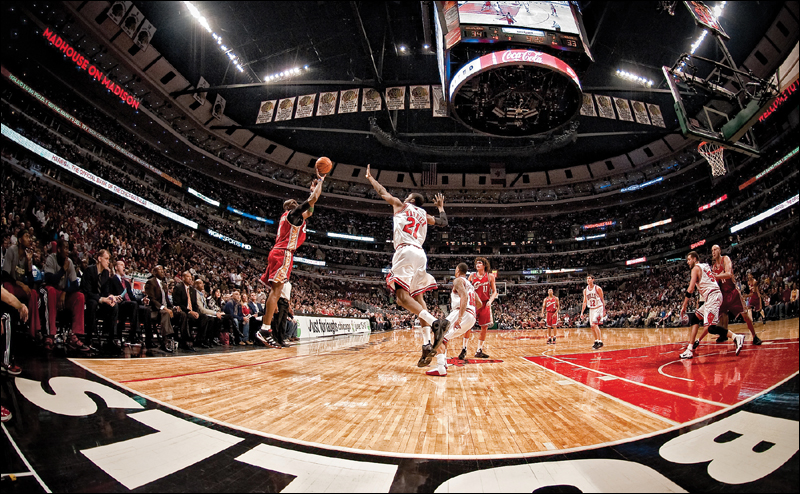
If you’re shooting sports during the day, the world is your oyster, because you don’t have to have lots of expensive equipment or crazy expensive lenses or any of that stuff. You can buy zoom lenses that go out to 300mm or 400mm for just a few hundred bucks from Nikon, Canon, Tamron, and Sigma (among others). For example, B&H Photo has a Canon 75–300mm f/4.0–5.6 Autofocus lens for less than $200. It’s fairly small and weighs only a fraction of Canon’s high-end 300mm f/2.8 lens, which costs around $7,300. (Yeouch!) But, since you’re shooting in daylight, you can get away with it, and you’ll get sharp, clean images (however, since you’ll be shooting at f/5.6, you won’t have as shallow a depth of field, so your backgrounds won’t be as out of focus as with the $7,300 f/2.8 lens, but that $7,100 left in your pocket should help you get over that pretty quickly). So, when do you need to buy the really expensive camera body and heavy, crazy-expensive lenses? Only if you: (a) shoot primarily at night, (b) shoot indoor sports, or (c) you plan to shoot sports for a living. That’s because, even in well-lit stadiums at night, to get to around the ![]() of a second shutter speed you need to freeze the action, you’ll have to shoot at f/2.8, and you’ll still need to raise your ISO to at least 1600 (even shooting as low as f/4 in a well-lit NFL stadium, I have to shoot at 4000 ISO). Shooting at these higher ISOs without a camera body built for low-light shooting (like the high-end Nikon and Canon bodies—$5,000 and $7,000, respectively), the noise in your nighttime or indoor shots will pretty much destroy your images. So, shoot in the day, and you’ll be able to afford to send your kids to college.
of a second shutter speed you need to freeze the action, you’ll have to shoot at f/2.8, and you’ll still need to raise your ISO to at least 1600 (even shooting as low as f/4 in a well-lit NFL stadium, I have to shoot at 4000 ISO). Shooting at these higher ISOs without a camera body built for low-light shooting (like the high-end Nikon and Canon bodies—$5,000 and $7,000, respectively), the noise in your nighttime or indoor shots will pretty much destroy your images. So, shoot in the day, and you’ll be able to afford to send your kids to college.
Turn Off VR (or IS) When Shooting Sports
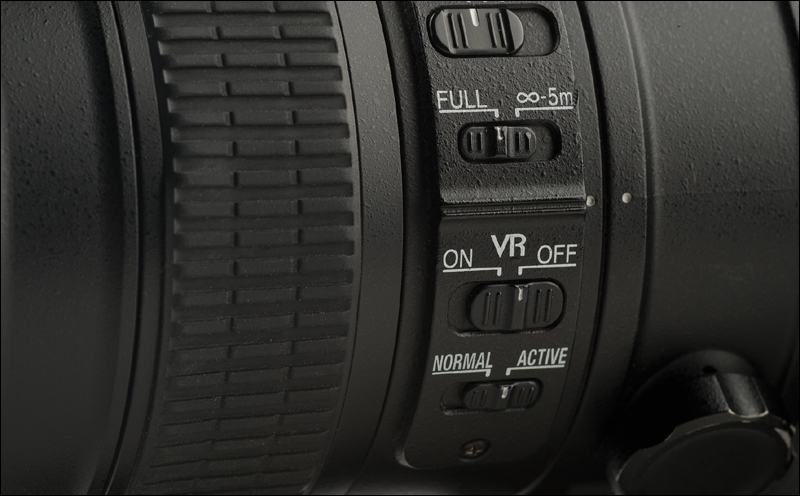
If you want sharper sports photos, and you have lenses that use VR (Vibration Reduction on Nikons) or IS (Image Stabilization on Canons), you should turn this off. There are two important reasons why: (1) the VR (or IS) slows down the speed of the autofocus, so it can stabilize the image, and (2) since you’ll be shooting at fast shutter speeds (hopefully at ![]() of a second or higher), you don’t get any benefit from VR (or IS), which is designed to help you in low-light, slow shutter speed situations. In fact, it works against you, because the VR (or IS) system is searching for vibration and that can cause slight movement. Normally, that wouldn’t be a problem, because you want VR (or IS) to do its thing in low light, but in brighter light (and faster shutter speeds), this movement can make things less sharp than they could be, so make sure you turn VR (or IS) off.
of a second or higher), you don’t get any benefit from VR (or IS), which is designed to help you in low-light, slow shutter speed situations. In fact, it works against you, because the VR (or IS) system is searching for vibration and that can cause slight movement. Normally, that wouldn’t be a problem, because you want VR (or IS) to do its thing in low light, but in brighter light (and faster shutter speeds), this movement can make things less sharp than they could be, so make sure you turn VR (or IS) off.
The Advantage of Using Fast Memory Cards
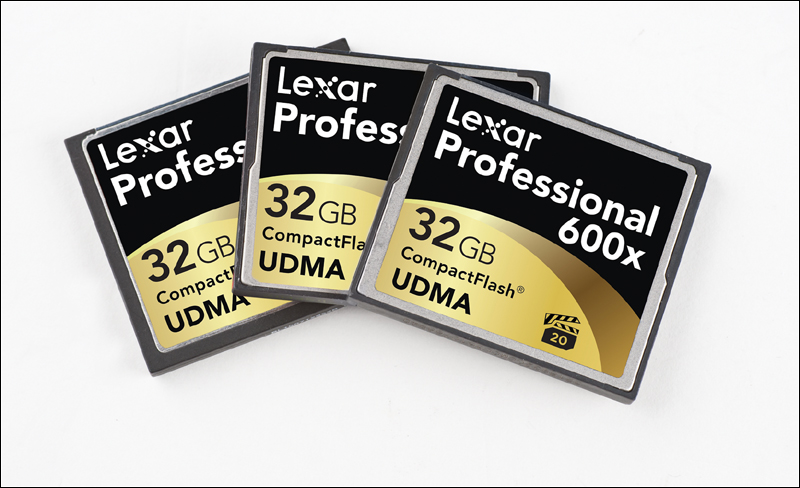
Fast memory cards were made for sports shooters, because we usually shoot in continuous shooting (burst) mode (capturing 8, 10, or 12 frames per second while we hold the shutter button down for seconds at a time). These bursts of images are temporarily stored in a memory buffer in our cameras and then they’re written to the memory card in our cameras. If you use a “slow card” (like a 133x speed), then you’re likely to experience the heartbreak of a full buffer at some really critical moment. What that means is you’re firing off these rapid-fire shots (click, click, click, click, click, click), but then your camera’s memory buffer gets full because those images in memory aren’t writing to the memory card fast enough. Even though we still have our fingers tightly pressed down on the shutter button, and the player with the ball is running right at you, and you’re about to get the “shot of the year,” you all of a sudden hear “click.........click.........click.........................click..........................click” and your frames per second drops to about 1 frame every 2 seconds. Ugghhh!!!! This is why fast cards (like 400x and 600x speed) are a big advantage for sports photographers—faster cards write data much faster, so the images in your camera’s buffer leave the buffer much quicker (leaving room for you to take more continuous shots), so your chance of hearing the dreaded “click.........click.........click” of a full buffer goes way down (and your chance of capturing that key moment stays way up).
How the Pros Focus for Sports
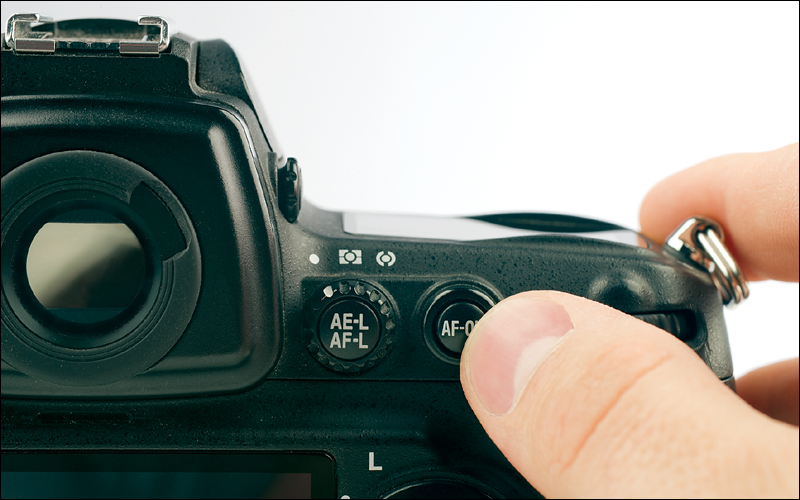
If you want to get more shots in focus, you’ve got to switch to back focusing (where you focus by pressing a button on the back of your camera body with your thumb, rather than focusing by pressing your shutter button). This makes a bigger difference than you’d think, because by separating the focus from the shutter button, your camera no longer focuses, then shoots—you’ve already focused on your subject with the button on the back, so now your shutter button just shoots. This back focusing helps to keep the autofocus from jumping off your subject when someone walks into your frame (which is a real struggle when shooting team sports), because if someone does walk into your frame (like a ref), you just take your thumb off the back focus button until they’re gone (but keeping shooting) and when they’re out of your frame, just hit the back focus button again. Generally, I just keep my thumb on that back focus button, aim at my subject, and then I don’t have to worry about my focus—I just concentrate on my timing. To turn on this feature on Nikon DSLRs (well, most of ’em anyway), go to the Custom Setting menu and, under Autofocus, choose AF Activation, and set it to AF-ON Only. On Canon cameras (like the 7D or the 5D Mark II), press the Menu button on the back of the camera, go to your Custom Function IV-1 menu, and choose Metering start/Metering + AF start.
Why Many Pros Shoot Sports in JPEG
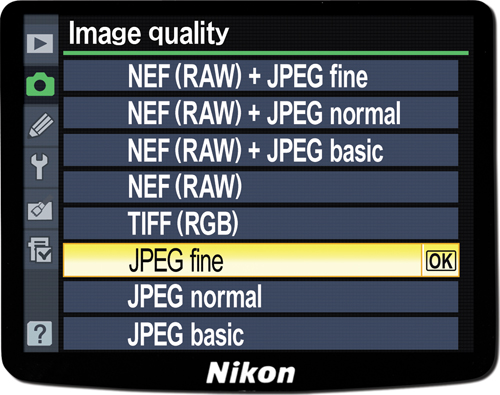
A lot of people are shocked when they hear that I shoot sports in JPEG format rather than RAW, but I’m not alone. Many of the pro shooters I know do the exact same thing for two key reasons (the first of which I covered in volume 1 of this book series): (1) You can shoot more continuous shots in JPEG format than in RAW, without filling your camera’s internal memory buffer (see page 125 for more on the buffer issue). DPReview.com (a respected source for this type of data), broke it down this way:
Shooting in RAW: After about 17 RAW photos, your buffer is full.
Shooting in JPEG: You can shoot about 65 or so shots before your buffer is full.
If you’re using fast memory cards (like 600x high-speed cards), that means that if you’re shooting in JPEG, your buffer rarely gets full because of how fast the images write to the memory card, which clears up the buffer for more shots. (2) JPEGs take less time to process. JPEGs get contrast, color enhancements, and sharpening applied within the camera itself, so JPEG images look more “finished” right out of the camera and are nearly ready for publishing without a lot of tweaking. When you set your camera to shoot in RAW, it turns all those in-camera contrast, sharpening, and color enhancements off, because you’ve chosen to do all that yourself later in Camera Raw or Lightroom, which takes more time, as does resaving the images as JPEGs for publishing. You could shoot RAW+JPEG, but that has its disadvantages, including eating up memory cards much faster, and taking longer on import.
Using a Remote Camera
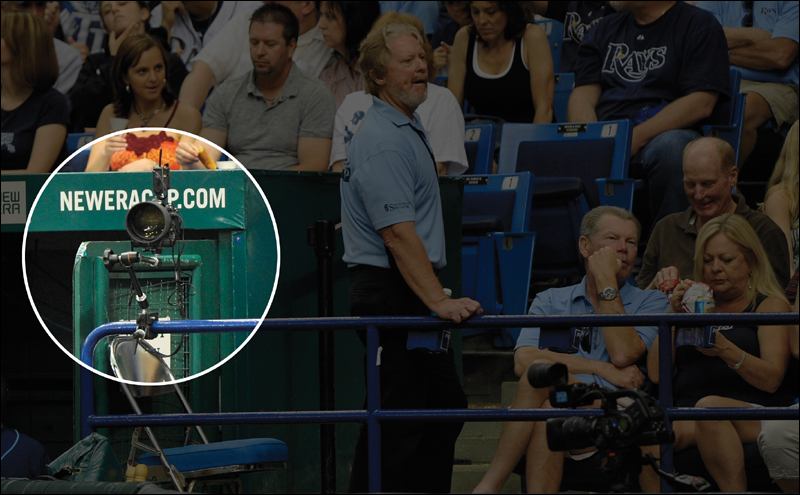
Having a second DSLR aimed at a different part of the field (or track, or arena, etc.) gives you a huge advantage, because you can cover twice the area and catch the shots and/or angles other photographers miss. For example, if you’re shooting baseball from a dugout, and you want to cover the batter with your main camera, you can have a second camera aimed to cover second base. When you see a play happen at second base, you press a remote to fire your second camera. If it’s mounted near you (or even on a tripod), you can just use a regular ol’ cable release (or wireless cable release). If it’s far away from you (like on the other side of the field, or down low on a horse track near the starting gate), you’ll need two wireless transmitters (I use PocketWizard Plus IIs)—one connects to your remote camera with a small accessory cable, and you hold the other in your hand. When you see the action come into the view of your remote camera, you press-and-hold the remote button and it fires the shots (I always set my remote camera to shoot a burst of shots for as long as I hold the remote button down. I also pre-focus on the spot I want [like second base itself], then switch my focus to Manual, so it doesn’t change when I press the remote button). Besides the wireless trigger, I would recommend: (1) a Manfrotto Super Clamp with a Manfrotto Variable Friction Magic Arm with Camera Bracket—this lets you mount the camera to all sorts of surfaces by just clamping it on, and then you can position it just how you like it. And, (2) you need to go to Home Depot or Lowe’s and buy a safety cable or two to double secure your rig, so if something comes loose, your gear doesn’t hit the floor, or worse yet, fall and hit somebody (a player, a fan, etc.).
Adding a Teleconverter to Get Really Tight
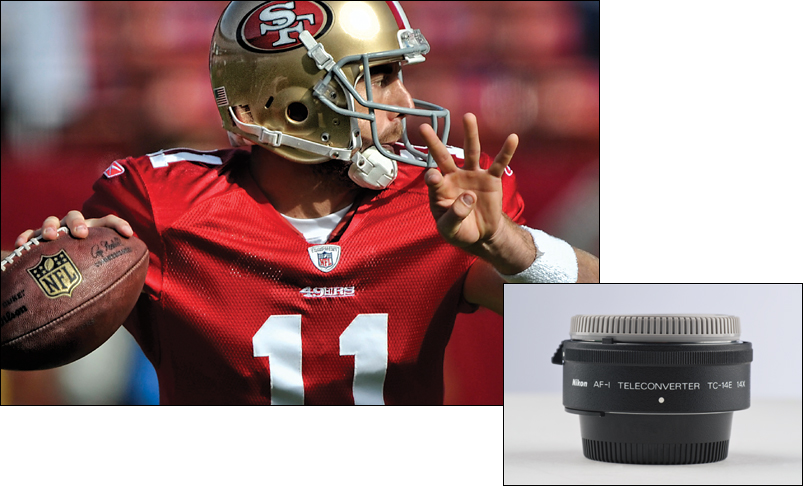
If you look at some of the really amazing sports shots out there today, many of them share something very specific in common—they bring you really, really close to the action. They bring you emotion and action that you’d miss from wide-angle TV shots, or from sitting up in the stands, or even from watching on the those giant stadium monitors. While I generally shoot a 400mm lens for almost every sport, I realized that I needed to get in even tighter—especially after having my portfolio reviewed by sports photography legend Dave Black, who encouraged me to put a 1.4x teleconverter in front of my 400mm lens (making it over 550mm in length) to get it even closer, and it made a tremendous difference. Whatever focal length you’re shooting, a teleconverter is a fairly inexpensive way for you to get even closer to the action and take your sports shots up to the next level. (Note: This works best for shooting day games, or shooting in really well-lit situations, because putting on a 1.4x tele-extender makes you lose 1 full stop of light, so your f/2.8 lens becomes an f/4 lens, your f/4 becomes an f/5.6, and so on. If you use a 2x tele-extender, then you lose 2 stops. So, for daylight you’ll be okay, but indoors, unless you have a camera body that shoots in low light with really low noise, it’s kinda dicey, so keep that in mind.) By the way, Dave had a great quote for me about getting in close. He said, “Go big or go home!” He’s right.
Why You Need to Shoot the Warm-Ups
The last thing you want to be doing at the start of the game is figuring out your settings and white balance. That’s one of the two main reasons you need to show up early for whatever sporting event you’re shooting and do this experimenting while the players are warming up. In almost every sport, about an hour before the event the players come out and go through pretty much whatever they’re going to be doing when the game (or race) starts, and you want to be there shooting a lot during that warm-up. Not just so you get your settings down pat, and when the game starts all you have to worry about is capturing the moments, but also because, just like the athletes (or drivers) need to warm up before the start, you need to warm up, as well. If it’s been a week or more since your last sports shoot, you need some time to shake the rust off and get back into the groove of panning with players, getting sharp on capturing the action, and just generally warming up. That way, when the game actually starts, you’re not spending the first quarter (or period, or 20 laps) getting your settings and into the zone for shooting.
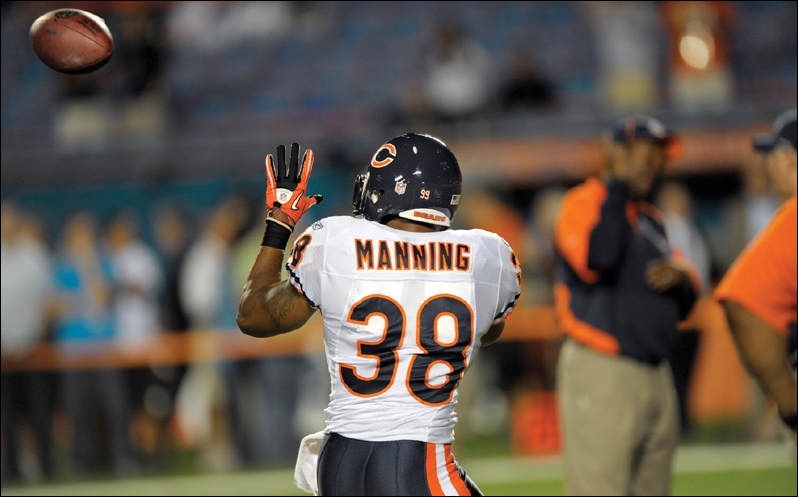
Shoot Little Details Surrounding the Event
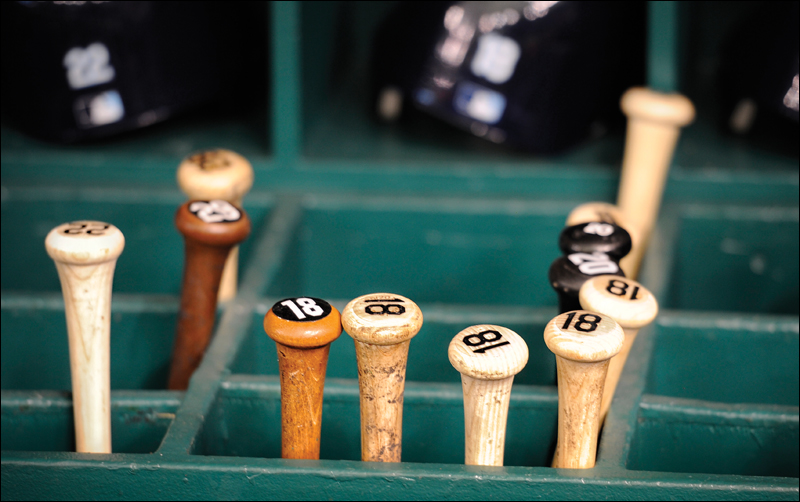
A sporting event is more than the players on the field (that’s why it’s called an event). Today it’s about the arena itself; it’s about the fans; it’s about all the sights and sounds that surround the event (if you shoot for a sports news service, they always ask for these types of shots to be submitted, as well). Since you’re telling the story of the sporting event, it’s about covering the details of the event. For example, when I’m shooting football, I always shoot a nice close-up of both teams’ helmets (there’s usually at least one sitting prominently on an equipment case in the bench area) or the football sitting there by itself just after the ref places it on the field for the next down. For baseball, I shoot a lone glove sitting on the bench, or some bats leaning against the wall in the dugout, or even a close-up of home plate. These storytelling shots are great to include in slide shows and always get a smile from the viewers, so make sure you keep these in mind to shoot between innings, quarters, periods, etc.
Getting More Football Shots In-Focus
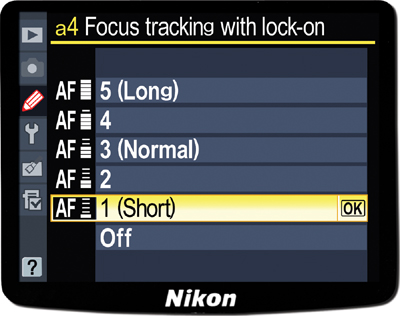
Although I use this tip primarily for football, this might help in a lot of different situations. There’s a setting in many DSLRs that lets you choose how long your focus stays locked on your subject. By default, this Focus Lock-On is set to Normal, but for most of the football game, I leave it set to Short, so that way if I’m focused on the quarterback at the start of the play, but then he passes the ball, I can quickly swing over and catch the receiver and it refocuses on that player very quickly. However, there are times when I don’t want my focus to leave the player quickly, and that’s on kickoffs and punt returns. That’s when I switch my Focus Lock-On to the Long setting. He’s not going to pass the ball or hand off to anybody else (unless it’s the final play of the game and they’re behind one touchdown), so I need that focus to stay locked on him and not jump off him if another player (or a ref) crosses in front of him or nearby him (and of course, both teams are racing right alongside or in front of him, so there are players right nearby that might make your autofocus want to jump over to them). Just don’t forget to switch it back to Short after the kickoff (or punt return). To change this setting on a Nikon, go under the Custom Setting menu, under Autofocus, and choose Focus Tracking with Lock-On, then choose Short during the regular game, and Long for kickoffs and punt returns. On Canon cameras (like the 7D), go to Custom Function III-1, which is AI Servo Tracking Sensitivity. Choose Fast for the regular game, and Slow for kickoffs and punt returns. Note: It’s very possible that you’ll run into a football photographer who does exactly the opposite of this, leaving his setting on Long the entire game. I personally haven’t had a lot of luck with Long, but like everything else in photography, you’ll find somebody that swears by it. So, which one is correct? Try ’em both and see (but again, I’m using the tip I shared here when I shoot).