
Chapter 12. GEF Editor
We take all that we have learned in the prior chapter building a GEF view and apply it to build a Genealogy Graph Editor. With this editor, you can load and save genealogy graphs in your workspace. A tool palette is provided for selection, adding people, connecting people and marriages, and more.
12.1 Setup
In addition to the setup described in the prior chapter (see Section 11.1 on page 185), implementing a GEF Editor depends upon the following plug-ins that must be added to the plug-in manifest:
• org.eclipse.core.resources
• org.eclipse.ui.ide
12.2 GenealogyGraphEditor
To start, modify the plug-in manifest to declare a new Genealogy Graph Editor with both editor and contributor classes in the com.qualityeclipse.genealogy.editor package. Even though our files contain only XML, we select the file extension *.gg so that there is no confusion with any other XML editors that may have installed in Eclipse.
<extension
point="org.eclipse.ui.editors">
<editor
class="com.qualityeclipse.genealogy.editor.
GenealogyGraphEditor"
default="true"
extensions="gg"
id="com.qualityeclipse.genealogy.editor"
name="Genealogy Graph Editor"
contributorClass="com.qualityeclipse.genealogy.editor.
GenealogyGraphEditorActionBarContributor">
</editor>
</extension>
Create a simple GenealogyGraphEditorActionBarContributor that for now does not do anything. This class should subclass the ActionBarContributor provided by GEF.
public class GenealogyGraphEditorActionBarContributor
extends ActionBarContributor
{
public GenealogyGraphEditorActionBarContributor() {}
protected void buildActions() {}
protected void declareGlobalActionKeys() {}
}
GEF provides several editor classes that you can subclass when implementing a GEF-based editor of your own. The GraphicalEditorWithFlyoutPalette contains a note indicating that it may change and should be used only for reference, but the class has been stable for at least the last three years. If you are concerned about this, simply copy the implementation into your own application.
• GraphicalEditor—a standard GEF-based editor with a single GEF viewer as its control
• GraphicalEditorWithPalette—a standard GEF-based editor with a single GEF viewer as its control with a tools palette to one side
• GraphicalEditorWithFlyoutPalette—a standard GEF-based editor with a single GEF viewer as its control and a tools palette to one side that can fold up to maximize the GEF Editor area
For our Genealogy Graph Editor, we subclass GraphicalEditorWithFlyoutPalette and set the edit domain (see Section 10.2.4 on page 180) in the constructor. We add a tool palette (see Section 10.3.1 on page 181) and implement load/save later, and thus only add method stubs at this time.
public class GenealogyGraphEditor
extends GraphicalEditorWithFlyoutPalette
{
public GenealogyGraphEditor() {
setEditDomain(new DefaultEditDomain(this));
}
protected PaletteRoot getPaletteRoot() {
return null;
}
public void doSave(IProgressMonitor monitor) {
}
}
Add a configureGraphicalViewer() method that configures the GEF viewer to set the EditPartFactory (see Section 11.3 on page 188) and the RootEditPart similar to what was done in the prior chapter (see Section 11.2 on page 186). This method should configure the viewer without setting its contents.
protected void configureGraphicalViewer() {
super.configureGraphicalViewer();
GraphicalViewer viewer = getGraphicalViewer();
viewer.setEditPartFactory(new GenealogyEditPartFactory());
viewer.setRootEditPart(new ScalableFreeformRootEditPart());
}
12.2.1 Reading and Displaying the Model
Our GenealogyGraphEditor has a field that holds the model being edited. Add an initializeGraphicalViewer() method to set the viewer’s content to the model being edited. This method is called by the GEF framework after the configureGraphicalViewer() method.
private final GenealogyGraph genealogyGraph = new GenealogyGraph();
protected void initializeGraphicalViewer() {
super.initializeGraphicalViewer();
getGraphicalViewer().setContents(genealogyGraph);
}
To display the genealogy graph from a file, implement the setInput(...) method which then calls readAndClose(...) to read the file content into the model. For the purposes of this book, we add some code to that same method which, if the file is empty, populates the model with some default data similar to what was done in the prior chapter (see Section 11.2.2 on page 187). In addition, you will want to properly handle and display exceptions to the user rather than just printing them to standard error as we have done here.
protected void setInput(IEditorInput input) {
super.setInput(input);
IFile file = ((IFileEditorInput) input).getFile();
setPartName(file.getName());
// For the purposes of this book, if the file is empty
// then load some default content into the model
try {
InputStream stream = file.getContents();
if (stream.read() == -1) {
stream.close();
readAndClose(getClass()
.getResourceAsStream("../view/genealogy.xml"));
return;
}
}
catch (Exception e) {
e.printStackTrace();
return;
}
// Read the content from the stream into the model
try {
readAndClose(file.getContents());
}
catch (CoreException e) {
e.printStackTrace();
return;
}
}
private void readAndClose(InputStream stream) {
genealogyGraph.clear();
try {
new GenealogyGraphReader(genealogyGraph).read(stream);
}
catch (Exception e) {
e.printStackTrace();
}
finally {
try {
stream.close();
}
catch (IOException e) {
e.printStackTrace();
}
}
}
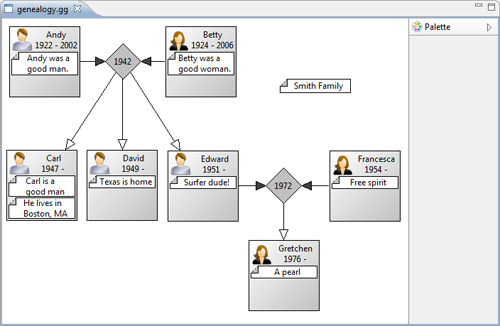
Now, if you launch a runtime workbench and create an empty genealogy.gg file in that runtime workspace, the GenealogyGraphEditor is opened, displaying some default content (see Figure 12–1). Selecting elements in the genealogy graph and adding tools to the palette for manipulating the genealogy graph are addressed in later sections (see Section 12.3 on page 207 and see Section 13.5.3 on page 251).
Figure 12–1. Genealogy editor showing default content.
12.2.2 Saving the Model
When the editor’s content has been modified and the File > Save menu item is selected, the doSave(...) method is called to save the editor’s content to the file. Implement the doSave(...) method as shown below to serialize the model, store that information in the file, update the state of the editor to indicate that it has been saved, and notify all listeners of the change in state.
public void doSave(IProgressMonitor monitor) {
// Serialize the model
StringWriter writer = new StringWriter(5000);
new GenealogyGraphWriter(genealogyGraph).write(
new PrintWriter(writer));
ByteArrayInputStream stream =
new ByteArrayInputStream(writer.toString().getBytes());
// Store the serialized model in the file
IFile file = ((IFileEditorInput) getEditorInput()).getFile();
try {
if (file.exists())
file.setContents(stream, false, true, monitor);
else
file.create(stream, false, monitor);
}
catch (CoreException e) {
handleException(e);
return;
}
// Update the editor state to indicate that the contents
// have been saved and notify all listeners about the
// change in state
getCommandStack().markSaveLocation();
firePropertyChange(PROP_DIRTY);
}
If there is an exception while saving the editor’s content, the following handleException(...) method is called to log the exception and notify the user:
private void handleException(Exception ex) {
ex.printStackTrace();
Status status = new Status(
IStatus.ERROR,
"com.qualityeclipse.genealogy",
"An exception occurred while saving the file",
ex);
ErrorDialog.openError(
getSite().getShell(), "Exception", ex.getMessage(), status);
}
To allow the editor’s content to be saved in a different file, implement the isSaveAsAllowed() method to return true.
public boolean isSaveAsAllowed() {
return true;
}
When the user selects File > Save As ..., the doSaveAs() method is called. Add the following GenealogyGraphEditor method to prompt the user for a new file in which to save the editor content. If the user chooses a new file, then change the file associated with the editor to the file selected by the user and call the doSave() method to save the editor content in the new file.
public void doSaveAs() {
SaveAsDialog dialog = new SaveAsDialog(getSite().getShell());
dialog.setOriginalFile(
((IFileEditorInput) getEditorInput()).getFile());
dialog.open();
IPath path = dialog.getResult();
if (path == null)
return;
IFile file =
ResourcesPlugin.getWorkspace().getRoot().getFile(path);
super.setInput(new FileEditorInput(file));
doSave(null);
setPartName(file.getName());
firePropertyChange(PROP_INPUT);
}
12.3 Selection
When you click on an EditPart or drag a rectangular area encompassing several EditParts, the GraphicalViewer records those EditParts as the current selection. In the following sections, we address both making that selection visible to the user and dynamically modifying that selection to prevent nested EditParts from being selected.
12.3.1 Making the Selection Visible
In our Genealogy Graph Editor (see Figure 12–1), you can click on a person or marriage, or drag a rectangular area encompassing several elements, to select them, but our editor is missing any visual feedback for the user to know that a selection has occurred. In this section, we address this by enhancing each EditPart and Figure to modify its appearance based upon whether it is selected. Alternatively, you can display selection using an EditPolicy as described in the Section 12.3.2 on page 209.
When a figure is selected, the underlying EditPart’s setSelected(...) method is called, allowing each figure to express selection in a different manner. The value passed to this method (and subsequently the value returned by the EditPart’s getSelected() method) indicates whether or not the element is selected and whether or not the selected element is the primary selected element.
• EditPart.SELECTED_NONE—indicates the element is not selected
• EditPart.SELECTED—indicates the element is selected
• EditPart.SELECTED_PRIMARY—indicates the element is selected and is the primary (last) element selected
By extending the EditPart’s fireSelectionChanged() method, we can modify the element’s appearance based upon whether the element is selected.
protected void fireSelectionChanged() {
((PersonFigure) getFigure()).setSelected(getSelected() != 0);
super.fireSelectionChanged();
}
The method above calls a new method that must be added to PersonFigure. This new method changes the color and the width of the border based upon whether the figure is selected.
public void setSelected(boolean selected) {
lineBorder.setColor(selected ?
ColorConstants.blue : ColorConstants.black);
lineBorder.setWidth(selected ? 2 : 1);
erase();
}
This new PersonFigure setSelected(...) method requires a new lineBorder field that is initialized in the PersonFigure’s constructor. Add the following field and modify the PersonFigure’s constructor as follows:
private final LineBorder lineBorder;
public PersonFigure(String name, Image image, int birthYear,
int deathYear) {
final ToolbarLayout layout = new ToolbarLayout();
layout.setSpacing(1);
setLayoutManager(layout);
setPreferredSize(100, 100);
lineBorder = new LineBorder(1);
setBorder(new CompoundBorder(lineBorder,
new MarginBorder(2, 2, 2, 2)));
... etc. ...
}
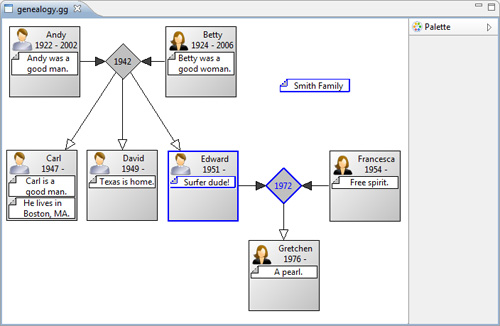
This same approach can be applied to MarriageEditPart and MarriageFigure and to NoteEditPart and NoteFigure. Once the changes are complete, when a genealogy element is selected, its border changes in color and thickness so that the user can see that the selection has occurred (see Figure 12–2).
Figure 12–2. Genealogy editor showing selected elements.
12.3.2 Selection EditPolicy
Rather than modifying each Figure subclass to display the selection as described in the prior section, most applications use a selection EditPolicy to achieve the same end. This is accomplished by implementing the EditPart createEditPolicies() method to install an EditPolicy-associated (see Section 10.3.4 on page 182) EditPolicy.SELECTION_FEEDBACK_ROLE key as shown in subsequent sections. The EditPolicy associated with that key will be used to provide selection feedback for the user on that EditPart. For the purposes of this book we will use both selection EditPolicy and Figures that modify their appearance when selected in combination.
12.3.2.1 NonResizableEditPolicy for Selection
The NonResizableEditPolicy displays an additional one-pixel-wide border around a selected EditPart’s figure and handles on its corners when the EditPart is selected. This behavior is appropriate for both the PersonEditPart and NoteEditPart, so implement the following method in each class. The call to setDragAllowed(false) is appropriate at this point in the book because we have not yet implemented the ability to drag figures, but it will be removed later once that functionality is implemented.
protected void createEditPolicies() {
NonResizableEditPolicy selectionPolicy =
new NonResizableEditPolicy();
selectionPolicy.setDragAllowed(false);
installEditPolicy(EditPolicy.SELECTION_FEEDBACK_ROLE,
selectionPolicy);
}
12.3.2.2 ConnectionEndpointEditPolicy for Selection
The ConnectionEndpointEditPolicy is appropriate for providing selection feedback of connections joining two figures. Implement the following method in GenealogyConnectionEditPart to provide selection feedback for connections in the GenealogyGraphEditor:
protected void createEditPolicies() {
ConnectionEndpointEditPolicy selectionPolicy =
new ConnectionEndpointEditPolicy();
installEditPolicy(EditPolicy.SELECTION_FEEDBACK_ROLE,
selectionPolicy);
}
12.3.2.3 Custom EditPolicy for Selection
The NonResizableEditPolicy displays handles on the corners of a figure’s bounding box, which is appropriate for a PersonEditPart but not for the MarriageEditPart. Implement the createEditPolicies() method for MarriageEditPart to instantiate a new NonResizableMarriageEditPolicy.
protected void createEditPolicies() {
NonResizableEditPolicy selectionPolicy =
new NonResizableMarriageEditPolicy();
selectionPolicy.setDragAllowed(false);
installEditPolicy(EditPolicy.SELECTION_FEEDBACK_ROLE,
selectionPolicy);
}
This new NonResizableMarriageEditPolicy class extends the NonResizableEditPolicy class to return selection handles appropriate for the MarriageFigure and MarriageEditPart. This includes a move handle which, in the future, will facilitate dragging the MarriageFigure (see Section 13.3.2 on page 235).
public class NonResizableMarriageEditPolicy
extends NonResizableEditPolicy
{
protected List<Handle> createSelectionHandles() {
List<Handle> list = new ArrayList<Handle>();
GraphicalEditPart part = (GraphicalEditPart) getHost();
DragTracker tracker = new SelectEditPartTracker(getHost());
list.add(moveHandle(part, tracker));
list.add(createHandle(part, NORTH, tracker));
list.add(createHandle(part, EAST, tracker));
list.add(createHandle(part, SOUTH, tracker));
list.add(createHandle(part, WEST, tracker));
return list;
}
}
The createSelectionHandles() method above calls a moveHandle(...) utility method in the same class to instantiate a specialized handle for moving the figure around the screen. Handles are subclasses of Figure and we do not want a rectangular border displayed around the MarriageFigure when selected, so we set the move handle’s border to null as shown below.
Handle moveHandle(GraphicalEditPart owner, DragTracker tracker) {
MoveHandle moveHandle = new MoveHandle(owner);
moveHandle.setBorder(null);
moveHandle.setDragTracker(tracker);
moveHandle.setCursor(ARROW);
return moveHandle;
}
The createSelectionHandles() method above also calls a createHandle(...) utility method in the same class to instantiate four small square handles positioned at the MarriageFigure’s diamond corners to denote selection.
Handle createHandle(GraphicalEditPart owner, int direction,
DragTracker t) {
ResizeHandle handle = new ResizeHandle(owner, direction);
handle.setCursor(ARROW);
handle.setDragTracker(t);
return handle;
}
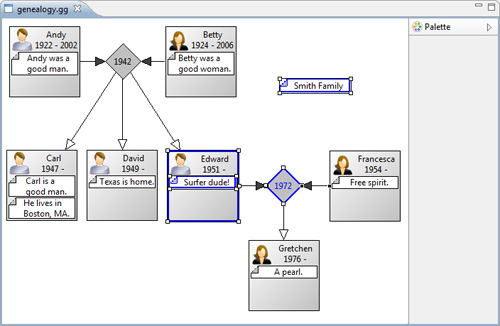
After all of these changes, all selected EditParts are displayed with handles (see Figure 12–3).
Figure 12–3. Genealogy editor showing selection handles.
12.3.3 SelectionChangeListener
When selecting and moving a PersonFigure, we don’t want any nested NoteFigures to be selected, yet when the user selects multiple figures in a rectangular area, the nested NoteFigures are selected (see Figure 12–3 above). One way to prevent this is to add a SelectionChangeListener that dynamically modifies the selection to remove any selected figures whose ancestor figure is already part of the current selection. Append the following code to the configureGraphicalViewer() method to add a SelectionChangeListener:
viewer.addSelectionChangedListener(
new SelectionModificationChangeListener (viewer));
The code above instantiates the new SelectionChangeListener class shown below.
class SelectionModificationChangeListener
implements ISelectionChangedListener
{
private final GraphicalViewer viewer;
SelectionModificationChangeListener(GraphicalViewer viewer) {
this.viewer = viewer;
}
}
To complete the SelectionModificationChangeListener class shown above, add the following selectionChanged(...) method to the class. This method cycles through each of the selected EditParts and removes any that have a selected ancestor.
public void selectionChanged(SelectionChangedEvent event) {
// Build a collection of originally selected parts
// and a collection from which nested parts are removed
List<?> oldSelection =
((IStructuredSelection) event.getSelection()).toList();
final List<Object> newSelection =
new ArrayList<Object>(oldSelection.size());
newSelection.addAll(oldSelection);
// Cycle through all selected parts and remove nested parts
// which have a parent or grandparent part that is selected
EditPart root = viewer.getRootEditPart();
Iterator<Object> iter = newSelection.iterator();
while (iter.hasNext()) {
EditPart part = (EditPart) iter.next();
while (part != root) {
part = part.getParent();
if (newSelection.contains(part)) {
iter.remove();
break;
}
}
}
// If the new selection is smaller than the original selection
// then modify the current selection
if (newSelection.size() < oldSelection.size()) {
viewer.getControl().getDisplay().asyncExec(new Runnable() {
public void run() {
viewer.setSelection(
new StructuredSelection(newSelection));
}
});
}
}
Unfortunately, this approach allows the original selection that includes the nested parts to be broadcast to all listeners and then causes a new selection to be broadcast with the revised selection. A better approach would be to correct the selection before the selection is broadcast, which is the approach we take in the next section.
12.3.4 SelectionManager
Rather than adding the SelectionChangedListener as described in the prior section, you can replace the SelectionManager to accomplish the same purpose. Rather than managing the selection itself, each GraphicalViewer delegates the selection manager to a separate SelectionManager instance. Replace the modification to configureGraphicalViewer() specified in the prior section with the following code:
viewer.setSelectionManager(new ModifiedSelectionManager(viewer));
The code above instantiates the new ModifiedSelectionManager class shown below.
class ModifiedSelectionManager extends SelectionManager
{
private final GraphicalViewer viewer;
public ModifiedSelectionManager(GraphicalViewer viewer) {
this.viewer = viewer;
}
}
Add the following setSelection(...) method to the class above. This method cycles through each of the selected EditParts and removes any that have a selected ancestor.
public void setSelection(ISelection selection) {
// Build a collection of originally selected parts
// and a collection from which nested parts are removed
List<?> oldSelection =
((IStructuredSelection) selection).toList();
final List<Object> newSelection =
new ArrayList<Object>(oldSelection.size());
newSelection.addAll(oldSelection);
// Cycle through all selected parts and remove nested parts
// which have a parent or grandparent part that is selected
Iterator<Object> iter = newSelection.iterator();
while (iter.hasNext())
if (containsAncestor(newSelection, (EditPart) iter.next()))
iter.remove();
// Pass the revised selection to the superclass implementation
// to perform the actual selection
super.setSelection(new StructuredSelection(newSelection));
}
In addition, we override the appendSelection(...) method to adjust the selection based upon whether the EditPart is a nested part of an already selected ancestor or is an ancestor of already selected parts. If “nothing” is selected, the collection returned by the SelectionManager’s getSelection() will contain the viewer’s primary EditPart and nothing else. Since the viewer’s primary EditPart is an ancestor of all EditParts in the editor, we must detect this special case and properly select the specified EditPart.
public void appendSelection(EditPart part) {
List<?> selection =
((IStructuredSelection) getSelection()).toList();
// If "nothing" is selected then getSelection() returns
// the viewer's primary edit part in which case the
// specified part should be selected.
if (selection.size() == 1 && selection.get(0) ==
viewer.getContents()){
super.appendSelection(part);
return;
}
// If the selection already contains an ancestor
// of the specified part then don't select the part
if (containsAncestor(selection, part))
return;
// Deselect any currently selected parts
// which have the new part as an ancestor
Iterator<?> iter = new ArrayList<Object>(selection).iterator();
while (iter.hasNext()) {
EditPart each = (EditPart) iter.next();
if (isAncestor(part, each))
deselect(each);
}
// Call the superclass implemention to select the part
super.appendSelection(part);
}
Both of the prior two methods call the following utility methods to determine if the specified ancestor is indeed the ancestor of the specified part or if the specified collection contains an ancestor of the specified part.
private static boolean isAncestor(EditPart ancestor, EditPart part)
{
while (part != null) {
part = part.getParent();
if (part == ancestor)
return true;
}
return false;
}
private static boolean containsAncestor(final List<?> list, EditPart
part) {
while (part != null) {
part = part.getParent();
if (list.contains(part))
return true;
}
return false;
}
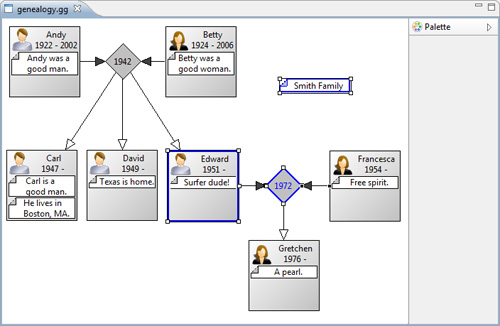
Now when we select the same rectangular area as before, the nested NoteEditPart is not selected as shown in Figure 12–4.
Figure 12–4. Genealogy editor showing correct selection handles.
12.3.5 Synchronizing the Selection in Multiple Editors
If you have multiple editors showing different aspects of the same collection of model objects, then you may want to keep the selection for those multiple editors in sync. To accomplish this, override each GraphicalEditor’s getSelectionSynchronizer() method to return a common SelectionSynchronizer instance.
12.3.6 Accessibility
Accessibility is an important aspect of well-designed programs. Up to this point, we could select elements in the GenealogyGraphEditor using the mouse, but not using the keyboard. One step toward making our editor more accessible to those with disabilities is to add the following statement to the end of the configureGraphicalViewer() method:
viewer.setKeyHandler(new GraphicalViewerKeyHandler(viewer));
With this statement in place, common keyboard actions can be used to scroll the editor and select elements in the editor without using the mouse. More specifically, the GraphicalViewerKeyHandler adds support for the following keyboard actions:
• Arrows (Left, Right, Up, Down)—Change the currently selected element.
• Shift-Arrows—Extend the currently selected element to include the elements to the left, the right, above, or below.
• Ctrl-Arrows—Move focus to a different element without changing the selection.
• Ctrl-Shift-Arrows—Scroll the GEF viewer left, right, up, or down.
• Alt-Down Arrow—Change the currently selected element to be the first nested element within the element that currently has focus.
• Alt-Up Arrow—Change the currently selected element to be the parent element containing the element that currently has focus.
• /, —Change the selection to be a connection associated with the element with focus. Repeatedly pressing either of these keys cycles the current selection forward or backward through the connections associated with the element with focus.
• ?, |—Extend the selection to include connections associated with the element with focus.
12.4 Summary
The GEF framework makes it easy to build an editor and add behavior for selecting graphical elements using both the mouse and the keyboard. In the next chapter, we explore commands for manipulating the currently selected elements.
References
Chapter source (see Section 2.6 on page 20).
Clayberg, Eric, and Dan Rubel, Eclipse Plug-ins, Third Edition. Addison-Wesley, Boston, 2009.
GEF and Draw2D Plug-in Developer Guide, Eclipse Documentation (see http://help.eclipse.org/).
Moore, Bill, David Dean, Anna Gerber, Gunnar Wagenknecht, and Philippe Vanderheyden, Eclipse Development Using the Graphical Editing Framework and the Eclipse Modeling Framework. IBM Redbooks, February 2004.