
Chapter 13. Commands and Tools
In the prior chapter, we constructed a GEF Editor and added the ability to select graphical elements in the editor. Now we explore adding commands to manipulate those selected elements, where each command encapsulates a single change to the model. EditParts use a collection of EditPolicy instances to specify what commands can be performed on which graphical elements. After a command is executed, it is placed on the command stack so that the user can choose to undo or redo the command at a later time.
13.1 Listening for Model Changes
We do not manipulate the graphical elements directly but rather modify the model and have the EditParts listen for model changes and update the graph accordingly. If a person is removed from the model, then the GenealogyGraphEditPart must notice this change and remove the corresponding EditPart from the GenealogyGraphEditor. To accomplish this, start by modifying the GenealogyGraphEditPart to implement the GenealogyGraphListener interface, then modify the GenealogyGraphEditPart constructor as shown below.
public GenealogyGraphEditPart(GenealogyGraph genealogyGraph) {
setModel(genealogyGraph);
genealogyGraph.addGenealogyGraphListener(this);
}
13.1.1 Adding and Removing EditParts
When a person, marriage, or note is added to the model, the GenealogyGraphEditPart must add the corresponding EditPart. Implement the following methods to the GenealogyGraphEditPart to accomplish this:
public void personAdded(Person p) {
addChild(createChild(p), 0);
}
public void marriageAdded(Marriage m) {
addChild(createChild(m), 0);
}
public void noteAdded(int index, Note n) {
addChild(createChild(n), index);
}
In a similar fashion, when a person, marriage, or note is removed from the model, the GenealogyGraphEditPart must update the graph to reflect this change. The following methods find and remove the EditPart corresponding to the model object that was removed:
public void personRemoved(Person p) {
genealogyElementRemoved(p);
}
public void marriageRemoved(Marriage m) {
genealogyElementRemoved(m);
}
public void noteRemoved(Note n) {
genealogyElementRemoved(n);
}
private void genealogyElementRemoved(GenealogyElement elem) {
Object part = getViewer().getEditPartRegistry().get(elem);
if (part instanceof EditPart)
removeChild((EditPart) part);
}
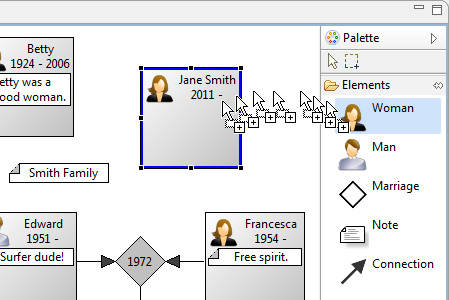
To enable users to add a person to the genealogy graph (see Figure 13–1) without implementing everything in the chapter, you would need to implement
• A GenealogyGraphListener (see Section 13.1 on page 219)
• The personAdded method (see Section 13.1.1 on page 220)
• The CreatePersonCommand (see Section 13.2.1 on page 227)
• The EditPolicy getCreateCommand method (see Section 13.3.1 on page 233)
• Palette creation (see Section 13.5.1 on page 250)
• Palette creation tools (see Section 13.5.3 on page 251)
Figure 13–1. Adding a person to the genealogy graph.
13.1.2 Updating Figures
When some aspect of a Person, Marriage, or Note changes, the model broadcasts that change via the PersonListener, MarriageListener, or NoteListener respectively. The corresponding EditParts must subscribe to these changes and update themselves accordingly. Start by modifying PersonEditPart to implement the PersonListener interface and add the following methods to add the PersonEditPart as a listener on the corresponding Person model element. Similar changes must be made to MarriageEditPart and NoteEditPart but are left as an exercise for the reader.
public void addNotify() {
super.addNotify();
getModel().addPersonListener(this);
}
public void removeNotify() {
getModel().removePersonListener(this);
super.removeNotify();
}
Next implement the following methods in PersonEditPart to update the underlying PersonFigure to reflect model changes that occur. Again, similar methods must be implemented in MarriageEditPart and NoteEditPart but are left as an exercise for the reader.
public void nameChanged(String newName) {
getPersonFigure().setName(newName);
}
public void birthYearChanged(int birthYear) {
int deathYear = getModel().getDeathYear();
getPersonFigure().setBirthAndDeathYear(birthYear, deathYear);
}
public void deathYearChanged(int deathYear) {
int birthYear = getModel().getBirthYear();
getPersonFigure().setBirthAndDeathYear(birthYear, deathYear);
}
private PersonFigure getPersonFigure() {
return (PersonFigure) getFigure();
}
The PersonListener, MarriageListener, and NoteListener interfaces share a common GenealogyElementListener superinterface; thus the following methods can be implemented once in GenealogyElementEditPart rather than in PersonEditPart, MarriageEditPart, and NoteEditPart:
public void locationChanged(int x, int y) {
getFigure().setLocation(new Point(x, y));
}
public void sizeChanged(int width, int height) {
getFigure().setSize(width, height);
}
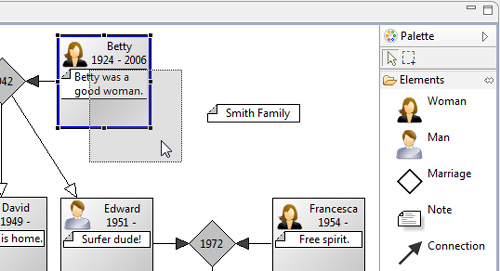
To enable users to move a Person (see Figure 13–2) around the graph without implementing everything in the chapter, you would need to implement
• The addNotify and removeNotify methods (see Section 13.1.2 on page 221)
• The locationChanged method (see Section 13.1.2 on page 221)
• The MoveAndResizeGenealogyElementCommand (see Section 13.2.2 on page 228)
• The createChangeConstraintCommand method (see Section 13.3.2 on page 235)
Figure 13–2. Moving a person within the genealogy graph.
13.1.3 Updating Connections
When the relationship between a person and a marriage is established or removed, the corresponding connection must be added or removed. The PersonListener marriageChanged(...) and parentsMarriageChanged(...) methods pass the new marriage object to the listener, but we also need the original marriage object so that existing connections can be updated. One possible solution would be to cache this information in each PersonEditPart instance. A better solution is to modify the listener interface to pass both the old state and the new state so that the EditParts do not have to cache and track this information themselves. Modify the PersonListener methods to include the additional information as shown below. A better approach might be to pass an event object containing this information, but this approach will suffice for the purposes of this book.
void marriageChanged(Marriage marriage, Marriage oldMarriage);
void parentsMarriageChanged(Marriage marriage,
Marriage oldMarriage);
Similar modifications must be made to MarriageListener for the same reasons.
void husbandChanged(Person husband, Person oldHusband);
void wifeChanged(Person wife, Person oldWife);
Once the interfaces have been modified, you will need to tweak the methods in the corresponding model classes to pass this additional information. With this additional information, we can implement the PersonEditPart marriageChanged(...) method to remove the old spouse connection and add a new spouse connection as shown below.
public void marriageChanged(Marriage marriage, Marriage oldMarriage)
{
ConnectionEditPart part = findConnection(getModel(),oldMarriage);
if (part != null)
removeSourceConnection(part);
if (marriage != null) {
part = createOrFindConnection(getModel(), marriage);
addSourceConnection(part, 0);
}
}
The parentsMarriageChanged(...) method can be implemented in a very similar fashion. Whereas the prior method managed the spouse connection to a marriage in which the person is at the “source” of the connection (the end without the arrowhead), this new method manages the offspring connection to a marriage in which the person is the “target” of the connection.
public void parentsMarriageChanged(Marriage marriage,
Marriage oldMarriage) {
ConnectionEditPart part = findConnection(getModel(),oldMarriage);
if (part != null)
removeTargetConnection(part);
if (marriage != null) {
part = createOrFindConnection(getModel(), marriage);
addTargetConnection(part, 0);
}
}
Similar methods must be implemented in MarriageEditPart to manage connections. All of these methods rely on two utility methods which we add to GenealogyElementEditPart for use by MarriageEditPart as well as PersonEditPart.
protected ConnectionEditPart findConnection(Person p, Marriage m) {
if (p == null || m == null)
return null;
Map<?, ?> registry = getViewer().getEditPartRegistry();
Object conn = new GenealogyConnection(p, m);
return (ConnectionEditPart) registry.get(conn);
}
protected ConnectionEditPart createOrFindConnection(Person p,
Marriage m) {
Object conn = new GenealogyConnection(p, m);
return createOrFindConnection(conn);
}
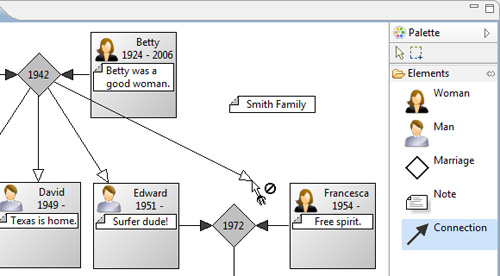
To enable users to add a connection between a Person and a Marriage (see Figure 13–3) without implementing everything in the chapter, you would need to implement
• The model connection listener methods (see Section 13.1.3 on page 223)
• The CreateConnectionCommand (see Section 13.2.1 on page 227)
• The GraphicalNodeEditPolicy for Person and Marriage (see Section 13.3.6 on page 240)
• Palette creation (see Section 13.5.1 on page 250)
• The connection creation tool (see Section 13.5.4 on page 252)
Figure 13–3. Adding a connection.
13.1.4 Adding and Removing Nested EditParts
A Person model element can have nested notes, so the PersonEditPart must add or remove nested NoteEditParts based upon events broadcast by the model. Add the following methods to PersonEditPart to implement this behavior:
public void noteAdded(int index, Note n) {
addChild(createChild(n), index);
}
public void noteRemoved(Note n) {
Object part = getViewer().getEditPartRegistry().get(n);
if (part instanceof EditPart)
removeChild((EditPart) part);
}
13.2 Commands
Commands encapsulate atomic changes to the model that can be executed, added to a command stack, and undone at the discretion of the user. As these commands are executed, the EditParts listen for model changes and update the graph as described in the prior section. Each command, as it is performed, is added to the command stack so that it can be undone later at the user’s discretion. When the command stack changes, we want to update the “dirty” state of the editor by implementing the following method in GenealogyGraphEditor:
public void commandStackChanged(EventObject event) {
firePropertyChange(IEditorPart.PROP_DIRTY);
super.commandStackChanged(event);
}
13.2.1 Create Command
To add new elements to the genealogy graph, the user clicks on the element in the palette and then clicks the location on the graph where the new element should be placed. The EditPolicy instantiates commands (see Section 13.3.1 on page 233) that encapsulate this behavior so that the operation can be performed and then undone at the user’s discretion. Start by creating the following command for adding a person to a genealogy graph:
public class CreatePersonCommand extends Command
{
private final GenealogyGraph graph;
private final Person person;
private final Rectangle box;
public CreatePersonCommand(GenealogyGraph g, Person p,
Rectangle box) {
super("Create Person");
this.graph = g;
this.person = p;
this.box = box;
}
public void execute() {
person.setLocation(box.x, box.y);
person.setSize(box.width, box.height);
graph.addPerson(person);
}
public void undo() {
graph.removePerson(person);
}
}
Similar commands must be created for Marriage, Note, and connections between Persons and Marriages. All of our various connection creation commands extend the following abstract class so that we can query the command to see if a particular source or target is appropriate for that command and then set the source or target if it is valid:
public abstract class CreateConnectionCommand extends Command
{
public CreateConnectionCommand() {
setLabel("Create " + getConnectionName());
}
public abstract String getConnectionName();
public abstract boolean isValidSource(Object source);
public abstract boolean isValidTarget(Object target);
public abstract void setSource(Object source);
public abstract void setTarget(Object target);
}
13.2.2 Move and Resize Command
When the user selects one or more elements, then drags those elements to a new location or changes their size, we need a way to capture that change in a command so that the user can undo that operation if desired. To accomplish this, create a new MoveAndResizeGenealogyElementCommand as shown below.
public class MoveAndResizeGenealogyElementCommand extends Command
{
private final GenealogyElement element;
private final Rectangle box;
public MoveAndResizeGenealogyElementCommand(
GenealogyElement element, Rectangle box
) {
this.element = element;
this.box = box;
setLabel("Modify " + getElementName());
}
private String getElementName() {
if (element instanceof Person)
return "Person";
if (element instanceof Marriage)
return "Marriage";
if (element instanceof Note)
return "Note";
return "Element";
}
}
The execute() method is called to perform the operation and must cache the original location and size of the element in case the operation is to be undone. Add the following field and two methods to the class above:
private Rectangle oldBox;
public void execute() {
oldBox = new Rectangle(
element.getX(), element.getY(), element.getWidth(), element.getH-
eight());
element.setLocation(box.x, box.y);
element.setSize(box.width, box.height);
}
public void undo() {
element.setLocation(oldBox.x, oldBox.y);
element.setSize(oldBox.width, oldBox.height);
}
13.2.3 Reorder Command
When a Note is dragged around inside a Person, the Note is not moved so much as reordered within the Person. Create a new ReorderNoteCommand to reorder a Note within a Person and cache its original position so that the operation can be undone.
public class ReorderNoteCommand extends Command
{
private final NoteContainer container;
private final Note note;
private int index;
private int oldIndex;
public ReorderNoteCommand(NoteContainer container, Note note) {
this.container = container;
this.note = note;
}
public void setAfterNote(Note afterNote) {
index = container.getNotes().indexOf(afterNote) + 1;
}
}
When the command is executed, it removes the note from the container while caching its original position, then adds the note to the container at its new position. Add the following methods to the ReorderNoteCommand class to perform and undo the operation:
public void execute() {
oldIndex = container.getNotes().indexOf(note);
container.removeNote(note);
container.addNote(index <= oldIndex ? index : index - 1, note);
}
public void undo() {
container.removeNote(note);
container.addNote(oldIndex <= index ? oldIndex : oldIndex - 1,
note);
}
13.2.4 Reparent Command
When a Note is dragged from the canvas into a Person, from one Person to another Person, or from a Person to the canvas, then we say that the Note has been “reparented.” Create the ReparentNoteCommand class as shown below.
public class ReparentNoteCommand extends Command
{
private final NoteContainer container;
private final Note note;
private NoteContainer oldContainer;
public ReparentNoteCommand(NoteContainer container, Note note) {
this.container = container;
this.note = note;
}
public void setOldContainer(NoteContainer container) {
oldContainer = container;
}
}
When a Note is dragged onto the canvas, the mouse location is used to determine the Note’s new location and the setBounds(...) method is called. When a Note is dragged into a Person, the mouse location is used to determine the position at which the Note is inserted in the list of notes, and the setAfterNote(...) method is called. Add the following fields and methods to the ReparentNoteCommand class:
private Rectangle box;
private int index;
public void setBounds(Rectangle box) {
this.box = box;
}
public void setAfterNote(Note afterNote) {
index = container.getNotes().indexOf(afterNote) + 1;
}
When the command is executed, we must cache the original location and position, remove the Note from the old container, and add the Note to the new container. Add the following fields and methods to the ReparentNoteCommand class to perform and undo the operation:
private NoteContainer oldContainer;
private Rectangle oldBox;
private int oldIndex;
public void execute() {
oldBox = new Rectangle(
note.getX(), note.getY(), note.getWidth(), note.getHeight());
oldIndex = oldContainer.getNotes().indexOf(note);
oldContainer.removeNote(note);
if (box != null) {
note.setLocation(box.x, box.y);
note.setSize(box.width, box.height);
}
container.addNote(index, note);
}
public void undo() {
container.removeNote(note);
oldContainer.addNote(oldIndex, note);
note.setSize(oldBox.width, oldBox.height);
note.setLocation(oldBox.x, oldBox.y);
}
13.2.5 Delete Command
When the user presses the delete key or selects Edit > Delete, we want to remove the currently selected elements from the GenealogyGraphEditor. As mentioned earlier, commands can be undone, so the delete command must cache the element being removed from the model so that element can be restored to the model upon request. The command is responsible for placing the model in a consistent state after the command is executed or undone. For example, when a Person is removed from the model, any connections to or from that Person must be removed and cached so that the GenealogyGraph remains in a consistent state. Create the following command class to delete a Person from the GenealogyGraph:
public class DeletePersonCommand extends Command
{
private final GenealogyGraph graph;
private final Person person;
public DeletePersonCommand(GenealogyGraph graph, Person person) {
super("Delete " + person.getName());
this.graph = graph;
this.person = person;
}
}
When the command is executed, it must cache and remove connections to the Person before removing the Person itself. Add two new fields and the following method to DeletePersonCommand to accomplish this:
private Marriage marriage;
private Marriage parentsMarriage;
public void execute() {
marriage = person.getMarriage();
parentsMarriage = person.getParentsMarriage();
person.setMarriage(null);
person.setParentsMarriage(null);
graph.removePerson(person);
}
Upon request, the command must restore the model to its prior state. Implement the following undo() command to restore the Person to the GenealogyGraph and restore any connections that the Person had prior to deletion:
public void undo() {
graph.addPerson(person);
person.setParentsMarriage(parentsMarriage);
person.setMarriage(marriage);
}
Similar commands must be implemented to delete Marriage, Note, and GenealogyConnection model elements. Implementing these classes is left as an exercise for the reader.
13.2.6 Composite Commands
Multiple commands can be chained together to form a CompositeCommand that will be executed and undone as an atomic operation. Commands that form a CompositeCommand are executed in the order in which they were chained and undone in the reverse order.
Command compositeCmd =
new MyDeleteCommand(...)
.chain(new MyCreateCommand(...))
.chain(new MyOtherCommand(...));
We used this technique to combine a delete connection command with a create connection command to form a reconnect connection command (see Section 13.3.7 on page 244).
13.3 EditPolicies
Each EditPolicy encapsulates a particular type of behavior that can be performed on a model element. This behavior includes such things as
• Commands that can be performed
• Feedback to the user (see Section 12.3.2 on page 209)
• Delegation/forwarding to other EditParts and EditPolicies
An EditPart creates a collection of EditPolicies to describe the ways in which the user can manipulate the model object represented by that EditPart. Typically this is accomplished by implementing the createEditPolicies() method as described in the prior chapter (see Section 12.3.2.3 on page 210).
13.3.1 Creating Components
When the user selects a creation tool in the palette (see Section 13.5.3 on page 251), and then clicks on the canvas, a CreationRequest is sent to the EditPart on which the user clicked so that the new element can be created. The EditPart finds the EditPolicy associated with the EditPolicy.LAYOUT_ROLE key and calls the EditPolicy getCommand(...) method to determine the command that should be executed to perform the operation. The default implemention of getCommand(...) redirects a call with CreationRequest to the getCreateCommand(...) method.
New elements can be placed anywhere in our GenealogyGraphEditor, so we associate an XYLayoutEditPolicy with the EditPolicy.LAYOUT_ROLE key and implement the getCreateCommand(...) method to return the appropriate command. Add the following statements to the GenealogyGraphEditPart createEditPolicies() method to facilitate creating new Person, Marriage, and Note elements in the GenealogyGraphEditor. The createChangeConstraintCommand(...) shown below with two arguments is deprecated and will be removed in future versions of GEF. The createChangeConstraintCommand(...) method with three arguments is implemented later in this chapter (see Section 13.3.2 on page 235).
installEditPolicy(EditPolicy.LAYOUT_ROLE, new XYLayoutEditPolicy() {
protected Command getCreateCommand(CreateRequest request) {
Object type = request.getNewObjectType();
Rectangle box = (Rectangle) getConstraintFor(request);
GenealogyGraph graph = getModel();
if (type == Person.class) {
Person person = (Person) request.getNewObject();
return new CreatePersonCommand(graph, person, box);
}
if (type == Marriage.class) {
Marriage marriage = (Marriage) request.getNewObject();
return new CreateMarriageCommand(graph, marriage, box);
}
if (type == Note.class) {
Note note = (Note) request.getNewObject();
return new CreateNoteCommand(graph, note, box);
}
return null;
}
protected Command createChangeConstraintCommand(
EditPart child, Object constraint) {
return null;
}
});
When a person clicks on the Note in the tool palette and then on a Person, we would like the Note to be added to the Person rather than the underlying canvas. To accomplish this, add the following statements to the PersonEditPart createEditPolicies() method. We extend OrderedLayoutEditPolicy rather than XYLayoutEditPolicy in this case because Notes are displayed in an ordered list inside a Person object rather than at the location at which the user clicks.
installEditPolicy(EditPolicy.LAYOUT_ROLE,
new OrderedLayoutEditPolicy() {
protected Command getCreateCommand(CreateRequest request) {
Object type = request.getNewObjectType();
if (type == Note.class) {
Note note = (Note) request.getNewObject();
return new CreateNoteCommand(getModel(), note, null);
}
return null;
}
protected Command createAddCommand(EditPart child,
EditPart after) {
return null;
}
protected Command createMoveChildCommand(EditPart c,
EditPart after) {
return null;
}
protected EditPart getInsertionReference(Request request) {
return null;
}
});
The getCreateCommand(...) above is called when the user clicks on the Note in the tool palette and then clicks on a Person. The other methods are called when reordering a Note (see Section 13.3.4 on page 238) and reparenting a Note (see Section 13.3.3 on page 236) as explained later in this chapter.
13.3.2 Moving and Resizing Components
When the user clicks and drags a PersonEditPart or one of the PersonEditPart’s corner handles, we want feedback for the user as to the new location and size of the element. By default, the GenealogyGraphEditPart’s XYLayoutEditPolicy provides this feedback, so we can remove the EditPolicy.SELECTION_FEEDBACK_ROLE selection policy defined earlier for PersonEditPart, MarriageEditPart, and NoteEditPart.
Now that users can see feedback as to where they are dragging and how they are resizing elements, we need to hook up the command to perform the operation. Once the user releases the mouse button, the layout EditPolicy (the EditPolicy associated with the EditPolicy.LAYOUT_ROLE key) for that element’s container is found and the createChangeConstraintCommand(...) method is called. Modify the following statement in the GenealogyGraphEditPart createEditPolicies() method to override the XYLayoutEditPolicy createChangeConstraintCommand(...) method as shown below.
installEditPolicy(EditPolicy.LAYOUT_ROLE, new XYLayoutEditPolicy() {
... existing code ...
protected Command createChangeConstraintCommand(
ChangeBoundsRequest request, EditPart child, Object constraint
) {
GenealogyElement elem = (GenealogyElement) child.getModel();
Rectangle box = (Rectangle) constraint;
return new MoveAndResizeGenealogyElementCommand(elem, box);
}
});
We want MarriageEditPart to be movable but not resizable, so additional changes are necessary. When the user selects an element, the layout EditPolicy (the EditPolicy associated with the EditPolicy.LAYOUT_ROLE key) for that element’s container is found and the createChildEditPolicy(...) method is called. Modify the following statement in the GenealogyGraphEditPart createEditPolicies() method to override the XYLayoutEditPolicy createChildEditPolicy(...) method and exclude MarriageEditParts from being resized:
installEditPolicy(EditPolicy.LAYOUT_ROLE, new XYLayoutEditPolicy() {
... existing code ...
protected EditPolicy createChildEditPolicy(EditPart child) {
if (child instanceof MarriageEditPart)
return new NonResizableMarriageEditPolicy();
return super.createChildEditPolicy(child);
}
});
When dragging a PersonEditPart, a gray rectangle is displayed showing where the element will be placed when the mouse is released. Our current implementation of NonResizableMarriageEditPolicy (see Section 12.3.2.3 on page 210) does not provide this feedback because it uses SelectEditPartTracker rather than DragEditPartsTracker. Modify the NonResizableMarriageEditPolicy createSelectionHandles() method as shown below so that appropriate feedback will be displayed when dragging a MarriageEditPart.
protected List<Handle> createSelectionHandles() {
... existing code ...
DragTracker tracker = new DragEditPartsTracker(getHost());
... existing code ...
}
13.3.3 Reordering Components
As discussed earlier, when a Note is dragged within a Person, it is not so much moved as reordered (see Section 13.2.4 on page 230). When using the OrderedLayoutEditPolicy, the createMoveChildCommand(...) method is called when an element is dragged within the same container. Implement the createMoveChildCommand(...) method in the PersonEditPart createEditPolicies() method discussed earlier (see Section 13.3.1 on page 233) to return a ReorderNoteCommand (see Section 13.2.4 on page 230) as shown below.
protected void createEditPolicies() {
... existing code ...
installEditPolicy(EditPolicy.LAYOUT_ROLE,
new OrderedLayoutEditPolicy() {
... existing code ...
protected Command createMoveChildCommand(EditPart child,
EditPart after) {
if (child == after || getChildren().size() == 1)
return null;
int index = getChildren().indexOf(child);
if (index == 0) {
if (after == null)
return null;
}
else {
if (after == getChildren().get(index - 1))
return null;
}
ReorderNoteCommand cmd = new ReorderNoteCommand(
getModel(), (Note) child.getModel());
if (after != null)
cmd.setAfterNote((Note) after.getModel());
return cmd;
}
... existing code ...
}
... existing code ...
}
Before the createMoveChildCommand(...) method is called, the OrderedLayoutEditPolicy getMoveChildrenCommand(...) method calls getInsertionReference(...) to determine where the element should be inserted. Because our PersonFigure displays NoteFigures vertically, we implement the getInsertionReference(...) to determine the insertion location based upon the current mouse location’s y-coordinate as shown below. The value returned by this method is passed as the second argument to the createMoveChildCommand(...) shown above.
protected void createEditPolicies() {
... existing code ...
installEditPolicy(EditPolicy.LAYOUT_ROLE,
new OrderedLayoutEditPolicy() {
... existing code ...
protected EditPart getInsertionReference(Request request) {
int y = ((ChangeBoundsRequest) request).getLocation().y;
List<?> notes = getChildren();
NoteEditPart afterNote = null;
for (Iterator<?> iter = notes.iterator(); iter.hasNext();){
NoteEditPart note = (NoteEditPart) iter.next();
if (y < note.getFigure().getBounds().y)
return afterNote;
afterNote = note;
}
return afterNote;
}
... existing code ...
}
... existing code ...
}
13.3.4 Reparenting Components
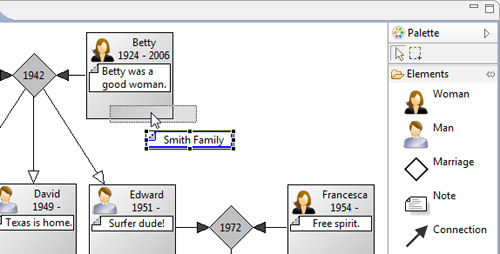
When an element is dragged from one container into a different container (see Figure 13–4) that uses XYLayoutEditPolicy, the XYLayoutEditPolicy createAddCommand(...) method is called to construct a command for reparenting the element. Our GenealogyGraphEditPart uses XYLayoutEditPolicy, so we must implement the createAddCommand(...) method so that a Note can be dragged from a Person on the canvas.
Figure 13–4. Reparenting a note.
protected void createEditPolicies() {
... existing code ...
installEditPolicy(EditPolicy.LAYOUT_ROLE,
new OrderedLayoutEditPolicy() {
... existing code ...
protected Command createAddCommand(EditPart child,
Object constraint) {
NoteContainer oldContainer =
(NoteContainer) child.getParent().getModel();
if (getModel() == oldContainer)
return null;
Note note = (Note) child.getModel();
ReparentNoteCommand cmd =
new ReparentNoteCommand(getModel(), note);
cmd.setBounds((Rectangle) constraint);
cmd.setOldContainer(oldContainer);
return cmd;
}
... existing code ...
}
... existing code ...
}
Similar to the XYLayoutEditPolicy described above, the OrderedLayoutEditPolicy createAddCommand(...) is called when an element is dragged from one container into a different container that uses OrderedLayoutEditPolicy. Our PersonEditPart uses OrderedLayoutEditPolicy, so we must implement the createAddCommand(...) method so that a Note can be dragged from the canvas into a Person.
protected void createEditPolicies() {
... existing code ...
installEditPolicy(EditPolicy.LAYOUT_ROLE,
new OrderedLayoutEditPolicy() {
... existing code ...
protected Command createAddCommand(EditPart child,
EditPart after) {
NoteContainer oldContainer =
(NoteContainer) child.getParent().getModel();
if (getModel() == oldContainer)
return null;
Note note = (Note) child.getModel();
ReparentNoteCommand cmd =
new ReparentNoteCommand(getModel(), note);
if (after != null)
cmd.setAfterNote((Note) after.getModel());
cmd.setOldContainer(oldContainer);
return cmd;
}
... existing code ...
}
... existing code ...
}
13.3.5 Deleting Components
When the user presses the delete key or selects Edit > Delete, the GEF framework asks each selected EditPart for the EditPolicy-associated EditPolicy.COMPONENT_ROLE key and then calls that EditPolicy’s getCommand(...) method. The ComponentEditPolicy class redirects deletion requests to getDeleteCommand(...), which in turn calls the createDeleteCommand method for that EditPolicy. To associate the DeletePersonCommand with the PersonEditPart, add the following statements to the PersonEditPart’s createEditPolicies() method. A similar set of statements must be added to the createEditPolicies() methods of both MarriageEditPart and NoteEditPart.
protected void createEditPolicies() {
... existing code ...
installEditPolicy(EditPolicy.COMPONENT_ROLE,
new ComponentEditPolicy() {
protected Command createDeleteCommand(GroupRequest request) {
GenealogyGraph graph =
(GenealogyGraph) getParent().getModel();
return new DeletePersonCommand(graph, getModel());
}
});
}
13.3.6 Creating Connections
To create connections between a Person and a Marriage, the user clicks on the connection creation tool to activate that tool, then clicks first on the Person and then on the Marriage. Because the Person was clicked first, it is considered the “source” of the connection and the Marriage becomes the “target”; thus the Person is a spouse in the marriage. If you click on the Marriage first and then the Person, the Marriage is the “source” of the connection and the Person is an offspring of the Marriage.
When the connection creation tool is activated, the EditPolicy associated with the EditPolicy.GRAPHICAL_NODE_ROLE key is located to determine which EditParts can be a connection source and which a connection target. To create connections to and from a Person, add the following statement to the PersonEditPart createEditPolicies() method:
protected void createEditPolicies() {
... existing code ...
installEditPolicy(EditPolicy.GRAPHICAL_NODE_ROLE,
new PersonGraphicalNodeEditPolicy(getModel()));
}
Now create the new PersonGraphicalNodeEditPolicy class as shown below. A similar modification and new class named MarriageGraphicalNodeEditPolicy class must be added for MarriageEditPart and is left as an exercise for the reader.
public class PersonGraphicalNodeEditPolicy
extends GraphicalNodeEditPolicy
{
private final Person person;
public PersonGraphicalNodeEditPolicy(Person person) {
this.person = person;
}
}
When the user clicks on the source for a new connection, the source EditPart’s GraphicalNodeEditPolicy getConnectionCreateCommand(...) method is called to construct a command to start the connection creation process. Add the following methods to PersonGraphicalNodeEditPolicy and similar methods to MarriageGraphicalNodeEditPolicy:
protected Command getConnectionCreateCommand(
CreateConnectionRequest request) {
request.setStartCommand(createConnectionCommand());
return request.getStartCommand();
}
public CreateConnectionCommand createConnectionCommand() {
return new CreateSpouseConnectionCommand(person);
}
When the user clicks on a Marriage as the connection source and then clicks on a Person as the connection target, the target EditPart’s GraphicalNodeEditPolicy getConnectionCompleteCommand(...) method is called to return the command that will create the connection. If the target is not valid for the particular connection requested, then null should be returned. Add the following methods to PersonGraphicalNodeEditPolicy and similar methods to MarriageGraphicalNodeEditPolicy.
protected Command getConnectionCompleteCommand(
CreateConnectionRequest request) {
Command startCmd = request.getStartCommand();
if (!(startCmd instanceof CreateConnectionCommand))
return null;
CreateConnectionCommand connCmd =
(CreateConnectionCommand) startCmd;
if (!connCmd.isValidTarget(getModel()))
return null;
connCmd.setTarget(getModel());
return connCmd;
}
protected Object getModel() {
return person;
}
13.3.6.1 Connection Creation Target Feedback
As described earlier in the book, the NodeEditPart getSourceConnectionAnchor(ConnectionEditPart) and getTargetConnectionAnchor(ConnectionEditPart) methods are called to determine the source and target anchor points respectively for an existing connection. The other two methods in the NodeEditPart interface, getSourceConnectionAnchor(Request) and getTargetConnectionAnchor(Request) methods, are used during the connection creation process before the connection has been created. As we did for MarriageEditPart earlier in the book (see Section 11.4 on page 193) we must modify PersonEditPart to implement the NodeEditPart interface and have each of its methods return the standard ChopboxAnchor (see Section 6.2.2 on page 73) so that connections originate and terminate along the figure’s bounding box.
public ConnectionAnchor getSourceConnectionAnchor(
ConnectionEditPart connection) {
return new ChopboxAnchor(getFigure());
}
public ConnectionAnchor getSourceConnectionAnchor(Request request) {
return new ChopboxAnchor(getFigure());
}
public ConnectionAnchor getTargetConnectionAnchor(
ConnectionEditPart connection) {
return new ChopboxAnchor(getFigure());
}
public ConnectionAnchor getTargetConnectionAnchor(Request request) {
if (request instanceof CreateConnectionRequest) {
Command cmd =
((CreateConnectionRequest) request).getStartCommand();
if (!(cmd instanceof CreateConnectionCommand))
return null;
if (!((CreateConnectionCommand) cmd).isValidTarget(getModel()))
return null;
return new ChopboxAnchor(getFigure());
}
return null;
}
When interactively creating a connection (see Section 13.3.7.3 on page 246 and Section 13.3.7.4 on page 247), we do not want the connection to appear to connect to the PersonEditPart unless the connection source is a MarriageEditPart. To accomplish this, the getTargetConnectionAnchor(Request) method above returns null if the connection cannot be established. A similar change must be made to the MarriageEditPart getTargetConnectionAnchor(Request) method described earlier. Additional feedback such as highlighting the figure if it is a valid connection target can be accomplished by overriding both GraphicalNodeEditPolicy showTargetConnectionFeedback(...) and eraseTarget-ConnectionFeedback(...), but this is left as an exercise for the reader.
13.3.6.2 Connection Creation Figure
When a connection is being created, the GraphicalNodeEditPolicy createDummyConnection(...) method is called to create a figure representing the connection being created. We override this method in PersonGraphicalNodeEditPolicy to return a line with an arrowhead rather than just a plain line. A similar method is added to MarriageGraphicalNodeEditPolicy.
protected Connection createDummyConnection(Request req) {
return GenealogyConnectionEditPart.createFigure(false);
}
This necessitates refactoring the GenealogyConnectionEditPart createFigure() method as shown below to call a new public static method which in turn is called by the method above.
protected IFigure createFigure() {
return createFigure(getModel().isOffspringConnection());
}
public static Connection createFigure(boolean isOffspringConnection)
{
PolylineConnection connection = new PolylineConnection();
// Add an arrowhead decoration
PolygonDecoration decoration = new PolygonDecoration();
decoration.setTemplate(ARROWHEAD);
decoration.setBackgroundColor(isOffspringConnection
? ColorConstants.white
: ColorConstants.darkGray);
connection.setTargetDecoration(decoration);
return connection;
}
13.3.6.3 Drag Create Connections
Currently when you mouse down on a Marriage or any of its handles, the Marriage is repositioned on the canvas to a location relative to the new mouse up location. We would like to create a new connection when you mouse down on the bottom handle of a Marriage rather than moving the Marriage to a new location. To accomplish this, we must replace the drag tracker for that bottom handle with a new instance of ConnectionDragCreationTool. Modify the NonResizableMarriageEditPolicy createSelectionHandles() method as shown below to have this new drag tracker associated with the bottom handle of a Marriage.
protected List<Handle> createSelectionHandles() {
... existing code ...
list.add(createHandle(part, SOUTH,
new ConnectionDragCreationTool()));
... existing code ...
}
13.3.7 Modifying Connections
If the user selects a connection, the source and target handles for that component are displayed. If the user clicks and drags one of those handles to connect two different components, we would like the underlying model to be adjusted as well.
13.3.7.1 Modifying Connection Source
When the user drags the source handle for a connection, the new source EditPart’s GraphicalNodeEditPolicy getReconnectSourceCommand(...) method is called to return a command that modifies the connection so that it originates with a different component. If the new source is invalid, then null should be returned. In our case, we return a delete connection command and a create connection command as a single composite command. Add the following PersonGraphicalNodeEditPolicy method and a similar method to MarriageGraphicalNodeEditPolicy.
protected Command getReconnectSourceCommand(
ReconnectRequest request) {
EditPart part = request.getConnectionEditPart();
if (!(part instanceof GenealogyConnectionEditPart))
return null;
GenealogyConnectionEditPart connPart =
(GenealogyConnectionEditPart) part;
CreateConnectionCommand connCmd = connPart.recreateCommand();
if (!connCmd.isValidSource(getModel()))
return null;
connCmd.setSource(getModel());
Command deleteCmd =
new DeleteGenealogyConnectionCommand(connPart.getModel());
Command modifyCmd = deleteCmd.chain(connCmd);
modifyCmd.setLabel("Modify " + connCmd.getConnectionName());
return modifyCmd;
}
The method above requests a new CreateConnectionCommand from the connection’s EditPart. Add the following method to GenealogyConnectionEditPart to instantiate and return the command that will re-create the EditPart’s connection:
public CreateConnectionCommand recreateCommand() {
CreateConnectionCommand cmd;
if (getModel().isOffspringConnection()) {
cmd = new CreateOffspringConnectionCommand(
getModel().marriage);
cmd.setTarget(getModel().person);
}
else {
cmd = new CreateSpouseConnectionCommand(getModel().person);
cmd.setTarget(getModel().marriage);
}
return cmd;
}
13.3.7.2 Modifying Connection Target
When the user drags the target handle for a connection, the new target EditPart’s GraphicalNodeEditPolicy getReconnectTargetCommand(...) method is called to return a command that modifies the connection so that it terminates at a different component. If the new target is invalid, then null should be returned. As in the prior section, we return a delete connection command and a create connection command as a single composite command. Add the following PersonGraphicalNodeEditPolicy method and a similar method to MarriageGraphicalNodeEditPolicy:
protected Command getReconnectTargetCommand(
ReconnectRequest request) {
EditPart part = request.getConnectionEditPart();
if (!(part instanceof GenealogyConnectionEditPart))
return null;
GenealogyConnectionEditPart connPart =
(GenealogyConnectionEditPart) part;
CreateConnectionCommand connCmd = connPart.recreateCommand();
if (!connCmd.isValidTarget(getModel()))
return null;
connCmd.setTarget(getModel());
Command deleteCmd =
new DeleteGenealogyConnectionCommand(connPart.getModel());
Command modifyCmd = deleteCmd.chain(connCmd);
modifyCmd.setLabel("Modify " + connCmd.getConnectionName());
return modifyCmd;
}
In the method above, we chain together a delete command with a create connection command to form a new modify connection command. This new composite command will be executed and undone atomically and appear as a single entry in the Edit menu.
13.3.7.3 Modifying Connection Source Feedback
When the user is dragging the source anchor of an existing connection, the getSourceConnectionAnchor(Request) method introduced earlier (see Section 13.3.6.1 on page 242) is called to determine the new source anchor. We do not want the connection to appear to connect unless the source is valid. Modify the PersonEditPart getSourceConnectionAnchor(Request) method to return an anchor if the target is valid or null if not.
public ConnectionAnchor getSourceConnectionAnchor(Request request) {
if (request instanceof ReconnectRequest) {
EditPart part =
((ReconnectRequest) request).getConnectionEditPart();
if (!(part instanceof GenealogyConnectionEditPart))
return null;
GenealogyConnectionEditPart connPart =
(GenealogyConnectionEditPart) part;
CreateConnectionCommand connCmd = connPart.recreateCommand();
if (!connCmd.isValidSource(getModel()))
return null;
return new ChopboxAnchor(getFigure());
}
return new ChopboxAnchor(getFigure());
}
A similar change must be made to the MarriageEditPart getSourceConnectionAnchor(Request). Additional feedback such as highlighting the figure if it is a valid connection source can be accomplished by overriding both GraphicalNodeEditPolicy showSourceConnectionFeedback(...) and eraseSourceConnectionFeedback(...), but this is left as an exercise for the reader.
13.3.7.4 Modifying Connection Target Feedback
As with feedback provided during connection creation when the user is selecting a connection target (see Section 13.3.6.1 on page 242), we do not want the connection to appear to connect unless the target is valid. Modify the PersonEditPart getTargetConnectionAnchor(Request) method to return an anchor if the target is valid or null if not.
public ConnectionAnchor getTargetConnectionAnchor(Request request) {
... existing code ...
if (request instanceof ReconnectRequest) {
EditPart part =
((ReconnectRequest) request).getConnectionEditPart();
if (!(part instanceof GenealogyConnectionEditPart))
return null;
GenealogyConnectionEditPart connPart =
(GenealogyConnectionEditPart) part;
CreateConnectionCommand connCmd = connPart.recreateCommand();
if (!connCmd.isValidTarget(getModel()))
return null;
return new ChopboxAnchor(getFigure());
}
return null;
}
A similar change must be made to the MarriageEditPart getTargetConnectionAnchor(Request) method. Additional feedback such as highlighting the figure if it is a valid connection target can be accomplished by overriding both GraphicalNodeEditPolicy showTargetConnectionFeedback(...) and eraseTarget-ConnectionFeedback(...), but this is left as an exercise for the reader.
13.3.8 Deleting Connections
Associating a delete command with a connection involves ConnectionEditPolicy rather than ComponentEditPolicy. Add the following statements to GenealogyConnectionEditPart’s createEditPolicies() method so that a selected connection can be deleted:
installEditPolicy(EditPolicy.COMPONENT_ROLE,
new ConnectionEditPolicy() {
protected Command getDeleteCommand(GroupRequest request) {
return new DeleteGenealogyConnectionCommand(getModel());
}
});
13.3.9 Deleting the Graph
The application should prevent the underlying root component from being deleted. To make this explicit, add the following statement to the GenealogyGraphEditPart’s createEditPolicies():
installEditPolicy(EditPolicy.COMPONENT_ROLE,
new RootComponentEditPolicy());
13.4 Global Edit Menu Actions
When the user selects one of the Edit commands such as Undo, Redo, or Delete, we would like the appropriate commands to be triggered in our editor. The GEF framework provides a series of Actions for hooking these menu items to their associated commands in the editor. Implement the following GenealogyGraphEditorActionBarContributor method to hook these menu items to the GenealogyGraphEditor:
protected void buildActions() {
addRetargetAction(new UndoRetargetAction());
addRetargetAction(new RedoRetargetAction());
addRetargetAction(new DeleteRetargetAction());
addRetargetAction(new LabelRetargetAction(
ActionFactory.SELECT_ALL.getId(), "Select All"));
}
Similarly to hooking the global Edit menu items, the following method associates various toolbar buttons with commands in our editor:
public void contributeToToolBar(IToolBarManager toolBarManager) {
toolBarManager.add(getAction(ActionFactory.UNDO.getId()));
toolBarManager.add(getAction(ActionFactory.REDO.getId()));
}
With all these changes in place, the user can select Edit > Delete, Edit > Undo, and Edit > Redo or the associated keyboard accelerators to perform the standard editing operations in our GenealogyGraphEditor.
13.5 Palette and Tools
Creating a palette and adding tools is our next challenge. A palette can contain horizontally oriented PaletteToolbars (see Section 13.5.2 on page 250) and vertically oriented PaletteDrawers (see Section 13.5.3 on page 251), each of which holds tools (see Figure 13–5). The user selects the active tool and then uses that to perform an operation in the editor. For example, click on the Marriage tool and then click on the canvas to add a new Marriage to the GenealogyGraph.
Figure 13–5. Palette drawers holding tools.
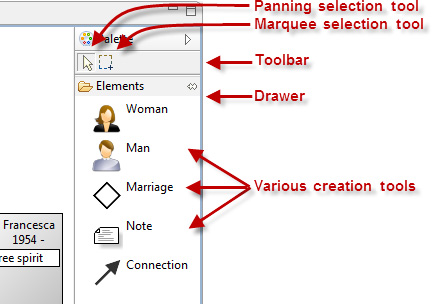
A palette can contain several different types of tools, useful for selection of existing elements and creation of new elements and connections:
• SelectionToolEntry—Select elements with click, Shift-click, and Ctrl-click.
• MarqueeToolEntry—Click/drag to select elements in a rectangular area.
• PanningSelectionToolEntry—combines all aspects of SelectionToolEntry and MarqueeToolEntry with the ability to pan the editor content.
• CreationToolEntry—Click to add new elements to the graph.
• CombinedTemplateCreationEntry—adds drag/drop support to CreationToolEntry.
• ConnectionCreationToolEntry—used to create connections between elements.
13.5.1 Palette Creation
Subclasses of GraphicalEditorWithPalette and GraphicalEditorWithFlyoutPalette can add a palette by implementing the getPaletteRoot(...) method. In our case, we implement getPaletteRoot(...) to call a factory method as shown below.
protected PaletteRoot getPaletteRoot() {
return GenealogyGraphEditorPaletteFactory.createPalette();
}
Our GenealogyGraphEditorPaletteFactory createPalette() method instantiates a palette and calls methods to add a toolbar with selection tools and a drawer with creation tools.
public static PaletteRoot createPalette() {
PaletteRoot palette = new PaletteRoot();
palette.add(createToolsGroup(palette));
palette.add(createElementsDrawer());
return palette;
}
13.5.2 Selection Tools
Typically, the PanningSelectionToolEntry is added first and set as the default tool. With this tool active, you can select elements and pan/scroll the editor content:
• Click to select an element.
• Shift-click to select multiple elements.
• Ctrl-click to toggle an element selection.
• Click on the canvas, then drag to select elements in a rectangular area.
• Hold down the space bar while click/dragging to pan/scroll the editor content.
The createToolsGroup(...) method instantiates and returns an instance of PaletteToolbar containing two selection tools. The PanningSelectionToolEntry is added first and set as the default tool.
private static PaletteEntry createToolsGroup(PaletteRoot palette) {
PaletteToolbar toolbar = new PaletteToolbar("Tools");
ToolEntry tool = new PanningSelectionToolEntry();
toolbar.add(tool);
palette.setDefaultEntry(tool);
toolbar.add(new MarqueeToolEntry());
return toolbar;
}
13.5.3 Component Creation Tools
The createElementsDrawer() method instantiates and returns an instance of PaletteDrawer containing tools for creating various types of elements. We start with the following method to create an empty drawer in the palette:
private static PaletteEntry createElementsDrawer() {
PaletteDrawer componentsDrawer = new PaletteDrawer("Elements");
return componentsDrawer;
}
Each creation tool has a factory associated with it for instantiating the element to be added to the model. Add the following statements to the createElementsDrawer() method to first define a new factory used by the creation tool to instantiate the new Person and then configure a new creation tool that uses the factory. This creation tool adds a female to the GenealogyGraph. Creation tools for adding males, marriages, and notes are very similar and are left as an exercise for the reader.
SimpleFactory factory = new SimpleFactory(Person.class) {
public Object getNewObject() {
Person person = new Person(Person.Gender.FEMALE);
person.setName("Jane Smith");
person.setBirthYear(currentYear);
return person;
}
};
CombinedTemplateCreationEntry component =
new CombinedTemplateCreationEntry(
"Woman",
"Add a new female to the Genealogy Graph",
factory,
FEMALE_IMAGE_DESCRIPTOR,
FEMALE_IMAGE_DESCRIPTOR);
componentsDrawer.add(component);
13.5.4 Connection Creation Tools
To create connections between a Person and a Marriage, the user first clicks on the connection creation tool to activate that tool, next clicks on the “source” component, and finally clicks on the “target” component to create a connection between “source” and “target” components. To make this all possible, we must add the connection creation tool to the palette as shown below.
ToolEntry connection = new ConnectionCreationToolEntry(
"Connection",
"Create a connection",
null,
CONNECTION_IMAGE_DESCRIPTOR,
CONNECTION_IMAGE_DESCRIPTOR);
componentsDrawer.add(connection);
13.5.5 Creation Drag and Drop
The prior section describes adding creation tools so that the user can click on the tool to activate it and then click on the location in the canvas where the new element will be added. To add the ability to drag an element from the palette and drop it on the canvas, we start by overriding the createPaletteViewerProvider() method to add a drag listener to the palette.
protected PaletteViewerProvider createPaletteViewerProvider() {
return new PaletteViewerProvider(getEditDomain()) {
protected void configurePaletteViewer(PaletteViewer viewer) {
super.configurePaletteViewer(viewer);
viewer.addDragSourceListener(
new TemplateTransferDragSourceListener(viewer));
}
};
}
If we were subclassing GraphicalEditorWithPalette, we would add the drag source listener by overriding initializePaletteViewer() as shown below.
protected void initializePaletteViewer() {
super.initializePaletteViewer();
getPaletteViewer().addDragSourceListener(
new TemplateTransferDragSourceListener(getPaletteViewer()));
}
Next we add a drop listener by adding the following to the GenealogyGraphEditor initializeGraphicalViewer() method:
getGraphicalViewer().addDropTargetListener(
new TemplateTransferDropTargetListener(getGraphicalViewer()));
With these changes in place, the user can drag and drop to add new elements to the GenealogyGraph.
13.6 Summary
Using variations of the commands and tools discussed in this chapter, it is easy to build a rich, interactive, GEF-based application. Implement one listener, one command, one EditPolicy, and a tool in the palette, then repeat to create each user operation one by one. In this way you can iteratively create your application.
References
Chapter source (see Section 2.6 on page 20).
Clayberg, Eric, and Dan Rubel, Eclipse Plug-ins, Third Edition. Addison-Wesley, Boston, 2009.
GEF and Draw2D Plug-in Developer Guide, Eclipse Documentation (see http://help.eclipse.org/).
Moore, Bill, David Dean, Anna Gerber, Gunnar Wagenknecht, and Philippe Vanderheyden, Eclipse Development Using the Graphical Editing Framework and the Eclipse Modeling Framework. IBM Redbooks, February 2004.