7
Beyond Words
Text, pictures, and graphics comprise newspapers. Radio delivers sound and the imagination it elicits. Television merges that sound with video. But only one medium can use all these tools—text, pictures, graphics, audio, video—to tell one story: the Internet.
From picture books to podcasts, TV reality to the tumblelogs that bring you a little of this and a little of that, weblogs have evolved into a new kind of journal.
Words often aren’t the best way to tell a story in this digital age. If “a picture is worth a thousand words,” as the cliché has long held, what is a slide show worth? And what if it is accompanied by audio?
Even when words are best, they aren’t always enough. That’s why a blogger with something to say needs to consider the right medium for saying it.
This chapter will consider the world of blogging beyond words— or at least the elements that enhance the story those words tell. We’ll start with the challenge of choosing good pictures to accompany word blogs, move to slide shows, and then evolve to the magic of multimedia.
Choosing the Right Photos
Every blog should have a photo. But not any photo. The first and most important rule of using photos in blogs is to choose those that reinforce the message of your text. If you’re writing a basketball blog and you write a post about the importance of keeping your head up and your eyes forward while dribbling, don’t use some random photo of a basketball court or a group of players in the midst of a game. That’s generic, and generic photos don’t work. Find a photo—or take one yourself—that shows a player doing exactly what you have described in your post.
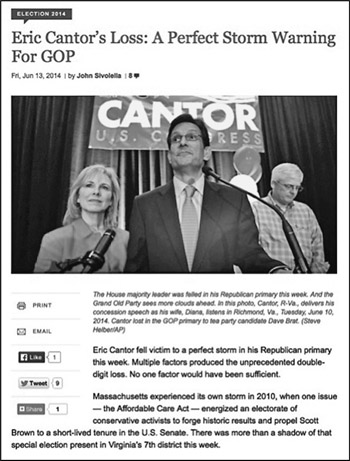
The photo of a dejected Eric Cantor after his election loss complements the main point of the blog post.
Or, better still, choose an image that in some way adds to that message. On the blog Cognoscenti, featured on the website for the National Public Radio affiliate in Boston, WBUR-FM, blogger John Sivolella wrote in June 2014 about the wider political meaning of the primary defeat of Republican U.S. House Majority Leader Eric Cantor. The editors at Cognoscenti illustrated his post with a photo of a dejected Cantor giving his concession speech the night he lost the election.
The Art of Writing Captions
The American photographer Elliott Erwitt took a photograph of a black man drinking from a water fountain in North Carolina. Almost 50 years later, the Telegraph of London named it one of the 10 photographs that changed the world.
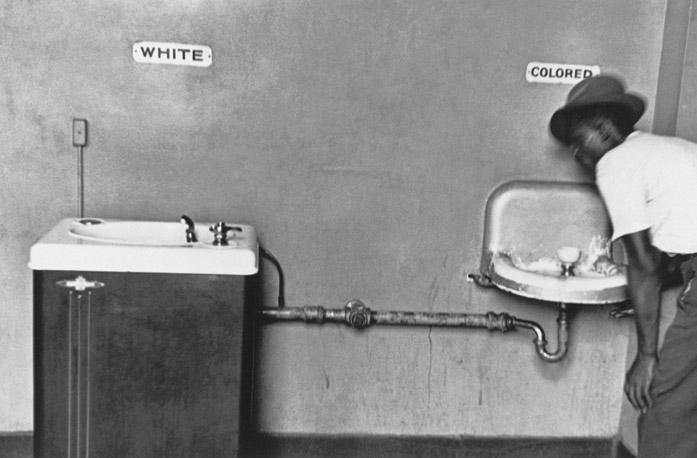
The 1950 photo by Elliott Erwitt tells the story of segregation in the American South in an image.
(Credit: Elliot Erwitt, Magnum Photos)
The man’s head, slightly out of focus, appears in the right third of the photo as he either is bending down for a sip of water or straightening up after he has taken his drink. Much of his body is outside the frame. Above the hat on his head, a small sign reads “colored.” In the left third of the photo, a much larger (and unoccupied) drinking fountain has a sign above it that reads “white.” The photo’s center third is largely a blank wall, but for a pipe that connects the two fountains.
The Telegraph editors felt the picture told the story of racial segregation in the United States.
Even a single picture can tell an entire story—or be an entire blog post. Often, it is the words that accompany the picture—the caption (called a cutline in newspapers)—that increases impact and provides context. These words generally appear directly below the photo.
Next time you look at a photo in a newspaper or on a good website, notice how you look at it. The photo (if it’s good) will arrest your attention. Then your eyes will look for words that explain the photo, and then you’ll look back at the photo with the knowledge you didn’t have before you read the words. Now the photo carries more meaning.
Here are two possible captions for the Elliot Erwitt photo:
- Segregated water fountains, North Carolina, 1950.
- An African-American man takes a drink from a “coloreds only” water fountain in North Carolina.
Which caption packs more punch?
The first one gives readers the basics: what is happening, where, and when. Readers look at the photo, read the caption, and learn these are segregated fountains in the American Deep South before the civil rights movement, and look back up at the photo with new eyes—and a new understanding of how in 1950, something as common as getting a few sips of water was strictly segregated by race.
The second caption provides much more information than a reader needs to grasp the impact of the image. It states what the reader can see: that the man is African-American and that he is drinking from a water fountain. It tells more than the reader needs to know to perceive the impact of the image: Does the man’s name and age matter, or that he was in a bus station? Or is it more important to say when this happened?
Here are some guidelines for writing captions:
- Explain the image, don’t repeat what the reader sees. Tell your readers the situation they are looking at. A dramatic photo of ominous storm clouds approaching could be anywhere. The simple caption “Dark skies outside Lewisham before yesterday’s hail storm” adds information to the photo. It says where the photo was taken and what happened afterwards.
- Explain details an image adds to the story. If you write a yoga blog and you post a photo of a man doing yoga in a studio while his dog sits beside him, the reader is going to be a bit befuddled. What’s the dog doing there? Tell the reader “West Side Yoga Studio offers a ‘doga’ class every Saturday. Participants can bring their dogs.”
- Add information the photo does not give. If you have posted a photo of the exterior and interior of a magnificent Gothic cathedral, tell your readers the location of the cathedral, its name, and other details that add to the readers’ appreciation. If, for example, you have taken photos of the Cathedral-Basilica of Notre-Dame de Québec, and choose one of a tomb inside the cathedral, tell readers what they are looking at: “The tomb of Saint François de Laval, appointed the first Roman Catholic bishop of Québec in 1674.” This is known as “writing to the corners of the picture.”
- Use present tense. A photograph captures a moment and suspends it in an eternal present. Whatever is happening in a photograph is happening when the viewer looks at it. Use present-tense verbs in captions: “A bowl of clam chowder steams as Bill Bishop ladles it from the pot for guests at St. Stephen’s Soup Kitchen.”
- Avoid the obvious. No need to write “Seen here …” or “Shown above …” or any of the other empty words one sees in the photo captions of small-town newspapers or amateur blogs.
- Be brief. Captions needn’t always be complete sentences. If you’re writing a family history blog, a caption reading “Uncle Steve and Aunt Nancy, Brighton Beach, 1956” works just fine.
Telling a Story with a Photo Blog
Speaking of family photos, consider this analogy as we move to the next step, photo galleries.
Perhaps someone in your family keeps a scrapbook of photographs from pre-digital times (which, hard as it may be for you to believe, weren’t all that long ago). Turning the pages of that old scrapbook is not only fascinating, but evocative—the facial expressions of the people in the photos, their style of clothing, the cars and scenery in the background, the posture of the subjects.
As you turn the pages and learn a little about each photo, perhaps by reading, perhaps by listening to a family member, a family narrative takes shape in your mind, often built around the passage of time. The photo blogger provides a similar narrative for his or her audience, using images that tell a story. Often these images use the passage of time, chronology, to tell a story with beginning, middle, and end. The story, as a writer might say, has an arc. The pictures are organized in an orderly manner, not at random.
Photo Galleries: Creating Narrative from Images
You’ll find many poor examples of galleries online. Photo galleries blanket the Web like weeds. Most are “clickbait”—if you make your way through a 20-page gallery, that counts as 20 page views for the website, and page views is one of the metrics that determines popularity and advertising sales. Open up your browser and you’ll find gallery clickbait without trying. “No Snack for You: 20 Vending Machine Failures.” “13 Amazingly Ridiculous Hairdos.” “14 Reasons Your Cat Actually Owns You.”
Serious news organizations love photo galleries, too. As the 2014 U.S. Open was being played on a golf course in North Carolina, the Kansas City Star’s website posted a photo gallery of 37 images from the second day of the tournament. The editors could have made this gallery an interesting narrative. The first photo could have shown an establishing shot of the golf course with a sign of the tournament. (An establishing shot typically is a wider view that sets—or establishes —the scene and place of the gallery.) The next few might have shown spectators arriving at the golf course, golfers warming up, perhaps caddies lining up the golf carts. Then the photos could have shown the top golfers playing the first holes. The middle might have shown the favorites in triumph and tragedy—the leader with a birdie putt and perhaps the leader from the previous day blasting out of a sand trap. The slide show might have closed with shots of the best golfers and the leader doffing his cap after the final hole. Perhaps the final photo could have shown the scoreboard at the end of the day.
These photos, working together chronologically, would have told a story. Instead, the viewer gets 37 photos in random order, probably the order in which they arrived at the computer of the Web producer (or intern) who created the photo gallery. It was a boring gallery and, more importantly, one that did not tell a story.
When you’ve gathered together images for a gallery, think about two things: (1) What is the story I want to tell? (2) What is the best order for me to sequence the photos to tell it?
“First and foremost, the gallery needs some kind of logical order,” says Craig Nickels, online production editor at the Milwaukee Journal Sentinel. “In most situations, photos can go in either chronological or reverse-chronological order. That helps create a narrative structure to the gallery: first this thing happened, then this other thing happened, and so on.”
“If we have photos from multiple days or geographic locations, I often try to group those together,” Nickels says. “I may also do the same if I have several photos of the same person. That allows me to avoid duplicate explanations in the captions. If my gallery is ‘Democrats celebrate Obama’s victory’ and I have six photos from a bar in Philadelphia, I can say, ‘Crowds gathered at Johnny’s Pub, a small dive bar in South Philly, to celebrate …’ in the first caption. Then in subsequent Philly photos, I can say, ‘… at Johnny’s Pub …’ without re-explaining what or where Johnny’s is.”
If the photo gallery is of an ongoing event—a game, a festival, a protest—Nickels puts the newest photos first, so that readers can come back to the page and get new content. “This means that these galleries will be in reverse-chronological order. While this is slightly less intuitive for the reader, it’s still easy enough to digest if the structure is predictable and consistent.”
Almost any piece of photo storage software can create a gallery. If you choose Google’s Blogger software, Picasa (a free Google product) has numerous options for making and embedding a gallery in your blog. There are a number of WordPress plug-ins and widgets that can create and embed a gallery, too, but perhaps the easiest is Cincopa (www.cincopa.com). Heavy users can pay for Cincopa’s premium service.
Nickels uses a plug-in called NextGen to organize photos and create galleries on his personal WordPress website. He uses Photoshop for photo editing, but there are other, free, choices.
Nickels offers this final piece of advice: “Photo galleries are pageview gold mines. With that in mind, I might suggest that if there’s a question about whether to do the gallery, do the gallery. If there’s a question about whether to include a photo, include it. Be reasonable, obviously, but lean toward the side of ‘more.’”
Taking It to the Next Level: Audio Slide Shows
If you master simple audio editing (and it’s easier than you think), you can create a narrative with images and sound. That’s a powerful combination.
First, a few definitions. With photo galleries, the user has to click to move from one image to the next. They are static and have no audio. A slide show moves from image to image automatically and usually has the potential for audio.
One great slide show example is “One in 8 Million,” an nytimes.com project that can be found at www.nytimes.com/packages/html/nyregion/1-in-8-million/). Each slide show tells the story of a New Yorker going about his or her life. The stories last two or three minutes and feature an audio track of the subject talking and interacting with others. But the key here is how well the images and the audio complement one another.
The slide show titled “Jessie Villanueva: The Sneaker Connoisseur” begins with audio of Villanueva speaking: “I keep them in closets, I keep them in containers, I keep them at the store so my wife doesn’t know I have them, I keep them wherever I can keep them so I can keep them. Now I have probably 150 pairs of my own shoes.” The photos that appear as he speaks are of three tall stacks of clear plastic shoe storage containers, a photo of a closet jammed with shoe boxes with Villanueva in the background, and a photo of a dozen pairs of shoes lined up next to a bedside table.
You can find more excellent examples of audio slide shows—these from around the world—at the website of the Guardian (www.theguardian.com/audioslideshows), based in London.
The audio slide shows on the websites of the Times and the Guardian were made with the same software, Soundslides, which is available for Mac and Windows operating systems. Soundslides is powerful, flexible, and intuitive. A stripped-down version costs $39.99; the better version, Soundslides Plus, $69.95.
Keep this in mind: not everything lends itself to audio. Sometimes simplicity is your best option.
For example, Nickels, of the Milwaukee Journal Sentinel, has found readers prefer galleries.
“Generally, more reader control is a good thing and galleries allow [the reader] to consume the photos and captions at [his or her] own pace.”
Still, if you’ve got really good audio, go with a slide show.
Building the Slide Show
Once you’ve got the images and audio for a slide show, review all your assets. Do you have what you need to tell the story? Do you have good images and enough images to complement the audio package?
Next, edit your audio down to two or three minutes. Anything longer is likely to lose the audience. (You may already have a basic audio editing program in your computer, but, if you don’t, we recommend Audacity, which is free, easy to use, and can export MP3 files. We’ll talk more about audio later in this chapter.)
In Soundslides, the length of your audio determines the length of the slide show—your slide show can only be exactly as long as your audio clip. You’ll probably want human voices of some kind: narration or sound bites from an interview. Natural sound helps transport the audience to the scene. You also can use music that is copyright-free, or your own music. If you are going to use narration, write a script and rehearse it before recording.
Next, choose the images you want to use. Don’t choose too many, or they’ll fly by the viewers’ eyes too quickly, and don’t choose too few, or they will remain on the screen too long. A two-minute slide show should be between 16 and 24 images. Process and prepare the images before you load them into your slide show program.
Once you’ve got your audio and your images loaded, arrange the images in the order you want. Now you can start to use the power of the program to make something more than just a photo gallery with sound. Soundslides Plus, for example, allows you to:
- Choose different “skins” (outer borders and overall design look) for your slide show.
- Make the transition between slides a quick cut, a cross-fade, a fade out/fade in, and more.
- Adjust the time each slide remains on the screen. One slide could be on the screen for eight seconds (that’s a really long time for a single visual) while another could appear for only, say, four seconds.
- Add effects to an image or to the slide show such as “The Ken Burns effect,” named for the producer of serialized documentaries on the American Civil War, baseball, and jazz. For the Civil War documentary, Burns (obviously) only had still images from the period. So he would have the camera slowly pan and zoom on the still image to create motion. You can do the same in your slide show.
- Offer the reader captions for each image.
- Export the completed slide show in a format that will easily embed in your blog. This is a bit complex with Soundslides. If you are not sophisticated with HTML code, you’ll need to create a video version of your slide show, which you can do by going to the Soundslides video conversion website (http://tools.soundslides.com/converter/). Once you create the video, just upload it to YouTube, copy the YouTube web address of your video, and paste the web address into your blog. The video of your slide show (with the audio) will be embedded. All the reader needs to do is click “Play.”
There are plenty more audio slide show tools out there, such as ProShow Gold. When you look for audio slide show software, aside from price (which is always a factor), look for three things: ease of use, editing and formatting tools, and range of formats. That last one is important—you want to be able to add an audio slide show to your blog with as little hassle (and coding) as possible.
Some of This, Some of That: Tumblelogs
When we think of blogs, we tend to think of a text-heavy website.
But as early as the mid-2000s, some bloggers were experimenting with what were known as “tumblelogs.” Instead of being text-heavy, these featured posts that relied more on images and videos. When a Web developer named David Karp couldn’t find software to create one, he teamed up with another developer, Marco Arment, and the two created their own tumblelog platform. They called it Tumblr.
That caught the eye of Jason Oberholzer and Cody Westphal. In 2008, they started personal Tumblrs to keep in touch with their college buddies.
“We were drawn to the platform as a place to do what we and our friends would naturally do if we were all still in the same dorm together—share media,” Oberholzer says. “Check out this picture! This video! This cool quote!”
A year later, they were swapping charts they’d found on the Internet demonstrating how bad the economy was.
“This took on a certain gallows humor, and we decided we should spin off a blog,” Oberholzer recalls. “We quickly moved off that as the content idea, and into our general love for charts and how many of them we were able to find online. There are so many.”
Their new Tumblr, called i love charts, soon caught the eye of Tumblr’s head of content, who gave it a promotional shout-out on “Tumblr Tuesday.”
“We woke up the next day with 1,000 followers and have been improvising ever since, trying to figure out the most fun we can have with the people who show up and care,” says Oberholzer.
They blog funny hand-drawn charts, including a bar chart titled “Tops to wear to appear slimmer” and ratings of the tops on a scale of “uncool” to “very cool.” Right beneath it is a chart from 1894 showing the working parts of a Remington typewriter. There are serious charts, too, such as one that displays the percentage of people in the United States who did not have health insurance from 2009 to 2014.
At first, the two men combed the Internet for interesting charts. As the blog’s visibility grew, Obberholzer says, “people started creating more of their own charts and sending them in. When we got noticed by the world outside Tumblr, … organizations, blogs, newsrooms, etc. began sending their charts to us in hopes we would share them. Now, it’s a mix of all these approaches.”
The reach of Tumblr is broad and deep. When Yahoo! bought Tumblr in September 2013 for $1.1 billion, Yahoo! CEO Marissa Mayer revealed that Tumblr hosted 105 million different blogs, had 900 new posts each second, and drew more than 300 million unique monthly visitors. An average of 120,000 people were signing up for Tumblr every day.
Like Twitter, Tumblr is considered a “microblogging” platform for short-form posts of mixed media. It couldn’t be easier to use.
When you log in, there is a dashboard atop the main page with icons for the seven things you can post on Tumblr. These are: text, a photo or other image, a quote with the source underneath, a link, a bit of conversation from a chat, an audio MP3 file, or a video (which can be either uploaded or imported from another website).
In the upper right of the Tumblr page is a search box. Check it out. A search for the 1970s rock band Little Feat turns up audio and video files of the band, and it also leads to Tumblr “tags.” These are the same as Twitter hashtags except a space can be placed between words. The search for Little Feat turns up the tags #Little Feat, #Lowell George (the band’s leader), #Classic Rock, #70s, and so on. Click on any one of the tags and you’ll be taken to Tumblr posts with that tag.
The beauty of Tumblr is that as easy as it is to use, it is built for mixed-media posts.
Many of the most fun, interesting, and popular Tumblr blogs are primarily images.
Magazines and major news organizations maintain Tumblr blogs. Al Jazeera America has one of the best news Tumblrs, with an emphasis on photos and people. National Geographic digs into its archive of 125 years of extraordinary photographs for its Tumblr called Found, which features wonderful images from around the world and across more than a century.
Brandon Stanton, a University of Georgia graduate now in his early thirties, lost his job trading bonds on the Chicago Board of Trade when the economy went sour in 2010. He decided, he writes, “to move to New York City and take portraits of strangers on the street.” After some trial and error, he started the Tumblr blog Humans of New York, in which he photographs New Yorkers on the street and collects quotes from them. Occasionally, he writes a story. He has taken more than 5,000 portrait photos, written more than 50 stories, and, as he says, “met some amazing people along the way.”
A publishing house spotted Stanton’s Tumblr and signed him up to create a book from Humans of New York. It was released in late 2013 and almost instantly became a No. 1 New York Times bestseller.
“When creating a data visualization, the first question I ask myself is: ‘Why am I visualizing this?’”
Alvin Chang is a journalist, a coder, and an artist. He combines those skills to make a pile of numbers clear and interesting to readers.

Alvin Chang
Today, the power of computers and the variety of tools available on the Web have made visualizing data—turning complex data sets into easy-to-understand infographics—a powerful journalistic tool.
Chang is data editor at the Connecticut Mirror, a nonprofit news outlet founded in 2009 and staffed by veteran journalists. He holds a master’s degree from New York University’s Interactive Telecommunications Program and has also written for a variety of newspapers.
For Chang, data visualization means telling a story.
“For those starting out, it’s important to understand that these storytelling tools are just that: tools,” he says. “It’s easy to become
enamored with flashy visualizations. But the goal for storytellers isn’t to use the tool. Rather, it’s to tell the story in the best possible way.”
Asking the right questions, he said, helps keep the focus on story.
“When creating a data visualization, the first question I ask myself is: ‘Why am I visualizing this?’ Sometimes, a single sentence works better than a visualization. But other times, a visualization helps a user understand a concept in a more nuanced or dramatic way. Once I can articulate ‘why a visualization?’ then it’s all about conceptualizing different ways I can tell that story.”
Using a database that listed the locations of all the Starbucks and Dunkin’ Donuts stores in the United States, Chang made a map of the U.S. showing every Starbucks location as a green dot and every Dunkin’ Donuts location as an orange dot. The reader can look at the entire United States or zoom in on a particular region or city. (If you’re curious, the Northeast and Florida are very orange; the West Coast is very green.)
Chang offers these guidelines—he calls them “workflow”—for data visualization in the service of storytelling:
- Articulate the story you want to tell.
- Plan the story with a tool that encourages you to think more than to create. Something, for example, as simple as paper and pencil works well.
- Take out everything in the plan that doesn’t contribute to the story.
- Gather the tools needed to create this story.
Learn just enough of the tool to create the story (mastery takes time). Among the open-source software Chang uses:
- Leaflet: for online mapping (http://leafletjs.com)
- Highcharts: for charts (www.highcharts.com)
- Data-Driven Documents: when he wants something beyond a bar/line/pie chart (http://d3js.org)
- Open Refine: when he needs to “clean,” or fix, incorrect or incomplete data (http://openrefine.org)
Chang said he also uses the commercial product Microsoft Excel for quick “data parsing,” or taking a block of data and sorting it in a useable form such as rows and columns. Keep in mind, however, that tools can change with lightning speed. Don’t discard those that have weathered the assault of newcomers. Do look around for those that might improve on them.
I Am a Radio Station: Podcasts
Human beings have no older tradition than the oral narrative. Never underestimate the power of the human voice to draw others into a story.
That’s the power of today’s podcasts, nothing more than radio shows that you can listen to whenever the spirit moves you. If you’re willing to spend about $200 and put in the time, you can be your own radio station, producing programs and making them instantly available to anyone with an Internet connection.
Producing a podcast requires more technical sophistication—and more equipment—than writing a blog post and inserting an image. If you want to get deeper into the technical side, there are hundreds of articles and dozens of books that will take you there.
But to start, you’ll need three important pieces of equipment: a portable recording device, a microphone, and audio editing equipment. Don’t drop a bundle on the highest-end equipment; the editing system Audacity, for example, is a free program that will meet your editing needs (http://audacity.sourceforge.net). But some expense is inevitable. Gathering sound on your cellphone won’t cut it without a microphone. Do your homework.
Getting Started
What kind of podcast do you want to build? What is it you have to say? Just as with text blogging, keep your topic narrow but rich enough to sustain the show. So, if you want to do a podcast on beer, you could feature only local beers and focus on a different local microbrewery each week.
Decide whether you want to do the podcast alone, or have a co-host. We’ve listed some podcasts below with one host and co-hosts. Listen to them. There is something about co-hosts that keeps the listener engaged. The pace seems quicker, differences of opinion or approach create a spark, and listeners enjoy the variety of more than one voice.
Building Your Podcast
- Keep it short. You’d be surprised how much effort it takes to produce just five minutes. That’s one good reason why a solo podcast should be under 15 minutes. The audience’s attention is the other. Divide even this length into segments, changing your subject or approach for each. Three five-minute segments offer enough depth and variety. The University of Texas at Austin, for example, has created a series of (so far) more than 60 podcasts called “15-Minute History.” These often are among the five most listened-to podcasts on iTunesU. Frequency matters. Most successful podcasts upload a new episode once a week. But too much ambition can turn podcasting into a full-time job.
- Use natural sound. Sound evokes imagination. The more varied the sounds you can include, the more the listeners’ imaginations will be roused. In the field, look to record “natural sound,” the background sound that’s all around us. It can be the clinking of silverware and clatter of plates in a restaurant, the chirping of birds and the rustling of leaves in the forest, the starter’s gun and the slapping of running shoes during a marathon. The nature of “nat sound” depends on the topic.
- Write a script. No matter how articulate you think you are, you’re not articulate enough to sit in front of a microphone, press “Record,” and create a seamless 15-minute podcast. Not a chance. So write a script, and practice reading it before you record. And time yourself to get a sense of how much you devote to narration, natural sound, music, and interviews. If you want your podcast to sound more like a conversation between two or more people, you needn’t script everything. But still jot down extensive notes— complete with key phrases or sentences. When you’re ready to record, do so in a quiet place away from traffic or people.
- Make your podcast sound professional. Listen to and model successful podcasts. They’ll likely start with theme music. As the music fades, the host or hosts will introduce themselves. Do the same. Then state the name of the podcast and preview that you’ll be featuring. Eliminate the “ums” and “ahs” and “y’knows” from your speech (this takes practice). Pace your delivery—not too fast, not too slow. Speaking a little bit faster than normal gives your delivery extra energy. And modulate your voice. Don’t read in a monotone. Oh, and one more thing: no dead air. On live radio, three seconds of silence seems an eternity.
- Find a hosting site. Once your podcast is done, export it as an MP3 file. Now you need to find a place to store it so listeners can access it. The major podcasts—the ones with financial backing and advertising—often rent space on Web servers. There are two simple and free alternatives, though neither offers all you want.
The website Soundcloud (https://soundcloud.com) will host mp3 files for free.
Then you can add the Soundcloud URL to your blog, where visitors can listen to it. But they cannot download your podcast to play on their own devices.
It is possible to upload your podcast to the Apple iTunes Store, from which anyone can download your work easily. But that demands storing the podcast on a Web server with a URL address. You also have to create an RSS feed for the file to be hosted at the iTunes Store.
Want to build a library of podcasts? You’ll need to find server space. As a start, ask around at your college or workplace. Many provide the space for free.
Here are a half-dozen podcasts we consider good models. Check them out:
- News: Today’s Takeaways (WNYC and Public Radio International)
- Politics: Slate Political Gabfest (www.slate.com)
- Arts and Entertainment: WTF with Marc Maron (Independent)
- Music and Movies: Who Charted? (Independent)
- A bit of everything: TED Talks (TED Conferences LLC)
TV Reality: Video Blogs
We’re going to keep this section brief. There are lots of books about video production. Our aim is to give you some tips on getting started with your “vlog,” or video blog. Or you can link to someone else’s video to accompany your writing.
Whatever your topic—music, food, fashion, cars, pets, politics, fitness—there are hundreds (maybe thousands) of videos on YouTube or Vimeo. If you’re reviewing a band’s new release, why not include a video of the song in your post so listeners can hear it and see the band?
This is called “embedding” a video. YouTube and Vimeo make it easy. In fact, with WordPress, all you need is to copy the URL and paste it into your blog. The video will automatically embed. With other blogging software, just go to the video you want to add on YouTube or Vimeo, click on the “Share” icon, copy the HTML embedding code, and paste it. Be sure you are in HTML mode when you paste.
If you fancy yourself a budding TV personality (and who doesn’t?), start a video blog with your own material. It’s the visual equivalent of a podcast.
The same guidelines for a good podcast apply here (flip a few pages back and you’ll find them). Once again, figure out a niche topic, keep your posts short, post regularly, gather material, write a script, and work on your voice and presentation.
Here are a few tips specific to creating vlogs.
If you don’t have a video camera, use your phone. The quality of video recording on smartphones continues to improve. But there are two major problems with shooting smart phone video: The camera is not stable and secured, and the built-in microphone is terrible. When you’re shooting for your blog, attach a microphone. And get a tabletop or full-size tripod on which to mount your phone. Always do an audio levels check through headphones before you start shooting.
Frame and light your shots. In the field, be aware of light levels and of shadows. If you are in your “studio”—which should be a quiet place with uncluttered, neutral-colored background—make sure your shots are well lit. In both your shots from the field and in the studio, stay tight on your subject, whether it be a fountain in a plaza or you talking to the camera. When shooting in the field, always be aware of the shot’s background (is it distracting?) and any unwanted audio (a jet flying overhead).
Edit with care and precision. Editing always takes longer than anticipated. But it’s also what will make your video look and sound professional. The industry editing standard is Final Cut Pro. After a few tutorials, you’ll be surprised how easy and intuitive it is to use. But even a package as basic and inexpensive as Apple’s iMovie is powerful. You won’t need 95 percent of what the software can do, but you will need to learn to edit, trim, and paste clips; to add text to your video; and to use basic transition effects, such as fades and dissolves.
Most essential: Make the first 15 seconds of your video as engaging and interesting as you can, because that’s about all the time you’ll have to hook your viewers. It’s not much different from writing a lede. On the Web, “time to boredom” is measured in seconds.
It helps to have a good name for your video blog. And you’ll need to host it at YouTube, Vimeo, or elsewhere. Once you’ve created what the video hosting services call a “channel,” you’re ready to post.
- Twenty-five years from now, as you and your family look back, would you rather be looking at a scrapbook of printed photographs or a photo gallery of digital images? Why?
- What is the most evocative photo you have in your phone’s photo gallery? What makes it good?
- Are still photos more emotionally powerful than video, or is it the other way around? To put it another way: Can an audio slide show pack more emotional punch than a video? Why or why not?
- Which classmates do you believe have the best voices for podcasting? Why?
Exercise
Create a podcast and several other blog posts that are primarily image-based. Make sure to write captions for your photos.