
3. IMPORTING PICTURES FROM AN SD CARD
![]()
ONE OF THE first screens you will run into when working in Lightroom is the Import screen. While it may seem like there is a lot of stuff to look at here, it’s really not all that complex. The important thing is to know how each field in the Import screen can help you later on as you’re searching for and editing images. Let me walk you through a few sections in the Import dialog that you don’t want to miss.
As soon as you insert a memory card into your computer, you’ll see Lightroom’s Import screen appear (if you don’t, you can always select File > Import from the menu). The screen is broken down into three columns (Figure 3.1). The Source column on the left side of the screen deals with where the images are coming from. You’ll see different sources listed in this column, including the card directory and other sections of your computer.
The middle column shows the contents of whatever source you selected in the left column. Frequently, I come back from a shoot and know that I don’t intend on keeping a good portion of the images from the beginning of the shoot. Instead of taking the extra time to import these images and wasting space on my computer, I can limit the pictures I import to only the ones I want.
In the bottom-right corner of the center column there is a slider that allows you to increase or decrease the size of the image thumbnails, so you can review the images quickly and make judgments as to what gets imported into Lightroom. I tend to make the thumbnails a little larger so it’s easier to see the differences among the pictures.
You can also look at individual pictures in the center column; just double-click on any thumbnail, and you will be taken to the Loupe View (keyboard shortcut E). You can go back to the Grid View by clicking on the Grid View icon in the bottom-left corner of the center column (keyboard shortcut G).
After you set your view, you can import the entire photo shoot or select individual pictures. To select individual pictures, start by clicking on the Uncheck All option, and then Shift-click to select a series of contiguous pictures, or Command-click (Mac) or Ctrl-click (PC) to select a set of noncontiguous images. Once the pictures are selected, you can click on the checkbox in the upper-left corner of any selected image to flag the entire set for import (Figure 3.2).
The right-hand column is the most important column because it’s where you select what information will be added to the pictures that you are about to import into Lightroom. Let’s walk through each of the sections in this column.
Import Location
First up is the location of the pictures. At the top-right corner of the Import screen you are asked to name a location where the pictures will go. By default, Lightroom attempts to place the pictures in your “My Pictures” (PC) or “Pictures” (Mac) folder.
It’s good to use a central location that you know has a lot of space for your collection of images to grow. Many photographers choose to keep their pictures in this directory, but after many shoots, they find the computer is running out of space. When this happens, they opt to keep a USB drive connected to their computer and load the pictures onto that.
Since you’re just starting out, I would leave this at its default (“My Pictures” or “Pictures”). Later on, when you have some Lightroom experience under your belt, I’ll share a workflow I use for my shoots that gives me a great amount of room to grow.

Figure 3.1 The Lightroom Import window with images of my buddy Lisa.

Figure 3.2 Shift-click to select a series of contiguous images, or use the Command (Mac) or Ctrl (PC) key to select noncontiguous images.
File Handling
When you are importing pictures into Lightroom, you will notice a drop-down menu called Build Previews at the top-right corner of the screen (Figure 3.3), which contains three options for creating thumbnails of your pictures. (There are actually four options, but one of them is generally not used.) These thumbnail options will help you speed up your workflow when you’re making edits or changes to your pictures, and will affect how much space you use on your computer. It’s a good idea to know what each thumbnail option means and how it will impact your work.
The Minimal Preview
When you select the Minimal preview, you allow Lightroom to use the embedded JPG in the raw file as the preview for the image. This preview is used in the grid mode when Lightroom has not yet rendered a preview that’s suitable for viewing. This is the fastest way to get all of your images into the Catalog.
Once the images are loaded into the Catalog, Lightroom will go ahead and generate Standard previews for these images. Using the Minimal preview is best when you want to quickly import your images into the catalog.
The Standard Preview
Importing images with the Standard preview will create larger thumbnails for your images in Lightroom. These larger previews are the ones Lightroom uses when you use the Develop module. If you’re going to do a lot of developing immediately, this is a better option for you to use, but it will take a little more time to import your images into the catalog.
The 1:1 Preview
When you want to zoom into an image to see it at 100 percent, Lightroom will automatically create a 1:1 preview of the image. This is the largest of the three thumbnails that will be created for your Lightroom library.
If you find that you are going to want to zoom into each picture in your photo shoot immediately, it’s often best to create a 1:1 preview during the import, even though it will take a little bit longer. Let’s take a look at a real-world scenario where the selection of this preview type will benefit you.
Imagine you’re shooting a portrait and you need to find out which of the images you have are focused correctly. If you select the Minimal preview during the catalog import, your import will take a lot less time. However, each time you zoom into a picture to check focus, you will notice a significant lag while Lightroom develops the 1:1 preview, and you’ll have to wait several seconds each time to see whether or not the picture is actually in focus. Going through this for each picture adds up to a lot of wait time.
In an instance like this, it’s probably better for you to select the 1:1 preview option and let Lightroom take a little bit longer during the import. You can walk away from the machine and let it finish doing the import, and when you come back, you’ll notice that moving from picture to picture will take a little bit less time, which will speed up your overall workflow.
If you are more concerned with adding the pictures to the catalog so that you can create collections in collection sets, it’s better to select the Minimal preview because it will get the images into the catalog a lot faster. (We’ll be talking about collections and collection sets in lessons 9 and 10. For now, we’ll leave this set to Minimal.)
Once the images are in the catalog, you can select Library > Previews > Build 1:1 Previews to make the previews on the fly in the grid mode (Figure 3.4). All of the previews you make for your images are loaded into the Lightroom previews file, which is stored next to the catalog file on your computer (Figure 3.5). The more images you add to the catalog, the larger that file will become.
Because 1:1 previews can take up a lot more space, Lightroom provides an option to regulate how long 1:1 previews are stored on your machine. Go to Lightroom > Catalog Settings, and under the File Handling tab, you will see a menu where you can select how frequently Lightroom will Automatically Discard 1:1 Previews (Figure 3.6). To keep file sizes small, I recommend you keep 1:1 previews for about a week.
Should you need to recover space from your previews, you can always select images inside the Library module and discard the 1:1 previews.

Figure 3.3 The thumbnail preview options in the Lightroom Import window.
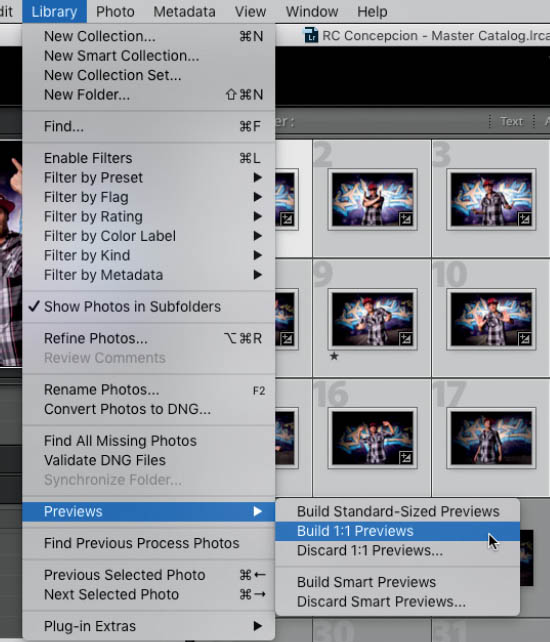
Figure 3.4 Generating previews in the Lightroom catalog.

Figure 3.5 The Lightroom previews file is located next to the catalog file on your computer.

Figure 3.6 Choose how frequently you want to discard your 1:1 previews based on your specific workflow.
File Renaming
Lightroom gives you the option to rename files during the import process, and I suggest you take this opportunity. I’ve seen shoots come into a Lightroom catalog with a similar name as a previous shoot, which can cause a lot of confusion. This usually occurs when you leave the image filenames at whatever defaults the camera has selected. If you’re someone who uses only one camera on a shoot, you may not run into this problem.
Check the Rename Files box (Figure 3.7), and then click on the Template drop-down menu, and you’ll see a series of file-naming templates that you can use (Figure 3.8). The good part about these is that they tend to include very specific information about the shoot, such as the date and sequence in which the images were shot. My favorite out of this list is Custom Name – Sequence. This lets me enter some custom text that makes sense to me in the empty field, and then it adds a number (-1 , -2, -3, etc.) to the end of each filename (Figure 3.9).

Figure 3.7 The options in the File Renaming panel allow you to rename your image files during the import process.
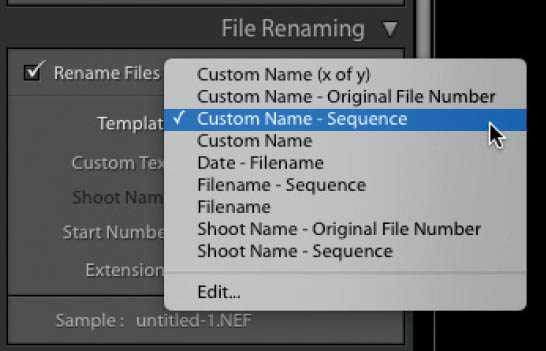
Figure 3.8

Figure 3.9
My Custom Naming Standard
I have a standard naming convention I like to use for my filenames that may seem a little anal, but it can totally help me later on:
date_description_d1_c1
From a formatting standpoint, everything is in lowercase and I always use an underscore for any spaces. The first part includes the date of the shoot. From there, I always add some descriptive text about the shoot (again, if it spans a couple of words, I’ll use the underscore). After the description, I use d1 and c1, which means day 1 and card 1. I may shoot multiple days on location, and there are plenty of times when I use multiple cards on a shoot, so this lets me tag which card I used right in the filename.
For example, imagine you were photographing in Italy for three days in February of 2017 and had three cards with you. Your file-naming convention could look like this:
feb2017_italy_d1_c1 (day 1 card 1)
feb2017_italy_d1_c2 (day 1 card 2)
feb2017_italy_d1_c3 (day 1 card 3)
feb2017_italy_d2_c1 (day 2 card 1)
Some will argue, “Isn’t this information that could be read from inside the EXIF data of the file?” Yes, it could be. However, I am planning on the off chance that there is no program out there available to read any of this information. Should something like this happen (and I know chances are slim), the couple of seconds I took to make this preparation would allow me to easily find a file with Windows Explorer or Finder on a Mac by typing in something that I remember about the trip. And it only took me a little bit of planning to make that possible.
Including information about which memory card each file came from can also save you when a card starts to fail. Memory cards are not invincible. Over time you may experience corruption of a single file on a card and wonder which card the file was saved on. Sometimes you get a pink bar on one of the images, or a bunch of blue noise. This is an early warning sign that the card the image was saved on is about to go bad. If the name of the card (e.g., c1, c2, and so forth) is included in the image filename, you can immediately determine which of your cards is beginning to go bad and pull it from the pile.
What do you do with it? Give it to a friend. Kidding!!
Metadata, Keywords, and Destination Folder
Once you’ve set up your file renaming conventions, you’ll need to specify where you want your images to be stored, as well as what kinds of information you want to add to them. I always recommend that all of the images from a shoot be stored in a single folder that has a name format similar to the one you used for the individual filenames (just get rid of the _d1_c1 portion of it). In the Destination panel, the Organize dropdown menu will let you specify that all files should be placed into one folder—just select the “Into one folder” option (Figure 3.10).
In the Apply During Import section, you can input keywords to attach to the images, as well as add metadata information to your files. Let’s talk about keywords first.

Figure 3.10 Organizing your images in one folder will cut down on the folder clutter that multiple subfolders can create.
When you’re adding keywords at this point, I would suggest using the most generic keywords you can to describe the shoot. Going back to the Italy example, if you’re importing images from when you were hanging out in Venice and the card has 30 pictures of you eating gelato on it, just use keywords like “Venice,” “Italy,” and “Vacation,” and skip adding “Gelato.” By using the keywords section to give broad brushstrokes to the files, you can do a portion of the heavy lifting during the import stage.
You can always go back and add “Gelato” to the individual pictures later.
Now it’s time to work on the metadata. Each file contains information related to the picture—from the camera model, to the lens, to the shutter speed used to take the picture—all of which is read from inside the camera. You can, however, add information to the file that can be read by external sites and programs, should you wish to publish it. This information is known as metadata, and can be added to images en masse using a Metadata preset.
Click on the Metadata drop-down menu and select New from the list (Figure 3.11). You’ll be presented with a dialog box where you can input information as it pertains to you. Not every field will be something you need to address. I suggest concentrating on the information in the IPTC Copyright and IPTC Creator fields.
In the IPTC Creator fields, you can add your contact details, but I advise you never include your phone number. When your picture is uploaded to a website like 500px or Flickr, the information you added will be readily available to viewers who want to contact you about the picture you took. Who knows, you may be able to sell a shot. Does this happen all of the time? Maybe not often enough to cover your rent payment, but what if it happened enough to let you feed your photography habit? I do know that it won’t happen at all if you don’t let yourself be found. So go ahead and add it!
Now that all of the information has been filled out, click on Import, and all of the images you’ve selected will be placed in the location you specified with the details you want. Not bad!

Figure 3.11 Make sure people can find you—just don’t put your phone number in here!