Data transformation generally entails certain actions that are meant to "clean" your data—actions such as establishing a table structure, removing duplicates, cleaning text, removing blanks, and standardizing data fields.
You will often receive data that is unpolished or "raw." That is to say, the data may have duplicates, blank fields, inconsistent text, and so on. Before you can perform any kind of meaningful analysis on data in this state, it's important to go through a process of data transformation, or data cleanup.
While many people store their data in Access, few use it for data transformation purposes, often preferring to export the data to Excel, perform any necessary cleanup there, and then import the data back to Access. The obvious motive for this behavior is familiarity with the flexible Excel environment. However, exporting and importing data simply to perform such easy tasks can be quite inefficient, especially if you are working with large datasets.
This chapter introduces you to some of the tools and techniques in Access that make it easy to clean and massage your data without turning to Excel.
Duplicate records are absolute analysis killers. The effect duplicate records have on your analysis can be far-reaching, corrupting almost every metric, summary, and analytical assessment you produce. For this reason, finding and removing duplicate records should be your first priority when you receive a new dataset.
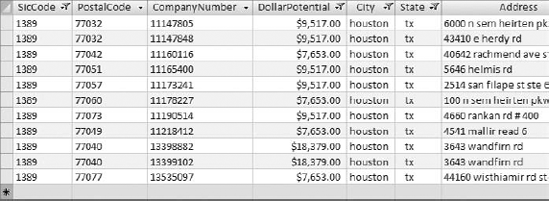
Before you jump into your dataset to find and remove duplicate records, it's important to consider how you define a duplicate record. To demonstrate this point, look at the table shown in Figure 4-1, where you see 11 records. Out of the 11 records, how many are duplicates?
If you were to define a duplicate record in Figure 4-1 as a duplication of just the SicCode, you would find 10 duplicate records. That is, out of the 11 records shown, one record has a unique SicCode while the other 10 are duplications. Now, if you were to expand your definition of a duplicate record to a duplication of both SicCode and PostalCode, you would find only two duplicates: the duplication of PostalCodes 77032 and 77040. Finally, if you were to define a duplicate record as a duplication of the unique value of SicCode, PostalCode, and CompanyNumber, you would find no duplicates.
This example shows that having two records with the same value in a column does not necessarily mean you have a duplicate record. It's up to you to determine which field or combination of fields best defines a unique record in your dataset.
Once you have a clear idea what field, or fields, best make up a unique record in your table, you can easily test your table for duplicate records by attempting to set them as a primary or combination key. To demonstrate this test, open the LeadList table in Design view; then tag the CompanyNumber field as a primary key. If you try to save this change, you get the error message shown in Figure 4-2. This message means there is some duplication of records in your dataset that needs to be dealt with.
If you have determined that your dataset does indeed contain duplicates, it's generally a good idea to find and review the duplicate records before removing them. Giving your records a thorough review ensures that you don't mistake a record as a duplicate and remove it from your analysis. You may find that you are mistakenly identifying valid records as duplications, in which case you need to include another field in your definition of what makes up a unique record.
The easiest way to find the duplicate records in your dataset is to run the Find Duplicates Query Wizard. Follow these steps:
To start this wizard, go up to the application Ribbon and select the Create tab.
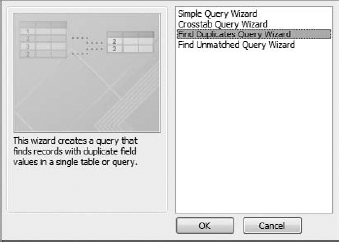
Click the Query Wizard button. This activates the New Query dialog box shown in Figure 4-3.
Select Find Duplicates Query Wizard and then click the OK button.
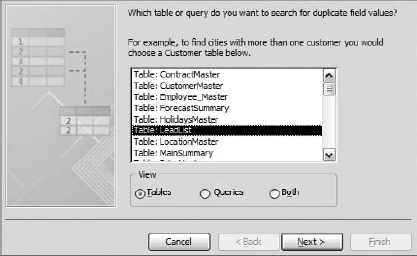
Select the particular dataset you will use in your Find Duplicate query. Notice you can use queries as well as tables. Select the LeadList table, as shown in Figure 4-4.
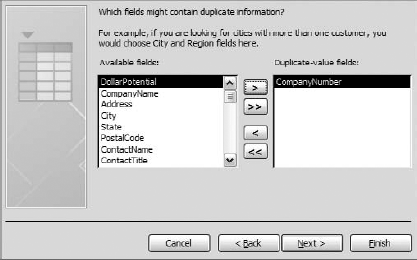
Identify which field, or combination of fields, best defines a unique record in your dataset. In the example shown in Figure 4-5, the CompanyNumber field alone defines a unique record. Click Next.
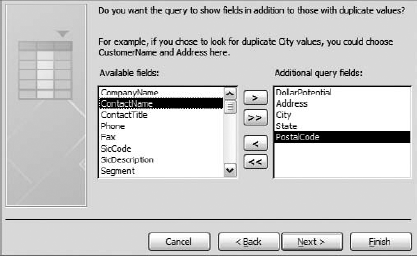
Shown in Figure 4-6, identify any additional fields you would like to see in your query. Click the Next button.
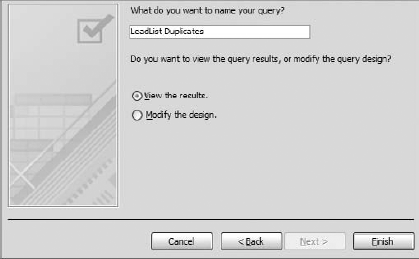
Finish off the wizard by naming your query and clicking the Finish button as shown in Figure 4-7.
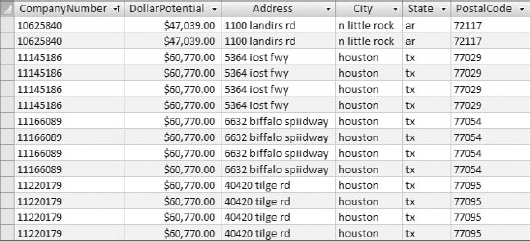
Once you click Finish, your new Find Duplicates query immediately opens for your review. Figure 4-8 shows the resulting query. Now that Access has found the records that are repeating, you can remove duplicates simply by deleting the duplicate records.
Note
The records shown in your Find Duplicates query are not only the duplications. They include one unique record plus the duplication. For example, in Figure 4-8, you will notice that there are four records tagged with the CompanyNumber 11145186. Three of the four are duplicates that can be removed, while one should remain as a unique record.
If you are working with a small dataset, removing the duplicates can be as easy as manually deleting records from your Find Duplicates query. However, if you are working with a large dataset, your Find Duplicates query may result in more records than you care to manually delete. Believe it when someone tells you that manually deleting records from a 5,000 row–Find Duplicates query is an eyeball-burning experience. Fortunately, there is an alternative to burning out your eyeballs.
The idea is to remove duplicates en masse by taking advantage of Access' built-in protections against duplicate primary keys. To demonstrate this technique, follow these steps:
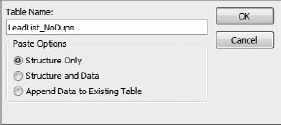
Right-click again and select Paste. At this point, the Paste Table As dialog box, shown in Figure 4-9, activates.
Name your new table "LeadList_NoDups" and select Structure Only from the Paste Options section. This creates a new empty table that has the same structure as your original.
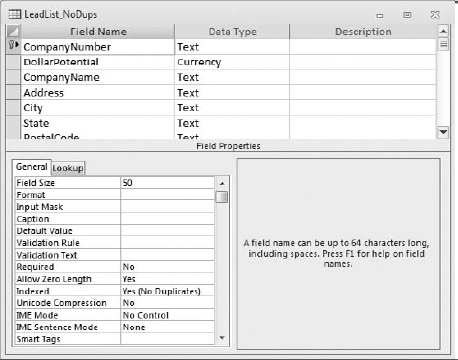
Open your new "LeadList_NoDups" table in Design view and set the appropriate field or combination of fields as primary keys. Again, it's up to you to determine which field or combination of fields best defines a unique record in your dataset. As you can see in Figure 4-10, the CompanyNumber field alone defines a unique record; therefore, only the CompanyNumber field is set as a primary key.
Pause here a moment and review what you have so far. At this point, you should have a table called LeadList and a table called LeadList_NoDups. The LeadList_NoDups table is empty and has the CompanyNumber field set as a primary key.
Create an Append query that appends all records from the LeadList table to the LeadList_NoDups table. When you run the Append query, you get a message similar to the one shown in Figure 4-11.
Because the CustomerNumber field in the LeadList_NoDups table is set as the primary key, Access does not allow duplicate customer numbers to be appended. In just a few clicks, you have effectively created a table free from duplicates. You can now use this duplicate-free table as the source for any subsequent analysis!
Besides duplicate records, you will find that many of the unpolished datasets that come to you requires other types of transformation actions. This section covers some of the more common transformation tasks you will have to perform.
Oftentimes, you have fields that contain empty values. These values are considered "Null"—a value of nothing. Nulls are not necessarily a bad thing. In fact, if used properly, they can be an important part of a well-designed relational database. Note, however, that an excessive number of Null values in your data can lead to an unruly database environment. Too many Nulls in a database makes querying and coding for your data more difficult because you must test for Nulls in almost every action you take.
Your job is to decide whether to leave the Nulls in your dataset or fill them in with an actual value. When deciding this, consider the following general guidelines:
Use Nulls Sparingly: Working with, and coding for, a database is a much less daunting task when you don't have to test for Null values constantly.
Use alternatives when possible: A good practice is to represent missing values with some logical missing value code whenever possible.
Never use Null values in number fields: Use Zeros instead of Nulls in a currency or a number field that feeds into calculations. Any mathematical operation performed using a field containing even one Null value results in a Null answer (the wrong answer).
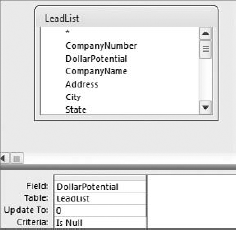
Filling in the Null fields in your dataset is as simple as running an Update query. In the example shown in Figure 4-13, you are updating the Null values in the DollarPotential field to zero.
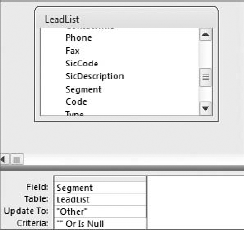
It's important to note that there are two kinds of blank values: Null and empty string (""). When filling in the blank values of a text field, include the empty string as a criterion in your Update query to ensure that you don't miss any fields. In the example shown in Figure 4-14, you are updating the blank values in the Segment field to "Other."
It's always amazing to see anyone export data out of Access and into Excel, only to concatenate (join two or more character strings end to end) and then re-import the data back into Access. You can easily concatenate any number of ways in Access with a simple Update query.
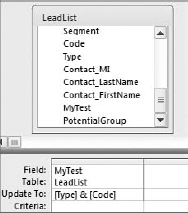
Look at the Update query shown in Figure 4-15. In this query, you are updating the MyTest field with the concatenated row values of the Type field and the Code field.
Tip
It's a good idea to create a test field to test the effects of your data transformation actions before applying changes to the real data.
Take a moment to analyze the following query breakdown:
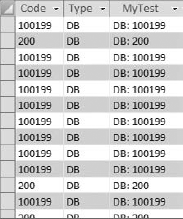
Figure 4-16 shows the results of this query.
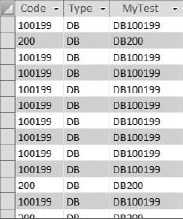
Figure 4.16. The MyTest field now contains the concatenated values of the Type field and the Code field.
Warning
When running Update queries that perform concatenations, make sure the field you are updating is large enough to accept the concatenated string. For example, if the length of your concatenated string is 100 characters long, and the Field Size of the field you are updating is 50 characters, your concatenated string will be cut short without warning.
You can augment the values in your fields by adding your own text. For example, you may want to concatenate the row values of the Type field and the Code field, but separate them with a colon. The query in Figure 4-17 does just that.
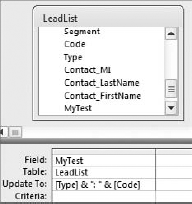
Figure 4.17. This query concatenates the row values of the Type field and the Code field and separates them with a colon.
Take a moment to analyze the following query breakdown:
Figure 4-18 shows the results of this query.
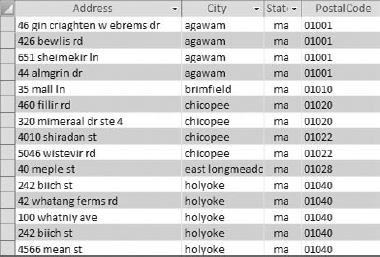
Making sure the text in your database has the correct capitalization may sound trivial, but it's important. Imagine you receive a customer table that has an address field where all the addresses are lowercase. How is that going to look on labels, form letters, or invoices? Fortunately, for those who are working with tables containing thousands of records, Access has a few built-in functions that make changing the case of your text a snap.
The LeadList table shown in Figure 4-19 contains an Address field that is in all lowercase letters.
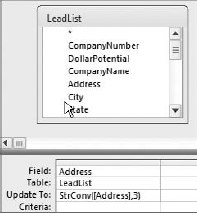
To fix the values in the Address field, you can use the StrConv function, which converts a string to a specified case.
The Update query shown in Figure 4-20 will convert the values of the Address field to the proper case.
Note
You can also use the Ucase and Lcase functions to convert your text to uppercase and lowercase text. These functions are highlighted in Appendix D of this book.
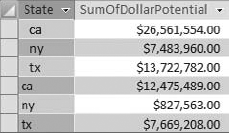
When you receive a dataset from a mainframe system, a data warehouse, or even a text file, it is not uncommon to have field values that contain leading and trailing spaces. These spaces can cause some abnormal results, especially when you are appending values with leading and trailing spaces to other values that are clean. To demonstrate this, look at the dataset in Figure 4-23.
This is intended to be an Aggregate query that displays the sum of the dollar potential for California, New York, and Texas. However, the leading spaces are causing Access to group each state into two sets, preventing you from discerning the accurate totals.
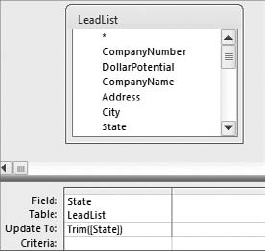
You can easily remove leading and trailing spaces by using the Trim function. Figure 4-24 demonstrates how you update a field to remove the leading and trailing spaces by using an Update query.
Note
Using the Ltrim function removes only the leading spaces, while the Rtrim function removes only the trailing spaces. These functions are highlighted in Appendix D of this book.
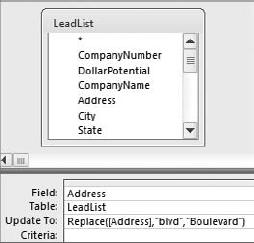
Imagine that you work in a company called BLVD, Inc. One day, the president of your company informs you that the abbreviation "blvd" on all addresses is now deemed an infringement on your company's trademarked name, and must be changed to "Boulevard" as soon as possible. How would you go about meeting this new requirement? Your first thought may be to use the built-in Find and Replace functionality that exists in all Office applications. However, when your data consists of hundreds of thousands of rows, the Find and Replace function will only be able to process a few thousand records at a time. This clearly would not be very efficient.
The Replace function is ideal in a situation like this. As you can see in the following sidebar, the Replace function replaces a specified text string with a different string.
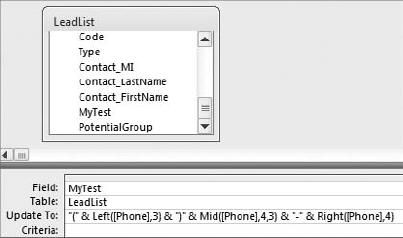
When transforming your data, you sometimes have to add your own text in key positions with a string. For example, in Figure 4-26, you will see two fields. The Phone field is the raw phone number received from a mainframe report, while the MyTest field is the same phone number transformed into a standard format. As you can see, the two parentheses and the dash were added in the appropriate positions within the string to achieve the correct format.
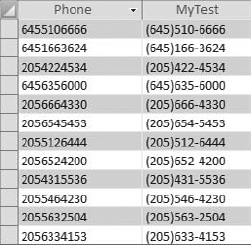
Figure 4.26. The phone number has been transformed into a standard format by adding the appropriate characters to key positions with the string.
The edits demonstrated in Figure 4-26 were accomplished by using the Right function, the Left function, and the Mid function in conjunction with each other. See the sidebar that follows for more information on these functions.
Figure 4-27 demonstrates how the MyTest field was updated to the correctly formatted phone number.
Have you ever gotten a dataset where two or more distinct pieces of data were jammed into one field and separated by commas? For example, a field called Address may have a string that represents "Address, City, State, Zip." In a proper database, this string is parsed into four fields.
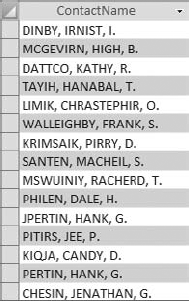
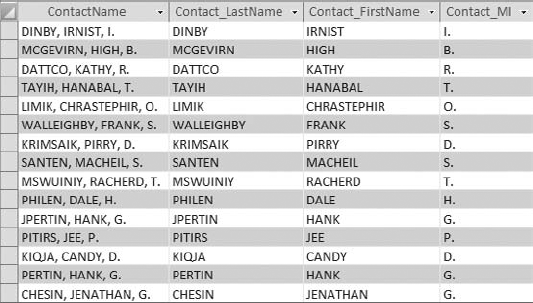
In Figure 4-31, you can see that the values in the ContactName field are strings that represent "Last name, First name, Middle initial." You need to parse this string into three separate fields.
Although this is not a straightforward undertaking, it can be done fairly easily with the help of the InStrInStr function, which is detailed in the following sidebar.
The easiest way to parse the contact name field, shown in Figure 4-23, is to use two Update queries.
Warning
This is a somewhat tricky process, so you will want to create and work in test fields. This ensures that you give yourself a way back from any mistakes you may make.
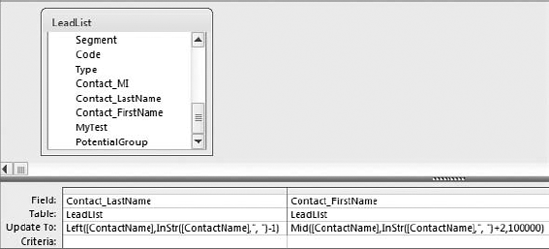
The first query, shown in Figure 4-32, parses out the last name in the ContactName field and updates the Contact_LastName field. It then updates the Contact_FirstName field with the remaining string.
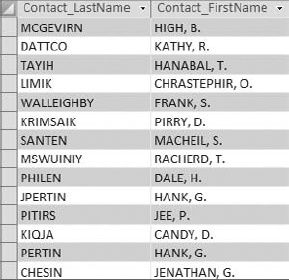
If you open the LeadList table, you can see the impact of your first Update query. Figure 4-33 shows your progress so far.
The second query, shown in Figure 4-34, updates the Contact_FirstName field and the Contact_MI.
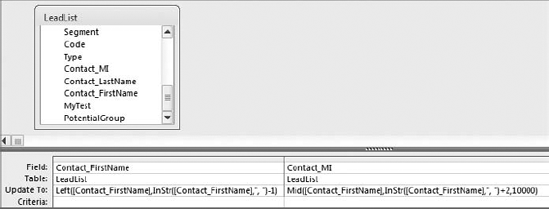
Figure 4.34. This query parses out the first name and the middle initial from the Contact_FirstName field.
After you run your second query, you can open your table and see the results, shown in Figure 4-35.
Data transformation is the process of cleaning up your data. Before you can perform any kind of meaningful analysis on data in this state, it's important to go through a process of data cleanup. Although Access has several built-in functions and tools that allow you to transform data, most users find themselves exporting data to Excel in order to perform these tasks.
As this chapter shows, there is no need to take the extra effort of moving records to Excel to transform data. Access can easily perform various types of data cleanup to include removing duplicates, concatenating strings of text, filling in blank fields, parsing characters, replacing text, changing case, and augmenting data with your own text.

