
Helper Layers

If you have ever found yourself squinting at your work, or staring for minutes on end trying to find “the thing” that may need your attention, I have a real treat for you. This chapter is brief, but I wish I had learned these techniques much earlier to avoid literal headaches and eye strain, as well as to simplify various kinds of image corrections and adjustments.
Helper layers are temporary layers that you put in place to change the look of your image while you’re working but do not include in the final piece. Helper layers have two key uses. The first is to enhance certain aspects of your work so they’re more visible, typically exaggerated to the point of absurdity. These usually take the form of extreme contrast or feature isolation, which removes distracting elements and lets you focus your attention. Just as important, the second use is to jar your perception of your work. When used to enhance or alter perception, helpers not only let you change the context of your work, they also reduce fatigue introduced by staring at details for too long. Sometimes these two uses overlap, as when inverting or desaturating an image.

The most typical (and effective) use of these helper layers is to place them in a group at the top of your working layer stack. Occasionally they can be paired with specific layers or groups for things like composites and some color work, but for the most part they should be left at the top for easy access and removal.
Depending on the type of correction or enhancement, you may find it necessary to frequently toggle these helper layers as a quick check rather than leaving them on while working. Keep your Layers panel open when using helpers and pay attention to your selected layers to avoid working on the wrong content. As an added precaution, consider locking the entire group—this lets you change visibility of the elements and the group without allowing parameter changes or painting on masks.
Finally, pay attention to the tools you’re using on your correction layers. Some of them, such as the Clone Stamp tool, have options for which layer content they use and target. If you leave the default setting of All Layers in force and work on a healing layer while a helper layer is visible, you will end up affecting everything currently visible on the canvas (including your helper layer) rather than only the content you actually want. Instead, ensure you’re using either Current Layer or Current Layer & Below if you work with a helper layer visible.
Invert
One of the first helpers that you can easily apply is the simple Invert adjustment layer. Using this adjustment layer lets you see your image slightly differently, and it may help you pick out a variety of otherwise hidden or obscured details. While this particular adjustment layer doesn’t appear to be that useful for artistic or technical senses, it illustrates the notion of having a quick change in what you’re seeing as a way to help refresh your eyes.
There are no controls, and the effect is basically a color negative of your image, inverting both color and luminosity at the same time. You will most likely use Invert along with other helper layers, especially as a quick toggle to look for glaring problems. Also consider pairing Invert with Canvas Flip and Rotation (commands on the Edit > Transform submenu) to check composition and graphic balance.

Luminosity
You can remove color temporarily by adding a solid black layer set to Color blending mode as a helper layer. Why would you want to? Recall that two colors may have similar luminosity values, so desaturating everything to gray values gives you a better sense of graphical composition and also helps you evaluate the relative brightness of various colors. This is especially helpful for working with vignettes and when dodging and burning for contour development and shaping. Use this technique zoomed out to retain a contextual view of your work.
If you prefer to stick with adjustment layers, you can substitute a Solid Color fill layer, also set to black, white, or any other desaturated gray. Because Color blending mode replaces the color from backdrop layers with the current blend layer, the result is the same no matter what gray value you use.

Combine the desaturation layer with inversion for a more flexible inversion adjustment, but instead of an Invert layer, use either a Curves or Levels layer below the filled gray layer. Using one of these adjustments gives you control over contrast as well. To use Curves, drag each end of the curve to its opposite vertical position: The left control point should be at the top, while the right control point should be at the bottom.

To get an inverted Levels adjustment, drag the Output sliders to their opposite ends. The Output sliders are below the Input sliders, which themselves are immediately below the histogram. Simply swap the black-point and white-point sliders.
I prefer using Levels to Curves here because I find it easier to create ultra-high-contrast regions by setting the Levels adjustment layer to Hard Mix. You will be able to see contrast areas by “sweeping” the Input midpoint slider back and forth. This is another visualization trick that helps with composition. By isolating different ranges, it’s easier to pick out unbalanced areas or features that may distract a viewer’s eye.

Solarize
A solarize curve is great for exaggerating extreme contrast to pick out transitions that may otherwise be invisible. Especially useful when working on smoothing out color and shading, this helper layer is best used as a quick toggle because the transitions can be misleading.
On a new Curves adjustment layer, set four additional control points and drag them to resemble this extreme configuration.

Once you have created your curve, you can save it as a preset by clicking the panel options menu in the upper right of the Properties panel, then choosing Save Curves Preset. In the image example, I used the Solarize curve to help me see where to smooth out tonal variations in the model’s skin.
Add a Luminosity helper above the Solarize layer (as described in the preceding section) to help see where to use dodge and burn techniques (see the “Dodge & Burn” chapter). You can check on your progress by toggling the Solarize helper layer on and off. Note that the transitions between color and value regions you see are not intuitive because of the shape of the curve. For example, if you attempt to dodge and burn when this curve is active, you may be doing the opposite of what you expect because you will be seeing the transition regions move around while you work. Instead, turn it on briefly to identify areas that need work, then turn it off and start on whatever correction layer you have chosen to use. While still working on the same correction layer, you can turn the Solarize curve back on to complete that region. It takes a little getting used to, but once you get the hang of working with the Solarize curve turned on, it becomes easy and quick to do very detailed corrections.
Color, Hue
Similar to removing color to see luminosity, you can also remove luminosity to see color separately from value (or brightness). The advantage here is to isolate tones to look for areas that may have subtle inconsistencies, such as frequently happens with makeup coverage. Add a 50% gray layer to your image and set its blending mode to Luminosity. The results themselves may be difficult to see, so add a Levels adjustment to increase contrast. Start by moving the black-point slider to 100 and the white-point slider to 155, leaving the midpoint slider alone. If the effect is too harsh, either lower the opacity of the Levels layer or adjust the black- and white-point sliders until everything balances well enough visually. Remember that the goal is to help you see things more clearly, not to achieve a particular look or special effect.

To isolate the hues in an image, add a blank layer set to Saturation blending mode, then fill with any fully saturated color. So long as it’s fully saturated, it will replace the saturation of the underlying image—open the Color Picker and set both the B (Brightness) and S (Saturation) values to 100. It’s common to choose a primary color, such as Red (RGB: 255, 0, 0), but it really doesn’t matter.
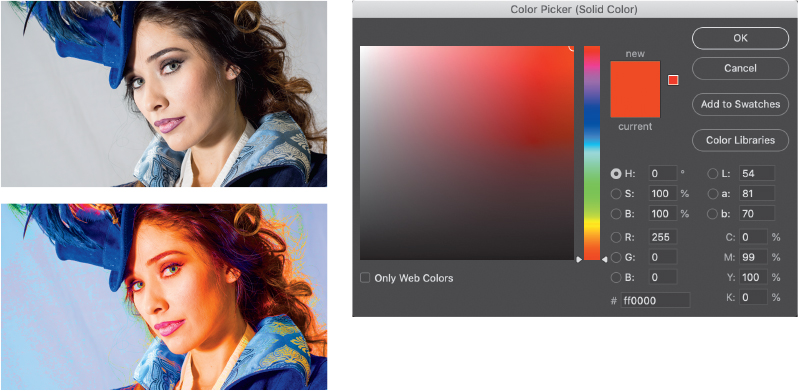
Notice that every hue is fully saturated, but luminosity is preserved. This helps you look for inconsistencies in tone across smooth areas, but you can also use the technique with a Color Balance adjustment layer if you place a color swatch in the layer stack for reference.

The swatch must be above the color correction layers, but below the visualization layers. You don’t want to adjust the reference along with your image! This helper is great for checking makeup, product colors, and matching composites.
Threshold
Admittedly, this is one of the helpers I use very rarely, and mostly to identify elements at the extreme edges of the histogram. A Threshold adjustment layer has a single control that lets you set a hard transition point at a given luminosity value. Everything below the threshold turns black, and everything above becomes white. Use this for visualizing extreme highlights or “hotspots” by dragging the slider to the right, and solid black areas of your image by dragging to the left.

I prefer to see the region of interest in white, so I typically leave the slider to the right and instead use an Invert helper layer above the Threshold layer when considering shadows and black regions.

There is a more flexible use, however, and that is to set the Threshold adjustment layer to Multiply or Screen (turn off the Invert layer). Using the Multiply blend mode lets the white areas of the Threshold result blend with the canvas contents, so you can see your image dynamically masked in this way—remember that the blended areas are Highlights when using Multiply. If you want to use the mask for controlling an adjustment or other layer, you have a couple of options.
Option 1: While Multiply is still blending the Threshold layer, use the Magic Wand tool with Tolerance set to 2 and Contiguous, then click in the black area. Then choose Select > Inverse or use the keyboard shortcut Shift+Command+I (macOS)/Shift+Ctrl+I (Windows) to invert the selection. Create either a new layer or an adjustment layer to have the selection automatically applied to a mask, and then use the Feather slider to smooth the pixelated edges.
Tip
If you do not plan to create a mask, you can also choose the Overlay blending mode to see highlights in white and shadows in black at the same time.
Option 2: Set the blending mode back to Normal, and save a new alpha channel, which you can then manipulate as you please and use later as a mask or selection template. This is my preferred method.

If you want to use Screen on the Threshold layer to show only shadows, you have to use a little wizardry. Add a filled layer filled with solid black above the Threshold and Invert adjustments (turn Invert off), and open the Layer Style dialog box. In the Blend If section, move the black slider for Underlying Layer to the right so it reads 250. Now the shadows show through. Fortunately, you can now switch between Multiply and Screen on the Threshold layer to show highlights or shadows quickly. Group these together along with the Invert layer for organization. Remember to use Invert only for the strict black-and-white display and choosing a selection area.

Saturation Mask
Saturation can be a really difficult characteristic to see in a photograph, especially where skin tones are concerned. A classic favorite for creating a saturation view is to use the Selective Color adjustment layer. For every color in the Colors menu, move the Black slider all the way left to −100. For each of the Whites, Neutrals, and Blacks options, move the slider all the way to the right at +100.

Selective color treats your RGB image as if it were a collection of pigments (subtractive color model). Because each printed color is made of a combination of cyan, magenta, yellow, and black pigments, the sliders control the mix or density of each virtual pigment. By removing black from each color, you are allowing “pure” pigment coloration for each of the tones, red through magenta. The gray values get maximum density of black to give those values maximum density.

The resulting view is grayscale, with white representing more saturation. Now add an Invert adjustment layer above the Selective Color layer, and set the blending mode of both adjustment layers to Luminosity. Group these two layers together so you can toggle them off and on easily. This inversion step lets you see the colors against white, which looks more natural.

Use this saturation view above other color correction adjustments, such as Hue/Saturation or Color Balance.
Bonus Tip
If you find these helper layers useful, gather them all together into a layer group called Helpers, set them to the appropriate starting values (such as with the Saturation Mask), and delete the masks. Ensure visibility is turned on for the group, but off for the individual helper layers. Open your Libraries panel and create a special Adjustments library, then drag the group over as a new item.
When you need your helpers, just right-click the library item and choose “Place Layers” to have the entire group plopped into your layer stack, ready to go. This is much easier than creating and managing presets for every adjustment.
