
CHAPTER 7
Planning Your Implementation and Configuring the LMS
The next three chapters cover how to implement your new LMS. This chapter applies mostly to corporate LMS and LCMS-LMS products. It explains how to assemble the right implementation team and plan your implementation. It goes into detail about the decisions you will need to make to configure your LMS so that it works best for your organization.
Your LMS evaluation and selection project is finally over. You have chosen an LMS that is well suited to your organization’s needs and, because you involved your key stakeholders in the evaluation process, all parties have bought in to the selected LMS. Depending on negotiations and the due diligence of your legal department, the contract may have taken awhile to iron out, but everyone has signed on the dotted line and you’re ready to begin a new project: LMS implementation.
LMS implementation usually involves a significant investment in cost and time, and represents a potential disruption to your organization. There are many moving parts, and as the old saying goes, “The devil is in the details.” For a successful LMS implementation, you need significant planning and attention to detail. Allocating the right resources to accomplish each step in the process is critical. The alternative is a high risk of unwanted surprises, extensive delays, and problems likely to result in unhappy sponsors and end users.
In many organizations, L&D will need to collaborate with IT on LMS implementation. If this applies to you, it will be very important to build a rapport with your colleagues in IT. These professionals often use terminology that describes system and technical operations with which you may be unfamiliar. Your knowledge and understanding of this jargon will help build credibility, trust, and a good working relationship with IT as you evaluate, select, and implement your LMS. You can look up these terms in appendix B, “Glossary of IT Technical Jargon.”
There are also some key terms that are frequently used by both L&D and IT, but with different definitions. As you work with IT on your LMS implementation, it will be important to distinguish the use of these terms to avoid misunderstanding. These dual-meaning terms can be found in appendix C, “Glossary of Terms With Different Meanings for L&D and IT.”
Many organizations remember their last LMS implementation as a nightmare, but most of the problems they encountered could have been avoided. With the appropriate resources and planning and a lot of attention to detail, your new LMS can serve you well for many years to come.
How to Implement an LMS
LMS implementation typically involves six major steps: preparation and planning, configuration, systems integration, content and data migration, user acceptance testing, and go live (Figure 7-1). There are a few other key activities, such as communications and change management, that are not specific to LMS implementation, but must be part of any large-scale project for the highest likelihood of success. There are lots of books about communications planning and change management, so I won’t cover them explicitly here.
This chapter covers the first two steps, planning and configuration. Chapter 8 covers steps three and four, integration and migration. And chapter 9 covers the final two steps, testing and go live.
Figure 7-1. The 6 Steps of LMS Implementation: Planning and Configuration

Step 1: Preparation and Planning
Careful preparation and planning is critical to the success of your LMS implementation. You must prepare by assembling an implementation team with the appropriate skill sets and freeing them from most of their other duties to allow sufficient time for them to work on the project.
Do not underestimate the amount of work involved in a large system implementation. I once worked with an organization that involved about a dozen people in the evaluation and selection process, and then left all the implementation details to a single person. This person was a dynamo. She relied heavily on the LMS vendor and external consultants, called for help from her colleagues at various stages, and worked many nights and weekends. But soon after the LMS went live, she was so exhausted and stressed that she resigned. It took the organization more than a year to recover from her loss and get the LMS initiative back on track. Spreading the workload across a team of people with the right combination of skills helps ensure the project’s success throughout implementation and after going live.
With your team in place, you must develop a project plan to organize all your implementation steps, activities, and milestones. All team members must be involved so that their viewpoints and areas of expertise are represented in your project plan. Any steps you miss in your initial planning will surely emerge later in the implementation process. The earlier you identify and build them into your plan, the less likely they are to result in unanticipated costs and delays to your go live date.
Assemble Your Team
To get started, you must assemble your implementation team. Ideally, many of the people who were involved in the evaluation and selection process will continue to participate as you implement the LMS.
You need to assemble a core project team that is directly responsible for LMS implementation tasks and decision making. You also need an extended team that is activated at various points in the project, like testing the system before it goes live, when more people are required to handle the workload. Through their involvement in important implementation tasks, the extended team members will become acclimated to the LMS, gaining valuable hands-on experience with the system before it is fully up and running. An added benefit will be their enthusiastic support for the new LMS as you roll the system out.
Once you have identified and engaged your core team members, you are ready to get started. The extended team members can be identified later, after the core team has convened and you have begun to develop the project plan.
Core Team
The size of the core team is likely to reflect the size of your organization. In smaller organizations, two or three people may each wear several hats. Larger organizations may have a larger core team of five, six, or more people. But regardless of how many people are assigned, the core team should include at least six main roles:
- The team leader is responsible for keeping the project on track and moving toward a successful outcome. A good team leader should be able to work effectively with all team members to remove obstacles, plan contingencies, interact with the LMS vendor, and escalate issues for resolution by upper management when necessary.
- The project manager is responsible for keeping track of all the tasks, subtasks, resource assignments, dependencies, and due dates. An LMS implementation project has many moving parts, and a skilled project manager is critical to success.
- An e-learning technology specialist is responsible for representing the organization’s e-learning tools, platforms, and instructional models. Migrating e-learning courseware from a legacy system to a new LMS can be complex. The e-learning technology specialist will have primary responsibility for managing the web-based course migration and interoperability testing along with any native LMS content, such as surveys and assessments.
- A learning management system administrator is responsible for representing the organization’s administration needs, including security roles and permissions, course structures, competencies, credit types, certification, recertification, compliance, audiences and domains, user profiles and demographics, assignments and notifications, the course catalog and metadata, and reports. If you are unsure what these learning management terms mean, you can find them explained for each of the three types of LMS products in chapters 2-4. The training administrator will play a key role in deciding how to configure the LMS to meet the organization’s needs.
- A system usability specialist is responsible for the look, feel, and ease of use of the system. This role is often filled by someone with a background in user interface design. The usability specialist is responsible for the logos, icons, branding, labels, style sheets, and color schemes that will be configured in the LMS, and may organize some usability tests to refine the system’s ease of use before it goes live.
- An IT architect is responsible for a range of system issues that may include security, single sign-on, data migration from the legacy LMS to the new LMS, and integration with other systems. If your organization is hosting the LMS on the premises—that is, in your own IT data center—then the IT architect may also be responsible for organizing the installation and maintenance of servers, network connectivity, and software.
In smaller organizations, the core team may comprise fewer people, and any two or three of these roles might be filled by a single person.
Extended Team
The extended team is activated at key points in the project. It comprises people who will work with the LMS frequently after implementation. Consider including e-learning authors, instructional designers, training and curriculum managers, administrators, and registrars. Be sure to involve stakeholders representing all content that will be delivered through the system, including HR learning and development, sales training, customer service center training, customer training, and other groups with training responsibilities. These extended team members will be involved in implementation activities like administrator training, content cleanup, systems integration testing, usability testing, and user acceptance testing. These activities will be described in chapters 8 and 9.
The extended team should also include IT production support, database administrators, systems integrators, network managers, and security officers. As extensions of the core team’s IT architect role, these resources will be involved in systems-related tasks such as login and authentication, data migration, and systems integrations.
Implementation Timeframe
Assuming adequate resources are assigned, implementation of an LMS that is installed in your own data center for hosting on-premise can take anywhere from six to 12 months. Vendor-hosted solutions, often referred to as “cloud” or “software as a service (SaaS)” solutions, can take anywhere from three to nine months. Much of the time involved depends on how clearly your organization’s requirements have been defined, how well suited your LMS is to those requirements, and the amount of variability and complexity that must be accommodated to support how your organization operates.
Failure to adequately define requirements can lead you to select a product that doesn’t match your needs. I have seen more than one LMS implementation slowed by the organization’s realization that the product does not do what they need it to do. Implementation time can double or more as you attempt to find creative workarounds, request custom enhancements, and change your existing processes to overcome system limitations. This leads to decreased support from key stakeholders, inflated implementation costs and schedules, and ultimately, a good deal of user dissatisfaction.
Project Plan
Planning is critical, not just at the outset of your project, but throughout. As the project proceeds, unanticipated needs and challenges will emerge, and your project plan will need to be continually expanded and refined. A strong project manager is a great asset to your LMS implementation.
The specifics of your plan will vary based on the needs of your organization. A good way to get started is to ask your LMS vendor to provide a project plan template. Any vendor-provided plan is likely to include all the tasks needed to implement the LMS from the vendor’s point of view. You can start with the vendor’s template and add the tasks that do not involve the vendor but are nevertheless important to your organization, like data cleanup, communications planning, change management planning, user acceptance testing, and end-user support.
Most project plans are likely to include higher-level categories of tasks such as LMS configuration, data transfer from the old LMS to the new one, systems integration development and testing, administrator training, report development, course catalog menu structure, and go-live planning. Each category will contain a collection of more specific tasks, some of which will need to happen sequentially and others in parallel. Depending on the specifics of your implementation, you may identify additional task categories to include in your plan.
Ask This
Ask your LMS vendor to provide a project plan template.
Step 2: Configuration
Most LMS products are designed to support a variety of ways in which organizations manage their learning programs. Because each organization is different, LMS products offer configurable parameters that you can set to reflect how your organization operates.
For example, one organization may want to use the LMS to train employees. The organization enters and updates its employees’ names, position titles, organizations, contact information, and other profile data in a human resource management system. This organization wants to set up the HRMS to provide those data to the LMS. However, they don’t want people changing their user profiles in the LMS, because that would put the two systems out of sync. As a result, they need to configure the LMS so that user profile data are updated automatically from the HRMS and cannot be changed by LMS users.
A different organization may want to use the LMS to train customers. It will need to configure the LMS to allow users to create and update their own accounts and user profile data.
To configure the LMS, your implementation team must select and enter your organization’s preferred values for all the configurable features that control how the LMS works. Configuring an LMS can be complicated, with many decisions to make. Your team will need to think through the various options for each configurable parameter and reach agreement on how to set it up.
To complicate things further, your organization is likely to evolve in its use of the LMS over time, using more of the system’s features, and adding more content and users. It is important that you make configuration decisions with the future learning management needs of your organization in mind. Some of the parameter values you configure can be changed easily at any time, while other changes may be more difficult. For these parameters, it is important to try to get it right the first time. The challenge is that you will be asked to make far-reaching configuration decisions, some of which may be difficult or impractical to change later on, without the benefit of hindsight and while you are still brand new to the system.
For example, let’s say you’ve been using your new LMS for a year. You originally established three domains reflecting each of your business units. The users, content, administrators, course catalog, and branding of each domain are separate from those of the other business unit domains. This seemed like a good idea when you first implemented your LMS. At the time, you thought that each group had its own training needs. But over time you have discovered that there is actually a lot of overlap in the training needs of each group, and much of their content has been duplicated across domains. This has caused a significant amount of extra work for administrators, who need to publish the same course up to three times. Each business unit must schedule its own offerings of the same course, making it difficult to optimize class sizes with attendees from all units.
So you’ve decided to collapse the three domains down to a single one. Unfortunately, this will not be easy. You must move all the content, users, and data to a single domain; consolidate your administrators and rework their roles and permissions; change some of the programming in your HRMS data integration; test the system to make sure you didn’t miss any details or lose any data; and communicate the change to users. It’s almost like implementing a new LMS.
You may think your LMS vendor will provide you with guidance and consulting so that you avoid making costly configuration mistakes. Well, LMS vendors are foremost in the business of selling their product to as many organizations as possible. Your LMS vendor will train you on how the product works and then expect you to make system configuration decisions based on what you have learned about the product and your knowledge of your organization. While most vendors will do their best to advise you on your options, your vendor cannot reasonably learn the ins and outs of each of its customer’s organizations to provide the necessary customer advocacy, consulting, and guidance. Your vendor’s expertise with its product and your core team’s expert knowledge of your organization’s needs must meet somewhere in the middle. Many organizations engage a third-party implementation consultant to learn the details of how the organization manages learning, advocate for its needs, advise on its LMS configuration decisions, and help ensure the success of the project.
The configuration decisions you will need to make involve understanding your data and operations, and understanding the data fields, functionality, and capabilities of your new LMS. Configuration decision making can take two to four weeks or more depending on the complexity of the system, the scope of your requirements, and the availability of your decision makers. Following are some of the most important parameters you will need to configure.
Unique ID, Username, and Password
Each user in the LMS must have a unique ID. Depending on the nature of your organization and who is using your LMS, you may decide to use an employee ID that is generated by the HRMS, a student ID that is generated by the student information system, or a member ID that is generated by a professional association’s member management system. For organizations that are not synchronizing the user accounts with a source system, the LMS may automatically generate a unique ID for each new user account. Some organizations use the username entered by a new user when they create their account as the unique ID. Like on many popular retail websites, this may be an email address or some other form of unique identification.
The username and password allow users to log in to the system. Each user must enter a username and password, which, when matched with a unique ID, authenticates the user and provides access to the system. In many configurations, users can change their username and password or retrieve lost credentials any time. However, in configurations that involve single sign-on, a separate system usually controls the username and password, and users can’t change them in the LMS.
User Profiles
You will need to decide what user demographic data you will need, where it is currently stored and managed, and where to put it in the LMS. The demographic data you collect in your LMS may differ depending on the nature of your organization. For example, in a business setting, LMS demographic data may include the user’s name and contact information; job function and organization; manager; employment status, such as part time or full time; time in current job; time in current organization; and hire date. In a K-12 or higher education setting, LMS demographic data may include name and contact information, grade level or year, degree program, and major. In a professional association setting, LMS demographic data may include name and contact information, company, membership status, and the year that membership was established.
When deciding how to configure the user profile, consider what data are needed for your LMS reports and how you want to segment the users in your system. For example, you may want to determine which courses are in highest demand by people in a specific job role, functional area, business unit, or region. You may want to take a look at pass-fail rates for students in a specific degree program, major, and academic year. You may need to assign new hire orientation training to people based on their hire date, job role, and region. Keep in mind that user profile information can also be used to provide personalized views of the content in your LMS, as explained in the section “Domains and Audiences.”
Organization Hierarchies
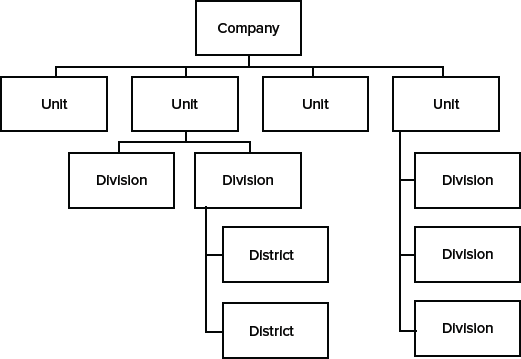
Many LMS products support organizational hierarchies that can be configured to match your organization’s structure. Think about your company’s org chart; the LMS would have an organization node associated with each box on the chart. People are then associated with the department or group in which they work, within the organizational hierarchy. This approach allows you to deploy courses that may be customized to a specific department or collection of departments. You can run reports for the entire enterprise, one specific department, or a department and all the departments below it. The organization hierarchy in an LMS is often imported from an HRMS.
In an extended enterprise solution where the LMS is also being used to train business partners, such as distributors, dealers, and suppliers, the organization structure may be configured to reflect the companies with which the organization does business. For organizations that sell training programs directly to the public, customers may be associated with a single customer node or one of several market segments or product groups. If your company sells products or services business to business, then customers may be organized into company accounts or industries. In Figure 7-2, you can see how the LMS organization structure reflects the way the company is organized.
Domains and Audiences
Some LMS products allow you to configure multiple domains, sometimes called multitenancy. This approach is particularly useful for extended enterprise solutions, where you need to train employees, suppliers, distributers, and customers. Without domains, it is difficult to prevent customers from accessing content designed for employees only. Domains allow you to place employee user accounts, internal courses, and administrators in the employee domain and customers, customer training courses, and another set of administrators in the customer domain. Each domain can be distinctly branded and configured, giving each group of users its own look, feel, and feature set. You can enable e-commerce in the customer domain, disable it in the employee domain, and run separate reports for each domain. The result is like having multiple LMS installations for the price of one. In Figure 7-3, you can see the organization structure of an LMS that has two domains, one for customers and another for employees.
Figure 7-2. Example of an LMS Organization Structure
It is important to note that some changes to your domain structure may be difficult to make after the product is up and running. For example, it may be relatively easy to add a new domain, but removing or reorganizing existing domains that already contain users and content can be very complex, so keep it as simple as you can.
Guidelines for Planning Your Domains
- Keep it simple. Use as few domains as possible. A single domain is often enough.
- Be sure you have a clear need for multiple domains. Consider what is unique in terms of the content, administration, branding, reports, and features needed by the users in each domain.
- Only configure what you need today. If you set up domains for possible future use, you will probably get it wrong.
Many LMS systems enable you to configure audiences based on user profile information. For example, you may define an audience comprising people in the northeast region who work in sales, or people whose hire date was within the last three months. Audiences enable you to assign training to groups of users in a way that is self-organizing. Without audiences, you would need to assign training to a list of named users, which means that you would need to update the list whenever someone changes jobs or leaves the company. When you configure an audience based on profile information, anyone who fits the profile at any given point is automatically included in the audience.
Figure 7-3. Example of Two LMS Domains

You can restrict a course’s visibility to people within each audience. For example, someone in sales may see a different set of course offerings from someone in IT, finance, or manufacturing. This approach makes the LMS easier to use by providing users with shorter and more relevant course lists. It also avoids the risk of people mistakenly registering and showing up for the wrong course.
Administrator Security Roles
Each security role you configure in your system represents a type of LMS administrator. For example, your implementation may require an instructor role, a course developer role, a course scheduler role, a registrar, and a super-user who can change the LMS configuration. To accomplish this, you would establish five security roles. You can then set the specific permissions for each role. In most LMS products, permissions can be set at a granular level. So, for example, an instructor may be able to view a roster, take attendance, and mark people complete, but may not be able to publish new courses to the system. A course developer may be able to create new course structures and create and publish courses, but may not be able to change the organizational hierarchy or user profile configuration. During the LMS configuration process, you will define the security roles your organization will use and the specific permissions for each role. Once user accounts are loaded into the system, you can associate users with each role.
Some LMS products enable a single user to have multiple roles. Other systems allow only one role per user. If your LMS supports multiple domains, a user may be able to be assigned different roles in each domain. You will need to design your security roles in a way that matches how your LMS works.
Course Catalog
An LMS course catalog is a comprehensive list of the courses you offer. People can browse the catalog to find the courses they want.
In some LMS products, the catalog is menu driven. People navigate through the catalog’s menus and submenus until they reach a list of relevant courses. In other LMS products, the catalog is a single list of all courses. People filter the list by selecting a topic, delivery method, and other parameters to narrow the selection to the courses most relevant to their needs.
You will need to design your catalog structure, and later set up your courses so that they appear in the right place in the catalog. When you configure your course catalog, you will need to think about clarity and balance.
Metadata
Course metadata consist of a set of properties or tags that describe your courses. For example, you may decide to configure a metadata property labeled delivery mode. The values for this property may be labeled web-based training (self-paced), live webinar, recorded webinar, and classroom. You may decide to configure another property that indicates the language in which the course is offered. Every time someone publishes a course in the LMS, the publisher selects a value for each metadata property.
Guidelines for Creating Your Course Catalog
- Avoid ambiguity. A vague menu item is not helpful. Menu items labeled skills and knowledge, miscellaneous, or other do not provide a clear indication of what courses will be found under them.
- Make each menu item distinct. For example, menu items labeled soft skills, interpersonal skills, and sales skills are not sufficiently distinct from one another.
- Make sure items in the same menu are categorically similar. For example, menu items that represent subjects, like time management, working with teams, and communications skills, should not be mixed with menu items that do not represent subjects, like new courses or courses in Spanish.
- Menu-item labels should be succinct and should not require additional explanation.
- Design the catalog so that the courses are evenly distributed among the menu items. Let’s say your catalog has one menu item labeled products and services containing 70 courses, another labeled submitting vouchers containing three courses, and a third menu item labeled policies and procedures containing nine courses. Consider deleting the submitting vouchers menu item and moving those courses into policies and procedures. Consider dividing the course-heavy products and services menu item into five or six menu items representing different product families or types of services. This will result in a more balanced course catalog, which is easier for users to navigate.
- If you have dozens of courses, try using a flat menu. If you have hundreds of courses, consider using submenus.
- Avoid creating menu items that result in a mix of courses and more submenu items. If you are using submenus, attach the courses to the submenu items rather than items in the main menu. This will result in a more predictable catalog, where all items at a given menu level behave the same way.
- Make sure there are no “orphaned” menu items. These are dead-ended menu items that, when clicked, produce no courses at all.
In some systems, you can configure each metadata property as either a required or optional field. For example, if you set language as a required field, administrators will not be able to save or publish a course without first setting a language value.
Some systems allow you to configure a metadata property so that multiple values can be associated with a single course. For example, an instructor-led course may have a delivery mode value of classroom, while a blended course may be associated with multiple delivery modes such as webinar, self-paced, assignment, test, and survey.
Metadata properties usually appear on the course details page, which is displayed after a course title has been selected from the catalog or search results. Along with the course title and description, metadata provide essential information to help people decide how to spend their valuable training time.
Course and Curriculum Structures
A course may include multiple learning activities, such as a reading assignment, a pretest, a self-paced module, attendance in a classroom or webinar session, a mastery test, and a survey. These activities may need to be configured to be taken either in any order or in an enforced sequence. Some activities may be mandatory, others optional. The course’s structure depends on which learning activities are used and in what order. In Figure 7-4, you can see an example of three standardized course structures: an instructor-led course followed by an online assessment, a live webinar followed by a survey, and a SCORM course followed by a survey.
Figure 7-4. LMS Course Structures Example

A curriculum may include a number of courses that may or may not need to be taken in sequence. Again, some may be mandatory and others optional. The criteria for earning completion credit may vary from curriculum to curriculum. So, courses have structures, and curricula have structures, or meta-structures. Figure 7-5 illustrates a curriculum structure where the learner must complete courses A, B, and C in sequence, then complete either course D or course E, and finally complete course F.
Figure 7-5. LMS Curriculum Structure Example

Many LMS products provide a lot of flexibility for defining course and curriculum structures. You can experiment with your LMS to establish models and templates for the types of course and curriculum structures you expect to use. This approach enables to you see how the LMS behaves so that you can adjust the course or curriculum structures until they are working the way you need.
Credit Types and Credits
Learning and development organizations often issue credit to people who have completed a course. Most LMS products allow you to configure any number of credit types. For example, one credit type may be labeled credit hours, while another is labeled continuing education units.
When someone publishes a course in the system, they may select one or more of the available credit types and enter the number of credits for each type to award people upon course completion. People who complete the course are automatically awarded the credits, which appear in their transcript and on the course completion certificate.
Many systems allow you to run reports by credit type. This can be useful in regulatory compliance or accreditation reporting.
Evaluations and Assessments
Many LMS products have built-in evaluation (survey) and assessment (test) tools. The advantage to using a native LMS tool is that you can easily view reports at the question level, which enables you to perform item analysis and determine the validity of your survey or test. The disadvantage is that if you switch LMS products, you may need to redevelop the assessment. You may also find it difficult to migrate the evaluation and assessment results contained in the old LMS, especially if the two systems’ features differ. These disadvantages are especially pertinent to corporate LMS products. Academic LMS products that support the IMS Global® Question & Test Interoperability® specification provide easier methods to transfer tests and test results from one system to another. Chapter 5 has more information about this specification and others.
If you decide to use a survey tool that’s built into your LMS to deliver a course completion survey, you’ll need to configure the survey and enter the questions and Likert scale anchors.
Sometimes, LMS products have unexpected constraints when it comes to survey reporting. Ask your vendor to explain how you can configure a standard survey for use in all courses and run survey results reports in all the ways you need to view data. For example, you may want to see the results for everyone who has taken a specific course or group of courses over the last year, or all the people who took a specific class, or all the people who have taken any course taught by a specific instructor.
If you can’t get the reports you need from your LMS, you may be better off using a third-party survey tool. In that case, you’ll need to devise a way to identify each survey with a course, class, and instructor in your LMS. If you decide to use a third-party testing or surveying tool, you will need to explore how the tool interoperates with the LMS. You may be able to use the ADL SCORM standard or simply serve up the test or survey in the third-party system after launching it from the LMS. Check with your survey tool vendor and LMS vendor to discuss options.
Ask This
Ask your vendor to explain how you can configure a standard survey for use in all courses and run survey results reports in all the ways you need to view data.
Competencies
Some organizations are interested in implementing a competency model in their LMS. Typically, an LMS will allow you to create a list of competencies and a proficiency scale that can be applied to any competency. For example, a user may have novice proficiency in one competency and expert proficiency in another.
In many LMS products, competencies can be used to direct people to training. To do this, competencies are associated with jobs, people, assessments, and courses. A job requires a certain set of competencies, each at a specific level of proficiency. A course covers a set of competencies. A person can take a self-assessment to compare their current proficiency level for each competency with the level their job role requires. Their competency gaps are identified in the assessment results. They can then search for courses that address those competencies. As you can see in Figure 7-6, competency-based assessments can be used to connect people, jobs, and courses in an LMS.
In talent management systems, competencies can be used in even more ways, including recruiting, selection, and career development. Job descriptions may reflect the competencies required for the job. Applicants may be assessed based on the competencies they describe in resumes or articulate in interviews. Employees may use competency-based self-assessments to compare their current skills with those required for a desired job role, and then use the reported gaps to create a professional development plan.
Configuring competencies in your LMS can be a big job. First, you will need to load all your competencies and your proficiency scale into the LMS. If you have different competencies for different job functions, all the competencies will need to be added and associated with the relevant jobs. If you decide to create competency-based assessments, you will need to design the assessment questions and scoring methods.
Figure 7-6. How Competencies Are Used in an LMS

Finally, you will need to associate relevant competencies with courses. You can do that by simply associating one or more competencies directly with a course, without considering proficiency levels, or you can associate each relevant competency at one or more specific proficiency levels with a course. Think about how you want your competency-course relationships to work, and check with your LMS vendor to determine what approaches the product supports.
Ask This
Think about how you want your competency-course relationships to work, and check with your LMS vendor to determine what approaches the product supports.
Notifications
LMS products provide three types of notifications: alerts, reminders, and confirmations. An alert may notify users of a canceled course or a change to a date or location. A reminder may notify users of a class that is about to begin or an assignment that is past due. And a confirmation may notify users that they have enrolled in a course, completed a course, or passed a test.
Most LMS products provide a set of predefined notifications. To configure notifications, you must decide which of these notifications you want to activate or deactivate. The more email people receive from an LMS, the less likely they are to pay attention, so to avoid spamming users, it is a good idea to turn off all unessential notifications. Many products provide a way for you to customize each notification’s list of recipients, subject text, and body text. These products provide you with a set of variables that can insert system-generated text into the notification, such as course title, student name, dates, and location.
For example, a notification may come out of the box with a registration confirmation message that is automatically sent to people who enrolled in a course. The message body may contain the following text and variables.
<First name>,
You have successfully registered in <course name> at <location> from <start date> to <end date>.
The Learning and Development Organization
A very important note of caution: Disable the LMS email send capability before you go live. You don’t want to send unintended email notifications to people while you are migrating data or configuring and testing the system. This may involve working with your vendor to ensure that the LMS email send capability is disabled in some other way.
Reports
An LMS provides a set of out-of-the-box reports. Many products also include reporting tools that enable you to configure your own custom reports. Some even provide advanced capabilities for creating graphical reports and dashboards.
Many products allow you to export your reports to Excel or CSV, PDF, and sometimes XML. Exporting to Excel or CSV, which can be opened in Excel, is especially useful if you want to adjust the data and layout, sort and filter it in a variety of ways, or generate graphs and charts. PDF can be useful if you need to distribute the report in a printable format. XML is a good format if you need to import the data into another system or application.
Early in the implementation process, you need to identify and list all the reports your organization needs. The data in your reports will guide many of your LMS configuration and data migration decisions. Be sure to identify who needs the report, how often, and why. As you consider why a report is needed, think about what decisions will be made or what actions will be taken from the report results. If the report’s purpose cannot be clearly articulated, then it will probably not be used in the long run. In my experience, out of the hundreds of potential reports available in some LMS products, many organizations tend to use only a handful.
Defining Your LMS Report Needs
- Document who needs the report, how often, and why.
- Make a list of all data to be included in the report.
- Create a mock-up of how the data should appear in the report. You may need different layouts for an HTML version of the report and an Excel version.
- Report filters allow you to limit the amount of data in the report. Define how you will need to filter the report, such as by enrollment date range, completion date range, course or course group, or user or user group.
- Sorting allows you to order the data in the HTML version of the report (the Excel version has its own sort features). Decide which columns you want to use to sort the data, and in which direction. In some LMS products, clicking on any column header in an HTML report will sort the data alphanumerically or by date, and may even toggle the data in forward (A to Z) or reverse (Z to A) alphabetical order.
You may need to configure security and roles and permissions that control who can see a given report. Some LMS products let you schedule a process that automatically runs a report and emails a link to a recipient list. To see the report, these people must have user accounts in the LMS. Some products allow you to send the report as an Excel or PDF attachment in the email message to a list of email recipients who may not have user accounts in the LMS. Consider how you need to distribute your reports, and make sure your LMS can be configured to support your approach.
E-Commerce
If you need to charge individuals for taking your courses, you will need an LMS with e-commerce features. These systems typically allow people to select courses from the catalog and place them in a shopping cart. Upon checkout, the person pays for the course or courses in the shopping cart, which completes the enrollment process. Payment can be done with a credit card or online payment service such as PayPal. To accept and process these payments, you will need to contract with a third-party payment processing service.
To configure e-commerce, you’ll need to enter information about your payment processing service provider. You must enter the price for each course that requires payment, so you’ll also need to configure the currency type you’re using in the LMS. Some LMS products that support domains allow different currency type and payment processing services to be configured in each domain.
Branding, Layout, and Welcome Page
Most LMS products provide a way for you to upload your organization’s logo and configure your preferred color scheme. You can then customize your own homepage with images, text, video, audio, links, and anything else you can do in HTML. Many products provide WYSIWIG (what you see is what you get) controls so that you can work on your homepage content and layout without needing to be an HTML expert.
Some LMS products provide advanced options to further customize the look and feel throughout the system. These systems may provide access to the cascading style sheets (CSS), which are used to control global and page-specific fonts, font sizes, font styles, font colors, background colors, paragraph spacing, buttons and numbering, and hyperlink colors. However, changing these CSS settings requires advanced HTML and CSS skills. Changing a font size can affect the system’s page layouts when viewed in a browser or mobile device. Take care to check the results of your CSS changes in all LMS pages.
By establishing a set of design standards, you provide a more consistent look to the LMS pages and make them fit in with other websites in your organization.
LMS configuration requires a lot of attention to detail. Once it is done, the system will begin to look and feel more familiar, like it belongs to your organization. Be sure to involve the right people in the decision-making process. You will need to take a thoughtful approach to group planning and decision making, considering not only your current needs, but also your future needs. Your LMS configuration decisions will determine how well the LMS is aligned with how your organization operates. The right configuration will save your administrators time and effort and provide a satisfying user experience.
Key Takeaways
This chapter focused on how to assemble your LMS implementation team, what to expect in terms of the implementation timeframe, and the first two steps of the implementation process: planning and making LMS configuration decisions. The key takeaways are:
- A core team will have primary responsibility for the success of the implementation, and an extended team will be involved in several of the more resource-intensive implementation tasks, like user acceptance testing.
- Implementation of an LMS hosted on-premise can take six to 12 months. Implementation of an LMS in the cloud can take three to nine months. If your requirements were not well defined and your system is not well suited to your organization’s needs, the implementation is likely to take much longer.
- Planning is rigorous at the beginning of the implementation process and continues all the way up to the day on which your system goes live. A strong project manager is a key asset to your core team.
- There are many configuration decisions to be made as you implement your LMS related to things like user authentication, user profiles, organizational structure, domains and audiences, security roles and permissions, course catalog, metadata, courses and curriculum structures, credit types, evaluations and assessments, competencies, notifications, reports, e-commerce, and branding and homepage layout.
The next chapter covers systems integration and how to move all your data and content from a legacy system to your new LMS.