5. Selections, Shapes and Masks
Introduction
TO GET THE MOST FROM PAINTER, you need to invest some time in understanding how the program isolates portions of images so you can paint them, apply special effects, or otherwise change them without affecting the rest of the image. Much of the program’s power is tucked into the complex area of selections, shapes and masks.
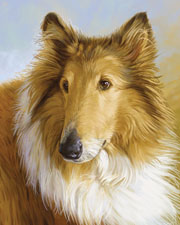
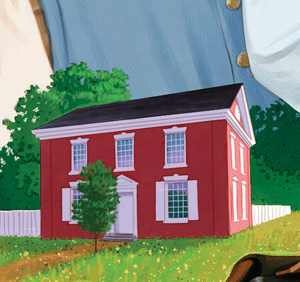
Artist Don Stewart was commissioned to paint Murphy by Mike and Robin Putnam. He began the image by making a tight sketch in Painter using the Sharp Pencil variant of Pencils on Fine Hard Grain paper. Next, so that he could protect areas while he painted, he isolated the important elements in his sketch by making selections with the Lasso (for example, the collie’s head and his eyes), and saved them as masks in the Channels panel. To read more about Stewart’s work, see “Using Hand-Drawn Selections” on page 195 and the gallery at the end of this chapter.
What is a Selection?
A selection is an area of the image that has been isolated so changes can be made to the contents only, or so the area can be protected from change. There are two kinds of selections in Painter: outline-based and pixel-based. Like a cookie cutter, an outline-based selection sharply defines the area it surrounds. But unlike cookie cutters in the real world, an outline-based selection border in Painter can be freely scaled or reshaped. Outline-based selections can be made by dragging with the Lasso tool (for freehand selecting), the Rectangular Selection tool or the Oval Selection tool.
If Painter’s outline-based selections are like the outlines produced by cookie cutters, then pixel-based selections are more like painted resists. Pixel-based selections make the selected areas fully or partially available for change or copying, with the degree of availability determined by the nature and “thickness” of the “resist material.” Pixel-based selections can be made by selecting based on the color or tone of pixels, rather than by an outline you draw. The Magic Wand tool makes pixel-based selections; they can also be made with the Auto Select and Color Select commands from the Select menu.
The perimeter of either kind of selection is indicated by an animated border, the selection marquee. A selection is temporary. If you choose Select, None (Ctrl/![]() -D) or accidentally click outside the selection marquee, the selection will be lost, unless you have stored it in the Selection Portfolio panel or saved it as a mask in the Channels panel or converted it to a shape. (The Selection Portfolio is described on page 183, the Channels panel is covered on page 191 and shapes are described next.)
-D) or accidentally click outside the selection marquee, the selection will be lost, unless you have stored it in the Selection Portfolio panel or saved it as a mask in the Channels panel or converted it to a shape. (The Selection Portfolio is described on page 183, the Channels panel is covered on page 191 and shapes are described next.)
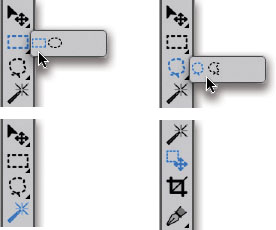
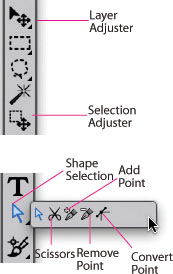
The selection tools are located near the top of the Toolbox. Some tools share a space in the Toolbox with other tools, as shown here in pop-out view. (The Rectangular Selection, Oval Selection, Lasso and Polygonal Selection Tool are shown popped out above; the Magic Wand and Selection Adjuster are shown below.
If you’ve made a selection and have deselected it—either by accident or to work outside of it—and then want to use it again, choose Select, Reselect (Ctrl/![]() -Shift-D).
-Shift-D).
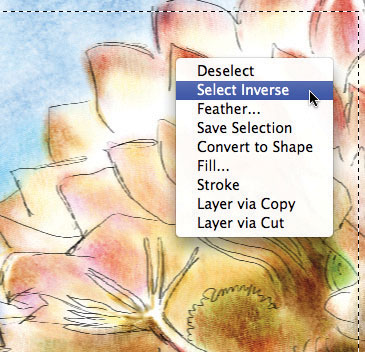
The context-sensitive menu for an active selection appears at the spot where you right/Ctrl-click.
What is a Shape?
A shape is similar in construction to an outline-based selection, but it has stroke and fill characteristics. (This chapter tells about how to draw shapes and how they are related to selections. The stroke and fill attributes of shapes, their layering capabilities and their relationship to layers, are covered in Chapter 6.) Shapes can be created with the Rectangular Shape, Oval Shape, Pen or Quick Curve tool. As soon as a shape is drawn, it is automatically stored in the Layers panel. (The Layers panel can be used to control how shapes are used in the image, as described in Chapter 6.)
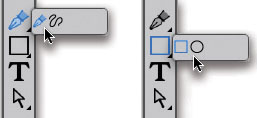
The shape-drawing tools are the Pen and Quick Curve (left), which share a Toolbox space, and the Rectangular Shape and Oval Shape (right), which also share a space.

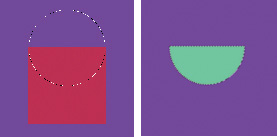
To isolate an area of the canvas for filling with blue, the Oval Selection tool was used. This extreme close-up shows the antialiasing of the edge after filling. At normal magnification, the antialiasing makes the edge look smooth.
Shapes can be used as independent elements in an illustration, or a shape can be converted to a selection and then used to isolate an area of the image. When you convert a shape to a selection (Shapes, Convert to Selection), its name disappears from the Layers panel and an animated selection marquee appears on the image. Beware: If you convert a shape to a selection, it will be permanently lost if you deselect it before you either convert it back to a shape, store the selection you made from it, or choose Edit, Undo (Ctrl/![]() -Z) or Select, Reselect (Ctrl/
-Z) or Select, Reselect (Ctrl/![]() -Shift-D).
-Shift-D).
What is a Mask?
Unlike a shape, which is stored outline information, a mask is stored pixel-based information. Masks can store 8-bit grayscale information, which means that complex image information such as a painting, a photo or a graphic can be saved and then loaded as a selection. Painter’s 8-bit masks allow 256 levels of opacity. When a mask is loaded as a selection, in areas where the mask is black, the selection completely protects the pixels of the image from change; where the mask is white, the pixels are fully selected and exposed to brushstrokes; gray areas of the mask result in partially selected pixels. The protective mask can be “thinned” or even completely removed pixel by pixel. Masks allow complex image information to be used as a selection. Another way to use a mask, besides loading it as a selection, is to choose it when applying the functions in the Effects menu, such as Tonal Control, Adjust Colors and Surface Control, Apply Surface Texture. Masks also provide a way of permanently storing selection information until you need to use it. The Channels panel not only stores masks but also controls operations such as turning them on and off so they can be used as selections. (The Channels panel is described on page 191.)
![]()
The Property Bar for each of the selection-drawing tools has buttons for access to the other selection-drawing tools. It also has a button for converting the current selection to a shape.
![]()
The Property Bar for each of the shape-drawing tools has buttons for access to the other shape-drawing tools. It also has a button for transforming the current shape to an outline-based selection. This button will work only if the shape is closed—that is, if it has no gaps.
Creating Outline-based Selections and Shapes
You can make an outline-based selection or a shape in a number of ways. One way, as mentioned earlier and described in more detail here, is to draw it with one of the selection or shape tools:
Rectangular and Oval Selection tools. Drag to make selections with these tools. To constrain the Oval or Rectangular Selection tools so they select perfect squares or circles, begin dragging and then hold down the Shift key to complete the drag.
Lasso tool. The Lasso tool is good for making quick, freehand selections. Choose the Lasso and carefully drag around the area that you want to isolate.
Polygonal Selection tool. The Polygonal Selection tool is helpful for quickly selecting an area by clicking at different points on the image to anchor straight line segments.
Rectangular and Oval Shape tools. Drag with these tools to create rectangular and elliptical shape layers. Hold down the Shift key and drag with the tool to draw a perfect square or circle shape.
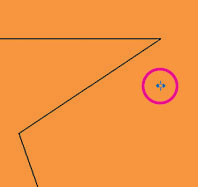
Pen tool. Choose the Pen tool for precise drawing using a combination of straight lines and curves. Click from point to point to create straight line segments; to draw curves, press to create a curve point and drag to pull out handles that control the curves. To complete an outline drawn by the Pen, close the shape by connecting to the origin point or by pressing the Close Shape button on the Property Bar.
Quick Curve tool. Drag with the Quick Curve tool to draw freehand shapes. Like the Pen, the Quick Curve has a Close Shape button on its Property Bar.
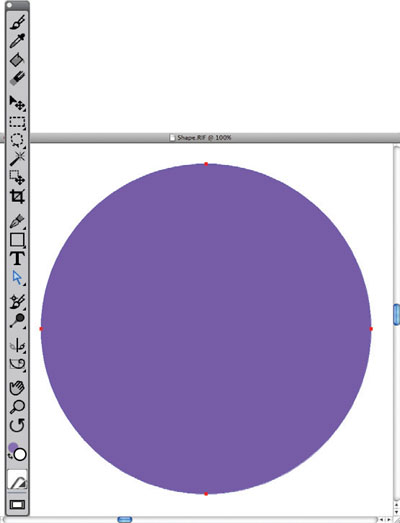
This shape has been selected with the Shape Selection tool (shown chosen in the Toolbox) and shows its control points and handles.
In addition to drawing them by hand, here are some other ways of making an outline-based selection or a shape:
Transforming a pixel-based selection. Change a pixel-based selection to an outline-based selection by choosing Select, Transform Selection. (See pages 188–189 for information about making soft-edged pixel-based selections and converting them.)
![]()
Using the Selection Portfolio. Drag a stored selection from the Selection Portfolio panel into your image. (If you use a lot of custom paths in your work, you may want to create custom libraries as described in the “Organizing with libraries” section of Chapter 1.)
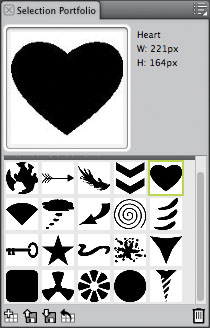
Choosing a heart-shaped path in Painter’s Selection Portfolio panel, opened by choosing Window, Media Library Panels, Selections
Converting text. Convert a text layer to shapes by choosing Convert Text to Shapes from the Layers panel’s pop-out menu. (For more information and creative techniques using type in Painter, turn to Chapter 6, “Using Layers” and Chapter 8, “Exploring Special Effects.”
Importing PostScript art. Import EPS paths as shapes from a PostScript drawing program. Painter supports two ways to import shapes such as preexisting EPS clip art or type set on a curve and converted to outlines in a PostScript drawing program. The first option (File, Acquire, Adobe Illustrator File) creates a new file, importing the EPS outlines—with their strokes and fills—into Painter as shapes. To add a shape to an existing Painter file, you can then click it with the Layer Adjuster tool and copy and paste it from the new file into your working composition.
The second option allows you to copy outlines with strokes and fills from a PostScript program to the clipboard and paste them into your Painter file. The outlines will be imported into your document as a layer and will appear in the Layers panel. Objects such as the converted letters “O” and “A” that have a counter, or hole, in them will come into Painter as compound shapes, preserving the holes.
Moving Selections and Shapes
For both pixel-based and outline-based selections, you can move the selection boundary without moving the pixels it surrounds. This gives you a great deal of flexibility in positioning the selection boundary before you use it to change the image. To move a selection boundary without moving any pixels, choose the Selection Adjuster tool and put its cursor inside the animated selection boundary; dragging will move the selection boundary. This works for both pixel-based and outline-based selections. To move the selection’s contents, drag with the Layer Adjuster tool instead of the Selection Adjuster; this turns the selected area into a new layer. The Layer Adjuster can also be used to move shapes: Click the name of the shape in the Layers panel and then use the Layer Adjuster tool to drag the shape.
Reshaping Selections
Painter allows an outline-based selection border or a shape to be transformed—scaled, skewed or rotated—without altering the image. It can also be expanded, contracted, smoothed, or made into a selection of its border area only. Selections made with the Lasso or Rectangular or Oval Selection tools, as well as selections converted from shapes, are automatically outline-based and thus can be transformed. Selections made with the Magic Wand or loaded from masks must be converted to outline-based information before they can be scaled, skewed or rotated. To convert a pixel-based selection to an outline-based selection, choose Select, Transform Selection. To convert a selection stored as a mask in the Channels panel to an outline-based selection, load the selection (Select, Load Selection) and then transform it.
Whether it was outline-based from the beginning or it was made by transforming, a selection needs to display its bounding box handles in order to be transformed. To display the handles for the currently working selection, the Selection Adjuster tool has to be chosen. Once the bounding box handles are visible, you can move the selection, or scale, skew, or rotate its outline, or change it using commands under the Select, Modify menu to widen, contract or smooth it, or make a selection around its border.
Alt/Option-dragging a selection to make a copy
Dragging a side handle to scale horizontally
Shift-dragging one of the corner handles to scale proportionally
Using a corner handle and the Ctrl/![]() key to rotate
key to rotate
Since outline-based selections are based on mathematical information, they can undergo all of the following transformations, carried out with the Selection Adjuster tool, with no loss of edge quality. (These transformations don’t work on pixel-based selections; a pixel-based selection has to be converted to an outline-based selection first, as described above.) Display the eight bounding box handles as described above and then:
To duplicate, hold down Alt/Option (a tiny “plus” will appear next to the cursor); drag and release to add a copy to the selection.
To scale, position the tool over one of the corner handles; when the cursor changes, drag the handle. To scale proportionally, hold down the Shift key as you drag. If you want to resize only horizontally or vertically, drag on the center handle of the top, the bottom or a side.
To rotate, use a corner handle, adding the Ctrl/![]() key as you position the cursor. Be sure you see the curved arrow cursor around the handle before dragging to rotate. Be careful: Don’t start dragging until you see the curved arrow cursor, because the Ctrl/
key as you position the cursor. Be sure you see the curved arrow cursor around the handle before dragging to rotate. Be careful: Don’t start dragging until you see the curved arrow cursor, because the Ctrl/![]() key is also used to temporarily turn the Selection Adjuster tool into the Layer Adjuster tool—the pointing-finger cursor. If you’re trying to rotate the selection boundary, don’t drag with the arrow cursor! If you do so accidentally, the contents of the selection will be moved, but you can recover by pressing Ctrl/
key is also used to temporarily turn the Selection Adjuster tool into the Layer Adjuster tool—the pointing-finger cursor. If you’re trying to rotate the selection boundary, don’t drag with the arrow cursor! If you do so accidentally, the contents of the selection will be moved, but you can recover by pressing Ctrl/![]() -Z.
-Z.
The Layer Adjuster and Selection Adjuster tools can move, rotate, scale and skew shapes and outline-based selections, respectively. The shape-editing tools that share a space on the Toolbox are used for reshaping shapes in a more detailed way.
To skew, press Ctrl/![]() while positioning the cursor over a center handle on the side, top or bottom and then drag. Be careful: Don’t start dragging until you see the slanted arrow cursor across the handle. If you don’t get the results you desire, you can recover by pressing Ctrl/
while positioning the cursor over a center handle on the side, top or bottom and then drag. Be careful: Don’t start dragging until you see the slanted arrow cursor across the handle. If you don’t get the results you desire, you can recover by pressing Ctrl/![]() -Z.
-Z.
Reshaping Shapes
The Layer Adjuster tool can scale, rotate and skew shapes in much the same way the Selection Adjuster works with outline-based selections. In addition, shapes can be modified in more detail with the shape-editing tools, which share a space in the Toolbox. The Shape Selection tool (hollow arrow) and the other shape-editing tools allow you to adjust individual anchor points and control handles to modify shapes.
The Shape Selection tool works much like its counterpart in Adobe Illustrator, by clicking the outline of a shape to show its control points, then dragging a point or path segment to change its position. You can also use it to click on an individual point so it will show its handles, and then drag a handle to adjust the curve.
The Scissors, Add Point, Remove Point and Convert Point tools will also be familiar to Illustrator users. For instance, the Scissors tool allows you to cut a path segment. To add a new anchor point, click with the Add Point tool. To delete an anchor point, click on it with the Remove Point tool.
Because it’s so easy to convert an outline-based selection to a shape and vice versa (see pages 188–189), you can easily modify an outline-based selection by converting it to a shape, editing it with the shape-editing tools and then converting it back to a selection.
This path has handles showing and is ready to be manipulated with the Shape Selection tool.
Selecting and Masking by Color
In addition to the selection-outlining tools described on pages 182–183, Painter also offers useful tools and procedures for making selections and masks based on the color in your image rather than on an outline you draw.
Magic Wand. Painter’s easy-to-use Magic Wand is a real production time-saver. The Magic Wand lets you select an area of your image based on color similarities of contiguous (touching) or noncontiguous pixels. This is especially useful for selecting a uniformly colored element in an image, without having to draw around the area with the Lasso or Pen tool. To select a wider range of color, increase the Tolerance number in the Property Bar before you use the Wand. To make a smooth-edged selection, make sure the Anti-Alias box is checked before you make the selection.
To manipulate a path while drawing it, press the Ctrl/![]() key to temporarily switch from the Pen to the Shape Selection tool so you can adjust the anchor points and control handles.
key to temporarily switch from the Pen to the Shape Selection tool so you can adjust the anchor points and control handles.

The Property Bar for the Magic Wand lets you set the Tolerance, or size of the color range, you want the Wand to select. You can also choose whether to select only those pixels that are connected as a continuous patch of color that touches the pixel you click; for this option, Contiguous should be turned on (checked in the Property Bar). To select all pixels within the color range, both touching and not touching, turn off the Contiguous option.
To add areas of similar adjacent color to the selection, reset the Tolerance higher; then hold down the Shift key and click inside the existing selection. To shrink your selection by reducing the range of the colors it’s based on, Alt/Option-click within the selection on the color you want to eliminate (you may want to set the Tolerance lower first). To remove a range of colors from a selection, Alt/Option-drag in the area. To add areas of similar color that are not adjacent (like Select, Similar in Photoshop), turn off the Contiguous check box in the Property Bar, and continue adding areas of non-contiguous color by Shift-clicking on other areas of the image. To turn off the nonadjacent mode, turn on Contiguous again.
Once the Magic Wand has produced the pixel-based selection you want, you can store it as a mask by choosing Select, Save Selection or by clicking the Save Selection as Channel button at the bottom of the Channels panel.
Color Select. Painter also offers an automated procedure for isolating parts of images based on color. It does something similar to the Magic Wand in non-Contiguous mode. In one way you have more control than with the Magic Wand because “Tolerance” is separated into three components (hue, saturation and value) and you can choose to partially select colors outside the range. The difficulty with this selection method is that it’s hard to control the smoothness of the edges, and they tend to be somewhat rougher than an antialiased Magic Wand selection. To generate a rough-edged pixel-based selection based on a range of color, choose Select, Color Select. When the Color Select dialog box opens, click in the image on the color that you want the range to center around. In the Color Select dialog box adjust the H (Hue), S (Saturation) and V (Value) Extents sliders to control the range of each of these properties sampled in the image. Experiment with adjusting the Feather sliders to “soften” the edges of the selection. To reverse the mask to a “negative,” enable the Inverted check box. Click OK to complete the selection.
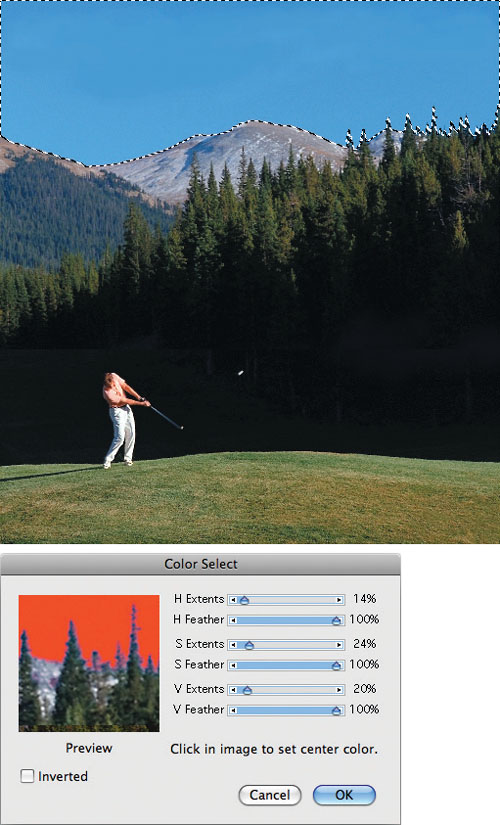
Our goal was to generate a selection for the sky in this photo. We chose Select, Color Select and clicked in the image to sample the color we wanted to isolate. We adjusted the H, S and V sliders until the red mask covered only the sampled color in the preview window, and then clicked OK to activate the selection. Alternatively, you can use New From Color Range (from the pop-out menu of the Channels panel) to accomplish the same thing, except as a mask rather than a selection; the mask is automatically stored in the Channels panel.
PHOTO: CORBIS IMAGES
To save your Color Select selection, you can use Select, Save Selection or click the button in the Channels panel as described above for the Magic Wand. But the Channels panel also provides a way to make and store a color-based mask directly, as described in the New from Color Range, below.
New From Color Range. In the Channels panel’s pop-out menu, choose New From Color Range. In the Color dialog box (which works the same as the Color Select box described above), you can then make the same Extents, Feather and Invert choices.
Other Pixel-based Selecting and Masking Options
Two powerful functions—Auto Select and New From (short for “New Channel From”)—create a selection or mask based on color or on tonality (brightness values, or shades of light and dark). When you choose Select, Auto Select or choose New From from the Channels panel’s pop-out menu, a dialog box opens that gives you a choice of Paper, which bases the selection or mask on the tonality of the currently selected Paper texture; 3D Brush Strokes, which is useful when you are “cloning” a painting from an image; Original Selection, which can be used to copy a selection from one file to another; Image Luminance, which bases the selection or mask on the lights and darks in the current image; Original Luminance, which is useful for importing an image into a channel so it can serve as a mask; or Current Color, which creates a selection or mask based on the current Main Color. The dialog boxes for Auto Select and New From are identical, with the exception that Auto Select creates a pixel-based selection, whereas New From creates and stores a mask. Both have an Invert check box for reversing the selection or mask, as described in the “Doing the Opposite” tip below.
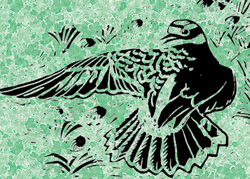
Killdeer by Mary Envall. To create this wildlife illustration—featuring a black-and-white ink drawing floating on top of colored, textured paper—Envall began by making a black-and-white scratchboard drawing in Painter. To drop the white background out behind the drawing she made an automatic selection, choosing Select, Auto Select, using Image Luminance. She floated the active selection by clicking on it with the Layer Adjuster. Next she chose the background (the Canvas) by clicking its name in the Layers panel and filled it with a colored texture, using Effects, Surface Control, Color Overlay using Paper and Dye Concentration.
To practice generating a mask based on the brightness values in an image, try this: Create a new file (Ctrl/![]() -N) with white as the Paper Color. Double-click the Main (forward) Color square in the Toolbox and when the Color panel opens, choose black. From the Brush Selector (opened by choosing Window, Brush Selector), choose the Scratchboard Tool variant of the Pens. Make a sketch, and then generate a mask for your sketch by choosing New From (Ctrl/
-N) with white as the Paper Color. Double-click the Main (forward) Color square in the Toolbox and when the Color panel opens, choose black. From the Brush Selector (opened by choosing Window, Brush Selector), choose the Scratchboard Tool variant of the Pens. Make a sketch, and then generate a mask for your sketch by choosing New From (Ctrl/![]() -Shift-M) using Image Luminance; click OK. The mask will appear in the Channels panel, targeted and with its eye icon turned on, and you will see the mask as a red overlay. You can edit it by painting on it with a brush. Current Color is the only option for Auto Select or New From that produces a completely jagged selection or mask, with no edge-smoothing or antialiasing at all. For an example of Auto-Selecting using Current Color, turn to “Selecting, Layering and Collaging” on page 197.
-Shift-M) using Image Luminance; click OK. The mask will appear in the Channels panel, targeted and with its eye icon turned on, and you will see the mask as a red overlay. You can edit it by painting on it with a brush. Current Color is the only option for Auto Select or New From that produces a completely jagged selection or mask, with no edge-smoothing or antialiasing at all. For an example of Auto-Selecting using Current Color, turn to “Selecting, Layering and Collaging” on page 197.
Susan LeVan used Painter’s New From, Color Range feature to make rough-edged masks for brushstrokes shown in this illustration Covering Home, created for Becoming Family magazine.
Feathering
Feathering a selection softens its edge. This is useful for vignetting an image or for blending a selected area into a background. To see feathering at work, drag a selection from the Selection Portfolio into your image. Choose Select, Feather, and type 20 into the field to define the extent of the feather; click OK. Now choose Edit, Fill, then select one of the options and click OK. Note the soft edges of the filled selection. The feather is always built both inward and outward from the selection boundary. Applying the Select, Feather command to an outline-based selection changes it to a pixel-based selection.

To vignette this photo, we began by making an Oval selection. We scaled the selection using the Selection Adjuster tool, and then applied a feather of 15 pixels (Select, Feather) to soften the edge. Next, we reversed the selection by choosing Select, Invert Selection. We chose Edit, Clear to delete the background, leaving the vignetted edge against the white Canvas below it.
PHOTO: CORBIS IMAGES
Converting Selections, Shapes and Masks
Outline-based and pixel-based selections have entirely different origins, but there is some degree of interchangeability.
To convert a pixel-based selection into an outline-based selection so you can transform the outline (scale, skew or rotate) using the Selection Adjuster tool, choose Select, Transform Selection. To convert a mask into an outline-based selection so you can transform it, first load the mask as a selection: In the Channels panel, click the Load Channel as Selection button at the bottom of the panel. In the Load Selection dialog box, choose the appropriate mask, make sure the Replace Selection button is chosen and click OK. This turns the mask into an active selection. Then you can choose Select, Transform Selection. (When a selection is loaded from a mask and transformed, the mask in the Channels panel remains unmodified unless you replace it using the Select, Save Selection, Replace Mask command.)
To convert an outline-based selection into a mask and save it in the Channels panel as pixel-based information instead of outline information, choose Select, Save Selection or click the Save Selection as Channel button at the bottom of the Channels panel. (You might want to make this kind of conversion in order to edit the mask by painting on it, and then load the modified mask as a selection again.)
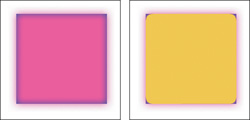
To show the difference between a hard-edged and a feathered selection, the original rectangular selection was filled with blue, then feathered 20 pixels and filled with a rose color (left). Then the selection was transformed to an outline-based selection and filled with yellow, revealing the new rounded hard edge (right).
To convert a shape to a selection so can you use it to isolate an area of the image canvas, select the shape by clicking its name in the Layers panel, and choose Shapes, Convert to Selection. (The tools that draw and edit shapes and selections have a Convert to Selection button on the Property Bar, allowing quick conversion of a shape you make or edit with one of these tools.) Remember: If you convert a shape to a selection, the shape is no longer stored in the Layers panel, and it will be lost when you deselect—unless you have stored it in the Selection Portfolio (described in “Saving Selection Outlines” below) or in the Channels panel as a mask (as described earlier in this section), or unless you convert it back to a shape (as described next).

We set this Adobe Woodtype Ornament using the Text tool. We Alt/Option-dragged with the Layer Adjuster tool to make a copy of the text ornament. To convert it to shapes, we chose Convert Text to Shapes from the Layers panel’s pop-out menu. Next, we converted the copy into an active selection (Shapes, Convert to Selection) for treating the image canvas. To add the colored texture, we clicked the Paper swatch in the Toolbox and chose Worn Pavement texture, and then chose Effects, Surface Control, Color Overlay, Using Paper, Hiding Power.
To convert the current selection into a shape so you can store it in the Layers panel, or edit its outline (using shape-editing tools on the anchor points and control handles), or fill and stroke it (using the Shapes, Set Shape Attributes dialog box), choose Select, Convert to Shape. Alternatively, all of the selection tools have a Convert to Shape button on the Property Bar for quick conversion when one of these tools is active.
Saving Selection Outlines
Use the Selection Adjuster tool to drag outline-based selections to the Selection Portfolio to store them. If you want to save shapes into this library, first convert them to selections (Shapes, Convert to Selection) and then drag them to the Selection Portfolio. If you’re very organized, you might create multiple selection libraries for different jobs. To swap outlines between libraries or to set up a new, empty panel, you can use the Selection Mover, accessed by clicking the triangle in the top-right corner of the Selection Portfolio panel to open the panel’s pop-out menu.
Use File, Export, Adobe Illustrator File to export shapes to PostScript drawing programs. We successfully exported simple shape objects as well as more complex objects that included blends and compounds, opening them in Illustrator.
Selections at Work
Once you’ve made or loaded a selection, you can choose to draw outside of it instead of inside, or use it to isolate areas of the image canvas or a layer when applying special-effects procedures found in the Effects menu.
Inverting a selection. If you want to apply a fill or effect to the outside of your active selection, use Select, Invert Selection beforehand. This procedure reverses the current selection. It’s often useful to save a selection as a mask in the Channels panel, and then save the inverse of it; for instance, save an element, and then save the background, also as a mask. This inverting process can also be used for painting outside a selection, but there’s a more efficient way to control painting, described next.
Using the Drawing icons. The Drawing icons are found in the bottom-left corner of an active document’s window. Take the name “Drawing icons” literally; they affect drawing and painting actions only, not fills or other effects. A fill or effect is always constrained to the inside of an active selection, regardless of which Drawing icon you choose. Several of the techniques in this chapter demonstrate how these icons work, and you can refer to “Selecting a Drawing Mode” in the Selections section of Painter’s online help for a concise explanation.
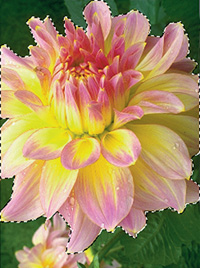
To make a selection isolating the large dahlia in this photo, we used Select, Color Select, and then used the Lasso to “clean up” the selection border—pressing the Alt/Option key to subtract from the selection—to exclude the smaller flower.
PHOTO: CORBIS IMAGES
Stroking a selection. In Painter, you can use any brush variant to stroke an outline-based selection. Begin by making an outline-based selection, either with one of the outline-based selection tools described earlier in this chapter or by transforming a pixel-based selection to outline-based (see page 188). The effect is more fun to observe if you choose one of Painter’s grain-sensitive brushes. In the Brush Selector, choose the Large Chalk variant of Chalk & Crayons. Next, choose a texture from the Paper Selector in the Toolbox. With the selection still active, press the Drawing icon in the bottom-left corner of the image window and choose from the three options: You can choose to have your stroke inside the selection border (Draw Inside), outside of it (Draw Outside), or centered directly on top of it (Draw Anywhere); then go to the Select menu and choose Stroke Selection.
Editing Selections
Painter offers methods for finessing outline-based and pixel-based selections that will be familiar to Photoshop users. (To read about editing masks, see “Using the Channels Panel,” on the facing page.)
Adding to a selection. To add to an existing selection marquee, choose a selection tool, and then click the Add to Selection button in the Property Bar and click or drag beyond or outside of the existing marquee. (A keyboard shortcut for using the button is to hold down the Shift key as you click or drag.) The Add to Selection operation is also useful.
Subtracting from a selection. To remove a portion of a selection, press the Subtract from Selection button in the Property Bar (or hold down the Alt/Option key) and drag with a selection tool. The Subtract from Selection and Intersect operations are also useful.
To create a light-valued border for an image, make a rectangular selection where you want the inner edge of your border; then choose Select, Modify, Border and set the width for the border large enough so it reaches all the way to the edge of the image. Then choose Effects, Tonal Control, Adjust Colors and move the Value slider to the right to lighten the border area.
PHOTO: CORBIS IMAGES
The Modify menu. Four commands under the Select, Modify menu—Widen, Contract, Smooth and Border—allow you to change outline-based selections. Widen and Contract allow you to change the size of a selection by a specified number of pixels on all edges. The Smooth command is useful for rounding corners and softening jaggedness in a selection. The Border function selects a border area (based on a specified number of pixels) outside the existing marquee, as shown at the left.
Masks
You can create masks in Painter in several ways: by making a selection and saving it in the Channels panel, by painting directly onto a new blank channel with brushes, by generating masks with procedures such as New From or New From Color Range in the Channels panel’s pop-out menu, or by using Boolean operations to calculate new masks from existing ones. To read about New from Color Range, turn to “Selecting and Masking by Color” on page 185, and for more information about calculating masks, turn to “Calculating and Operating” on page 192.

Multiple applications of the Smooth function can turn a perfectly good typeface (Stone Sans, left) into a trendy, avant-garde one. Set type with the Text tool, convert the characters to shapes (choose Convert Text to Shapes at the bottom of the pop-up menu of the Layers panel), convert the shapes to selections (Shapes, Convert to Selection), apply the Smooth operation (Select, Modify, Smooth) and fill them with a color (Edit, Fill; when you convert shapes to a selection, the Canvas becomes the active layer, so you may want to add a new layer to receive the fill). If the characters aren’t “smooth” enough yet, undo the fill (Ctrl/![]() -Z), smooth again, and fill again.
-Z), smooth again, and fill again.
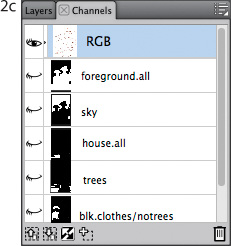
Using the Channels Panel
The Channels panel lists all the masks you’ve made and stored. A Painter file can contain a maximum of 32 of these stored masks. If you’ll be doing a lot of work with masks, it’s a good idea to get on friendly terms with this panel. Here are some basics:
To view a mask as an overlay on top of the RGB image, click to open the eye icon to the far left of the mask’s name.
To view a mask as an opaque overlay, click its name to choose it (the mask’s name will then be highlighted) and choose Channel Attributes from the pull-down menu of the Channels panel, and move the Opacity slider to 100%. Viewing a mask as an opaque overlay can often help you see defects in the mask, and it may be less confusing than using partial opacity. Adjusting the Opacity slider changes the overlay’s onscreen appearance only; it does not affect the actual density of the mask.
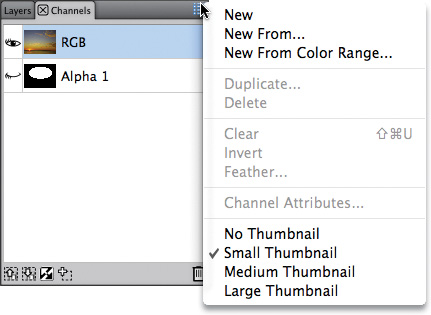
The Channels panel. Several useful commands are found in the pop-out menu.
To hide a mask, click its eye icon shut.
To view a mask alone in black and white, without the RGB Canvas, open the mask’s eye icon and close the RGB eye icon.
To edit a mask, click the mask’s name to activate it and open its eye icon. You can edit the mask by painting on it with any brush except a Watercolor brush or a plug-in brush (such as Blenders, Digital Watercolor, FX, Liquid Ink, Photo, or Liquid Ink).
To apply a paper grain to a mask, click the mask’s name to activate it and use Effects, Surface Control, Express Texture, Using Paper. Watch the Preview as you experiment with the Gray Threshold, Grain and Contrast sliders.
![]()
Five buttons at the bottom of the Channels panel offer shortcuts to important commands: From left to right, Load Channel as Selection, Save Selection as Channel, Invert Channel, New Channel and Delete.
To blur a mask so that loading it as a selection will produce a feathered selection, click on the mask’s name to activate it, choose Feather from the Channels panel’s pop-out menu, type a number in the field and click OK.

To change the mask overlay to a color easier to see while making a mask for an orange Garibaldi fish, we changed the overlay color from the default red to yellow by choosing Channel Attributes from the Channels panel’s pop-out menu and clicking the Color swatch in the Channel Attributes dialog box.
PHOTO: CORBIS IMAGES
Calculating and Operating
Painter offers Boolean operations, useful functions that help generate new masks that fit perfectly against existing ones. Skillful use of these techniques will save time and effort.
To edit a mask using a selection, create a selection marquee, and choose Select, Save Selection or click the Save Selection as Channel button at the bottom of the Channels panel. In the Save Selection dialog box, choose the mask you wish to edit from the Save To pop-up menu, and choose the operation you wish to perform.
To replace a mask with the active selection, in the Save Selection dialog box, from the Save To menu, choose the mask you wish to replace, and then click the Replace Mask button. This choice “throws away” the original mask.
To edit a selection using a mask, create a selection marquee and choose Select, Load Selection, or click the Load Channel as Selection button at the bottom of the Channels panel. In the Load Selection dialog box, choose the mask you want to use and click a button to add, subtract or intersect; then click OK. The Intersect with Selection button makes a new selection from the intersection of the existing selection and the mask, selecting only the area where the two overlap. ![]()
Viewing the mask as an overlay (left) and the filled circle area created by using the Intersect With Selection command (right).
Working with Bézier Paths and Selections
Overview Use the Pen tool to create paths of straight and curved lines; convert the paths to selections; use a custom pencil to draw inside and outside of the selections.

JOHN FRETZ
TO DESIGN A LOGO FOR THE 100-YEAR-OLD Bethany Church in Seattle, John Fretz used a custom pencil to draw inside and outside of selections to create a look similar to his colored-pencil illustration style.
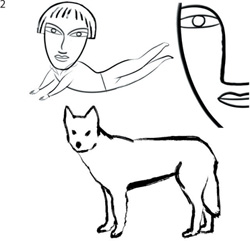
1 Sketching the logo. Fretz created a 4 × 4-inch pencil drawing of the logo that included a rough grid aligning the roofs of the houses. He scanned the sketch at 300 ppi and opened it in Painter to use as a template.
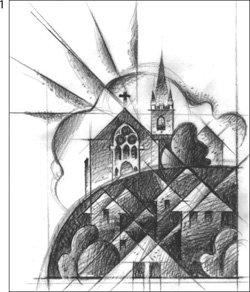
The logo sketch, including a rough grid
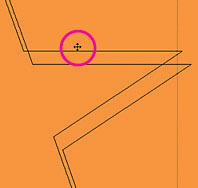
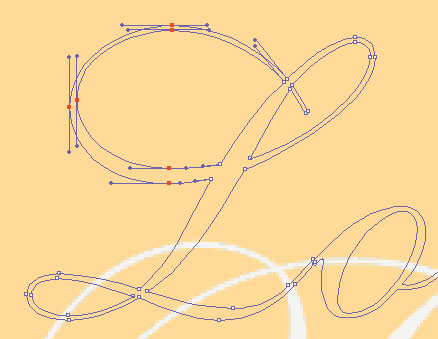
2 Creating a path with Bézier curves. The most efficient way to create a combination of curve and straight-line path segments is with the Pen tool. You can set up shape attributes (with no fill or stroke) to produce only a skeletal line that will help you see precise lines and curves while you draw: Choose the Pen tool from the Toolbox. In the Property Bar, make sure the Stroke and Fill boxes are not checked. Now click to place anchor points for straight-line segments, and press, hold and drag to create anchor points with handles that control curve segments. When you want to close a path, place the cursor over the starting anchor point, and then click when you see a small circle, or press the Close Shape button in the Property Bar.
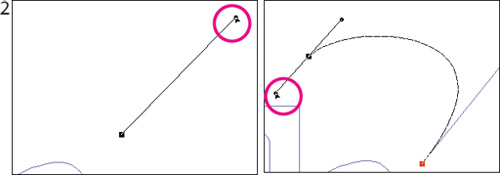
As this diagram shows, pulling a handle from an anchor point and then pressing and dragging creates a curve.
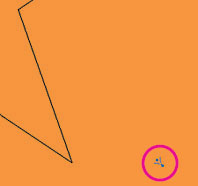
3 Changing the path shape. You can use the Shape Selection tool to fine-tune a path. First, if the anchor points are not showing, click the shape with the Shape Selection tool to show them; to show the control handles for an anchor point, click the point. Move the Shape Selection tool over an anchor point, a control handle, or a curve segment and drag to reposition it. (You can temporarily change from the Pen tool to the Shape Selection tool by pressing the Ctrl/![]() key.)
key.)
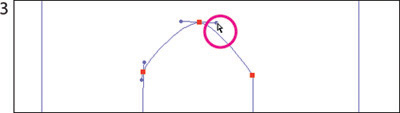
Dragging on a control handle changes the shape of a path.
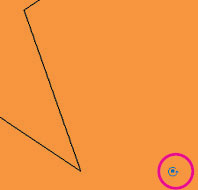
4 Changing the path to a selection. Paths must be turned into selections before you can use them to control where paint is applied on the image. You can convert a closed path drawn with the Pen or Quick Curve tool to a selection immediately after drawing it (or after selecting it with the Shape Selection tool) by pressing the Convert to Selection button in the Property Bar. You can also change a path into a selection by selecting the shape in the Layers panel and choosing Shapes, Convert to Selection. In your image, the Bézier curves will turn into a selection marquee. To save and name the selection as a mask in the Channels panel for future use, choose Select, Save Selection. Type into the Name field and click OK. If necessary, click on RGB in the Channels panel to return to the image.
![]()
Click on the Convert to Selection button to change the shape into a selection.
5 Creating the pencil and surface. To re-create the graduated effect he gets with conventional pencils on rough illustration board, Fretz built a heavy, grainy pencil. To build a grainy pencil similar to the one Fretz used, choose Window, Brush Controls, General and then choose the Pencils and the 2B Pencil variant in the Brush Selector. In the General panel of the Brush Controls, modify the variant by switching to the Cover method and Grainy Edge Flat Cover subcategory, and change the Grain setting to 10%. In the Size panel, increase the Size to roughly 200 pixels. In the Spacing panel, set the Spacing slider at 25% (so the dabs created by the larger pencil will overlap and paint continuous strokes). Now choose black in the Color panel (Window, Color Panels, Color). Fretz clicked the Paper Selector in the Toolbox and chose Basic Paper because of its even texture, scaling it to 300% using the Scale slider.
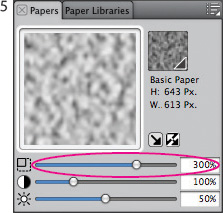
Scaling the Basic Paper texture
6 Drawing in and out of selections. Fretz used the Drawing Modes, accessed via the Navigator panel, to paint inside and outside of selections. To access the Drawing Modes click the Navigator Settings (gear) button on the Navigator panel (Window, Navigator) and from the pop-up menu choose Drawing Mode and then Draw Anywhere, Draw Outside or Draw Inside. Begin by loading a selection (Select, Load Selection) and choosing the Brush tool in the Toolbox. For a clean surface to work on, add a new layer (by clicking the New Layer button on the Layers panel) and fill it with white (choose white in the Color panel and then choose Edit, Fill, Using Current Color); to see through the layer to the scanned drawing below, adjust the Opacity control in the Layers panel. To protect the area inside an active selection, choose Draw Outside; to protect the area outside the selection, choose Draw Inside. Fretz switched back and forth between these two options as he rendered a graduated, even texture using his custom pencil. (You can also use the Select, Invert command, or Ctrl/![]() -I, to invert an active selection.)
-I, to invert an active selection.)
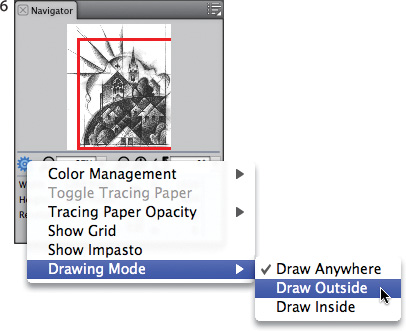
Choosing a Drawing Mode located in the Navigator panel
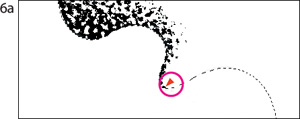
Painting outside of the cloud selection using the custom black pencil
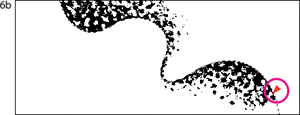
Painting inside of the cloud selection
7 Subtracting from a selection. To fill each house with white and leave the windows black, Fretz loaded each house selection and subtracted the window selection from it: Choose Load Selection again and in the Load Selection dialog box, choose a selection and click the Subtract From Selection button to subtract it from the original selected area. Fretz filled the resulting selection with white; then he added black texture to the house with his custom pencil. He continued to add white fill and black texture, until he completed the logo, and then restored the painted layer to full opacity. ![]()

The subtracted selection of the windows protected those areas, keeping them black when Fretz filled the house with white. He used his custom pencil to add black texture over the white fill.
Using Hand-Drawn Selections
Overview Create a drawing; select areas of the image using the Lasso; use selections to limit brushstrokes painted with various brushes.
DON STEWART
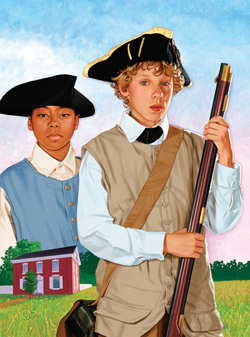
TO CREATE GUNS AT THE GUILFORD COURTHOUSE for Tudor Publishers, Don Stewart began by making a drawing in Painter while referring to photo references. In preparation for painting, he drew freehand selections using the Lasso tool (just as he would use friskets with conventional airbrush) so that he could isolate portions of the image as he painted.
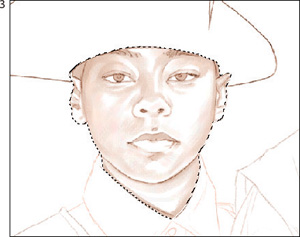
1 Developing the composition. After discussing the assignment with the art director, Stewart drew a rough thumbnail sketch in Painter. Upon approval of the thumbnail sketch, he shot photos for reference. Then he created a new Painter file that measured 5.5 × 7.5 inches at 300 ppi. With a dark brown color chosen in the Color panel, he used the Sharp Pencil variant of Pencils to draw a detailed brown pencil sketch on top of Fine Hard Grain texture.
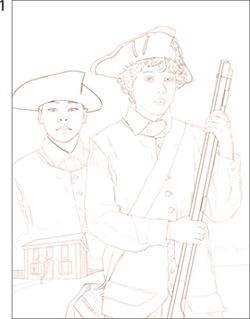
Stewart drew a brown line drawing using the Sharp Pencil variant of Pencils.
2 Creating selections. To isolate areas of his image, Stewart built a selection for each element in his drawing. To select with the Lasso tool, press L to choose the Lasso and drag carefully around the area you want to select, ending at your origin point. (You may find it helpful to zoom in on your image to make detailed freehand selections. Press M to switch to the Magnifier tool and click to zoom in; pressing Alt/Option and clicking will zoom out. (You can also zoom in and out of your image by using the Scale slider in the lower-left corner of the image window.)
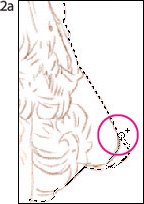
Adding to a selected area
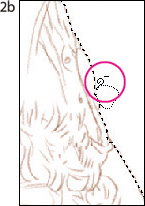
Subtracting from a selected area
The masks stored in the Channels panel. The Canvas is selected.
Painter’s Lasso tool lets you add to or subtract from the currently active selection. To add to the currently selected area, click the Add to Selection button on the Property Bar or hold down the Shift key and then drag with the Lasso. To subtract from the currently selected area, use the Subtract from Selection button on the Property Bar or hold down the Alt/Option key and then drag to cut away part of the active selection. Saving the completed selection as a mask will store it permanently with your image in the Channels panel. To save a selection, choose Select, Save Selection or click the Save Selection as Channel button at the bottom of the Channels panel. For straight line selections, such as the house, Stewart used the Pen tool and then converted the shapes to selections. For information about this method, see “Working with Bézier Paths and Selections” on page 193.
3 Painting inside selections. With the selections and masks built, Stewart was ready to start painting. He chose Painter’s Big Canvas texture (copied from the Paper Textures 2 library in the Paper Textures folder, Extras folder on the Painter 12 DVD-ROM). After loading the selection for the area he wanted to isolate and paint (Select, Load Selection), he used the Wash Camel variant of Watercolor to brush on color.
Painting inside the selection for the face
4 Painting richer color and texture. After he finished the underpainting for the image, Stewart loaded selections to isolate each area again, one at a time. This time he used the Digital Airbrush variant of Airbrushes to add richer color and to smooth areas. To build up deeper shadows within the isolated areas, he used the Simple Water variant of Digital Watercolor.
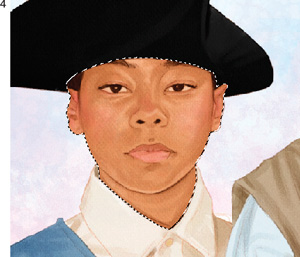
The in-progress underpainting painted with the Digital Airbrush (Airbrushes) and Simple Water variant of Digital Watercolor
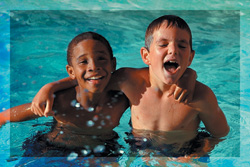
5 Adding details. Using the pop-up menu on the Paper Selector (Toolbox), Stewart switched back to the Fine Hard Grain texture that he used for his drawing. Then he used both the Sharp Chalk (Chalk) and Round Camelhair (Oils) to add details to the image; for instance, on the foreground boy’s sunlit hair and shirt. Next, Stewart added more texture interest by spraying a subtle splattered paint look on the foreground grass and on the sky, by using a combination of the Pepper Spray and Coarse Spray Airbrushes. The final illustration can be seen on page 195. ![]()
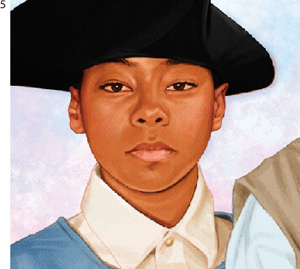
Adding deeper color and details to the face and clothing and texture to the sky
The splattered paint on the grass and the subtle texture on the blue vest
Selecting, Layering and Collaging
Overview Create a scanned collage background; create drawings; use Painter’s Selection tools to isolate the drawing elements; copy the elements and paste them into the scanned collage background; paint into selected areas with brushes.
SUSAN LEVAN / LEVAN/BARBEE STUDIO
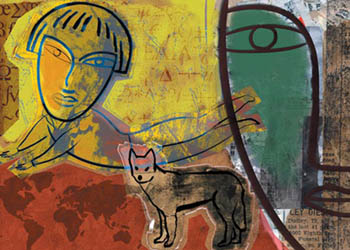
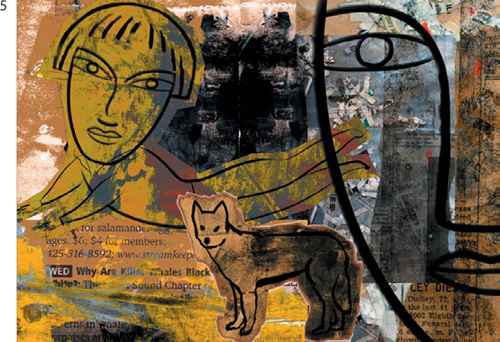
“WHAT I LIKE ABOUT USING the Current Color Auto Select feature with Chalk is the random residue of the original color that is left behind. This creates a natural, subtle texture within the masked areas of color,” says Susan LeVan of LeVan/Barbee Studio. A collage artist with traditional media, LeVan brings her collage process into Painter. When she created Floating Girl, she used brushes to paint within selections she had made using the Current Color setting of the Auto Select command. This creates jaggy torn paper edges around the elements in her image, giving her piece texture, lightness and air. LeVan’s collage technique also employs the use of other selection tools as well as painted and pasted layers.
1 Choosing a background for the collage. LeVan keeps a library of “grounds,” traditional collages of paper and paint, that she often uses as background elements in her digital illustrations. She opened a scan of one of her traditional collages that she had built using newspaper, rag paper and conventional acrylic paint. The collage background measured 1200 × 857 pixels.
The scan of the conventional collage
2 Drawing the foreground elements. LeVan opened a new image file that measured 1200 × 1248 pixels, with a white paper color. She sketched line drawings in black—a girl, a coyote and a face, each on its own separate transparent layer—using black color. She used the Sandy Pastel Paper texture throughout the entire image-building process. To sketch as LeVan did, from the Brush Selector, choose the Dry Ink variant of Calligraphy, choose black in the Color panel and choose Sandy Pastel Paper in the Paper Selector in the Toolbox. If the Layers panel is not open, choose Window, Show Layers. To create a new layer, click the New Layer button near the bottom of the Layers panel.
LeVan drew the girl, coyote and face on separate layers.
3 Making the “cut paper” girl. Next, LeVan opened a scan of another collage from her library of scanned surfaces (this one composed of newspaper, torn paper and bright yellow and orange acrylic paint) to use with the line drawing. She clicked the thumbnail for the girl’s layer in the Layers panel and copied the line drawing of the girl (Select, All; and then Edit, Copy) and pasted it into the brightly painted collage (Edit, Paste). Then she merged the line drawing layer with the collage by choosing Drop from the Layers panel menu.
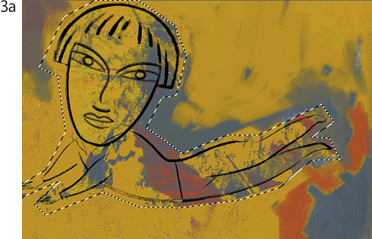
The girl pasted into the brightly colored collage and selected
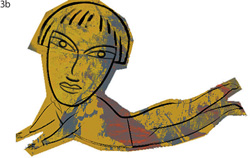
The girl with “cut paper” edge
To create a hard-edged cut-paper look around the girl, LeVan used the Pen tool to draw a loose Shape that also incorporated some of the collage background. She converted the Pen tool shape to a selection by clicking the Convert to Selection button on the Property Bar. Then she copied the selected area of the collage, and pasted it as a layer into the background file from step 1.
4 Building a “torn paper” coyote. She copied and pasted the coyote line drawing into a brown and black area of another copy of the original collage scan (to make a duplicate of your file, choose File, Clone) and she dropped this layer by choosing Drop from the Layers panel menu. Then, using the Square Chalk variant of Chalk & Crayons and white paint, she drew loosely around the coyote. To create the torn-paper look, she selected the coyote by choosing Select, Auto Select Using Current Color, and enabling the Invert button. Then she copied and pasted the coyote area as a layer into the original background scan from step 1.
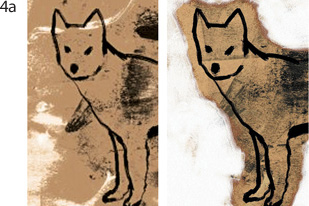
The coyote pasted into the collage (left) and drawn around with the white chalk (right)
This detail shows the “torn paper” edge achieved with the Auto Select, Using Current Color technique.
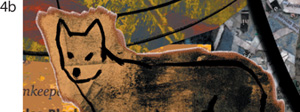
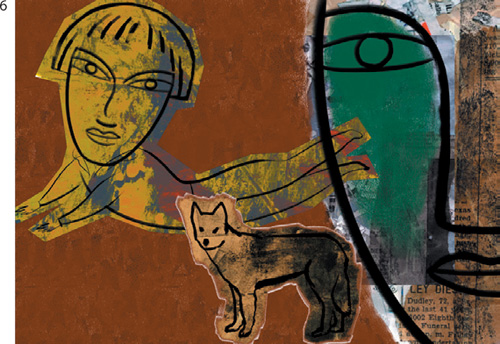
5 Adding the face and arranging the pasted elements. LeVan copied the face from the drawing made in step 2 and pasted it into the background scan from step 1. She used the Layer Adjuster tool to move the girl, coyote and face into position where she wanted them.
The “cut paper” girl, “torn paper” coyote, and line drawing of the face are pasted into the master collage file.
6 Creating texture and color variations. Next, LeVan focused more attention on the figures by painting over areas of the background. She used the Square Chalk variant (Chalk & Crayons) to paint rich brown and green strokes onto the Canvas, behind the layered girl, coyote and face elements.
Painting brown and green colors on the background with the Square Chalk
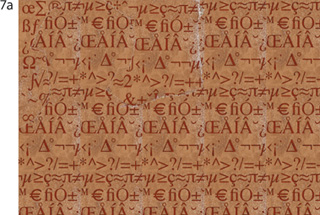
7 Adding pattern elements to the background. LeVan built and added pattern elements to the background. First, she made a pattern from a light brown area of the background above the girl. (For information about building patterns, see “Creating a Seamless Pattern” in Chapter 8.) She cloned the working master collage file (File, Clone) and filled with it with the custom brown pattern. (Effects, Fill, Fill With Pattern). Then she chose a dark red in the Color panel and chose the Text tool in the Toolbox. She clicked in the brown pattern file, and set type using the Symbol font. (For information on using Painter’s text tools see Chapter 9, “Working With Type in Painter.”) When the type was as she liked it, LeVan flattened the file by choosing Drop from the Layers panel menu. Then she used the Rectangular Selection tool to select an area of background with the type, and she captured it as a pattern into her current Patterns library.
To incorporate the type pattern into the master collage file, she filled the clone image with the type pattern by choosing Effects, Fill, Fill With Pattern. Then using the Lasso in her main collage file, she selected an area behind the girl. LeVan opened the Clone Source panel (Window, Clone Source). From the pop-out menu on the Clone Source panel, she chose Open Source Image, selected her pattern file as the Clone Source, and then she chose Effects, Fill, Fill With Clone Source to add the type pattern to the Canvas in the collage file.
The clone image filled with the type pattern
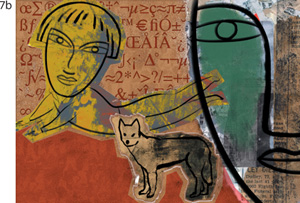
Cloning the type pattern into the collage
8 Finessing the composition. LeVan felt the text area around the girl was too prominent, so she painted over the text pattern, adding a new layer by clicking the new Layer button on the Layers panel and using the Square Chalk to lightly brush textured yellow paint over the area.
Yellow and blue paint added
She added new layers, moving them to various levels in the layer stack by dragging their thumbnails down in the Layers panel. She painted on the new layers and she changed the Composite Method of each layer to blend the colors. For instance, applying the Colorize Composite Method to a layer painted yellow will change any colors underneath but without affecting the black line work. On the other hand, painting in blue on a layer that’s in Lighten Composite Method will color the black line work in the layers below without covering yellow, for example, since the blue paint is darker than the yellow. For more information about working with layers and Composite Methods, see Chapter 6, “Using Layers.”
9 Adding the map and final brushwork. LeVan opened a small clip art image of a world map. She copied and pasted the map into the lower-left corner of her working collage file and then reduced the Opacity of the clip art map layer to 40% using the Opacity slider in the Layers panel. To complete her collage, LeVan added colored washes with the Simple Water variant of Digital Watercolor. The final image can be seen on page 197. ![]()
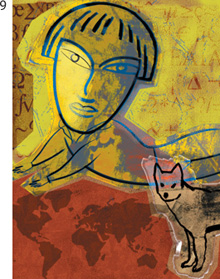
All of the elements are added to the collage.
Gallery
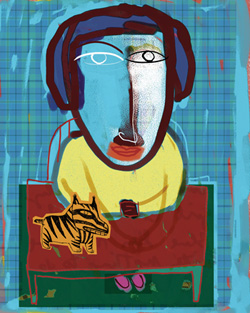
![]() Using vivid color and loose illustrative strokes, collage artist Susan LeVan of LeVan/Barbee Studio creates a strong emotional quality in her work. When LeVan created the works shown on these pages, she used brushes to paint within selections.
Using vivid color and loose illustrative strokes, collage artist Susan LeVan of LeVan/Barbee Studio creates a strong emotional quality in her work. When LeVan created the works shown on these pages, she used brushes to paint within selections.
For Blue Woman, LeVan repeatedly used the Select, Auto Select command using the Current Color setting and painted back into her image. To begin the work, she used the Scratchboard Tool and Round Pen variants of the Pens and black color to create a loose line drawing of the woman and table. She drew the pet in her conventional sketchbook with a black Sigma Micron pen and scanned it; then she opened the scan in Painter and copied and pasted the drawing into her working file. After positioning it with the Layer Adjuster, she merged it with the canvas by choosing Drop from the Layers panel menu. Next, LeVan made selections for the line drawing and animal by choosing Select, Auto Select, Using Current Color and painted grainy strokes within each selection using the Square Chalk variant of Chalk & Crayons. Then she inverted the selection (Select, Invert Selection) and painted a light blur background behind the figure and table using the Square Chalk variant.
For more color and texture interest in her composition, LeVan used a weave to create plaid wallpaper behind the woman. Using the Magic Wand, she selected the blue chalk background behind the woman and copied it to new layer, where she filled it with Bright Weave (Edit, Fill, Fill with Weave). Then she blended the Weave layer with the image using the Gel Composite Method, and reduced its opacity to 10% and moved it up and to the right. (To learn more about working with layers, see the introduction to Chapter 6, “Using Layers.”)
The line making up her nose, face, hair and hands was painted with black color and the Chunky Oil Pastel variant of Pastels. Finally, to add texture to the right side of the woman’s face, LeVan brushed lightly with a large Square Chalk brush. For more depth and interest in the woman’s eyes, LeVan painted transparent washes using the Simple Water variant of Digital Watercolor.
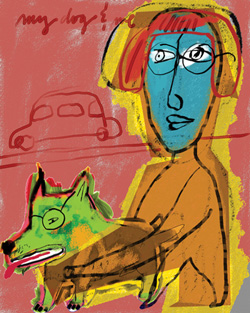
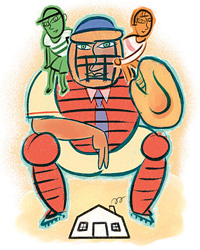
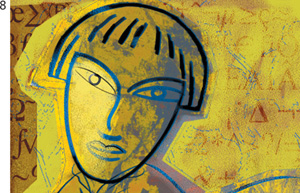
![]() My Dog and Me is a member of a series of work by Susan LeVan, featuring men, women and their pets. “The long series of man or woman with a dog was originally inspired by a Picasso painting that I loved as a teenager, Boy Leading a Horse. I have continued to do variations on this theme for thirty years. Picasso remains an important influence on my work, especially his use of a stylized central figure on a flat, simple picture plane,” says LeVan.
My Dog and Me is a member of a series of work by Susan LeVan, featuring men, women and their pets. “The long series of man or woman with a dog was originally inspired by a Picasso painting that I loved as a teenager, Boy Leading a Horse. I have continued to do variations on this theme for thirty years. Picasso remains an important influence on my work, especially his use of a stylized central figure on a flat, simple picture plane,” says LeVan.
LeVan used a panel composed primarily of saturated colors, including warm reds, oranges and yellows, accented by greens and blues. To begin, LeVan filled the Canvas with a gray color and then brushed over the surface using the Square Chalk variant of Chalk & Crayons and a reddish color, over Basic Paper texture. She added a new layer and drew the expressive woman’s figure using the Calligraphy Pen variant of Pens. For the dog, she scanned a black-and-white line drawing from one of her sketchbooks and opened it in Painter. To select the line drawing of the dog, she used the Select, Color Select, Current Color feature and copied and the line drawing into her working image. Next, she targeted the Canvas and used the Felt Marker variant of Markers and a bright green color to paint the background for the dog. For the background colors for the woman, she used the Square Chalk and a yellow color. She selected parts of both backgrounds with the Magic Wand and drew in the selection with a yellow Square Chalk.
For more texture interest, LeVan put a weave texture into the line drawing of the woman. She used the Select, Color Select, Current Color feature to select the black outline of the woman, and then she copied and pasted it onto another layer and filled it with the Bright Weave, chosen from the Weave Selector on the Toolbox (Edit, Fill, Fill with Weave). Next, she used the Pen tool to draw the hard-edged form within the woman. With the Pen tool chosen, she disabled the stroke and fill check boxes in the Property Bar; then she drew the path. To convert the path to a selection, she clicked the Convert to Selection button on the Property Bar. With the selection active, she copied and pasted it into a new top layer and filled it with an orange color, and then composited it with the Colorize Composite Method.
She added more color and textured brush work using various brushes, including the Square Chalk and Chunky Oil Pastel variants. For the inscription “My Dog and Me,” the road lines and the automobile, she used the Simple Water variant of Digital Watercolor. For more information on LeVan’s collage painting technique, see “Selecting, Layering and Collaging” on page 197.
![]() Don Stewart specializes in book illustration and commissioned portraits. For many years he worked on gessoed illustration board with airbrush and colored pencil. Today he draws on the computer, using Painter’s tools and brushes that match his traditional ones.
Don Stewart specializes in book illustration and commissioned portraits. For many years he worked on gessoed illustration board with airbrush and colored pencil. Today he draws on the computer, using Painter’s tools and brushes that match his traditional ones.
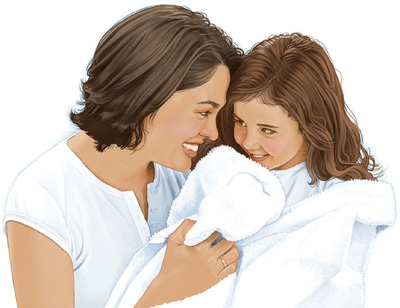
Stewart was commissioned by Church & Dwight Company, Inc. to paint Soft Moment for a package design. Stewart began the image by making a drawing in Painter using the Sharp Pencil variant on Fine Hard Grain paper. Next, so that he could protect some areas while he painted others, he isolated the important elements in his sketch by making selections with the Lasso (for example, the clothing, the towels and the people’s skin) and saved them as masks in the Channels panel (Select, Save Selection). Stewart loaded a selection for an element (Select, Load Selection) and then laid in washes for the preliminary color scheme using the Wash Camel variant of Watercolor. Next, he loaded each selection again and added richer color and values to each element with Digital Watercolor. For instance he used the Simple Water variant of Digital Watercolor to paint the texture on the towel. For finer, opaque details he used the Detail Oils Brush variant of Oils (for highlights on the people’s hair and faces, for instance). To paint deeper shadows and model the forms on the faces and clothing, he painted with the Simple Water variant of Digital Watercolor.
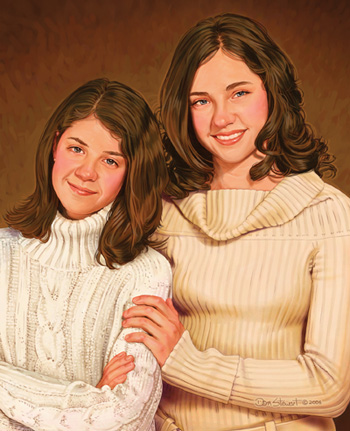
![]() Don Stewart began Sisters by sketching in Painter using the Sharp Pencil variant of Pencils on Fine Hard Grain paper texture. Then, he isolated areas of his image by making freehand selections with the Lasso (for example, the background, figures and clothing) so that he could limit the paint as he created an underpainting with the Wash Camel variant of Watercolor. For the background, Stewart painted, modulated and blended colors using a variety of Oils brushes, including the Round Camelhair variant of the Oils. For smoother areas (the skin, for instance), he painted with the Digital Airbrush variant of Airbrushes. To build up deeper values, Stewart painted transparent washes using the Simple Water (Digital Watercolor). To add final details, he applied highlights using a small Digital Airbrush, and the Sharp Chalk variant of Chalk & Crayons. For subtle texture in a few areas on the clothing, he used the Large Chalk variant of Chalk & Crayons.
Don Stewart began Sisters by sketching in Painter using the Sharp Pencil variant of Pencils on Fine Hard Grain paper texture. Then, he isolated areas of his image by making freehand selections with the Lasso (for example, the background, figures and clothing) so that he could limit the paint as he created an underpainting with the Wash Camel variant of Watercolor. For the background, Stewart painted, modulated and blended colors using a variety of Oils brushes, including the Round Camelhair variant of the Oils. For smoother areas (the skin, for instance), he painted with the Digital Airbrush variant of Airbrushes. To build up deeper values, Stewart painted transparent washes using the Simple Water (Digital Watercolor). To add final details, he applied highlights using a small Digital Airbrush, and the Sharp Chalk variant of Chalk & Crayons. For subtle texture in a few areas on the clothing, he used the Large Chalk variant of Chalk & Crayons.
![]() Nick Anderson is an editorial cartoonist at the Houston Chronicle in Houston, Texas. His award-winning cartoons have been published in Newsweek, The New York Times, The Washington Post, USA Today, and The Chicago Tribune. Anderson is the recipient of the 2005 Pulitzer Prize for editorial cartooning.
Nick Anderson is an editorial cartoonist at the Houston Chronicle in Houston, Texas. His award-winning cartoons have been published in Newsweek, The New York Times, The Washington Post, USA Today, and The Chicago Tribune. Anderson is the recipient of the 2005 Pulitzer Prize for editorial cartooning.
Anderson begins each cartoon by doing rough sketches on conventional tracing paper. When a concept is approved, he creates a black-and-white drawing working on a Wacom Cintiq display using Photoshop. Then, he saves his drawing as a TIFF file for import into Painter, where he uses a variety of Painter brushes to add color and texture. Anderson usually creates masks for the important elements in each cartoon. He paints directly on the alpha channel masks by using the Flat Color variant of Pens and black and white paint. To begin each mask, he created a new empty channel by clicking the New Channel button on the Channels panel. By default, this command creates a mask that is filled with black, which can be viewed on the working image as a red overlay. With the red overlay in place over his drawing, Anderson paints directly onto the channel using white or black paint. Creating channels can be tedious, but when they are complete, they allow him to paint freely within isolated areas.
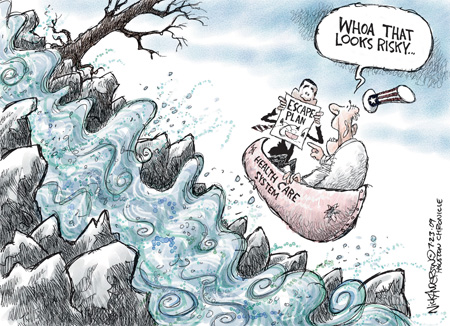
For Health Care Rapids, Anderson was inspired by stories about the national health care crisis. “It seemed to me that many of the opponents to reforming our health care system play on fears of change. But doing nothing while costs continue to rise dramatically and more people are pushed into the ranks of the uninsured seems crazier than doing nothing. So I came up with this visual to communicate what I consider to be the dangers of the status quo,” says Anderson.
To begin, he opened his drawing in Painter and cut it to a layer by choosing Select All, and Select, Float. So that the white areas of the drawing would appear transparent, he set the Layer Composite Method to Multiply in the Layers panel. Working on the Canvas, he used the Flat Water Blender variant of Digital Watercolor to lay down most of the base colors, changing the size of the brush as he worked. Then, he built up subtle, colored glazes, adding richness and depth to the image with a lower opacity version of the brush. To achieve the look of the rushing water, he painted thin, wavy strokes using a small Flat Water Blender that incorporated a high Wet Fringe setting in the Property Bar. For the highlights on the water, he used a tiny Wet Eraser (Digital Watercolor.) Anderson painted soft, wispy clouds with a large Flat Water Blender that incorporated a high Diffusion setting to achieve the look of clouds with soft edges. As a final touch, Anderson added spatters and bubbles on a new layer. He clicked the New Layer button on the Layers panel, and using the Spatter Water variant of Digital Watercolor, he painted a random spatter texture on to the rapids, and the sky, varying the opacities of the brush as he painted.

![]() Nick Anderson discusses his inspiration for the cartoon Compassionate Release: “Eight years after being convicted of killing 243 passengers in Pan Am 103, the bomber was released by the Scottish Government on “compassionate grounds” because he was suffering from terminal cancer. This struck me as absolutely absurd. I’m not convinced there’s an after life, but if there is, he’ll receive his justice then,” says Anderson.
Nick Anderson discusses his inspiration for the cartoon Compassionate Release: “Eight years after being convicted of killing 243 passengers in Pan Am 103, the bomber was released by the Scottish Government on “compassionate grounds” because he was suffering from terminal cancer. This struck me as absolutely absurd. I’m not convinced there’s an after life, but if there is, he’ll receive his justice then,” says Anderson.
For most of the coloring of Compassionate Release, Anderson used a custom version of the versatile Flat Water Blender variant of Digital Watercolor, that included reduced Diffusion and increased Wet Fringe settings in the Property Bar. While painting the base colors, he set the Diffusion at 0; and Wet Fringe at 100%. After laying in the underpainting, he built the color and values from light to dark varying the Opacity in the Property Bar as he painted. When he wanted to reveal more or less grain, he adjusted the Grain setting in the Property Bar. After laying in the basic colors and modeling of the forms, Anderson added a new layer and used the Square Chalk variant of Chalk & Crayons to paint opaque highlights over the underlying color. To clean up edges on this layer, he used a small Eraser. Next, to spray a granular texture on the foreground, Anderson used a small Spatter Water variant of Digital Watercolor. To build more depth and richness on the colored background, he again chose the Flat Water Blender, added a new layer and painted on this separate layer, so he that could easily make corrections with an Eraser and then reduce the opacity of the layer, if necessary. Finally, Anderson used a small Square Chalk to add a few white highlights on the large hand and on the running bomber.
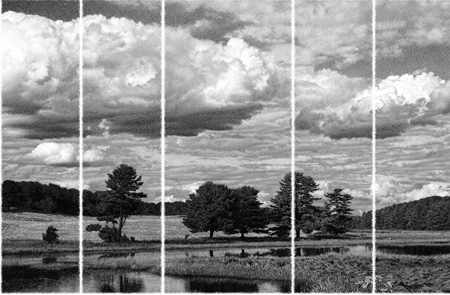
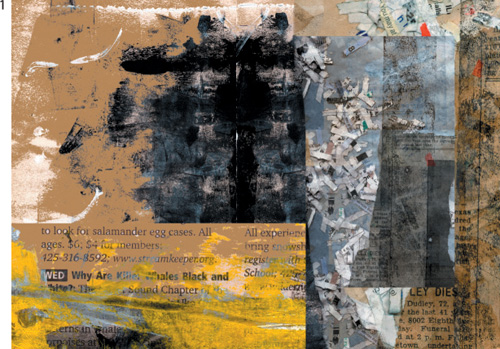
![]() Artist Martha Jane Bradford has developed a technique for using masks to constrain paint, and to build tones in her images. She creates a style that has the look of an aquatint or hard-ground etching. “My goal was to let the pixels show by drawing and printing the files at 64 ppi . . . the tones created with a mixture of at least three values so there are no flat color areas in the drawing—this makes the texture of the drawing sparkle,” she explains. The black-and-white drawing Sheepscot Village Trees is shown above.
Artist Martha Jane Bradford has developed a technique for using masks to constrain paint, and to build tones in her images. She creates a style that has the look of an aquatint or hard-ground etching. “My goal was to let the pixels show by drawing and printing the files at 64 ppi . . . the tones created with a mixture of at least three values so there are no flat color areas in the drawing—this makes the texture of the drawing sparkle,” she explains. The black-and-white drawing Sheepscot Village Trees is shown above.
Bradford began by working at the final size, a 2288 × 1500 pixel file. She put her reference photo on a layer to use as a guide. Bradford decided that the basic image would have four shades of gray plus white on a black background. To make the first mask, she clicked the New Channel button on the Channels panel, filled it with black and then renamed it Value One. So that she could get fine, grainy edges, she used the Charcoal variant of Charcoal & Conté over Synthetic Superfine paper. Then, she drew with white on the black mask wherever she wanted Value 1 (the white of the Canvas) to show. Then, she carefully made masks for the remaining values 2–6.
Bradford created the black-and-white drawing using the set of masks. To paint, she began by creating a layer for Value 1, which she left empty everywhere except for the lightest areas of the drawing. She loaded a selection using the Value 1 mask by choosing Select, Load Selection. Next, she created a layer for Value 1, where she used the Value 1 mask to lay in the lightest tones, drawing with a combination of large-sized Pixel Spray and Charcoal brushes on Synthetic Superfine Paper. She continued the process to paint the values 2–6.
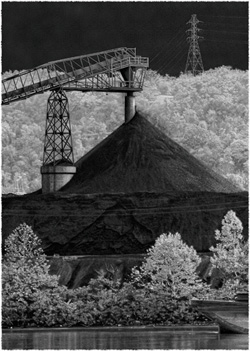
![]() Martha Jane Bradford created Black Diamond using a similar method to Sheepscot Village Trees on the facing page.
Martha Jane Bradford created Black Diamond using a similar method to Sheepscot Village Trees on the facing page.
Bradford began by working at the final size, a 2048 × 2880 pixel file because masks can get fuzzy edges when resized. She put her reference photo on a layer to use as a guide. Bradford decided that the basic image would have six values from white through gray to black, using six masks representing different facets of the sky, land and water. To make the first mask, she clicked the New Channel button on the Channels panel, filled it with black and then renamed it Value 1. In the Brush Selector, she chose the Charcoal variant of Charcoal & Conté. Then, she drew with white on the black mask wherever she wanted Value 1 (the white of the Canvas) to show. She carefully made masks for the remaining 5 values. To paint, she began by creating a layer for Value 2, which she left empty everywhere except for the highlights on the foliage. She loaded a selection using the Value 2 mask by choosing Select, Load Selection. Then, she used the Charcoal to draw the highlights. Next, she created a layer for Value 3, where she used the Value 3 mask to lay in the lightest tones, drawing with a combination of large-sized Charcoal brushes on Synthetic Superfine Paper.
She also used a layer mask on the Value 4 layer, which she used to fine-tune the shading on the trees and concrete pillar. This mask, like everything in the drawing, was drawn with a Charcoal variant over Synthetic Superfine Paper. To finish, she used the same process while painting the remaining values.