
Chapter 8
Delivering Training
Creating a Positive Learning Environment
The success or failure of your training session is often determined long before the first participant sets foot in your training room. The trainer's job is to create and maintain an environment conducive to learning and to create opportunities for participants to experience personal growth, a sense of achievement and accomplishment, and recognition and rewards.
Much of the difference between success and failure has to do with one simple word: preparation. This includes preparing yourself and the learning environment, preparing the participants, and preparing the participants' managers.
Active from the Start or Before
Participant preparation is critical to the success of the training session. Some ways to involve participants prior to the session are covered below.
Presession Questionnaire
Several weeks before the session, send a letter or email and questionnaire to the participants. Use a letter similar to the one in Exhibit 8.1 to welcome them to the session, provide them with an outline of the session and logistical information, and explain anything that should be done prior to the session, such as reading assignments, self-assessment instruments, or the questionnaire.
The purpose of the presession questionnaire is to find out about participants' expectations and perceived needs as well as gather information to create customized role plays, case studies, and other activities. The questionnaire helps to prepare them mentally for the learning experience. A tip sheet can be included to help participants get the most out of the training program. This is particularly helpful for those who may be attending a training session for the first time or when the participants are coming from different locations or organizations and are unlikely to know each other. Exhibit 8.2 is a sample of a tip sheet. It is sent to participants from different organizations attending a three-day residential program at a conference center.
Presession Assignments
Presession assignments are a good way to save valuable workshop time and get participants ready for the learning experience. Keep the prework minimal—a one- or two-page reading assignment and perhaps a self-assessment instrument. Participants overwhelmed with too much will be turned off before they begin. Also, keep in mind that there will always be some people who don't complete the prework assignments. Have a plan to deal with that situation. Ask them to work on the assignment during a break, or ask participants to work on the assignment while the group is involved in an activity.
Manager Involvement and Support
Ideally, managers of those attending training programs should sit down with their employees and tell them how the training relates to their jobs, explain what the program is about, tell employees why they are going and what the managers expect the participants to gain from the program, and find out what the employees hope to learn. The reality is that this scenario does not play out very often. Although managers cannot be forced to prepare their employees for the training experience, they can be prodded a little. Send the managers an email such as Exhibit 8.3, suggesting how they can help prepare their employees for training.
Be sure to include an outline of the program and send a separate tip sheet, such as How to Prepare Your Employees for Training, shown in Exhibit 8.4.
For multisession training programs, involve the participants' managers in another way. Create “homework” assignments or projects that the participants must complete outside the sessions, discuss with their managers, and have the managers sign off on them. For example, with one or two weeks between sessions, participants can be asked to apply what they learned in the session, write a summary, discuss it with their managers, and be prepared to discuss it during the next session. Exhibit 8.5 is an example of an assignment following a session on delegation.
The more supportive and involved participants' managers are, the more positive and participative the participants are in the training session. Studies also find that the more voluntary the training, the higher the motivation and involvement of the participants.
Rehearsal
Now that the up-front work to prepare your participants is over, do not overlook or short-shrift your self-preparation. You must be completely comfortable and proficient with the content and the activities. Take nothing for granted. Spend plenty of time practicing. Make sure to plan transitions or bridges from one activity to another. Anticipate questions and problems and think about how you would handle them.
Seating Arrangements
In many cases, you will not have any control over the room in which you are assigned to train or even the seating arrangements. You could be in a boardroom with a huge oval mahogany table and overstuffed chairs, or you might find yourself in an amphitheater with the seats bolted to the floor. Even in situations in which the chairs cannot be moved, keep in mind that people can be moved.
Different room setups result in different group dynamics. Part of the planning process is deciding how much interaction you want and how much control you want as the trainer. Then you choose the seating configuration conducive to creating the desired outcome. Careful thought and planning of the seating arrangements will help facilitate participation and minimize problems.
Figures 8.1 through 8.7 illustrate common seating arrangements. Read the following seven lists indicating the trainer's intent and desired outcome. Then, referring to the figures, write down which setup will most likely achieve the desired results. Answers are given in Appendix A.

Figure 8.1 Classroom Style

Figure 8.2 Horseshoe
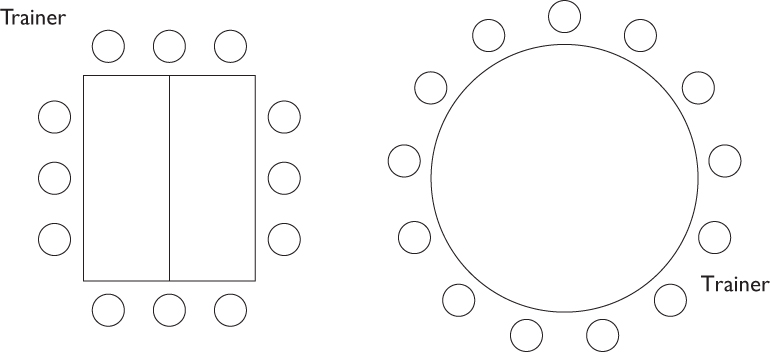
Figure 8.3 Single Square or Round
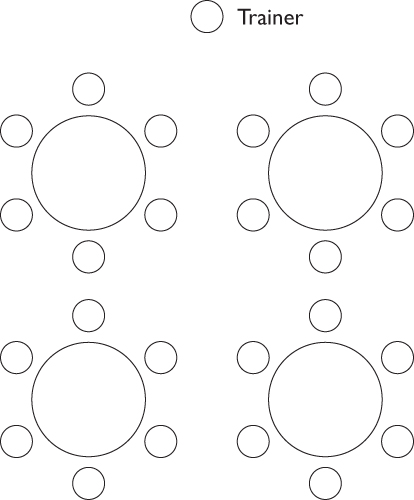
Figure 8.4 Cluster
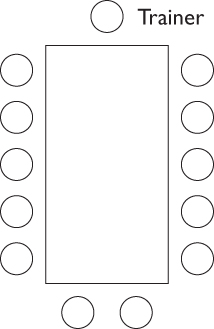
Figure 8.5 Conference
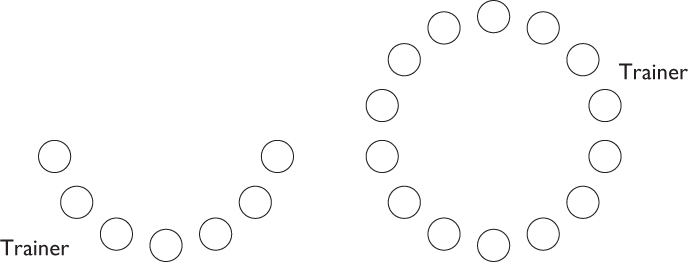
Figure 8.6 Semicircle and Full Circle
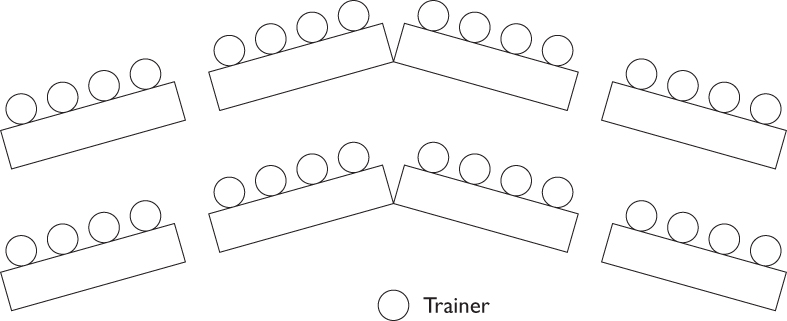
Figure 8.7 Chevron
Trainer's Intent/Desired Interaction 1
- Formal atmosphere
- Low group involvement
- High degree of trainer control
- Primarily one-way communication
- Preferred Setup 1
- Seating arrangement: ______________
Trainer's Intent/Desired Interaction 2
- Trainer serves as facilitator
- Emphasis on small-group work
- High participant involvement
- Freedom of movement for both trainer and participants
- Room for flip chart and work table
- Preferred Setup 2
- Seating arrangement: ______________
Trainer's Intent/Desired Interaction 3
- Moderate group involvement
- Trainer in control; focal point
- Allows for some participant movement
- Some two-way communication
- Preferred Setup 3
- Seating arrangement: ______________
Trainer's Intent/Desired Interaction 4
- Trainer becomes part of the group
- High participant involvement and interaction
- Informal, relaxed atmosphere
- Facilitates problem solving and promotes open discussion
- Preferred Setup 4
- Seating arrangement: ______________
Trainer's Intent/Desired Interaction 5
- High participant involvement
- Very informal
- Allows for changing configurations
- Conducive to a variety of activities and interactions
- Preferred Setup 5
- Seating arrangement: ______________
Trainer's Intent/Desired Interaction 6
- Formal environment
- Low to moderate group involvement
- Some two-way communication
- High degree of control on part of trainer
- Preferred Setup 6
- Seating arrangement: ______________
Trainer's Intent/Desired Interaction 7
- Formal atmosphere
- Moderate participant involvement
- Trainer clearly in control
- Preferred Setup 7
- Seating arrangement: ______________
It's Showtime
The importance of getting off to a good start cannot be overstated. What you say and what you do in the first few minutes can make the difference between a fabulous learning experience and a dismal failure. It is your job to (1) create a safe environment in which learning can take place; (2) stimulate participants' thinking; (3) involve the participants in the learning process; (4) manage the learning process; and (5) ensure individual participant accountability.
At the beginning and throughout the training session, you may be challenged, perplexed, and even stymied by participants' lack of motivation and sometimes outright resistance. You have, of course, taken participant motivation into account, using it as a driving force behind the design and development of your program. However, continue to be diligent and vigilant about motivational strategies throughout the delivery.
To guide you in those strategies, consider the ARCS model introduced by J. M. Keller (1983). The ARCS (attention, relevance, confidence, satisfaction) model offers an approach that ensures participant “buy-in” and participation. Use Keller's four-part model as a quality check on your design. An effective training program will reflect the following:
- Attention. From the very beginning, grab and hold the participants' attention, using a variety of techniques.
- Relevance. Design the program to meet the real-world needs and experiences of the participants, and clearly point out the tangible benefits. Throughout the program, provide a framework, helping participants link content with what they already know.
- Confidence. Design the training and facilitate the learning process in such a way that the participants gain confidence to apply new knowledge, behavior, and skills back on the job.
- Satisfaction. The artful design of the training program, coupled with skillful facilitation of the process, results in a high degree of participant satisfaction with the learning experience. Additionally, the participants' ability and motivation to apply the learning results in personal satisfaction.
Grab Their Attention
The technique of grabbing participants' attention and creating a readiness for learning is called “set induction.”
Using Icebreakers and Openers
Techniques that immediately involve participants are very effective in piquing their interest and curiosity and preparing them for the learning experience. Many trainers start with an icebreaker, an activity designed to put people at ease and help them become acquainted. Typically, icebreakers are not necessarily related to the content. Their purpose is to help reduce tension and anxieties, energize the group, set a tone for the program, and involve everyone. Openers, on the other hand, are subject-matter-oriented activities that accomplish all the above and also introduce the participants to the session content. It is far better if the opening activity serves several purposes, including setting a tone or mindset, and does not seem frivolous and a waste of time.
Many trainers use the tried-and-true (albeit boring) method of having people introduce themselves and say what they want to get from the training. A variation of this method, and just as boring, is to have people pair up, interview each other, then introduce each other to the rest of the group. These two openers are not only unimaginative, but create an outcome quite the opposite from what the trainer intends. Rather than being at ease, participants are uncomfortable at having to speak up in a room full of strangers. Furthermore, with the partner introductions, many people are embarrassed because they forget the other person's name or fumble with the information.
Although it is true that people should be active from the very beginning, it is also true that the activity must have a purpose beyond introducing people to each other. To find ideas for icebreakers, browse through the dozens of books on the market that offer icebreakers, openers, and warm-up activities for every purpose. (Check those listed in Appendix B for specific titles.) Write down the ones that appeal to you and how they could be used, that is, with what topic and audience. File them for use in another session or to spruce up an existing design.
A few basic openers are included on the next few pages that can be adapted to any topic.
Human Scavenger Hunt
In programs of three hours or more, you may want participants to get to know each other quickly so you can establish a safe environment in which people will feel comfortable participating. One of the most popular get-acquainted activities that also guarantees instant involvement is the Get-Acquainted Scavenger Hunt made popular by Ed Scannell and John Newstrom (1983).
Notice that the statements are both content-related and personal. Content questions include those that address having a daily to-do list, maintaining a neat work area, listening to educational tapes, and scheduling the night before. Personal items include cooking, pets, and birthdays. The two types of questions give participants an opportunity to relate on a personal level, while preparing them mentally for the session content.
The Party
This activity is great for networking and becoming acquainted. It creates movement and enables people to meet a number of fellow participants, regardless of the group size. The topics discussed can be adapted to any content.
Getting Around
Another popular activity is conducted in the following way:
Instant Assessment
Another activity that gets people involved from the beginning is called an “Instant Assessment” (Silberman, 2005).
People really enjoy this activity. It takes little time, yet gets people immediately involved in the content of the session. Notice that the items have an element of fun to them, yet also have a serious content-related component. This activity also appeals to those people who are tactile because they have an opportunity to touch and pick up the cards. From the trainer's point of view, the responses reveal some interesting information that can be referred to throughout the session.
What Do You Want to Know?
Another activity you might like to try follows.
Pretest
Also try the following activity for a quick start.
This type of quiz creates awareness among participants that they may not know as much as they may think they do about the topic, and that recognition motivates people to “buy” what the trainer is “selling.” You might make it even more interesting by asking participants to estimate how many correct responses they expect to get on the quiz.
A quiz or self-evaluation can be handled two ways. One approach is to have people complete it and score the quiz individually. Another is to ask participants to work on it with partners. Working in pairs is less threatening and serves to generate interest and enthusiasm as the pairs discuss and debate their answers.
You can make this activity more complex and fun by turning it into a game called “Test Match” (Sugar, 1998), which is designed as a team competition.
What's in It for Them
Participants attend a training session for a variety of reasons. Some really are excited and cannot wait to get started; others view the experience as something worse than a trip to the dentist. Some cannot imagine why they are there. After all, they have “been there, done that.”
Although it is true that people come to sessions with a lot of “baggage” you do not know anything about and cannot do anything about, you can lessen their resistance and improve their general mind-set by pointing out “what's in it for them.” Tell them how this session will benefit them by enhancing their skills, providing them with additional information, or helping them overcome any barriers that might be preventing them from doing their best—how the training will improve their lives.
Preview of Coming Attractions
After explaining the benefits to them and providing any background as to why and how this program came about, review the objectives by comparing intended outcomes with their needs and expectations. Several of the opening activities mentioned earlier, such as “What Do You Want to Know?” are very effective in making sure both trainer and participants are on the same page from the very beginning.
Be sure to provide an overview of the program, including your expectations, time frames, break times, and logistics. Let the participants know, for example, how often and how long the breaks will be, as well as how you are going to monitor and signal when breaks are over. This is also the perfect opportunity to explain the interactive format, particularly for those who have only experienced teacher-centered, passive learning.
Using Small Groups
Participants will be in small groups for most of the activities you will be conducting, such as those described in Chapter 7. The ideal size for a subgroup is five to seven people. The minimum is three, with eight as the maximum. Sometimes, however, participants will be working in pairs. Small groups, by definition, include pairs and trios. Pairs provide intimacy and thus instant interaction. Trios have the advantage of offering multiple views on the problem being discussed. “Buzz group” is another term for small group, from the buzzing sound of multiple groups engaged in lively discussion.
If possible, arrange for breakout rooms for small-group activities. Putting subgroups in separate rooms saves time, is less noisy, and preserves a collective spirit. Unfortunately, it is not always possible to have separate rooms. If that is the case, carve out areas within the main room and form small-group clusters with as much space between them as possible.
Assignments to small groups typically assume the form of a question or problem. Or ask small groups to develop a list, share personal incidents, or produce a definition.
The Power of Two
So far we have addressed methods and activities that involve the entire group or a number of small groups, but do not overlook the power of pairs to promote active learning. Asking participants to work with learning partners is an efficient and effective cooperative-learning technique. It guarantees 100 percent participation; as Mel Silberman puts it, “People can't hide or be left out in a pair.” Pairing not only promotes interaction, but also creates a safe environment in that no individual feels pressured to come up with the right answer.
Experiential Learning Cycle
After the opening activities are over, it is time to move to the meat of the program. Introduce the first activity. If you follow your carefully crafted design, you should have no problem. Not necessarily! The design may look great on paper, but how it plays out is what is important. Many trainers design and develop what appears to be a dynamite session, with plenty of participant interaction. If the session fails, they blame the participants (“What a bunch of losers!”); others denounce the use of participant-centered, active-learning methods and revert to the comfortable and less-risky trainer-centered approach.
For activities to do what they are designed to do, the trainer must make sure each activity completes the steps in the Experiential Learning Cycle. Experiential learning is a process by which participants learn inductively, that is, discover for themselves the intended learnings through direct experience during an activity. The Experiential Learning Cycle is a model of the five-step process that enables the participants to learn or derive meaning from what they experienced. This model is represented in Figure 8.8.
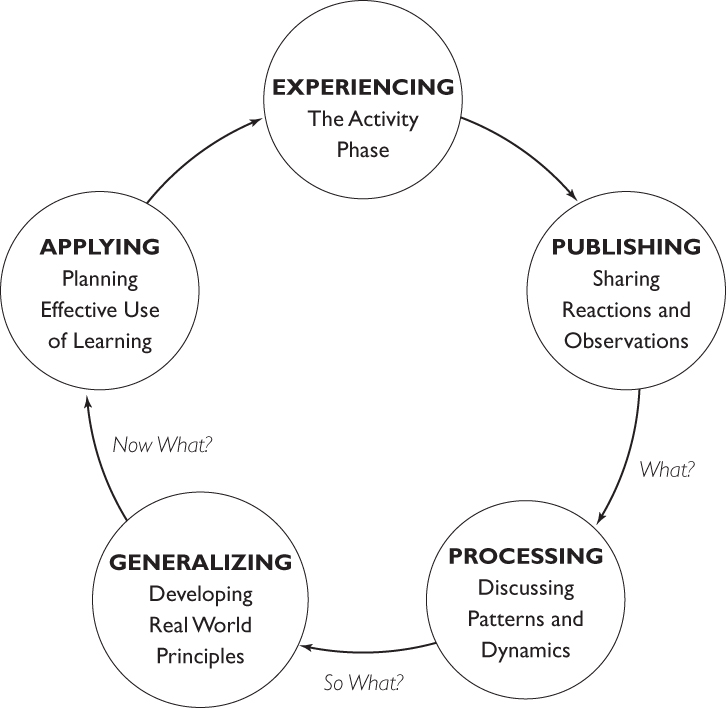
Figure 8.8 The Experiential Learning Cycle
Source: Introduction to Reference Guide to Handbooks and Annuals (1999 ed.). San Francisco: Pfeiffer.
- Experiencing. The process starts with participants experiencing or becoming involved in the activity. The basis for the entire process, the experience itself requires participants to do, say, hear, observe, and so on.
- Publishing or sharing. Following the actual experience, participants share their reactions to and observations about the activity.
- Processing or interpreting. In this part of the cycle, the trainer helps participants address the dynamics of the group interaction. During this critical stage, the facilitator helps the group explore and analyze what happened to them during the experience.
- Generalizing. After processing, participants make a connection between the activity and their real-world situations. They explore the meaning of the activity and how it relates to them. This is where most experience an “AHA!” The light bulb goes on. The participants reach a deeper level of understanding and insight.
- Applying. The final step requires participants to think about what they are going to do with this new learning, how they are going to apply it.
If any part of the cycle is omitted or inadequately addressed, there is a high probability that the structured experience will not produce the desired results. In fact, the processing and subsequent parts of the cycle are where the real learning takes place. Therefore, plan carefully and allow sufficient time for the complete processing of the activity. As a rule of thumb, spend as much time on processing—that is, discussing the activity—as you spend on the activity itself.
With that in mind, take a look at a systematic process for managing each experiential learning activity.
Introducing the Activity
All training activities, including role plays, case studies, assessment instruments, small-group discussion, and other structured experiences, must be introduced or positioned within the context of the overall session. Here are some guidelines for introducing any learning activity:
- Give a purpose and objectives for the activity. Be careful not to give out too much information. If you are focusing on discovery learning, then do not tell the participants what they are supposed to learn from doing the activity. That would defeat the purpose of inductive or discovery learning.
- Rearrange the furniture and regroup the participants as appropriate for the activity. The goal is to group people as quickly and as efficiently as possible.
-
Provide specific instructions as to what the participants are to do both during and after the activity. Define terms and distribute materials, carefully going over printed material. It's a good idea to write and display on a flip chart a brief, step-by-step outline of the activity including times associated with each step. For example, the time line for a survival simulation might look like this:
2:00 Individual reading 10 minutes 2:10 Individual ranking 15 minutes 2:25 Group discussion 25 minutes 2:50 Group ranking 15 minutes 3:05 Scoring and posting 10 minutes 3:15 Discussion of activity 40 minutes Make sure all participants are settled in their small groups before you give them any instructions or explanations. People have a hard time concentrating on two things at once.
- Make appropriate role assignments. To help pace the group on longer assignments, have each small group appoint a timekeeper. If small groups must write something on flip-chart pages, they will need a scribe or recorder. If each small group must report back to the large group, tell each to appoint a spokesperson. Make it clear that you do not want the same people assuming the same roles each time.
- Solicit questions and make sure everyone understands what they are to do before you continue.
- If necessary, demonstrate any rules or procedures.
- Begin the activity and circulate around the room to each small group to determine whether everyone knows what to do. Clarify as needed.
Conducting the Activity
Even though the participants are engaged in the activity, the trainer still has work to do. The following are some guidelines for keeping the activity on track:
- In the first few minutes of the activity, expect some confusion and/or frustration. It's okay. Some of this helps encourage problem solving and learning. Remember that the participants are learning by doing.
- Continue to move about the room from group to group to make sure the participants are on track.
- Remain in your role as the facilitator. Resist giving participants the answers or becoming directly involved in the activity. Give suggestions or ask guided questions, if you find that participants are way off the mark.
- Constantly observe how individuals and small groups are working on the task or problem as well as how the members work together. Intervene only when absolutely necessary!
- Remind the participants of time passing, giving them signals half-way through a particular stage and also two-minute warnings for each deadline.
- Use your judgment about calling time. In some cases, you may have to allot extra time; in other situations, the small groups may finish earlier than anticipated and be ready to move on to the processing stage.
Processing the Activity
What happens after the actual activity is over is critical. For our purposes, “processing” the activity refers to the entire discussion of the activity and includes the four stages of the Experiential Learning Cycle: publishing, processing, generalizing, and applying.
- Remember that this is where the real learning takes place. Plan to use about as much time to process an experiential activity as it took to conduct it.
- If you used only some participants to do a demonstration or role play, elicit feedback from them first before eliciting it from others.
- To make sure you address each part of the Experiential Learning Cycle, prepare questions using the following format: What? So what? Now what?
- Begin by asking participants WHAT they experienced during the activity. “What” questions are designed to elicit how the participants feel about the activity.
- What went on during the activity?
- What was your reaction?
- What did you observe?
- How did you feel?
- Next ask questions that address SO WHAT? “So what” questions relate to what the participants think or have learned from the activity.
- What did you learn about yourself?
- What did you learn from the experience?
- What similar experiences have you had? How does this relate to anything you have experienced on the job?
- How did this experience help you?
- What are the implications of the behaviors you experienced or observed?
- Finally, ask participants to answer questions dealing with NOW WHAT? “Now what” questions address what the participants are going to do.
- How can you apply what you learned through this activity on the job?
- What might you do differently?
- How can this experience help you in the future?
- Record participants' feedback and points on the flip chart. Ask one participant to serve as a scribe so that you can concentrate on facilitating the discussion.
- Do not be alarmed if people have differences of opinion. That is quite healthy. Just make sure the discussion does not get out of control.
- Be sure you have completed the learning cycle and helped participants make the connection between the activity and their own situations.
- Wrap it up by asking a few general processing questions to elicit feedback and reactions to the activity itself.
- What did you like about the activity?
- What did you dislike about the activity?
- What changes would you make?
- What suggestions do you have to make this a more meaningful experience?
- Don't worry about getting some negative reactions. Every participant cannot be expected to like every activity. Negative reactions are prompted by many factors, including learning style. Do not agonize over one or two negative comments. However, if your entire group reacts negatively, do some real soul searching and take a careful look at the design as well as your facilitation.
Creating Your Own Activity
Think about something you would like to communicate to participants. Then decide on an activity or specific method that will actively involve the participants in learning the material. Using the worksheet in Exhibit 8.6, think through and then outline the entire process for the activity, including specific processing questions.
Tips for Using Specific Methods
Although the steps and guidelines just mentioned are appropriate for any method, it is important to address some special considerations and guidelines related to specific techniques.
Assessment Instruments
Like other activities, assessment instruments need to be properly introduced and positioned. This is particularly important with self-assessment instruments that some participants might find threatening. Consider the following guidelines for the use of assessment instruments:
- Begin by explaining what the assessment is designed to do and why you have chosen this one in particular.
- Emphasize that this is an assessment, not a test. A test implies that there are right and wrong answers. Point out that there is no right or wrong.
- Explain thoroughly how participants are to respond to the assessment items. It is a good idea to read the instructions aloud and also demonstrate, using a slide, how to mark the responses. This, of course, depends on the complexity of the instrument.
- Give participants adequate time to complete the instrument, but let them know how long it should take.
- After they have completed the instrument, ask them to put it aside until everyone has finished.
- At this point, you may want to present a lecturette or engage participants in an activity that introduces them to the theory behind the instrument and the topic.
- After participants have an understanding of how the instrument relates to the topic and what the assessment is designed to show, ask them to predict what their scores might be. For example, the Thomas-Kilmann Conflict Mode Instrument (Thomas & Kilmann, 1974) is designed to give participants insight into their approaches to dealing with conflict. After they complete the instrument and put it aside, introduce them to the five approaches using a card sort activity. Then ask them to write down which approach they tend to use most frequently. (Most people believe they primarily use collaboration, when, in fact, collaboration is the least-used approach.)
- After the participants have written down their predictions, ask them to score the instrument and read the interpretive material.
- Then conduct a discussion to clarify the participants' understanding of the assessment and what the scores mean. Ask for volunteers to share their scores and personal insights. Ask people to indicate whether their scores were consistent with what they expected. In other words, did the data confirm or refute their speculations? If people disagree with the results of the assessment, point out that they generated the data, and only they can verify it. Suggest that they revisit particular items that caused them concern and analyze their responses.
- The last step is to process the activity using the general suggestions and guidelines discussed earlier.
Videos
Participants often regard videos as an opportunity to “take a snooze”—sometimes literally. How the video is used is critical to the success of this method. Follow these suggestions to ensure maximum impact:
- Introduce the video by explaining why you are showing it and what the video is about, including a brief description of the setting and characters. Also, prepare participants for anything unusual or unique in the video. For example, any of the videos produced by Video Arts reflect the British accent and dry wit of actor John Cleese.
- Tell the participants what to look for as they view the video. In fact, it is a good idea to prepare a list of specific questions related to the video and create a handout or post the questions on a flip chart. The entire group can address each question, or different questions can be assigned to specific individuals or groups of participants. This technique will make the participants much more attentive because they know they will have to report their observations to the entire group.
- Show the video in its entirety; then lead a discussion based on the questions or points the participants were to look for.
- Another method for making a video more interactive is the stop-action technique. This involves stopping the video at strategic places to discuss points or observations. Studies show that this stop-action technique results in significantly greater learning. Here are three ways to use film-stopping intervals:
- Ask the group, “What would you do?” to give the participants an opportunity to speculate on what they believe is the most appropriate action or behavior.
- Ask the participants to recap or review the key learning points they saw demonstrated in the segment just viewed.
- Ask them how the video segment relates to their own situations on the job.
- Whichever viewing method you choose, make sure you devote adequate time to processing, just as you would with any other activity or technique.
Role Plays
As discussed in Chapter 7, role plays are extremely effective if handled properly. Keep in mind the following guidelines when using any type of role-play activity:
- Be clear about your objectives and communicate them clearly to the participants. Be sure they understand that the purpose is to practice the skills they have learned in the session.
- A risk-free environment is critical to the success of a role play. The key is to introduce role plays incrementally and only after you have presented a model of desired behavior through a video or demonstration.
- Review the procedure, steps, or skills that have been presented throughout the session.
- Prepare an Observer Sheet that helps the observer focus on each role player's behavior. This sheet can also serve as a checklist for the participants to follow even after the session is over.
- Hear feedback first from those who participated as actors and then from observers before giving your input.
- During the discussion, maintain focus on the process, not the content.
Simulations
Because of its length and complexity, a simulation requires more time and thought when preparing the participants for this activity.
In addition to following the general guidelines for introducing, conducting, and processing an activity discussed earlier, be sensitive to the potential risks. Since participants are in small groups, they will interact with a smaller number of people for a lengthy period. These factors coupled with the nature of the activity are likely to create more stress among individuals as they deal with both task and people skills. People tend to “show their true colors,” sometimes resulting in intra-group conflict. Do not be surprised when it happens, and use it as a learning opportunity during the processing stage.
Improving Platform Presence
How you come across to your participants is just as important as your training design and content. In fact, because you are the medium through which the message is communicated, your demeanor, appearance, and behavior can make or break a program.
Physical Appearance
People form an impression of you within the first few seconds—as soon as you enter the room. That impression is lasting and often determines how your participants react to you.
Three words should guide you in your selection of dress for your training sessions: professional, appropriate, comfortable. First and foremost, remember that you are a professional, and that is the image you want to project at all times.
A good rule of thumb is to dress equal to or above the level of your training group. If, for example, your participants are dressed in business casual, then you should dress accordingly, but go one step beyond a skirt or slacks and a sweater. Add a blazer or sport coat. Make sure your clothing is comfortable and fits well.
Avoid wearing anything distracting. This is a particular concern for women and their accessories: Do not wear bangle bracelets or dangling earrings; both become a distraction rather than an enhancement. Shoes are another consideration. Men's choices are pretty limited—slip-ons or tied. That choice is determined by the degree of casualness of the rest of your attire. Women, however, can choose flats or heels of varying height. This becomes a matter of personal preference and comfort. Particularly when conducting an all-day seminar or workshop, do not wear very high heels. They change your center of gravity, cause you to walk and stand differently, and do not provide you with the stability and balance you need in front of a training group.
Body Language, Gestures, Movement, and Facial Expression
Your body language, gestures, movement, and facial expression all contribute to the impression your participants form of you. They can either encourage participants to listen or discourage them from paying attention to your message.
Posture
Always stand straight with your feet shoulder-width apart to give you balance. If you stand with your feet close together, you will have a tendency to sway. Of course, in an all-day training session, you may find yourself becoming less formal and sit on a table or with the participants later in the day. So much depends on the group, the topic, the organization's culture, and the mood you are trying to create.
Gestures
Gestures are very effective means of emphasizing your points. They should be natural, meaningful, and controlled. Do not fling your arms wildly or use your hands and arms in a robotic manner. When you extend your arm and hand in a pointing gesture, be sure to keep your fingers together, using your entire hand to point rather than one finger. Remember that sharp, sudden gestures create negative emotions.
Movement
Although movement is a matter of style, be aware of the impact it can have on a group. At one extreme is the statue, the trainer who stays in one place and never moves. Although certainly not distracting, this posture is uninteresting. At the other extreme is the trainer who is in constant motion, who never stays in one place for more than a few seconds. Not only is this behavior distracting but participants will probably feel worn out or exhausted by the end of a session just from watching the trainer.
Facial Expressions
Do not overlook the importance of facial expressions. From the first moment the participants see you, they should feel your warmth. The most effective way of achieving this is to smile with both your mouth and your eyes. Throughout your session, your facial expressions can help or hinder your message. Make sure they are congruent with your words. Do not frown if you are saying something meant to be positive and upbeat.
Remember: What people see is more powerful than what they hear. Perception is reality, and how participants perceive you will impact not only how they react to you personally but how they react to the learning experience.
As you have learned (or perhaps already knew), there is more to training than standing in front of a group and spewing forth information accompanied by a glitzy slide presentation. Training is not an event—it is a process, one that involves thoughtful preparation and purposeful delivery. There is, however, even more to consider, such as the use of visual aids, which we explore in the next chapter.