Overview
This chapter introduces you to Dependency Injection (DI) in TypeScript. It demonstrates how to implement the DI design pattern. You will also see some common use cases for the DI pattern, including ones from libraries such as Angular and Nest.js. This chapter will teach you how to build a simple Angular application that uses DI. You will also learn some basics of InversifyJS and how to use it in your TypeScript applications. By the end of this chapter, you will be able to build a calculator application that utilizes DI using InversifyJS.
Introduction
A design pattern is a general, repeatable way to solve a commonly recurring problem in software design. It is not just code that you can paste and use in your own code, but a guideline to writing code. It is usually not tied to any specific language, so a given pattern can be transformed from language to language, with its implementation changed to match the desired language and environment.
Design patterns can usually be used in many different situations and help you solve a lot of different problems. For example, if you want to make sure you only have one active connection to a database, you may want to use the Singleton design pattern, which basically ensures that only a single instance of something exists, or if you want to write an ORM tool (an object-relational mapping tool, for abstracting away a database) that allows the use of multiple databases, you may want to use the Adapter design pattern, which allows the ORM tool to talk to multiple types of database drivers using a "common language."
Using design patterns can speed up development, since they are battle-tested through decades of prior usages, in a variety of problems. Furthermore, if working in a team, it is easier to explain a solution to a given problem compared with conventional methods. Design patterns serve as a sort of "common language."
Note that when beginning to learn the concepts of design patterns, it may be difficult to wrap your head around them, and you may find it harder to solve problems with them than without them. This is because it's not straightforward to spot when a specific design pattern fits a given problem, especially when you don't have experience using it, or don't understand either the pattern or the problem completely. There are also some patterns that are commonly easier to understand than others (for example, the Singleton pattern is easier to understand than the Adapter pattern).
Furthermore, if you're just beginning to use a design pattern, its usefulness may not be apparent until further down the project lifetime, where you might actually want to add features that you may have not initially thought of or even just fix bugs. Lastly, it's important to note that not every problem can be solved using a design pattern, and using the wrong one may entail more issues than it solves. Also, not every problem requires a design pattern – you can add as many patterns as you want to a "Hello World" program, but their usefulness will be doubtful. So, it's important to take a step back and see whether using it really fits the problem you're trying to solve.
The DI Design Pattern
DI is a technique whereby one object supplies the dependencies of another object. A dependency of an object is anything required in order to perform its operation in the application. Before diving into an explanation of what DI is, let's try to understand the fundamental element in the preceding definition with an example.
Let's say we have two classes:

Figure 8.1: A simple class dependency
As shown in the preceding diagram, Class A uses some properties/methods of Class B. Thus, we can say that ClassB is a dependency of ClassA.
Let's look at a more real-world example (albeit simplified). Most websites, whether social media websites, government websites for disbursal of services, or e-commerce platforms, require a user to register in order to use the services offered by the website. Imagine you are developing one such website. You require a UserRegistrationService class to gather user details, save them in a database, a file, or any other repository, and then send an email to the user informing them of a successful registration.
Your website's method for handling the registration process would therefore probably look something like this:
class UserRegistrationService {
registerUser(email: string, password: string) {
// TODO: process registration
// TODO: send registration success email
}
}
This service has two primary responsibilities – saving the user's details to persistent storage and sending them an email. For now, you are not concerned with whether the details are stored in a database, SaaS, or a file. In the same vein, you are not concerned if the registration email is automated or done manually. Thus, we just want to get some UserRepository, and some EmailService, as shown here:
interface User {
email: string;
password: string;
}
interface UserRepository {
save(user: User): Promise<User>;
}
interface EmailService {
sendEmail(to: string, subject: string, body?: string): Promise<void>;
}
As mentioned, we don't care about their implementation, or even creating them; we want someone else to do that, so our implementation of UserRegistrationService could look something like this:
class UserRegistrationService {
constructor(
private userRepository: UserRepository,
private emailService: EmailService
) {}
async registerUser(email: string, password: string){
await this.userRepository.save({
email,
password,
});
await this.emailService.sendEmail(email, 'Welcome to my website!');
}
}
Note that we don't know what the actual implementation behind UserRepository or EmailService is; we just know their structure.
Now, if we change how users are saved, for example, deciding to migrate from a file to a MySQL database, or if we change our email provider from Mailchimp to SendGrid, the UserRegistrationService class stays intact and should still function as before as long as any implementation thereof conforms to the same UserRepository and EmailService interfaces (for example, have the same structure – same method signatures, with the same parameters, and so on) and provide the same functionality as described previously.
For example, in the following code snippets, notice both the file-based and the MySQL-based implementations, implement UserRepository, which is the only thing that UserRegistrationService is aware of.
The file-based implementation is as follows:
// FileUserRepository.ts
import * as fs from 'fs';
class FileUserRepository implements UserRepository {
save(user: User): Promise<User> {
return new Promise((resolve, reject) => {
fs.appendFile('users.txt', JSON.stringify(user), err => {
if (err) return reject(err);
resolve(user);
});
});
}
}
The MySQL-based implementation is as follows:
// MySqlUserRepository.ts
import mysql from 'mysql';
class MySqlUserRepository implements UserRepository {
connection = mysql.createConnection({
// connection details
});
save(user: User): Promise<User> {
return new Promise((resolve, reject) => {
return this.connection.query(
`INSERT INTO users (email, password)
VALUES (?, ?)`,
[user.email, user.password],
(err, data) => {
if (err) return reject(err);
resolve(data);
}
);
});
}
}
To put it simply, DI allows us to separate the what from the how. The dependent class only needs to know how to interact with a user repository – by calling a method called save, with a single parameter of the User type), as well as with an email sender – by calling a method called sendEmail that takes in two parameters; a to email address, of the string type, a second parameter for the email's subject, also of the string type, and an optional third parameter for the email's body (also of the string type).
Then, these services can handle the what should (actually) be done portion – saving the user's details to a file, to a MySQL database, or an entirely different thing, and then sending the email automatically using an SaaS service, queuing them for manual sending later, or anything else.
Going back to the dependency chart, in this example, the dependencies are as follows:

Figure 8.2: UserRegistrationService dependencies
Another benefit of having used DI here is that it simplifies testing our implementations separately from their dependencies. For example, when testing the registerUser method of UserRegistrationService, we only want to test the registerUser method; we don't care about how its dependencies behave in production (we will test these separately). We can just mock them with any implementation while testing to have them behave how we want. Remember that the whole point of DI is that we don't care about what the dependencies do and how they do it, as long as they conform to the agreed-upon interface – UserRepository and EmailService in this case. Here is how we would test the registerUser method in code:
interface User {
email: string;
password: string;
}
test('User registration', async () => {
const mockUserRepository: UserRepository = {
async save(user: User) {
return user;
},
};
const mockEmailService: EmailService = {
async sendEmail(to: string, subject: string, body?: string) {},
};
const userRegistrationService = new UserRegistrationService(
mockUserRepository,
mockEmailService
);
await userRegistrationService.registerUser(
'super-secret-password'
);
expect(mockUserRepository.save).toHaveBeenCalled();
expect(mockEmailService.sendEmail).toHaveBeenCalled();
// ...
});
Even though the preceding examples only demonstrate classes, dependencies can be of any type – classes, functions, plain objects, and even simple constants (depending on the language and specific implementation).
For example, if UserRegistrationService were to require a constant value, for example, a salt to hash the user's password with, it would be provided in the constructor, too, as another argument, as shown here:
import * as bcrypt from 'bcrypt';
class UserRegistrationService {
constructor(
private userRepository: UserRepository,
private emailService: EmailService,
private passwordHashSalt: string
) {}
async registerUser(email: string, password: string) {
const hashedPassword = await bcrypt.hash(password, this.passwordHashSalt);
await this.userRepository.save({
email,
password: hashedPassword,
});
await this.emailService.sendEmail(email, 'Welcome to my website!');
}
}
Note
The following sections will be using decorators, covered in Chapter 7. Decorators. Please make sure that you have read and understood them before continuing, as decorators are an essential part of how all DI libraries covered next are built on.
Another concept related to DI is Inversion of Control (IoC), a programming principle in which the control flow is inverted, as the name suggests. While DI's concern is to decouple dependencies via abstractions (such as our UserRepository abstraction over the MySqlUserRepository implementation), in IoC, the concern is to let the consumer decide what should be done by the component/library. For example, in our implementation of UserRegistrationService above, we used IoC, since we allow how the user's details are sent, as well as how an email is sent by the consumer, to be specified. In the application's case, it could decide whether it wanted to use FileUserRepository or MySqlUserRepository, and in the test code we decided that both of them should do nothing. This was also decided at the consumer (test code) level.
To summarize, DI concerns itself with letting a class know about abstractions over implementations, while IoC's concerns revolve around letting the consumer decide about the implementation(s) that should be used.
Some popular frameworks, both in the frontend as well as the backend, have embraced DI as a core part of their framework – the most popular ones are Angular in frontend development and Nest.js in the backend. DI allows applications built on top of these frameworks to be very robust and flexible, especially in large applications due to the nature of DI, which allows the creation of classes (and other dependencies) to be separated from their usage.
DI in Angular
Another actual real-world example of DI can be found in the Angular framework – a modern framework for building frontend applications using TypeScript. Angular has its own implementation for a DI library. Furthermore, the Angular framework itself, as well as apps built on it, heavily relies on this DI implementation.
Let's take a look at a simple Angular app and see how DI makes it straightforward to build an easy-to-maintain, scalable application.
An Angular app is made up of several NgModule, each of which is usually a logical part of an app – this can be a feature, a UI components library, or anything else. Each NgModule can have two types of "things:"
- Declarations (Component and Directive)
- Providers (usually Service)
Declarations are what constitute the UI of the app, things such as the WelcomeMessageComponent class (shown in the following snippet), which takes in name as an input (using the @Input decorator, which is kind of like passing in parameters to a function or a constructor of a class, just with components), and displays it in an HTML h1 tag (an HTML tag to display a main header):
import { Component, Input } from '@angular/core';
@Component({
selector: 'welcome-message',
template: `
<h1>Welcome {{ name }}!</h1>
`,
})
export class WelcomeMessageComponent {
@Input() name: string;
}
The preceding code will yield the following output:

Figure 8.3: Displayed output of rendering WelcomeMessageComponent with "John" passed in to the name input
Providers are usually services, which hold the main logic of the app and are usually used for anything that's not specifically related to the UI.
For example, you could have a UsersService class that handles fetching a list of users from a backend, as shown here:
import { Injectable } from '@angular/core';
import { Observable, of } from 'rxjs';
export interface User {
name: string;
}
@Injectable()
export class UsersService {
getUsers(): Observable<User[]> {
return of([
{ name: 'Alice' },
{ name: 'Bob' },
{ name: 'Charlie' }
]);
}
}
The preceding code has a UsersService class that has a single method – getUsers(), which returns a static array of User objects. Note that we wrap our static array with of(), which takes a static value and wraps it in an Observable, so we can later change the behavior of this method to asynchronously return data (for example, from a remote endpoint, as we'll see next).
Note
An observable is an asynchronous stream of data, basically allowing data to be passed between "publishers" and "subscribers." This data can be a one-time operation, such as with an HTTP call, can have multiple emits (for example, emit an increasing number from 1 through 10, in sequence, every 1 second), or can even be infinite (for example, emitting an event every time the user clicks a specific button). It is part of the Observer pattern.
We would then use UsersService in our UsersList component, which displays the users in a list, as shown here:
import { Component } from "@angular/core";
import { Observable } from "rxjs";
import { UsersService, User } from "./users.service";
@Component({
selector: 'users-list',
template: `
<ul>
<li *ngFor="let user of (users$ | async)">
{{ user.name }}
</li>
</ul>
`
})
export class UsersListComponent {
readonly users$: Observable<User[]>;
constructor(private usersService: UsersService) {
this.users$ = usersService.getUsers();
}
}
Here, we create a simple component, UsersListComponent, that displays a list of users, which it gets from UsersService that's injected into it at creation time by the Angular DI.
Once the service is injected, we call getUsers() and store the returned Observable in a users$ member so we can later access it from the template, which utilizes the async pipe to tell Angular to subscribe to the Observable and update the template when its underlying value changes:

Figure 8.4: The output from running the app
We won't dive into Angular's template engine or change detection mechanisms – those are two big topics in themselves – but you can refer to the Angular documentation for more information on that. Instead, let's focus on what's going on with regard to DI – notice that we asked for a UsersService object in the UsersListComponents constructor; we didn't specify that we wanted to get a specific instance of the service and so on, just that we want one. This is very powerful, since this offloads the logic of how and where this service is instantiated to a dedicated place (the NgModule) and opens up a lot of possibilities. We could test the component more easily (by providing a fake UsersService), or even just replace the UsersService implementation at runtime with another one.
Angular providers can also require other providers; for example, we could have a generic HTTP client service that knows how to make HTTP calls, and then inject that into our UsersService, which can focus on more high-level details such as the endpoint, which it needs to use in order to fetch the users. In fact, Angular has such an HTTP service built in, called HttpClient. You can use it and fix the mock implementation we had for the users with a real one, utilizing DI further as shown here:
import { Injectable } from '@angular/core';
import { HttpClient } from '@angular/common/http';
import { Observable } from 'rxjs';
export interface User {
name: string;
}
@Injectable()
export class UsersService {
constructor(private httpClient: HttpClient) {}
getUsers(): Observable<User[]> {
return this.httpClient.get<User[]>('/api/users');
}
}
Here, we ask for an HttpClient and use its get() method to make a GET request to the /api/users endpoint in our site, which should return an array of User objects – that is, objects with a property called name, with a string type.
This replaces the mock implementation we had earlier with a more real-world use case by calling an external endpoint instead of returning a static list of users.
Again, notice that we just asked for an HttpClient interface again. We don't care about how it's implemented (this could involve using XMLHttpRequest, fetch, or even another underlying library), as long as it conforms to the HttpClient interface.
You may have noticed that the path that we request from HttpClient is a relative one. This works if our backend is on the same domain as our frontend (for example, https://example.com is our website and https://example.com/api/users would return the users). However, if we want to move our backend to a different server, this will break our website. In the next exercise, we will fix this, using Angular's DI mechanism and by adding HttpInterceptor.
HttpInterceptor is an interface Angular provides that we can implement in order to "hook," or even change network requests, either on their way out (the request), or on their way back (the response), before any other consumer "sees" the response. This will work wherever HttpClient is used in the application, without requiring any more code modifications in other services that use HttpClient.
Note
The example discussed in this section is the basis of our next exercise.
Exercise 8.01: Adding HttpInterceptor to an Angular App
In this exercise, we'll add HttpInterceptor to our existing Angular application, which we built in the preceding section, to allow our backend service to sit on a different domain from our frontend application. This allows the two applications to be separated completely, and very easily, without requiring any extra changes in the rest of the application. Here are the steps to complete this exercise:
Note
Before you begin, make sure you run npm install in the exercise-starter directory. The code files for this exercise can be found here: https://packt.link/avWRA. This repository contains two folders, exercise-starter and exercise-solution. The former contains the template files that you can use to code along with this exercise, whereas the latter contains the final code of this exercise for your reference.
- Start by cloning the application we have written so far in this section. This can be found at https://packt.link/JAgZ7.
- Create a class, ApiHttpInterceptor, in a new file, api-http.interceptor.ts, and save the file in the exercise-starter/src/app/interceptors/ folder. This file implements the HttpInterceptor interface (imported from @angular/common/http). Be sure to mark it with the @Injectable decorator so that Angular knows it's a service that can be used in DI:
import { HttpEvent, HttpHandler, HttpInterceptor, HttpRequest } from '@angular/common/http';
import { Injectable } from '@angular/core';
import { Observable } from 'rxjs';
@Injectable()
export class ApiHttpInterceptor implements HttpInterceptor {
intercept(req: HttpRequest<any>, next: HttpHandler): Observable<HttpEvent<any>> {
throw new Error('Method not implemented.');
}
}
Angular will call the intercept() method of ApiHttpInterceptor when a request is made by any HttpClient. We get the request (req) and HttpHandler (next), which we need to call when we're finished to let Angular call any other HttpInterceptor in the chain.
- Update the code to change the URL path:
import { HttpEvent, HttpHandler, HttpInterceptor, HttpRequest } from "@angular/common/http";
import { Injectable } from "@angular/core";
import { Observable } from "rxjs";
@Injectable()
export class ApiHttpInterceptor implements HttpInterceptor {
intercept(req: HttpRequest<any>, next: HttpHandler): Observable<HttpEvent<any>> {
if (!req.url.startsWith('/api/')) {
return next.handle(req);
}
const relativeUrl = req.url.replace('/api/', '');
const newRequest = req.clone({
url: `https://jsonplaceholder.typicode.com/${relativeUrl}`
});
return next.handle(newRequest);
}
}
The preceding code checks the URL path. For each request, if it's issued to a relative path, starting with /api, the code changes it. It does so by looking at the url property of HttpRequest. If the URL doesn't start with /api, you don't need to do anything, just call next.handle() with the original request. Otherwise, clone the original request with a new URL, and then call next.handle() with the new request. This is the request that will actually be sent out. We're using https://jsonplaceholder.typicode.com here, a free service that has some predefined endpoints we can use to get data from, for testing purposes. In an actual application, this would be your backend service's endpoint.
Lastly, we also need to register this interceptor in our AppModule so that it can know what interceptors to inject into HttpClient. We do this by adding ApiHttpInterceptor, which we created as a provider, and we tell Angular to use it when looking for HTTP_INTERCEPTORS – this is the DI symbol that Angular uses when it asks for all the interceptors it needs to use when making a network request via the HttpClient service.
- Open the app.module.ts file present in the exercise-starter/src/app folder and update it with the code given here:
import { HttpClientModule, HTTP_INTERCEPTORS } from '@angular/common/http';
import { NgModule } from '@angular/core';
import { BrowserModule } from '@angular/platform-browser';
import { AppComponent } from './app.component';
import { ApiHttpInterceptor } from './interceptors/api-http.interceptor';
import { UsersListComponent } from './users-list.component';
import { UsersService } from './users.service';
import { WelcomeMessageComponent } from './welcome-message.component';
@NgModule({
imports: [BrowserModule, HttpClientModule],
declarations: [AppComponent, WelcomeMessageComponent, UsersListComponent],
providers: [UsersService, { provide: HTTP_INTERCEPTORS, useClass: ApiHttpInterceptor, multi: true }],
bootstrap: [AppComponent],
})
export class AppModule { }
Since we want Angular to know about our interceptor, we add it to the HTTP_INTERCEPTORS list (notice the bold line).
- Run the new app by running npm start -- --open in the exercise-starter directory. Your default browser should open up at http://localhost:4200, and you should see a list of 10 users:

Figure 8.5: Output of the exercise
If you open the DevTools, you should see only one request to the users endpoint, which is for https://jsonplaceholder.typicode.com/users (and not http://localhost:4200/users):
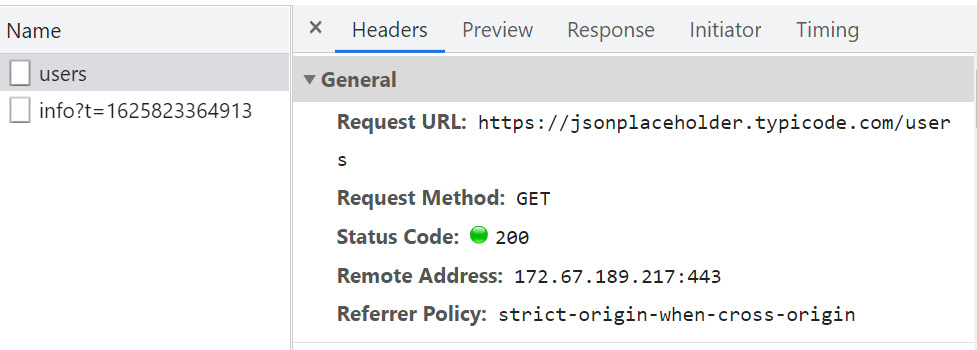
Figure 8.6: Requests to the users endpoint
Notice that our UsersService didn't change at all here (and you can imagine the benefits if we had dozens of services like it), but it is still working as expected from its point of view.
All the code explained in this section and the exercise is just some examples of how DI comes into play in Angular. However, there is much more. You can register any value as a dependency to be injected (not just classes). You can control the instantiation of the providers to be Singletons for the entire app, creating a new instance for every NgModule or even for every Component instance. You can also create them using some more complex logic via factories and more. You have just scratched the surface of the very powerful DI library that Angular offers.
DI in Nest.js
Another framework to look at, also heavily inspired by Angular's architecture, is Nest.js, which also heavily utilizes DI. Nest.js is a framework for building backend applications using Node.js and TypeScript. Like Angular, Nest.js also has Modules (equivalent to Angular's NgModule), and Providers. It also has Controller, which handles incoming requests from clients and returns responses. These are similar to Angular's components – both are what the consumers see. In Angular, Component and Directive make up the UI, and in Nest.js, Controller makes up the API to be consumed.
We won't dive into Nest.js' architecture, but here's a small example of a couple of things that it leverages DI for:
import { Controller, Get, Param } from '@nestjs/common';
import { HelloService } from './hello.service';
@Controller('hello')
export class HelloController {
constructor(private helloService: HelloService) {}
@Get(':username')
async getByUsername(@Param('username') username: string) {
const message = await this.helloService.getHello(username);
return { message };
}
}
This is a simple "Hello World" controller, which, for a GET request to /hello/foo, will return { message: "Hello foo" }. A controller is a container for endpoints under a given prefix (so in this case, any request that starts with "/hello" will end up going to this controller), and the @Get decorator around the getByUserName() function tells Nest.js to call that method when a GET method is performed to the given path (the paths of the individual methods/decorators are concatenated to those of the controller) – "/hello/:username" in this case (anything starting with a : is a placeholder for dynamic content. In this case, :username is the placeholder, and we can get it by using the Param decorator, giving it the placeholder's name).
Notice that we get HelloService in the constructor, similar to Angular, via DI. We also get the username param from the Param decorator, which also leverages DI behind the scenes to get the current Request object. Lastly, the framework is responsible for creating both HelloService and HelloController for us; we don't need to do so ourselves. This, like in Angular, makes testing HelloController easy, since you can just fake HelloService in your tests with a mock implementation to either assert or modify the behavior of the controller. This is a very simple example, but you can imagine HelloService replaced with something like an authentication service, or an ORM tool for accessing the database.
In the next section, we'll cover InversifyJS – an IoC container for TypeScript (and JavaScript) applications. Unlike Angular, which is only for the frontend, or Nest.js, which is only for the backend, and which are both frameworks that dictate what your application's architecture will be (at least at some level), InversifyJS is a generic library that only does IoC and allows you to use DI in any application.
InversifyJS
InversifyJS is an implementation of an IoC container (inversion of control, which DI is part of) for TypeScript (and JavaScript) applications. It is one of many implementations and, as we've seen above, some frameworks come with their own DI solution, such as Angular or Nest.js.
Note
Other alternatives to InversifyJS for general-purpose projects include TypeDI and TSyringe, as well as typescript-ioc.
The basic idea in InversifyJS, as in most other implementations for an IoC container, is to have one place that defines all the concrete implementations of functionality, and the rest of the app only depends on abstractions (for example, interfaces). This greatly reduces coupling, and changing one implementation to another doesn't affect the entire app or require lots of code changes.
Note
Coupling is about how tightly integrated/dependent two components (usually classes) are, in the sense that if we change one of them, how likely is the other to break without applicable changes to it too? The more tightly integrated/connected two components are to one another, the more coupled they are, and vice versa.
Ideally, changing one class should not require changes in others. In such cases, the classes are considered decoupled (or loosely coupled).
To make InversifyJS work, we first need to add a polyfill for reflect-metadata, which allows libraries to perform runtime reflection on objects to get their types in a more powerful manner than the (currently) built-in typeof and instanceof operators.
In addition, since InverisfyJS works through decorators, you need to enable them by setting experimentalDecorators and emitDecoratorMetadata to true in your project's tsconfig.json file (note the bold lines):
{
"compilerOptions": {
"target": "es5",
"lib": ["es6", "dom"],
"types": ["reflect-metadata"],
"module": "commonjs",
"moduleResolution": "node",
"experimentalDecorators": true,
"emitDecoratorMetadata": true
}
}
Note
There are additional requirements in order for InversifyJS to work, but all modern browsers and Node.js versions should be able to use it without further polyfills. For more details, visit the following link: https://github.com/inversify/InversifyJS/blob/master/wiki/environment.md.
Just as with Angular and Nest.js' DI containers (NgModule and Module, respectively), InversifyJS also needs to know how to resolve dependencies. This is generally configured in a single place, usually in a file named inversify.config.ts in the root of the project.
Note
This is the recommendation, but this file can be placed anywhere and named anything, or split into multiple files; for example, for separating the registration of classes of different features or domains, similar to NgModules in Angular or Modules in Nest.js.
This file should be the only place in the application where there is coupling. The rest of the app should only be dependent on abstractions.
These abstractions will usually be interfaces, but you can also depend on a specific implementation, or a class (which can then be injected with a compatible subclass).
In addition, since interfaces in TypeScript only exist at compile time (see Chapter 7, Inheritance and Interfaces), InversifyJS also requires a runtime abstraction token to know what to resolve.
Exercise 8.02: "Hello World" Using InversifyJS
In this exercise, we'll create a simple "hello world" application using InversifyJS. We'll implement all the basic building blocks for a typical use case. Perform the following steps to implement this exercise:
Note
The code files for this exercise can be found at https://packt.link/bXSTd.
- First, create the abstraction for our logger using an interface in a new file called logger.interface.ts in the src folder. This is what consumers will reference later:
export interface Logger {
log(message: string): void;
}
- Next, create a concrete implementation for Logger. This implementation is what the consumers of the code will get injected with when they require Logger later on:
import { injectable } from "inversify";
import { Logger } from "./logger.interface";
@injectable()
export class ConsoleLogger implements Logger {
log(message: string) {
console.log(message);
}
}
Note that ConsoleLogger implements Logger. This ensures that we write a compatible implementation to what our consumers expect, and that they don't break at runtime. In addition, the @injectable decorator is used to indicate to InversifyJS that this implementation can be used as a dependency, and also that it can be injected to other dependencies. This is how we make InversifyJS aware that ConsoleLogger is something that it should be aware of.
- Create a new file called types.ts in the src folder. Then, define an injection token that consumers can rely on later to ask InversifyJS to inject whatever implementation is behind it at runtime:
export const TYPES = {
Logger: Symbol.for("Logger"),
};
In this exercise, we'll stick with the recommended approach of creating a TYPES object that resolves to a Symbol for each type (using an injection token is required in most DI libraries in TypeScript, since interfaces don't exist at runtime, so InversifyJS can't rely on them).
Note
If your target environment doesn't support symbols, you can instead use a plain string. Just ensure that you don't have the same string registered for multiple types.
- Create a new file called ioc.config.ts in the src folder. Then, configure the IoC container using the following code:
import { Container } from "inversify";
import { ConsoleLogger } from "./console-logger";
import { Logger } from "./logger.interface";
import { TYPES } from "./types";
export const container = new Container();
container.bind<Logger>(TYPES.Logger).to(ConsoleLogger);
This is what ties all three things (console-logger, logger.interface, and types) together:
- Create a consumer for the logger in a new file called main.ts in the src folder. Notice that we use the @inject decorator to tell InversifyJS that we want the Logger type:
import "reflect-metadata";
import { inject, injectable } from "inversify";
import { container } from "./ioc.config";
import { Logger } from "./logger.interface";
import { TYPES } from "./types";
@injectable()
class Main {
constructor(@inject(TYPES.Logger) private logger: Logger) {}
run() {
this.logger.log('Hello from InversifyJS!');
}
}
// Run the app:
const main = container.resolve(Main);
main.run();
Note
The interface type annotation is just for TypeScript to be able to type check the logger instance, but since interfaces only exist at compile time, this is irrelevant for runtime, in which the argument passed to @inject is what matters.
- Now, run the app by executing npm start in the parent directory. You should get the following output on your console:
Hello from InversifyJS!
Of course, for such a simple example, it would have been better to just have a single line as follows:
console.log('Running');
However, in more complex applications, and even simple ones, DI can help, especially if the application is expected to be actively maintained, with the addition of features and the fixing of bugs happening all the time.
In the next activity, you will be tasked with creating a more complex app to demonstrate how DI can help us develop applications while keeping best practices in mind to make the app easy to maintain.
Activity 8.01: DI-Based Calculator
As a TypeScript developer, you are tasked with creating a calculator. Like any calculator, you need your app to do the four basic math operations of addition (+), subtraction (-), multiplication (*), and division (/).
Note
To keep things simple and focused solely on DI, you won't be adding support for additional operators (for example, power (^)), or support the order of operations, so your calculator will just walk through the expression from left to right and perform the relevant operation. For example, the expression (13+5*3-7 will result in 47 and not the mathematically correct 21).
To complete this activity, you will have to implement InversifyJS and utilize IoC to provide the math operators that the calculator can operate on.
You can start with the starter project and build it up by following the high-level steps provided here. This activity will challenge the skills that you have developed not only in this chapter but also in preceding ones. Hence, feel free to glance at the solution to debug any issues you may have with your implementation or code.
Note
This activity is based on the last section, on InversifyJS, so be sure you understand it fully before moving on to this one. You can find both the activity starter and solution at https://packt.link/Pt3Vq. The activity-starter folder contains the template files you can use to code along with this activity. The activity-solution folder contains the files representing the solution of this activity.
Perform the following steps to implement this activity:
- You will have to start off by creating the basic building block of your calculator – an operator defined via an interface.
- Then, create operators for addition, subtraction, multiplication, and division.
For the preceding two steps, note that you need to create the requisite abstract interface and injection token.
- Implement a calculator class that uses these operators via InversifyJS. This file represents your main app. You might need to map all expression parts and parse them. For this, you can refer to the maths.ts file placed in the src/utils folder, which creates and exports two such functions – tryParseNumberString and tryParseOperatorSymbol.
- Configure the IoC container (present in the src/ioc.config.ts file) so that Calculator can receive AddOperator, SubtractOperator, and so on when it asks for TYPES.AddOperator, for example. You can simplify the ioc.config.ts file further by using barrels. The code for this can be found in the operator/index.ts file. You can use the code in the aforementioned file to configure and then simplify your IoC container.
- Create the main.ts file that will kick-start your calculator.
After solving the preceding steps, the expected output should look like the following:
result is 150
- Bonus Steps:
As a bonus, let's say that you want some reporting on the operations performed in the calculator. You can add logging (console- and file-based) easily without too many changes:
- For console-based logging, you need to add a logger via DI that the calculator will write to on every expression evaluation. You can follow the given sequence to do so. First, you need to define the Logger interface. Then, create the console-based implementation of Logger. Next, create an injection token for it and register it in our container. Then, use the logger in the code for the main calculator app.
- Now, let's say we want to replace our console-based logger with a file-based one, which will persist across runs so that we can track the calculator's evaluation history.
- To do this, you first need to create a FileLogger class that implements Logger in a new file in the src/logger folder. Then, you need to make a single-line change in the ioc.config.ts file, which you used for console-based logging.
For console-based logging, use this command:
container.bind<Logger>(TYPES.Logger).to(ConsoleLogger);
For file-based logging, use this command:
container.bind<Logger>(TYPES.Logger).to(FileLogger);
However, note that you will have to correctly import all Logger interfaces across all files.
The output for the console-based logger is as follows:
[LOG] Calculated result of expression:13*10+20 is 150
The output for the file-based logger is as follows:

Figure 8.7: Final output of the file-based logger in activity-starter/src/tmp/calculator.log, after changing the app to use it
Note
The solution to this activity can be found via this link.
The solution to this activity (activity-solution) also includes unit tests for everything, so you can see how easy testing is when IoC is used as well as check that your own implementation passes the tests. In addition, activity-solution also includes a file that creates a ConfigurationService to supply FileLogger with a dynamic loggerPath, with implementations for an in-memory one, or an environment variables-based one.
There is a lot more ground to cover on InversifyJS. However, this chapter serves as a good start. We encourage you to take a look at the official documentation to learn more about what it can offer and to see further examples, including factories, container modules, and middlewares. However, these topics are beyond the scope of this chapter.
Summary
This chapter equipped you first with the fundamentals of DI in TypeScript by explaining how you can implement the DI design pattern and by taking you through a number of use cases. You also learned how to build a basic Angular app using DI.
This chapter also introduced some basics of InversifyJS and explained how to use it in your applications. You have seen how easy it is to add or change dependencies without breaking the code for other consumers, along with the power of IoC and DI to replace one implementation with another in a very simple manner, for all consumers.
Of course, there's a lot more to this topic in general than this chapter covered. However, this chapter serves as a good start in getting up and running with DI in TypeScript. In the next chapter, you will learn about generics in TypeScript.