
Mosaic is a technique that lends itself to being turned on edge from time to time. Especially in those cases where you’ve used a plate view mosaic to spell out letters or even complete words, you may find things look better if you turn your work 90 degrees. For example, take a look at the small mosaic in Figure 8-21.

It may not look like much. In fact, when you first look at Figure 8-21 it’s hard to even tell what letter, if any, it’s supposed to be. Turn it 90 degrees and look at again. You’re likely to recognize the character now (see Figure 8-22).
The dollar sign, with its thin vertical lines, is much more recognizable when turned upright. But now there’s a problem. What do you do with a small mosaic like this when its studs are turned the wrong way? Rather than having to build an entire model turned on its side like this, you can easily incorporate this submodel into a larger work.
Let’s say you want a bank, or maybe even a casino, to add to your LEGO town. The dollar sign mosaic could be used to help indicate the nature of the building you’re constructing. In fact, with just a bit of planning, you could make the dollar sign part of the wall of the building, as you see in Figure 8-23.
You can see that I’ve built a portion of the wall surrounding the dollar sign mosaic to give you an idea what the final model might look like. Of course, you’re probably wondering, “What makes it stay in like that?” The answer is a bit of geometric trickery that is surprisingly easy to accomplish.
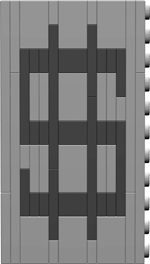
Figure 8-22. Turning a letter or symbol the right way makes it easier to read. But how do you add it to a model where the other bricks are pointing in different directions?
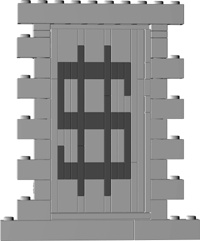
Figure 8-23. At close range, you will be able to see the different orientations of the bricks and plates. From a short distance away, however, your model takes on a more uniform and realistic look.
What you don’t see in Figure 8-23 are the two 1x1 Technic bricks, one on either side that are helping to hold the mosaic section in place. To give you a better idea of what’s really going on, I have created some close-up images of this wall example. In Figure 8-24, you can see that the right side of the mosaic is supported by a 1x1 plate (shown in black) that fits perfectly into one of the two Technic bricks. The plate is oriented vertically, like the rest of the mosaic, whereas the Technic brick is oriented with its stud up, just like the rest of the main wall.
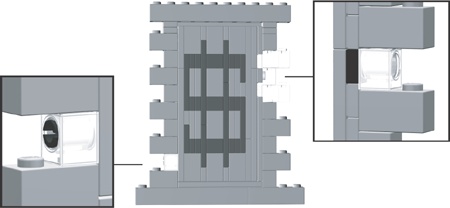
Figure 8-24. Mixing Technic bricks with regular system parts offers some amazing construction possibilities.
The left side of the mosaic (as seen in Figure 8-24) is supported by a Technic pin (shown in black) coming out of the other Technic brick and into the bottom of the plate next to it. Once again, the Technic brick is oriented with its stud facing up, whereas the plate to its right is turned 90 degrees just like the rest of the mosaic-related pieces. The result, when viewed from even a short distance, is that the mosaic section is really just part of the wall. The delicate lines that form the dollar sign become natural looking and easy for the eye to read.