In the last chapter, you created a model from scratch. You designed and built a small version of NASA’s well-known Space Shuttle. Hopefully, by using some of these techniques you will create your own original models. At some point though, you’ll want to take that model apart to re-use the pieces. How will you remember everything you need to re-create the model in the future? It’s simple—you just need to document the parts and the steps you used to arrive at your final design.
Many of the LEGO sets you already have probably came with instructions. You might look at them and wonder how you can create such detailed plans for a model. Luckily, there are ways to create these instructions that don’t require a degree in fine arts in order to make them useful.
One easy method you can use to create plans for your model is to simply document your building process step by step with a digital camera. The fact that there is no film to develop and print means that you can take as many pictures as you need to fully explain how to obtain the desired results.
First, you can take a picture (or several pictures) of the parts used to build the model, as shown in Figure 11-2.
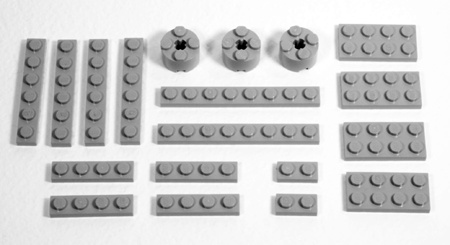
Figure 11-2. Set out the parts for the model and take a picture of them before beginning construction. In this case, I show the pieces needed to build a 4X 1x2 plate.
The elements shown in Figure 11-2 give the builder a clear picture of what parts they’ll need to build the model.
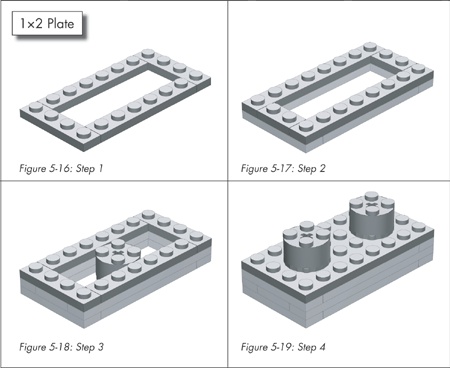
Then capture each step, right after you’ve added the parts for that step to the model. Figures Figure 11-3 and Figure 11-4 show sequential steps for building a 1x2 plate in 4X scale. You saw this same model back in Chapter 5 (Figure 5-19).
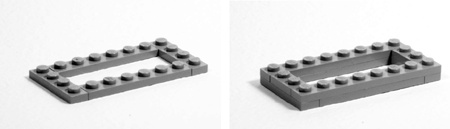
Figure 11-3. Each photograph should show a single step in the construction of the model. Here are steps 1 and 2 of the 1x2 plate in 4X scale.

Figure 11-4. Each subsequent picture should show the model from the same angle but with more parts added. Here you see steps 3 and 4.
You can then import these pictures into a word processor so that you can create instructions for them, all as a single document. Or, alternatively, you can post them to the Internet and let people view them one at a time. Either way, the pictures are an effective way to share your building techniques or even to just remember how to build a favorite model again in a few years.
Throughout this book, you have seen instructions for a number of different examples. I created most of these images using computer software (LeoCAD) that allows me to build virtual models. Similar to programs that are used to design cars and airplanes, these amazing utilities provide an endless supply of LEGO bricks in every color you need. You can design and build the entire model, as seen in Figure 11-5.
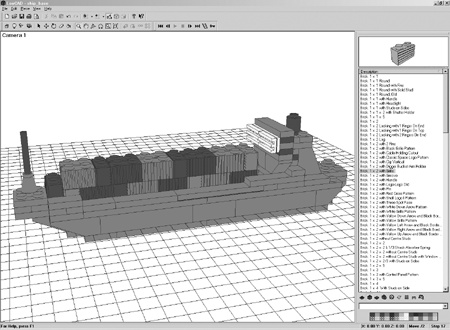
Figure 11-5. LeoCAD is one program available to help you create virtual LEGO models. With this and other programs, you never run out of elements.
Note
For a list of software and websites that will help you to create your own computer-generated LEGO models and instructions, please visit www.apotome.com/links.html.
These programs also enable you to track each step as you go and then use that information to create step-by-step instructions that other builders can follow. Figure 11-6 shows an example of these types of instructions taken from Chapter 5.