Lesson 4. Exposure: The Zone System
I’ve already asked you to consider using your camera on Manual mode for your exposures. Trust me when I tell you that it will make you better at what you do. Now make the best exposures possible. There are two different approaches to this, and I think it helps to understand both. The first applies to the digital photographer shooting JPG or to the film photographer. This is an older way of doing things but the longer I photograph, the more I refer back to it. There are times when knowing how to expose in this way is just the simplest and most accurate.
Once upon a time we didn’t have histograms, the flexibility of RAW files, and Lightroom. You understood how your camera’s light meter saw the world, made your exposure based on that understanding, and bracketed—making an exposure or two in either, or both, directions, just in case. There are excellent reasons for learning to shoot in RAW formats, which I’ll discuss in the next lesson, and I recommend you consider shooting in RAW, but it’s not always necessary. Shooting RAW requires faster cameras, faster computers, larger hard drives, and more time in post-processing. And the chief benefits of shooting RAW for most photographers, which are flexibility and file depth, become less of a need if you learn to expose well. I’m not saying you should shoot in either RAW or JPG, but that understanding them both is helpful.
In the next lesson I’ll introduce the histogram, a powerful means of looking at exposure. For now, let’s talk about how your meter works. In general, the meter in your camera has no idea what you’re photographing. So it reads the light and assumes the scene is an average gray. Not all white, not all black. Gray. And if you do as the meter says you’ll get an average gray photograph. Which is fine if you’ve got an even mix of black and white, or gray. But what do you do if you’ve got a mostly white scene? Just live with it being rendered gray?
Ansel Adams is known for many things, one of his most important contributions was an exposure model known as the Zone System. It had wide application for exposing negatives as well as for darkroom work. I just want to look at one application. The Zone System divides the spectrum from white to black into 11 zones, Zone 0 being black with no detail, Zone X (10) being white with no detail, and Zone V being gray. Each zone is one full f-stop apart. What we do with this information is simple, and probably easiest explained with a couple of examples. First, let’s assume I’m photographing a coastal scene on a foggy day. The scene is gray. I meter and make the shot in JPG mode or with my favorite film. When I look at the resulting photograph, it will be gray. Perfect. The scene was gray, and the resulting exposure is faithful. But let’s assume I’m photographing a snowy hillside. If I make the exposure as my meter tells me to, I’ll get a gray (underexposed) photograph because the camera assumes the scene is gray. But I want my whites to be white, so I need to second-guess the meter and give the exposure extra light. But how much? Well, the Zone System shows me that middle gray and white with meaningful detail are three or four stops apart. I’d bet on three to be safe. So I give it three extra stops of light. Easy, right? Well, not so quick.

This is the Zone System, represented graphically. Zero is pure black, with no details. Zone I is near black but without texture. II is textured black, the darkest part of an image in which detail is recorded. III is dark showing adequate texture. At the other end is X, pure white, with no detail, like specular highlights or light sources. IX, like glaring snow, is slight tone without texture, and VIII is the lightest tones with texture. In between are five shades of gray.
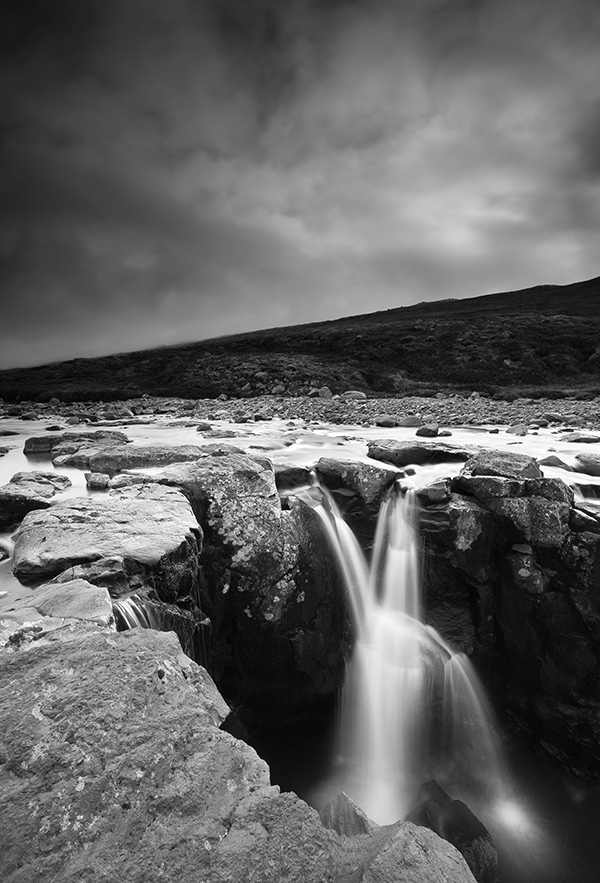
Because meters are becoming more and more sophisticated, it can be hard to know where, from within the scene, the meter is reading. But most cameras still have, among several metering modes, the ability to spot meter, which is not very clever but is quite precise. Place the middle of the frame on the area in the scene that’s the brightest white that still has detail (not, for example, the sun, which has no detail). Set your exposure as the camera tells you. Then add three stops of light (by adjusting your shutter speed, aperture, or ISO—or a combination of the three). Your whites will be white.
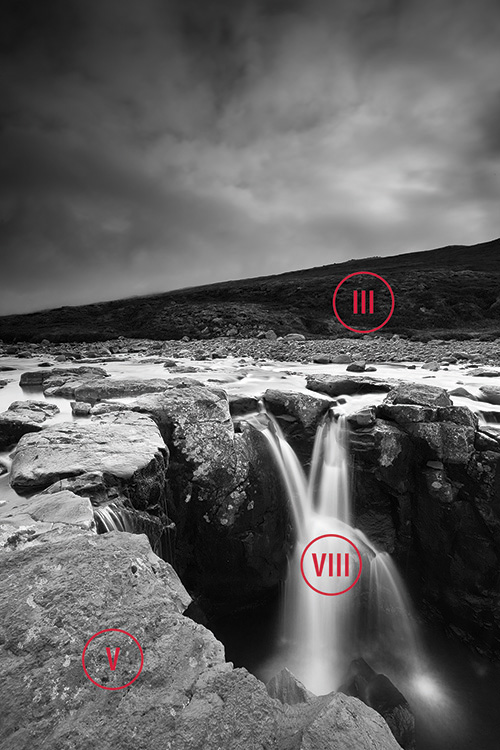
Look at the image of the waterfall. I’ve called out three easy-to-spot zones. If you metered off the waterfall—the process I suggest in the previous paragraph—approximately Zone VIII, you’d want to add three more stops of light to get the best exposure for the scene. If, however, you metered instead from the foreground rock, very close to Zone V, you could leave your settings exactly as the camera suggests. Finally, metering from the darker background, which is about Zone III, you’d want to underexpose by about two stops, the difference between Zone III, which is the area you’re metering, and Zone V, which is where the camera thinks you’re metering.
Get it right and you might not need the flexibility of RAW files at all. Or shoot in both RAW and JPG, which most cameras can do, and you’ll have a RAW file with extra flexibility and depth, as well as a perfectly exposed JPG image you can use straight out of camera.
“Knowing how to expose the old-fashioned way can get you to perfect exposures in average conditions right away.”
Here’s the other way you can do it: carry a gray card. Or find something in the scene that is average, boring, middle, 18 percent gray, and meter off that, giving the camera what it thinks it’s looking at in the first place (such as the foreground rock in the waterfall image). No adjustments are needed because the camera sees the light it is calibrated to see and reads it perfectly, as long as both the card and your scene are in the same light. If you knew the palm of your hand was in Zone VI, you could meter off your hand, then add one stop (gray is Zone V, your hand is Zone VI—one stop lighter, so you add one stop). If you get confused, ask yourself: The camera sees the spot I am metering as gray; is it gray? No? If it’s lighter, add stops. If it’s darker, remove them.
So why do this? Well, first, a lot of beginners are told to shoot RAW, and then told, as I’ll tell you in the next lesson, to expose to favor the right side of the histogram. All good advice. Except that it assumes you’ll be working on the images later in Lightroom or Photoshop, because straight-out-of-the-camera RAW files can be pretty gross, and if you’re not quite there yet (in terms of post-processing) you’ll be seeing a lot of very boring, washed-out frames, and wondering what you’re doing wrong. You’re doing nothing wrong, but no one told you the files would look so gross and need extra work. So knowing how to expose the old-fashioned way can get you to perfect exposures in average conditions right away. Even if I’m shooting RAW I’ll often do a couple old-school exposures just to show me later, when I’m in Lightroom, the potential for the image. For example, if I’m making photographs at sunset I might slightly underexpose for deeper saturation of colors and shoot a JPG as a reference frame. Or—and I like the confidence this gives me—if I know I’ve nailed the exposure, I’ll bracket my exposures, giving me a stop or two in either direction. No histogram, no “expose to the right.” Just meter well and shoot. That stuff will make more sense in the next lesson, but listen: if you’re just starting out and you want to make photographs without the fuss of Lightroom or Photoshop, there’s no shame in making JPG files. There’s no need to make a religion of RAW formats. As good as they are, they aren’t the only option. You’ll have less flexibility with JPG, and one day you might wish you had those larger files, but we never used to hedge our bets like this when we shot film. We made the negatives we made and they’re still beautiful all these years later. If it’s all confusing to you, set your digital camera to shoot both RAW and large, fine, JPG files.