Working with gradients
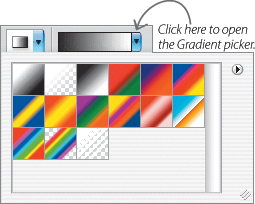
When you select the Gradient Tool from the Tool panel, the Gradient picker appears at the upper left of the Options bar. To open the picker, click the blue arrow. Most times, you’ll use a black to white (or white to black) gradient on a layer mask.

Left: The Gradient Tool can be used to create a smooth transition from white to black on a layer mask. This makes for a smooth transition on a layer of the part that is revealed and the part that is hidden.
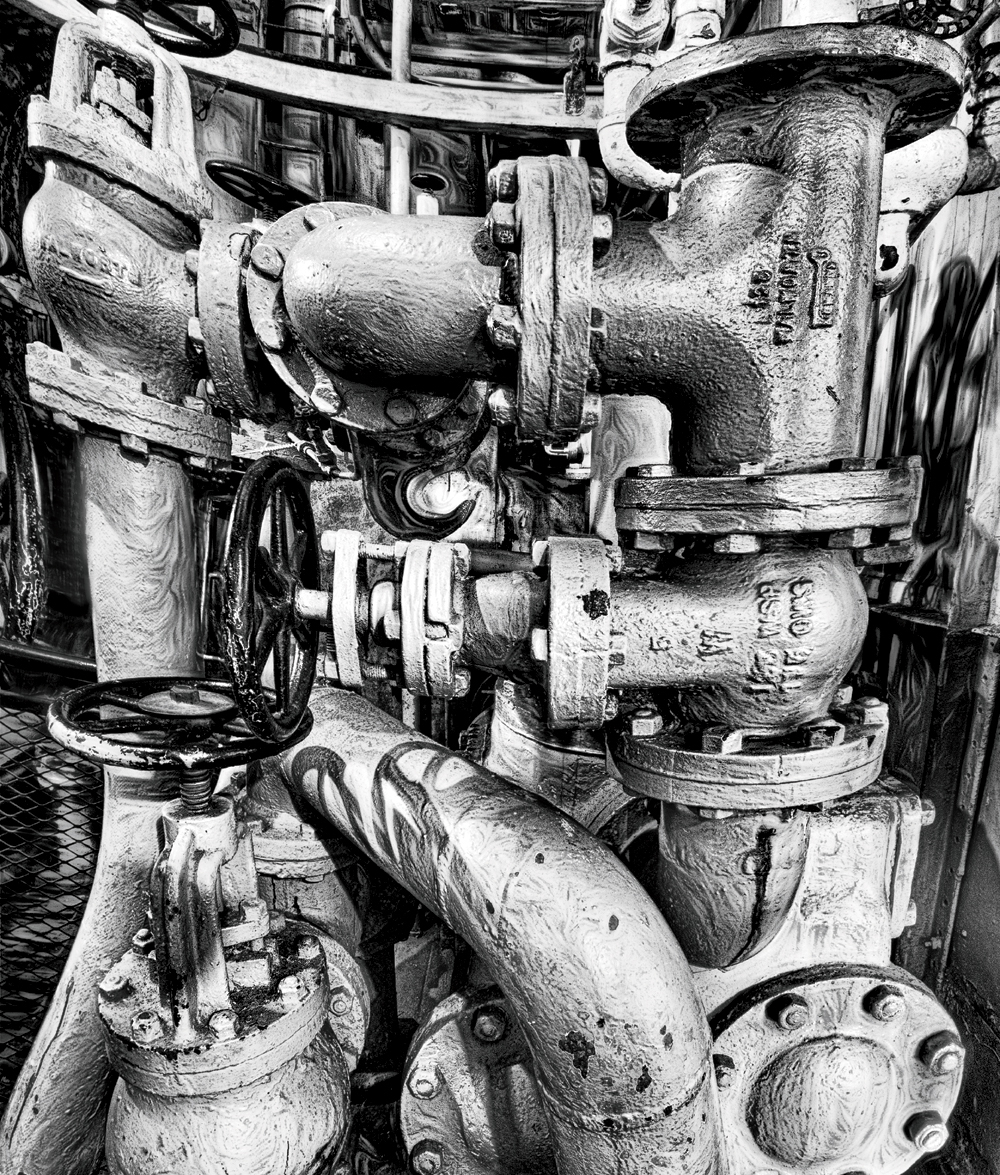
Far Left: The steam sidewheel paddle ferry Eureka is from the 1890s. Moored in San Francisco’s Maritime National Park, it is open to visitors.
Aboard the Eureka, the only way I could photograph the massive engine room was with a wide-angle lens (12mm), which works to exaggerate the curvilinear shapes of pipes going in every direction.
12mm, 15 seconds at f/18 and ISO 200, tripod mounted.
Photoshop offers many tools that you can use to create layer masks, either by themselves or in combination.
As I said before, my first tool of choice for working on masks is the Brush Tool. But a very close second is the Gradient Tool. For some images, the Gradient Tool even beats the Brush Tool hands down. Landscape photos are particular grist for the Gradient Tool’s mill because there can be great variation in exposure values between the earth and the sky, and you can blend them seamlessly using the Gradient Tool.
Gradient Tool setup works in a similar fashion to Brush Tool setup. To start with, choose the Gradient Tool in the Photoshop Tool panel (it is circled in red on the Tool panel to the left). Sometimes the Gradient Tool will be hidden behind the Bucket Tool since they nest under the same tool button. If you don’t see it, press Shift+G to toggle between the Bucket and Gradient Tools in the Tool panel.
After selecting the Gradient Tool, the Gradient picker appears at the left of the Options bar at the top of the Photoshop window (in the same place as the Brush Tool picker described on page 52). Using the Gradient picker (above left), you can select a gradient that will suit your masking and blending needs.
Most of the time, for photographic applications on a layer mask, you can keep the choice of gradient simple and choose the first black-to-white (or white-to-black) pattern shown in the upper left of the default Gradient picker.
Using the Gradient Tool to seamlessly blend two layers
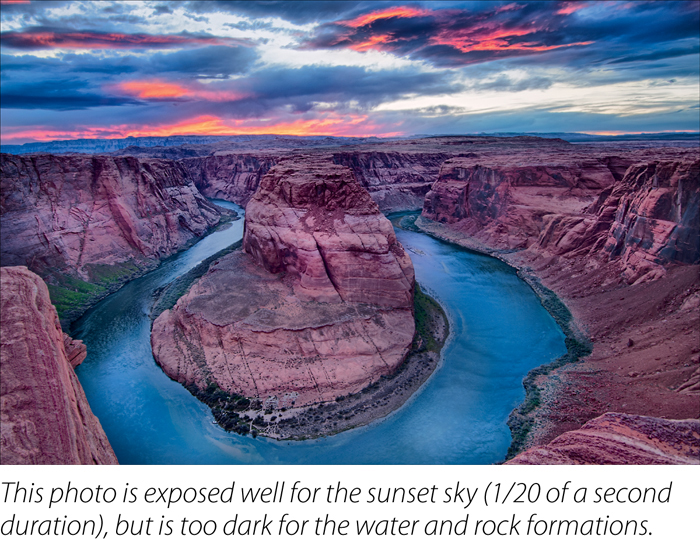
A typical situation where I would use the Gradient Tool on a layer mask is when I have two exposures that need to be blended together seamlessly. For instance, in the shot of Horseshoe Bend on the Colorado River taken at sunset (right), the upper photo is exposed correctly for the river, and the other photo is exposed for the sky.
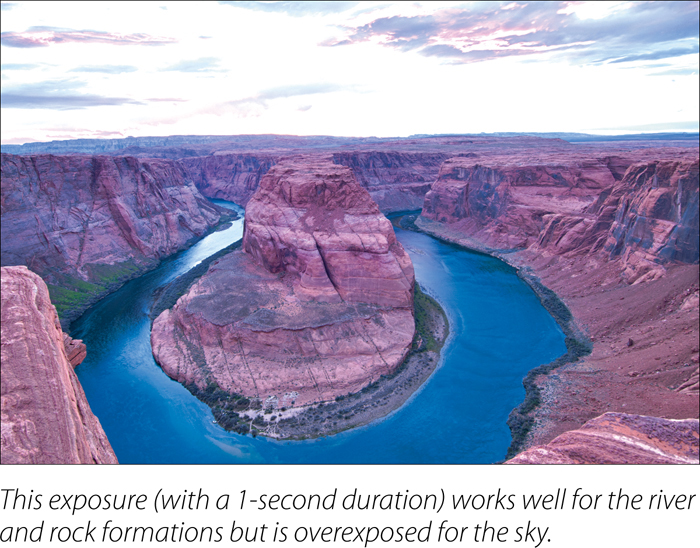
By themselves, each photo doesn’t quite work because one appears overexposed and the other underexposed. When combined together, so that the exposures for the sky and water are both correct, the composite image becomes something spectacular (shown on pages 62–63).
1. Open the two photos you would like to combine in Photoshop. For this example, I’ll use the Colorado River photographs.
2. Select the Move Tool from the Tool panel.![]()
3. Click the window containing the photo exposed for the sky (and underexposed for the river) and choose Select ![]() All.
All.
4. Next, select Edit ![]() Copy to copy the entire image.
Copy to copy the entire image.
5. Click the image window containing the photo exposed for the river, and then choose Edit ![]() Paste to copy the sky photo into the river image window. (Turn to pages 44–45 to find detailed directions about this copy and paste procedure.)
Paste to copy the sky photo into the river image window. (Turn to pages 44–45 to find detailed directions about this copy and paste procedure.)
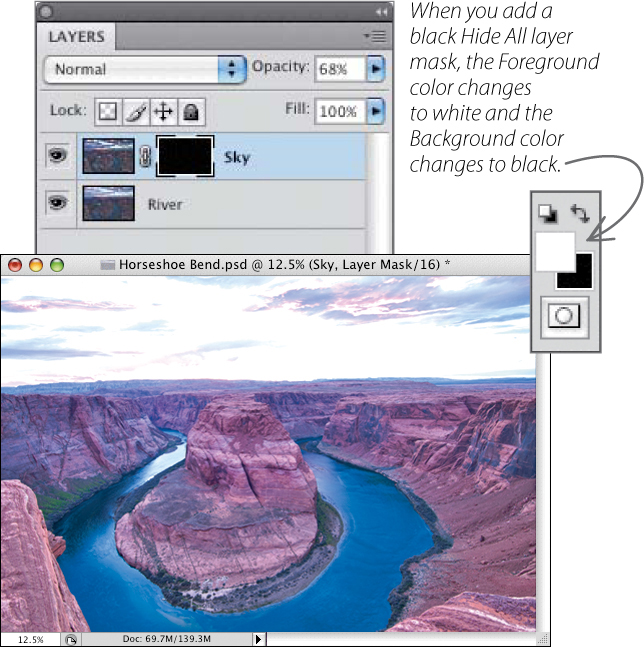
You will now have two layers in a stack. For this example, I’ve named the layers “Sky” and “River.” The “Sky” layer is currently visible in the image window and the “River” layer is hidden.

6. Make sure the “Sky” layer in the Layers panel is selected and add a black Hide All layer mask (page 45, step 2).
The Hide All layer mask will hide the “Sky” layer and make the “River” layer visible in the image window.
At the bottom of the Tool panel, the Foreground color will automatically change to white and the Background color will change to black.
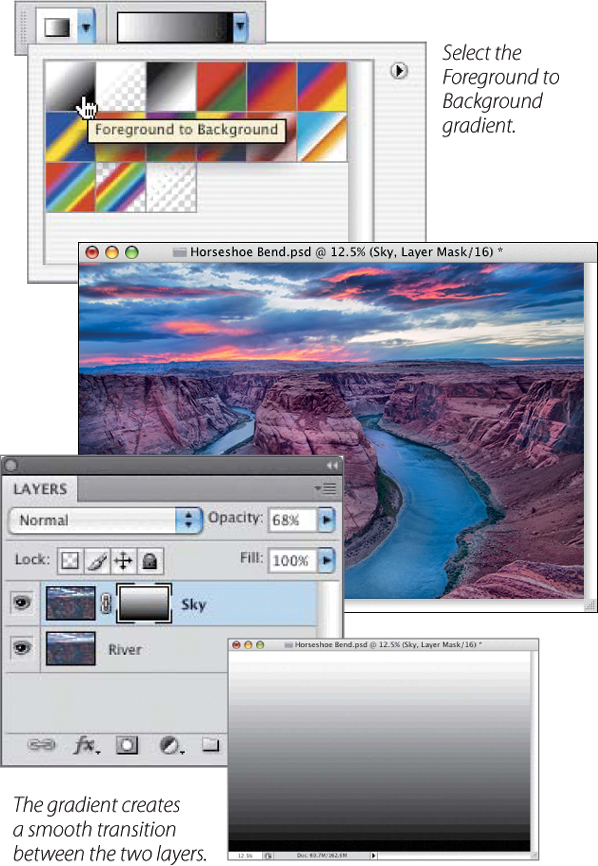
7. Click the Gradient Tool in the Tool ![]() Panel to select it.
Panel to select it.
8. Open the Gradient picker (page 59) and select the gradient in the upper-left corner labeled “Foreground to Background.”
9. With the layer mask selected in the “Sky” layer, position the Gradient Tool at the top of the image window, and click and drag the gradient down to the bottom of the image window.
This draws a white-to-black gradient on the layer mask that reveals the correctly exposed sky area of the “Sky” layer and reveals the correctly exposed rocks and river of the “River” layer.
To see the finished image, turn to pages 62–63.
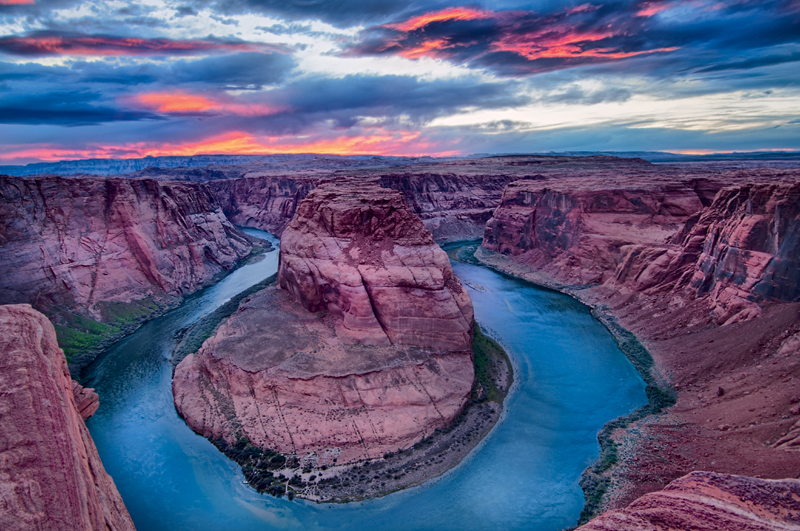
Thunder was booming along the high mesas of the Colorado River plateau, and rain squalls were flitting across the landscape, driven by a biting wind. My hopes for photographing in the light of the “golden hour” at sunset were fairly slight, but, after all, one never knows! So I wrapped my gear in watertight plastic bags, and trudged out to the edge of the Colorado River, a thousand feet below at Horseshoe Bend.
By the time I reached the edge of the canyon, the rain had diminished but the light was dull and overcast, and the chill winter wind made waiting uncomfortable. I was ready to call it a day, but then I said “Never surrender”—and just before darkness fell, the clouds lit up with the glorious colors shown here.
12mm, two exposures (1 second for the Colorado River, 1/20 of a second for the sky), both exposures at f/7.1 and ISO 200, tripod mounted; exposures combined using a layer mask and gradient in Photoshop.
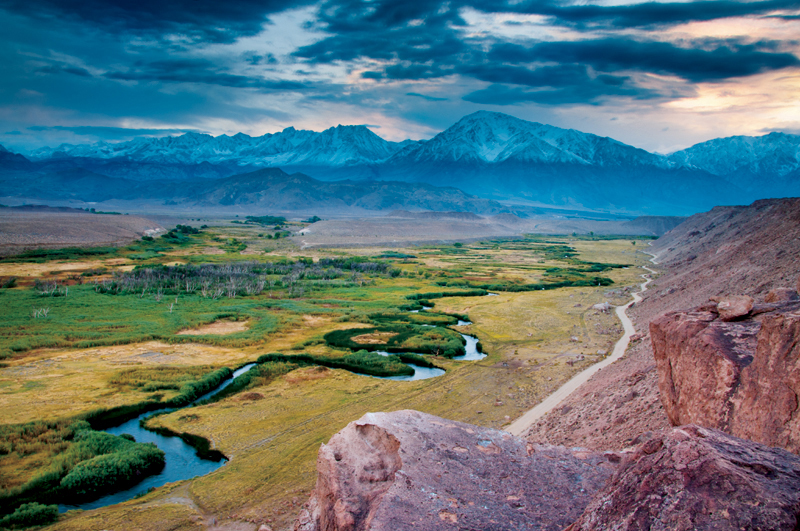
Pages 64–65: Standing on the edge of the cliff that marks the beginning of the volcanic uplands of Owens Valley, California, I looked out along the Owens River toward the magnificent winter crest of the Sierra Nevada Mountains.
It was clear that the exposure value for the river valley in shadow was quite different than the bright mountains still reflecting the afternoon sun. Fortunately, I was easily able to solve this exposure problem using a series of layers, layer masks, and the Gradient Tool.
20mm, six exposures at shutter speeds ranging from 1/13 of a second to 1.6 seconds, each exposure at f/22 and ISO 100, tripod mounted; exposures combined in Photoshop.