2. Objective-C Boot Camp
iOS development centers on Objective-C. It is the standard programming language for both the iPhone family of devices and for Mac OS X. It offers a powerful object-oriented language that lets you build applications that leverage Apple’s Cocoa and Cocoa Touch frameworks. In this chapter, you learn basic Objective-C skills that help you get started with iOS programming. You learn about interfaces, methods, properties, memory management, and more. To round things out, this chapter takes you beyond Objective-C into Cocoa to show you the core classes you’ll use in day-to-day programming and offers you concrete examples of how these classes work.
The Objective-C Programming Language
Objective-C is a strict superset of ANSI C. C is a compiled, procedural programming language developed in the early 1970s at AT&T. Objective-C, which was developed by Brad J. Cox in the early 1980s, adds object-oriented features to C. It blends C language constructs with concepts that originated in Smalltalk-80.
Smalltalk is one of the earliest and best-known object-oriented languages. It was developed at Xerox PARC as a dynamically typed interactive language. Cox layered Smalltalk’s object and message passing system on top of standard C to create his new language. This approach allowed programmers to continue using familiar C-language development while accessing object-based features from within that language. In the late 1980s, Objective-C was adopted as the primary development language for the NeXTStep operating system by Steve Jobs’s startup computer company NeXT. NeXTStep became both the spiritual and literal ancestor of OS X.
Objective-C 2.0 was released in October 2007 along with OS X Leopard, introducing many new features like properties and fast enumeration. In 2010, Apple updated Objective-C to add blocks, a C-language extension that provides anonymous functions, letting developers treat code like objects. In the summer of 2011, Apple introduced automated reference counting, or ARC. This extension greatly simplified development, allowing programmers to focus on creating application semantics rather than worry about memory management.
Object-oriented programming brings features to the table that are missing in standard C. Objects refer to data structures that are associated with a publicly declared list of function calls. Every object in Objective-C has instance variables, which are the fields of the data structure, and methods, which are the function calls the object can execute. Object-oriented code uses these objects and methods to introduce programming abstractions that increase code readability and reliability.
Object-oriented programming lets you build reusable code units that can be decoupled from the normal flow of procedural development. Instead of relying on process flow, object-oriented programs are developed around the smart data structures provided by objects and their methods. Cocoa Touch on iOS and Cocoa on Mac OS X offer a massive library of these smart objects. Objective-C unlocks that library and lets you build on Apple’s toolbox to create effective, powerful applications with a minimum of effort and code.
Note
iOS Cocoa Touch class names that start with NS, such as NSString and NSArray, harken back to NeXT. NS stands for NeXTStep, the operating system that ran on NeXT computers.
Classes and Objects
Objects form the heart of object-oriented programming. You define objects by building classes, which act as object creation templates. In Objective-C, a class definition specifies how to build new objects that belong to the class. So to create a “widget” object, you define the Widget class and then use that class to create new objects on demand.
Each class lists its instance variables and methods in a public header file using the standard C .h convention. For example, you might define a Car object like the one shown in Listing 2-1. The Car.h header file shown here contains the interface that declares how a Car object is structured.
Listing 2-1. Declaring the Car Interface (Car.h)
#import <Foundation/Foundation.h>
@interface Car : NSObject
{
int year;
NSString *make;
NSString *model;
}
- (void) setMake:(NSString *) aMake andModel:(NSString *) aModel
andYear: (int) aYear;
- (void) printCarInfo;
- (int) year;
@end
Note that all classes in Objective-C should be capitalized (Car) and that their methods should not be. In Listing 2-1, the methods are the declarations that start with a minus sign toward the bottom of the listing. Objective-C uses camel case. Instead of creating identifiers_like_this, Objective-C traditionally prefers identifiersLikeThis. You see that in Listing 2-1 with the first two method names.
In Objective-C, the @ symbol indicates certain keywords. The two items shown here (@interface and @end) delineate the start and end of the class interface definition. This class definition describes an object with three instance variables: year, make, and model. These three items are declared between the braces at the start of the interface.
The year instance variable is declared as an integer (using int). Both make and model are strings, specifically instances of NSString. Objective-C uses this object-based class for the most part rather than the byte-based C strings defined with char *. As you see throughout this book, NSString offers far more power than C strings. With this class, you can find out a string’s length, search for and replace substrings, reverse strings, retrieve file extensions, and more. These features are all built in to the base Cocoa Touch object library.
This class definition also declares three public methods. The first is called setMake:andModel:andYear:. This entire three-part declaration, including the colons, is the name of that single method. That’s because Objective-C places parameters inside the method name, using a colon to indicate each parameter. In C, you’d use a function such as setProperties(char *c1, char *c2, int i). Objective-C’s approach, although heftier than the C approach, provides much more clarity and self-documentation. You don’t have to guess what c1, c2, and i mean because their use is declared directly within the name:
[myCar setMake:c1 andModel:c2 andYear:i];
The three methods are typed as void, void, and int, respectively. As in C, these refer to the type of data returned by the method. The first two do not return data; the third returns an integer. In C, the equivalent function declaration to the second and third method would be void printCarInfo() and int year().
Using Objective-C’s method-name-interspersed-with-arguments approach can feel odd to new programmers but quickly becomes a much-loved feature. There’s no need to guess which argument to pass when the method name itself tells you what items go where. In Objective-C, method names are also interchangeably called “selectors.” You see this a lot in iOS programming, especially when you use calls to performSelector:, which lets you send messages to objects at runtime.
Notice that this header file uses #import to load headers rather than #include. Importing headers in Objective-C automatically skips files that have already been added. This lets you add duplicate #import directives to your various source files without penalties.
The code for this example—and all the examples in this chapter—is found in the sample code for this book. See the Preface for details about downloading the book’s sample code from the Internet.
Creating Objects
To create an object, you tell Objective-C to allocate the memory needed for the object and return a pointer to that object. Because Objective-C is an object-oriented language, its syntax looks a little different from regular C. Instead of just calling functions, you ask an object to do something. This takes the form of two elements within square brackets, the object receiving the message followed by the message itself:
[object message]
Here, the source code sends the message alloc to the Car class and then sends the message init to the newly allocated Car object. This nesting is typical in Objective-C.
Car *myCar = [[Car alloc] init];
The “allocate followed by init” pattern you see here represents the most common way to instantiate a new object. The class Car performs the alloc method. It allocates a new block of memory sufficient to store all the instance variables listed in the class definition, zeroes out any instance variables, and returns a pointer to the start of the memory block. The newly allocated block is called an “instance” and represents a single object in memory.
Some classes, like views, use specialized initializers such as initWithFrame:. You can write custom ones such as initWithMake:andModel:andYear:. The pattern of allocation followed by initialization to create new objects holds universally. You create the object in memory and then you preset any critical instance variables.
Memory Allocation
In this example, the memory allocated is 16 bytes long. Both make and model are pointers, as indicated by the asterisk. In Objective-C, object variables point to the object itself. The pointer is 4 bytes in size. So sizeof(myCar) returns 4. The object consists of two 4-byte pointers, one integer, plus one additional field that does not derive from the Car class.
That extra field is from the NSObject class. Notice NSObject at the right of the colon next to the word Car in the class definition of Listing 2-1. NSObject is the parent class of Car, and Car inherits all instance variables and methods from this parent. That means that Car is a type of NSObject, and any memory allocation needed by NSObject instances is inherited by the Car definition. So that’s where the extra 4 bytes come from.
The final size of the allocated object is 16 bytes in total. That size includes two 4-byte NSString pointers, one 4-byte int, and one 4-byte allocation inherited from NSObject.
With the manual retain/release (MRR) compiler (that is, compiled with -fno-objc-arc), you can print out the size of objects by dereferencing them and using C’s sizeof() function. The following code snippet uses standard C printf statements to send text information to the console. printf commands work just as well in Objective-C as they do in ANSI C.
NSObject *object = [[NSObject alloc] init];
Car *myCar = [[Car alloc] init];
// This returns 4, the size of an object pointer
printf("object pointer: %d
", sizeof(object));
// This returns 4, the size of an NSObject object
printf("object itself: %d
", sizeof(*object));
// This returns 4, again the size of an object pointer
printf("myCar pointer: %d
", sizeof(myCar));
// This returns 16, the size of a Car object
printf("myCar object: %d
", sizeof(*myCar));
You cannot use this sizeof() check with the default ARC compiler. Instead, use an Objective-C runtime function to retrieve the same information. (Make sure to include <objc/objc-runtime.h> to compile.) The class_getInstanceSize() function returns the size of any object allocated by a given class, allowing you to see how much space any object instance occupies in memory:
printf("myCar object: %d ", (int) class_getInstanceSize([myCar class]);
Note
As ARC gains traction in the iOS developer community, the phrase Manual Reference Counting (MRC) is starting to compete with Manual Retain Release (MRR). This chapter uses MRR throughout, due to the standards when the material was being prepared. I’m actually rooting for MRC over MRR, as I think it better describes the technology. Time will tell.
Releasing Memory
In C, you allocate memory with malloc() or a related call and free that memory with free(). In Objective-C, how you release that memory depends on whether or not you’re using automated reference counting (ARC) compiler features or manual retain/release (MRR).
In both scenarios, you allocate memory with alloc. Objective-C also lets you allocate memory a few other ways, such as by copying other objects. With ARC, you never explicitly free memory. The compiler takes care of that for you. With MRR, you are responsible for releasing memory when you are done using it; free an object by sending it the release message:
[object release];
[myCar release];
This chapter discusses both ARC and MRR. If you are new to iOS 5 development and will not be working with any legacy code, you might assume you should only focus on using ARC code. The realities of iOS development challenge that assumption. Anyone who works with iOS should understand how both ARC and manual memory management work.
Understanding Retain Counts with MRR
Under MRR, releasing memory is a little more complicated than in standard C. That’s because Objective-C uses a reference-counted memory system. Each object in memory has a retain count associated with it. You can see that retain count by sending retainCount to the object in any project that’s not compiled with ARC. (Under ARC, you may not use retainCount directly. Similar prohibitions exist for retain, release, and autorelease.) Never rely on using retainCount in software deployment in the real world. It’s used here only as a tutorial example to help demonstrate how retains work.
Every object is created with a retain count of 1. Sending release reduces that retain count by 1. When the retain count for an object reaches 0, or more accurately, when it is about to reach 0 by sending the release message to an object with a retain count of 1, it is released into the general memory pool.
Car *myCar = [[Car alloc] init];
// The retain count is 1 after creation
printf("The retain count is %d
", [myCar retainCount]);
// This would reduce the retain count to 0, so it is freed instead
[myCar release];
// This causes an error. The object has already been freed
printf("Retain count is now %d
", [myCar retainCount]);
Sending messages to freed objects will crash your application; you’re addressing memory you no longer own. When the second printf executes, the retainCount message is sent to the already-freed myCar. This creates a memory access violation, terminating the program. As a general rule in MRR applications, it’s good practice to assign instance variables to nil after the final release that deallocates the object. This prevents the FREED(id) error you see here, when you access an already-freed object:
The retain count is 1
objc[10754]: FREED(id): message retainCount sent to freed
object=0xd1e520
As a developer, you must manage your MRR objects. Keep them around for the span of their use and free their memory when you are finished. Basic memory management strategies and an ARC overview follow later in this chapter.
Methods, Messages, and Selectors
In standard C, you’d perform two function calls to allocate and initialize data. Here is how that might look, in contrast to Objective-C’s [[Car alloc] init] statement:
Car *myCar = malloc(sizeof(Car));
init(myCar);
Objective-C doesn’t use function_name(arguments) syntax. Instead, you send messages to objects using square brackets. Messages tell the object to perform a method. It is the object’s responsibility to implement that method and produce a result. The first item within the brackets is the receiver of the message; the second item is a method name, and possibly some arguments to that method that together define the message you want sent. In C, you might write
printCarInfo(myCar);
but in Objective-C, you say:
[myCar printCarInfo];
Despite the difference in syntax, methods are basically functions that operate on objects. They are typed using the same types available in standard C. Unlike function calls, Objective-C places limits on who can implement and call methods. Methods belong to classes. And the class interface defines which of these are declared to the outside world.
Undeclared Methods
With ARC, the LLVM compiler will not allow you to send a message to an object that does not declare that method selector. Sending printCarInfo to an array object, for example, causes a runtime error and crashes the program. Under MRR, the compiler issues a warning about the method call. Under the ARC compiler’s default settings, the call will not compile as the built-in static analyzer raises an objection (see Figure 2-1). Only objects that implement a given method can respond to the message properly and execute the code that was requested. Here’s what happens when the MRR version is compiled and run, with the warnings ignored:
2009-05-11 09:04:31.978 HelloWorld[419:20b] *** -[NSCFArray printCarInfo]:
unrecognized selector sent to instance 0xd14e80
2009-05-11 09:04:31.980 HelloWorld[419:20b] *** Terminating app due to uncaught exception
'NSInvalidArgumentException', reason: '*** -[NSCFArray
printCarInfo]: unrecognized selector sent to instance 0xd14e80'

Figure 2-1. Xcode’s ARC compilation will not compile method calls that do not appear to be implemented by the receiver.
With MRR’s default settings, these warnings do not make the compilation fail, and it’s possible that this code could run without error if NSArray implemented printCarInfo and did not declare that implementation in its published interface. Because NSArray does not, in fact, implement this method, running this code produces a runtime crash.
Pointing to Objects
Objective-C lets you point to the same kind of object in several different ways. Although array was declared as a statically typed (NSArray *) object, that object uses the same internal object data structures as an object declared as id. The id type can point to any object, regardless of class, and is equivalent to (NSObject *). The following assignment is valid and does not generate any warnings at compile time:
NSArray *array = [NSArray array];
id untypedVariable = array; // This assignment is valid
To further demonstrate, consider a mutable array. The NSMutableArray class is a subclass of NSArray. The mutable version offers arrays that you can change and edit. Creating and typing a mutable array but assigning it to an array pointer compiles without error. Although anotherArray is statically typed as NSArray, creating it in this way produces an object at runtime that contains all the instance variables and behaviors of the mutable array class.
The problem with the following code is not the assignment, it’s the method call. Although anotherArray is allocated and initialized as a mutable array, it’s assigned to a normal array. The static analyzer complains at the addObject: method.
NSArray *anotherArray = [NSMutableArray array];
// This mutable-only method call will cause an error
[anotherArray addObject:@"Hello World"];
Although assigning a child class object to a pointer of a parent class generally works at runtime, it’s far more dangerous to go the other way. A mutable array is a kind of array. It can receive all the messages that arrays do. Not every array, on the other hand, is mutable. Sending the addObject: message to a regular array is lethal. Doing so bombs at runtime, because arrays do not implement that method:
NSArray *standardArray = [NSArray array];
NSMutableArray *mutableArray;
// This line produces a warning
mutableArray = standardArray;
// This will bomb at runtime
[mutableArray addObject:@"Hello World"];
The code seen here produces just one warning, at the line where the standard array object is assigned to the mutable array pointer, namely “Incompatible pointer types.” Parent-to-child assignments do not generate this warning. Child-to-parent assignments do. So do assignments between completely unrelated classes. Do not ignore this warning; fix your code. Otherwise, you’re setting yourself up for a runtime crash.
In Xcode, you can set the compiler to treat warnings as errors. Because Objective-C is so dynamic, the compiler cannot catch every problem that might crash at runtime the way static language compilers can. Pay special attention to warnings and try to eliminate them.
Inheriting Methods
Objects inherit method implementations as well as instance variables. A Car is a kind of NSObject, so it can respond to all the messages that an NSObject responds to. That’s why myCar can be allocated and initialized with alloc and init. These methods are defined by NSObject. Therefore, they can be used to create and initialize any instance of Car, which is derived from the NSObject class.
Similarly, NSMutableArray instances are a kind of NSArray. All array methods can be used by mutable arrays, their child class. You can count the items in the array, pull an object out by its index number, and so forth.
A child class may override a parent’s method implementation, but it can’t negate that the method exists. Child classes always inherit the full behavior and state package of their parents.
Declaring Methods
As Listing 2-1 showed, a class interface defines the instance variables and methods that a new class adds to its parent class. This interface is normally placed into a header file, which is named with an .h extension. The interface from Listing 2-1 declared three methods:
- (void) setMake:(NSString *) aMake andModel:(NSString *) aModel
andYear: (int) aYear;
- (void) printCarInfo;
- (int) year;
These three methods, respectively, return void, void, and int. Notice the dash that starts the method declaration. It indicates that the methods are implemented by object instances. For example, you call [myCar year] and not [Car year]. The latter sends a message to the Car class rather than an actual car object. A discussion about class methods (indicated by “+” rather than “-”) follows later in this section.
Method calls can be complex. The following invocation sends a method request with three parameters. The parameters are interspersed inside the method invocation. The name for the method (that is, its selector) is setMake:andModel:andYear:. The three colons indicate where parameters should be inserted. The types for each parameter are specified in the interface after the colons: (NSString *), (NSString *), and (int). Because this method returns void, the results are not assigned to a variable:
[myCar setMake:@"Ford" andModel:@"Prefect" andYear:1946];
Implementing Methods
Together, a method file and a header file pair store all the information needed to implement a class and announce it to the rest of an application. The implementation section of a class definition provides the code that implements functionality. This source is usually placed in an .m (for “method”) file.
Listing 2-2 shows the implementation for the Car class example. It codes all three methods declared in the header file from Listing 2-1 and adds a fourth. This extra method redefines init. The Car version of init sets the make and model of the car to nil, which is the NULL pointer for Objective-C objects. It also initializes the year of the car to 1901.
The special variable self refers to the object that is implementing the method. That object is also called the “receiver” (that is, the object that receives the message). This variable is made available by the underlying Objective-C runtime system. In this case, self refers to the current instance of the Car class. Calling [self message] tells Objective-C to send a message to the object that is currently executing the method.
Several things are notable about the init method seen here. First, the method returns a value, which is typed to (id). As mentioned earlier in this chapter, the id type is more or less equivalent to (NSObject *), although it’s theoretically slightly more generic than that. It can point to any object of any class (including Class objects themselves). You return results the same way you would in C, using return. The goal of init is to return a properly initialized version of the receiver via return self.
Second, the method calls [super init]. This tells Objective-C to send a message to a different implementation—namely the one defined in the object’s superclass. The superclass of Car is NSObject, as shown in Listing 2-1. This call says, “Please perform the initialization that is normally done by my parent class before I add my custom behavior.” Calling a superclass’s implementation before adding new behavior demonstrates an important practice in Objective-C programming.
Finally, notice the check for if (!self). In rare instances, memory issues arise. In such a case, the call to [super init] returns nil. If so, this init method returns before setting any instance variables. Because a nil object does not point to allocated memory, you cannot access instance variables within nil.
As for the other methods, they use year, make, and model as if they were locally declared variables. As instance variables, they are defined within the context of the current object and can be set and read as shown in this example. The UTF8String method that is sent to the make and model instance variables converts these NSString objects into C strings, which can be printed using the %s format specifier.
Note
You can send nearly any message to nil (for example, [nil anyMethod]). The result of doing so is, in turn, nil. (Or, more accurately, 0 casted as nil.) In other words, there is no effect. This behavior lets you nest method invocations with a failsafe should any of the individual methods fail and return nil. If you were to run out of memory during an allocation with [[Car alloc] init], the init message would be sent to nil, allowing the entire alloc/init request to return nil in turn.
Listing 2-2. The Car Class Implementation (Car.m)
#import "Car.h"
@implementation Car
- (id) init
{
self = [super init];
if (!self) return nil;
// the make and model are initialized to nil by default
year = 1901;
return self;
}
- (void) setMake:(NSString *) aMake andModel:(NSString *) aModel
andYear: (int) aYear
{
// Note that this does not yet handle memory management properly
// The Car object does not retain these items, which may cause
// memory errors down the line
make = aMake;
model = aModel;
year = aYear;
}
- (void) printCarInfo
{
if (!make) return;
if (!model) return;
printf("Car Info
");
printf("Make: %s
", [make UTF8String]);
printf("Model: %s
", [model UTF8String]);
printf("Year: %d
", year);
}
- (int) year
{
return year;
}
@end
Class Methods
Class methods are defined using a plus (+) prefix rather than a hyphen (-). They are declared and implemented in the same way as instance methods. For example, you might add the following method declaration to your interface:
+ (NSString *) motto;
Then you could code it up in your implementation:
+ (NSString *) motto
{
return @"Ford Prefects are Mostly Harmless";
}
Class methods differ from instance methods in that they generally cannot use state. They are called on the Class object itself, which does not have access to instance variables. That is, they have no access to an instance’s instance variables (hence the name) because those elements are only created when instantiated objects are allocated from memory.
So why use class methods at all? The answer is threefold. First, class methods produce results without having to instantiate an actual object. This motto method produces a hard-coded result that does not depend on access to instance variables. Convenience methods such as this often have a better place as classes rather than instance methods.
You might imagine a class that handles geometric operations. The class could implement a conversion between radians and degrees without needing an instance—for example, [GeometryClass convertAngleToRadians:theta]. Simple C functions declared in header files also provide a good match to this need.
The second reason is that class methods can provide access to a singleton. Singletons refer to statically allocated instances. The iOS SDK offers several of these. For example, [UIApplication sharedApplication] returns a pointer to the singleton object that is your application. [UIDevice currentDevice] retrieves an object representing the hardware platform you’re working on.
Combining a class method with a singleton lets you access that static instance anywhere in your application. You don’t need a pointer to the object or an instance variable that stores it. The class method pulls that object’s reference for you and returns it on demand.
Third, class methods tie into memory management schemes, for both ARC and MRR compilation. Consider allocating a new NSArray. You do so via [[NSArray alloc] init], or you can use [NSArray array]. This latter class method returns an array object that has been initialized and set for autorelease. As you read about later in this chapter, Apple has provided a standard about class methods that create objects. They always return those objects to you already autoreleased. Because of that, this class method pattern is a fundamental part of the standard iOS memory management system.
Fast Enumeration
Fast enumeration was introduced in Objective-C 2.0 and offers a simple and elegant way to enumerate through collections such as arrays and sets. It adds a for-loop that iterates through the collection using concise for/in syntax. The enumeration is very efficient, running quickly. Attempts to modify the collection as it’s being enumerated raise a runtime exception; don’t do that.
NSArray *colors = [NSArray arrayWithObjects:
@"Black", @"Silver", @"Gray", nil];
for (NSString *color in colors)
printf("Consider buying a %s car", [color UTF8String]);
Note
Use caution when using a method such as arrayWithObjects: or dictionaryWithKeysAndValues:. These can be unnecessarily error-prone. A common error occurs when one of the mid-list arguments evaluates to nil. This is especially easy to miss for NSDictionarys, which can have missing key-value pairs as a result. Developers often use this method with instance variables without first checking whether these values are non-nil, which can cause runtime errors. Another common mistake is to forget the final “sentinel” nil at the end of your arguments. This missing nil may not be caught at compile time but will cause runtime errors as well.
Class Hierarchy
In Objective-C, each new class is derived from an already-existing class. The Car class described in Listings 2-1 and 2-2 is formed from NSObject, the root class of the Objective-C class tree. Each subclass adds or modifies state and behavior that it inherits from its parent, also called its “superclass.” The Car class adds several instance variables and methods to the vanilla NSObject it inherits.
Figure 2-2 shows some of the classes found in the iOS SDK and how they relate to each other in the class hierarchy. Strings and arrays descend from NSObject, as does the UIResponder class. UIResponder is the ancestor of all onscreen iOS elements. Views, labels, text fields, and sliders are children, grandchildren, or other descendants of UIResponder and NSObject.
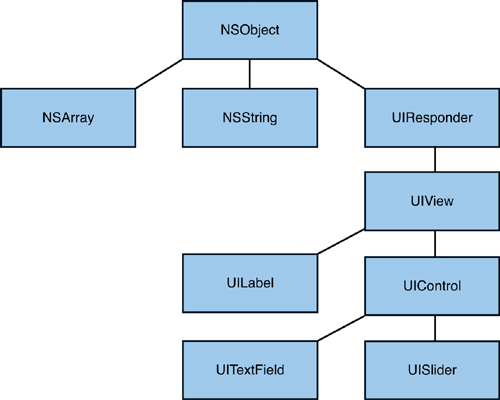
Figure 2-2. All Cocoa Touch classes are descended from NSObject, the root of the class hierarchy tree.
Every class other than NSObject descends from other classes. UITextField is a kind of UIControl, which is in turn a kind of UIView, which is a UIResponder, which is an NSObject. Building into this object hierarchy is what Objective-C is all about. Child classes can do the following:
• Add new instance variables that are not allocated by their parent, also called the superclass. The Car class adds three: the make and model strings, and the year integer.
• Add new methods that are not defined by the parent. Car defines several new methods, letting you set the values of the instance variables and print out a report about the car.
• Override methods that the parents have already defined. The Car class’s init method overrides NSObject’s version. When sent an init message, a car object runs its version, not NSObject’s. At the same time, the code for init makes sure to call NSObject’s init method via [super init]. Referencing a parent’s implementation, while extending that implementation, is a core part of the Objective-C design philosophy.
Logging Information
Now that you’ve read the basics about classes and objects, it’s important to understand how to log information about them. In addition to printf, Objective-C offers a fundamental logging function called NSLog. This function works like printf and uses a similar format string, but it outputs to stderr instead of stdout. NSLog uses an NSString format string rather than a C string one.
NSStrings are declared differently than C strings. They are prepended with the @ (at) symbol. A typical NSString looks @"like this"; the equivalent C string looks "like this", omitting the @. Whereas C strings refer to a pointer to a string of bytes, NSStrings are objects. You can manipulate a C string by changing the values stored in each byte. NSStrings are immutable; you cannot access the bytes to edit them, and the actual string data is not stored within the object.
// This is 12 bytes of addressable memory
printf("%d
", sizeof("Hello World"));
// This 4-byte object points to non-addressable memory
NSString *string = @"Hello World";
printf("%d
", sizeof(*string)); // Only with –fno-objc-arc
In addition to using the standard C format specifiers, NSLog introduces an object specifier, %@, which lets you print objects. It does so by sending an object the description message. It is then the object’s job to return a human-readable description of itself. This behavior allows you to transform
printf("Make: %s ", [make UTF8String]);
into
NSLog(@"Make: %@", make);
Table 2-1 shows some of the most common format specifiers. This is far from an exhaustive list, so consult Apple’s String Programming Guide for Cocoa for more details.
Table 2-1. Common String Format Specifiers
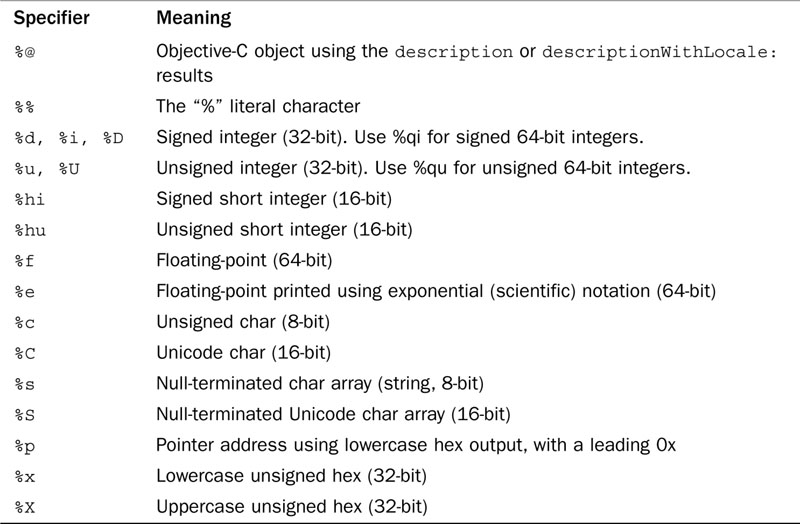
Notice that NSLog does not require a hard-coded return character. It automatically appends a new line when used. What’s more, it adds a timestamp to every log, so the results of the NSLog invocation shown previously look something like this:
2011-05-07 14:19:08.792 HelloWorld[11197:20b] Make: Ford
Nearly every object converts itself into a string via the description message. NSLog uses description to show the contents of objects formatted with %@. This returns an NSString with a textual description of the receiver object. You can describe objects outside of NSLog by sending them the same description method. This is particularly handy for use with printf and fprintf, which cannot otherwise print objects:
fprintf(stderr, "%s ", [[myCar description] UTF8String]);
You can combine NSLog’s object formatting features with printf’s no-prefix presentation by implementing a simple NS-styled print utility such as the following function. This function automatically adds a carriage return, as NSLog does but printf does not. It also handles printing objects, which printf natively does not. Adjust this accordingly for your own needs. As with NSLog, the data this function sends to standard out can be viewed in the Xcode debugging console.
void nsprintf(NSString *formatString,...)
{
va_list arglist;
if (formatString)
{
va_start(arglist, formatString);
{
NSString *outstring = [[NSString alloc]
initWithFormat:formatString arguments:arglist];
fprintf(stderr, "%s
", [outstring UTF8String]);
// [outstring release]; // uncomment if not using ARC
}
va_end(arglist);
}
}
Cocoa touch offers an NSStringFrom family of functions. These provide a simple way to convert structures to printable strings suitable for logging. For example, NSStringFromCGRect() creates a string from a CGRect structure and NSStringFromCGAffineTransform() builds its string formatted to contain the data from a Core Graphics affine transform.
Basic Memory Management
Memory management comes down to two simple rules. At creation, every object has a retain count of 1. At release, every object has (or, more accurately, is about to have) a retain count of 0. When using manual retain/release (MRR), it is up to you as a developer to manage an object’s retention over its lifetime. With automated reference counting (ARC), the compiler does most of the work for you. Here are two quick-and-dirty guides that explain how each approach works.
Managing Memory with MRR
Under MRR, your role as a coder is to ensure that every object you allocate moves from the start to the finish of its life cycle without being prematurely released and to guarantee that it does finally get released when it is time to do so. Complicating matters is Objective-C’s MRR autorelease pool. If some objects are autoreleased and others must be released manually, how do you best control your objects? Here’s a quick-and-dirty guide to getting your memory management right.
Creating Objects
Any time you create an object using the alloc/init pattern with the MRR compiler, you build it with a retain count of 1. It doesn’t matter which class you use or what object you build, alloc/init produces a +1 count.
id myObject = [[SomeClass alloc] init];
For locally scoped variables, if you do not release the object before the end of a method, the object leaks. Your reference to that memory goes away, but the memory itself remains allocated. The retain count remains at +1.
- (void) leakyMRRMethod
{
// This is leaky in MRR
NSArray *array = [[NSArray alloc] init];
}
The proper way to use an alloc/init pattern is to create, use, and then release. Releasing brings the retain count down to 0. When the method ends, the object is deallocated.
- (void) properMRRMethod
{
NSArray *array = [[NSArray alloc] init];
// use the array here
[array release];
}
Autoreleasing objects do not require an explicit release statement for locally scoped variables. (In fact, avoid doing so to prevent double-free errors that will crash your program.) Sending the autorelease message to an object marks it for autorelease. When the autorelease pool drains at the end of each event loop, it sends release to all the objects it owns.
- (void) anotherProperMRRMethod
{
NSArray *array = [[[NSArray alloc] init] autorelease];
// This won't crash the way release would
printf("Retain count is %d
",
[array retainCount]); // don't use retainCount in real code!
// use the array here
}
By convention, object-creation class methods, both MRR and ARC, return an autoreleased object. The NSArray class method array returns a newly initialized array that is already set for autorelease. The object can be used throughout the method, and its release is handled when the autorelease pool drains.
- (void) yetAnotherProperMethod
{
NSArray *array = [NSArray array];
// use the array here
}
At the end of this method, the autoreleased array can return to the general memory pool.
Creating Autoreleased Objects
As a rule, whenever you ask another method to create an object, it’s good programming practice to return that object autoreleased. Doing so consistently lets you follow a simple rule: “If I didn’t allocate it, then it was built and returned to me as an autoreleasing object.” You must do this manually in MRR. In ARC, the compiler is smart enough to autorelease the object for you.
- (Car *) fetchACarInMRR
{
Car *myCar = [[Car alloc] init];
return [myCar autorelease];
}
This holds especially true for class methods. By convention all class methods that create new objects return autoreleasing objects. These are generally referred to as “convenience methods.” Any object that you yourself allocate is not set as autorelease unless you specify it yourself.
// This is not autoreleased in MRR
Car *car1 = [[Car alloc] init];
// This is autoreleased in MRR
Car *car2 = [[[Car alloc] init] autorelease];
// By convention, this *should* be an autoreleased object in MRR
Car *car3 = [Car car];
To create a convenience method at the class level, make sure to define the class with the + prefix instead of - and return the object after sending autorelease to it.
+ (Car *) car
{
// MRR requires an explicit autorelease call
return [[[Car alloc] init] autorelease];
}
Autoreleasing Object Lifetime
So how long can you use an autoreleasing object? What guarantees do you have? The hard-and-fast rule is that the object is yours until the next item in the event loop gets processed. The event loop is triggered by user touches, by button presses, by “time passed” events, and so forth. In human reckoning these times are impossibly short; in the iOS SDK device’s processor frame of reference, they’re quite large. As a more general rule, you can assume that an autoreleased object should persist throughout the duration of your method call.
Once you return from a method, guarantees go out the window. When you need to use an array beyond the scope of a single method or for extended periods of time (for example, you might start a custom run-loop within a method, prolonging how long that method endures), the rules change. In MRR, you must retain autoreleasing objects to increase their count and prevent them from getting deallocated when the pool drains; when the autorelease pool calls release on their memory, they’ll maintain a count of at least +1. In ARC, assigning an autoreleasing object to any default (strong) variable or property retains that object for the lifetime of that scoping.
Never rely on an object’s retainCount to keep track of how often it has already been retained. If you want to make absolutely sure you own an object, then retain it, use it, and release it when you’re done. If you’re looking at anything other than your own object’s relative retain counts and matching releases, you’re going to run into systemic development errors.
Note
Avoid assigning properties to themselves, especially in MRR (for example, myCar.colors = myCar.colors). The release-then-retain behavior of properties may cause the object to deallocate before it can be reassigned and re-retained.
Retaining Autoreleasing Objects
In MRR, you can send retain to autoreleasing objects just like any other object. Retaining autoreleasing objects allows them to persist beyond a single method. Once retained, an autoreleased object is just as subject to memory leaks as one that you created using alloc/init. For example, retaining an object that’s scoped to a local variable might leak, as shown here:
- (void)anotherLeakyMRRMethod
{
// After returning, you lose the local reference to
// array and cannot release.
NSArray *array = [NSArray array];
[array retain];
}
Upon creation, array has a retain count of +1. Sending retain to the object brings that retain count up to +2. When the method ends and the autorelease pool drains, the object receives a single release message; the count returns to +1. From there, the object is stuck. It cannot be deallocated with a +1 count and with no reference left to point to the object, it cannot be sent the final release message it needs to finish its life cycle. This is why it’s critical to build references to retained objects.
By creating a reference, you can both use a retained object through its lifetime and be able to release it when you’re done. Set references via an instance variable (preferred) or a static variable defined within your class implementation. If you want to keep things simple and reliable in MRR, use retained properties built from those instance variables. A discussion of how retained properties work and why they provide a solution of choice for developers follows later in this chapter.
Managing Memory with ARC
Automatic reference counting (ARC) simplifies memory management by automating the way objects are retained and released. By handling your memory for you, ARC allows you to focus your effort on code semantics, reducing the time and overhead you devote to thinking about memory management issues.
To create an object in ARC, either allocate and initialize it or use a class convenience method. You do not have to retain your object, autorelease your object, or otherwise deal directly with any memory issues. The following two lines are functionally equivalent in ARC:
NSArray *array = [[NSArray alloc] init];
and
NSArray *array = [NSArray array];
That’s because the compiler takes control of all memory management for you. In each case, assigning the new array to the local variable retains the array. This behavior is called strong. By default, object variables are “strong,” which means they retain their contents throughout their scope.
Important things are happening on the right-hand side of the assignment as well. In the first instance, the compiler balances the +1 retain count of the newly created object with the array variable’s desire to retain it. It performs a simple assignment. In the second instance, the compiler retains the autoreleased object returned by the NSArray class’s convenience method, again assigning a +1 retained object to the variable.
In ARC, you do not implement or invoke retain, release, retainCount, or autorelease. In the preceding examples, the compiler releases the array when the variable’s scope ends.
As with MRR, class convenience methods—methods that create new objects for you—return autoreleased objects. In ARC, you do not need to perform the autorelease yourself. Here’s what a Car convenience class method might look like. It’s not a very interesting method, and has no side effects, but it demonstrates how ARC adds memory management for you. With ARC, you almost never have to worry about memory leaking when you follow good programming practices.
+ (Car *) car
{
// ARC implicitly adds autoreleasing
return [[Car alloc] init];
}
A more in-depth discussion of ARC follows later in this chapter for experienced developers making the move from MRR to ARC coding.
Properties
Properties expose class variables and methods to outside use through what are called “accessor methods”—that is, methods that access information. Using properties might sound redundant. After all, the class definition shown in Listing 2-1 already announces public methods. So why use properties? It turns out that there are advantages to using properties over publicly declared methods, not the least of which are encapsulation, dot notation, and memory management.
Encapsulation
Encapsulation allows you to hide implementation details away from the rest of your application, including any clients that use your objects. The object’s internal representation and its method mechanisms are kept separate from the way the object declares itself to the outside. Properties provide ways to expose object state and other information in a well-structured and circumscribed manner.
Properties are not, however, limited to use as public variables. They play an important role within class definitions as well. Properties allow you to add smart proactive development techniques, including lazy loading and caching orthogonally, to the rest of a class implementation. That’s why classes can be property clients as well as providers.
Dot Notation
Dot notation allows you to access object information without using brackets. Instead of calling [myCar year] to recover the year instance variable, you use myCar.year. Although this may look as if you’re directly accessing the year instance variable, you’re not. Properties always invoke methods. These, in turn, can access an object’s data. So you’re not breaking an object’s encapsulation because properties rely on these methods to bring data outside the object.
Due to method hiding, properties simplify the look and layout of your code. For example, you can access properties to set a table’s cell text via
myTableViewCell.textLabel.text = @"Hello World";
rather than the more cumbersome
[[myTableViewCell textLabel] setText:@"Hello World"];
The property version of the code is more readable and ultimately easier to maintain. Admittedly, Objective-C 2.0’s dot notation may initially confuse programmers who are used to using dots for structures instead.
Properties and Memory Management
Under manual retain/release compilation (MRR), properties can help simplify memory management. You can create properties that automatically retain the objects they’re assigned to for the lifetime of your objects and release them when you set those variables to nil. In MRR compilation, retained properties are qualified as retain. (In ARC, they are strong.) Setting a retained property ensures that memory will not be released until you say so. Of course, properties are not a magic bullet. They must be defined and used properly.
Assigning an object to a retained property means you’re guaranteed that the objects they point to will be available throughout the tenure of your ownership. As already mentioned, that guarantee extends to instance variables in ARC. By default, ARC instance variables are qualified as strong, holding onto any object until the instance variable is reassigned or the object finishes its lifetime.
MRR and Retained Properties
Until ARC made its debut, a retained property offered a convenient way to hold onto objects until they were no longer needed. Want to retain an object for a long time? Create a property. Now, with ARC, retained properties are needed only for objects that must be accessible outside your class implementation.
Listing 2-2 did not retain its make and model. Under MRR, if those objects were released somewhere else in an application, the pointers to the memory that stored those objects would become invalid. At some point, the application might try to access that memory and crash. By retaining objects, you ensure that the memory pointers remain valid and meaningful.
The arrayWithObjects: method normally returns an autoreleased object, whose memory is deallocated at the end of the event loop cycle. Assigning the array to a retained property means that the array sticks around indefinitely. You retain the object, preventing its memory from being released until you are done using it.
self.colors = [NSArray arrayWithObjects:
@"Gray", @"Silver", @"Black", nil];
When you’re done using the array and want to release its memory, set the property to nil. This approach works because Objective-C knows how to synthesize accessor methods, creating properly managed ways to change the value of an instance variable. You’re not really setting a variable to nil. You’re actually telling Objective-C to run a method that releases any previously set object and then sets the instance variable to nil. All this happens behind the scenes. From a coding point of view, it simply looks as if you’re assigning a variable to nil.
self.colors = nil;
Do not send release directly to retained properties—for example, [self.colors release]. Doing so does not affect the colors instance variable assignment, which now points to memory that is likely deallocated. When you next assign an object to the retained property, the memory pointed to by self.colors will receive an additional release message, likely causing a double-free exception.
Declaring Properties
There are two basic styles of properties: readwrite and readonly. Read-write properties, which are the default, let you modify the values you access; read-only properties do not. Use readonly properties for instance variables that you want to expose, without providing a way to change their values. They are also handy for properties that are generated by algorithm, such as via a cache or lazy load.
The two kinds of accessor methods you must provide are called setters and getters. Setters set information; getters retrieve information. You can define these with arbitrary method names or you can use the standard Objective-C conventions: The name of the instance variable retrieves the object, while the name prefixed with set, sets it. Objective-C can even synthesize these methods for you. For example, if you declare a property such as the Car class’s year in your class interface, as such
@property (assign) int year;
and then synthesize it in your class implementation with
@synthesize year;
you can read and set the instance variable with no further coding. Objective-C builds two methods that get the current value (that is, [myCar year]) and set the current value (that is, [myCar setYear:1962]) and add the two dot notation shortcuts:
myCar.year = 1962;
NSLog(@"%d", myCar.year);
To build a read-only property, declare it in your interface using the readonly qualifier. Read-only properties use getters without setters. For example, here’s a property that returns a formatted text string with car information:
@property (readonly) NSString *carInfo;
Although Objective-C can synthesize read-only properties, you can also build the getter method by hand and add it to your Class implementation. This method returns a description of the car via stringWithFormat:, which uses a format string a la sprintf to create a new string:
- (NSString *) carInfo
{
return [NSString stringWithFormat:
@"Car Info
Make: %@
Model: %@
Year: %d",
self.make ? self.make : @"Unknown Make",
self.model ? self.model : @"Unknown Model",
self.year];
}
This method now becomes available for use via dot notation. Here is an example:
NSLog(@"%@", myCar.carInfo);
If you choose to synthesize a getter for a read-only property, you should use care in your code. Inside your implementation file, make sure you assign the instance variable for that property without dot notation. Imagine that you declared model as a read-only property. You could assign model with
model = @"Prefect";
but not with
self.model = @"Prefect";
The latter use attempts to call setModel:, which is not defined for a read-only property.
Note
The “?:” ternary operator used in this section defines a simple if-then-else conditional expression. (a ? b : c) returns b if a is true, and c otherwise.
Creating Custom Getters and Setters
Although Objective-C automatically builds methods when you @synthesize properties, you may skip the synthesis by creating those methods yourself. For example, you could build methods as simple as these. Notice the capitalization of the second word in the set method. Objective-C expects setters to use a method named setInstance:, where the first letter of the instance variable name is capitalized:
-(int) year
{
return year;
}
- (void) setYear: (int) aYear
{
year = aYear;
}
In MRR Objective-C, you would want to add memory management when building your own setters and getters, as demonstrated in the following code snippet. You do not need to add memory management in ARC. The compiler handles those matters for you, so the ARC setModel: method only has to make the newModel to model assignment:
- (NSString *) model
{
return model;
}
- (void) setModel: (NSString *) newModel
{
if (newModel != model) {
[newModel retain];
[model release];
model = newModel;
}
}
Property accessor methods go even further by building more complicated routines that generate side effects upon assignment and retrieval. For example, you might keep a count of the number of times the value has been retrieved or changed, or send in-app notifications to other objects. You might build a flushable cache to hold objects until you experience memory warnings or use lazy loading to delay creating assets until they’re requested by a getter.
The Objective-C compiler remains happy so long as it finds, for any property, a getter (typically named the same as the property name) and a setter (usually setName:, where name is the name of the property). What’s more, you can bypass any Objective-C naming conventions by specifying setter and getter names in the property declaration. This declaration creates a new Boolean property called forSale and declares a custom getter/setter pair. As always, you add any property declarations to the class interface.
@property (getter=isForSale, setter=setSalable:) BOOL forSale;
Now you can synthesize the methods as normal in the class implementation. The implementation is typically stored in the .m file that accompanies the .h header file:
@synthesize forSale;
If you have more than one item to synthesize, you can add them in separate @synthesize statements or combine them onto a single line, separating each by a comma:
@synthesize forSale, anotherProperty, yetAnotherProperty;
Using this approach creates both the normal setter and getter via dot notation plus the two custom methods, isForSale and setSalable:.
You can also use @synthesize statements to declare local variables that are tied to property names. For example, you can tie a property’s methods to its local backing variable by using the same name. Here, the myString variable backs the myString property:
@interface MyClass : NSObject
{
NSString *myString;
}
@property (strong) NSString *myString;
@end
@implementation MyClass
@synthesize myString;
@end
The instance variable declaration is not necessary. Synthesizing a property automatically creates its backing variable. The following snippet is functionally equivalent to the preceding one:
@interface MyClass : NSObject
@property (strong) NSString *myString;
@end
@implementation MyClass
@synthesize myString;
@end
Some Objective-C programmers like to distinguish the instance variable from the property. They do this by prefixing instance variables with an underscore. The equivalent variable can be specified in the synthesize declaration. This approach helps emphasize encapsulation, in that instance variables are private to classes:
@interface MyClass : NSObject
@property (strong) NSString *myString;
@end
@implementation MyClass
@synthesize myString = _myString;
@end
Property Qualifiers
In addition to readwrite and readonly, you can specify whether a property is retained and/or atomic. The default behavior for properties in ARC is strong; in MRR the default behavior is assign. Strong and retain are synonymous; “strong” emphasizes the object relationship while “retain” places its emphasis on the underlying mechanics.
Assigned properties are not retained. ARC uses two styles of unretained property assignment. A weak property uses self-nullifying pointers; you never have to worry about dangling pointers. An unsafe_unretained property simply points to memory and, as its name indicates, may point to an unsafe address. Under ARC, assign properties are used to point to non-object value types such as integers and structures.
The following sections discuss property qualifiers for MRR and ARC compilation.
MRR Qualifiers
With assign, there’s no special retain/release behavior associated with the property, but by making it a property you expose the variable outside the class via dot notation. In MRR, a property that’s declared
@property NSString *make;
uses the assign behavior.
Setting the property’s attribute to MRR’s retain does two things. First, it retains the passed object upon assignment. Second, it releases the previous value before a new assignment is made. You can clear up any current memory usage by assigning the retained property to nil. To create a retained property, add the attribute between parentheses in the declaration:
@property (retain) NSString *make;
A third attribute called copy copies the passed object and releases any previous value. With MRR, copies are always created with a retain count of 1.
@property (copy) NSString *make;
ARC Qualifiers
When you’re declaring properties, strong properties automatically retain the objects assigned to them, releasing them only when the object whose property this is gets released or the property is set to nil. Use strong properties to hold onto any items that may be referenced through the lifetime of your object. By setting a property to be strong, you’re assured that the instance the property points to will not be released back into the general memory pool until you’re done with it, as shown here:
@property (nonatomic, strong) NSDate *date;
Like MRR’s assign properties, weak properties do not retain objects or otherwise extend their lifetime. However, weak properties do something that assign properties never did. They ensure that if the object being pointed to gets deallocated, the property returns nil, not a reference to reclaimed memory. ARC eradicates dangling pointers, creating safe nil values instead. This is known as “zeroing” weak references.
Use assign properties in ARC to point to items that aren’t objects, such as floats and Booleans as well as structs such as CGRect:
@property (assign) CGRect bounds;
Atomic Qualifiers
When you develop in a multithreaded environment, you want to use atomic properties. Xcode synthesizes atomic properties to automatically lock objects before they are accessed or modified and unlock them after. This ensures that setting or retrieving an object’s value is performed fully regardless of concurrent threads. There is no atomic keyword. All methods are synthesized atomically by default. You can, however, state the opposite, allowing Objective-C to create accessors that are nonatomic:
@property (nonatomic, strong) NSString *make;
Marking your properties nonatomic does speed up access, but you might run into problems should two competing threads attempt to modify the same property at once. Atomic properties, with their lock/unlock behavior, ensure that an object update completes from start to finish before that property is released to a subsequent read or change.
Some will argue that accessors are not usually the best place for locks and cannot ensure thread safety. An object might be set to an invalid state, even with all atomic properties. As Jay Spenser, one of my early readers, pointed out, “If you had a trade-in thread and an inventory thread, you could end up thinking you had a 1946 Tesla Prefect on your lot.”
Key-Value Coding
Key-value coding allows you to access properties by using strings that store property names. Just as you can access a property by myObject.propertyName, you can also retrieve the same value by issuing [myObject valueForKey:@"propertyName"]. Key-value coding is particularly valuable when working with numerous objects that share property names, allowing you to extract properties by name in a collection.
For example, this code snippet takes an average of all the myNumber properties in an array. It uses the @avg collection operator combined with the name of the key-value-compliant myNumber property:
NSNumber *averageNumber = [myArray valueForKeyPath:@"@avg.myNumber"];
NSLog(@"Average number is : %0.2f", averageNumber.floatValue);
You might use key-value coding to extract all items from an array whose property exceeds 50, as shown here:
// collect the indices of each object whose myNumber is over 50
NSIndexSet *indexSet = [myArray indexesOfObjectsPassingTest:
^BOOL(id obj, NSUInteger idx, BOOL *stop) {
NSNumber *num = [(MyClass *)obj valueForKey:@"myNumber"];
return (num.intValue > 50);
}];
NSArray *subArray = [myArray objectsAtIndexes:indexSet];
NSLog(@"Numbers larger than 50 include %@", subArray);
Key-value coding offers a highly flexible way to get at information structured within an object. As these simple examples demonstrate, the key-value coding API provides powerful routines that support that access, especially when applying key-value across numerous object instances.
Key-Value Observing
Key-value observing (better known as KVO) introduces a way to trigger notifications when object properties change. Just like you can add observers for notifications, targets for controls, and delegates for other objects, KVO lets you create callbacks when an object’s state updates.
Add observers to objects by specifying which key path they are interested in. Here, the main view controller (self) will receive a message whenever myObject’s myString property changes. You can add many observers to an object, or add the same observer for many key paths.
[myObject addObserver:self forKeyPath:@"myString"
options:NSKeyValueObservingOptionNew context:NULL];
The callback method for key-value observing is fixed. Implement observeValueForKeyPath:ofObject:change:context: to participate in observing. Once the observer is added, this method is called each time the myString property changes to a new value. If you observe many items, you may want to add some kind of tag to your objects to distinguish which object triggered the observer callback:
- (void) observeValueForKeyPath:(NSString *)keyPath
ofObject:(id)object change:(NSDictionary *)change
context:(void *)context
{
NSLog(@"Key path %@ has changed to %@",
keyPath, [object valueForKey:keyPath]);
}
MRR and High Retain Counts
In MRR, retain counts that go and stay above +1 do not necessarily mean you’ve done anything wrong. Consider the following code segment. It creates a view and starts adding it to arrays. This raises the retain count from +1 up to +4.
// On creation, view has a retain count of +1
UIView *view = [[[UIView alloc] init] autorelease];
printf("Count: %d
", [view retainCount]); // MRR only
// Adding it to an array increases that retain count to +2
NSArray *array1 = [NSArray arrayWithObject:view];
printf("Count: %d
", [view retainCount]);
// Another array, retain count goes to +3
NSArray *array2 = [NSArray arrayWithObject:view];
printf("Count: %d
", [view retainCount]);
// And another +4
NSArray *array3 = [NSArray arrayWithObject:view];
printf("Count: %d
", [view retainCount]);
Notice that each array was created using a class convenience method and returns an autoreleased object. The view is set as autorelease, too. Some collection classes such as NSArray automatically retain objects when you add them into an array and release them when either the objects are removed (mutable objects only) or when the collection is released. This code has no leaks because every one of the four objects is set to properly release itself and its children when the autorelease pool drains.
When release is sent to the three arrays, each one releases the view, bringing the count down from +4 to +1. The final release, when the object is at +1, allows the view to deallocate when this method finishes: no leaks, no further retains, no problems.
Other Ways to Create Objects
You’ve seen how to use alloc to allocate memory. Objective-C offers other ways to build new objects. You can discover these by browsing class documentation, as the methods vary by class and framework. As a rule of thumb, if you build an MRR object using any method whose name includes alloc, new, create, or copy, you maintain responsibility for releasing the object. Unlike class convenience methods, methods that include these words generally do not return autoreleased objects.
In ARC, the same rules hold. These methods return +1 new objects; however, ARC’s memory management means you don’t have to worry about this in your code. The retain counts are managed for you and you do not explicitly have to release the object.
Sending a copy message to an object in MRR, for example, duplicates it. copy returns an object with a retain count of +1 and no assignment to the autorelease pool. Use copy when you want to duplicate and make changes to an object while preserving the original. Note that for the most part, Objective-C produces shallow copies of collections such as arrays and dictionaries. It copies the structure of the collection, and maintains the addresses for each pointer, but does not perform a deep copy of the items stored within.
C-Style Object Allocations
As a superset of C, Objective-C programs for the iOS SDK often use APIs with C-style object creation and management. Core Foundation (CF) is a Cocoa Touch framework with C-based function calls. When working with CF objects in Objective-C, you build objects with CFAllocators and often use the CFRelease() function to release object memory.
There are, however, no simple rules. You may end up using free(), CFRelease(), and custom methods such as CGContextRelease() all in the same scope, side by side with standard Objective-C class convenience methods such as imageWithCGImage:. The function used to create the context object used in the following snippet is CGBitmapContextCreate(), and like most Core Foundation function calls it does not return an autoreleased object. This code snippet is admittedly a bit of a forced example to show off lots of different approaches in action; it builds a UIImage, the iOS class that stores image data:
UIImage *buildImage(int imgsize)
{
// Create context with allocated bits
CGContextRef context =
MyCreateBitmapContext(imgsize, imgsize);
CGImageRef myRef =
CGBitmapContextCreateImage(context);
free(CGBitmapContextGetData(context)); // Standard C free()
CGContextRelease(context); // Core Graphics Release
UIImage *img = [UIImage imageWithCGImage:myRef];
CFRelease(myRef); // Core Foundation Release
return img;
}
ARC does not perform memory management for Core Foundation. A discussion about using ARC with Core Foundation follows later in this chapter.
Carbon and Core Foundation
Working with Core Foundation comes up often enough that you should be aware of its existence and be prepared to encounter its constructs, specifically in regard to its frameworks. Frameworks are libraries of classes you can utilize in your application.
Table 2-2 explains the key terms involved. To summarize the issue, early OS X used a C-based framework called Core Foundation to provide a transitional system for developing applications that could run on both Classic Mac systems as well as Mac OS X. Although Core Foundation uses object-oriented extensions to C, its functions and constructs are all based on C, not Objective-C.
Table 2-2. Key OS X Development Terms
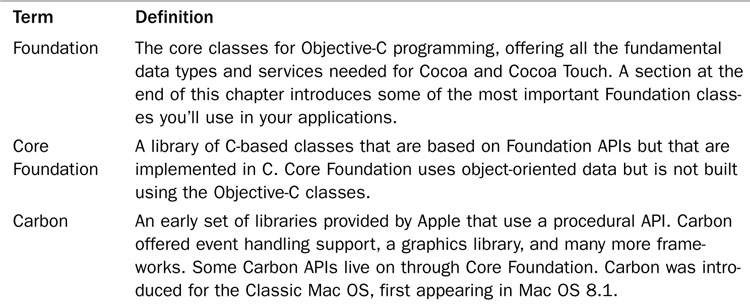
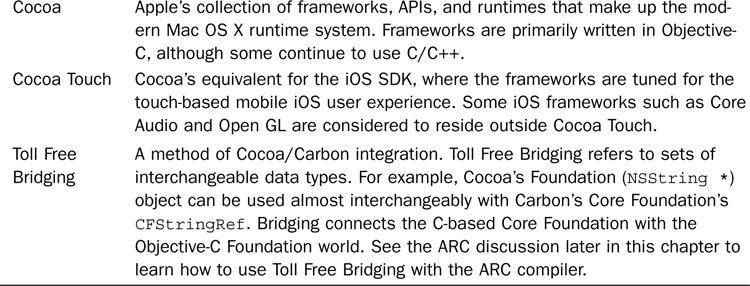
Core Foundation technology lives on through Cocoa. You can and will encounter C-style Core Foundation when programming iOS applications using Objective-C. The specifics of Core Foundation programming fall outside the scope of this chapter, however, and are best explored separately from learning how to program in Objective-C.
Deallocating Objects
There’s no garbage collection in iOS and little likelihood there ever will be. With ARC, there’s also little reason for it. Objects automatically clean up after themselves. So what does that mean in practical terms? When using MRR, you are responsible for bringing objects to their natural end. With ARC, you remain responsible for tidying up any loose ends that may linger at the end of the object’s life.
MRR Deallocation
Under manual memory management, instance variables must release any retained objects before deallocation. You as the developer must ensure that those objects return to a retain count of 0 before the parent object is itself released. You perform these releases in dealloc, a method automatically called by the runtime system when an object is about to be released. If you use an MRR class with object instance variables (that is, not just floats, ints, and Bools), you probably need to implement a deallocation method. The basic dealloc method structure looks like this:
- (void) dealloc
{
// Class-based clean-up
clean up my own properties and instance variables here
// Clean up superclass
[super dealloc]
}
The method you write should work in two stages. First, clean up any retained memory from your class. Then ask your superclass to perform its cleanup routine. The special super keyword refers to the superclass of the object that is running the dealloc method. How you clean up depends on whether your instance variables are automatically retained.
You’ve read about creating objects, building references to those objects, and ensuring that the objects’ retain counts stay at +1 after creation. Now, you see the final step of the object’s lifetime—namely releasing those +1 objects so they can be deallocated.
In the case of retained properties, set them to nil using dot notation assignment. This calls the custom setter method synthesized by Objective-C and releases any prior object the property has been set to. Assuming that prior object had a retain count of +1, this release allows that object to deallocate:
self.make = nil;
When using plain (nonproperty) instance variables or assign-style properties, send release at deallocation time. Say, for example, you’ve defined an instance variable called salesman. It might be set at any time during the lifetime of your object. The assignment of salesman might look like this:
// release any previous value
[salesman release];
// make the new assignment. Retain count is +1
salesman = [[SomeClass alloc] init];
This assignment style means that salesman could point to an object with a +1 retain count at any time during the object’s lifetime. Therefore, in your dealloc method, you must release any object currently assigned to salesman. You can guard this with a check if salesman is not nil, but practically you’re free to send release to nil without consequence, so feel free to skip the check.
[salesman release];
A Sample MRR Deallocation Method
Keeping with an expanded Car class that uses retained properties for make, model, and colors, and that has a simple instance variable for salesman, the final deallocation method would look like this. The integer year and the Boolean forSale instance variables are not objects and do not need to be managed this way.
- (void) dealloc
{
self.make = nil;
self.model = nil;
self.colors = nil;
[salesman release];
[super dealloc];
}
Managing an object’s retain count proves key to making Objective-C memory management work. Few objects should continue to have a retain count greater than +1 after their creation and assignment. By guaranteeing a limit, your final releases in dealloc are ensured to produce the memory deallocation you desire.
ARC Deallocation
You can create your own dealloc methods in ARC classes, just like you do in MRR ones. There are, however, differences. You never call [super dealloc] the way you do with MRR. And, you do not worry about any memory management. If you look at the sample MRR deallocation method, that pretty much eliminates every single line in that code.
So what’s an ARC dealloc method supposed to do? It’s where you clean up all associated issues such as freeing malloc’ed memory, disposing of system sounds, or calling Core Foundation release as needed. The compiler automatically calls [super dealloc] for you, regardless of whether or not you override dealloc in your class.
Cleaning Up Other Matters
The dealloc method offers a perfect place to clean up shop. For example, you might need to dispose of an Audio Toolbox sound (as shown here) or perform other maintenance tasks before the class is released. These tasks almost always relate to Core Foundation, Core Graphics, Core Audio, Address Book, Core Text, or similar C-style frameworks.
if (snd) AudioServicesDisposeSystemSoundID(snd);
Think of dealloc as your last chance to tidy up loose ends before your object goes away forever. Whether this involves shutting down open sockets, closing file pointers, or releasing resources, use this method to make sure your code returns state as close to pristine as possible.
Using Blocks
In Objective-C 2.0, blocks refer to a language construct that supports “closures,” a way of treating code behavior as objects. First introduced to iOS in the 4.x SDK, Apple’s language extension makes it possible to create “anonymous” functionality, a small coding element that works like a method without having to be defined or named as a method.
This allows you to pass that code as parameters, providing an alternative to traditional callbacks. Instead of creating a separate “doStuffAfterTaskHasCompleted” method and using the method selector as a parameter, blocks allow you to pass that same behavior directly into your calls. This has two important benefits.
First, blocks localize code to the place where that code is used. This increases maintainability and readability, moving code to the point of invocation. This also helps minimize or eliminate the creation of single-purpose methods.
Second, blocks allow you to share lexical scope. Instead of explicitly passing local variable context in the form of callback parameters, blocks can implicitly read locally declared variables and parameters from the calling method or function. This context-sharing provides a simple and elegant way to specify the ways you need to clean up or otherwise finish a task without having to re-create that context elsewhere.
Defining Blocks in Your Code
Closures have been used for decades. They were introduced in Scheme (although they were discussed in computer science books, papers, and classes since the 1960s), and popularized in Lisp, Ruby, and Python. The Apple Objective-C version is defined using a caret symbol, followed by a parameter list, followed by a standard block of code, delimited with braces. Here is a simple use of a block. It is used to show the length of each string in an array of strings.
NSArray *words = [@"This is an array of various words"
componentsSeparatedByString:@" "];
[words enumerateObjectsUsingBlock:
^(id obj, NSUInteger idx, BOOL *stop){
NSString *word = (NSString *) obj;
NSLog(@"The length of '%@' is %d", word, word.length);
}];
This code enumerates the “words” array, applying the block code to each object in that array. The block uses standard Objective-C calls to log each word and its length. Enumerating objects is a common way to use blocks in your applications. This example does not highlight the use of the idx and stop parameters. The idx parameter is an unsigned integer, indicating the current index of the array. The stop pointer references a Boolean value. When the block sets this to YES, the enumeration stops, allowing you to short-circuit your progress through the array.
Block parameters are defined within parentheses after the initial caret. They are typed and named just as you would in a function. Using parameters allows you to map block variables to values from a calling context, again as you would with functions.
Using blocks for simple enumeration works similarly to existing Objective-C 2.0 “for in” loops. What blocks give you further in the iOS APIs are two things. First is the ability to perform concurrent and/or reversed enumeration using the enumerateObjectsAtIndexes:options:usingBlock: method. This method extends array and set iteration into new and powerful areas. Second is dictionary support. Two methods (enumerateKeysAndObjectsUsingBlock: and enumerateKeysAndObjectsWithOptions:usingBlock:) provide dictionary-savvy block operations with direct access to the current dictionary key and object, making dictionary iteration cleaner to read and more efficient to process.
Assigning Block References
Because blocks are objects, you can use local variables to point to them. For example, you might declare a block as shown in this example. This code creates a simple maximum function, which is immediately used and then discarded:
// Creating a maximum value block
float (^maximum)(float, float) = ^(float num1, float num2) {
return (num1 > num2) ? num1 : num2;
};
// Applying the maximum value block
NSLog(@"Max number: %0.1f", maximum(17.0f, 23.0f));
Declaring the block reference for the maximum function requires that you define the kinds of parameters used in the block. These are specified within parentheses but without names (that is, a pair of floats). Actual names are only used within the block itself.
The compiler automatically infers block return types, allowing you to skip specification. For example, the return type of the block in the preceding example is float. To explicitly type blocks, add the type after the caret and before any parameter list, like this.
// typing a block
float (^maximum)(float, float) = ^float(float num1, float num2) {
return (num1 > num2) ? num1 : num2;
};
Because the compiler generally takes care of return types, you need only worry about typing in those cases where the inferred type does not match the way you’ll need to use the returned value.
Blocks provide a good way to perform expensive initialization tasks in the background. The following example loads an image from an Internet-based URL using an asynchronous queue. When the image has finished loading (normally a slow and blocking function), a new block is added to the main thread’s operation queue to update an image view with the downloaded picture. It’s important to perform all GUI updates on the main thread, and this example makes sure to do that.
// Create an asynchronous background queue
NSOperationQueue *queue = [[NSOperationQueue alloc] init];
[queue addOperationWithBlock:
^{
// Load the weather data
NSURL *weatherURL = [NSURL URLWithString:
@"http://image.weather.com/images
/maps/current/curwx_600×405.jpg"];
NSData *imageData = [NSData dataWithContentsOfURL:weatherURL];
// Update the image on the main thread using the main queue
[[NSOperationQueue mainQueue] addOperationWithBlock:^{
UIImage *weatherImage = [UIImage imageWithData:imageData];
imageView.image = weatherImage;}];}];
This code demonstrates how blocks can be nested as well as used at different stages of a task. Take note that any pending blocks submitted to a queue hold a reference to that queue, so the queue is not deallocated until all pending blocks have completed. That allows me to create an autoreleased queue in this example without worries that the queue will disappear during the operation of the block.
Blocks and Local Variables
Blocks are offered read access to local parameters and variables declared in the calling method. To allow the block to change data, the variables must be assigned to storage that can survive the destruction of the calling context. A special kind of variable, the __block variable, does this by allowing itself to be copied to the application heap when needed. This ensures that the variable remains available and modifiable outside the lifetime of the calling method or function. It also means that the variable’s address can possibly change over time, so __block variables must be used with care in that regard.
Note
The _block qualifier has changed semantics in ARC, now acting as a __strong reference, so it retains and releases accordingly. Under MRR, it uses __unsafe_unretained (assign) behavior, where it did not implicitly retain.
The following example shows how to use locally scoped mutable variables in your blocks. It enumerates through a list of numbers, selecting the maximum and minimum values for those numbers:
// Using mutable local variables
NSArray *array = [@"5 7 3 9 11 13 1 2 15 8 6"
componentsSeparatedByString:@" "];
// assign min and min to block storage using __block
__block uint min = UINT_MAX;
__block uint max = 0;
[array enumerateObjectsUsingBlock:^(id obj, NSUInteger idx, BOOL *stop)
{
// update the max and min values while enumerating
min = MIN([obj intValue], min);
max = MAX([obj intValue], max);
// display the current max and min
NSLog(@"max: %d min: %d
", max, min);
}];
Blocks and typedef
Using typedef simplifies the way you declare block properties in your classes and use blocks as arguments to method calls. The following snippet defines a DrawingBlock type and uses it to create a copy property in the MyView class:
typedef void (^DrawingBlock)(UIColor *);
@interface MyView : UIView
@property (copy) DrawingBlock drawingBlock;
@end
This particular block type takes one argument, a UIColor object. You can assign a block to a variable of this type like this:
theView.drawingBlock = ^(UIColor *foregroundColor) {
[theView.superview.backgroundColor set];
CGContextFillRect(UIGraphicsGetCurrentContext(),
theView.bounds);
[foregroundColor set];
[[UIBezierPath bezierPathWithRoundedRect:theView.bounds
cornerRadius:32.0f] fill];
};
It might be called from within the class implementation like this:
drawingBlock([UIColor greenColor]);
This is, admittedly, a contrived example. It might suffer if theView changed after the block is created and assigned. What this example demonstrates is how to move behavior out of a class definition, allowing a client to customize, in this case, a drawing block, whose creation is decoupled from the original class’s implementation.
Blocks and Memory Management with MRR
When using blocks with standard Apple APIs, you will not need to retain or copy blocks. When creating your own blocks-based APIs in MRR, where your block will outlive the current scope, you may need to do so. In such a case, you will generally want to copy (rather than retain) the block to ensure that the block is allocated on the application heap. You may then autorelease the copy to ensure proper memory management is followed.
Using blocks with ARC is discussed later in this chapter.
Other Uses for Blocks
In this section, you have seen how to define and apply blocks. In addition to the examples shown here, blocks play other roles in iOS development. Blocks can be used with notifications, animations, and as completion handlers. Many iOS APIs use blocks to simplify calls and coding. You can easily find block-based APIs by searching the Xcode Document set for method selectors containing “block,” “completion,” and “handler.”
Getting Up to Speed with ARC
Automated reference counting (ARC) offers a new compiler feature for your iOS projects. Introduced by way of LLVM (llvm.org), ARC simplifies memory management by automating the way objects are retained and released. By handling your memory for you, ARC allows you to focus your effort on code semantics, reducing the time and overhead you devote to thinking about memory management issues.
The problems with this in practice are as follows. First, most experienced iOS developers already use memory management almost reflexively. They don’t have to plan when to retain an object, and when to autorelease it—it’s something that comes out of years of patterned responses. Second, ARC has yet to fully stabilize. Apple is still working on adding features as this chapter is being written, even though initial technical specifications have been published (http://clang.llvm.org/docs/AutomaticReferenceCounting.html).
This quick overview, therefore, introduces ARC with a single goal: to get you up to speed as fast as possible, moving past your previous coding patterns into new ones. It will help you learn the steps to translate your code from the old form to the new so you can get going right away. It also shows how to preserve old-style compilation for those who need to avoid that transition as long as possible.
Property and Variable Qualifiers
ARC means approaching memory management in new ways. The first and easiest of these rules is this: With ARC, you move from assign and retain attributes for objects to weak and strong. Each of these (assign, retain, weak, and strong) is a qualifier. They qualify the kind of property attributes used. These same qualifiers can be used to set the attributes of variables, in the same way you can use const and volatile as type qualifiers in standard C.
Note
ARC continues to use assign qualifiers for non-object values such as int and CGRect.
Strong and Weak Properties
When you’re declaring properties, strong usurps the role of retained properties. In versions previous to Objective-C 2.0, retained properties automatically retained items, releasing them only when your object was released or the property set to nil.
Use strong properties to hold onto any items that may be referenced through the lifetime of your object. By setting a property to be strong, you’re assured that the instance the property points to will not be released back into the general memory pool until you’re done with it.
Thus, instead of
@property (nonatomic, retain) NSDate *date;
you declare
@property (nonatomic, strong) NSDate *date;
Like strong properties, weak properties replace a previous Objective-C style—in this case assign. Like assign properties, weak properties do not retain objects or otherwise extend their lifetime. However, weak properties do something that assign properties never did. They ensure that if the object being pointed to gets deallocated, the property returns nil, not a reference to reclaimed memory. ARC eradicates dangling pointers, creating safe nil values instead. This is known as “zeroing weak references.”
You are limited to deployment targets of iOS 5.0 or later (also OS X 10.7 or later) when using weak qualifiers. Prior to iOS 5.0, the operating system runtime cannot guarantee that dangling pointers get reassigned to nil.
If the compiler reports errors, as shown in Figure 2-3, check your deployment target. Use the Project Navigator and select the project file. In the Build Settings, ensure that the iOS Deployment Target is set to at least iOS 5.0. If you must deploy to iOS 4.x, use __unsafe_unretained qualifiers instead of weak. This is functionally equivalent to old-style assign properties and will work on old-style OS runtimes. When working with _unsafe_unretained qualifiers, make sure you don’t dereference those pointers after the object disappears, just as you had to make sure pre-ARC.
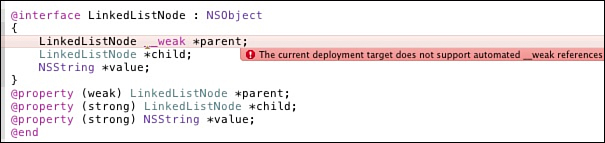
Figure 2-3. Weak references are supported starting with iOS 5.0. ARC will not compile to earlier deployment targets.
Note
Use copy properties to create a copy of an object and then retain it. Copy properties are like strong properties that first copy the object in question and then use that copy instead of the original object. The ARC migratory converts assign properties to unsafe_unretained for deployment targets prior to 5.0. When you are using LLVM 3 with non-ARC code, strong and unsafe_unretained are synonyms for retain and assign.
Using Variable Qualifiers
ARC’s weak and strong qualifiers are not limited to property attributes. You can also qualify variable declarations in your code. All variables, such as
NSDate *lastRevision;
default to strong handling. They retain any object assigned to them throughout their scope. Consider the code in Listing 2-3. In old-style Objective-C, this code might have been problematic. When the retained property is set to the new date, the old property was sent a release message.
Listing 2-3. Contrasting Old and New Style Coding
NSDate *lastRevision = self.date; // store the most recently used date
self.date = [NSDate date]; // update the date property to the current time
NSTimeInterval timeElapsed = [date timeIntervalSinceDate:lastRevision];
NSLog(@"Time between revisions: %f", timeElapsed);
With ARC, the compiler automatically ensures that lastRevision is not deallocated before it’s used to calculate the elapsed time interval. Variable qualification persists throughout their scoping. Listing 2-3 works because the lastRevision date is qualified as strong by default, thus retaining its value.
You can explicitly declare the qualifier in code as well. The following snippet is equivalent to the qualifier-free declaration:
NSDate __strong *lastRevision;
Available memory management qualifiers include the following. Notice the double underscores that begin each qualifier:
• __strong—The default, a strong qualifier holds onto an object throughout a variable’s scope.
• __weak—Weak qualifiers use autozeroing weak references. If the assigned object gets deallocated, the variable is reset to nil. Weak references are available only for deployed targets of iOS 5.0 and later.
• __unsafe_unretained—An unsafe reference works like an old assignment. You may encounter invalid pointers should the assigned object be deallocated.
• __autoreleasing—These variables are used with object pointer arguments (id *), which are autoreleased on return. The NSError class offers the most common use case for these variables—for example, int result = doSomething(arg, arg, arg, &error);. Convenience methods also return autoreleased objects.
Apple recommends avoiding weak qualifiers when you intend to use objects that have no other references to them. Here’s an example:
NSDate __weak *weakDate = [NSDate date];
NSLog(@"The date is %@", weakDate);
Theoretically, the date that prints out could be nil; that’s because no other references exist to the date other than the weak one. In practice, however, the date does display correctly. You just can’t depend on it. Avoid this pattern where possible.
Autoreleased Qualifiers
ARC automatically rewrites strong declarations to autoreleasing ones for pointers to objects. You may want to declare autoreleased qualifiers in your code directly to better match reality. For example, consider this file manager call. If it fails, it assigns an error to the NSError object that was passed to it as an (id *) reference:
NSError __autoreleasing *error
// Retrieve the icon's file attributes
NSString *iconLocation =
[[NSBundle mainBundle] pathForResource:@"icon" ofType:@"png"];
NSDictionary *dictionary = [[NSFileManager defaultManager]
attributesOfItemAtPath:iconLocation error:&error];
if (!dictionary)
NSLog(@"Could not get attribute information: %@", error);
Note
This code does not set error to nil when declaring the variable. With ARC, all strong, weak, and autoreleasing stack variables are automatically initialized with nil.
If you do not declare error explicitly as autoreleasing, the compiler performs the following tweaks for you behind the scenes. It creates an autoreleasing temporary variable (probably not named “tmp,” though) and uses that in the method call. It then performs an assignment back to your original strong variable. During optimization, the compiler removes the extra variable. As with previous versions of Objective-C, autoreleased objects persist until the next item in the event loop is processed.
NSError __strong *error;
NSError __autoreleasing *tmp = error;
NSString *iconLocation =
[[NSBundle mainBundle] pathForResource:@"icon" ofType:@"png"];
NSDictionary *dictionary = [[NSFileManager defaultManager]
attributesOfItemAtPath:iconLocation error:&error];
error = tmp;
if (!dictionary)
NSLog(@"Could not get attribute information: %@", error);
Reference Cycles
ARC does not eliminate reference cycles. For example, consider the following linked list class declaration:
@interface LinkedListNode : NSObject
{
LinkedListNode *parent;
LinkedListNode *child;
NSString *value;
}
@property (strong) LinkedListNode *parent;
@property (strong) LinkedListNode *child;
@property (strong) NSString *value;
@end
When an object uses strong links to its parent and its child, it creates two way linking. This causes a reference cycle. The linked list cannot be deallocated unless its members are manually torn down after use—that is, the links are removed for each object along the chain. Otherwise, the child’s references hold onto the parent, and the parent’s references hold onto the child.
Avoid this situation by applying strong references from parent to child and weak references from child to parent. The weak link is applied up the chain (from child to parent) rather than down the chain (parent to child) to ensure that removing a child does not collapse your data structure and to allow the entire list to be deallocated when its top-most parent is no longer referenced.
Here’s how the class interface declaration looks when you rewrite it using weak child-to-parent linking. As mentioned, you must use a deployment target of at least iOS 5.0 for the following to compile:
@interface LinkedListNode : NSObject
{
LinkedListNode __weak *parent;
LinkedListNode *child;
NSString *value;
}
@property (weak) LinkedListNode *parent;
@property (strong) LinkedListNode *child;
@property (strong) NSString *value;
@end
A similar scenario arises when using completion handlers in ARC, as shown in Figure 2-4. If the completion block refers to its owner, you run into a reference cycle. The owner is retained by the handler, just as the owner retains the handler.

Figure 2-4. ARC detects possible strong retain cycles. Here, the completion block is defined with copy, a strong style.
The easiest way to work around this is to use a temporary weak variable to point to any object that would otherwise be strongly retained Here’s an example:
MyView __weak *weakView = theView;
theView.drawingBlock = ^(UIColor *foregroundColor) {
[weakView.superview.backgroundColor set];
CGContextFillRect(UIGraphicsGetCurrentContext(), weakView.bounds);
[foregroundColor set];
[[UIBezierPath bezierPathWithRoundedRect:weakView.bounds
cornerRadius:32.0f] fill];
};
To be more thorough, Apple recommends using strong references within blocks to retain weak references for the duration of the block. Notice the post-assignment check that ensures that the object still exists:
MyView __weak *weakView = theView;
theView.drawingBlock = ^(UIColor *foregroundColor) {
MyView *strongView = weakView;
if (strongView)
{
// view still exists
[strongView.superview.backgroundColor set];
CGContextFillRect(UIGraphicsGetCurrentContext(),
strongView.bounds);
[foregroundColor set];
[[UIBezierPath bezierPathWithRoundedRect:strongView.bounds
cornerRadius:32.0f] fill];
}
else
{
// view was prematurely released
}
};
Note
The __block qualifier has changed semantics in ARC, now acting as a __strong reference, so it retains and releases accordingly. Formerly it used __unsafe_unretained (assign) behavior, where it did not implicitly retain.
Autorelease Pools
Create autorelease pools in ARC by using the @autoreleasepool construct shown in Listing 2-4. This new construct provides performance that’s many times more efficient than the original NSAutorelesePool. Apple says it can be up to five or six times faster.
Listing 2-4. main.m, ARC Style
int main(int argc, char *argv[])
{
@autoreleasepool
{
int retVal = UIApplicationMain(argc, argv, nil,
@"MyAppDelegateClass");
return retVal;
}
}
As I discovered to my dismay (when executing Quartz image creation), the ARC migratory cannot yet handle variables created inside autorelease pools, retained, and then used outside them. Therefore, beware. Declare a strong variable outside the pool (local or instance) and use it to hold onto any object needed later. Here is an example from Chapter 15’s XML Parser example that addresses that need to transfer objects created inside a pool for later use:
- (TreeNode *)parseXMLFromURL: (NSURL *) url
{
TreeNode *results = nil;
@autoreleasepool {
NSXMLParser *parser =
[[NSXMLParser alloc] initWithContentsOfURL:url];
results = [self parse:parser];
}
return results;
}
Opting into and out of ARC
In the newest Xcode, all new projects are created ARC compliant. Old-style projects imported into the new Xcode do not transition to ARC until you migrate your code. Migration is offered in Edit > Convert > Convert to Objective C Automatic Reference Counting. Migration helps you move from memory managed code (manual retain/release, or MRR) to ARC.
Thoroughly back up your projects first. No matter how much Xcode offers to help you with that, it’s best to protect yourself. Create your own revision point that you can move back to outside of Xcode auspices.
Migrating to ARC
Xcode migration assists you through the process of changing both settings and code. Your project updates to use the LLVM 3.0 compiler and is prescanned for lexical issues. Lexical issues will include any in-code autorelease pools as well as any other potential conflicts. The migration tool tags these, allowing you to manually alter items as needed before it begins the in-code conversion.
Figure 2-5 shows a typical conversion analysis result. The project that was scanned included NSAutoreleasePool objects as well as Core Foundation objects cast to id. The Issue Navigator allows you to address each complaint, one by one.
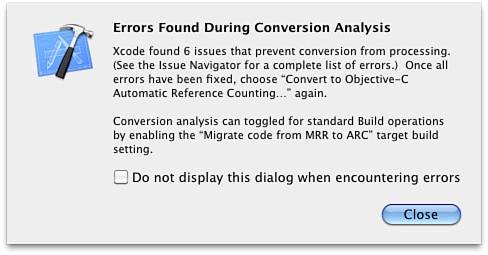
Figure 2-5. Xcode scans your project for lexical issues before proceeding with the conversion.
You can jumpstart your conversion by pre-changing the contents of your main() function in the main.m file to the code shown in Listing 2-4. Use your actual app delegate class name, not the placeholder shown here. This book is being written fairly early in the ARC introduction process. As Xcode’s migration tool continues to improve, this step may no longer be necessary.
Once your project passes the lexical scan, it moves on to the actual ARC conversion. Xcode introduces the process and asks permission to begin. Once you click Next, Xcode allows you to enable or disable automatic snapshots. Make your choice and continue on. From there on, let Xcode do its work.
In early beta releases, this could take a bit of time and involve crash-and-burn. Here’s where you need to let Apple do its magic and hope that everything gets finished and released expeditiously. For whatever reason, everything seems to convert better when using a device scheme rather than a simulator scheme, so if you run into i386 errors, look at the current active scheme.
Will My Code Still Work after Conversion?
I have had significant issues of production code not working after ARC conversion. Keep in mind that ARC is a beta release at the time this book is being written and that code that relies heavily on Core Foundation (as mine does) may need more love and attention than the automated conversion can offer. Your mileage can and will vary. Code written from scratch under ARC will probably be more reliable and maintainable than any that has been autoconverted.
Be aware that you can disable conversion on a file-by-file basis; read on to discover how.
Disabling ARC across a Target
You are not required to use ARC. That’s handy if you’d rather continue development for iOS 5 using your current code base without making it ARC compatible yet. The switch for ARC is found in the Target > Build Settings > Apple LLVM Compiler 3.0 - Code Generation section, as shown in Figure 2-6. This translates to enabling or omitting the -fobjc-arc compiler flag.
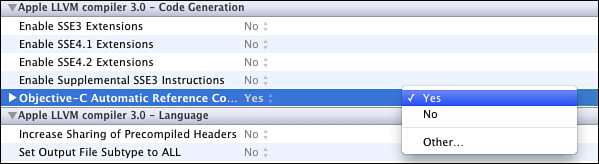
Figure 2-6. Target Build settings allow you to choose whether or not to use ARC.
Remaining in a pre-ARC compiler world limits you from taking advantage of the new ARC features in exchange for backward code stability.
Disabling ARC on a File-by-File Basis
To disable ARC for any given file, open Target > Build Phases > Compile Sources. Select a file and edit the Compiler Flags field, adding -fno-objc-arc. (The converse, -fobjc-arc, explicitly enables ARC.) This prevents ARC from being applied, as evaluated on a file-by-file basis. It also will affect the migrator in future Xcode builds, preventing the code from being updated.
You’ll want to do this for any code that is excessively affected by ARC migration, particularly classes that rely heavily on Core Foundation calls. When non-ARC code interacts with ARC code, it need only obey normal Objective-C conventions. For example, ARC methods that use the phrases “copy” and “new” return objects with +1 retain counts. Convenience methods return autoreleased objects, and so forth.
Control ARC’s return behavior by declaring NS_RETURNS_RETAINED and NS_RETURNS_NOT_RETAINED. For example,
- (NSString *) copyName NS_RETURNS_NOT_RETAINED;
returns an autoreleased object to non-ARC code, even though the name starts with the phrase “copy.”
The NS_RETURN declarations work in all versions of LLVM, in non-ARC code as well as ARC code. These declarations help the static analyzer override implicit misunderstandings, such as when + (id) newObject should return an autoreleased object as a convenience method rather than a +1 version.
Use special care when working with weak references. You can explicitly disallow weak references to your class instances in your implementation:
- (BOOL) supportsWeakPointers { return NO; }
This approach is built in to a number of AppKit classes on the Mac, including NSWindow. It is unclear which Cocoa Touch classes are affected.
Creating an ARC-less Project from Xcode Templates
Regardless of ARC’s advantages, there are practical reasons you may want to bypass ARC while developing applications. Committing to ARC may mean refactoring a large codebase. You may not have time to make the move and still meet development deadlines. Or, you may simply want to delay learning the new ARC concepts until a more convenient time.
Follow these steps to convert Xcode’s Empty Application template back to pre-ARC development standards:
1. Create a new Xcode project using the Empty Application template.
2. Select the project file in the Project Navigator. Choose Target > Build Settings and search for Code Generation or Automated Reference Counting. As shown in Figure 2-6 and discussed previously, switch Objective-C Automatic Reference Counting to No.
3. Edit your window property in the AppDelegate.h file from strong to retain.
4. In the AppDelegate.m file, add autorelease to the window property assignment. This is optional because the window property will generally persist throughout your entire application life cycle, regardless of whether the retain count is +1 (with autorelease and the retained property) or +2 (without autorelease). Adding autorelease is really for form’s sake here.
After following these steps, you’ll have created a backward-compatible project that will use pre-ARC memory management while still taking advantage of all new iOS APIs and creation tools.
ARC Rules
ARC requires that you obey certain rules that do not apply when compiling without ARC. These rules include:
• Do not implement or invoke retain, release, retainCount, or autorelease.
• Do not explicitly invoke dealloc; even [super dealloc] is prohibited. You can freely override the dealloc method to perform any standard task cleanup such as freeing malloc’ed memory, disposing of system sounds, or calling Core Foundation release (CFRelease), as needed. The compiler automatically calls [super dealloc] for you, regardless of whether you override dealloc in your subclasses or not.
• Never use NSAllocateObject or NSDeallocateObject.
• Do not cast between (id) and (void *). Instead, cast to Core Foundation object references and pass those as function arguments.
• Do not use NSZone—or memory zones at all.
• Do not use NSAutoreleasePool. Use @autoreleasepool blocks instead.
• You must assign the result of [super init], typically as self = [super init]. You probably already do this, as well as checking to see whether self is nil. Just keep doing that.
• Do not use object pointers in C structures; use Objective-C classes to manage your objects instead.
In addition to these rules, ARC uses standard preexisting rules for memory management:
• Methods named with new and copy return values with +1 retain counts unless explicitly overridden by NS_RETURN_NOT_RETAINED. ARC checks for proper camel case for method names using the phrase copy; for example, mutableCopy triggers a +1 retain count but not copyright or copycat. For the most part, these retain counts are hidden from your code due to ARC’s memory management.
• Convenience methods return autoreleased values.
Using ARC with Core Foundation and Toll Free Bridging
Core Foundation objects are a reality for anyone who develops iOS applications outside of the most limited UIKit situations. These classes use C-based APIs rather than Objective-C. Core Foundation can be used directly, using CF-style classes such as CFStringRef, or by using any iOS frameworks that adhere to Core Foundation conventions, such as Core Graphics, Core Text, and Address Book, among others.
ARC does not integrate into Core Foundation object management. That leaves the memory management in your hands, as old-style Objective-C did. If you allocate, you must release. CFRetain() and CFRelease() continue with the same roles they held prior to ARC’s debut.
Toll Free Bridging allows you to work with Core Foundation objects in an Objective-C context, and vice versa. To cast an object from one to the other and back, use the qualifiers and function demonstrated in this section.
Casting between Objective-C and Core Foundation
ARC offers C-style casting with its standard parentheses form. You can cast to and from Objective-C and Core Foundation objects, specifying the destination type you wish to cast to. ARC provides three basic ways to cast, depending on how you want to handle retain counts and what kinds of objects are used as the source and destination.
Basic Casting
The simplest bridging cast lets you move between the Objective-C and Core Foundation worlds. Use __bridge to cast an operand, specifying what type to cast to within the parentheses. These examples demonstrate casting in both directions. In the first, an NSData object is cast to CFDataRef. In the second, a CFDataRef object is cast to NSData.
CFDataRef theData = (__bridge CFDataRef) data;
NSData *otherData = (__bridge NSData *) theData;
This bridging only casts to and from Objective-C and Core Foundation. Casting in this manner between objects that use the same kind of retainability (that is, Objective-C to Objective-C or CF to CF) produces ill-formed casts.
ARC conversion automates many basic bridging details for you. For example, a line of code that performs a simple (id) cast:
self.coreLayer = [CALayer layer];
self.coreLayer.contents = (id) myUIImage.CGImage;
would be translated to this bridge:
self.coreLayer.contents = (__bridge id) myUIImage.CGImage;
Adjusting Retain Counts
Two additional bridging casts adjust retain counts during assignment. Apple recommends against using retain-altering bridging casts directly. To improve code readability, use their equivalent CF macros instead. Each of the following examples uses the CF macros followed by the alternative bridging cast.
The CF bridging macros used in these examples respectively produce id and CFTypeRef results. Cast their results for assignment to other types (in the same CF or Objective-C family), as demonstrated in these examples.
Transfers
The bridge_transfer cast releases an object as it is assigned, allowing its recipient to retain it. Its macro equivalent is CFBridgingRelease(). Use this cast to assign Core Foundation objects to Objective-C. It transfers the responsibility of a +1 object to ARC to manage.
The most common use for transfer bridging assigns the results of a CF creation function that returns a +1 object. Prior to ARC, the results of CFUUIDCreateString() might have been cast directly to an NSString and then autoreleased:
CFUUIDRef theUUID = CFUUIDCreate(kCFAllocatorDefault);
NSString *uuidString =
[(NSString *)CFUUIDCreateString(NULL, theUUID) autorelease];
CFRelease(theUUID);
NSLog(@"UUID is %@", uuidString);
Bridging handles the memory management issues for you. It transfers ownership from a retained Core Foundation creation function to a local ARC Objective-C recipient. Here, the strong variable uuidString retains the resulting string. It will continue to do so throughout its scope, releasing it when it is finished.
CFUUIDRef theUUID = CFUUIDCreate(kCFAllocatorDefault);
NSString *uuidString =
(NSString *) CFBridgingRelease(CFUUIDCreateString(NULL, theUUID)).
CFRelease(theUUID);
NSLog(@"UUID is %@", uuidString);
You can use a direct bridging cast instead of the macro, as follows. Although it is lexically correct, Apple considers this code as slightly less readable than its alternative:
NSString *uuidString = (__bridge_transfer NSString *)
CFUUIDCreateString(NULL, theUUID));
Retains
The __bridge_retained cast retains an object as it is assigned. Use this cast to assign Objective-C objects to Core Foundation. On transfer, ARC retains the object and the recipient takes responsibility for balancing that +1 retain. Use retained bridging to hold onto objects that might otherwise be released, such as those returned from class convenience methods, until your CF code finishes using them. Use CFRelease() to release bridge-retained objects:
// theDate receives retained object
CFDateRef theDate = (CFDateRef) CFBridgingRetain([NSDate date]);
// ...use theDate here...
CFRelease(theDate);
As with transfers, you can invoke the retain cast directly:
CFDateRef theDate = (__bridge_retained CFDate) [NSDate date];
Choosing a Bridging Approach
Here’s a quick way to determine which bridging approach to use when casting between Objective-C and Core Foundation objects:
• If you’re assigning the result of a Core Foundation function that returns an object with a +1 retain count (for example, any copy, new, or create function) that you would normally balance with CFRelease(), use CFBridgingRelease() or a transfer bridge cast, ARC takes control of its object management and you do not have to release it yourself.
• If you’re using an autoreleased Objective-C object in a Core Foundation context, use CFBridgingRetain() or a retained bridge cast to hold onto it until you’re ready to CFRelease() it.
• If you’re moving between an Objective-C variable to a CF one, or vice versa, and you do not need to retain or release in that assignment, use a simple __bridge cast.
In summary, unless you’re using CF creation/Objective-C convenience methods, just use __bridge. Otherwise, CF to Objective-C is __bridge_transfer and Objective-C to CF is __bridge_retain with a CFRelease() to follow.
Runtime Workarounds
The following casting calls are part of the Objective-C runtime and were used in early beta releases of ARC, before Apple implemented bridging casts. These functions may continue to work moving forward, even as Apple introduces new approaches. Or, as Apple’s documentation suggests, they may be removed as valid ways to cast between CF and Objective-C id. Developer beware.
As with the standard bridge cast, objc_unretainedObject() returns an id, leaving the CF object’s retain count unchanged.
CFUUIDRef theUUID = CFUUIDCreate(kCFAllocatorDefault);
NSString *uuidString = objc_unretainedObject(
CFUUIDCreateString(NULL, theUUID));
CFRelease(theUUID);
NSLog(@"UUID is %@", uuidString);
The retain-adjusted bridging casts are also represented through Objective-C runtime functions. Use objc_retainedObject() to transfer retain management to ARC, while consuming a retain on the object in question, avoiding a secondary CFRelease(). The objc_unretainedPointer() function converts from id to a CF object, without transferring ownership of that object:
- (NSDictionary *) propertyListFromData: (NSData *) data
{
CFStringRef errorString;
CFPropertyListRef plist =
CFPropertyListCreateFromXMLData(kCFAllocatorDefault,
(CFDataRef) objc_unretainedPointer(data),
kCFPropertyListMutableContainers, &errorString);
if (!plist) {NSLog(@"%@", errorString); return nil;}
NSDictionary *dict = objc_retainedObject(plist);
return dict;
}
Conversion Issues
Apple warns that conversion to CF is particularly dangerous if the passed object is the only reference to that object. It recommends explicitly retaining and then releasing the object around its use. Here’s an example:
- (NSDictionary *) propertyListFromData: (NSData *) data
{
CFStringRef errorString;
CFDataRef theData = CFRetain(objc_unretainedPointer(data));
CFPropertyListRef plist = CFPropertyListCreateFromXMLData(
kCFAllocatorDefault, theData, kCFPropertyListMutableContainers,
&errorString);
CFRelease(theData);
if (!plist) {NSLog(@"%@", errorString); return nil;}
NSDictionary *dict = objc_retainedObject(plist);
return dict;
}
Tips and Tricks for Working with ARC
Here are a few final tips to keep in mind when working with ARC.
• If you’re not using a storyboard entry point, use the name of your primary application delegate class in your main() function in main.m rather than simply calling UIApplicationMain(argc, argv, nil, nil). The fourth argument should be a string with the name of your class—for example, @"MyAppDelegate".
• Declare UIWindow in your application delegate and set the window’s rootViewController property to your primary view controller. (It can be a navigation controller as well as a UIViewController subclass.) The window variable defaults to strong and will retain your window.
• For the most part, ARC has become far more clever in dealing with CGImages returned from functions and other non-Objective-C items in terms of assigning them to objects, but this remains a feature that continues to evolve.
• You can use CFAutorelease tricks with ARC CF objects so long as you compile that code using MRR and then call the function from your ARC-compiled methods.
// Compile with -fno-objc-arc
#define _CFAutorelease(obj) ([(id)obj autorelease])
CFTypeRef CFAutorelease(CFTypeRef anObject)
{
return _CFAutorelease(anObject);
}
Crafting Singletons
The UIApplication and UIDevice classes let you access information about the currently running application and the device hardware it is running on. They do so by offering singletons—that is, sole instances of classes in the current process. For example, [UIApplication sharedApplication] returns a singleton that can report information about the delegate it uses, whether the application supports shake-to-edit features, what windows are defined by the program, and so forth.
Most singleton objects act as control centers. They coordinate services, provide key information, and direct external access, among other functionality. If you have a need for centralized functionality, such as a manager that accesses a web service, a singleton approach ensures that all parts of your application coordinate with the same central manager.
Building a singleton takes very little code. You define a static shared instance inside the class implementation and add a class method pointing to that instance. In this snippet, the instance is built the first time it is requested:
@implementation MyClass
static MyClass __strong *sharedInstance = nil;
+( MyClass *) sharedInstance {
if(!sharedInstance)
sharedInstance = [[self alloc] init];
return sharedInstance;
}
// Class behavior defined here
@end
To use this singleton, call [ViewIndexer sharedInstance]. This returns the shared object and lets you access any behavior that the singleton provides. For thread-safe use, you may want to use a more guarded approach to singleton creation, such as this one:
+ (MyClass *)sharedInstance
{
static dispatch_once_t pred;
dispatch_once(&pred, ^{
sharedInstance = [[self alloc] init];
});
return sharedInstance;
}
Categories (Extending Classes)
Objective-C’s built-in capability to expand already-existing classes is one of its most powerful features. This behavioral expansion is called a “category.” Categories extend class functionality without subclassing. You choose a descriptive expansion name, build a header, and then implement the functionality in a method file. Categories add methods to existing classes even if you did not define that class in the first place and do not have the source code for that class.
To build a category, you declare a new interface. Specify the category name (it’s arbitrary) within parentheses, as you see here. List any new public methods and properties and save the header file. This Orientation category expands the UIDevice class, which is the SDK class responsible for reporting device characteristics, including orientation, battery level, and the proximity sensor state. This interface adds a single property to UIDevice, returning a read-only Boolean value. The new isLandscape property reports back whether the device is currently using a landscape orientation.
@interface UIDevice (Orientation)
@property (nonatomic, readonly) BOOL isLandscape;
@end
You cannot add new instance variables to a category interface as you could when subclassing. You are instead expanding a class’s behavior, as shown in the source code of Listing 2-5. The code implements the landscape check by looking at the standard UIDevice orientation property.
You might use the new property like this:
NSLog(@"The device orientation is %@"
[UIDevice currentDevice].isLandscape ? @"Landscape" : @"Portrait");
Here, the landscape orientation check integrates seamlessly into the SDK-provided UIDevice class via a property that did not exist prior to expanding the class. Just FYI, UIKit does offer a pair of device orientation macros (UIDeviceOrientationIsPortrait and UIDeviceOrientationIsLandscape), but you must pass these an orientation value, which you have to poll from the device.
When working with actual production code, do not use any method or property name that Apple may eventually add to its classes. Instead of isLandscape, you might use esIsLandscape, for example, to guard against such potential overlaps. In this example, “es” is my initials. You might use the initials of your company or some other similar prefix.
Note
In addition to adding new behavior to existing classes, categories also let you group related methods into separate files for classes you build yourself. For large, complex classes, this helps increase maintainability and simplifies the management of individual source files. Please note that when you add a category method that duplicates an existing method signature, the Objective-C runtime uses your implementation and overrides the original.
Listing 2-5. Building an Orientation Category for the UIDevice Class
@interface UIDevice (Orientation)
@property (nonatomic, readonly) BOOL isLandscape;
@end
@implementation UIDevice (Orientation)
- (BOOL) isLandscape
{
return
(self.orientation == UIDeviceOrientationLandscapeLeft) ||
(self.orientation == UIDeviceOrientationLandscapeRight);
}
@end
Protocols
Chapter 1, “Introducing the iOS SDK,” introduced the notion of delegates. Delegates implement details that cannot be determined when a class is first defined. For example, a table knows how to display rows of cells, but it can’t know what to do when a cell is tapped. The meaning of a tapped row changes with whatever application implements that table. A tap might open another screen, send a message to a web server, or perform any other imaginable result. Delegation lets the table communicate with a smart object that is responsible for handling those taps but whose behavior is written at a completely separate time from when the table class itself is created.
Delegation basically provides a language that mediates contact between an object and its handler. A table tells its delegate “I have been tapped,” “I have scrolled,” and other status messages. The delegate then decides how to respond to these messages, producing updates based on its particular application semantics.
Data sources operate the same way, but instead of mediating action responses, data sources provide data on demand. A table asks its data source, “What information should I put into cell 1 and cell 2?” The data source responds with the requested information. Like delegation, data sourcing lets the table place requests to an object that is built to understand those demands.
In Objective-C, both delegation and data sourcing are produced by a system called protocols. Protocols define a priori how one class can communicate with another. They contain a list of methods that are defined outside any class. Some of these methods are required. Others are optional. Any class that implements the required methods is said to “conform to the protocol.”
Defining a Protocol
Imagine, if you would, a jack-in-the box toy. This is a small box with a handle. When you turn the crank, music plays. Sometimes a puppet (called the “jack”) jumps out of the box. Now imagine implementing that toy (or a rough approximation) in Objective-C. The toy provides one action, turning the crank, and there are two possible outcomes: the music or the jack.
Now consider designing a programmatic client for that toy. It could respond to the outcomes, perhaps, by gradually increasing a boredom count when more music plays or reacting with surprise when the jack finally bounces out. From an Objective-C point of view, your client needs to implement two responses: one for music, another for the jack. Here’s a client protocol you might build:
@protocol JackClient <NSObject>
- (void) musicDidPlay;
- (void) jackDidAppear;
@end
This protocol declares that to be a client of the toy, you must respond to music playing and the jack jumping out of the box. Listing these methods inside an @protocol container defines the protocol. All the methods listed here are required unless you specifically declare them as @optional, as you read about in the next sections.
Incorporating a Protocol
Next, imagine designing a class for the toy itself. It offers one action, turning the crank, and requires a second object that implements the protocol, in this case called client. This class interface specifies that the client needs to be some kind of object (id) that conforms to the JackClient protocol (<JackClient>). Beyond that, the class does not know at design time what kind of object will provide these services.
@interface JackInTheBox : NSObject
- (void) turnTheCrank;
@property (strong) id <JackClient> client;
@end
Adding Callbacks
Callbacks connect the toy class to its client. Because the client must conform to the JackClient protocol, you can send jackDidAppear and musicDidPlay messages to the object and they will compile without error. The protocol ensures that the client implements these methods. In this code, the callback method is selected randomly. The music plays approximately nine out of every ten calls, sending musicDidPlay to the client.
- (void) turnTheCrank
{
// You need a client to respond to the crank
if (!client) return;
// Randomly respond to the crank turn
int action = random() % 10;
if (action < 1)
[client jackDidAppear];
else
[client musicDidPlay];
}
Declaring Optional Callbacks
Protocols include two kinds of callbacks: required and optional. By default, callbacks are required. A class that conforms to the protocol must implement those methods or they produce a compiler warning. You can use the @required and @optional keywords to declare a protocol method to be of one form or the other. Any methods listed after an @required keyword are required; after an @optional keyword, they are optional. Your protocol can grow complex accordingly, as shown here:
@protocol JackClient <NSObject>
- (void) musicDidPlay; // required
@required
- (void) jackDidAppear; // also required
@optional
- (void) nothingDidHappen; // optional
@end
In practice, using more than a single @optional keyword is overkill. The same protocol can be declared more simply. When you don’t use any optional items, skip the keyword entirely. Notice the <NSObject> declaration. It’s required to effectively implement optional protocols. It says that a JackClient object conforms to and will be a kind of NSObject.
@protocol JackClient <NSObject>
- (void) musicDidPlay;
- (void) jackDidAppear;
@optional
- (void) nothingDidHappen;
@end
Implementing Optional Callbacks
Optional methods let the client choose whether to implement a given protocol method. They reduce the implementation burden on whoever writes that client but add a little extra work to the class that hosts the protocol definition. When you are unsure whether a class does or does not implement a method, you must test before you send a message. Fortunately, Objective-C and the NSObject class make it easy to do so:
// optional client method
if ([client respondsToSelector: @selector(nothingDidHappen)])
[client nothingDidHappen];
NSObject provides a respondsToSelector: method, which returns a Boolean YES if the object implements the method or NO otherwise. By declaring the client with <NSObject>, you tell the compiler that the client can handle this method, allowing you to test the client for conformance before sending the message.
Conforming to a Protocol
Classes include protocol conformance in interface declarations. A view controller that implements the JackClient protocol declares it between angle brackets. A class might conform to several protocols. Combine these within the brackets, separating protocol names with commas.
@interface TestBedViewController :
UIViewController <JackClient>
@property (strong) JackInTheBox *jack;
@end
Declaring the JackClient protocol lets you assign the host’s client property. The following code compiles without error because the class for self was declared in conformance with JackClient:
self.jack = [JackInTheBox jack];
jack.client = self;
Had you omitted the protocol declaration in your interface, this assignment would produce an error at compile time.
Once you include that protocol between the angle brackets, you must implement all required methods in your class. Omitting any of them produces the kind of compile-time warnings shown in Figure 2-7. Exploring each complaint in the Issues Navigator lets you discover which method is missing and what protocol that method belongs to.
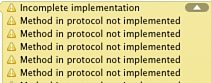
Figure 2-7. You must implement all required methods to conform to a protocol. Objective-C warns about incomplete implementations.
The majority of protocol methods in the iOS SDK are optional. Both required and optional methods are detailed exhaustively in the developer documentation. Note that protocols are documented separately from the classes they support. For example, Xcode documentation provides three distinct UITableView reference pages: one for the UITableView class, one for the UITableViewDelegate protocol, and another for the UITableViewDataSource protocol.
Foundation Classes
If you’re new to Objective-C, there are a few key classes you absolutely need to be familiar with before moving forward. These include strings, numbers, and collections, and they provide critical application building blocks. The NSString class, for example, provides the workhorse for nearly all text manipulation in Objective-C. However, like other fundamental classes, it is not defined in Objective-C itself. It is part of the Foundation framework, which offers nearly all the core utility classes you use on a day-to-day basis.
Foundation provides over a dozen kinds of object families and hundreds of object classes. These range from value objects that store numbers and dates, to strings that store character data; from collections that store other objects, to classes that access the file system and retrieve data from URLs. Foundation is often referred to (slightly inaccurately) as Cocoa. (Cocoa and its iPhone-device-family equivalent Cocoa Touch actually include all the frameworks for OS X programming.) To master Foundation is to master Objective-C programming, and thorough coverage of the subject demands an entire book of its own.
Because this section cannot offer an exhaustive introduction to Foundation classes, you’re about to be introduced to a quick-and-dirty survival overview. Here are the classes you need to know about and the absolutely rock-core ways to get started using them. You find extensive code snippets that showcase each of the classes to give you a jumping-off point if, admittedly, not a mastery of the classes involved.
Strings
Cocoa strings store character data, just as their cousins the (char *) C strings do. They are, however, objects and not byte arrays. Unlike C, the core NSString class is immutable in Cocoa. That is, you can use strings to build other strings, but you can’t edit the strings you already own. String constants are delineated by quote marks and the @ character. Here is a typical string constant, which is assigned to a string variable:
NSString *myString = @"A string constant";
Building Strings
You can build strings using formats, much as you would using sprintf. If you’re comfortable creating printf statements, your knowledge transfers directly to string formats. Use the %@ format specifier to include objects in your strings. String format specifiers are thoroughly documented in the Cocoa String Programming Guide, available via Xcode’s documentation window (Command-Option-?). The most common formats are listed in Table 2-1.
NSString *myString = [NSString stringWithFormat:
@"The number is %d", 5];
You can append strings together to create new strings. The following call outputs “The number is 522” and creates a new instance built from other strings.
NSLog(@"%@", [myString stringByAppendingString@"22"]);
Appending formats provides even more flexibility. You specify the format string and the components that build up the result:
NSLog(@"%@", [myString stringByAppendingFormat:@"%d, 22]);
Note
Allow custom objects to respond to %@ delimiters by implementing the description method. Return an NSString object that describes your object’s state. NSLog() automatically calls description for you on objects passed as its format parameters.
Length and Indexed Characters
Every string can report its length (via length) and produce an indexed character on demand (via characterAtIndex:). The two calls shown here output 15 and e, respectively, based on the previous @"The number is 5" string. Cocoa characters use the unichar type, which store Unicode-style characters.
NSLog(@"%d", myString.length);
printf("%c", [myString characterAtIndex:2]);
Converting to and from C Strings
The realities of normal C programming often crop up despite working in Objective-C. Being able to move back and forth between C strings and Cocoa strings is an important skill. Convert an NSString to a C string either by sending UTF8String or cStringUsingEncoding:. These methods are equivalent, producing the same C-based bytes:
printf("%s
", [myString UTF8String]);
printf("%s
", [myString cStringUsingEncoding: NSUTF8StringEncoding]);
You can also go the other way and transform a C string into an NSString by using stringWithCString:encoding:. The examples here use UTF-8 encoding, but Objective-C supports a large range of options, including ASCII, Japanese, Latin, Windows-CP1251, and so forth. UTF-8 encoding can be used safely with ASCII text; UTF-8 was explicitly created to provide backward compatibility with ASCII, avoiding endianness and byte order marks.
NSLog(@"%@", [NSString stringWithCString: "Hello World"
encoding: NSUTF8StringEncoding]);
Writing Strings to and Reading Strings from Files
Writing to and reading strings from the local file system offers a handy way to save and retrieve data. This snippet shows how to write a string to a file:
NSString *myString = @"Hello World";
NSError __autoreleasing *error;
NSString *path = [NSHomeDirectory()
stringByAppendingPathComponent:@"Documents/file.txt"];
if (![myString writeToFile:path atomically:YES
encoding:NSUTF8StringEncoding error:&error])
{
NSLog(@"Error writing to file: %@", [error localizedFailureReason]);
return;
}
NSLog(@"String successfully written to file");
The path for the file is NSHomeDirectory(), a function that returns a string with a path pointing to the application sandbox. Notice the special append method that properly appends the Documents/file.txt subpath.
In Cocoa, most file access routines offer an atomic option. When you set the atomically parameter to YES, the iOS SDK writes the file to a temporary auxiliary and then renames it into place. Using an atomic write ensures that the file avoids corruption.
The request shown here returns a Boolean YES if the string was written, or NO if it was not. Should the write request fail, this snippet logs the error using a language-localized description. It uses an instance of the NSError class to store that error information and sends the localizedFailureReason selector to convert the information into a human-readable form using the current (localized) language settings. Whenever iOS methods return errors, use this approach to determine which error was generated.
Reading a string from a file follows a similar form but does not return the same Boolean result. Instead, check to see whether the returned string is nil, and if so display the error that was returned.
NSString *inString = [NSString stringWithContentsOfFile:path
encoding:NSUTF8StringEncoding error:&error];
if (!inString)
{
NSLog(@"Error reading from file %@", [path lastPathComponent],
[error localizedFailureReason]);
return;
}
NSLog(@"String successfully read from file");
NSLog(@"%@", inString);
Accessing Substrings
Cocoa offers a number of ways to extract substrings from strings. Here’s a quick review of some typical approaches. As you’d expect, string manipulation is a large part of any flexible API, and Cocoa offers many more routines and classes to parse and interpret strings than the few listed here. This quick NSString summary skips any discussion of NSScanner, NSXMLParser, and so forth.
Converting Strings to Arrays
You can convert a string into an array by separating its components across some repeated boundary. This example chops the string into individual words by splitting around spaces. The spaces are discarded, leaving an array that contains each number word.
NSString *myString = @"One Two Three Four Five Six Seven";
NSArray *wordArray = [myString componentsSeparatedByString: @" "];
NSLog(@"%@", wordArray);
Requesting Indexed Substrings
You can request a substring from the start of a string to a particular index, or from an index to the end of the string. These two examples return @"One Two" and @"Two Three Four Five Six Seven", respectively, using the To and From versions of the indexed substring request. As with standard C, array and string indexes start at 0.
NSString *sub1 = [myString substringToIndex:7];
NSLog(@"%@", sub1);
NSString *sub2 = [myString substringFromIndex:4];
NSLog(@"%@", sub2);
Generating Substrings from Ranges
Ranges let you specify exactly where your substring should start and stop. This snippet returns @"Tw", starting at character 4 and extending two characters in length. NSRange provides a structure that defines a section within a series. You use ranges with indexed items such as strings and arrays.
NSRange r;
r.location = 4;
r.length = 2;
NSString *sub3 = [myString substringWithRange:r];
NSLog(@"%@", sub3);
The NSMakeRange() function takes two arguments: a location and a length returning a range. NSMakeRange(4,2) is equivalent to the range used in this example.
Search and Replace with Strings
With Cocoa, you can easily search a string for a substring. Searches return a range, which contain both a location and a length. Always check the range location. The location NSNotFound means the search failed. This returns a range location of 18, with a length of 4:
NSRange searchRange = [myString rangeOfString:@"Five"];
if (searchRange.location != NSNotFound)
NSLog(@"Range location: %d, length: %d", searchRange.location, searchRange.length);
Once you’ve found a range, you can replace a subrange with a new string. The replacement string does not need to be the same length as the original, thus the result string may be longer or shorter than the string you started with.
NSLog(@"%@", [myString stringByReplacingCharactersInRange:
searchRange withString: @"New String"]);
A more general approach lets you replace all occurrences of a given string. This snippet produces @"One * Two * Three * Four * Five * Six * Seven" by swapping out each space for a space-asterisk-space pattern:
NSString *replaced = [myString stringByReplacingOccurrencesOfString:
@" " withString: @" * "];
NSLog(@"%@", replaced);
Changing Case
Cocoa provides three simple methods that change a string’s case. Here, these three examples produce a string all in uppercase, all in lowercase, and one where every word is capitalized ("Hello World. How Do You Do?"). Because Cocoa supports case-insensitive comparisons (caseInsensitiveCompare:), you rarely need to apply case conversions when testing strings against each other.
NSString *myString = @"Hello world. How do you do?";
NSLog(@"%@", [myString uppercaseString]);
NSLog(@"%@", [myString lowercaseString]);
NSLog(@"%@", [myString capitalizedString]);
Testing Strings
The iOS SDK offers many ways to compare and test strings. The three simplest check for string equality and match against the string prefix (the characters that start the string) and suffix (those that end it). More complex comparisons use NSComparisonResult constants to indicate how items are ordered compared with each other.
NSString *s1 = @"Hello World";
NSString *s2 = @"Hello Mom";
NSLog(@"%@ %@ %@", s1, [s1 isEqualToString:s2] ?
@"equals" : @"differs from", s2);
NSLog(@"%@ %@ %@", s1, [s1 hasPrefix:@"Hello"] ?
@"starts with" : @"does not start with", @"Hello");
NSLog(@"%@ %@ %@", s1, [s1 hasSuffix:@"Hello"] ?
@"ends with" : @"does not end with", @"Hello");
Extracting Numbers from Strings
Convert strings into numbers by using a Value method. These examples return 3, 1, 3.141592, and 3.141592, respectively:
NSString *s1 = @"3.141592";
NSLog(@"%d", [s1 intValue]);
NSLog(@"%d", [s1 boolValue]);
NSLog(@"%f", [s1 floatValue]);
NSLog(@"%f", [s1 doubleValue]);
Mutable Strings
The NSMutableString class is a subclass of NSString. It offers you a way to work with strings whose contents can be modified. Once instantiated, you can append new contents to the string, which allows you to grow results before returning from a method. This example displays "Hello World. The results are in now."
NSMutableString *myString = [NSMutableString stringWithString:
@"Hello World. "];
[myString appendFormat:@"The results are %@ now.", @"in"];
NSLog(@"%@", myString);
Numbers and Dates
Foundation offers a large family of value classes. Among these are numbers and dates. Unlike standard C floats, integers, and so forth, these elements are all objects. They can be allocated and released, and used in collections such as arrays, dictionaries, and sets. The following examples show numbers and dates in action, providing a basic overview of these classes.
Working with Numbers
The NSNumber class lets you treat numbers as objects. You can create new NSNumber instances using a variety of convenience methods—namely numberWithInt:, numberWithFloat:, numberWithBool:, and so forth. Once they are set, you extract those values via intValue, floatValue, boolValue, and so on. Use normal C-based math to perform your calculations.
You are not limited to extracting the same data type an object was set with. You can set a float and extract the integer value, for example. Numbers can also convert themselves into strings.
NSNumber *number = [NSNumber numberWithFloat:3.141592];
NSLog(@"%d", [number intValue]);
NSLog(@"%@", [number stringValue]);
One of the biggest reasons for using NSNumber objects rather than ints, NSIntegers, floats, and so forth, is that they are objects. You can use them with Cocoa routines and classes. For example, you cannot set a user default (that is, a preference value) to, say, the integer 23, as in “You have used this program 23 times.” You can, however, store an object [NSNumber numberWithInt:23] and later recover the integer value from that object to produce the same user message.
If, for some reason, you must stick with C-style variables or byte arrays, consider using NSValue. The NSValue class allows you to encapsulate C data, including int, float, char, structures, and pointers into an Objective-C wrapper.
For the most part, you’ll want to use NSInteger and NSUInteger typedefs instead of int and uint in your Objective-C applications. These provide architecture-safe versions of the corresponding C types. Tied to the underlying architecture, the size of NSInteger and NSUInteger always matches any valid pointer that might be used on that platform.
Note
The NSDecimalNumber class provides an object-oriented wrapper for base-10 arithmetic.
Working with Dates
As with standard C and time(), NSDate objects use the number of seconds since an epoch (that is, a standardized universal time reference) to represent the current date. The iOS SDK epoch was at midnight on January 1, 2001. The standard UNIX epoch took place at midnight on January 1, 1970.
Each NSTimeInterval represents a span of time in seconds, stored with subsecond floating-point precision. The following code shows how to create a new date object using the current time and how to use an interval to reference sometime in the future (or past):
// current time
NSDate *date = [NSDate date];
// time 10 seconds from now
date = [NSDate dateWithTimeIntervalSinceNow:10.0f];
You can compare dates by setting or checking the time interval between them. This snippet forces the application to sleep until 5 seconds into the future and then compares the date to the one stored in date:
// Sleep 5 seconds and check the time interval
[NSThread sleepUntilDate:[NSDate dateWithTimeIntervalSinceNow:5.0f]];
NSLog(@"Slept %f seconds", [[NSDate date] timeIntervalSinceDate:date]);
The standard description method for dates returns a somewhat human-readable string, showing the current date and time:
// Show the date
NSLog(@"%@" [date description]);
To convert dates into fully formatted strings rather than just using the default description, use an instance of NSDateFormatter. You specify the format (for example, YY for two-digit years, and YYYY for four-digit years) using the object’s date format property. A useful list of format specifiers is offered at the end of Chapter 11, “Creating and Managing Table Views.” You can find a more complete specifier write-up at http://unicode.org/reports/tr35/tr35-10.html#Date_Format_Patterns.
In addition to producing formatted output, this class can also be used to read preformatted dates from strings, although that is left as an exercise for the reader.
// Produce a formatted string representing the current date
NSDateFormatter *formatter = [[NSDateFormatter alloc] init];
formatter.dateFormat = @"MM/dd/YY HH:mm:ss";
NSString *timestamp = [formatter stringFromDate:[NSDate date]];
NSLog(@"%@", timestamp);
Note
See the NSDate category at http://github.com/erica for examples of using common date scenarios (such as yesterday, tomorrow, and so forth). Chapter 11 contains a handy table of date formatter codes.
Timers
When working with time, you may need to request that some action occur in the future. Cocoa provides an easy-to-use timer that triggers at an interval you specify; use the NSTimer class. The timer shown here triggers after 1 second and repeats until the timer is disabled:
[NSTimer scheduledTimerWithTimeInterval: 1.0f target: self
selector: @selector(handleTimer:) userInfo: nil repeats: YES];
Each time the timer activates, it calls its target sending the selector message it was initialized with. The callback method takes one argument (notice the single colon), which is the timer itself. To disable a timer, send it the invalidate message; this releases the timer object and removes it from the current runloop.
- (void) handleTimer: (NSTimer *) timer
{
printf("Timer count: %d
", count++);
if (count > 3)
{
[timer invalidate];
printf("Timer disabled
");
}
}
Recovering Information from Index Paths
The NSIndexPath class is used with iOS tables. It stores the section and row number for a user selection (that is, when a user taps on the table). When provided with index paths, you can recover these numbers via the row and section properties. Learn more about this class and its use in Chapter 11.
Collections
The iOS SDK primarily uses three kinds of collections: arrays, dictionaries, and sets. Arrays act like C arrays. They provide an indexed list of objects, which you can recover by specifying which index to look at. Dictionaries, in contrast, store values that you can look up by keys. For example, you might store a dictionary of ages, where Dad’s age is the NSNumber 57, and a child’s age is the NSNumber 15. Sets offer an unordered group of objects and are usually used in the iOS SDK in connection with recovering user touches from the screen. Each of these classes offers regular and mutable versions, just as the NSString class does.
Building and Accessing Arrays
Create arrays using the arrayWithObjects: convenience method, which returns an autoreleased array. When you’re calling this method, list any objects you want added to the array and finish the list with nil. (If you do not include nil in your list, you’ll experience a runtime crash.) You can add any kind of object to an array, including other arrays and dictionaries. This example showcases the creation of a three-item array:
NSArray *array = [NSArray arrayWithObjects:@"One", @"Two", @"Three", nil];
The count property returns the number of objects in an array. Arrays are indexed starting with 0, up to one less than the count. Attempting to access [array objectAtIndex: array.count] causes an “index beyond bounds” exception and crashes. So always use care when retrieving objects, making sure not to cross either the upper or lower boundary for the array.
NSLog(@"%d", array.count);
NSLog(@"%@", [array objectAtIndex:0]);
Mutable arrays are editable. The mutable form of NSArray is NSMutableArray. With mutable arrays, you can add and remove objects at will. This snippet copies the previous array into a new mutable one and then edits the array by adding one object and removing another one. This returns an array of [@"One", @"Two", @"Four]:
NSMutableArray *mutableArray = [NSMutableArray arrayWithArray:array];
[mutableArray addObject:@"Four"];
[mutableArray removeObjectAtIndex:2];
NSLog(@"%@", mutableArray);
Whether or not you’re working with mutable arrays, you can always combine arrays to form a new version containing the components from each. No checks are done about duplicates. This code produces a six-item array, including one, two, and three from the original array, and one, two, and four, from the mutable array:
NSLog(@"%@", [array arrayByAddingObjectsFromArray: mutableArray]);
Checking Arrays
You can test whether an array contains an object and recover the index of a given object. This code searches for the first occurrence of “Four” and returns the index for that object. The test in the if-statement ensures that at least one occurrence exists.
if ([mutableArray containsObject:@"Four"])
NSLog(@"The index is %d",
[mutableArray indexOfObject:@"Four"]);
Converting Arrays into Strings
As with other objects, sending description to an array returns an NSString that describes an array. In addition, you can use componentsJoinedByString: to transform an NSArray into a string. The following code returns @"One Two Three":
NSArray *array = [NSArray arrayWithObjects:@"One", @"Two", @"Three", nil];
NSLog(@"%@", [array componentsJoinedByString:@" "]);
Building and Accessing Dictionaries
NSDictionary objects store keys and values, enabling you to look up objects using strings. The mutable version of dictionaries, NSMutableDictionary, lets you modify these dictionaries by adding and removing elements on demand. In iOS programming, you use the mutable class more often than the static one, so these examples showcase mutable versions.
Creating Dictionaries
Use the dictionary convenience method to create a new mutable dictionary, as shown here. This returns a new initialized dictionary that you can start to edit. Populate the dictionary using setObject:forKey:.
NSMutableDictionary *dict = [NSMutableDictionary dictionary];
[dict setObject:@"1" forKey:@"A"];
[dict setObject:@"2" forKey:@"B"];
[dict setObject:@"3" forKey:@"C"];
NSLog(@"%@", [dict description]);
Searching Dictionaries
Searching the dictionary means querying the dictionary by key name. Use objectForKey: to find the object that matches a given key. When a key is not found, the dictionary returns nil. This snippet returns @"1" and nil:
NSLog(@"%@", [dict objectForKey: @"A"]);
NSLog(@"%@", [dict objectForKey: @"F"]);
Replacing Objects
When you set a new object for the same key, Cocoa replaces the original object in the dictionary. This code replaces "3" with "foo" for the key "C":
[dict setObject:@"foo" forKey:@"C"];
NSLog(@"%@", [dict objectForKey:@"C"]);
Removing Objects
You can also remove objects from dictionaries. This snippet removes the object associated with the "B" key. Once removed, both the key and the object no longer appear in the dictionary.
[dict removeObjectForKey:@"B"];
Listing Keys
Dictionaries can report the number of entries they store plus they can provide an array of all the keys currently in use. This key list lets you know what keys have already been used. It lets you test against the list before adding an item to the dictionary, avoiding overwriting an existing key/object pair.
NSLog(@"The dictionary has %d objects", [dict count]);
NSLog(@"%@", [dict allKeys]);
Accessing Set Objects
Sets store unordered collections of objects. You encounter sets when working with the iPhone device family’s multitouch screen. The UIView class receives finger movement updates that deliver touches as an NSSet. To work with touches, you typically issue allObjects to the set and work with the array that’s returned. After the set is converted to an array, use standard array calls to list, query, and iterate through the touches. You can also use fast enumeration directly with sets.
Memory Management with Collections
Arrays, sets, and dictionaries automatically retain objects when they are added and release those objects when they are removed from the collection. Releases are also sent when the collection is deallocated. Collections do not copy objects. Instead, they rely on retain counts to hold onto objects and use them as needed.
Writing Out Collections to File
Both arrays and dictionaries can store themselves into files using writeToFile:atomically: methods so long as the types within the collections belong to the set of NSData, NSDate, NSNumber, NSString, NSArray, and NSDictionary. Pass the path as the first argument, and a Boolean as the second. As when saving strings, the second argument determines whether the file is first stored to a temporary auxiliary and then renamed into place. The method returns a Boolean value: YES if the file was saved, NO if not. Storing arrays and dictionaries creates standard property lists files.
NSString *path = [NSHomeDirectory()
stringByAppendingPathComponent:@"Documents/ArraySample.txt"];
if ([array writeToFile:path atomically:YES])
NSLog(@"File was written successfully");
To recover an array or dictionary from file, use the convenience methods arrayWithContentsOfFile: and dictionaryWithContentsOfFile:. If the methods return nil, the file could not be read.
NSArray *newArray = [NSArray arrayWithContentsOfFile:path];
NSLog(@"%@", newArray);
Building URLs
NSURL objects point to resources. These resources can refer to both local files and to URLs on the Web. Create url objects by passing a string to class convenience functions. Separate functions have been set up to interpret each kind of URL. Once built, however, NSURL objects are interchangeable. Cocoa does not care if the resource is local or points to an object only available via the Net. This code demonstrates building URLs of each type, path and Web:
NSString *path = [NSHomeDirectory()
stringByAppendingPathComponent:@"Documents/foo.txt"];
NSURL *url1 = [NSURL fileURLWithPath:path];
NSLog(@"%@", url1);
NSString *urlpath = @"http://ericasadun.com";
NSURL *url2 = [NSURL URLWithString:urlpath];
NSLog(@"%d characters read",
[[NSString stringWithContentsOfURL:url2] length]);
Working with NSData
If NSString objects are analogous to zero-terminated C strings, then NSData objects correspond to buffers. NSData provides data objects that store and manage bytes. Often, you fill NSData with the contents of a file or URL. The data returned can report its length, letting you know how many bytes were retrieved. This snippet retrieves the contents of a URL and prints the number of bytes that were read:
NSData *data = [NSData dataWithContentsOfURL:url2];
NSLog(@"%d", [data length]);
To access the core byte buffer that underlies an NSData object, use bytes. This returns a (const void *) pointer to the actual data stored by the NSData object.
As with many other Cocoa objects, you can use the standard NSData version of the class or its mutable child, NSMutableData. Most Cocoa programs that access the Web, particularly those that perform asynchronous downloads, pull in a bit of data at a time. For those cases, NSMutableData objects prove useful. You can keep growing mutable data by issuing appendData: to add the new information as it is received.
File Management
The iOS SDK’s file manager is a singleton provided by the NSFileManager class. It can list the contents of folders to determine what files are found and perform basic file system tasks. The following snippet retrieves a file list from two folders. First, it looks in the sandbox’s Documents folder and then inside the application bundle itself.
NSFileManager *fm = [NSFileManager defaultManager];
// List the files in the sandbox Documents folder
NSString *path = [NSHomeDirectory() stringByAppendingPathComponent:@"Documents"];
NSLog(@"%@", [fm directoryContentsAtPath:path]);
// List the files in the application bundle
path = [[NSBundle mainBundle] bundlePath];
NSLog(@"%@", [fm directoryContentsAtPath:path]);
Note the use here of NSBundle. It lets you find the application bundle and pass its path to the file manager. You can also use NSBundle to retrieve the path for any item included in your app bundle. (You cannot, however, write to the application bundle at any time.) This code returns the path to the application’s Default.png image. Note that the file and extension names are separated and that each is case sensitive.
NSBundle *mainBundle = [NSBundle mainBundle];
NSLog(@"%@", [mainBundle pathForResource:@"Default" ofType:@"png"]);
The file manager offers a full suite of file-specific management. It can move, copy, and remove files as well as query the system for file traits and ownership. Here are some examples of the simpler routines you may use in your applications:
// Create a file
NSString *docspath = [NSHomeDirectory()
stringByAppendingPathComponent:@"Documents"];
NSString *filepath = [NSHomeDirectory()
stringByAppendingPathComponent:@"Documents/testfile"];
NSArray *array = [@"One Two Three" componentsSeparatedByString:@" "];
[array writeToFile:filepath atomically:YES];
NSLog(@"%@", [fm directoryContentsAtPath:docspath]);
// Copy the file
NSString *copypath = [NSHomeDirectory()
stringByAppendingPathComponent:@"Documents/copied"];
if (![fm copyItemAtPath:filepath toPath:copypath error:&error])
{
NSLog(@"Copy Error: %@", [error localizedFailureReason]);
return;
}
NSLog(@"%@", [fm directoryContentsAtPathdocspath]);
// Move the file
NSString *newpath = [NSHomeDirectory()
stringByAppendingPathComponent:@"Documents/renamed"];
if (![fm moveItemAtPath:filepath toPath:newpath error:&error])
{
NSLog(@"Move Error: %@", [error localizedFailureReason]);
return;
}
NSLog(@"%@", [fm directoryContentsAtPath:docspath]);
// Remove a file
if (![fm removeItemAtPath:copypath error:&error])
{
NSLog(@"Remove Error: %@", [error localizedFailureReason]);
return;
}
NSLog(@"%@", [fm directoryContentsAtPath:docspath]);
As another convenient file trick, use tildes in path names (for example, “~/Library/Preferences/foo.plist”) and apply the NSString method stringByExpandingTildeInPath.
One More Thing: Message Forwarding
Although Objective-C does not provide true multiple-inheritance, it offers a work-around that lets objects respond to messages that are implemented in other classes. If you want your object to respond to another class’s messages, you can add message forwarding to your applications and gain access to that object’s methods.
Normally, sending an unrecognized message produces a runtime error, causing an application to crash. But before the crash happens, iOS’s runtime system gives each object a second chance to handle a message. Catching that message lets you redirect it to an object that understands and can respond to that message.
Consider the Car example used throughout this chapter. The carInfo property introduced midway through these examples returns a string that describes the car’s make, model, and year. Now imagine if a Car instance could respond to NSString messages by passing them to that property. Send length to a Car object and instead of crashing, the object would return the length of the carInfo string. Send stringByAppendingString: and the object adds that string to the property string. It would be as if the Car class inherited (or at least borrowed) the complete suite of string behavior.
Objective-C provides this functionality through a process called “message forwarding.” When you send a message to an object that cannot handle that selector, the selector gets forwarded to a forwardInvocation: method. The object sent with this message (namely an NSInvocation instance) stores the original selector and arguments that were requested. You can override forwardInvocation: and send that message on to another object.
Implementing Message Forwarding
To add message forwarding to your program, you must override two methods: methodSignatureForSelector: and forwardInvocation:. The former creates a valid method signature for messages implemented by another class. The latter forwards the selector to an object that actually implements that message.
Building a Method Signature
This first method returns a method signature for the requested selector. For this example, a Car instance cannot properly create a signature for a selector implemented by another class (in this case, NSString). Adding a check for a malformed signature (that is, returning nil) gives this method the opportunity to iterate through each pseudo-inheritance and attempts to build a valid result. This example draws methods from just one other class via its carInfo instance variable:
- (NSMethodSignature*) methodSignatureForSelector:(SEL)selector
{
// Check if car can handle the message
NSMethodSignature* signature = [super
methodSignatureForSelector:selector];
// If not, can the car info string handle the message?
if (!signature)
signature = [carInfo methodSignatureForSelector:selector];
return signature;
}
Forwarding
The second method you need to override is forwardInvocation:. This method only gets called when an object has been unable to handle a message. This method gives the object a second chance, allowing it to redirect that message. The method checks to see whether the carInfo string responds to the selector. If it does respond, it tells the invocation to invoke itself using that object as its receiver.
- (void)forwardInvocation:(NSInvocation *)invocation
{
SEL selector = [invocation selector];
if ([carInfo respondsToSelector:selector])
{
printf("[forwarding from %s to %s] ", [[[self class] description]
UTF8String], [[NSString description] UTF8String]);
[invocation invokeWithTarget:self.carInfo];
}
}
Under ARC, you can call non-class messages such as UTF8String and length via performSelector:-style calls. ARC raises errors when you send undeclared methods to objects, even if forwarding allows objects to respond properly to those messages. You can work around this by declaring a class category that specifies the forwardable methods, allowing them to compile without warnings:
printf("Sending string methods to the myCar Instance:
");
// These will compile with minor warnings about not casting the results
// of the methods. Ignore the warnings or cast to (char *) and (int)
// respectively
printf("UTF8String: %s
",
[myCar performSelector:@selector(UTF8String)]);
printf("String Length: %d
",
[myCar performSelector:@selector(length)]);
// This will not compile at all
// printf("String Length: %d
", [myCar length]);
// This will compile cleanly and work at runtime
printf("String Length: %d
", [(NSString *)myCar length]);
House Cleaning
Although invocation forwarding mimics multiple inheritance, NSObject never confuses the two. Methods such as respondsToSelector: and isKindOfClass: only look at the inheritance hierarchy and not at the forwarding change.
A couple of optional methods allow your class to better express its message compliance to other classes. Reimplementing respondsToSelector: and isKindOfClass: lets other classes query your class. In return, the class announces that it responds to all string methods (in addition to its own) and that it is a “kind of” string, further emphasizing the pseudo-multiple inheritance approach.
// Extend selector compliance
- (BOOL)respondsToSelector:(SEL)aSelector
{
// Car class can handle the message
if ( [super respondsToSelector:aSelector] )
return YES;
// CarInfo string can handle the message
if ([carInfo respondsToSelector:aSelector])
return YES;
// Otherwise...
return NO;
}
// Allow posing as class
- (BOOL)isKindOfClass:(Class)aClass
{
// Check for Car
if (aClass == [Car class]) return YES;
if ([super isKindOfClass:aClass]) return YES;
// Check for NSString
if ([carInfo isKindOfClass:aClass]) return YES;
return NO;
}
Super-easy Forwarding
The method signature/forward invocation pair of methods provides a robust and approved way to add forwarding to your classes. A simpler approach is also available on iOS 4.0 and later devices. You can replace both those methods with this single one, which does all the same work with less coding and less operational expense. According to Apple, this approach is “an order of magnitude faster than regular forwarding.”
- (id)forwardingTargetForSelector:(SEL)sel
{
if ([self.carInfo respondsToSelector:sel])
return self.carInfo;
return nil;
}
Summary
This chapter provided an abridged, high-octane introduction to Objective-C and Foundation. In it, you read about the way that Objective-C extends C and provides support for object-oriented programming. You were introduced to MRR and ARC memory management. You were subjected to a speedy review of the most important Foundation classes. So what can you take away from this chapter? Here are a few final thoughts:
• Try testing all the material discussed in this chapter directly in Xcode. Mess around with the examples. Hands-on experience offers the best way to gain critical skills you need for iOS development.
• Learning Objective-C and Cocoa takes more than just a chapter. If you’re serious about learning iOS programming, and these concepts are new to you, consider seeking out single-topic books that are dedicated to introducing these technologies to developers new to the platform. Consider Aaron Hillegass’s Cocoa Programming for Mac OS X, 3rd Edition, or Stephen Kochan’s Programming in Objective-C 2.0, 2nd Edition, or Fritz Anderson’s Xcode 3 Unleashed. Apple has an excellent Objective-C 2.0 overview at http://developer.apple.com/Mac/library/documentation/Cocoa/Conceptual/ObjectiveC/Introduction/introObjectiveC.html.
• This chapter mentioned Core Foundation and Carbon but did not delve into these technologies in any depth. You can and will experience C-based APIs in the iOS SDK, particularly when you work with the address book, with Quartz 2D graphics, and with Core Audio, among other frameworks. Each of these specific topic areas is documented exhaustively at Apple’s developer website, complete with sample code. A strong grounding in C (and sometimes C++) programming will help you work through the specific implementation details.