19. A Taste of Core Data
Beginning with the 3.0 SDK, Apple has finally brought Core Data to the iPhone. The Core Data framework provides persistent data solutions. It offers managed data stores that can be queried and updated from your application. With Core Data, you gain a Cocoa Touch-based object interface that brings relational data management out from SQL queries and into the Objective-C world of iPhone development. This chapter introduces Core Data. It provides just enough recipes to give you a taste of the technology, offering a jumping off point for further Core Data learning. By the time you finish reading through this chapter, you’ll have seen Core Data in action. You’ll gain an overview of the technology and have worked through several common Core Data scenarios. This chapter cannot provide a full review of Core Data—there are stand-alone books for that—but it does offer a jumping off point for anyone who wants to integrate this technology into their iPhone applications.
Introducing Core Data
Core Data simplifies the way your applications create and use managed objects. Until the 3.0 SDK, all data management and SQL access were left to fairly low-level libraries. It wasn’t pretty, and it wasn’t easy to use. Now Core Data has joined the Cocoa Touch framework family, bringing easy data management to the iPhone. Core Data provides a flexible object management infrastructure. It offers tools for working with persistent data stores, generating solutions for the complete object life cycle.
Core Data lives in the Model portion of the Model-View-Controller paradigm. Core Data understands that application-specific data must be defined and controlled outside the application’s GUI. Because of that, the application delegate, view controller instances, and custom model classes provide the most natural homes for Core Data functionality. Where you place the ownership depends on how you’ll use the data.
As a rule, your application delegate usually owns any shared database that gets used throughout the application. Simpler applications may get by with a single view controller that manages the same data access. The key lies in understanding that the owner controls all data access—reading, writing, and updating. Any part of your application that works with Core Data must coordinate with that owner.
While it’s agreed that the data model portion of the application exists separately from its interface, Apple understands that data does not exist in a vacuum. The 3.0 SDK integrates seamlessly with UITableView instances. Cocoa Touch’s fetched-results controller class was designed and built with tables in mind. It offers useful properties and methods that support table integration. You see this integration in action via recipes later in this chapter.
Creating and Editing Model Files
Model files define how Core Data objects are structured. Each project that links against the Core Data framework includes one or more model files. These .xcdatamodel files define the objects, their attributes, and their relationships.
Each object may own any number of properties, which are called attributes. Attribute types include strings, dates, numbers, and data. Each object can also have relationships, which are links between one object and another. These relationships can be single, using a one-to-one relationship, or they can be multiple, using a one-to-many relationship. In addition, those relationships can be one-way, or they can be reciprocal, providing an inverse relationship.
You define your model in Xcode by laying out a new data model file. Create these Xcode model files by selecting File > New File > iPhone OS > Resource > Data Model > Next. Enter a name for your new file, click Next, and click Finish. Xcode adds the new model file to your project.
Double-click the .xcdatamodel file to open it in an editor window, as shown in Figure 19-1. Add new object entities (basically “classes”) in the top-left list; define attributes and relationships in the top middle (essentially “instance variables”). The top right offers a context-sensitive inspector. An object graph appears below, offering a grid-based visual presentation of the entities you have defined.
Figure 19-1 The model editor allows you to build object definitions for your Core Data applications.
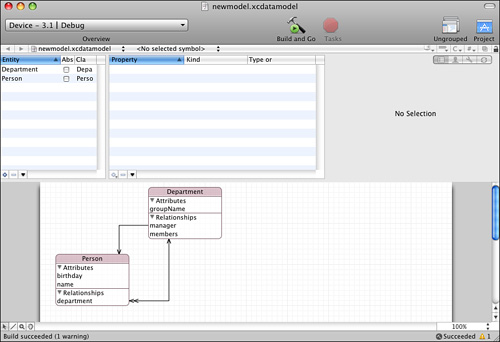
Tap the + button at the bottom-left of the Entity list at the top-left of the window to add a new entity (a class definition that acts as an object skeleton) to your model. By default all new entities are instantiated at runtime as instances of the NSManagedObject class. Edit the word “Entity” to give your new object a name, for example, Person.
With the entity selected, you can add attributes. Each attribute has a name and is typed, just as you’d define an instance variable. Relationships are pointers to other objects. You can define a single pointer for a one-to-one relation (the single manager for a department) or a set for a one-to-many relation (all the members of a department).
Take note of the inspector at the top-right. Here, you can edit an object’s name, set its type, define its default value, and more.
The graph at the bottom of the editor shows the entities you have defined. It provides arrows that represent the relationships between the various kinds of entities in your project. In this model, every person belongs to a department. Each department has a manager (a one-to-one relationship) and any number of members (a one-to-many relationship).
Generating Header Files
Once you have laid out and saved your model, you can generate header files for each entity. These header files are not required, but they allow you to use dot notation in your applications, which saves you from having to use valueForKey: calls to retrieve managed object attributes.
Select an entity, and choose File > New File > iPhone OS > Cocoa Touch Class > Managed Object Class > Next > Next > Finish. Xcode generates a pair of .h/.m files for the entity and adds it to your project. For example, here is the Department header for the project shown in Figure 19-1.
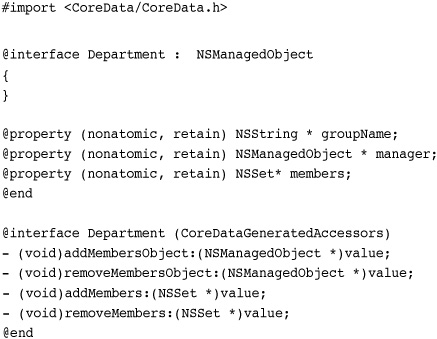
You can see that the group name is a string, that the manager points to another managed object, and that the members one-to-many relationship is defined as a set.
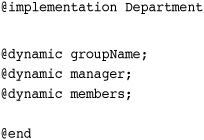
Although this looks like a standard Objective-C class header file, importantly there are no actual implementation details that you have to work with. Core Data takes care of those for you using the @dynamic compiler keywords.
The main reason for generating Core Data files lies in their ability to add new behavior and transient attributes, that is, attributes not saved in the persistent store. For example, you might create a fullName attribute returning a name built from a person’s firstName and lastName. Plus, there’s nothing to stop you from using a managed object class like any other class, that is, using and manipulating all kinds of data. You can bundle any kind of Objective-C behavior into a managed object instance by editing its implementation file. You can add instance and class methods as needed.
Creating a Core Data Context
After designing the managed object model, it’s time to build code that accesses a data file. To work with Core Data you need to programmatically create a managed object context. A context performs all the access and update functions needed to coordinate your model with a file.
The following method initializes the context for an application. This work is all done for you when you use a prebuilt Core Data template; this method shows how to do the same work by hand. It starts by reading in all the model files from the application bundle and merging them into a central model. It then initializes a persistent store coordinator. This coordinator provides low-level file access using the central model. You supply a URL that points to the file you want to use to store the model’s data. Finally, this method initializes a new context using the coordinator and stores it as a retained instance variable.
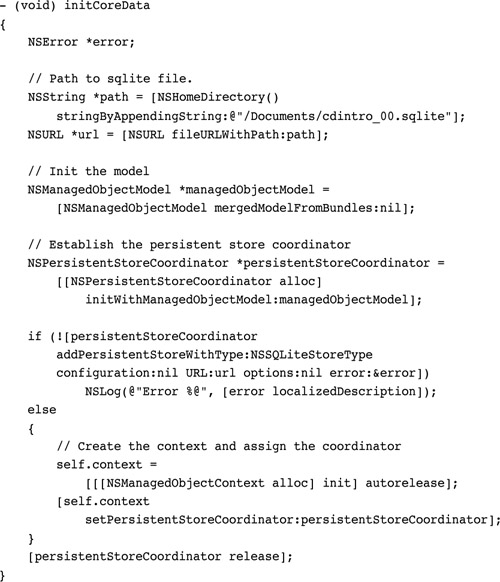
It’s important to maintain a context instance that you can refer to, whether from a view controller (for a simple Core Data application) or from your application delegate (the typical location for more complex applications). The context is used for all read, search, and update operations in your application.
Adding Objects
Create new objects by inserting entities into your managed context. The following snippet builds three new items, a department and two people. After inserting the object, which returns the new instance, you set the managed object’s properties (its attributes and relationships) by assignment. Each person belongs to a department. Each department has a set of members and one manager. This code reflects the design built in Figure 19-1. You do not have to explicitly set the department’s members. The inverse relationship takes care of that for you, adding the members into the department when you set the person’s department attribute.
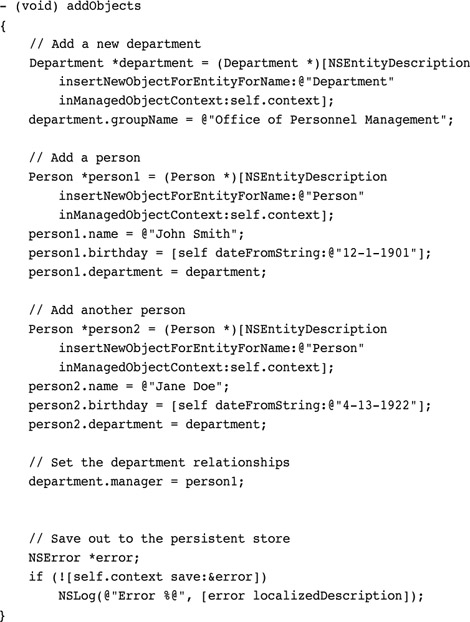
No changes to the persistent store file take effect until you save. A save operation brings the database file up to date with the model stored in memory. The single save request in this code tells the context to synchronize its state with the persistent store, writing out all changes to the database file.
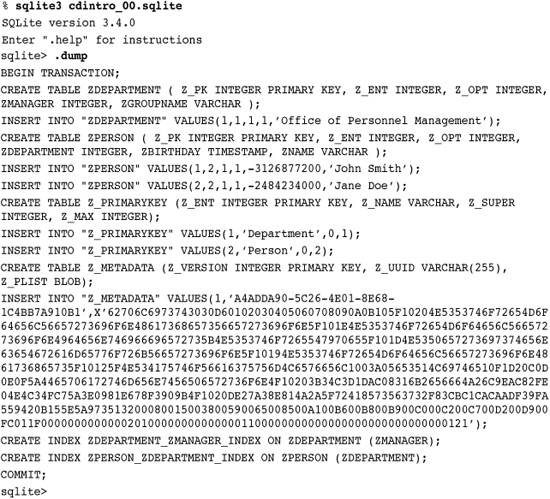
If you run this code in the simulator, you can easily inspect the .sqlite file that’s created. Navigate to the simulator folder (~/Library/Application Support/iPhone Simulator/User/Applications) and into the folder for the application itself. Stored in the Documents folder (depending on the URL used to create the persistent store), a .sqlite file contains the database representation that you’ve created.
Use the command-line sqlite3 utility to inspect the contents by performing a .dump operation. Here you see the two SQL table definitions (department and manager) that store the information for each object plus the insert commands used to store the instances built in your code.
Querying the Data Base
Retrieve objects from the database by performing fetch requests. A fetch request describes your search criteria. It’s passed through and used to initialize a results object that contains a pointer to the managed objects that meet those criteria. The results controller executes the fetch before passing back the array of managed object results.
The following fetchObjects method creates a new request, setting its entity type to Person. This search looks for Person objects in the shared managed store. Each request must contain at least one sort descriptor. For this example, the search returns a list of Person records sorted in ascending order by their name field. Although you can produce more complicated queries, this example shows the simplest “please return all managed items of a given type” request.
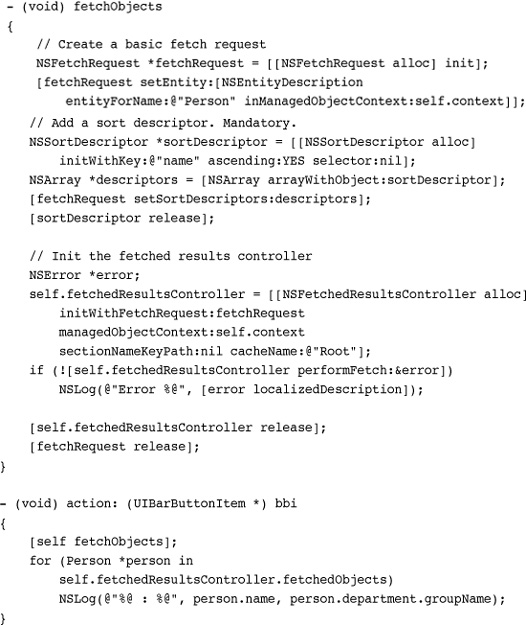
The fetch request is used to initialize an NSFetchedResultsController object. This class manages the results returned from a Core Data fetch. The results controller is kept on hand via a retained class property (self.fetchedResultsController). Fetch results provide concrete access to the data model objects. After fetching the data, this action: method lists out each person by name and department. It uses the results’ fetchedObjects property to do so.
Detecting Changes
Fetched results might be used as a table data source or to fill out an object settings form, or for any other purpose you might think of. Whether you’re retrieving just one object or many, the fetched results controller offers you direct access to those managed objects on request.
So how do you make sure that your fetched data remains current? After adding new objects or otherwise changing the data store, you want to fetch a fresh set of results. Subscribe to the results controller’s controllerDidChangeContent: callback. This method notifies your class when changes affect your fetched objects. To subscribe, declare the NSFetchedResultsControllerDelegate protocol and assign the controller’s delegate as follows. After setting the results’ delegate, you receive a callback each time the data store updates.
self.fetchedResultsController.delegate = self.
Removing Objects
Removing objects, especially those that use relationships in addition to simple properties, can prove harder than you might first expect. Consider the following code. It goes through each person in the fetched object results and deletes them before saving the context. This method fails as it tries to save the context to file.
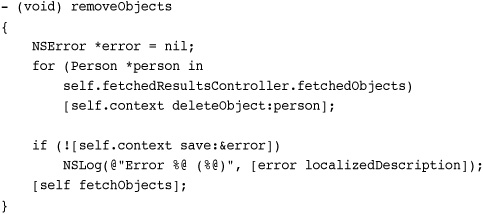
That’s because Core Data ensures internal consistency before writing data out, throwing an error if it cannot. The managed model from Figure 19-1 uses several cross-references. Each person may belong to a department, which stores a list of its members and its manager. These references must be cleared before the object can safely be removed from the persistent store. If not, objects may point to deleted items, a situation that can lead to bad references.
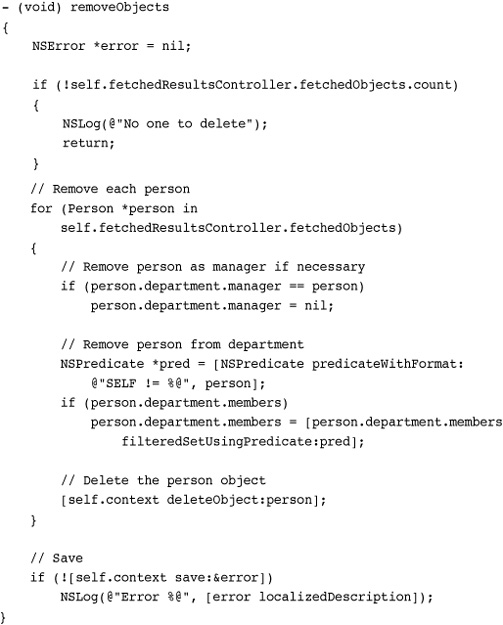
The following is another version of the same method, one that saves without errors. This updated version removes all references from the department object. It checks whether a person is a manager, removing that connection if it exists. It also filters the person out of its department members using a predicate to return an updated set. Once these connections are removed, the context will save out properly.
In addition to this kind of manual disconnection, you can set Core Data delete rules in the data model editor. Delete rules control how an object responds to an attempted delete. You can Deny delete requests, ensuring that a relationship has no connection before allowing object deletion. Nullify resets inverse relationships before deleting an object. Cascade deletes an object plus all its relationships; for example, you could delete an entire department (including its members) all at once with a cascade. No Action provides that the objects pointed to by a relationship remain unaffected, even if those objects point back to the item about to be deleted.
In the sample code that accompanies this chapter, the introductory project (essentially Recipe 0 for this chapter) nullifies its connections. The department/members relationship represents an inverse relationship. By using Nullify, the default delete rule, you do not need to remove the member from the department list before deleting a person.
On the other hand, the department’s manager relationship is not reciprocal. As there is no inverse relationship, you cannot delete objects without resetting that manager. Taking these delete rules into account, the remove objects method for this example can be shortened to the following.
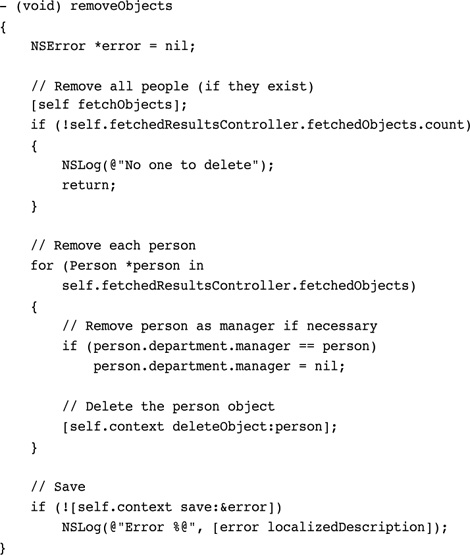
Xcode issues warnings when it detects nonreciprocal relationships. Avoid these unbalanced relationships to simplify your code and provide better internal consistency. If you cannot avoid nonreciprocal items, you need to take them into account when you create your delete methods, as was done here.
Recipe: Using Core Data for a Table Data Source
Core Data on the iPhone works closely with table views. The NSFetchedResultsController class includes features that simplify the integration of Core Data objects with table data sources. As you can see in the following list, many of the fetched results class’s properties and methods are designed for table support.
• Index path access—The fetched results class offers object-index path integration in two directions. You can recover objects from a fetched object array using index paths by calling objectAtIndexPath:. You can query for the index path associated with a fetched object by calling indexPathForObject:. These two methods work with both sectioned tables and those tables that are flat—that is, that only use a single section for all their data.
• Section key path—The sectionNameKeyPath property links a managed object attribute to section names. This property helps determine which section each managed object belongs to. You can set this property directly at any time or you initialize it when you set up your fetched results controller.
Recipe 19-1 uses an attribute named section to distinguish sections, although you can use any attribute name for this key path. For this example, this attribute uses the first character of each object name to assign a managed object to a section. Set the key path to nil to produce a flat table without sections.
Recipe 19-1 Building a Sectioned Table with Core Data

Get This Recipe’s Code
To get the code used for this recipe, go to http://github.com/erica/iphone-3.0-cookbook-, or if you’ve downloaded the disk image containing all of the sample code from the book, go to the folder for Chapter 19 and open the project for this recipe.
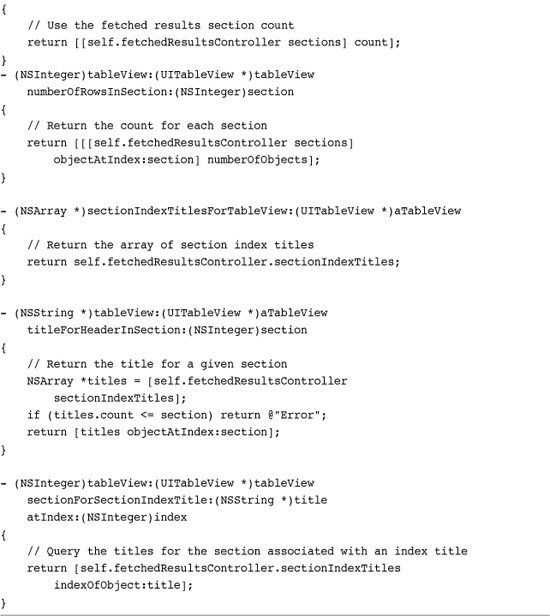
• Section groups—Recover section subgroups with the sections property. This property returns an array of sections, each of which stores the managed objects whose section attribute maps to the same letter.
Each returned section implements the NSFetchedResultsSectionInfo protocol. This protocol ensures that sections can report their objects and numberOfObjects, their name, and an indexTitle, that is, the title that appears on the quick reference index optionally shown above and at the right of the table.
• Index titles—The sectionIndexTitles property generates a list of section titles from the sections within the fetched data. For Recipe 19-1, that array includes single letter titles. The default implementation uses the value of each section key to return a list of all known sections.
Two further instance methods, sectionIndexTitleForSectionName: and sectionForSectionIndexTitle:atIndex:, provide section title lookup features. The first returns a title for a section name. The second looks up a section via its title. Override these to use section titles that do not match the data stored in the section name key.
As these properties and methods reveal, fetched results instances are both table aware and table ready for use. Recipe 19-1 uses these features to duplicate the indexed color name table first introduced in Chapter 11, “Creating and Managing Table Views.” The code in this recipe recovers data from the fetched results using index paths, as shown in the method that produces a cell for a given row and the method that tints the navigation bar with the color from the selected row.
Each method used for creating and managing sections is tiny. The built-in Core Data access features reduce these methods to one or two lines each. That’s because all the work in creating and accessing the sections is handed over directly to Core Data. The call that initializes each fetched data request specifies what data attribute to use for the sections. Core Data then takes over and does the rest of the work.

Caching reduces overhead associated with producing data that’s structured with sections and indices. Multiple fetch requests are ignored when the data has not changed, minimizing the cost associated with fetch requests over the lifetime of an application. The name used for the cache is completely arbitrary. Either use nil to prevent caching or supply a name in the form of an NSString. The snippet above uses "Root", but there’s no reason you can’t use another string.
Recipe: Search Tables and Core Data
Core Data stores are designed to work efficiently with NSPredicates. Predicates allow you to create fetch requests that select only those managed objects that match the predicate’s rule or rules. Adding a predicate to a fetch request limits the fetched results to matching objects.
Recipe 19-2 adapts the search table from Recipe 11-16 to build a Core Data-based solution. This recipe uses a search bar to select data from the persistent store, displaying the results in a table’s search sheet. Figure 19-2 shows a search in progress.
Recipe 19-2 Using Fetch Requests with Predicates
Get This Recipe’s Code
To get the code used for this recipe, go to http://github.com/erica/iphone-3.0-cookbook-, or if you’ve downloaded the disk image containing all of the sample code from the book, go to the folder for Chapter 19 and open the project for this recipe.
Figure 19-2 To power this search table with Core Data, the fetched results must update each time the text in the search box changes.
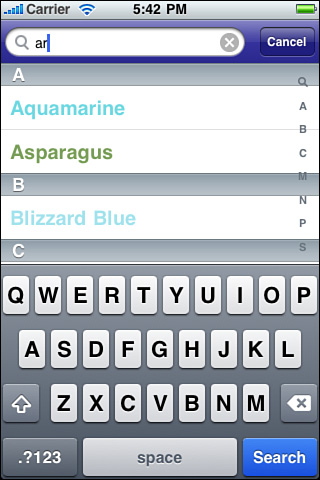
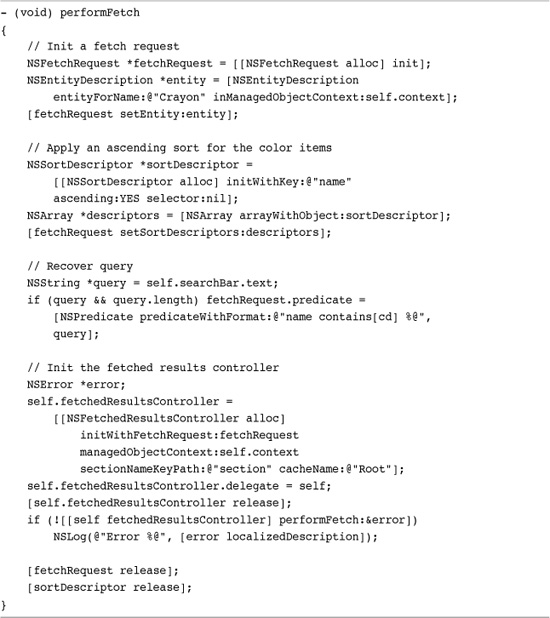
As the text in the search bar at the top of the table changes, the search bar’s delegate receives a searchBar:textDidChange: callback. In turn, that method performs a new fetch. Recipe 11-16 shows that fetch method, which builds a restrictive predicate.
The recipe’s performFetch method creates that simple predicate based on the text in the search bar. It sets the request’s predicate property to limit matches to names that contain the text, using a case insensitive match. contains matches text anywhere in a string. The [cd] after contains refers to case and diacritic insensitive matching. Diacritics are small marks that accompany a letter, such as the dots of an umlaut or the tilde above a Spanish n.
For more complex queries, assign a compound predicate. Compound predicates allow you to combine simple predicates together using standard logical operations like AND, OR, and NOT. Use the NSCompoundPredicate class to build a compound predicate out of a series of component predicates, or include the AND, OR, and NOT notation directly in NSPredicate text, as was done in Chapter 18, “Connecting to the Address Book.”
None of the methods from Recipe 19-1 need updating for use with Recipe 19-2’s performFetch method. All the cell and section methods are tied to the results object and its properties, simplifying implementation even when adding these search table features.
Recipe: Integrating Core Data Tables with Live Data Edits
Recipe 19-3 demonstrates how to move basic table editing tasks into the Core Data world. Its code is based on the basic edits of Recipe 11-12. There are, however, real changes that must be made to provide its Core Data solution. These changes include the following adaptations.
• Adding and deleting items are restricted to the data source—Methods that commit an editing style (i.e., perform deletes) and that add new cells do not directly address the table view. In the original recipe, each method reloaded the table view data after adds and deletes. Recipe 19-3 saves data to the managed context but does not call reloadData.
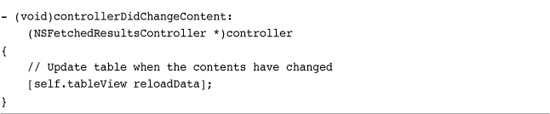
• Data updates trigger table reloads—The actual reloadData call triggers when the fetched results delegate receives a controllerDidChangeContent: callback. This method gets sent when the fetched results object recognizes that the stored data has updated. That happens after data changes have been saved via the managed object context.
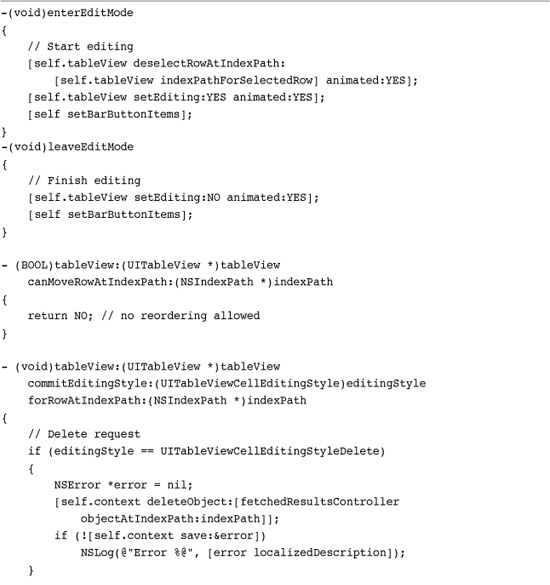
• The table forbids reordering—Recipe 19-3’s tableView:canMoveRowAtIndexPath: method hard codes its result to NO. When working with sorted fetched data sources, users may not reorder that data. This method reflects that reality.
Together, these changes allow your table to work with add and delete edits, as well as content edits. Although content edits are not addressed in this recipe, they involve a similar fetch update approach when users modify attributes used by sort descriptors.
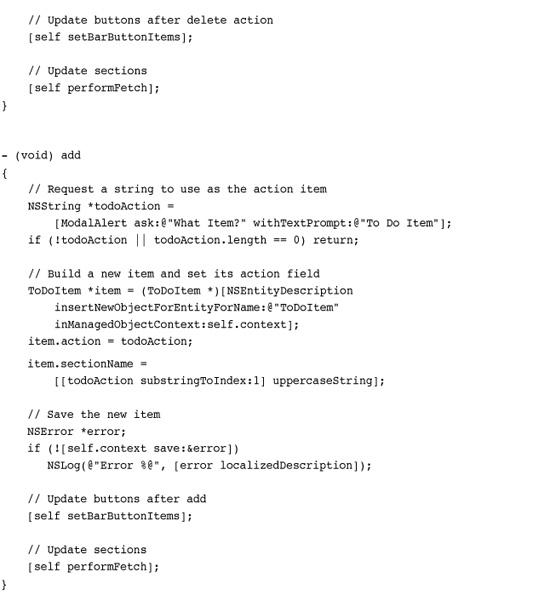
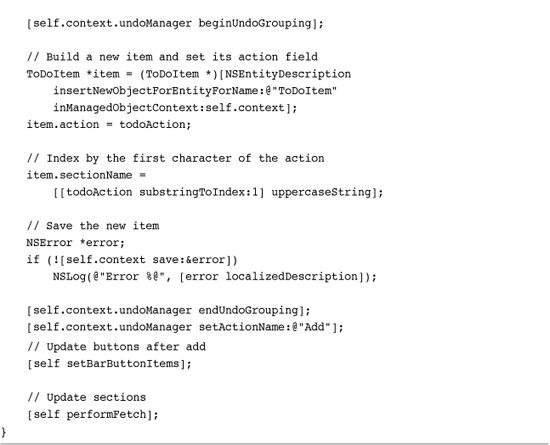
The actual add and delete code follows the approach detailed at the start of this chapter. Objects are added by inserting a new entity description. Their attributes are set and the context saved. Objects are deleted from the context, and again the context is saved. These updates trigger the content changed callbacks for the fetched results delegate.
As this recipe shows, the Core Data interaction simplifies the integration between the data model and the user interface. And that’s due in large part to Apple’s thoughtful class designs that handle the managed object responsibilities. Recipe 19-3 highlights this design, showcasing the code parsimony that results from using Core Data.
Recipe 19-3 Adapting Table Edits to Core Data
Get This Recipe’s Code
To get the code used for this recipe, go to http://github.com/erica/iphone-3.0-cookbook-, or if you’ve downloaded the disk image containing all of the sample code from the book, go to the folder for Chapter 19 and open the project for this recipe.
Recipe: Implementing Undo-Redo Support with Core Data
Core Data simplifies table undo-redo support to an astonishing degree. It provides automatic support for these operations with little programming effort. Here are the steps you need to take to add undo-redo to your table based application.
1. Add an undo manager to the managed object context. After establishing a managed object context (typically in your application delegate), set its undo manager to a newly allocated instance.
self.context.undoManager =
[[[NSUndoManager alloc] init] autorelease];
2. Assign that undo manager in your view controller. Set your view controller’s undo manager to point to the undo manager used by the managed object context.

3. Optionally, provide shake-to-edit support. If you want your application to respond to device shakes by offering an undo-redo menu, add the following line to your application delegate.
application.applicationSupportsShakeToEdit = YES;
4. Ensure that your view controller becomes the first responder when it is onscreen. Provide the following suite of methods. These methods allow the view responder to become first responder whenever it appears. The view controller resigns that first responder status when it moves offscreen.

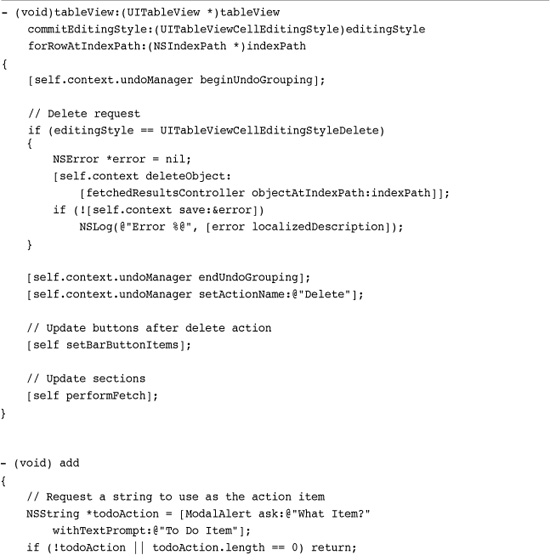
The preceding steps provide all the setup needed to use undo management in your table. Recipe 19-4 integrates that undo management into the actual delete and add methods for the table. To make this happen, it brackets the core data access with an undo grouping. The beginUndoGrouping and endUndoGrouping calls appear before and after the context updates and saves with changes. An action name describes the operation that just took place.
Recipe 19-4 Expanding Cell Management for Undo/Redo Support
Get This Recipe’s Code
To get the code used for this recipe, go to http://github.com/erica/iphone-3.0-cookbook-, or if you’ve downloaded the disk image containing all of the sample code from the book, go to the folder for Chapter 19 and open the project for this recipe.
These three calls (begin, undo, and setting the action name) comprise all the work needed to ensure that Core Data can reverse its operations. For this minimal effort, your application gains a fully realized undo management system, courtesy of Core Data. Be aware that any undo/redo data will not survive quitting your application. This works just as you’d expect with manual undo/redo support.
Summary
This chapter offered just a taste of Core Data’s capabilities. These recipes showed you how to design and implement basic Core Data applications. They used Core Data features to work with its managed object models. You read about defining a model and implementing fetch requests. You saw how to add objects, delete them, modify them, and save them. You learned about predicates and undo operations, and discovered how to integrate Core Data with table views. After reading through this chapter, here are a few final thoughts to take away with you:
• Xcode issues a standard compiler warning when it encounters relationships that are not reciprocal. Nonreciprocal relationships add an extra layer of work, preventing you from taking advantage of simple delete rules like Nullify. Avoid these relationships when possible.
• When moving data from a pre-3.0 store into a new SQLite database, be sure to use some sort of flag in your user defaults. Check whether you’ve already performed a data upgrade or not. You want to migrate user data once when the application is upgraded but not thereafter.
• Predicates are one of my favorite 3.0 SDK features. Spend some time learning how to construct them and use them with all kinds of objects like arrays and sets, not just with Core Data.
• Core Data’s capabilities go way beyond the basic recipes you’ve seen in this chapter. Check out Tim Isted’s Core Data for iPhone, available from Pearson Education/Addison-Wesley for an in-depth exploration of Core Data and its features.