

7 Electric Circuits
Making a Flashlight, Magic Wand, and Steadiness Circuit
Tinkering with electricity is especially exciting because you can’t see it, yet you know that it can flow through wires as well as the tissues of your very own body. Raymond F. Yates’ 1942 classic, A Boy and a Battery, missed the mark by about 50 percent; it turns out kids love making lights light and buzzers buzz no matter what gender they are!
As I’m sure Edison would attest, were he with us today, making a lightbulb glow ranks among one of the deepest primordial sources of satisfaction. Perhaps the first people to make fire—and there were undoubtedly many firsts—experienced a bit more exhilaration, but a little shard of that original ecstasy can be seen in the eyes of every child who rigs a circuit to give light.
As you start your kids tinkering, here again is a brilliant opportunity to keep your mouth shut. Pass out batteries and lights, LEDs, buzzers, electromagnets, motors, and switches, then sit back and watch what happens, perhaps giving pointers here and there—but only as needed. This could take up an entire session with your group. No sense rushing for the final product until people have a feel for the phenomena.
You can do this free-form tinkering with snazzy little wood blocks, each mounted with a component such as a battery or a motor, together with a bunch of loose alligator clip leads to connect them. Or, you can just strip a bit of wire on the leads of each of several items and have the kids twist them together in order to connect. Figure 7-1 shows a hybrid arrangement with clip leads connecting a battery pack to an unmounted, stripped holiday light.
If you provide kids with just a few lights and a motor or two, the questions will flow, and the learning will take off effortlessly. More stuff adds more dimensions of complexity and more questions.

Figure 7-1. Lighting the lights
There’s no need to go into any detail with explanations while they are tinkering. Just listen to and restate the students’ questions, looking for clarity in the question itself. Once the circuits are working nicely, you can go back as a group and look for fundamental principles with which to describe them. You may come up with some like these:
• The batteries all have two sides, as do the lights (and buzzers, motors, etc.).
• Connecting to only one side of either the light or the battery is not good enough. All working circuits have at least one complete circle from one end of the battery to the other.
• The more lights are in a row, the dimmer they are.
• If several lights are in parallel, each one’s brightness is nearly the same as if only one is hooked up.
You can have kids draw some of the circuits they create and then have them come to the board and draw them. Other groups can then follow these circuit models. This activity is well suited to presenting challenges like the following: Make a light glow and a motor go together! Or make two lights glow in two different ways! Or hook up two batteries in two different ways! Start with these entry-level projects and know that there really isn’t any end. Your kids have started down the path known as electrical engineering, and only fate knows how far they’ll go.
Make: Flashlight and Magic Wand
Gather Stuff
• PVC tube, 1/2" around and 10" long
• Holiday lightbulb (You’ll want the small, pointy, cool ones shown in the photos here, not the old, bulbous, hot ones, which only light at high voltages. These small ones are still available widely at dollar stores and your local yard sale. The newer LED ones will also work fine and will demonstrate the principle of a diode, but it matters which direction the electricity flows, which may be an unwelcome complication with younger students.)

Be cautious about possible high levels of lead in the vinyl insulation. It is possible to find these sold with low lead content—IKEA offers them—but it is always best to have kids wash their hands after tinkering with anything vinyl or PVC. Finally, you can substitute small flashlight bulbs or LEDs if you want to avoid the holiday lights altogether.
• Three AA batteries
• Connection wire, around 22 gauge
• Paper clip
• Electrical tape
• Aluminum foil
• Paper

Gather Tools
• Wire strippers
• Scissors
• Hot glue gun and glue
Tinker
Step 1
Snip off a single holiday light and strip its leads. (Clip the plug off the end of the string of lights and throw it away to avoid someone trying to plug in the partial string.)

Step 2
Strip the ends of two connection wires a bit longer than the tube. Twist the stripped ends to the stripped leads of the light, one with a paper clip at the other end, the other with a bit of aluminum foil. Tape at least one of the twisted junctions so they don’t touch and short the circuit.

Step 3
Put three AA batteries head to tail and roll them tightly in a piece of paper. Tape it to keep it from unrolling.


Step 4
Cut and strip one more connecting wire with a bit of aluminum foil smashed onto the end of it. Tightly tape the two foil tabs to the two ends of the battery pack. The batteries inside the tube should all be touching tightly together as well. Exploit the stretchiness of the electrical tape to make it nice and tight for good connections. Wrap the tape around tightly end to end a couple of times.


Step 5
Lay the circuit out just as it will slide into the magic wand: wire—battery pack—wire—lightbulb—wire.

Step 6
Jam it all in the tube and make sure the lightbulb comes out the top. Now the two bare wires at the base can be connected in any way to make the light come on. You could just twist them together every time you want it to come on.

Step 7
Or you could make a slicker, push-to-light arrangement. The model shown here uses an unbent paper clip and a little hole drilled in the side of the PVC. (If you don’t have a drill, you can melt that hole with a small nail held in a candle flame—ouch! Better get the pliers to hold it in the candle flame. And of course, make sure you have good ventilation if you go the melting route.) First the paper clip goes up through the hole from the inside out, with the other end hooked around the end of the PVC to secure it.

Step 8
The other wire then gets wound around the PVC so that when the paper clip is pressed up to the PVC, the bare wire and the paper clip contact each other. It takes some tweaking, but in the end it’s nice because when you push, you’re making the direct physical connection, which in turn makes the electrical connection.

Step 9
Tape it all up (except for where you need the contact to be made) and glue or otherwise fasten the light into the top end of the wand.

Make: Steadiness Circuit
• Base board—is a two-by-four is shown here
• Uninsulated, stiff wire
• Large nail, finishing nail if possible
• Large, wooden clothespin
• Tongue depressor or similar piece of thin wood
• Battery, 9 V with connector snap if possible (If you use LED lights, you’ll only need 3 volts. Some holiday lights, LED as well as normal incandescent, can’t handle the 9 volts, but those that can are gloriously bright, and that’s what you want for this project.)
• Straw
Gather More Tools
• Hammer
• Side cutters (hefty), if you need to cut the nail head off

Figure 7-3. Hold it steady and win the game!
Tinker
Step 1
First make another flashlight, this one mounted on a tongue depressor with a clothespin as a switch. Hot glue a stripped holiday bulb so that it sticks off the end of the tongue depressor.

Step 2
Glue the 9 V battery onto the other end, with the leads sticking off. (If you don’t have a battery snap, you can snip one off a broken device from your house, or just use paper clips to grab the little snap lugs, making sure to keep them apart so as not to short and drain your battery.)

Step 3
Wrap little aluminum foil strips around the end of one of the wires from the 9 V battery and one additional connection wire. (Be sure to strip them first.) Fold the strips several layers thick, and make them around two inches long.

Step 4
Wrap these strips around the two handles of a clothespin. Put some glue under the strips so they don’t fall off the clothespin, but keep the two surfaces where they’ll come together clean to ensure a good connection.

Step 5
Connect the other end of the loose wire to the remaining stripped wire of the lightbulb. Glue the clothespin onto the battery. It’s going to work better to have the handles sticking off the end a bit. Now squeeze the handles together. If everything is in order, the electrons will flow, and the light will glow.

Step 6
Now make the base for the game. First bend the wand into shape by twisting a piece of stiff, uninsulated wire into a circle with a lollipop handle. The smaller the circle, the harder the game.

Step 7
Twist a connection wire onto this wire, making a good, tight connection.

Step 8
Drill or pound two holes into opposite sides of the base board. (You could use a nail for a drill bit for these small holes, since the wood is soft, and it is so easy to break small drill bits.)

Step 9
Shape your course with a long piece of stiff wire, threading the loop-on-a-handle onto it and jabbing the ends into the holes in the base board. Glue them to make them stay. The bends may be altered later to make the game easier or harder.

Step 10
Get one last longish piece of connection wire, strip it, and twist it securely onto the long bendy wire.

Step 11
Now you’ve got two connection wires coming off the base board: one from the loop-on-a-handle, and one from the long bendy wire. Make sure they’ve been stripped. Twist a large paper clip onto the end of each one.

Step 12
Hammer a large nail into the base board. If you can’t find a finishing nail (the kind with a tiny little nubbin of a head), snip off the nail’s head with the hefty side cutters. Watch the eyes! Safety glasses are good, or cover it with your other hand.

Step 13
Glue a straw onto the back of the flat flashlight. See in the image below how it sticks down farther than the handles of the clothespin? That’s key.

Step 14
Slide that straw onto the nail you just hammered in, such that the flat flashlight now stands at attention beside the twisty wire. Clip the paper clips onto the two aluminum-foiled clothespin handles, and you’re ready for action: the flat flashlight circuit now extends to the stiff bendy wire and the loop-on-a-handle.

Your mission, should you choose to accept it, is to maneuver the loop-on-a-handle from one end of the bendy wire to the other (Figure 7-4) without illuminating the light-of-instant-death. Best of luck.

Figure 7-4. Only a steady hand wins!

Notice the black tape around the stiff wire where it enters the base board back in Figure 7-3? This is a battery saver; you can leave the paper clips connected and drop the loop-on-a-handle there. The tape stops the connection. Unclipping a paper clip when you’re not playing is also a battery saver. Of course, when you’re done playing, you can remove the flat flashlight and use it for flashlighting.
It seems like a bright idea to just connect up these happy little flashlights permanently, but the holiday light will sap the 9 volt battery quickly and the three AA batteries within about an hour, so it is best to keep them connected to the push-to-light switches: the clothespin in this project and the paper clip on bare wire in the previous project. This sort of switch is called a momentary switch in industry.
What’s Going On?
Electric current flows through the wires in this project when the battery pushes on it and when the wires or other conductors present a complete circuit. Within the holiday light, there is a teeny-tiny wire that glows white hot when the current flows through it. That is the filament; it’s an example of an incandescent light. (Fluorescent and solid-state (LED) lights don’t use filament at all and are much more efficient, that is, they use less electricity while giving the same amount of light. But hey, we can handle a bit of inefficiency for the sake of a good, cheap tinkering project.) So this tinkering is all about making the circuit to let the current flow through that filament.
Did you notice that the switches in these projects are just breaks in the circuit? All switches are, no matter how fancy.
We used small batteries for this project, since the light is usually not going to be on for long. Bigger batteries may have the same voltage but they’ll also have more energy waiting inside them. Electrochemical reactions provide the electricity in a battery, and when the reactants are used up, the battery is dead. Bigger batteries may have the same reactions giving the same voltage, but since they contain a lot more reactants, they have a greater total energy and last a lot longer.
Can you see examples in your life of larger batteries used for things that need more energy (motors and large speakers) and smaller ones for things that need less (LED lights, black and silver LCD displays)?
Usually those holiday lights are hooked up to the wall socket, which provides a much higher voltage. The catch is that they are not hooked up one by one, but rather in a string. When lights, or any resistors, are hooked up in a row to a certain voltage, they divide the voltage among themselves. Often there are 30 to 40 of those cute little bulbs hooked up in a row across the 120 volts of a US wall socket. That means they’re getting 3 or 4 volts each. (The more there are, the less each gets.) This is called a series circuit. The downside is that when you remove one bulb, the circuit is broken, and all the rest go out.
Have you had frustrating holiday light experiences with series circuits? What happens when you take out a bulb from the string of holiday lights in your garage?
You can fiddle around taking individual bulbs out of a long string of holiday lights to see what the circuit really is. Often it is two or three different chains of bulbs in parallel. Thus, when you remove one bulb, that chain goes out but the others stay on. (When a bulb burns out, on the other hand, it may have a slick mechanism to allow the current to continue flowing through it so that the other bulbs remain lit. This was one of the great engineering achievements of the late 20th century.)
Can you find two or more bulbs in your string of holiday lights that have three wires connected to them, like in Figure 7-5? That’s an indication that you’ve got more than one circuit in parallel.
To get 3 volts from AA batteries, you put two together in series. If you want 6 volts, put four together. If you rip apart a dead 9 volt battery, you’ll find six little cells all hooked together in series. Go much above 9 volts, and your merry little bulb will flash and then turn dark and melancholy. There’s only so much that little filament can handle.
You’ll never get a shock from less than 12 volts, unless you put it across your tongue or similar body tissue. You can try pressing the connection snaps of a 9 V battery to your tongue and see if it’s still charged. This is perfectly safe and very instructive: that little zing is electricity traveling through a wet tissue of your body. Your entire body conducts electricity, but the dry outer skin doesn’t conduct very well, so it protects you a bit. Still, if you have enough voltage—120 is enough—and you lower your resistance by stepping into a puddle barefoot, you can die when the electricity flows through the wet tissue of your heart. Your heart is controlled by electrical impulses, and these can get fouled up when other electrical signals come through. If you’re lucky, the paramedics will come quickly and bring a defibrillator, which sends another electrical shock through your chest designed to set the heart signals clicking normally again. This has been shown to be even more critical than CPR for saving lives.
And, er, I hope it goes without saying that you should definitely not tinker with high voltages and your heart.
You win the steadiness game by not completing the circuit. If you want to cheat or impress your friends, secretly unhook the circuit in a different place, and the light will never glow! A buzzer would work in exactly the same position as the light, or you could try to hook them up in parallel, that is, hook in the buzzer without taking out the light. It could be that one or the other of them takes all the current. In a parallel circuit the electricity will look for the easiest path.
The circuit can be extended by longer wires. You can see that it could be used as a sort of security system: move the loop-on-a-handle just a hair, and the buzzer buzzes in the next room. Connect the loop-on-a-handle to the fridge door, and you’ll know when someone is raiding the icebox. Gotcha!

Figure 7-5. Holiday lights diagram
Keep On
You can make “glowies” (Figure 7-6) with a couple of tiny watch batteries and an LED. LEDs are directional, unlike the holiday light, so if they don’t work the first time, switch the leads.
Security systems can be applied to nearly everything. A fifth-grade girl came to us with a plan to fortify her lunch box. Figure 7-7 shows the result: unless you disarm it with a secret lever, a terrifying wail is heard upon opening the lid. Safe sandwiches.

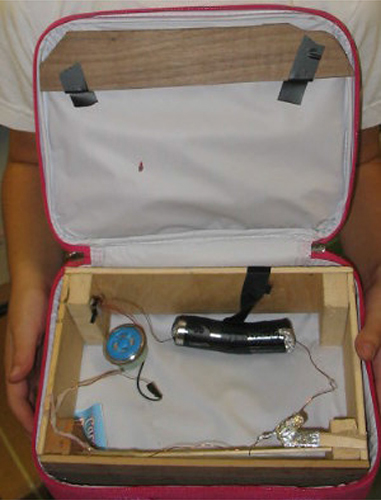
Figure 7-7. Keeping sandwiches safe since 2013
And naturally, if you go to the trouble to make a dollhouse, you’d best wire it up. You can see the light fixture on the top in Figure 7-8, but the light switch is just out of view under the mezzanine.

Internet Conenctions
• Lightning is a massive current following a circuit through the air, cloud to cloud or cloud to ground. Search “lightning strike” on YouTube and try to figure how the lightning ended up striking in these places. Sure, it was the path of least resistance, but how so?
• Search “Faraday cage” and see if you can figure out why a car is a fabulous place to be in a lightning storm. Hint: The rubber wheels matter not.
• Want free energy? Get a solar cell, and you’ll never have to buy another battery (until the sun goes down). Kelvin.com has got a lot of solar cells, kits, and gadgets.
Standards Topic Links
• Electricity, electronics, energy, circuits, series and parallel, components, conductors, and insulators
More Tinkering with Circuits
• Mike Rigsby, Haywired: Pointless (Yet Awesome) Projects for the Electronically Inclined (Chicago Review Press, 2009)
• Massimo Banzi and Michael Shiloh, Getting Started with Arduino, 3rd Edition (O’Reilly, 2014) Want a bit of higher-tech tinkering with circuits? Arduino allows you to tinker together a gadget and then control it with a computer. This book will jump-start you.
• Raymond F. Yates, A Boy and a Battery (a classic, albeit a bit dated, from 1942)