
In This Chapter
Setting up the Zend Framework
Building your Data Models
Automating tasks with cron jobs
Creating your game's scoreboard
Finally! It's time to start coding.
Tip
If you skipped to this chapter to get to the fun stuff, I recommend taking a look at Chapter 9 to get an idea of the application you're building here. Also, I use the Zend Framework and its included Twitter API library heavily in this chapter. If you aren't familiar with Web development frameworks like Zend, please check out Chapter 10. Finally, this Web application is based on a LAMP (Linux, Apache, MySQL, & PHP) stack. If you don't have your servers set up yet, please review Chapter 11.
Still here? Okay, time to get to work.
In Chapter 10, I discussed how Twitter API libraries could speed up development by saving you from reinventing basic functionality, and it can make your code more robust by encouraging a solid design pattern. I've chosen the Zend Framework and its included Twitter API library for the Twooshes project. To get started with the Zend Framework, the first thing you need to do is set up your directory structure.
Stake a place on your hard drive and copy the folder structure illustrated in Figure 12-1.
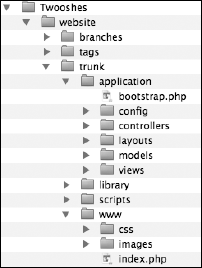
Underneath your project folder, titled Twooshes for this example application, is a directory called website. Underneath the website folder are three folders titled branches, tags, and trunks. This is a common Subversion folder structure:
The
trunkfolder holds the main working code for your project.The
branchesfolder is used for instances when you need to make a copy of the trunk. For example, if you want to try some experimental code but you don't want to break anything in the trunk, you make a copy of the trunk in thebranchesdirectory and try your experimental code there.The
tagsdirectory is used for storing version snapshots, or copies, of the trunk that you don't intend to modify. Copies stored intagsare used for instances where you want to roll your project back to a specific point in time.
These common subversion folders prove useful as your project matures, the code base grows, and more developers begin working together on your code. It is helpful to be familiar with this pattern because you are likely to run into it again if you work on anyone else's Web project.
Underneath the trunk folder is where your main project code is stored. It contains four folders: application, library, scripts, and www.
The
applicationfolder is where the majority of your custom written PHP code resides.The
libraryfolder is where you store the Zend Framework code.The
wwwfolder is the only folder that you'll make public when you upload your project to your Web server. It contains the publicly accessible files, such as images, CSS, Javascript, and Zend Framework loader files.
By "install the Zend Framework" I really mean go to the Zend Framework Web site, download the framework, and copy it to your library folder.
To do that, first go to the Zend Framework Web site (http://framework.zend.com/download/latest) and download the latest version of the framework (version 1.9.6 as of this writing). Choose the "Minimal Package." You will most likely be asked to login or register a Zend account before you can download the free framework.
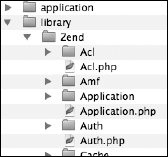
Uncompress your freshly downloaded file. In its contents is a folder labeled Zend. It can be found as a subdirectory to the library folder. Copy the Zend folder and its contents to your project's library directory. Glimpsing at your library folder, it should look similar to Figure 12-2.
Once your directories are set up and your Zend Framework files are in place, you need to set up and understand the Zend Framework bootstrap process.
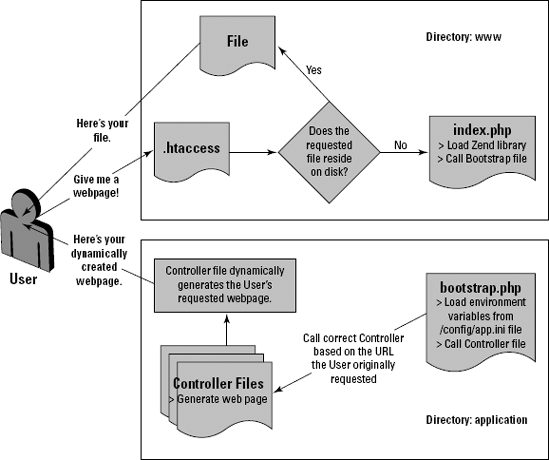
The Zend Framework uses a design pattern called the Front Controller Pattern. This design pattern routes all application requests through one central script. That script then handles all the common housekeeping tasks and runs the appropriate request specific scripts. In the case of the Zend Framework, the central entry script is index.php.
To ensure that your application's environment variables are set up correctly, and that all requests are routed through index.php, you will use a process known as bootstrapping. An .htaccess file in your public root folder will direct all HTTP traffic to your index.php file, also in your public root folder. The index.php file will then call the bootstrap.php file that resides in your publicly inaccessible application folder. Then the bootstrap.php file sets up all of your environment variables stored in the app.ini file in your config folder, and it will call the correct request specific controller based on the user's requested URL. See Figure 12-3 for an illustration of this workflow.
Create a new file in your www directory titled .htaccess and add the code shown in Listing 12-1.
Note
In Chapter 11, you set up your Web server to support .htaccess files. If you skipped Chapter 11, make sure your Apache install is configured to support .htaccess files. You can do this by verifying that the setting AllowOverride All is in your httpd.conf file and by making certain you have enabled the mod_rewrite extension. See Chapter 11 for detailed instructions on this process.
Example 12.1. www/.htaccess
RewriteEngine On
 RewriteOptions MaxRedirects=250
 RewriteCond %{REQUEST_FILENAME} -s [OR]
 RewriteCond %{REQUEST_FILENAME} -l [OR]
 RewriteCond %{REQUEST_FILENAME} -d
 RewriteRule ^.*$ - [NC,L]
 RewriteRule ^.*$ /index.php [NC,L]
The code in Listing 12-1 simply says "if a requested file exists, serve that file; else go to index.php."
Now create a file named index.php in your www directory. This file loads the Zend library and runs your bootstrap file.
The first thing you need to do in your index.php file is open the PHP script tag and define a named constant to store the folder path of your application directory. You can see how this is done if Listing 12-2.
Next, you need to create another named constant defining your application's environment. In most cases, this refers to either:
development: Used when you're working locally.
testing: Used on servers that are dedicated to testing and not customer use.
production: Used for servers your customers use.
But you can invent as many or as few environments as you want. I define the environment as "development" in Listing 12-3. When this code is placed on a live customer facing Web server, the environment should be defined as "production."
Example 12.3. Defining the Application Environment in Your index.php File
defined('APPLICATION_ENV')
     || define('APPLICATION_ENV', (getenv('APPLICATION_ENV') ? getenv('APPLICATION_ENV') : 'development'));
Note
Defining your application's environment allows you to store different settings for each environment in your configuration (config) file. For example, you may store connection settings in your config file for a database used for test data and a database used for live customer data. Defining the environment tells your application which database connection settings to use.
Now, use the APPLICATION_PATH constant to point PHP's include_path to the Zend Framework stored in your library directory, as seen in Listing 12-4. This tells PHP where to look for Zend Framework files and classes.
Finally, create the Zend_Application object by passing it the application environment, and configuration file path as parameter, and run the bootstrap file. This is done in Listing 12-5.
Example 12.5. Create Zend_Application and Run Bootstrap
require_once 'Zend/Application.php';

 // Create application, bootstrap, and run
 $application = new Zend_Application(
     APPLICATION_ENV,
     APPLICATION_PATH . '/config/app.ini'
 );
 $application->bootstrap()->run();
Your complete index.php file should look like Listing 12-6.
Example 12.6. The Complete index.php File
<?php

 // Define path to application directory
 defined('APPLICATION_PATH')
     || define('APPLICATION_PATH', realpath(dirname(__FILE__) . '/../application'));

 // Define application environment
 defined('APPLICATION_ENV')
     || define('APPLICATION_ENV', (getenv('APPLICATION_ENV') ? getenv('APPLICATION_ENV') : 'testing'));

 // Ensure library/ is on include_path
 set_include_path(APPLICATION_PATH . '/../library' . PATH_SEPARATOR . get_include_path());

 // Create application, bootstrap, and run
 require_once 'Zend/Application.php';

 $application = new Zend_Application(
     APPLICATION_ENV,
     APPLICATION_PATH . '/config/app.ini'
 );
$application->bootstrap()->run();Your bootstrap file is used to run common generic startup code. In your application folder, create a new file called bootstrap.php and add the code in Listing 12-7 into the file.
Example 12.7. application/bootstrap.php
<?php

 class Bootstrap extends Zend_Application_Bootstrap_Bootstrap
 {
    protected function _initAutoload()
    {
       $moduleLoader = new Zend_Application_Module_Autoloader(array(
          'namespace' => '',
          'basePath'  => APPLICATION_PATH));
       return $moduleLoader;
    }

    function _initViewHelpers()
    {
       $this->bootstrap('layout'),
       $layout = $this->getResource('layout'),
       $view = $layout->getView();

       $view->doctype('XHTML1_STRICT'),
       $view->headMeta()->appendHttpEquiv('Content-Type', 'text/html;charset=utf-8'),
       $view->headTitle()->setSeparator(' - '),
       $view->headTitle('Twooshes'),
    }
 }
The _initAutoload function, seen in Listing 12-7, automatically loads required Zend Framework classes. This saves you from needing to constantly write 'require' or 'include' statements when referencing a Zend Framework class.
The _initViewHelpers function, seen in Listing 12-7, specifies the file used for the default HTML page layout. It looks for a file named layout.phtml in the application/layouts directory. You create this file later in this chapter. It also sets the global doctype, content type, and generic page title across all pages in your application.
Create a file named app.ini in your config folder. This is your config file and holds your environment specific variables. Add the contents of the example config file, seen in Listing 12-8, to your app.ini.
Example 12.8. application/config/app.ini
[production]
 phpSettings.display_startup_errors = 0
 phpSettings.display_errors = 0
 phpSettings.date.timezone = "UTC"
 includePaths.library = APPLICATION_PATH "/../library"
 bootstrap.path = APPLICATION_PATH "/bootstrap.php"
 bootstrap.class = "Bootstrap"
 resources.frontController.controllerDirectory = APPLICATION_PATH "/controllers"
 resources.db.adapter = PDO_MYSQL
 resources.db.params.host = 192.168.1.1
 resources.db.params.username = twooshesUser
 resources.db.params.password = password
 resources.db.params.dbname = twooshes
 resources.layout.layoutpath = APPLICATION_PATH "/layouts"

 [staging : production]

 [testing : production]
 phpSettings.display_startup_errors = 1
 phpSettings.display_errors = 1

 [development : production]
 phpSettings.display_startup_errors = 1
 phpSettings.display_errors = 1
In Chapter 11, you created a MySQL database server and a new MySQL user for this project. You need to modify Listing 12-8's database connection settings to match your database's connection settings. The settings your need to update are
resources.db.params.host: The IP address of your database server.resources.db.params.username: The username of your database user. (This shouldn't be therootuser.)resources.db.params.password: The password for the database user.resources.db.params.dbname: The name of your project's database.
The layout template allows you to build a common site-wide HTML framework that you plug dynamic page specific content into. This is useful for things like headers and footers, and saves you from having to make edits in numerous places due to redundant code.
To make your layout template, create a file called layout.phtml in your application/layouts directory and insert the code in Listing 12-9.
Example 12.9. application/layouts/layout.phtml
<?php echo $this->doctype(); ?>
 <html xmlns="http://www.w3.org/1999/xhtml" xml:lang="en" lang="en">
 <head>
     <?php echo $this->HeadMeta(); ?>
     <?php echo $this->headTitle(); ?>
     <?php echo $this->headLink()->prependStylesheet($this->baseUrl().'/css/site.css'), ?>
 </head>
 <body>
 <div id="content">
     <?php echo $this->layout()->content; ?>
 </div>
 </body>
 </html>
In Listing 12-9, the doctype, meta tags, and page title are being populated by variables set in your bootstrap.php file. This line of code between the div tags in Listing 12-9 is where your page specific controllers insert their output:
<?php echo $this->layout()->content; ?>
The next step is to create a skeleton view and controller.
The Zend Framework uses the Model-View-Controller (MVC) design pattern. For our purposes, consider the model as the data, the view as the HTML, and the controller as the code you write to generate dynamic content.
Tip
Review Chapter 9 for additional details on the MVC pattern.
The first view and controller you need is for the home index page. That is the page you get when you visit http://twooshes.com.
To make your first view, create a new directory called scripts under your application/views directory. Under your new scripts directory, create a subdirectory titled index. In the index directory, create a new file titled index.phtml.
This file is the HTML template for the controller. In Listing 12-10, I create a variable called foobar between the <h1> tags. This variable's value is set from the controller. Add the code in Listing 12-10 to your index.phtml file.
Create a new file called IndexContoller.php under your application/controllers directory
Note
The capitalization of the filename matters.
In Listing 12-11, the value of the view variable foobar is set to "Hello World." Insert the code in Listing 12-11 into your IndexController.php file.
Test your Zend Framework install and your new view and controller by uploading the following folders and their contents to your Web server's var directory:
wwwapplicationlibrary
Note
If you need a refresher, Chapter 11 contains details on how to upload files to your Web server.
Once your files have been uploaded, visit your Web site with your browser of choice. You should see a white page with "Hello World" written in the top-left corner.
For the Twooshes game, you give the Twitter user a point when they tweet something that is exactly 140 characters long, and you deduct a point when they post a tweet with any Trending Topics.
To keep up with this, you need two database tables:
user
tweet
The first table keeps up with the player's data and their total score. I title this table user. The second table keeps a historical record of the tweets that make up the user's score. I title this table tweet.
For this tutorial, you use the MySQL database you set up in Chapter 11.
When I access the Twitter API to get data, I prefer to store the majority of the data that the API returns whether I'm going to use it immediately or not. I do this because calling the Twitter API is expensive, in that the API calls are slow, and I can only perform so many API calls per hour due to Twitter's API rate limiting. So, I try to maximize the value I receive from each call. The alternative to this approach is to store only the data you know you will need for your app. This is an equally acceptable approach, and it's beneficial because it will keep your data structures lean. For the purposes of keeping this tutorial from being inundated with long lists of variable names, I only store the most necessary data fields.
Tip
Name your data fields exactly the same way they are named in the Twitter API results. This keeps confusion to a minimum and makes mapping the API data to the database straightforward. I make one exception in this example with the twitter_id field. This is the ID that Twitter has attached to a user. Twitter calls this field id. To avoid confusing it with my table's primary key userId, I store Twitter's id field as twitter_id.
Example 12.12. 'User' Table Creation SQL
CREATE TABLE  `twooshes`.`user` (
   `userId` int(10) unsigned NOT NULL auto_increment,
   `created` timestamp NOT NULL default '0000-00-00 00:00:00',
   `updated` timestamp NOT NULL default CURRENT_TIMESTAMP on update CURRENT_TIMESTAMP,
   `score` int(10) NOT NULL,
`trendingTopics` int(10) NOT NULL,
   `twooshes` int(10) NOT NULL,
   `enabled` tinyint(1) unsigned default '1',
   `twitter_id` int(10) unsigned NOT NULL,
   `screen_name` varchar(30) NOT NULL,
   `profile_image_url` varchar(400) NOT NULL,
   `url` varchar(400) default NULL,
 `created_at` timestamp NOT NULL default '0000-00-00 00:00:00',
 PRIMARY KEY  (`userId`),
   UNIQUE KEY `userId` (`userId`),
   UNIQUE KEY `twitter_id` (`twitter_id`),
   UNIQUE KEY `screen_name` (`screen_name`),
   KEY `score` (`score`),
   KEY `trendingTopics` (`trendingTopics`),
   KEY `twooshes` (`twooshes`)
 ) ENGINE=InnoDB DEFAULT CHARSET=utf8;
Have a look at the SQL in Listing 12-12. All the fields in this table will be populated using the Twitter API, except for the first seven fields listed:
userIdis the primary key of the table and is an auto incremented integer. This is your own proprietary user ID and isn't the same as the ID that Twitter returns for the user. You store the ID that Twitter returns astwitter_id.createdis the date and time that the user record was created. It must be manually set when you insert a new row into the user table.updatedis the date and time of the last time any field on that row was updated. That field updates itself automatically so you don't need to manage it.scoreis that users total up-to-date game score.trendingTopicsis the number of tweets for that user that contain a trending topic.twooshesis the number of tweets for that user that contain exactly 140 characters.enabledis by default set to true, but if a user stops following your game's Twitter account, this field is be set to false.
You'll eventually need to sort the users by score to display a leader board. So, the score, trendingTopics, and twooshes fields are set as keys, so they'll be indexed. This will speed up the sorting.
You'll use the tweet table to keep a record of how a user's score was calculated. You may also eventually use this table to show the user the tweets that make up their score.
Example 12.13. 'Tweet' Table Creation SQL
CREATE TABLE  `twooshes`.`tweet` (
   `tweetId` int(10) unsigned NOT NULL auto_increment,
   `userId` int(10) unsigned NOT NULL,
   `created` timestamp NOT NULL default CURRENT_TIMESTAMP,
   `status_id` bigint(20) unsigned NOT NULL,
   `status` varchar(140) NOT NULL,
   `created_at` timestamp NOT NULL default '0000-00-00 00:00:00',
   `twoosh` tinyint(1) unsigned default '0',
   `trendingTopic` varchar(60) default NULL,
   PRIMARY KEY  (`tweetId`),
   UNIQUE KEY `tweetId` (`tweetId`),
   UNIQUE KEY `status_id` (`status_id`),
   KEY `user_ibfk_1` (`userId`),
   CONSTRAINT `user_ibfk_1` FOREIGN KEY (`userId`) REFERENCES `user` (`userId`) ON DELETE CASCADE
 ) ENGINE=InnoDB DEFAULT CHARSET=utf8;
In Listing 12-13, I have written the SQL to create the tweet table. Notice the twoosh field and trendingTopic field. If a tweet is exactly 140 characters long, you will place a 1, signifying a truth Boolean, in the twoosh column. If a tweet contains a trending topic, you will put the trending phrase in the trendingTopic field. It is possible that a tweet contains more than one trending topic. In that case, you'll simply store the first trending topic you find in the tweet.
Also notice in Listing 12-13 that the created column is auto populated, so you don't need to worry about populating that field when you insert data. There is also a foreign key constraint on the userId. This prevents the accidental deletion of a user record that still has tweets associated with it.
Finally, run the create table statements in Listings 12-12 and 12-13 on your Twooshes database. You can use any MySQL client, such as phpMyAdmin, the standard MySQL command-line, or MySQL Query Browser.
Once you have created your MySQL tables, you need to create a Table Data Gateway. This is a design pattern the Zend Framework uses to manage the creation of most of your SQL code. You interact with the database tables via objects. This is the model part of the model-view-controller design pattern.
When you abstract your data in a data model, you can retrieve data from your controller by making simple calls like this:
$user = new user("dustyreagan");
 $user->location = "Austin";
That code creates a new user named "dustyreagan" and sets that user's location to "Austin."
Tip
See how readable that code is? Data models help keep the code complexity in your controllers to a minimum.
First, create a new folder under your models folder called DbTable. Under DbTable create two new files: User.php and Tweet.php. These files represent your two database tables.
In Listing 12-14, I have the code for the User.php file. It defines the name of the table and the dependent tweet table. Add the code in Listing 12-14 to your User.php file.
Example 12.14. application/models/DbTable/User.php
<?php
 class Model_DbTable_User extends Zend_Db_Table_Abstract
 {
    protected $_name = 'user';
    protected $_dependentTables = array('Model_DbTable_Tweet'),
 }
For the Tweet.php file, you define the name of the table and create a reference map to the parent user table. The code for this is in Listing 12-15.
Example 12.15. application/models/DbTable/Tweet.php
<?php
 class Model_DbTable_Tweet extends Zend_Db_Table_Abstract
 {
    protected $_name    = 'tweet';
    protected $_referenceMap    = array(
       'User' => array(
          'columns'           => 'userId',
          'refTableClass'     => 'Model_DbTable_User',
          'refColumns'        => 'userId',
          'onDelete'          => self::CASCADE,
          'onUpdate'          => self::CASCADE
       )
    );
 }
Once you define your tables for the Zend Framework, you need to further abstract the data model into usable objects.
Tip
Keep SQL statements delegated to models. Don't add SQL statements to your controllers.
The tweet model is very simple. It performs two functions for your game:
Map status update data to an object.
Provide a function that returns the
status_idof the latest tweet in yourtweettable.
First, create a file called Tweet.php in your application/models directory.
To map tweet data to your Tweet object, define the tweet fields as public variables, then take the data in as parameters in your constructor and map the parameters to your public variables. Listing 12-16 shows how to achieve this.
Example 12.16. application/models/Tweet.php
<?php

 class Tweet
 {
    public $status_id;
    public $status;
    public $created_at;
    public $twoosh;
public $trendingTopic;
public function __construct($status_id, $status, $created_at, $twoosh, $trendingTopic)
{
$this->status_id = $status_id;
$this->status = $status;
$this->created_at = $created_at;
$this->twoosh = $twoosh;
$this->trendingTopic = $trendingTopic;
}
}For Twooshes, you need to poll the Twitter stream of the game's Twitter account on a consistent basis, looking for tweets that earn the player a point. After you have observed and processed a set of tweets for points, you don't need to observe them again. To avoid reviewing old tweets, you need the status_id of the latest tweet you have stored in your tweet table. To do that, add a static function to your Tweet model that runs a SQL query to return the max status_id. This function is seen in Listing 12-17.
Example 12.17. application/models/Tweet.php : getLastStatusId()
public static function getLastStatusId()
 {
    $db = Zend_Db_Table::getDefaultAdapter();

    $select = 'select max(status_id) as status_id from tweet';
    $lastStatusId = $db->fetchOne($select);

    if(empty($lastStatusId))
       $lastStatusId = 1;

    return $lastStatusId;
 }
In Listing 12-17, I load the Zend_Db_Table object using the default connection found in the config/app.ini file. Then I run a SQL statement that returns the max status_id. If you haven't stored any status updates yet, your max status_id will come back NULL. If you use the Twitter API to request the latest tweets, giving it a variable since_id equal to NULL, the API returns no results. This isn't what you want. So if the max status_id comes back NULL, I set status_id equal to 1.
Your final Tweet.php file looks like Listing 12-18.
Example 12.18. Final Tweet.php file
<?php

 class Tweet
 {
    public $status_id;
    public $status;
    public $created_at;
    public $twoosh;
    public $trendingTopic;

    public function __construct($status_id, $status, $created_at, $twoosh, $trendingTopic)
    {
       $this->status_id = $status_id;
       $this->status = $status;
       $this->created_at = $created_at;
       $this->twoosh = $twoosh;
       $this->trendingTopic = $trendingTopic;
    }

    public static function getLastStatusId()
    {
       $db = Zend_Db_Table::getDefaultAdapter();

       $select = 'select max(status_id) as status_id from tweet';
       $lastStatusId = $db->fetchOne($select);

       if(empty($lastStatusId))
          $lastStatusId = 1;

       return $lastStatusId;
    }
}The User model in Twooshes is more complicated than the Tweet model. But never fear. I tackle it a section at a time.
Your User model needs to provide a variety of functions for your Twitter game:
Access the fields associated with a user.
Load a user from the database by their screen name or Twitter Id.
Load a User object using the data retrieved from the Twitter API.
Save the current user object to the database.
Store a Tweet associated to the user.
Add a point to the user's score.
Subtract a point from the user's score.
The first thing you need to do is create a file called User.php in your application/models directory. Then, in that file define the following publicly accessible variables:
twitter_id: The ID Twitter assigned to the user.screen_name: The user's Twitter screen name.profile_image_url: The URL to the user's profile image.created_at: The date the user created their Twitter account.enabled: Set to 0 if the user is no longer playing Twooshes, set to 1 by default for active players.
You also need a private field for the userId. This is the value of the primary key field for the user in your user database table. You need this value to save a tweet to the user. You don't need the userId value outside of the User model, so keep that value private.
Listing 12-19 shows how to start the User class and define all the fields.
Example 12.19. application/models/User.php
<?php

 class User
 {
    public $twitter_id;
    public $screen_name;
    public $profile_image_url;
    public $created_at;
    public $enabled = 1;

    private $userId;
 }
Next, add a class constructor so you can load the user from the database based on their screen_name or twitter_id. This gives you the ability to load a user and the user's properties from a controller like this:
$user = new user("dustyreagan");
 $location = $user->location;
To do this, your constructor needs to load the user data table object, determine whether you are searching on screen_name or twitter_id, and then map the row results to the class' variables. Listing 12-20 illustrates how this is done.
Example 12.20. application/models/User.php : constructor
public function __construct($identifier = null)
 {
    if(!empty($identifier))
    {
       $userTable = $this->getUserTable();

       if(is_numeric($identifier))
          $select = $userTable->select()->where('twitter_id = ?', $identifier);
       else
          $select = $userTable->select()->where('screen_name = ?', $identifier);

       $row = $userTable->fetchRow($select);
       $this->mapResponse($row);
    }
 }

 private $_userTable;
 private function getUserTable()
 {
    if (null === $this->_userTable)
    {
       require_once APPLICATION_PATH . '/models/DbTable/User.php';
       $this->_userTable = new Model_DbTable_User;
    }
    return $this->_userTable;
 }
In Listing 12-20, the constructor tests whether a parameter called $identifier is included when the User object is created. If $identifier isn't null, the constructor then loads the user table by calling a private function named getUserTable, also seen in Listing 12-20.
The getUserTable function checks whether the user table has already been loaded; if not, it loads the table and stores it in a private variable $_userTable. If the getUserTable function is called more than once, instead of reloading the table, it simply returns the set private variable $_userTable for efficiency.
After the user table is loaded, the constructor then tests whether the $identifier is a number. If so, it assumes it's the twitter_id, else it assumes it's the screen_name. The SQL select statement is created depending on whether the $identifier is the twitter_id or the screen_name. Then the user row is fetched from the user table and passed to the public function mapResponse.
The code for the mapResponse function is shown in Listing 12-21.
Example 12.21. application/models/User.php : mapResponose()
public function mapResponse($response)
 {
    // basic check that $response is actually user data
    if(!empty($response->screen_name))
    {
       // if $reponse contains twitter_id you're mapping row data
       if(!empty($response->twitter_id))
       {
          $this->twitter_id = $response->twitter_id;
          $this->enabled = $response->enabled;
          $this->userId = $response->userId;
       }
       // else you're mapping API data
       else
          $this->twitter_id = $response->id;

       // these mappings are the same in the API & your database
       $this->screen_name = $response->screen_name;
       $this->profile_image_url = $response->profile_image_url;
       $this->created_at = $this->formatCreatedAt($response->created_at);
    }
 }

 private function formatCreatedAt($created_at)
 {
   return date('Y-m-d H:i:s', strtotime($created_at));
 }
The mapResponse function seen in Listing 12-21 loads either Twitter data returned from the API, or from your user table, to the User class variables.
The private function formatCreatedAt, also seen in Listing 12-21, formats the date and time returned by the Twitter API to conform to MySQL standards.
You need the ability to save your User object to the database using a command like this from the controller:
$user->save();
To do that, you need to create a public function in your User model named save. The save function needs to be smart enough to insert new data if it doesn't already exist in your database, and update old data if it does. You can do this by running a SQL statement to check whether the row already exists, then by running another SQL statement to do the insert or update as appropriate. However, since you are using MySQL you can use ON DUPLICATE KEY UPDATE to do all this in one command. Listing 12-22 shows how this is done.
Example 12.22. application/models/User.php : save()
public function save()
 {
    $db = Zend_Db_Table::getDefaultAdapter();

    $sql = 'INSERT INTO user (
             created,
             twitter_id,
             screen_name,
             profile_image_url,
             created_at,
             enabled) VALUES (now(), ?, ?, ?, ?, ?)
       ON DUPLICATE KEY UPDATE
             updated = now(),
             twitter_id = ?,
             screen_name = ?,
             profile_image_url = ?,
             created_at = ?,
             enabled = ?';

      $data = array(
       'twitter_id'=>$this->twitter_id,
       'screen_name'=>$this->screen_name,
       'profile_image_url'=>$this->profile_image_url,
       'created_at'=>$this->created_at,
       'enabled'=>$this->enabled
      );

      $db->query($sql, array_merge(array_values($data), array_values($data)));
 }
You need to be able to save a user's tweets, and add the appropriate points, from the constructor like this:
$user->addTweet($tweet);
I do this using a function called addTweet, seen in Listing 12-23.
Example 12.23. application/models/User.php : addTweet()
public function addTweet($tweetObj)
 {
   $data = array(
      'userId' => $this->userId,
       'created_at' => $this->formatCreatedAt($tweetObj->created_at),
       'status_id' => $tweetObj->status_id,
       'status' => $tweetObj->status,
       'twoosh' => $tweetObj->twoosh,
       'trendingTopic' => $tweetObj->trendingTopic
);
$this->getTweetTable()->insert($data);
if($tweetObj->twoosh == 1)
$this->addPoint();
if(!empty($tweetObj->trendingTopic))
$this->subPoint();
}
private $_tweetTable;
private function getTweetTable()
{
if (null === $this->_tweetTable)
{
require_once APPLICATION_PATH . '/models/DbTable/Tweet.php';
$this->_tweetTable = new Model_DbTable_Tweet;
}
return $this->_tweetTable;
}Missing from Listing 12-23 are the addPoint and subPoint functions. These two functions run an update statement on the score of the user's record. These function and their update statements are seen in Listing 12-24.
Example 12.24. application/models/User.php : addPoint() and subPoint()
private function addPoint()
{
$db = Zend_Db_Table::getDefaultAdapter();
$sql = 'update user set score = score + 1, twooshes = twooshes + 1
where userId = ' . $this->userId;
$db->query($sql);
}
private function subPoint()
{
$db = Zend_Db_Table::getDefaultAdapter();
$sql = 'update user set score = score - 1, trendingTopics = trendingTopics + 1
where userId = ' . $this->userId;
$db->query($sql);
}Listing 12-25 is the complete User.php file.
Example 12.25. The Complete User.php File
<?php
class User
{
public $twitter_id;
public $screen_name;
public $profile_image_url;
public $created_at;
public $enabled = 1;
private $userId;
public function __construct($identifier = null)
{
if(!empty($identifier))
{
$userTable = $this->getUserTable();
if(is_numeric($identifier))
$select = $userTable->select()->where('twitter_id = ?', $identifier);
else
$select = $userTable->select()->where('screen_name = ?', $identifier);
$row = $userTable->fetchRow($select);
$this->mapResponse($row);
}
}
private $_userTable;
private function getUserTable()
{
if (null === $this->_userTable)
{
require_once APPLICATION_PATH . '/models/DbTable/User.php';
$this->_userTable = new Model_DbTable_User;
}
return $this->_userTable;
}
public function mapResponse($response)
{
// basic check that $response is actually user data
if(!empty($response->screen_name))
{
// if $reponse contains twitter_id you're mapping row data
if(!empty($response->twitter_id))
{$this->twitter_id = $response->twitter_id;
$this->enabled = $response->enabled;
$this->userId = $response->userId;
}
// else you're mapping API data
else
$this->twitter_id = $response->id;
// these mappings are the same in the API & your database
$this->screen_name = $response->screen_name;
$this->profile_image_url = $response->profile_image_url;
$this->created_at = $this->formatCreatedAt($response->created_at);
}
}
private function formatCreatedAt($created_at)
{
return date('Y-m-d H:i:s', strtotime($created_at));
}
public function save()
{
$db = Zend_Db_Table::getDefaultAdapter();
$sql = 'INSERT INTO user (
created,
twitter_id,
screen_name,
profile_image_url,
created_at,
enabled) VALUES (now(), ?, ?, ?, ?, ?)
ON DUPLICATE KEY UPDATE
updated = now(),
twitter_id = ?,
screen_name = ?,
profile_image_url = ?,
created_at = ?,
enabled = ?';
$data = array(
'twitter_id'=>$this->twitter_id,
'screen_name'=>$this->screen_name,
'profile_image_url'=>$this->profile_image_url,
'created_at'=>$this->created_at,
'enabled'=>$this->enabled
);
$db->query($sql, array_merge(array_values($data), array_values($data)));
}public function addTweet($tweetObj)
{
$data = array(
'userId' => $this->userId,
'created_at' => $this->formatCreatedAt($tweetObj->created_at),
'status_id' => $tweetObj->status_id,
'status' => $tweetObj->status,
'twoosh' => $tweetObj->twoosh,
'trendingTopic' => $tweetObj->trendingTopic
);

   $this->getTweetTable()->insert($data);

   if($tweetObj->twoosh == 1)
      $this->addPoint();

   if(!empty($tweetObj->trendingTopic))
      $this->subPoint();
 }

 private $_tweetTable;
 private function getTweetTable()
 {
    if (null === $this->_tweetTable)
    {
       require_once APPLICATION_PATH . '/models/DbTable/Tweet.php';
       $this->_tweetTable = new Model_DbTable_Tweet;
    }
    return $this->_tweetTable;
 }
private function addPoint()
 {
   $db = Zend_Db_Table::getDefaultAdapter();

   $sql = 'update user set score = score + 1, twooshes = twooshes + 1
         where userId = ' . $this->userId;

   $db->query($sql);
 }

 private function subPoint()
 {
   $db = Zend_Db_Table::getDefaultAdapter();

   $sql = 'update user set score = score - 1, trendingTopics = trendingTopics + 1
         where userId = ' . $this->userId;

   $db->query($sql);
}In order for people to play Twooshes, they must follow your application's Twitter account. After they follow the account, you need to follow them back so you can monitor their Twitter stream for Twooshes and trending topics. To do that there are two tasks that need to be automated here:
You need to automatically follow users back who start following your apps Twitter account.
You need to continuously monitor your applications Twitter stream to identify tweets that are 140 characters long or contain a trending topic.
You can solve these problems by writing a script that performs these tasks and then schedule it to run every few minutes using a cron job.
Note
Cron is a job scheduler found in Unix and Linux based operating systems. You give the cron a basic command line and tell it when to run.
To tackle this problem start by writing the script that will auto-follow users back.
First, you need to create a new controller and view for your auto-follow script. To create your controller, make a new file titled FollowcronController.php in your application/controllers directory and insert the code in Listing 12-26.
Example 12.26. application/controllers/FollowcronController.php
<?php

 class FollowcronController extends Zend_Controller_Action
 {
    public function indexAction()
    {
       // Disable layout
       $layout = Zend_Layout::getMvcInstance();
       $layout->disableLayout();

       // your auto follow script code goes here
    }
 }
The cron script doesn't need to render HTML so I've disabled the rendering of the Web site layout in Listing 12-19.
To create your view, make a new directory under your application/views/scripts directory titled followcron. In this directory, create a new file called index.phtml. Leave this file empty. You have to create this file to adhere to Zend Frameworks MVC pattern, but you don't need to use it.
Note
For your Twitter application account, you want to keep a strict one-to-one ratio of following to follower. If someone stops following your account, they are opting out of the game and you want to stop calculating their score. Conversely, if someone starts following your account, you must follow them back in order to calculate their score.
You can figure out who you need to follow and unfollow by using the two Twitter API social graph methods:
friends/ids: returns the IDs of everyone the user is following.followers/ids: returns the IDs of everyone who is following the user.
These methods return a list of Twitter user IDs and nothing more. There is one gotcha, however. As of Zend Framework 1.9, these methods aren't included in Zend's Twitter methods library. Indeed this is a bummer, but you can correct this by simply adding the missing methods to your copy of Zend's Twitter library.
You'll find Zend's Twitter service methods in the Twitter.php file located in your library/Zend/Service directory. Open this file up and add the two new methods listed in Listing 12-27 to the bottom of the Twitter.php file before the last closing bracket.
Example 12.27. library/Zend/Service/Twitter.php : Add Social Graph Methods
public function userFriendsIds($screen_name = null)
 {
    $_params = "screen_name=$screen_name";

    $path = '/friends/ids.xml';

    $username = $this->_username;
    $password = $this->_password;
    $credentials = sprintf("%s:%s", $username, $password);

    $ch = curl_init('http://twitter.com'. $path . '?' . $_params);

    curl_setopt($ch, CURLOPT_USERPWD, $credentials);
    curl_setopt($ch, CURLOPT_RETURNTRANSFER, true);
$data = curl_exec($ch);
curl_close($ch);
return new Zend_Rest_Client_Result($data);
}
public function userFollowersIds($screen_name = null)
{
$_params = "screen_name=$screen_name";
$path = '/followers/ids.xml';
$username = $this->_username;
$password = $this->_password;
$credentials = sprintf("%s:%s", $username, $password);
$ch = curl_init('http://twitter.com'. $path . '?' . $_params);
curl_setopt($ch, CURLOPT_USERPWD, $credentials);
curl_setopt($ch, CURLOPT_RETURNTRANSFER, true);
$data = curl_exec($ch);
curl_close($ch);
return new Zend_Rest_Client_Result($data);
}The two methods in Listing 12-27 take an optional Twitter screen name as input. Then, they grab the authentication credentials provided when the Twitter service object is created. Finally, they call the Twitter API using cURL and the authentication credentials provided which returns the IDs for the screen name provide, or if no screen name is provided, it returns the IDs for the authenticated user.
Now that you have the Twitter API library methods you need, you can get back to writing your auto follow script.
Go back to your FollowcronController.php file. The first thing you need to do is create a new Zend_Service_Twitter object. Listing 12-28 shows how this is done with the new code lines in bold.
Example 12.28. application/controllers/FollowcronController.php
<?php
 class FollowcronController extends Zend_Controller_Action
 {
    private $_twitter = null;

    public function indexAction()
    {
       // Disable layout
       $layout = Zend_Layout::getMvcInstance();
       $layout->disableLayout();

       $this->_twitter = new Zend_Service_Twitter('Twooshes', 'password123'),

   }
 }
Next, you need to create a function that collects the IDs of the users that are following your game's Twitter account. To do that, add the function in Listing 12-29 to your FollowcronController class.
Example 12.29. application/controllers/FollowcronController.php
private $_followerIds = null;
 private function getFollowerIds()
 {
    if($this->_followerIds == null)
    {
       $response = $this->_twitter->user->followersIds();
       if(!empty($response->id))
       {
          foreach($response->id as $twitter_id)
             $this->_followerIds[] = (string) $twitter_id;
       }
       else
          $this->_followerIds = array();
    }
    return $this->_followerIds;
 }
The function in Listing 12-29 has an associated private variable called $_followerIds. When the function is called for the first time, it checks whether $_followerIds has a null value. If so, it calls the userFollowersIds method you recently added to Zend's Twitter library. Then, it takes the IDs returned from the method call and adds them to an array that you can easily work with. Once this is done, the function assigns that array to $_followerIds. If the function is called again in this HTTP request, it will simply return the results it has already stored in the $_followerIds variable. This saves you from unnecessary additional API calls.
You also need a function for collecting the IDs of people our game's Twitter account is following. Add the function in Listing 12-23 to your FollowcronController class.
The function in Listing 12-30 works just like the function in Listing 12-29, except it returns the IDs of the users you are following.
Example 12.30. application/controllers/FollowcronController.php
private $_followingIds = null;
 private function getFollowingIds()
 {
    if($this->_followingIds == null)
    {
       $response = $this->_twitter->user->friendsIds();
       if(!empty($response->id))
       {
          foreach($response->id as $twitter_id)
             $this->_followingIds[] = (string) $twitter_id;
       }
       else
          $this->_followingIds = array();
    }
    return $this->_followingIds;
 }
Now you have a list of the people who are following your account and a list of the people you're following. Next, you need to figure out who you aren't following and who isn't following you. You can do this by evaluating the differences in your two lists. To find out who you aren't following, look to see who is in your followers list but not in your following list, and vice versa to find out who isn't following you.
Fortunately, PHP provides an array function that does this work for you called array_diff. array_diff returns an array containing all the entries from the first array parameter that aren't present in the second array parameter. Thus, the parameter order is important. To keep things straight, add the two functions listed in Listing 12-31 to your FollowcronController class.
Example 12.31. application/controllers/FollowcronController.php
private function getNonFollowersIds()
 {
    $following = $this->getFollowingIds();
    $followers = $this->getFollowerIds();

    return array_diff($following, $followers);
 }

 private function getNewFollowersIds()
 {
    $following = $this->getFollowingIds();
    $followers = $this->getFollowerIds();

    return array_diff($followers, $following);
 }
In Listing 12-31, the functions are nearly identical except for the order of the parameters in array_diff function.
Next, take the arrays of people you need to unfollow and follow and loop through both of them, calling the Zend Twitter library's destroy and create friendship methods, respectively, inside the loop. You also need to disable User accounts you unfollow and create User accounts you follow. You can do that using the User data model. You may also want to print the amount of people your script has followed and unfollowed so you can easily see what it's doing. Finally, you need to close your Twitter session using Zend's endSession method. After you've done all this your indexAction function should look similar to Listing 12-32.
Warning
At this point, you need to be very careful with which Twitter account you're authenticating with. Use a Twitter account dedicated to this application you're building, not your personal Twitter account. If you don't do this, you may unintentionally drop and follow people by running this script.
Example 12.32. application/controllers/FollowcronController.php : indexAction()
public function indexAction()
 {
    // Disable layout
    $layout = Zend_Layout::getMvcInstance();
    $layout->disableLayout();

    $this->_twitter = new Zend_Service_Twitter('Twooshes', 'password123'),

    $nonFollowersIds = $this->getNonFollowersIds();
    $newFollowersIds = $this->getNewFollowersIds();

    print_r($nonFollowersIds);
    echo "<hr/>";
    print_r($newFollowersIds);
    echo "<hr/>";

    require_once APPLICATION_PATH . '/models/User.php';

    foreach ($nonFollowersIds as $value)
    {
       $this->_twitter->friendship->destroy($value);

       $user = new User($value);
       $user->enabled = 0;
       $user->save();
    }
foreach ($newFollowersIds as $value)
{
$response = $this->_twitter->friendship->create($value);
$user = new User();
$user->mapResponse($response);
$user->save();
}
echo "Followed " . count($newFollowersIds) . "<br />";
echo "UnFollowed " . count($nonFollowersIds);
$this->_twitter->account->endSession();
}The tweet monitor script uses the Twitter API to get your friends timeline. Then, it loops through each tweet looking for tweets that are exactly 140 characters long or that contain a trending topic. Finally, it saves any twooshes or tweets with trending topics to that user's record.
First, you need to create a new controller and view for your tweet monitor script. To create your view, make a new directory under your application/views/scripts directory titled tweetcron and add a new file titled index.phtml. Leave this file empty, just like you did for followcron.
To create your controller, make a new file titled TweetcronController.php in your applicationcontrollers directory and insert the code in Listing 12-33.
Example 12.33. application/controllers/TweetcronController.php
<?php
 class TweetcronController extends Zend_Controller_Action
 {
    public function indexAction()
    {
       // Disable layout
       $layout = Zend_Layout::getMvcInstance();
       $layout->disableLayout();

       $twitter = new Zend_Service_Twitter('Twooshes', 'password123'),

       require_once APPLICATION_PATH . '/models/User.php';
       require_once APPLICATION_PATH . '/models/Tweet.php';
// call public static method to get max since_id
$lastStatusId = Tweet::getLastStatusId();
$data = array(
'count'=>200,
'since_id'=>$lastStatusId
);
// Get current tweets
$response = $twitter->status->friendsTimeline($data);
$twitter_search = new Zend_Service_Twitter_Search();
$twitter_trends = $twitter_search->trends();
// loop through each tweet
foreach($response as $value)
{
// if length is 140 mark it a Twoosh
$twoosh = 0;
if(strlen($value->text) == 140)
$twoosh = 1;
// loop through each trending topic
$trendingTopic = null;
foreach($twitter_trends['trends'] as $trend)
{
// if the tweet contains a trending topic mark it
if(strlen(stristr($value->text, $trend['name'])) > 0)
{
echo $trend['name'];
$trendingTopic = $trend['name'];
break;
}
}
// if the tweet is a twoosh or contained a trending topic, process it
if($twoosh == 1 || !empty($trendingTopic))
{
// create a new tweet object
$tweet = new tweet($value->id, $value->text, $value->created_at, $twoosh, $trendingTopic);
// associate the tweet to a user
$user = new user((int) $value->user->id);
$user->addTweet($tweet);
// update the user DB record while you have fresh API data
$user->mapResponse($value->user);
$user->save;
}
}
}
}To automate the running of your auto-follow and tweet monitor scripts, you need to modify your Web server's crontab file. This file can usually be found in /etc/crontab. Use a command line terminal to SSH into your Web server. Once in, enter the command:
sudo nano /etc/crontab
Enter your password when prompted. Then, in the command line text editor add the bold lines in Listing 12-34. Make sure to replace the domain name with your own domain name.
Example 12.34. /etc/crontab
# m h dom mon dow user  command
 */1 *   * * * root      /usr/bin/curl http://yourdomain.com/tweetcron
*/5 *   * * * root      /usr/bin/curl http://yourdomain.com/followcron
These two lines will have the cron job call the tweecron script every minute and call the followcron script every five minutes.
Exit and save the crontab file. Finally, restart the cron with the following command:
sudo /etc/init.d/cron restart
Now that your game's Twitter account is following players and keeping score, it's high time to create a scoreboard that players can page through to see their score. To do this, you need to revisit the very first view and controller you created when you set up the Zend Framework. Look at your IndexController.php file first.
Your original IndexController file simply set an example value in the View. Now, you need it to display a pageable table of players ordered by score. Sounds complicated, but it isn't that bad if you enlist the help of the Zend_Paginator class. This class takes a Zend_DbTable object and a page number as input. It is clever enough to figure out the most optimal way to retrieve data from your database, freeing you up to deal with the appearance of the table. Have a look at how your new IndexController.php file looks in Listing 12-35.
Example 12.35. application/controllers/IndexController.php
<?php

 class IndexController extends Zend_Controller_Action
 {
    public function indexAction()
    {
       $pageNumber = $this->_getParam('page'),

       if(empty($pageNumber))
          $pageNumber = 1;

       $userTable = $this->getUserTable();

       $select = $userTable->select()
          ->where('enabled = ?', 1)
          ->order("score desc, screen_name");

       Zend_Paginator::setDefaultScrollingStyle('Sliding'),
       Zend_View_Helper_PaginationControl::setDefaultViewPartial(
          'pagination_control.phtml'),

       $paginator = new Zend_Paginator(new Zend_Paginator_Adapter_DbTableSelect($select));
       $paginator->setItemCountPerPage(5);
       $paginator->setCurrentPageNumber($pageNumber);

       $this->view->paginator = $paginator;
    }

    private $_userTable;
    private function getUserTable()
    {
       if (null === $this->_userTable) {
          require_once APPLICATION_PATH . '/models/DbTable/User.php';
          $this->_userTable = new Model_DbTable_User;
       }
       return $this->_userTable;
    }
 }
In Listing 12-35, I look for a page number value in the query-string using the _getParam method. If a value isn't found I set $pageNumber = 1. Next, I set up the Zend_DbTable select statement. Finally, I set up the Zend_Paginator class and assign it to the view.
Take a look at this line during the Zend_Paginator setup:
Zend_View_Helper_PaginationControl::setDefaultViewPartial(
    'pagination_control.phtml'),
That line of code points to a new file you need to create in your application/views/scripts directory called pagination_control.phtml. This file contains the HTML template for page buttons used to go to a new page.
Create the file pagination_control.phtml in your application/views/scripts directory and add the code in Listing 12-36 to the file.
Example 12.36. application/views/scripts/pagination_control.phtml
<?php if ($this->pageCount): ?>
<div class="paginationControl">
<!-- First page link -->
<?php if ($this->current != $this->first): ?>
<a href="<?php echo $this->url() . '?page=' . $this->first; ?>">
<<</a> |
<?php else: ?>
<span class="disabled"><< |</span>
<?php endif; ?>
<!-- Previous page link -->
<?php if (isset($this->previous)): ?>
<a href="<?php echo $this->url() . '?page=' . $this->previous; ?>">
<</a> |
<?php else: ?>
<span class="disabled">< |</span>
<?php endif; ?>
<!-- Numbered page links -->
<?php foreach ($this->pagesInRange as $page): ?>
<?php if ($page != $this->current): ?>
<a href="<?php echo $this->url() . '?page=' . $page; ?>">
<?php echo $page; ?></a> |
<?php else: ?>
<?php echo $page; ?> |
<?php endif; ?>
<?php endforeach; ?>
<!-- Next page link -->
<?php if (isset($this->next)): ?>
<a href="<?php echo $this->url() . '?page=' . $this->next; ?>">
></a> |
<?php else: ?>
<span class="disabled">> |</span>
<?php endif; ?><!-- First page link -->
<?php if ($this->current != $this->last): ?>
<a href="<?php echo $this->url() . '?page=' . $this->last; ?>">
>></a>
<?php else: ?>
<span class="disabled">>></span>
<?php endif; ?>
</div>
<?php endif; ?>You can use pagination_control.phtml to modify the appearance of the pagination buttons.
Finally, update the IndexController view, otherwise known as the index.phtml file found in application/views/scripts/index, with the code found in Listing 12-37.
Example 12.37. application/views/scripts/index/index.phtml
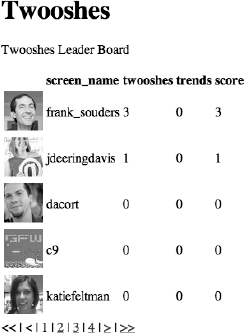
<h1>Twooshes</h1>

 <p>Twooshes Leader Board</p>

 <div class="leader-board">
    <?php if (count($this->paginator)): ?>
       <table class="niceTableInverse">
       <tr>
          <th></th>
          <th>screen_name</th>
          <th>twooshes</th>
          <th>trends</th>
          <th>score</th>
       </tr>
       <?php foreach ($this->paginator as $item): ?>
          <tr>
             <td><img src="<?php echo $item->profile_image_url; ?>" /></td>
             <td><?php echo $item->screen_name; ?></td>
             <td><?php echo $item->twooshes; ?></td>
             <td><?php echo $item->trendingTopics; ?></td>
             <td><?php echo $item->score; ?></td>
          </tr>
       <?php endforeach; ?>
       </table>
    <?php endif; ?>
    <?php echo $this->paginator; ?>
 </div>
Notice that the View checks whether any paginator items exist. If they exist, it loops through the paginator items and adds them as table rows. Finally, it prints the paginator buttons under the scoreboard results table and before the final closing div tag.
Tip
For more details on the Zend_Paginator class, check Chapter 39 of the Zend Framework Programmer's Reference Guide (http://framework.zend.com/manual/en/zend.paginator.html).
With all this done after you've uploaded all these files to your production server, the index of your Web site should look something like Figure 12-4. (Provided you've got a few followers and some scores.)
Okay! You're done! Well, kind of. The basics of your Twitter app are done, but there are still a lot of enhancements that could be made. Think about all the cool features you could add. Also, the site is still pretty ugly. You could definitely spend some time making it more aesthetically pleasing. You are now at a crossroads. You have two options: show your friends your site now, or wait until you make some more enhancements.
If you are working solo, with no external pressure from your boss, investors, or teammates, my advice to you is release your software right now! As soon as it is somewhat stable and functional, it's time to show it to your friends. In fact I've already shown the Twooshes Twitter app to my Twitter followers and I haven't even finished writing this chapter.
I recommend releasing early for two reasons:
You need user feedback to learn what the next steps are in improving your application.
If you wait to release your app until it's perfect, you may never release it. Or when you release it, you may find it isn't what your users needed or wanted.
After your initial release, you need to frequently make improvements to your application.
Tip
Keep your project's feature roadmap to yourself, or between you and your teammates. Telling your users about your feature roadmap is as good as promising them the features. They may begin to make plans based on your feature roadmap, and if you later decide not to implement a feature, your users may become upset or consider you flakey. If you keep your roadmap to yourself you will delight users with new unexpected features, and you'll retain your creative freedom.