Chapter 7: Generating Content with Puppeteer
When I launched Puppeteer-Sharp (https://github.com/hardkoded/puppeteer-sharp) back in 2019, I was surprised to see that the two main use-case scenarios were content generation and web scraping.
Things are not too different in the Node.js world. Lots of developers use Puppeteer in Node.js for content generation and web scraping as well.
If you are a QA analyst, you will learn how to use screenshots to create regression tests. But, please, don't stop there; the other sections will give you a complete picture of everything you can do with Puppeteer on this topic. If you are not much into web development, share this chapter with your development team. No, don't share it – ask them to buy the book. That will be better.
Web developers will love this chapter. We will see how to use Puppeteer as a content generator tool for your website.
We will cover the following topics in this chapter:
- Taking screenshots
- Using screenshots for regression tests
- Generating PDF files
- Creating HTML content
By the end of this chapter, you will have gotten to a new level. You will have learned how to use Puppeteer as a testing tool and as a content generator.
Let's get started.
Technical requirements
You will find all the code of this chapter in the GitHub repository (https://github.com/PacktPublishing/UI-Testing-with-Puppeteer) under the Chapter7 directory. Remember to run npm install on that directory and then go to the Chapter7/vuejs-firebase-shopping-cart directory and run npm install again.
Taking screenshots
Taking screenshots is the first feature I mention when I give talks about Puppeteer or Puppeteer-Sharp. Don't ask me why, maybe because I find it fun to use, or perhaps because it's hard to explain why we would need to take screenshots.
As a web developer, there are many things you can accomplish using screenshots. The first popular use-case you'll find is to improve your Open Graph information.
According to their website (https://ogp.me/), "The Open Graph protocol enables any web page to become a rich object in a social graph. For instance, this is used on Facebook to allow any web page to have the same functionality as any other object on Facebook."
Open Graph is what will make social media posts (on Twitter or Facebook) look pretty when people share the URL of your site. We are not going to talk about product positioning on social media in this book. But what you need to know is that if you are working on a public site with users wanting to share your content on social media, someone will ask you to improve the open graph information:

A post with no Open Graph information
You don't want your site to look like the preceding screenshot when you share your products on social media. You want your links to be like Amazon, with a nice description and a big image, as shown in the following screenshot:
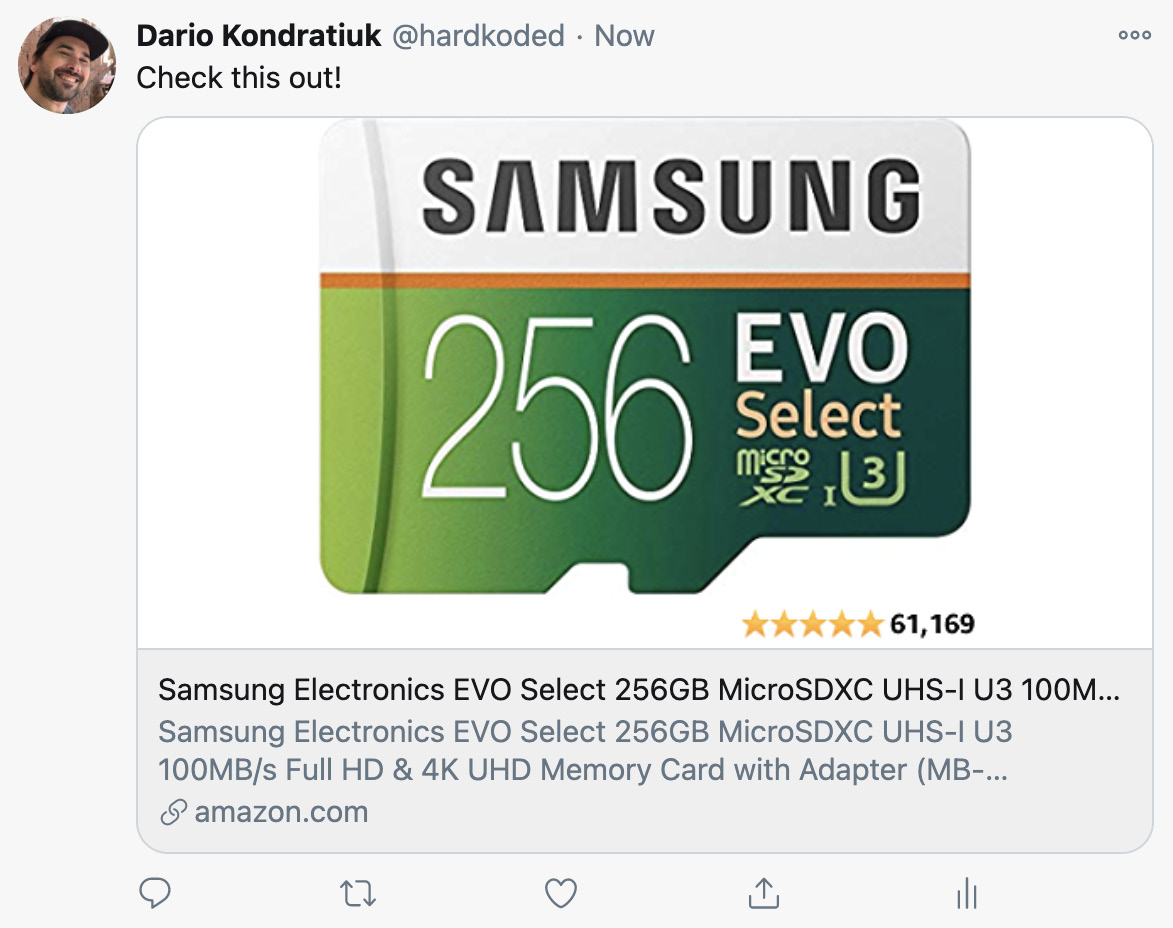
Amazon posts on social media
Adding an image to your posts is as easy as adding a meta property called og:image in the html head of your product page:
<head>
<title>The Rock (1996)</title>
<meta property="og:title" content="The Rock" />
<meta property="og:type" content="video.movie" />
<meta property="og:url" content="https://www.imdb.com/title/tt0117500/" />
<meta property="og:image" content="https://ia.media-imdb.com/images/rock.jpg" />
</head>
Those few lines will make your post look prettier on social media.
What does this have to do with taking screenshots? Well, sometimes getting the image for a post is simple. In a shopping cart, the image would be the product image – a piece of cake. But sometimes, getting the image for a URL is not that easy. Let's take, for instance, this post from the great HolyJS conference:

HolyJS post
If you go to that post (https://www.hardkoded.com/ui-testing-with-puppeteer/holyjs-post), you won't find the image used in that tweet. You will see Roman's photo, but you won't find the image with the photo, the conference logo, or the talk title. They might have created that image manually. You don't need great Photoshop skills to do that. But if you created hundreds of tweets for all the talks at the HolyJS conference, I bet it would be more productive to code a Puppeteer script in a few minutes.
We could have an internal page that we would navigate by passing a talk ID. Once loaded, we take a screenshot, and we save that image in some kind of storage.
But before getting into Puppeteer's code, let me show you a new tool. Do you know that you can take full-page screenshots using Chromium?
If you open up the Developer Tools in Chrome and then press Cmd + Shift + P in macOS or Ctrl + Shift + P, a command menu list will pop up, just like in VS Code:
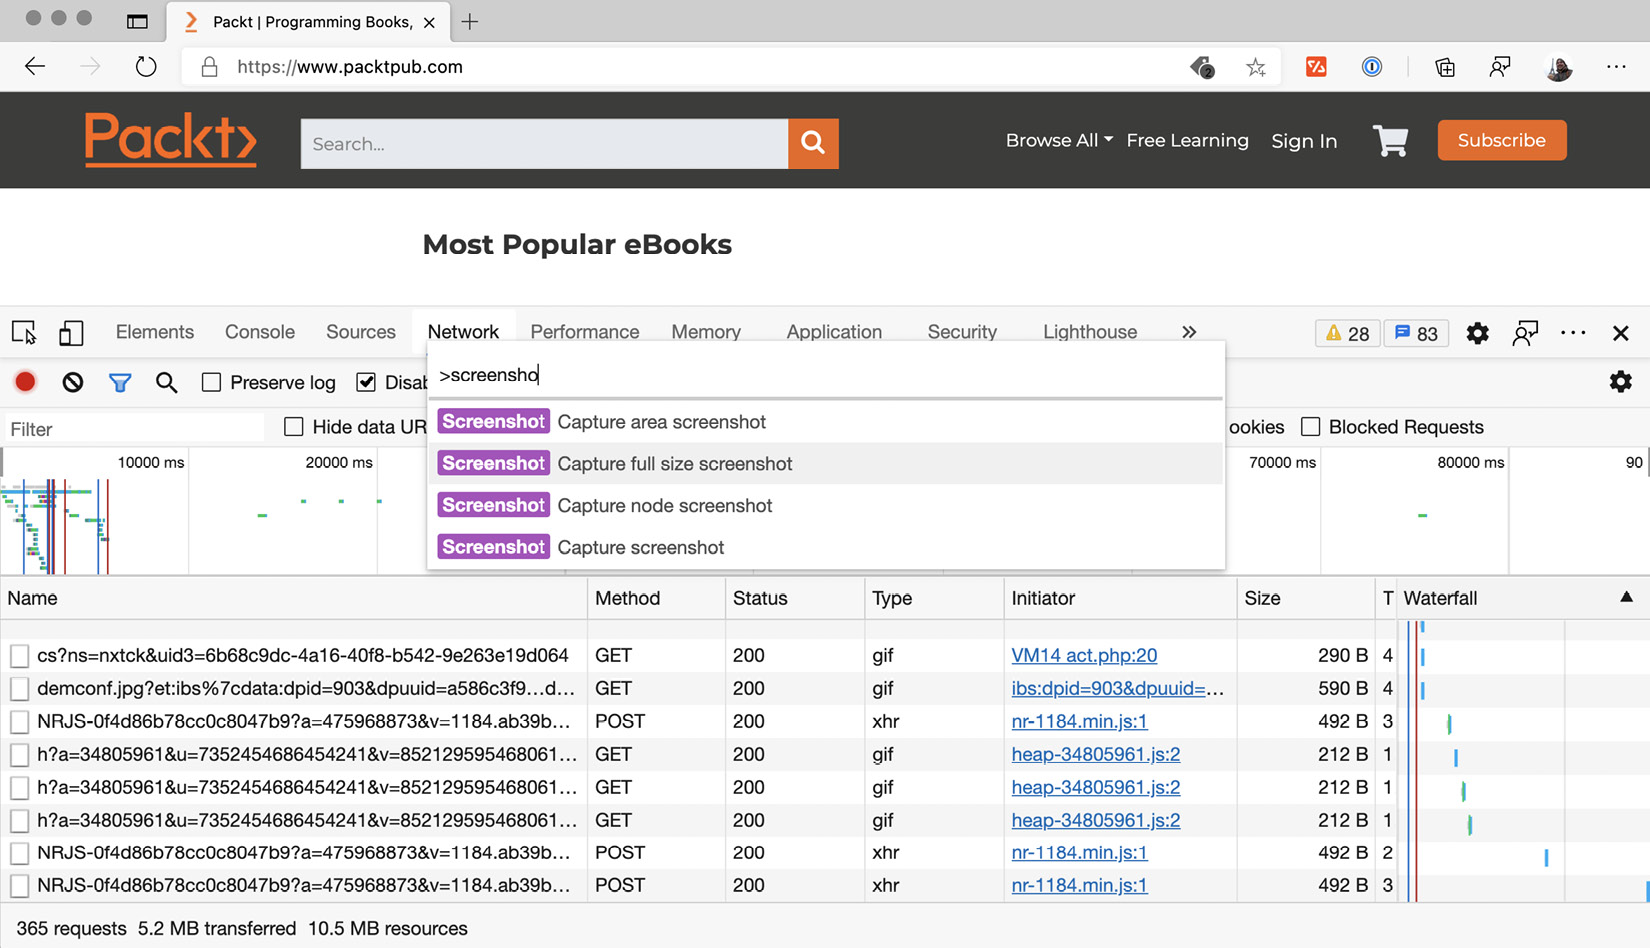
Taking screenshots using Chromium
You will find tons of commands there. Do you want to have some fun? Open the 3D Viewer. I'll give you 3 minutes.
OK, back to work. If you type screenshot in the command menu list, you will get four options.
The first option is Capture area screenshot. This option works like the take screenshot area you have in macOS by pressing Cmd + Shift + 4 or the Rectangular snip in Windows's snipping tool. When you select that option, the cursor turns into a cross. You select the area you want to take a screenshot of, then you release the mouse and get an image download.
The second option is Capture a full size screenshot. This feature is so cool that I would put this option in a huge font size, in bold, red, and italics, but I don't think my editor would let me. Capture a full size screenshot will take a screenshot of the entire page, even the parts off the screen. I remember other tools trying to accomplish this by taking several screenshots while scrolling the page, and the results were terrible. To be honest, I have heard of people having issues with this option, but generally speaking, the results are pretty good. You can use this tool for marketing purposes or for reporting bugs so that you can show the entire page.
The third option is also fantastic. Now I don't know which one is my favorite. Capture node screenshot works with the Elements tab. You go to the Elements tab, select an element by clicking on it, then select the Capture node screenshot option, and you will get a screenshot of that element. This is way better than trying to select a section of the page with the capture area option.
The last option is just Capture screenshot. It will capture the visible part of the page. Yes, I know, it sounds boring compared with the others, but it's still useful.
I don't think I need to tell you the good news because you already know. We can do all these things with Puppeteer using the screenshot function.
Both the Page class and the ElementHandle class have this function. If you call the screenshot function on an ElementHandle, you will use the Capture node screenshot option in Chrome.
The function's signature is quite simple, just screenshot([options]), which means that just calling screenshot() would be enough. But the options object has many interesting properties. Let's take a look at them:
- path is one of the most common properties you will use. If you pass a path, your screenshot will be saved there. Whether you pass the path or not, the resulting image will be returned by the screenshot function.
- With the type option, you can determine whether you want a jpeg or a png image. If you don't pass a type, Puppeteer will infer the type from the path. If you pass neither the type nor the path, it will default to png.
- If you set the type (whether using the type option or the path options) to jpeg, you can also pass a quality option. It has to be a value from 0 to 100. It will determine the quality of the jpeg image.
- Then we have fullPage. This option is a boolean option that will help us perform the Capture a full size screenshot action.
- The clip property is an object that will help us perform the Capture area screenshot action. It represents a square, an area, using four properties: x for the x-coordinate, y for the y-coordinate, and then width and height to determine the area's size.
- With the omitBackground property, you will be able to change the page's default (white) background to transparent.
Important Note
omitBackground changes the default background of the page. If the page has a custom background, even a white background using background-color: white, or an image, this option won't work.
- The last property available is encoding, which will determine the return type of the screenshot function. If you pass base64, it will return a base64 string. If you pass binary or don't set any value, it will return a Node.js Buffer object.
Time to see some code. Let's create a script and try to replicate the four options that Chrome offers. You will also be able to see this code in the screenshots.js file:
const browser = await puppeteer.launch({headless: false, defaultViewport: null});
const page = await browser.newPage();
await page.goto('https://www.packtpub.com/');
await page.screenshot({ path: 'normal-only-viewport.png'});
await page.screenshot({ path: 'full-page.png', fullPage: true});
await page.screenshot({
path: 'clip.png',
clip: {
x: 300,
y: 150,
width: 286,
height: 64
}
});
const firstBook = await page.$('.tombstone');
await firstBook.screenshot({ path: 'first-book.png'});
We can see the four actions expressed in the code. If we pass only the path, we Capture screenshot. Then, if we set fullPage to true, we will get Capture full size screenshot. If, instead of passing fullPage, we pass a clip, we'll get Capture area screenshot. Finally, based on the ElementHandle we get from page.$('.tombstone'), we get Capture node screenshot.
Tip
Finding the right clip will be quite tricky. Pages change their layout based on the window size, which might break the fixed position you are trying to use. I would recommend trying to capture node screenshots instead of using a clip. If there is no element you can use, I would try to build the clip based on other elements' positions.
I bet web developers will find more use cases for the screenshot feature. But if you are a QA analyst, we will now learn how to use screenshots to perform UI regression tests.
Using screenshots for regression tests
We briefly talked about UI regression tests in Chapter 2, Automated Testing and Test runners. Now it's time to get practical. First, let's recap the concept of regression. Regression is something you hear a lot when you see bug reports. If a user says something like "I found a regression in X feature," they mean that something that was working before in a certain way has now changed. It might be a bug, an error in the app, or an unreported change of behavior.
We can say that a UI regression is when we detect that a page or component has changed visually. I want to be emphatic again. It might have changed due to a bug or an unreported change of style.
To prove a regression, you need evidence. Until now, we were testing behavior, and our evidence was the code: "If I input the user, the password, and then I click on the login button, I should get logged in."
To prove a UI regression, our evidence will be screenshots. A UI regression test would consist of the following steps:
- The first thing we need to do is take a screenshot of the current state.
- The first time we run a test, we have nothing to compare our screenshot to. We have no history, no evidence. We have nothing to test. But now, we have the evidence for the next run.
- If we have evidence, we will compare our current screenshot with the baseline, and we will fail if the images are different.
That's it. Simple. But what happens when we have a difference? When we get a test fail in end-to-end tests, we would first see if it's an error in our test. If our tests are working as expected, that failure will end up in a bug report.
But with UI regression tests, that's a little bit different. We would need to evaluate the results to check if we found an error or if the baseline has changed. We get UI changes in pages all the time, so we need to see if they are desired changes or not. If a change was desired, we would need to delete our baseline and create a new baseline image.
That's our cake. Now, what tools do we need to bake that cake? And also, what are our requirements for those tools? We need four elements:
- A test runner. We already talked about what we need from a test runner, and we saw that Mocha and Jest meet our expectations.
- A screenshot taker. The screenshot taker needs to be stable. By stable, I mean that it needs to return the same screenshot under the same circumstances all the time. It sounds obvious, but UI regression tests are the king of flaky tests. We need a tool that provides the same screenshots consistently. Puppeteer is great for this.
- A place to store baselines. We are not talking about a tool here. But we need files to be organized so that it's easy to find and remove baselines and find the resulting comparisons.
- A tool to compare images. This tool is as important as the screenshot taker. We don't want false alarms. We don't need a tool that tells us that everything is wrong just because one pixel is not the exact same white as the baseline. This tool should allow us to pass some kind of threshold to determine how sensitive we want it to be to changes. It should also need to support anti-aliased pixels to reduce the difference in the image rendering. Pixelmatch (https://www.hardkoded.com/ui-testing-with-puppeteer/pixelmatch) is the most popular image comparison package for Node.js.
As you can see, it shouldn't be that hard implementing that. But many tools on the market solve all that boilerplate for us. Again, it's not about me telling you what's the best tool. You have to look for the right tool for you. I found that Project Awesome (http://www.hardkoded.com/ui-testing-with-puppeteer/awesome-regression-testing) has a huge list of regression testing tools. On that site, I found differencify (https://www.hardkoded.com/ui-testing-with-puppeteer/differencify). I like it because it's simple and covers all the requirements mentioned in the preceding list. I don't like much that it's a layer between Puppeteer and us, but it does the job; I can live with that.
We can create a test called "Should visually match", and use differencify there. You can find this test in the homepage.tests.js file. Let's see how to implement it:
it ('Should visually match', async() => {
const target = differencify.init({
chain: false,
testName: 'Home' });
await target.launch();
const page = await target.newPage();
await page.setViewport({ width: 1600, height: 1200 });
await page.goto(config.baseURL);
const image = await page.screenshot();
const result = await target.toMatchSnapshot(image);
await page.close();
await target.close();
expect(result).to.be.true;
});
It looks pretty much like a normal Puppeteer test. But there are some differences. Let's take a look at them:
It begins by declaring a variable named target and assigning to it the result of differencify.init. We won't get into the internals of differencify, because we don't care about the internals. The only thing important in that init call is that we are setting the test name there, which, as we will see later, will be used to name the images.
After that, it looks like pure Puppeteer code, except that we call target.launch(); instead of puppeteer.launch();.
One important thing we need to do when taking screenshots is setting the viewport. The viewport will determine the size of the screenshot we will use. Even if you take a full-page screenshot, the viewport will determine that image's width.
Unless you want to check a page's style after specific actions, UI regression tests will just go to a page, wait for the page to be loaded and stable, and take a screenshot. By stable, I mean that you don't want to take a screenshot with half of the resources, for example, images still loading.
Once the page is loaded, we take a screenshot using page.screenshot() and then call await target.toMatchSnapshot(image). This function will be responsible for creating a baseline image if it doesn't exist, and if it exists, make the image comparison.
When we run the test for the very first time, the test will pass because, again, there is no baseline. One important thing we will notice is that differencify created the baseline inside a differencify_reports directory. You can see the complete directory structure inside the Chapter7/differencify_reports directory.
Now we have our baseline. Hopefully, this test will be green unless something changes on that page. Let's try to break it. We will open the vuejs-firebase-shopping-cart/src/components/Header.vue file and change the color .navbar-btn elements to blue:
.navbar-btn {
color: blue;
}
This is a typical scenario of a UI regression test. Maybe you wanted to change the color of a button on the login page, and you didn't realize that the navbar-btn class was also being used on the home page.
If we run the test, we will get the following output, telling us that the test has failed:
1) Home Page
Should visually match:
AssertionError: expected false to be true
+ expected - actual
-false
+true
That doesn't say much. It just simply says that the image is not the same. But if we go to the differencify_reports directory, we will see that differencify created two new files: Home 1.current.png under differencify_reports/__image_snapshots__/__current_output__, which shows the latest screenshot. The second image is Home 1.differencified.png under differencify_reports/__image_snapshots__/__differencified_output__. You can see the differencified image inside the directory mentioned above or following the link https://www.hardkoded.com/ui-testing-with-puppeteer/differencified will show us where the changes were detected. In this case, you will see that it highlighted the word "Checkout". We can now compare the baseline image with the one created in the __current_output__ directory and evaluate what went wrong.
To wrap up this section, UI regression tests are not for every project. If you use CSS frameworks like bootstrap or tailwindcss the chances of UI regressions are low. There are also projects where the page style is not considered a bug. Stakeholders won't care if a box is a few pixels below.
I do think it's an excellent tool for frontend developers working on custom CSS. With UI regression tests, a frontend developer can measure the impact of their changes. It's like unit tests for CSS.
In the next chapter, we are going to talk about device emulation. With device emulation plus UI regression tests, you will be able to check how your site looks on mobile devices.
Now it's time to learn another way to generate content with Puppeteer. Time to generate PDF files.
Generate PDF files
We are out of QA land, and we'll go into the development world again.
When I talk about PDF generation, I get the same question I mentioned in the screenshot section: "Why would I need to generate PDFs using Puppeteer?"
The first scenario to mention is using PDFs as an output format for your website. I don't know if you've lived what I lived once. I had to build an e-commerce app. I built the product list, the checkout process, and even the receipt page. Then the requirement came out: "We need to send an email with that receipt as a PDF." That's an estimation breaker. There is no easy way to create PDF files just from scratch.
Then you find a library that generates PDFs, and you are happy with it. But the stakeholders tell you that it needs to look exactly like the receipt page. Your estimation goes to the trash again. There should be an easy way to generate PDF files.
Maybe it's not a receipt. Haven't you ever got a request to send a daily report by email as a PDF? You would end up using some huge, complex, and expensive reporting tool, just for that daily email.
The second scenario is PDF files as a product by themselves. Do you sell documents? Finance reports? You can autogenerate that content using PDF generation tools.
I bet you already know that you can save any page as a PDF file using Chrome's print tool:

Save as PDF in Chrome
You can go to any page, hit Cmd + P or Ctrl + P, and instead of selecting a real printer, you choose Save as PDF. Then you click Save, and you get your PDF.
I think I don't need to tell you this, but as you might have guessed, Puppeteer uses this same utility to generate PDF files.
There is something essential you need to know. If you know this, you will be able to answer lots of questions in Stack Overflow. Here goes: PDF generation doesn't work as a screenshot but as a print action.
It might sound obvious, now that we've seen that Print dialog. But it's important for you to know that the viewport (the window size) won't determine how the PDF will be generated. The page size will determine that.
Designers and frontend developers can determine how a page should be printed using the media query print (https://www.hardkoded.com/ui-testing-with-puppeteer/mediaqueries).
Let's see how you can change a page style using @media print:
<html>
<head>
<style>
body {
color: blue;
font-size: 16px;
}
@media print {
body{
color: black;
font-size: 32px;
}
}
</style>
</head>
<body>
Hello world;
</body>
</html>
As we can see, if you browse this HTML content (you will find this code as mediaprint.html in the repository), you will find that "Hello world" is rendered in blue with a size of 16px. But if you hit print, the browser will add all the CSS style from the @media print section, changing the font size to 32px and the color to black. In the next section, we will learn how to add print styles if the page has none. For now, what you need to know is that we are printing content.
If the @media print style used in the page doesn't work for you, there is a way to bypass this functionality. You can force the media type screen using the following code:
page.emulateMediaType('screen')
If you call emulateMediaType before generating the PDF, @media print will be ignored by the browser.
I don't think I need to tell you that the function we will use to generate PDF files is called page.pdf. Unlike screenshot, there is no elementHandle.pdf because you can't print just an element.
The signature is simple, just page.pdf([options]), but we have many available options. Let's begin with the options that map the settings you would find in the print dialog.
The first option you will see in the print dialog after selecting Save as PDF, is the Layout. The option to set the layout is landscape. It's a boolean that will tell the browser if you want to generate the PDF with a landscape orientation or not.
The next option is Pages. In Puppeteer, the property is pageRanges. It's a string where you can pass things like '1-5, 8, 11-13'. If you don't set this property, it will work as if you had set Pages to All in the print dialog.
If you click More settings in the print dialog, the next option available will be Paper size. In Puppeteer, it will be format, which is a string that accepts the following options:
- Letter: 8.5 in x 11 in
- Legal: 8.5 in x 14 in
- Tabloid: 11 in x 17 in
- Ledger: 17 in x 11 in
- A0: 33.1 in x 46.8 in
- A1: 23.4 in x 33.1 in
- A2: 16.54 in x 23.4 in
- A3: 11.7 in x 16.54 in
- A4: 8.27 in x 11.7 in
- A5: 5.83 in x 8.27 in
- A6: 4.13 in x 5.83 in
Puppeteer also offers two extra options: width and height. If none of those formats suit you, you can set custom dimensions with these two properties. These properties accept a number or a string. If you use strings, you can pass values in units, such as px for pixels, in for inches, cm for centimeters, or mm for millimeters.
Next up is Scale. The property is scale, and it's the zoom that will be used to print the page. You will see it in the print dialog as a percentage from 10% to 200%. Here, it will be a decimal value from 0.1 to 2.
After Scale, you will find Pages per sheet. We don't have that setting in Puppeteer.
The next option in the Print dialog is Margins. The Print dialog offers a few fixed options. In Puppeteer, the margin option is an object with four properties:
- top
- right
- bottom
- left
All these properties accept a number or a string, supporting units as width and height do.
After the margins, the print dialog offers an extra set of options. The first one is Headers and footers. This is a really fun feature in Puppeteer. Puppeteer not only provides a displayHeaderFooter boolean property, but it also provides a headerTemplate property and a footerTemplate property. That means that you can set what you want the header and the footer to look like. Puppeteer will even populate elements with the following classes:
- date: Formatted print date
- title: Document title
- url: Document location
- pageNumber: Current page number
- totalPages: Total pages in the document
The next option is Background graphics. You can turn this option on with the printBackground property. It will tell the browser that you want to print background graphics. This is false by default because this option is intended for printers, and you don't want to waste your toner on a background. But you should consider whether this is something you need to turn on. Let's consider Wikipedia:
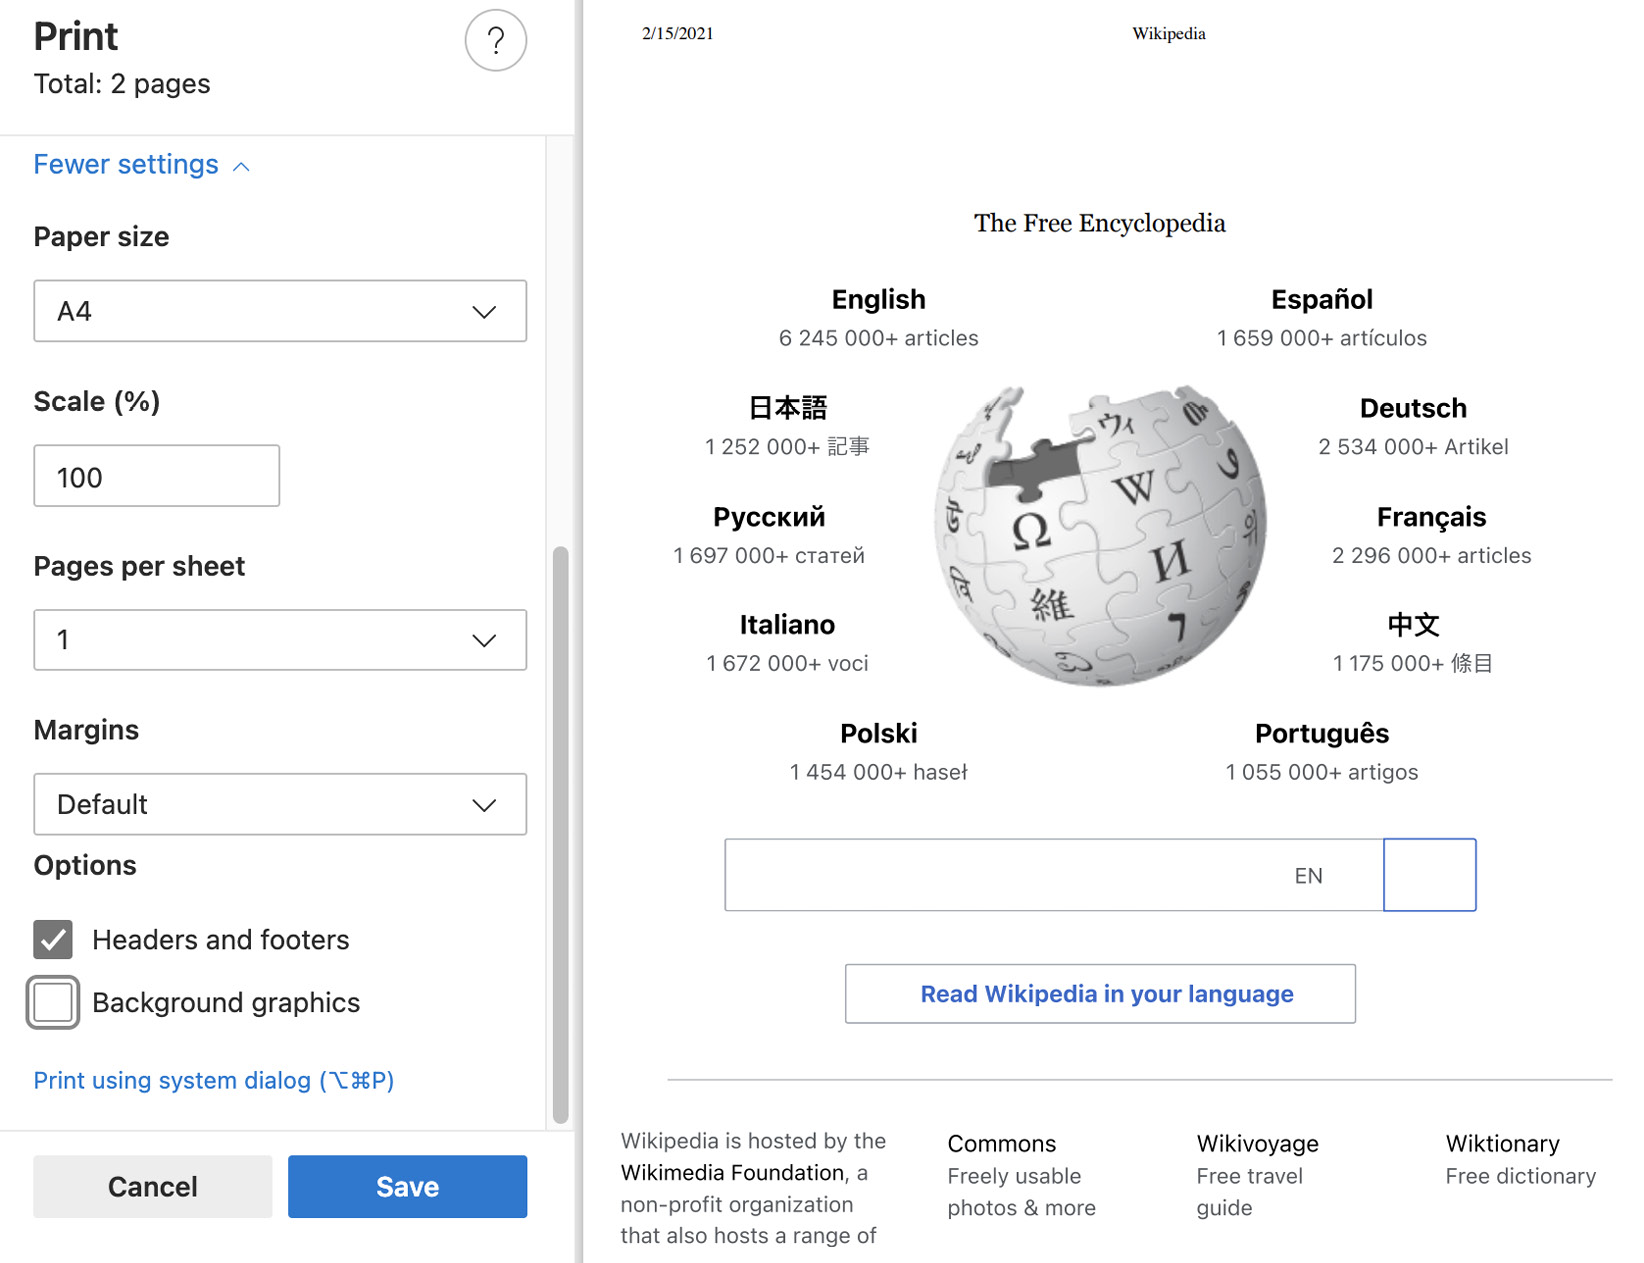
Wikipedia without the background graphics checked
As you can see, the Wikipedia title is missing if you don't check the Background graphics checkbox because it's the background image of a SPAN element. If you don't know about this flag, you might be scratching your head for several minutes, trying to see what's wrong with your code. Now you know that you have to consider printBackground.
There is one option that you won't see in the print dialog, and it's preferCSSPageSize. This property, whose default is false, will tell the browser to honor the @page size declared on the page over width/height or page format. Developers can use @page size (https://www.hardkoded.com/ui-testing-with-puppeteer/pagesize) to set the preferred page size when the page is printed.
The last option is the most important. The function's output works in the same way as in the screenshot function. If you set the path property, a file will be generated in that path. Either way, the function's return value will be a Buffer (https://nodejs.org/api/buffer.html) with the binary representation of the PDF file.
Time to take a look at some code. In the following code, which you can see in the pdfdemo.js file, we are going to print www.wikipedia.org using the options we have learned:
const browser = await puppeteer.launch({
headless: true,
defaultViewport: null});
const page = await browser.newPage();
await page.goto('https://www.wikipedia.org/');
await page.pdf({
path: './headers.pdf',
printBackground : true,
displayHeaderFooter : true,
headerTemplate: `
<span style="font-size: 12px;">
This is a custom PDF for
<span class="title"></span> (<span class="url"></span>)
</span>`,
footerTemplate: `
<span style="font-size: 12px;">
Generated on: <span class="date"></span><br/>
Pages <span class="pageNumber"></span> of <span class="totalPages"></span>
</span>`,
margin:{
top:'100px',
bottom: '100px'
}
});
await browser.close();
The first thing to notice in this piece of code is that the pdf function only works in headless mode. If you call pdf while in headful, you will get an Error: Protocol error (Page.printToPDF): PrintToPDF is not implemented.
The second thing to notice is that you need to set up a margin if you want to use footer and header templates. In my personal experience, I wouldn't use very complex templates here. Things can get nasty and hard to debug.
The last thing to mention in the code is the CSS classes used in the template. As you can see, I'm leaving empty SPANs like <span class="title"></span> so the browser can replace them with real data.
This code will generate the following headers.pdf file:
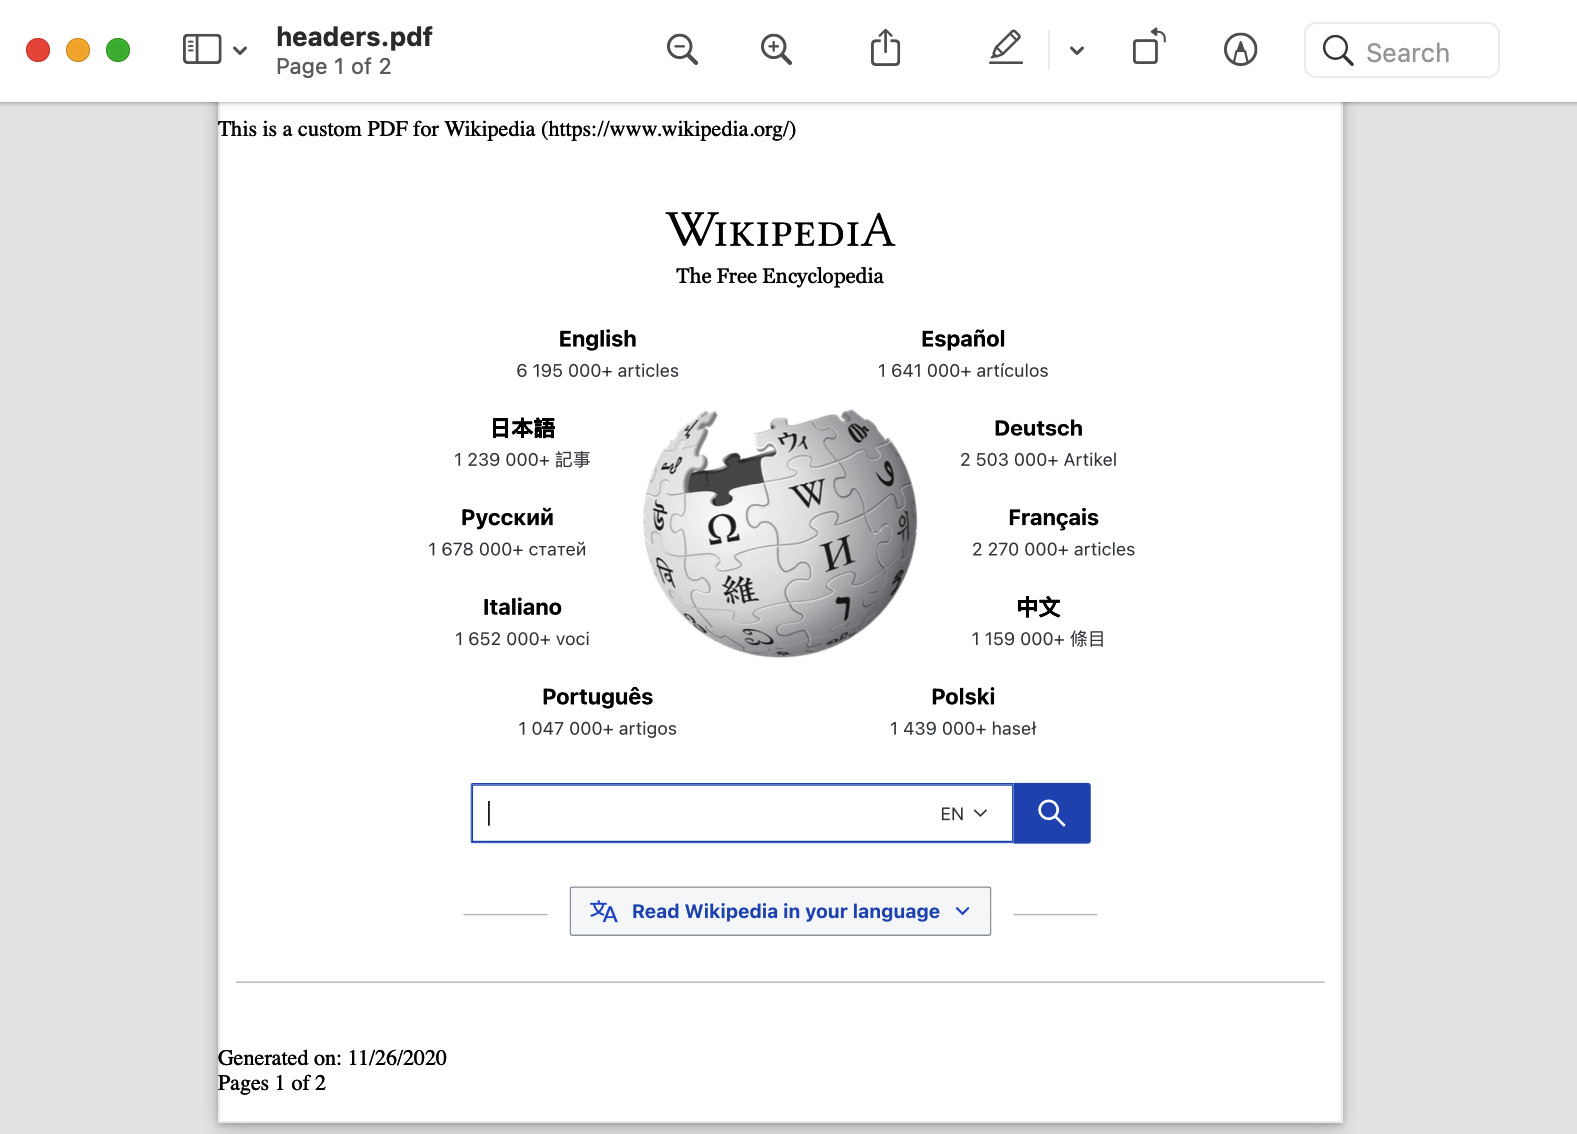
PDF output
As you can see, we now have a custom header with a title and URL, a custom footer with the date and the pages, and, as we set printBackground, we are getting the Wikipedia logo.
You might think that's it, but it's not. We have one more way to generate content. We will build our own pages on the fly.
Creating HTML content
In this section, we will see a few simple features but pretty useful ones. You will be able to follow the code from this section in the demohtml.js file. Most of the time, you navigate pages using the HTTP protocol as we did with Wikipedia. If you open the mediaprint.html file, you navigated to that page using the pseudo protocol "file." Although it's not a real protocol, you should know that with Puppeteer, you can also navigate local files using a URL such as file:///some/folder/of/my/computer/mediaprint.html.
So, if you want to generate a social image, like the HolyJS conference one we saw in the first section, you could create a page on your website, navigate to that page using Puppeteer, take a screenshot, and use that image in your social post.
You could also have that file stored locally and navigate that file using the file:// protocol.
What I want to show you in this section is that you don't necessarily need to have a file in your file system to generate that social image. You could have the HTML that you need in some external source, for instance, a content database, load that HTML in an empty page, and then take a screenshot.
We can do that using the setContent function. The signature is quite simple: page.setContent(html[, options]), where html is the HTML to load, and the options object, which supports two options you might already know: timeout and waitUntil. We need a timeout and a waitUntil property because the HTML we are loading might involve network requests, and we would need to wait for them.
Let's say we are assigned the task of creating that social media post. The content team tells us that we need to use the content socialPostTemplate from the contentdb component. We could do something like this:
const puppeteer = require('puppeteer');
const content = require('./contentdb');
(async () => {
const browser = await puppeteer.launch({
headless: true,
defaultViewport: null});
const page = await browser.newPage();
await page.setContent(content.socialPostTemplate);
await page.screenshot({path:'fromhtml.png'});
await browser.close();
})();
We load contentdb using the require function. Then we call newPage, which will give us an empty canvas, the about:blank page. Once we have the empty canvas, we load the HTML using setContent, take the screenshot, and close the page.
Once you call setContent, the page will be fully functional. That means that you could even call the evaluate function to customize and populate that template's values.
One thing to consider is that the setContent function will override all the page content. You won't be able to append content using setContent.
Two more functions will come in handy while creating new content. The first one is page.addScriptTag(options), which will allow you to inject script tags into any page. These are the options available:
- You can pass url, to inject a JavaScript file from a URL.
- You can also use path to inject a JavaScript file from a local file.
- If you have the script in a memory variable, you can use content and set the entire script there.
- Finally, you can pass type, which is the script type you can set to a script element (https://www.hardkoded.com/ui-testing-with-puppeteer/scriptelement).
You can use these two functions when you want to inject new functionality that wouldn't be solved with just an evaluate function call.
We also have page.addStyleTag(options). It's just like addScriptTag, but instead of injecting a script, you can inject a CSS file or content. The addStyleTag function has the same options as addScriptTag, except for the type option, which is not a valid option of the link element used to add CSS files. If we go back to PDF generation, you can use the following code to inject CSS content before generating a PDF file:
await page.addStyleTag({
content : `
.search-input {
display: none !important;
}`
});
await page.pdf({…});
With this piece of code, we are hiding the search input before generating the PDF. This is a relatively simple change, but imagine all the things you would be able to set up in real-life scenarios.
Summary
In this chapter, we covered many of my favorite features. Creating content is an unexpected use for a browser automation tool.
We learned how to generate screenshots, use them for UI regression testing, and generate content for our websites. We also learned how to generate PDF files and all the options available. By the end of the chapter, we learned how to generate pages on the fly.
During this chapter, we also saw many features available in Chrome. I hope you learned some new tricks there.
In the next chapter, we will take our tests to the next level. We will learn how to test our websites by emulating different mobile devices and network conditions.