11. Printing Visio Diagrams
In This Chapter
• How can I print this?
• Which settings will help me avoid unpleasant surprises?
• How can I select what will actually print?
• How can I get the best quality when I print?
Print is a little five-letter word. It really shouldn’t be complicated. We have all felt the angst of intending to print one thing and getting something else entirely. Also, we live in a society that is becoming ever more aware of being ecologically friendly, which translates to using eco settings and less paper when we print. Nevertheless, printing diagrams may often be needed for handouts at meetings, advertising, hard copies for review, or plans for a worksite.
Visio diagrams range from simple and sleek to sprawling multipage complex diagrams that can be intimidating to look at, much less print. How do you select the parts you want to print and avoid taking out a forest? This chapter considers these questions as it analyzes the Print settings and options that Visio provides.
Just the Basics
Have you ever clicked the Print button, and after going through several pop-ups and choosing the correct files, you end up printing something totally different from what you expected? Many factors influence how printers interpret what users send to them. There may be issues or limitations at the printer (low paper or toner). The print server may have drivers that affect how the print job format looks by the time it gets to the printer. And on your computer there may be problems with the way the printer is configured or installed. That’s why there are network administrators and help desks to keep all this set up and working.
This section focuses on the factors that you have control over when you print Visio content as you look at the basic settings within Visio and their purpose. After all, it is embarrassing when the print job failed because you made a mistake, right?
Print from the Backstage
As we have seen, Visio 2013 uses the Backstage to handle tasks related to Visio files and printing. This is accessed by selecting the colored File tab. From there, select Print from the vertical menu to the left. You can also get there by using the keyboard shortcut Ctrl+P when working with the drawing window.
Using the Print Settings Pane
As you can see in Figure 11.1, the Print Settings pane is a refined interface. It is divided into two sections—the Settings pane to the left that shows the current print selections, and the Print Preview pane.

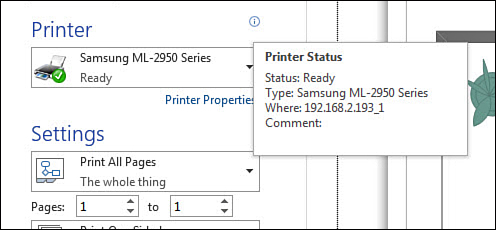
The prominent Print button sends the job to the printer using the settings displayed. It does not get much easier than that. You can quickly choose a different printer from the Printer drop-down list. Notice that the status of printers is shown; this may help you immediately avoid problems by sending your job to a printer that is ready rather than to one offline.
Aside from the Ready status, you can use the information icon to see more detailed information regarding the connection or the IP address (see Figure 11.2).
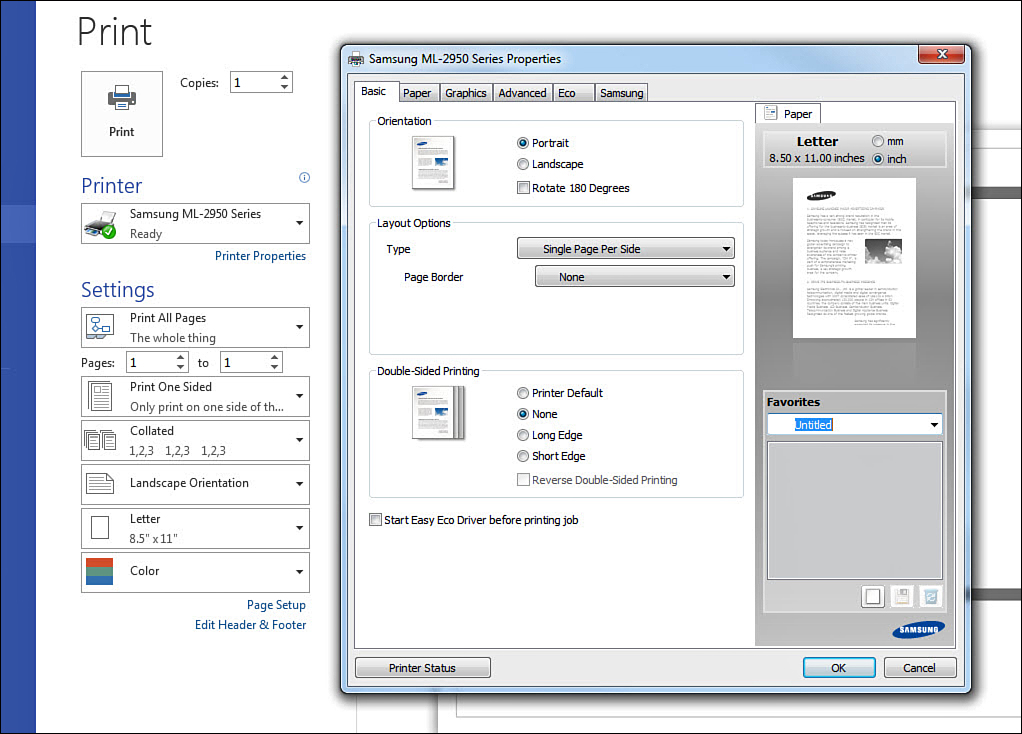
Just below the Printer button is a link labeled Printer Properties. This brings up the properties of the printer that was installed in your operating system. You would get the same results opening the printer properties from Devices and Printers or the Control Panel in Windows. As you can see in Figure 11.3, these settings are unique to the printer installed. Although not all printers have the same options, you can expect to find certain basic settings here, such as color, quality, print selection, duplexing and paper settings.
Collation
In Figure 11.3, notice the button under Settings labeled Collated (see Figure 11.4). You use this only when printing more than one copy of a multipage document. This allows you to adjust the order the pages are printed out by the printer. Two options are presented, the first being Collated 1,2,3 1,2,3 1,2,3. This indicates that the pages print in order for the first copy and then another copy is printed in order, and so on. This saves time when you need several copies for handouts because they are already in order.

Uncollated means that all copies of page 1 are printed, then all of page 2, and so on. You may want this if another step is needed for a specific page before assembling the copies for distribution.
Orientation
In settings below the Collated options, notice a button that says either Landscape Orientation or Portrait Orientation. This is not the same as the page orientation that you can use when working on the drawing window. Orientation tells the printer how to reproduce the selected print job onto paper. In Figure 11.1 check out the preview of a page using Landscape Orientation on letter-size paper from a laser printer. Notice how this layout is changed after selecting Portrait Orientation in Figure 11.5.
 Note
Note
The Settings field may present extra drop-down menus depending on the capability of your printer. For example, if your printer has a duplexer, you might see options related to single- or double-sided printing.
Background Printing
Visio 2013 features default background printing. This refers to the way Visio handles the printing task in the background while you continue working without being forced to wait for the print job to complete.
In the status bar below the drawing window, you can see the status for sent print jobs until they are completed.
The Print Preview Pane
To the right you can’t miss the Print Preview pane, which allows you to interact with the drawing without leaving the Print page. You can zoom in and out and pan across the drawing by clicking and dragging. To zoom in or out use the Zoom control, or use the scroll wheel on your mouse. To the right of the Zoom control is a Zoom to Page button you can use to jump to a view of the full page.
In Visio there is a Page Break preview that can be useful when locating shapes that extend past the page size. Figure 11.6 shows the same view you see in your drawing window. It doesn’t look too bad, right?

FIGURE 11.6 You can zoom in to check the way your diagram will look before printing in the Print Preview pane.
Now check to see what the actual printed pages will look like. Remember that your drawing may occupy a single drawing page, but the print job for your drawing can be spread across several sheets of printer paper. To the left of the Zoom control is a small button that is grayed out for drawings that are contained in a single page size. The drawing in Figure 11.6 has at least four paper pages to print this drawing based on the dashed page breaks that are visible. Click this icon to Show/Hide Page Breaks. Figure 11.7 shows the result, and you can decide if you are happy with the way the print job will print or if some rearranging is called for. This useful feature removes any concerns you may have before sending files to the printer.
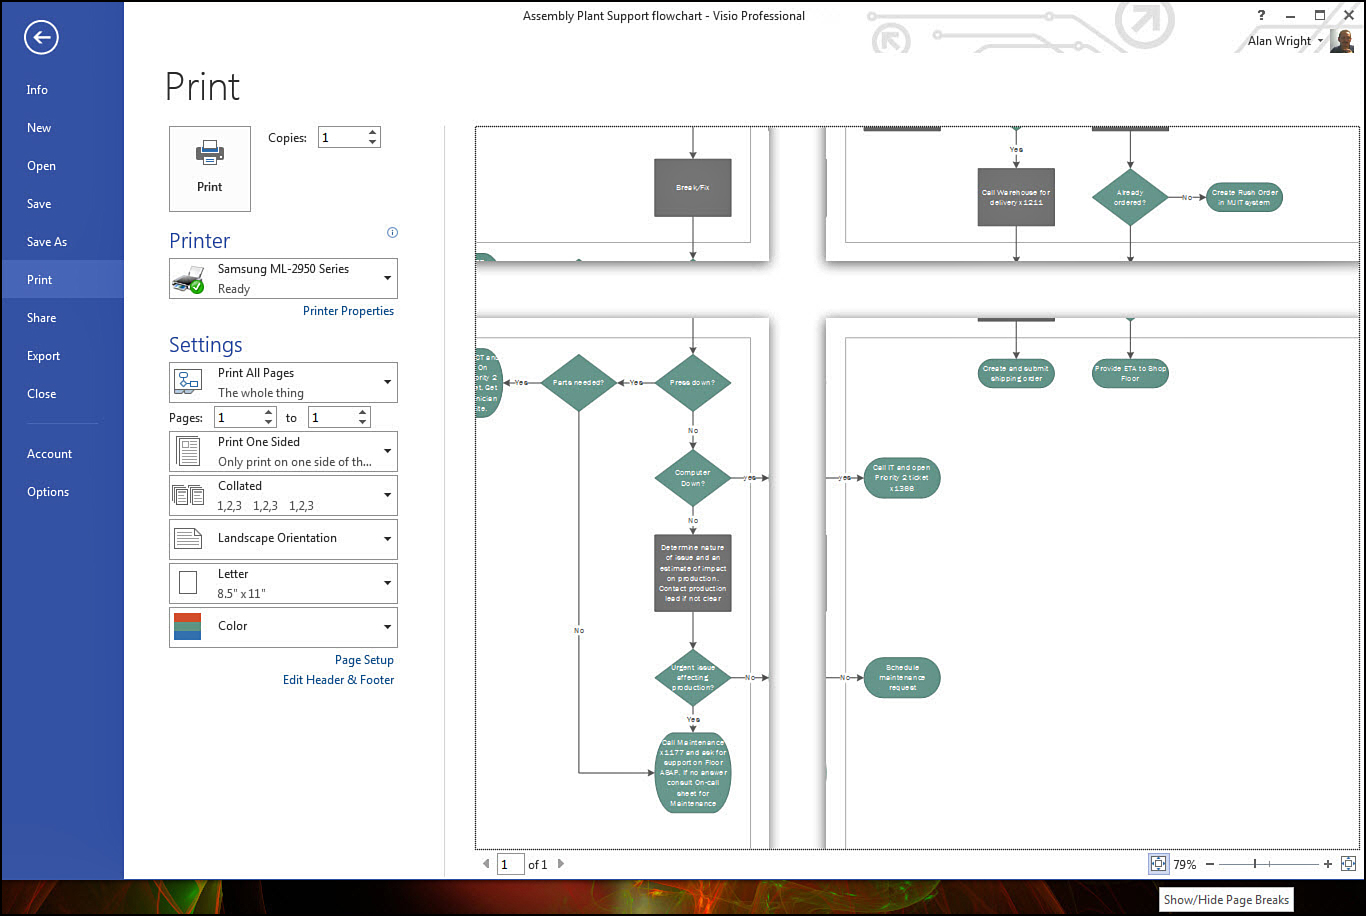
FIGURE 11.7 The Page Break preview feature allows you to see what the actual printed pages look like when printing overlapping pages.
Test Your Print Job
It can be handy to test print jobs when you have doubts. However, it is better to print to a file format rather than burn through the paper tray until you get your settings right. Besides, office administrators can be cranky when the toner gets low on the color laser printer. You may have the means to print to PDF already installed on your computer. PDF is a great option for this because it will not change any formatting and reproduces what would happen if the pages had been printed by a printer using the printer tool settings. Once the output has been generated, you just save the pages as a pdf formatted file. Because they look exactly as the printed pages would you can open the file to check the print job. If you are happy with the results you can send the same settings to a printer confident of the results. Another advantage is that .pdf files can readily be viewed by anyone, even if they do not have Visio installed, because PDF viewers are free applications and are commonly installed.
Another option is built in to Windows and Visio; you can choose Microsoft XPS Document Writer in your list of printers (see Figure 11.8). This creates an image that again corresponds to what is printed on paper. Windows has an XPS Viewer, which is normally included in the operating system. In Windows 7, for example, click Start and type XPS. The XPS Viewer is listed.

Controlling the Space Around the Print Job
With laser and inkjet printers or plotters, generally there are limits to how close they can print to the edge of the paper. This physical limitation must be respected when setting up a print job. This area is usually referred to as a bleed, crop, or margin, depending on the context and application. In Visio this area is referred to as margins.
A separate feature on printed pages refers to the top and bottom areas of a document referred to as headers and footers. These have counterparts in the visual drawing window, but this chapter talks about print features.
Headers and Footers
You can print information at the header of your pages or at the footer. To configure this feature, open the link labeled Edit Header and Footer, which you’ll find below Settings in the Print Settings pane. (Refer to Figure 11.7 to see this link.)
Notice the results in Figure 11.9 of various header and footer assignments to a drawing that has been printed. This additional information is visible only on a printed output of the Visio drawing and is not visible in the drawing window. The capability to add information when printing provides some nice ways to reference a printout when there are many printed pages and identify the date the drawing was printed, which can help avoid confusion if changes have been made or if the printout is used for review.
Refer to Figure 11.10 to see what can be added to the header and footer. The fields you can choose from are limited in scope and will use information specific to the print job. For example, page number and total printed pages will be related to which printed page and how many total printed pages are included.
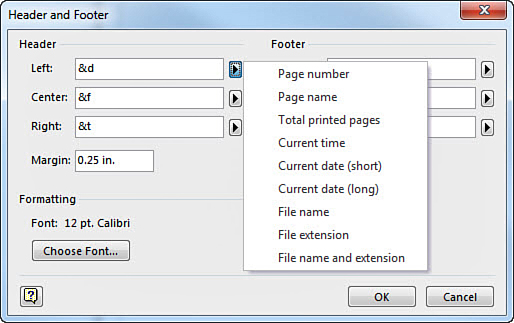
These same nine information sources can be assigned to the Left, Center, or Right of either the header or footer sections. The drawing in Figure 11.9 used all but the Footer Center location. Click Choose Font, and you can adjust the font, font style, size, color, script, and use strikeout or underline effects.
Note
In Chapter 8, “Making Advanced Diagrams,” you learned how to add visible title or header and footer information using background pages. Because you can customize the text fields and thereby better control what is displayed, you will find Borders & Titles to be a better solution when you want to display document information in your printed diagrams. For example, file path or last edit date cannot be displayed using the nine header and footer fields.
→ To learn more about inserting visible header and footer fields to your drawings, see page 157.
You can adjust the location of your header and footer information by adjusting the Margin setting, as shown in Figure 11.11. This also refers to the distance from the top or bottom of the printable area, but it is not the same as the print margins discussed next. Be careful with this adjustment because if you have shapes or background page data near the edge of the paper, this may create an undesirable overlap; check the results with the print preview pane.
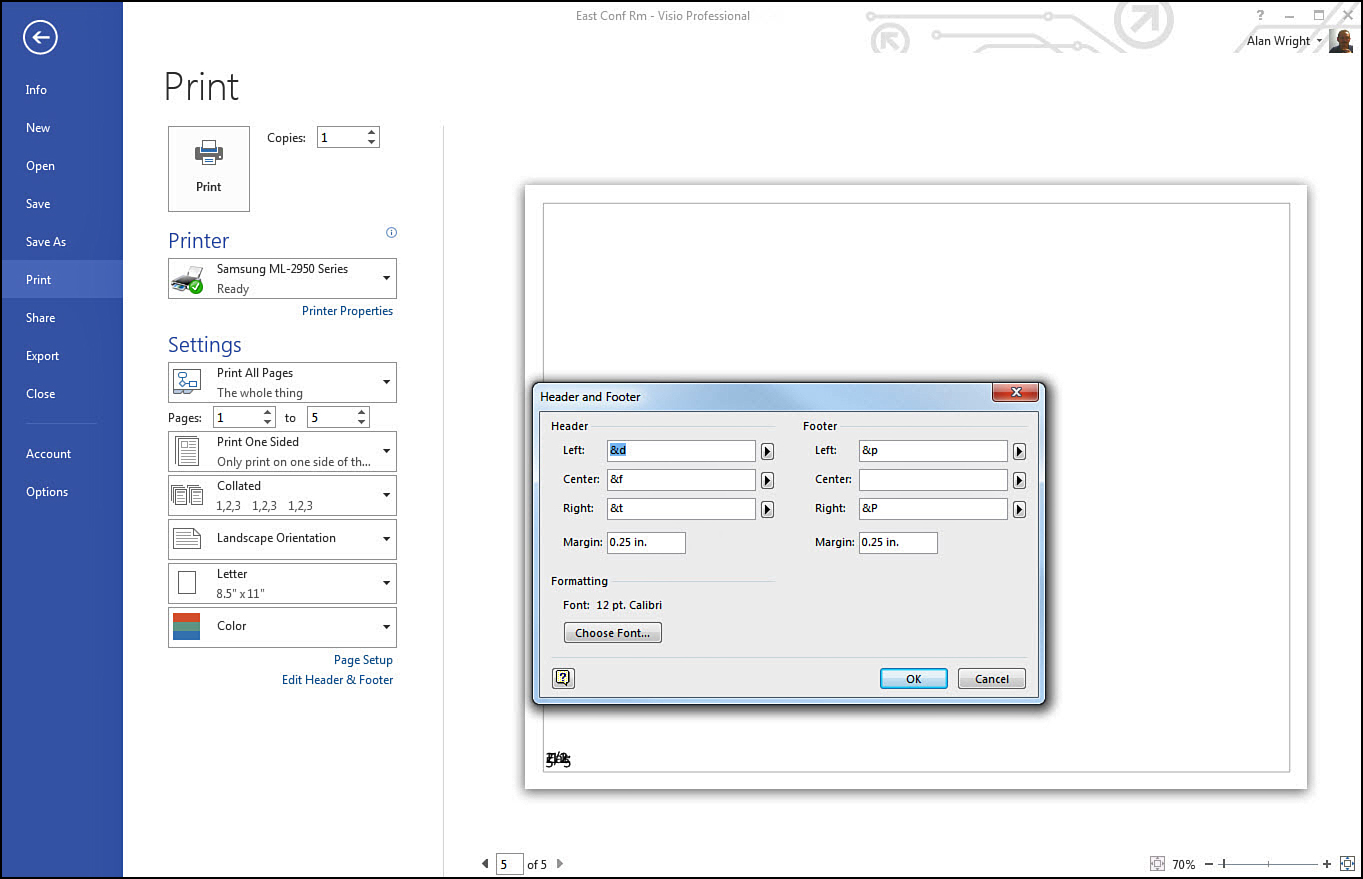
FIGURE 11.11 The Header and Footer dialog box allows you to adjust the distance of text from the edge of your printable area using the Margin settings.
Margins
Print margins refer to the space that you allow around the drawing up to the edge of the paper, and this is configured using the Page Setup dialog box. A few factors may influence your decision to change this. For example, using printed header and footer information discussed in the previous section may move you to adjust the upper and lower margins to provide better text positioning or the physical limitations of your printer may require increasing the margin space.
1. Open the Page Setup dialog box by pressing Shift+F5, or from the Print Settings pane using the link below Settings labeled Page Setup.
2. On the Print Setup tab, click the button labeled Setup to open the Print Setup dialog box.
3. In the Print Setup dialog box, you can adjust the margins for left, right, top, and bottom (see Figure 11.12.) Notice additional settings here, such as Center for smaller drawings.
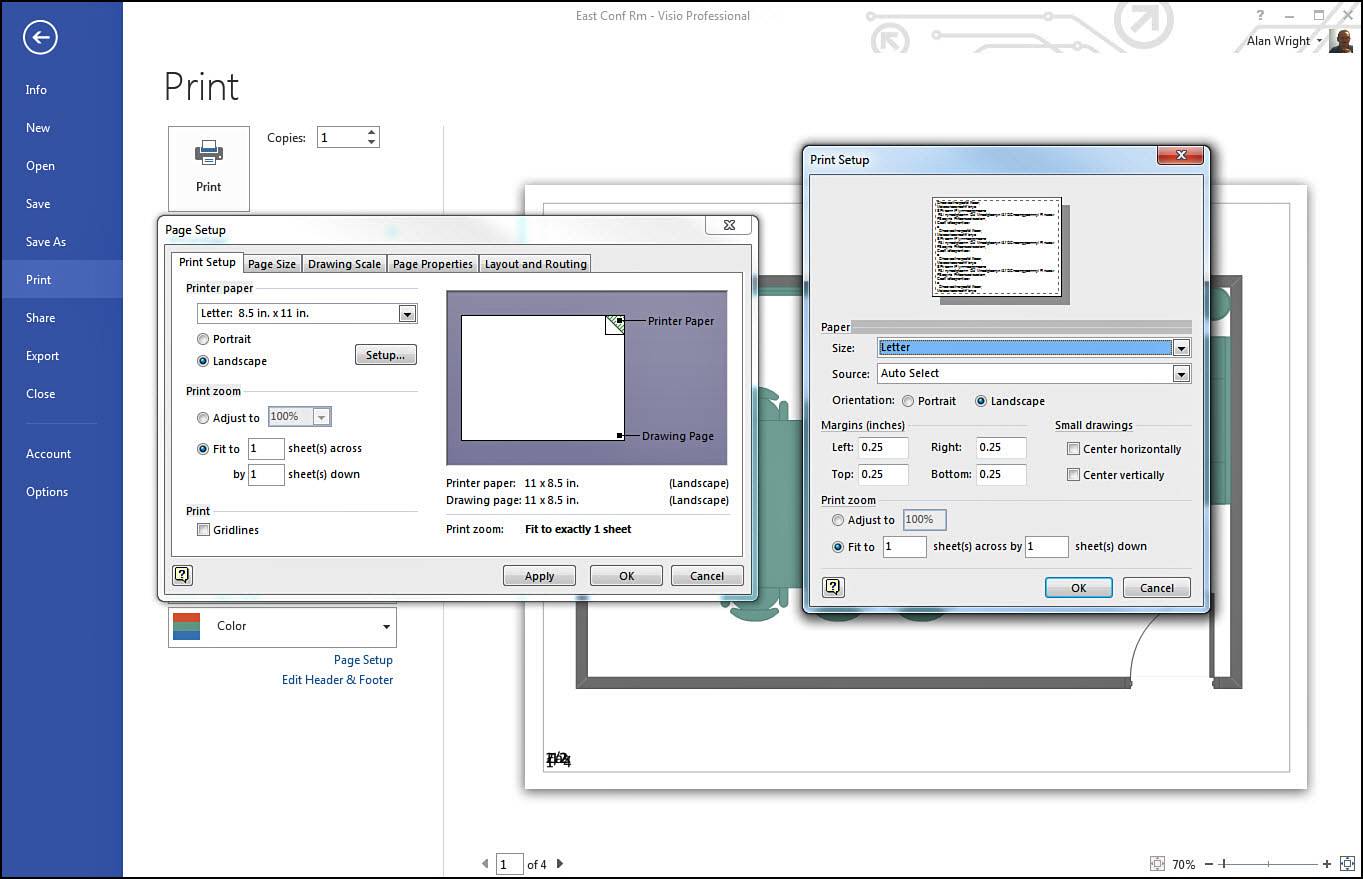
4. Click OK to save changes to Print Setup and click OK again to close the Page Setup dialog box.
Selecting What You Will Print
Choosing what you print is easier than you might think. In other applications, such as Word, there is a tendency to print an entire document. When working with Visio it is common to limit your print job to particular pages or even parts of pages, especially with larger diagrams. Visio 2013 has refined the interface to put the tools right in front of you that allow you to make basic selections.
Note
This chapter refers often to the Print Settings pane, which can be opened using the File tab and then selecting Print from the left vertical menu. Alternatively, you can press CTRL+P on the keyboard.
Look closely at the Print Settings pane and at the section labeled Settings. Settings presents you with a group of drop-down boxes to configure the print job. Print All Pages is set by default. (Isn’t it great how it sums it up with “The whole thing”?) Notice the other choices offered for the document in the drop-down in Figure 11.13.
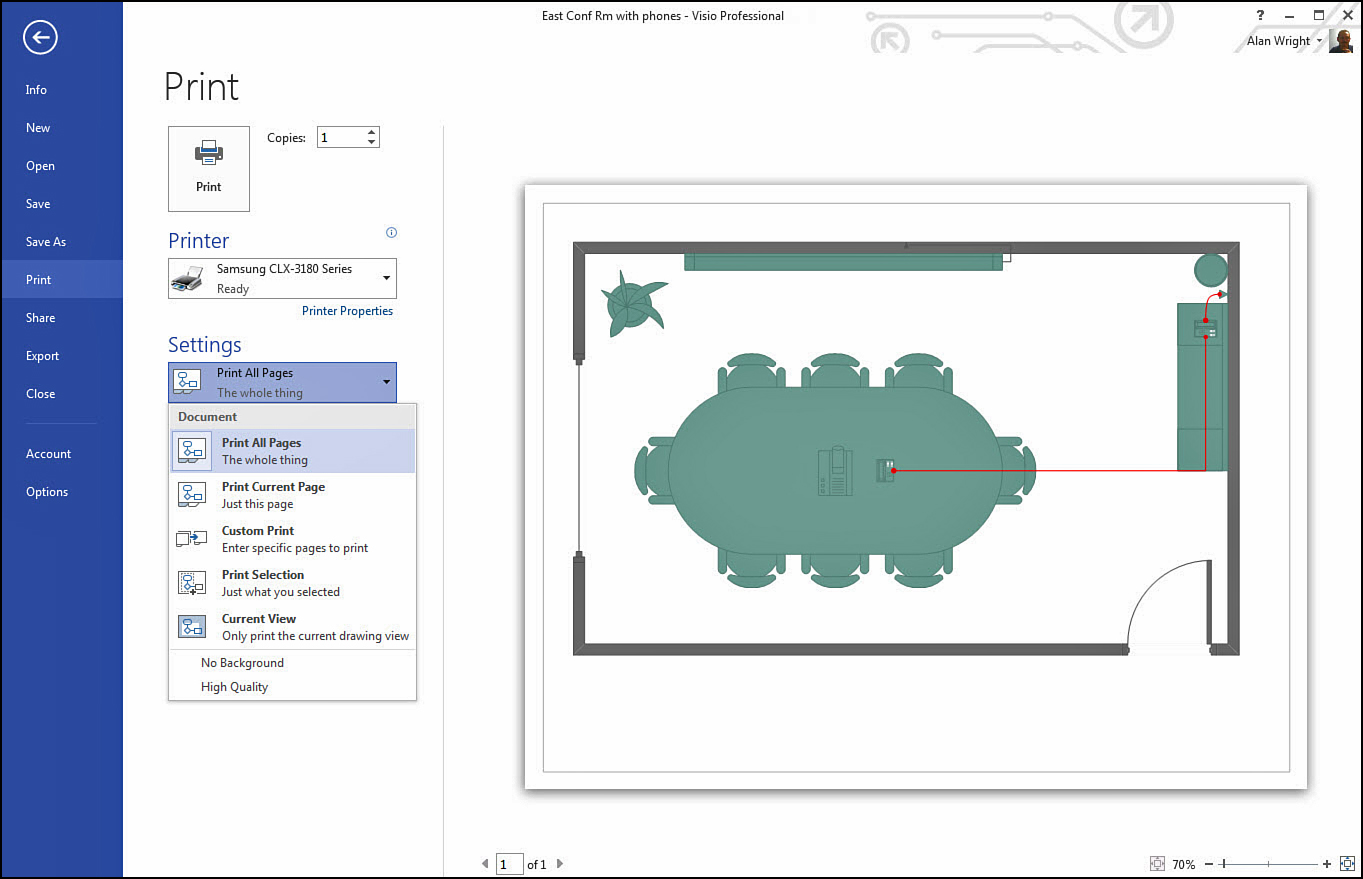
Remember that the default is Print All Pages, which prints all pages in your Visio file. The other options allow you to be more selective.
Printing Just a Portion of a Diagram
When working with large plans or complex flowcharts, you may be interested in printing only a small section for a meeting or for review. The following section shows how easily this can be done.
Using Current View
Current View does not refer to the view in the Print Preview pane, but rather to the view you establish in the drawing window.
1. In the drawing window, zoom into a drawing and pan until you see the area you would like to print.
2. Press Ctrl+P to jump to the Print menu. In the Print Settings pane under Settings, click Print All Pages to view other options.
3. Select Current View (see Figure 11.14). Notice the Preview pane adjusts to show the area that was visible in the drawing window.
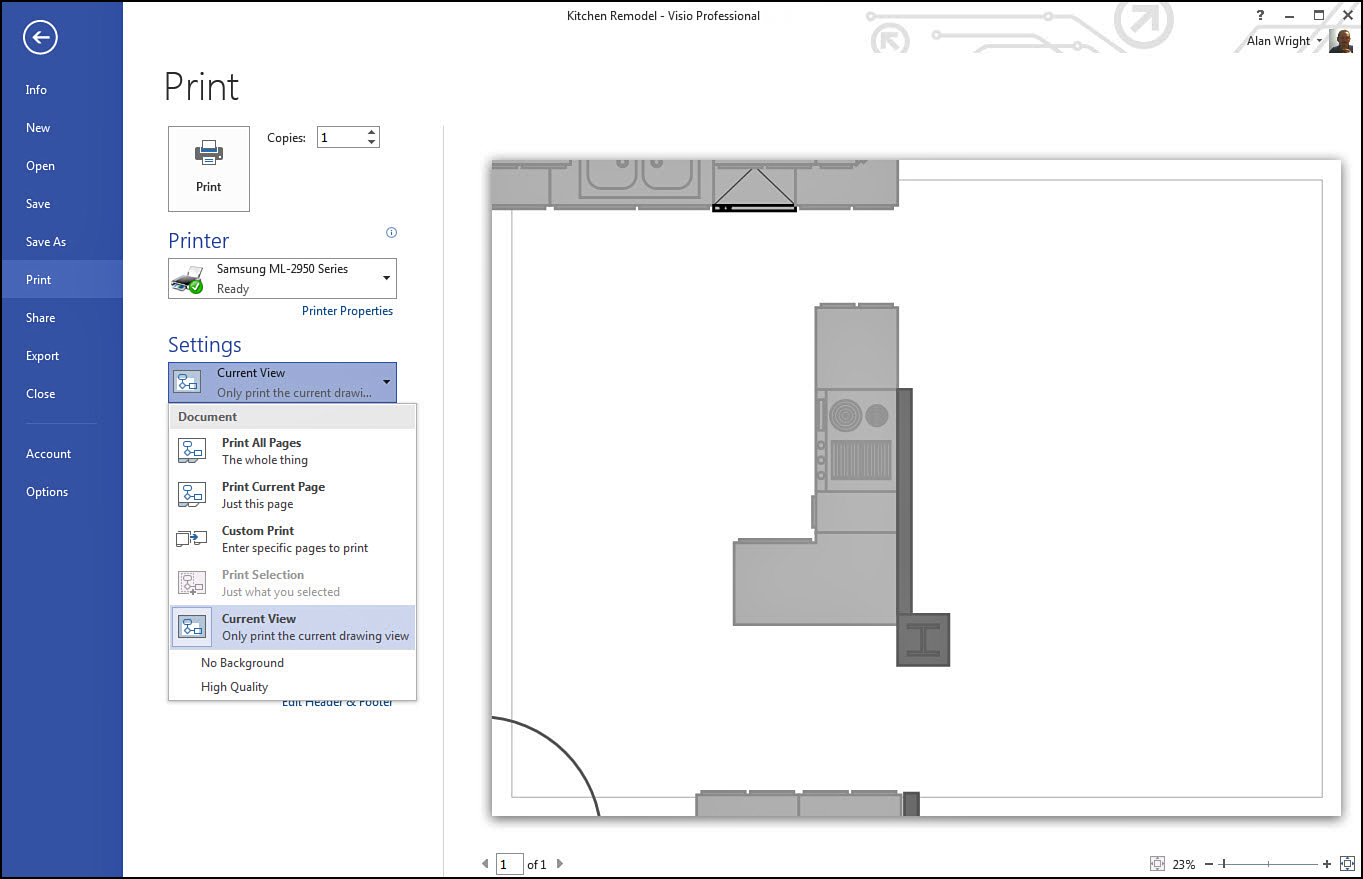
4. Click Print, and you’re done.
The print job is what is displayed in the Print Preview pane. There might be a slight difference between the Preview pane and the drawing window as Visio fills the paper; it may include more vertical or horizontal real estate.
Selecting Specific Pages in Visio
You can choose the specific pages to print in a couple ways. You can use the Print Preview pane to display a page and then select Print Current Page to print only the page displayed in the Print Preview pane.
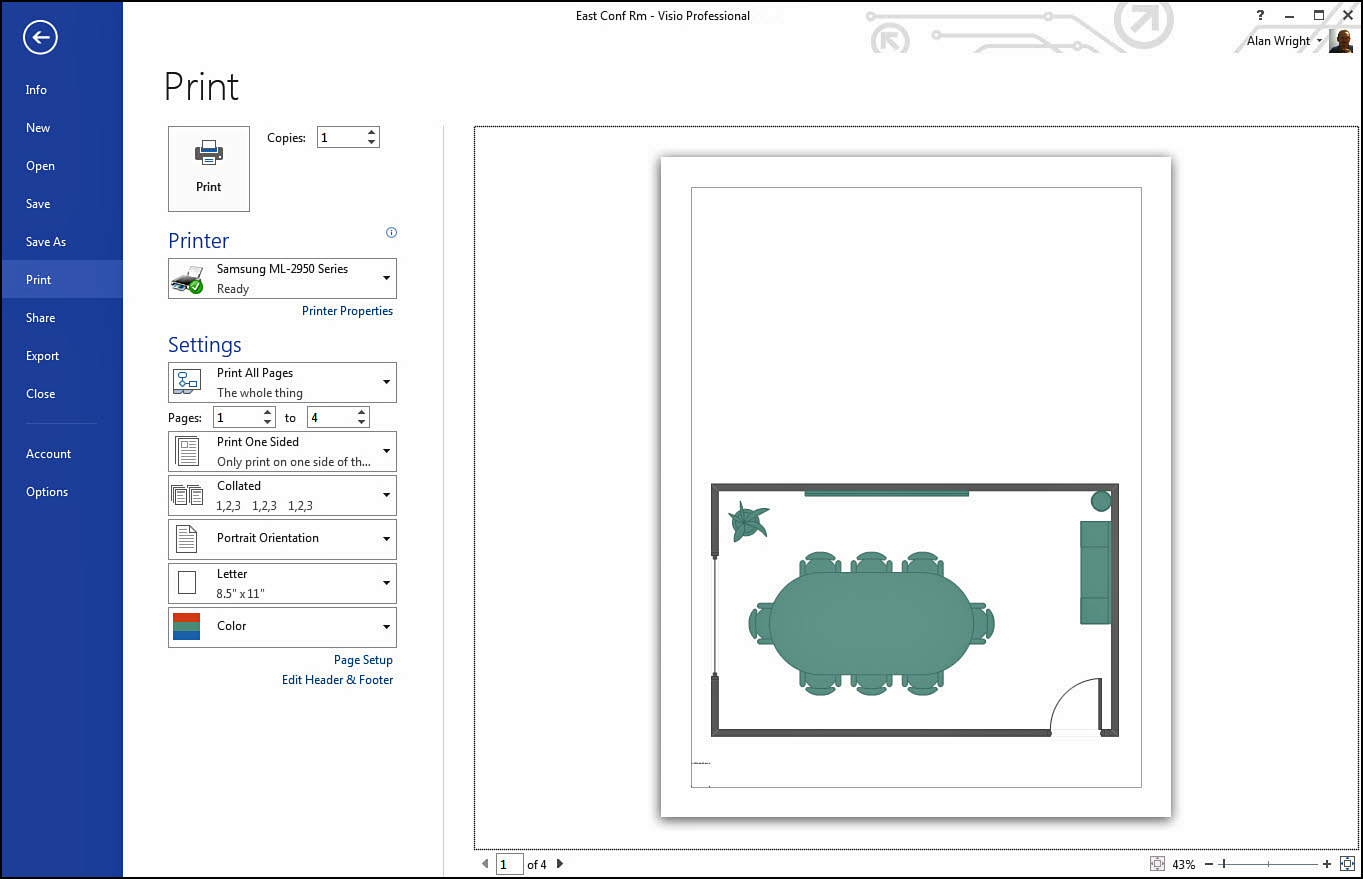
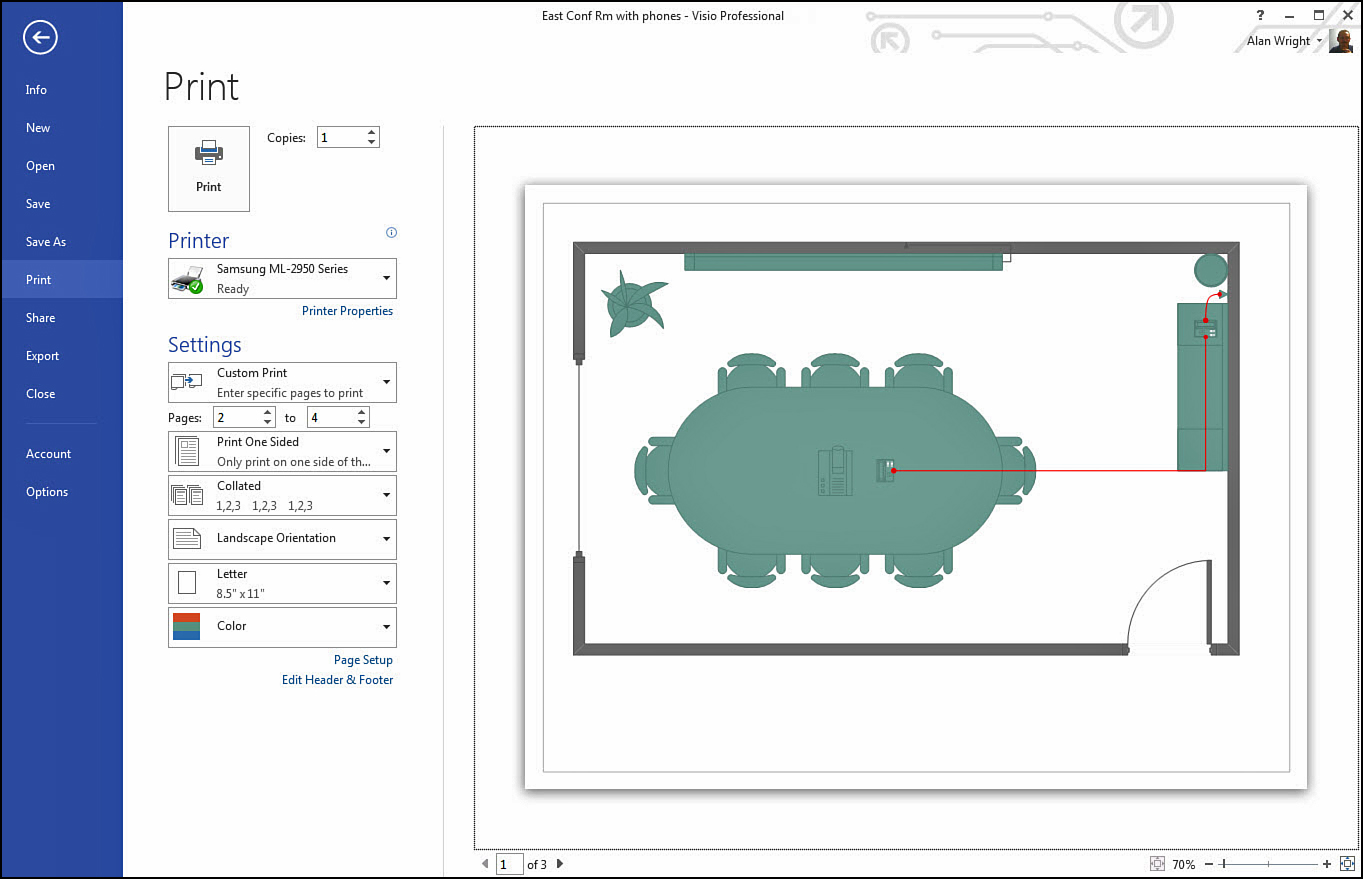
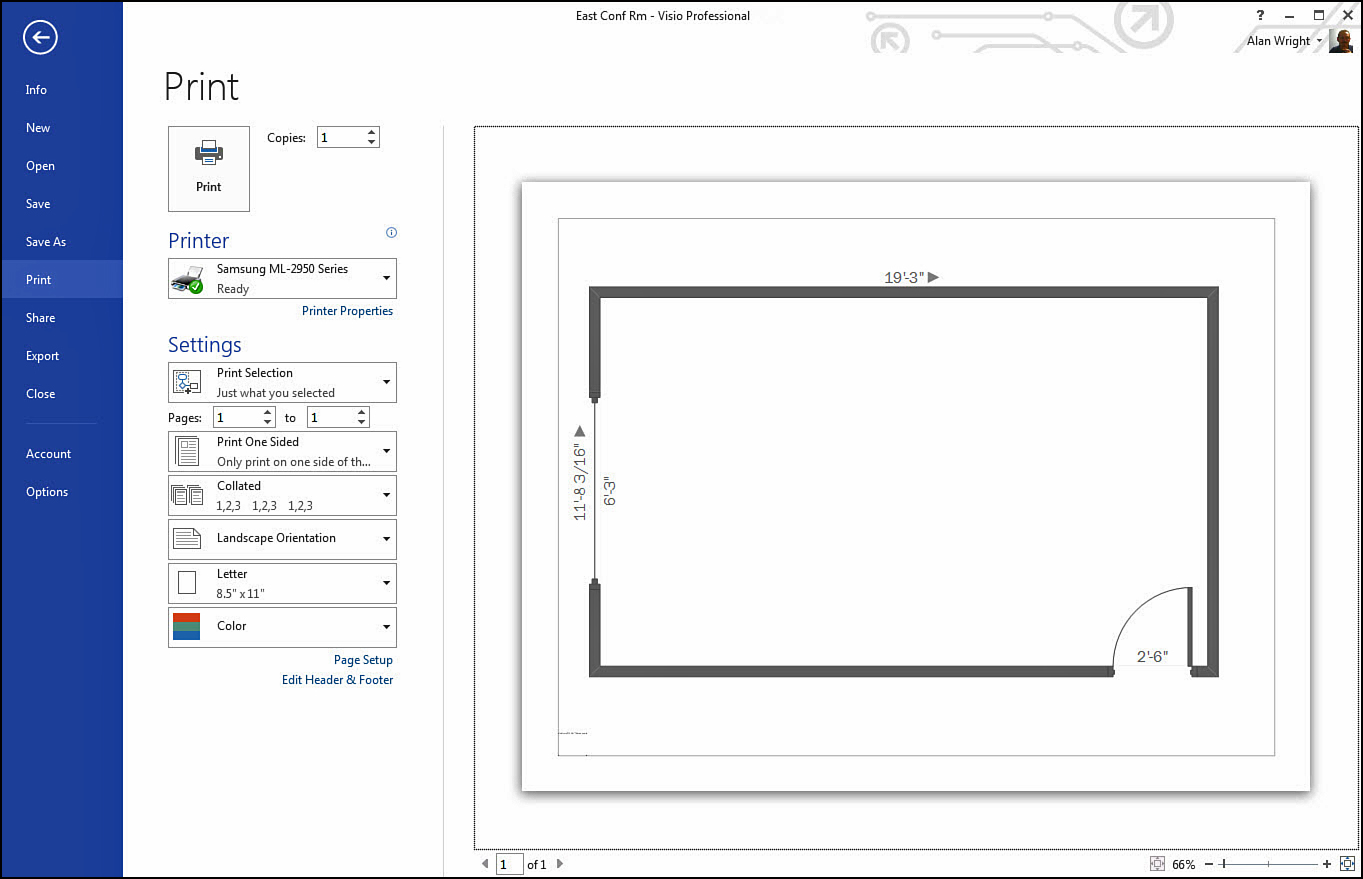
One of the options shown in Figure 11.14, Custom Print, focuses the print job on a range of pages. You can alter the page number fields labeled Pages, and To and Custom Print are automatically selected.
Look at Figure 11.15. Under Settings, you see Pages: 2 to 4. In this document, which could have dozens of pages, you are focused on printing only pages 2 through 4. Notice the Print Preview pane shows 1 of 3 pages that you can scroll through. When you press Print, only those three pages are printed.
Background Page Printing (or Not)
Background pages are special pages to which you can add graphics and visual text. If you decide you do not want the background content on the printed page, you can quickly strip this from the print job. In Figure 11.16 you see the effects of a background page with the title and page number. In the Document settings notice the words No Background toward the bottom of the list. Select this to remove the effects of all background pages in the drawing. The results are shown in Figure 11.17. Notice that No Background is checked, showing that the feature is enabled. Select it again to disable.
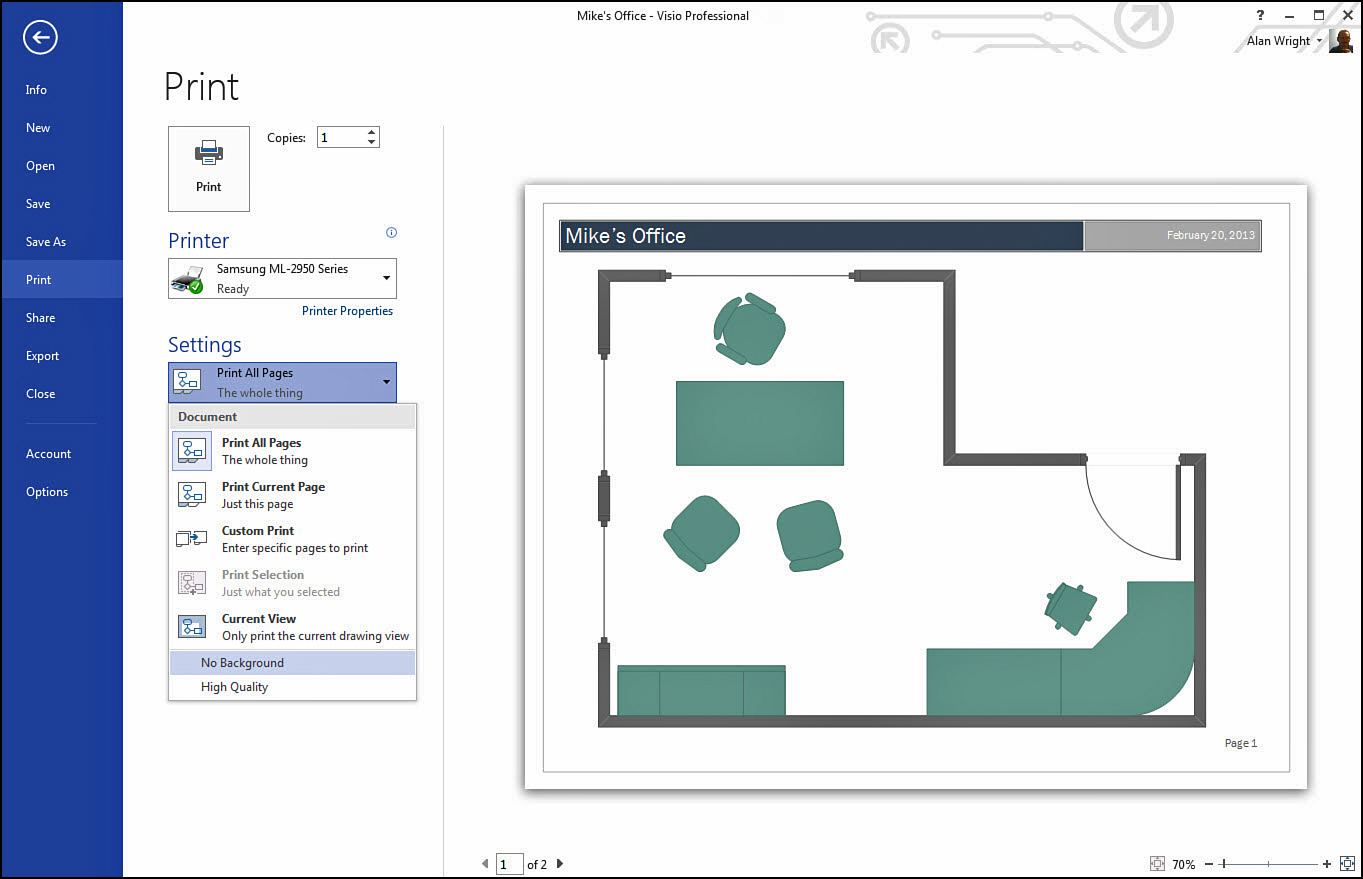
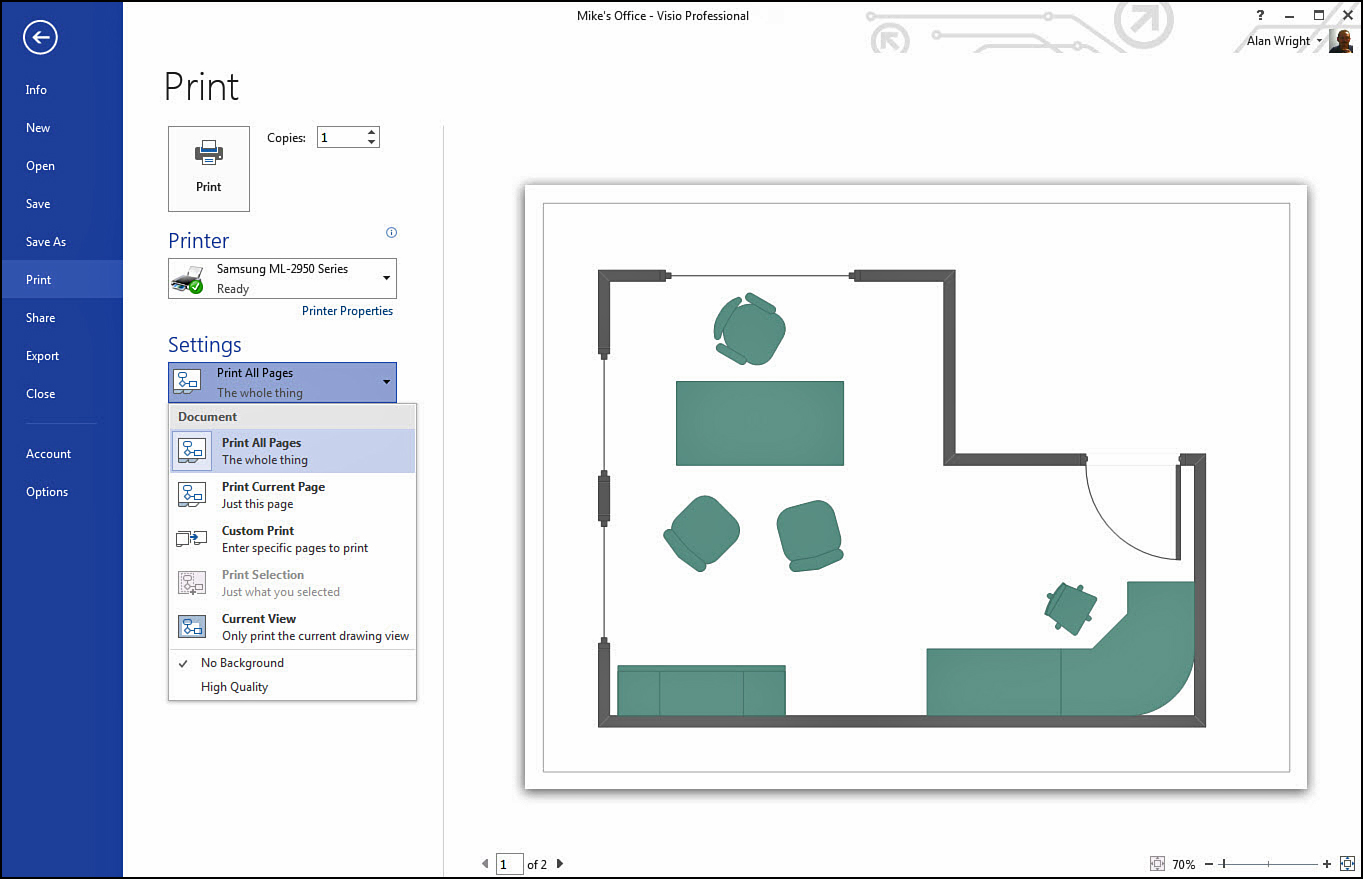
FIGURE 11.17 No Background can be turned on or off, and the results are immediately displayed in the Print Preview pane.
If you decide that you want to print a background page, make sure you have assigned this background to a foreground page first. When this page is printed it will include the background page content by default unless you have unchecked this option.
Note
Removing the background pages from the Print Setting pane affects only the print job and does not alter the pages in the drawing window. You may want to simplify for review or conserve ink or toner.
→ To learn more about background pages, see page 64.
Notice High Quality is also listed here. This feature is explained toward the end of the chapter.
Selecting Shapes to Print
Another way to limit the items being printed is to manually select items first in the drawing window and choose Print Selection from the Print settings pane. The drawing shown in the print preview pane in Figure 11.18 is the same drawing shown back in Figure 11.1. The difference is that the walls, window, and the door have been selected by holding down Ctrl and clicking each item. The document is set to Print Selection in the Settings pane, which correctly adjusts the preview window to show you what will be printed.
You can also click and drag the pointer over an area and select a group of shapes and connectors if that is faster or easier.
Printing by Layer
Layers are discussed in Chapter 8. One of the benefits of working with layers is the capability to choose which layers print.
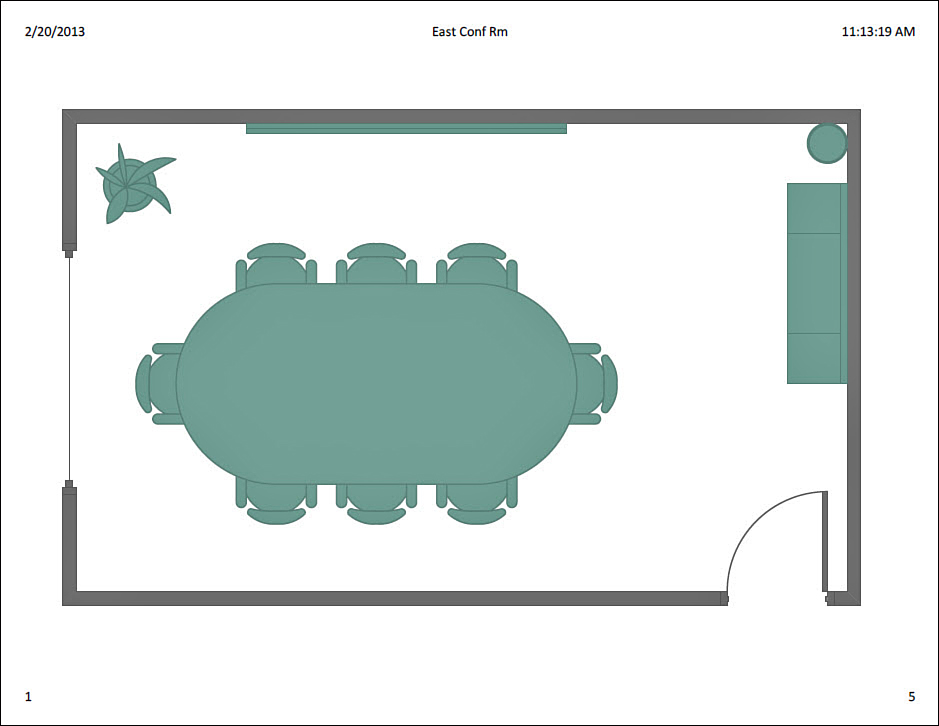
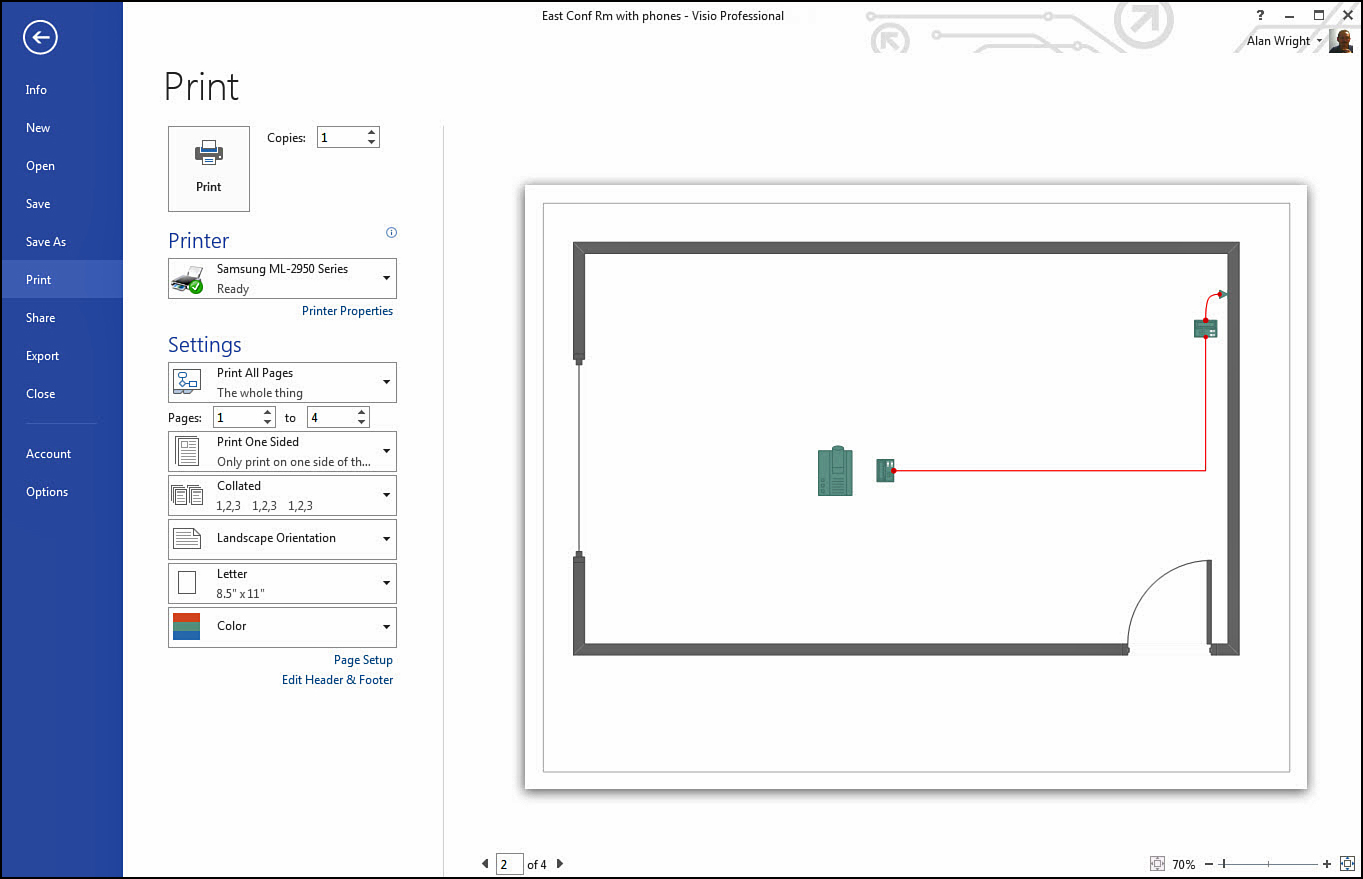
Notice how easy it is to select what is printed by using predefined layers. Figure 11.19 shows plans for a conference room upgrade with furniture and some communications equipment installed. You can print this image without all the furniture so that you can focus on the equipment that needs to be installed in this room.
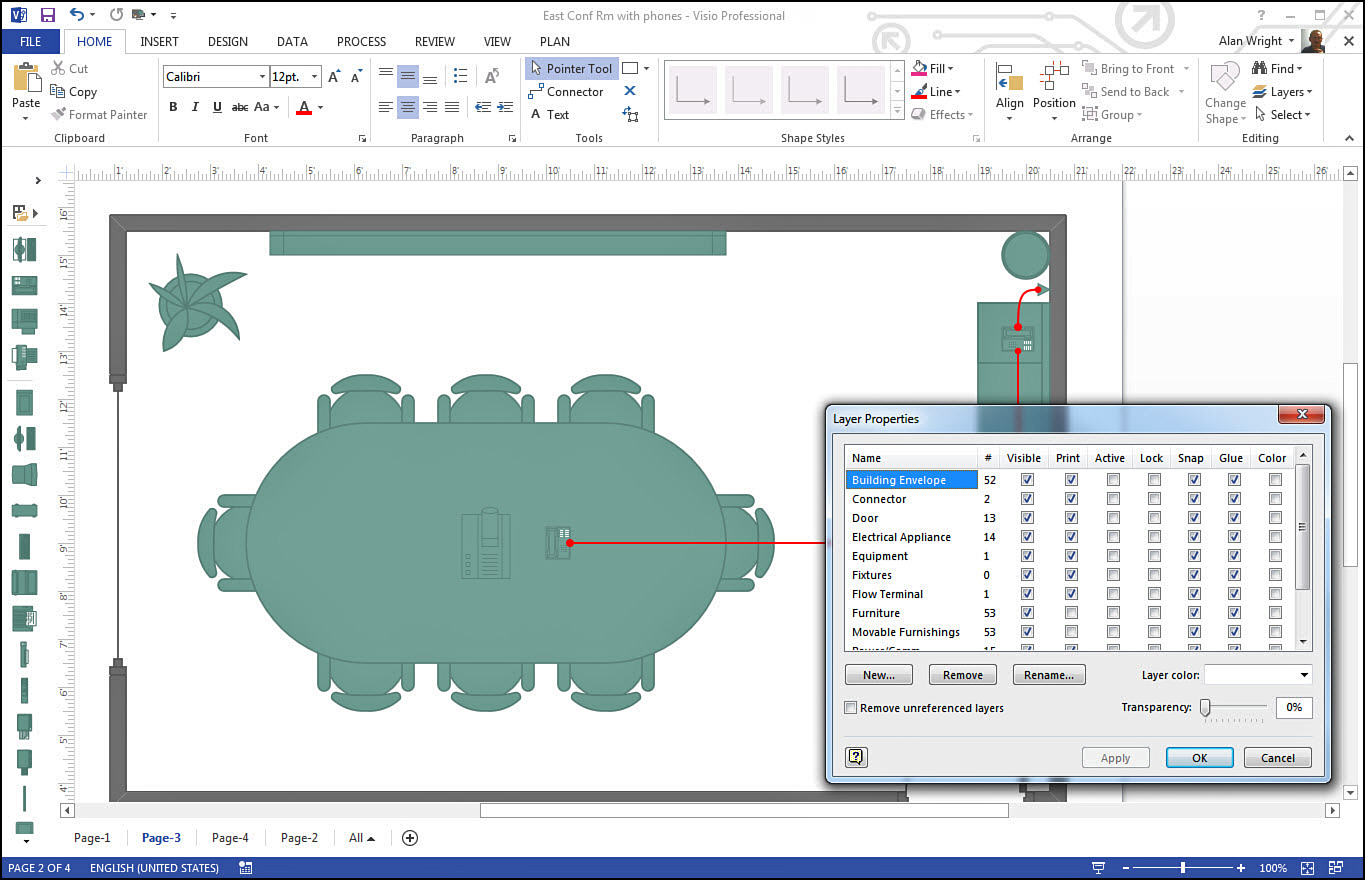
From the Home tab, click Layers and then Layer Properties to open the Layer Properties dialog box. The Furniture and Movable Furnishings are unchecked in the Print column. The results of this change can be seen immediately in the Print Preview pane shown in Figure 11.20.
Many layers are created automatically when you place shapes and connectors on your drawings, and it may be very simple to make selections like this one. Visio also allows you to create new layers as needed and assign content according to your criteria. In any case, printing or not printing a layer is a simple choice you can make.
→ To learn more about creating and using layers, see page 163.
Gridlines
Gridlines are sometimes desirable features in a printed diagram. They provide guidelines and a sense of scale. Modifications can be easily noted and scaled.
To print gridlines, select the Page Setup link from the main Print Settings pane. Figure 11.12 shows both the Page Setup link and the Page Setup dialog box that this opens. Select Gridlines at the bottom of the Print Setup tab to enable this feature in the printed copy.
Get High-Quality Print Jobs
When you want to ensure that your print quality is maximized, one quick setting to check is the High Quality setting. Located in the Print Settings pane, this setting is included at the bottom of the Document drop-down list that is labeled Print All Pages by default. Notice the location in Figure 11.21 in the Drawing2 settings.
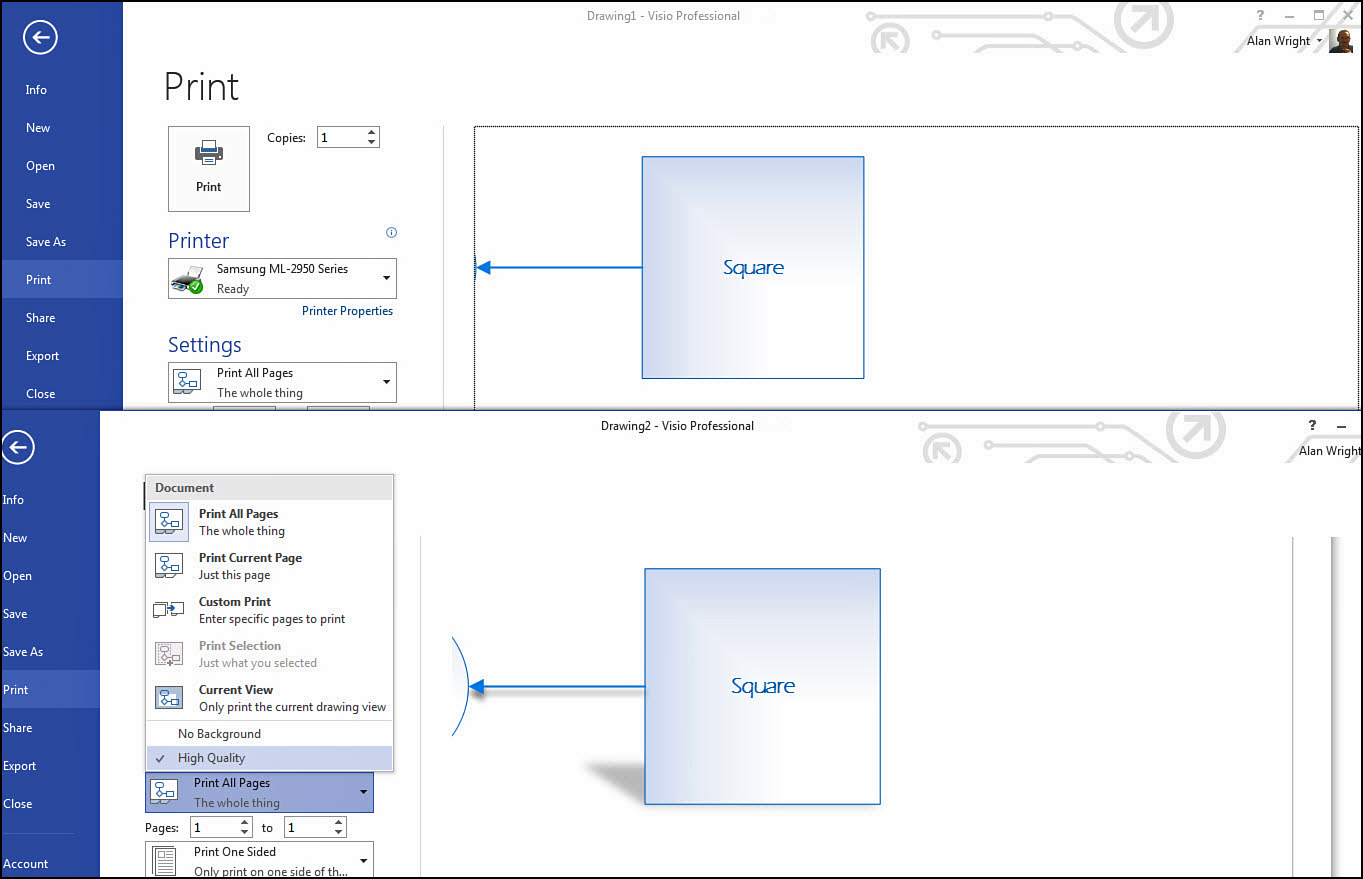
High Quality is a setting that changes the print output from the default optimized draft mode to a high-quality mode. You may not often see any difference, because the draft mode provides very sharp print quality. So what is the difference?
When Visio (and other Office products) prints a document, it does not include some visual effects that are seen in the drawing window unless you ask it to. Shadows are a good example. To print this effect takes extra time and slows down the printer. Visio removes these effects to improve speed. In Figure 11.21 you can see two Visio windows overlapped with the same content. Drawing2 in the lower window has High Quality enabled, and you can see that a shadow effect for the shape and connector is visible in the Print Preview window. This effect was removed in the Drawing1 document by default.
Other settings you can check using Printer Properties are unique to your printer. Make sure that you are using the equivalent of best or high in your printer’s settings rather than draft or normal if the quality is not as good as desired. Also, some known techniques work well when you’re dealing with certain quality issues. You will see a reference to this in Chapter 16, “Additional Visio Resources”.
 Caution
Printer settings for quality and color should be weighed against the use of the printed media. Does it justify high-quality, full-color for handouts used in a status meeting? Not likely. However, the brochures that are printed for advertising would be another issue. Be aware of the default output and adjust it if warranted. The settings are right there and no one begrudges you for being green when you can be.
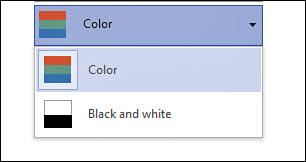
Color Printing
Last but not least is the capability to change your color settings quickly. In the Print Settings pane you find a button that allows you to choose quickly between the default Color or black and white (see Figure 11.22). This is a nice feature when printing handouts and for print jobs that do not need color, and it helps show you are eco-conscious and doing your part to keep operating costs down.