
Chapter 14. Special Programming Techniques
Introduction
The “A” in BASIC—the predecessor of Visual Basic—stands for “all-purpose.” As an heir of that original programming language, Visual Basic has maintained the standard of being an all-purpose language, a language that is generic enough to handle a vast set of different programming needs. That has never been truer than with Visual Basic 2005.
The recipes included in this chapter cover a wide range of topics, from basic application management to credit card verification. The key is that you can do all these varied tasks quite easily in Visual Basic.
14.1. Preventing Multiple Instances of a Running Application
Problem
You don’t want the active user to run more than one copy of an application at any one time.
Solution
Sample code folder: Chapter 14SingleInstanceOnly
Capture attempts to start up secondary instances of an application through an application-wide event handler. This event handler, new to Visual Basic 2005 and available only to Windows Forms applications using the Application Framework, triggers in the primary instance whenever the user tries to start a secondary instance.
Discussion
Create a new Windows Forms application in Visual Studio. The Application Framework is enabled by default; you can confirm this by checking the “Enable application framework” field on the Application tab of the Project Properties window, shown in Figure 14-1.
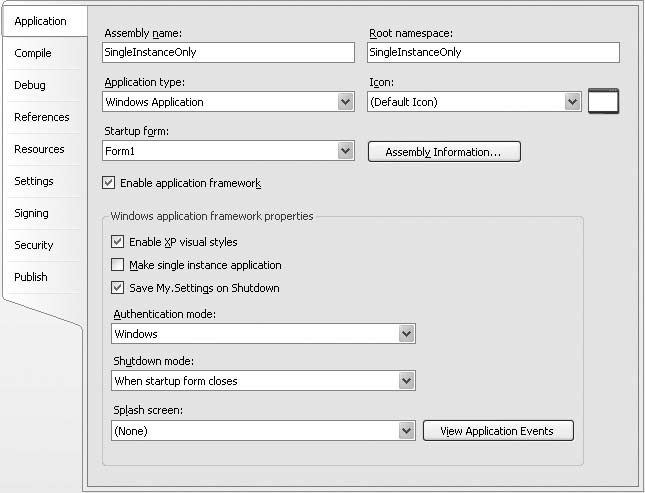
Even with the Application Framework enabled, by default the application allows multiple instances to start at once. To prevent this, select the “Make single instance application” field on this same Project Properties panel (Figure 14-1 still shows it as unchecked).
The event to handle is typically called MyApplication_StartupNextInstance, and it
appears by default in the project’s
ApplicationEvents.vb file. Since you already have
the Application panel of the Project Properties window open, you can
access this file quickly by clicking on the View Application Events
button. The source code appears, with the start of a partial My.MyApplication class:
	Namespace My
	   Partial Friend Class MyApplication

	   End Class
	End Namespace
To add the event handler, select “(MyApplication Events)” from
the Class Name drop-down list, which appears just above and to the
left of the source code editor window. Then select
“StartupNextInstance” from the Method Name drop-down list that is
above and to the right of the code editor. The template for the event
handler appears in the MyApplication class:
	Private Sub MyApplication_StartupNextInstance( _
	      ByVal sender As Object, ByVal e As _
	      Microsoft.VisualBasic.ApplicationServices. _
	      StartupNextInstanceEventArgs) _
	      Handles Me.StartupNextInstance

	End Sub
To complete the program, add the following code to this template:
	MsgBox("You cannot start a second instance " & _
	   "of this program.", _
	   MsgBoxStyle.OkOnly Or MsgBoxStyle.Exclamation)
	e.BringToForeground = True
Even if you limit your application to a single instance, it may be important to capture any command-line arguments supplied with the secondary instance. For example, Microsoft Word works like a single-instance application. It allows you to start up the application, supplying a document to edit as a command-line argument. If you run this command in Microsoft Word:
winword.exe C:Chapter14.doc
the Chapter14.doc file appears as a new document, but running in the context of the already active single allowable instance of Microsoft Word.
In Visual Basic, you can access command-line arguments through
the Command() function or through the My.Application.CommandLineArgs collection.
However, these methods are valid only for the primary instance. If you
examine Command() in the MyApplication_StartupNextInstance event
handler, you will only see the arguments for the initial
instance.
Fortunately, the e argument
of the MyApplication_StartupNextInstance handler
includes a CommandLine property,
which communicates the command-line arguments for the subsequent
instance as a String. Use this
property as you would the return value of the standard Command() function. Once the event handler
ends, you won’t have access to the second instance’s command line, so
make sure you examine or save it, if needed, while in the
handler.
14.2. Creating a Simple User Control
Problem
You would like to create your own Windows Forms control by building it up from other existing controls.
Solution
Sample code folder: Chapter 14UserControl
Create a user control, a custom user-interface control built from a drawing surface in which any other existing controls can appear.
Discussion
Visual Basic allows you to build two types of controls: user controls and custom controls. User controls act somewhat like borderless forms on which you can “draw” other existing controls. Custom controls provide no default user interface; you must manage all custom control drawing yourself through source code. This recipe will focus on the user control, designing a simple control that displays the current time.
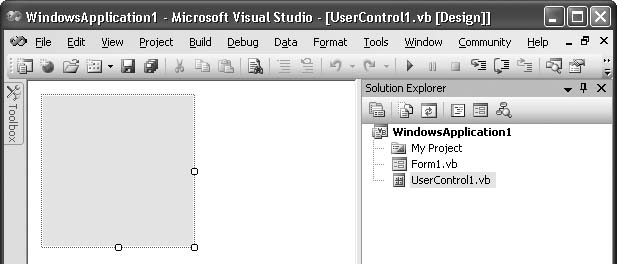
Create a new Windows Forms application. For now, we’ll just
ignore the Form1 form included in
the project. To add a new user control to the project, select the
Project → Add User Control menu command. Accept the default
UserControl1.vb name, and then click the Add
button on the Add New Item form. A blank user control appears, as
shown in Figure
14-2.
Our simple user control will include two constituent controls: a
label to display the time, and a timer that will trigger once a second
to update the time. First, resize the user control down to a reasonable size. We used a
Size property of 96, 24. Add a Label control named Label1, and set the following
properties:
Set
AutoSizetoFalse.Set
Locationto0, 0.Set
Sizeto96, 24.Set
Textto12:00am.Set
TextAligntoMiddleCenter.
Add a Timer control named
Timer1, and set the following
properties:
Set
EnabledtoTrue.Set
Intervalto1000, which sets it to trigger once every second.
Switch to the source code for the user control through the View → Code menu command, and add the following source code:
	Public Class UserControl1
	   Public Event TimeChanged(ByVal sender As UserControl1, _
	      ByVal e As System.EventArgs)

	   Private Sub Timer1_Tick(ByVal sender As System.Object, _
	         ByVal e As System.EventArgs) Handles Timer1.Tick
	      ' ----- Update every second.
	      Dim newTime As String

	      If (Me.DesignMode = False) Then
	         newTime = Format(Now, "h:mmtt").ToLower( )
	         If (newTime <> Label1.Text) Then
	            Label1.Text = newTime
	            RaiseEvent TimeChanged(Me, New System.EventArgs)
	         End If
	      End If
	   End Sub

	   Private Sub UserControl1_Load(ByVal sender As Object, _
	         ByVal e As System.EventArgs) Handles Me.Load
	      ' ----- Always reset the time when first started.
	      If (Me.DesignMode = False) Then
	         Label1.Text = Format(Now, "h:mmtt").ToLower( )
	         RaiseEvent TimeChanged(Me, New System.EventArgs)
	      End If
	   End Sub
	End Class
That’s the whole control. It’s just about ready to add to the
Form1 surface, but you first have
to build the project to allow Visual Studio to create an instance of
the control. Build it using the Build → Build WindowsApplication1 menu
command.
Switch over to the Form Designer for Form1. If you open the Toolbox, you will see
the user control UserControl1 in
the magically added WindowsApplication1 Components section, as shown
in Figure 14-3. (The
section name will vary if you gave your project a different
name.)

Double-click the user control in the Toolbox to add it to the form surface. It should display the “12:00am” message we added to the control’s label. However, if you run the application, the running form will display the correct time.
Our user control included a public event named TimeChanged:
	Public Event TimeChanged(ByVal sender As UserControl1, _
	   ByVal e As System.EventArgs)
You can respond to this event from Form1. Open the source code for Form1, and add the following event
handler:
	Private Sub UserControl11_TimeChanged( _
	      ByVal sender As UserControl1, _
	      ByVal e As System.EventArgs) _
	      Handles UserControl11.TimeChanged
	   MsgBox("Changed!")
	End Sub
Now, when you run the program, a “Changed!” message appears at
startup (via the code for the user control’s UserControl1_Load event handler), and also
every time the minute changes (via the user control’s Timer1_Tick event handler).
Visual Basic 2005 lets you easily design a new user control
using mixtures of existing controls. You can also draw on the user
control’s surface through its Paint
event handler, but you don’t have to. (If you wish to update the
surface via Paint, and not through
subordinate controls, use a custom control instead of a user
control.)
All child controls added to the surface of the user control are
“owned” by the user control, not by (in this example) Form1. This means that your control can
monitor any normal control events for its child controls, but the form
using your user control will not know about those events. In this
recipe, the user control exposes a Click event that Form1 can monitor. An event fires any time
the user clicks on the user control surface. However, because we
covered the surface with a label, clicks will never reach the
user control surface, and the form will never be
informed of such click events. If you want clicks on the label to
transfer to the user control, you must manage that yourself. Adding
this code to the user control’s source code will do the trick:
	Public Shadows Event Click(ByVal sender As Object, _
	   ByVal e As System.EventArgs)

	Private Sub Label1_Click(ByVal sender As Object, _
	      ByVal e As System.EventArgs) Handles Label1.Click
	   RaiseEvent Click(Me, e)
	End Sub

	Private Sub UserControl1_Click(ByVal sender As Object, _
	      ByVal e As System.EventArgs) Handles MyBase.Click
	   RaiseEvent Click(Me, e)
	End Sub
Because the UserControl class
(from which our UserControl1 class
derives) already exposes a Click
event, you have to cover it up by declaring a new Click event. The Shadows keyword covers up the event in the
base. Now add Click event handlers
to capture clicks on both the Label
and UserControl surfaces, and pass
them on to those who add UserControl1 to their forms. Look carefully
at the UserControl1_Click event
handler just above. Make sure that it handles MyBase.Click, and not Me.Click. If you use Me.Click, a click on the control surface
will repeatedly call itself until you run out of stack space.
After adding this code, resize the label a little smaller so
that the user can click on the user control surface. Return to the
source code for Form1, and add this
code to its class template:
	Private Sub UserControl11_Click(ByVal sender As Object, _
	      ByVal e As System.EventArgs) Handles UserControl11.Click
	   MsgBox("Clicked!")
	End Sub
Now run the program. You will see the “Clicked!” message whether you click on the label or the user control surface.
If you are building a user control for use elsewhere in the same
project, any child controls you include on the surface of your user
control will, by default, be accessible to the entire application. For
instance, in this recipe’s code, you can access the caption for the
user control’s label from the code for Form1. Go back to that UserControl11_TimeChanged event handler you
added to Form1. On a new line, type
the following:
UserControl1.L
As you type the letter L, you
will see Label1 appear in the
IntelliSense pop up. If you don’t want this to happen, return to the
user control designer, select Label1, and change its Modifers property to Private instead of Friend.
14.3. Describing User Control Properties
Problem
You’ve added an extra property to your user control, and although it appears in the Properties panel when the control is added to a form, no description appears for that property.
Solution
Sample code folder: Chapter 14UserControlProperties
Add a < DescriptionAttribute> attribute to the
property, and use it to supply any descriptive text you want as
metadata attached to the property.
Discussion
Create a new Windows Forms project, and add a new user control
to the project through the Project → Add User Control menu command.
(See Recipe 14.2 for
details on designing new user controls.) Name the new control
SimpleControl.vb. For this sample, it’s not
necessary to add any child controls, but you should change the user
control’s BackColor property to
ButtonShadow, just so you will
recognize the control when it’s added to Form1 later.
Access the source code for the user control and add the following code to the class:
	Private hiddenData As String

	Public Property ExtraData( ) As String
	   Get
	      Return hiddenData
	   End Get
	   Set(ByVal value As String)
	      hiddenData = value
	   End Set
	End Property
This code adds a simple property, ExtraData, to the control, storing the
actual value in the private hiddenData member. The control is complete;
build it using the Build → Build WindowsApplication1 menu
command.
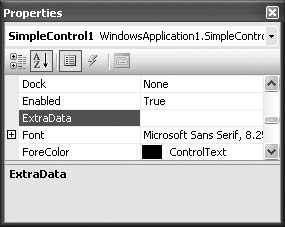
Return to the form designer for Form1. Locate the new SimpleControl control in the Toolbox and add
it to the form. If you look in the Properties panel, you will see the
ExtraData property, but it won’t
have any description (see Figure 14-4).
To add the description, return to the source code for the user control. Add the following line to the top of the SimpleControl.vb source-code file:
Imports System.ComponentModel
Just before the Public Property
ExtraData line in the SimpleControl class, add this new code
line:
	<DescriptionAttribute( _
	   "Extra details related to this control.")> _
so that the start of the property looks like this:
	<DescriptionAttribute( _
	   "Extra details related to this control.")> _
	Public Property ExtraData( ) As String
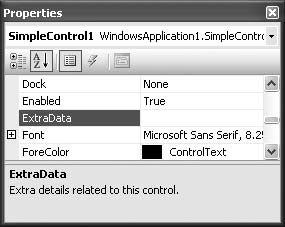
Rebuild the project, return to Form1, and select the user control you added
to the form earlier. When selected, the ExtraData property should now include a
description, as shown in Figure 14-5.
The System.ComponentModel
namespace exposes several attributes that, when used, enhance the
elements included in the Properties panel. One of these attributes,
<DescriptionAttribute>,
identifies the text that appears in the description portion of the
Properties panel when the matching property is selected. This
attribute is stored as metadata attached to the SimpleControl.ExtraData property, and it is
referenced by the control that implements the Properties panel.
See Also
Recipe 14.2 discusses the implementation of user controls.
14.4. Starting Other Applications by EXE, Document, or URL
Problem
You need to start up a separate application, based on either the path to the executable program file, a document with a registered file extension, or a valid URL for a web page or other resource.
Solution
Use the System.Diagnostics.Process.Start() method to
initiate applications external to your own application.
Discussion
The Start() method returns an
object of type System.Diagnostics.Process that encapsulates
the newly started application. Process.Start() works with three types of
targets:
If you know the path to the executable (EXE) file, you can specify it using the first argument to
Process.Start( ). If you don’t supply a full path, Windows will search through the path defined for the current user for the program. Any additional command-line arguments appear in the second argument:' ----- Start up a new Notepad window. Process.Start("C:WindowsNotepad.exe") ' ----- Excluding the path and extension works. Process.Start("Notepad") ' ----- Open a specific file through Notepad. Process.Start("Notepad.exe", "C:DataFile.txt")You can start an application associated with a registered file extension by specifying a file with that extension as the argument:
	' ----- Open Notepad with a specific file.
	Process.Start("C:DataFile.txt")
The file must already exist and must have a valid registered file extension, or an exception will occur.
You can specify any URL, including a web page or email address (in a mailto:// URL). Any of the accepted URL prefixes, such as
http://,
            mailto://
, orfile://, can be included in the URL:' ----- Open a specific web page in the default browser. Process.Start("http://www.microsoft.com")
The arguments passed to Process.Start() are similar to those you
would enter in the Windows Start → Run menu command prompt, or in the
Windows Command Prompt using the Start command.
The Process object returned
by Process.Start() includes several
properties and methods that let you monitor and control (somewhat) the
new process. To force the new process to exit, use the Process object’s
Kill() method.
Visual Basic also includes another command from its pre-.NET
days that starts up external applications. The Shell() function accepts two arguments: the
command and the window style. The command is the executable filename
of the program to run, with any command-line arguments included. The
second argument uses the members of the Microsoft.VisualBasic.AppWinStyle
enumeration to indicate whether the new program’s main window should
start as maximized, minimized, or normal, and whether it should
immediately receive the input focus. Here are the choices:
AppWinStyle.HideAppWinStyle.MaximizedFocusAppWinStyle.MinimizedFocusAppWinStyle.MinimizedNoFocusAppWinStyle.NormalFocusAppWinStyle.NormalNoFocus
For example, to start up Notepad with a specific file open, use this command:
	Shell("Notepad.exe C:DataFile.txt", _
	   AppWinStyle.NormalFocus)
You can use only executable programs with Shell(). It does not accept URLs or files
with registered extensions.
See Also
Recipe 14.5 shows how to wait for the newly started process to complete before continuing with the main program.
14.5. Waiting for Applications to Finish
Problem
You need to start up a separate application. Once it starts, you need to wait until that program completes. Your application can then continue on with its own processing.
Solution
Use the System.Diagnostics. Process.Start() method to initiate the
program and return an instance of System.Diagnostics.Process. Now call that
object’s WaitForExit()
method.
Recipe 14.4
discusses how to use the Start()
method, so we won’t repeat all that detail here. The following code
starts up Notepad and waits for it to exit before continuing:
	Dim notepadProcess = Process.Start("Notepad.exe")
	notepadProcess.
WaitForExit( )
	MsgBox("Welcome back!")
Discussion
The WaitForExit() method
accepts an optional millisecond count as its only argument. When used,
WaitForExit() waits up to the
number of milliseconds specified and then continues with the program,
even if the external process is still running.
Another Process class method,
WaitForInputIdle(), waits until the external
process has reached a state where it is waiting for user input before
continuing. It also accepts an optional millisecond count.
As discussed in Recipe
14.4, you can also use the Visual Basic Shell() function to start applications. This
function includes two optional arguments (the third and fourth
arguments) that control how long the current program should wait for
the external process. The third argument, wait, accepts a Boolean value that, when set to True, causes the current program to wait
until the external program completes. The fourth argument, timeout, indicates the maximum time, in
milliseconds, that the program should wait for the external program to
complete before continuing. Its default value is -1, which causes Shell() to wait forever.
The following statement starts up Notepad and waits up to 10 seconds for it to complete:
Shell("Notepad.exe", AppWinStyle.NormalFocus, True, 10000)See Also
Recipe 14.4
discusses the Shell() function and
the Process.Start() method.
14.6. List All Running Processes
Problem
You need to display a list of the processes that are currently running on the local workstation.
Solution
Sample code folder: Chapter 14RunningProcesses
Use the System.Diagnostics.Process class to access a
collection of objects representing all currently running processes.
Discussion
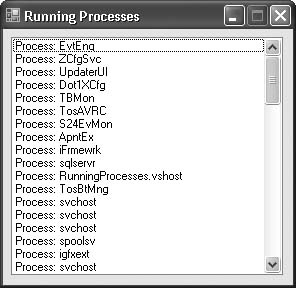
This recipe’s sample code displays any process with a window
title in a listbox. Create a new Windows Forms application, and add a
ListBox control named ListBox1 to Form1. Then add the following event handler
to Form1’s code:
	Private Sub Form1_Load(ByVal sender As Object, _
	      ByVal e As System.EventArgs) Handles Me.Load
	   ' ----- Show all top-level processes.
	   For Each oneProcess As Process In Process.GetProcesses( )
	      If (oneProcess.MainWindowTitle <> "") Then
	         ListBox1.Items.Add("Program: " & _
	            oneProcess.MainWindowTitle)
	      Else
	         ListBox1.Items.Add("Process: " & _
	            oneProcess.ProcessName)
	      End If
	   Next oneProcess
	End Sub
Run the program to display the list of processes. It should
generally match the list of processes and applications you see in the
Windows Task Manager, although the form itself (“Form1”) will probably
not appear, since it wasn’t yet visible when ListBox1 was populated. Figure 14-6 shows the running
program with the listbox populated.
The System.Diagnostics.Process class includes a
shared member named GetProcesses()
that returns a collection of Process objects, each representing a running
process. There are many more processes than just those with window
titles; all running Windows services also appear in this
collection.
The Process object includes
many properties and methods that let you manage each process. However,
your level of authorization as configured by the system administrator
may prevent you from modifying or even viewing process details.
14.7. Terminating a Running Process
Problem
You need to stop a running process immediately.
Solution
Sample code folder: Chapter 14ProcessTerminate
Use the Process object’s
Kill() method to stop the running
process.
Discussion
This recipe’s code creates a simple program that lets you stop
any running application, similar to using the End Task button on the
Windows Task Manager. Create a new Windows Forms application, and add
to the form a ListBox control named
ProcessList and a Button control named KillProcess. Change the Button control’s Text property to Kill, and set the ListBox control’s Sorted property to True. Now open the source code for the form,
and replace the default empty class template with the following
code:
	Public Class Form1
	   Private Sub Form1_Load(ByVal sender As Object, _
	         ByVal e As System.EventArgs) Handles Me.Load
	      ' ----- Display all top-level windows.
	      For Each oneProcess As Process In _

Process.GetProcesses( )
	         If (oneProcess.MainWindowTitle <> "") Then
	            ProcessList.Items.Add(New SmallProcess( _
	               oneProcess.MainWindowTitle, oneProcess.Id))
	         End If
	      Next oneProcess
	   End Sub

	   Private Sub KillProcess_Click( _
	         ByVal sender As System.Object, _
	         ByVal e As System.EventArgs) _
	         Handles KillProcess.Click
	      ' ----- Kill the selected process.
	      Dim oneProcess As Process
	      Dim selectedProcess As SmallProcess

	      On Error Resume Next

	      If (ProcessList.SelectedIndex = -1) Then Exit Sub
	      selectedProcess = CType(ProcessList.SelectedItem, _
	         SmallProcess)

	      ' ----- Confirm with the user.
	      If (MsgBox("Really kill '" & _
	         selectedProcess.ToString( ) & "'?", _
	         MsgBoxStyle.Question Or MsgBoxStyle.YesNo) <> _
	         MsgBoxResult.Yes) Then Exit Sub

	      ' ----- Locate and kill the process.
	      oneProcess = Process.GetProcessById(selectedProcess.ID)
	      oneProcess.Kill( )

	      ' ----- Remove the process from the list.
	      ProcessList.Items.Remove(ProcessList.SelectedItem)
	   End Sub
	End Class

	Public Class SmallProcess
	   ' ----- A small class that makes it easier to
	   '       track processes in the on-screen list.
	   Public WindowTitle As String
	   Public ID As Integer

	   Public Sub New(ByVal processTitle As String, _
	         ByVal processID As Integer)
	      WindowTitle = processTitle
	      ID = processID
	   End Sub

	   Public Overrides Function ToString( ) As String
	      Return WindowTitle
	   End Function
	End Class
To kill a process, run this program, select a process from the list, and click the Kill button. Be careful: it will stop the indicated program.
By providing the Process.Kill() method, .NET endows your
application with a lot of power. However, the system administrator may
establish limits on the user running your program that will prevent access to or modification of
process state.
This recipe’s code includes a secondary class, SmallProcess, that helps keep track of items
in the ListBox control. The
Items collection of a ListBox control can hold any type of object,
but how to display its own text is up to the object. You can store an
entire Process object in the list,
but the output from Process.ToString() is not as user-friendly.
By storing just the parts you need in a separate class instance that
includes its own ToString() method,
you can get the results you need, both in terms of display and of
access to the process IDs.
14.8. Pausing Execution of a Program
Problem
You want to postpone all activities on the current process thread.
Solution
Sample code folder: Chapter 14PauseExecution
Put the thread to sleep using the
System.Threading.Thread.Sleep() method. This
method accepts an amount of time to “sleep,” in milliseconds.
Discussion
Create a new Windows Forms application, and add a Button control named Button1. Now add the following code to the
form’s class template:
	Private Sub Button1_Click(ByVal sender As System.Object, _
	      ByVal e As System.EventArgs) Handles Button1.Click
	   Threading.Thread.Sleep(3000)
	   MsgBox("Good Morning")
	End Sub
When you run the program and click on Button1, the “Good Morning” message appears
after a three-second pause.
If your program includes only a single thread (the default behavior), putting the thread to sleep puts the entire application to sleep.
If you pass zero (0) to the
Sleep() method, the thread pauses
temporarily to allow other busy threads to perform some
processing.
14.9. Control Applications by Simulating Keystrokes
Problem
You need another application to perform some tasks while your application is running, but it doesn’t expose any type of control interface, whether ActiveX or .NET.
Solution
Sample code folder: Chapter 14UsingSendKeys
Use the My.Computer.Keyboard.SendKeys() method to
simulate the user controlling the other application from the
keyboard.
Discussion
The following method uses SendKeys() to control the built-in Windows
Paint program, using it to convert an existing image to black and
white:
	Public Sub MakeBitmapBW(ByVal sourceFile As String, _
	      ByVal destFile As String)
	   ' ----- Use the Paint program built into Windows to
	   '       convert an existing bitmap file from color to
	   '       black and white.
	   Dim paintProcess As Process

	   On Error Resume Next

	   ' ----- Remove the existing output file.
	   Kill(destFile)

	   ' ----- Start Paint using the original file.
	   paintProcess = Process.Start("mspaint.exe", sourceFile)
	   appactivate(paintProcess.Id)

	   ' ----- Wait a bit for the file to open.
	   System.Threading.Thread.Sleep(2000)

	   ' ----- Convert the image to black and white. First,
	   '       display the Attributes form using Control-E.
	   My.Computer.Keyboard.SendKeys("^e", True)
	   System.Threading.Thread.Sleep(500)

	   ' ----- Alt-B sets the "Black and White" field.
	   My.Computer.Keyboard.SendKeys("%b", True)
	   System.Threading.Thread.Sleep(500)

	   ' ----- Use Enter to accept the change. A confirmation
	   '       window will appear. Use Enter for that window
	   '       as well.
	   My.Computer.Keyboard.SendKeys("~", True)
	   System.Threading.Thread.Sleep(500)
	   My.Computer.Keyboard.SendKeys("~", True)
	   System.Threading.Thread.Sleep(500)

	   ' ----- Save the file using the File->Save As… feature.
	   My.Computer.Keyboard.SendKeys("%fa", True)
	   System.Threading.Thread.Sleep(500)

	   ' ----- Add the filename to the Save As window.
	   '       Hopefully, the name has no special characters.
	   My.Computer.Keyboard.SendKeys(destFile, True)
	   My.Computer.Keyboard.SendKeys("~", True)
	   System.Threading.Thread.Sleep(1000)

	   ' ----- Exit the
application.
	   My.Computer.Keyboard.SendKeys("%{F4}", True)
	End Sub
To use this method, pass it the full path to an existing bitmap file and a path to the desired output location.
The SendKeys() method inserts
specific keyboard commands into the global keyboard input stream.
Those commands appear as if the user had actually typed them from the
keyboard. The first argument to SendKeys() is a string containing each
character to be inserted into the input stream. The second argument, a
Boolean, indicates whether SendKeys() should wait until the active
window acknowledges acceptance of the input.
Normally, each character you include in the character string is
sent to the active window, one by one. However, some keys, such as the
function keys (F1, F2, etc.) and the arrow keys, don’t have
single-character equivalents. Instead, there are special sequences you
can use for these keys, most enclosed in curly braces. Some normal
characters that have special meaning to SendKeys() must also appear in curly braces.
Table 14-1 lists the
text to include in the character string when you wish to use one of
these special keyboard keys.
To include this key… | …use this text |
Backspace | |
Break | |
Caps lock | |
Caret (^) | |
Clear | |
Close brace (}) | |
Close bracket (]) | |
Close parenthesis ()) | |
Delete | |
Down arrow | |
End | |
Enter | |
Escape | |
F1 through F16 | |
Help | |
Home | |
Insert | |
Keypad add | |
Keypad divide | |
Keypad enter | |
Keypad multiply | |
Keypad subtract | |
Left arrow | |
Num lock | |
| |
Open bracket ([) | |
Open parenthesis (() | |
Page down | |
Page up | |
Percent sign (%) | |
Plus (+) | |
Print screen | |
Return | |
Right arrow | |
Scroll lock | |
Tab | |
Tilde (~) | |
Up arrow | |
For example, if you want to send the number 25, a tab character, and then the number 50 to the input stream, send the following sequence:
25{TAB}50You can also simulate the simultaneous use of the Shift, Control, or Alt keys in combination with other keys. Special prefix characters represent these three special modification keys:
For Shift, use + (the plus sign).
For Control, use ^ (the caret).
For Alt, use % (the percent sign).
So, to send the Control-C character, use:
^c
If you want several characters to be used with one of these three modifiers, surround those keys with parentheses, and put the modifier just before that set. For instance, to send “hello” with the Shift key held down, use:
+(hello)
The key string provides a shortcut to transmit the same key multiple times, too. To use it, enclose the character to repeat and a count within curly braces. Separate the character and the count with a space. The following text sends 10 question marks:
{? 10}There are some caveats when using
SendKeys(). Just because you include
characters in the input stream doesn’t mean that they will arrive at
the program you target. Remember, the user still has access to the
real keyboard, and to the mouse. The user could start pressing keys
and clicking around the display right in the middle of your SendKeys() action, and you would have no
control over the destination or sequence of the streaming
input.
Similarly, even if you use True for the second argument to have
your program wait until the keys are processed, there is no guarantee
that the impact of those keys on the destination will complete before
the wait is complete. A target program may acknowledge receipt of an
input character and start to process it, but it could take several
seconds (or longer) for it to complete the associated action.
Meanwhile, your call to SendKeys()
has exited, and your code is continuing on its way, possibly starting
another call to SendKeys().
If you can control the other application through more direct
means, such as through an exposed library or interface, that is
preferred. Avoid having an application control itself with SendKeys().
Besides the SendKeys()
command within the My namespace,
Visual Basic includes a SendKeys
class in the System.Windows.Forms
namespace. This class includes shared Send() and SendWait() methods. Each accepts a string
that is identical to the one used with the SendKeys() method. Except for slight
differences in syntax and location in the .NET hierarchy, there is no
essential difference between the My
version and the Forms
version.
14.10. Watching for File and Directory Changes
Problem
You need to monitor a directory, watching for any files that are added, removed, or changed.
Solution
Sample code folder: Chapter 14FileWatcher
Use a FileSystemWatcher object and its events
notify you of any changes in a specific directory or to specific
files. System.IO.FileSystemWatcher
includes many properties that let you adjust the types of files or
changes to monitor. It also includes distinct events for most types of
changes.
Discussion
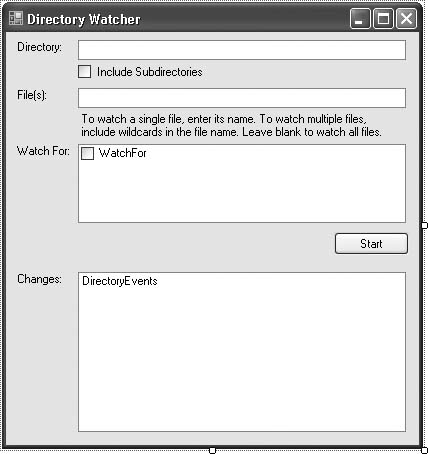
The code in this recipe implements a simple test program that
watches for any change in a selected directory. Create a new Windows
Forms application, and add the following controls to Form1:
A
TextBoxcontrol namedWatchDirectory.A
TextBoxcontrol namedWatchFilter.A
CheckBoxcontrol namedIncludeSubdirectories. Change itsTextproperty toInclude Subdirectories.A
CheckedListBoxcontrol namedWatchFor.A
Buttoncontrol namedStartStop. Change itsTextproperty toStart.A
ListBoxcontrol namedDirectoryEvents.
Add additional labels, if desired, and arrange the form to look like the one in Figure 14-7.
Open the source-code file for the form, and add the following
code to the Form1 class
template:
	Public WithEvents WatchForChanges As IO.FileSystemWatcher

	Private Sub Form1_Load(ByVal sender As System.Object, _
	      ByVal e As System.EventArgs) Handles MyBase.Load
	   ' ----- Add the types of actions. The Enum class's
	   '       GetNames method returns a collection of the
	   '       enumeration type's members as strings. Since
	   '       "Enum" is a keyword in Visual Basic, the
	   '       "Enum" class must be escaped with brackets.
	   For Each scanFilters As String In [Enum].GetNames( _
	         GetType(IO.NotifyFilters))
	      WatchFor.Items.Add(scanFilters)
	   Next scanFilters
	End Sub

	Private Sub StartStop_Click(ByVal sender As System.
Object, _
	      ByVal e As System.EventArgs) Handles StartStop.Click
	   ' ----- Start or stop watching a directory.
	   Dim monitorEvents As Integer = 0

	   If (StartStop.Text = "Start") Then
	      ' ----- Check for valid settings.
	      If (My.Computer.FileSystem.DirectoryExists( _
	            WatchDirectory.Text) = False) Then
	         MsgBox("Please specify a valid directory.")
	         Exit Sub
	      End If
	      If (WatchFor.SelectedItems.Count = 0) Then
	         MsgBox("Please specify the events to watch for.")
	         Exit Sub
	      End If

	      ' ----- Build the events setting. The Enum class's
	      '       Parse( ) method converts a string back to its
	      '       Integer enumeration value, in this case,
	      '       from the IO.NotifyFilters enumeration.

For Each scanEvents As String In WatchFor.CheckedItems
	         monitorEvents = monitorEvents Or _
	            CInt([Enum].Parse(GetType(IO.NotifyFilters), _
	            scanEvents))
	      Next scanEvents

	      ' ----- Start the watching process.
	      DirectoryEvents.Items.Clear( )
	      WatchForChanges = New IO.
FileSystemWatcher
	      WatchForChanges.SynchronizingObject = Me
	      WatchForChanges.Path = WatchDirectory.Text
	      WatchForChanges.Filter = WatchFilter.Text
	      WatchForChanges.NotifyFilter = monitorEvents
	      WatchForChanges.IncludeSubdirectories = IncludeSubdirectories.Checked
	      WatchForChanges.EnableRaisingEvents = True
	      StartStop.Text = "Stop"
	   Else
	      ' ----- End the watching process.
	      WatchForChanges.EnableRaisingEvents = False
	      WatchForChanges.Dispose( )
	      WatchForChanges = Nothing
	      StartStop.Text = "Start"
	   End If
	End Sub

	Private Sub WatchForChanges_Changed(ByVal sender As Object, _
	      ByVal e As System.IO.
FileSystemEventArgs) _
	      Handles WatchForChanges.Changed
	   DirectoryEvents.Items.Add("Changed: " & e.Name)
	End Sub

	Private Sub WatchForChanges_Created(ByVal sender As Object, _
	      ByVal e As System.IO.FileSystemEventArgs) _
	      Handles WatchForChanges.Created
	   DirectoryEvents.Items.Add("Created: " & e.Name)
	End Sub

	Private Sub WatchForChanges_Deleted(ByVal sender As Object, _
	      ByVal e As System.IO.FileSystemEventArgs) _
	      Handles WatchForChanges.Deleted
	   DirectoryEvents.Items.Add("Deleted: " & e.Name)
	End Sub

	Private Sub WatchForChanges_Renamed(ByVal sender As Object, _
	      ByVal e As System.IO.RenamedEventArgs) _
	      Handles WatchForChanges.Renamed
	   DirectoryEvents.Items.Add("Renamed: " & e.OldName & _
	      " to " & e.Name)
	End Sub
To use the program, enter a valid directory in the WatchDirectory field, optionally enter a
filename or wildcard in the WatchFilter field, and select one or more
entries in the WatchFor list. Now
click the StartStop button, and begin making changes in the target
directory.
The FileSystemWatcher class monitors activity in
a specific directory and raises events based on changes in that
directory. The class often reports any change immediately. This means
that if you create a new file in the directory and take several minutes to fill
it with data before closing it, FileSystemWatcher will report the creation
of the file at the start of its life, not when it was closed. This can
lead to interaction issues in your program. When you receive
notification of a new file in a monitored directory, you should
confirm that the complete file has been written out before processing
it.
The FileSystemWatcher class
uses a shared memory buffer for part of its processing. This buffer is
limited in size, so if you experience a lot of changes in a directory,
the buffer may “overflow, " and you will lose notifications. The
object includes an Error event that
will let you know when this happens. Also, you can adjust the InternalBufferSize property to allocate more
buffer space.
The Toolbox displayed for a Windows Forms form in Visual Studio
includes a FileSystemWatcher
control. This control is the same as the class included in this
recipe’s sample code. If you choose to declare the object through code
instead of as a control, make sure you set its SynchronizingObject property to the active
form (as is done in the sample code) to prevent intrathread
errors.
14.11. Creating an Icon in the System Tray
Problem
You wish to use a System Tray icon to regularly notify the user of the status of your application.
Solution
Sample code folder: Chapter 14SystemTrayIcon
Add a NotifyIcon control to your application’s
form. It includes properties that simplify displaying a System Tray
icon and its related notification “balloon.”. Once you’ve added the
control to your form, assign an icon (.ico) file
or image to its Icon property, and
ensure that its Visible property is
set to True. That’s it. If you want
to enable a tooltip for the icon, set the Text property as needed.
Discussion
The NotifyIcon control also
includes support for simple notification balloons. Use the BalloonTipIcon, BalloonTipText, and BalloonTipTitle properties to set the icon,
main text, and title of the balloon, respectively.
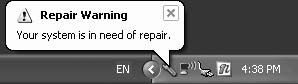
Create a new Windows Forms application. Add a Button control named Button1 to the form, and set its Text property to Show Warning. Then add a NotifyIcon control named NotifyIcon1 to the form. Set the following
properties on that control:
Set
BalloonTipIcontoWarning.Set
BalloonTipTexttoYour system is in need of repair.Set
BalloonTipTitletoRepair Warning.Set the
Iconproperty to any valid .ico icon file. (See below for a source for icon files.)
Now add the following source code to Form1’s class template:
	Private Sub Button1_Click(ByVal sender As System.Object, _
	      ByVal e As System.EventArgs) Handles Button1.Click
	   ' ----- Show the balloon for 3 seconds by default.
	   NotifyIcon1.ShowBalloonTip(3000)
	End Sub
Run the program, and click on the Show Warning button to view the notice bubble, as shown in Figure 14-8.
The NotifyIcon control
includes many events that can detect various types of clicks or
double-clicks on the icon or its balloon.
If you need a notification icon for your application, you can try one of the many icons included with Visual Studio. Depending on how you installed the product, you may find a compressed folder named VS2005ImageLibrary.zip in the Common7 VS2005ImageLibrary folder of the main product install folder (usually at c:Program FilesMicrosoft Visual Studio 8). This archive includes an icons folder with many professionally designed icons in it. You can include them freely in applications for your personal use, but be sure to read the Visual Studio license agreement if you plan to use these icons in your commercial applications.
14.12. Accessing the Clipboard
Solution
Use the My.Computer. Clipboard object to get and set data on the
clipboard. This object includes four types of
methods:
Contains… methods that indicate whether data of a particular type can be found right now on the clipboardGet… methods that retrieve data already found on the clipboard in a specific data formatSet… methods that allow you to place data onto the clipboard in one or more predefined or custom formatsA
Clear( )method that removes all data from the clipboard
Each Contains…, Get…, and
Set… method sets focuses on six
types of data:
Text
Images
Sound files
Sets of files
Custom data
Custom data in multiple formats
To retrieve plain text data found on the clipboard, use the following statement:
	Dim fromClipboard As String = _

My.Computer.Clipboard.GetText( )
Use the Clear( ) method to
remove all data from the clipboard:
My.Computer.Clipboard.Clear( )
Discussion
The My.Computer.Clipboard
object includes six distinct Get…
methods that let you retrieve the contents of the system clipboard,
each one based on a different type of data:
GetAudioStream( )Retrieves audio content from the clipboard as a
System.IO.Streamobject. Any .NET features that support such streams can use the returned data. The following block of code plays a sound file retrieved from the clipboard:My.Computer.Audio.Play( _ My.Computer.Clipboard.GetAudioStream( ), _ AudioPlayMode.Background)
GetFileDropList( )Retrieves a list of file paths as a
Stringcollection. This collection is created by any application that stores compatible file lists on the clipboard. For instance, if you copy files in Windows Explorer, those files (but not their contents) appear on the clipboard as a File Drop List. Use this code to retrieve that list:Dim allFiles As System.Collections.Specialized. _ StringCollection = _ My.Computer. Clipboard.GetFileDropList( ) Dim oneFile As String For Each oneFile In allFiles ' ----- Process each file here. Next oneFile
GetImage( )Retrieves any image data stored on the clipboard as a
System.Drawing.Imageobject.GetText( )Retrieves text from the clipboard.
GetText( )includes an optional parameter that lets you specify the specific type of text to retrieve, using the values of theSystem.Windows.Forms.TextDataFormatenumeration. Their names equate to the type of text retrieved:TextDataFormat.CommaSeparatedValueTextDataFormat.HtmlTextDataFormat.RtfTextDataFormat.UnicodeText
If you don’t include the text type argument,
GetText( )retrieves the text in the most basic text format available on the clipboard.GetData( )Retrieves data in a custom format from the clipboard. All data stored on the clipboard includes a format name. You must pass a format name to the
GetData(
              )
argument to retrieve data of that type. For example:Dim roundaboutText = _ CStr(My.Computer.Clipboard.GetData("Text"))The data is returned as a
System.Object, and it must be converted to its final data type manually.GetDataObject( )The clipboard can store data in multiple formats at once.
GetDataObject( )returns the complete set of all stored data formats, using an interface defined throughSystem.Windows.Forms.IDataObject. Once retrieved, you can query the names of each format using this interface’sGetFormats( )method, check for a specific format usingGetDataPresent( ), and retrieve specific data as aSystem.ObjectusingGetData( ). The following code displays the names of each format included on the clipboard:MsgBox(Join(My.Computer.Clipboard.GetDataObject( ). _ GetFormats(True), ", "))
Before attempting to retrieve data in a specific format from the
clipboard, it is a good idea to confirm that such data
exists. (If the specified data type does not exist, the Get… methods return the value Nothing.) The My.Computer. Clipboard object includes several such
confirmation methods that parallel the Get… methods listed above, each of which
returns a Boolean value indicating
whether or not the specified data is available:
Since the system clipboard is a resource shared among all
running programs, and since the user can modify the clipboard through
another program at any time, it is possible that one of these Contains… methods will return True for a particular format, but the
related Get… method, even when used
immediately, will return nothing.
A group of Set… methods let
you store data back to the clipboard in a variety of formats:
SetAudio( )Stores audio data on the clipboard. The lone argument to this method must be either a
Bytearray or aStreamcontaining audio data.SetFileDropList( )Stores a list of files on the clipboard. You must pass a collection of strings using the
System.Collections.Specialized.StringCollectionto this method. For example:Dim filesToInclude As New System.Collections. _ Specialized.StringCollection filesToInclude.Add("c:datafile.txt") filesToInclude.Add("c: empworkfile.txt") My.Computer.Clipboard.SetFileDropList(filesToInclude)SetImage( )Stores an image on the clipboard. Pass this method an argument of type
System.Drawing.Image.SetText( )Stores text in a specific format on the clipboard. The first argument is a
Stringcontaining the text to add. An optional second argument uses theTextDataFormatenumeration discussed in the earlierGetText( )entry.SetData( )Stores any type of custom data on the clipboard, based on a format name you provide:
My.Computer.Clipboard.SetData("MyCustomFormat", dataObject)SetDataObject( )Lets you append multiple formats at once to the clipboard. You must pass this method an instance of
System.Windows.Forms.DataObject, populated with data you provide. This object includes each of theSet… methods used for the clipboard itself, includingSetText( )andSetData( ):Dim toClipboard As New System.Windows.Forms.DataObject toClipboard.SetData("MyCustomFormat", dataObject) toClipboard.SetText(dataObject.ToString( )) My.Computer.Clipboard.SetDataObject(toClipboard)
14.13. Adding Tooltips to Controls
Problem
You want a tooltip to appear when the user hovers the cursor (mouse) over a control.
Solution
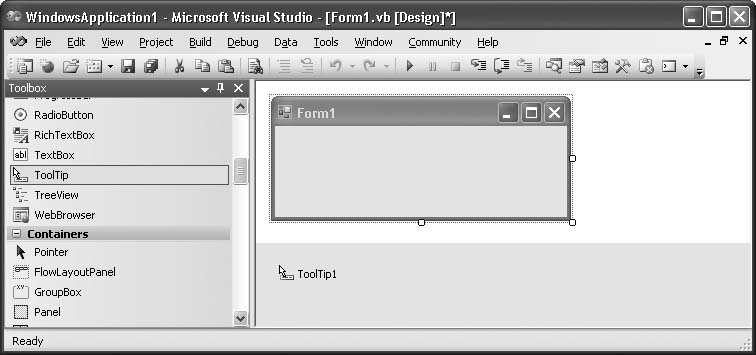
Use the ToolTip control,
included in the Windows Forms Toolbox, on your form. Figure 14-9 shows the
ToolTip control in the Toolbox and
applied to the form.
Discussion
When applied to a form, the ToolTip control enhances all displayable
on-form controls, adding a new pseudoproperty to the properties
collection of each control. If you add a ToolTip control named ToolTip1 to the form, each visible control
includes a new “ToolTip on ToolTip1” property. For a specific control,
fill this pseudoproperty with the text to display in the tooltip.
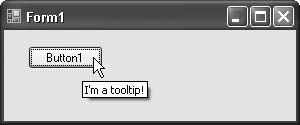
Figure 14-10 shows a
tooltip in use on a running form.
Normally, adding a single ToolTip control to a form is sufficient for
all your tooltip display needs. While each control communicates its
own tooltip display text through the added ToolTip pseudoproperty, the ToolTip control itself manages how that text
gets displayed, through its own property settings. For instance, the
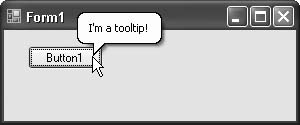
IsBalloon property, when set to
True, displays the tooltip in a
balloon display instead of a plain square (see Figure 14-11).
You can also take full control of the drawing of the tooltip by
setting its OwnerDraw property to
True and responding to the
control’s Draw event. See Chapter 9 for examples of drawing to
a custom graphics surface.
See Also
Recipe 14.11 shows how to add tooltips to notification icons in the System Tray.
14.14. Dragging and Dropping Files to a ListBox
Problem
You want a ListBox control to
accept file paths dragged to it from Windows Explorer.
Solution
Sample code folder: Chapter 14DragDropFiles
Use the control’s DragEnter
and DragDrop events to watch for
dropped file lists and process them when dropped.
Discussion
Create a new Windows Forms application, and add a ListBox control named ListBox1 to Form1. Set this control’s AllowDrop property to True. Now add the following code to the
form’s source code:
	Private Sub ListBox1_DragEnter(ByVal sender As Object, _
	      ByVal e As System.Windows.Forms.DragEventArgs) _
	      Handles ListBox1.DragEnter
	   ' ----- Allow the dropping of file lists.
	   If (e.Data.GetDataPresent(DataFormats.FileDrop) = _
	         True) Then
	      e.Effect = DragDropEffects.Copy
	   End If
	End Sub

	Private Sub ListBox1_DragDrop(ByVal sender As Object, _
	      ByVal e As System.Windows.Forms.DragEventArgs) _
	      Handles ListBox1.DragDrop
	   ' ----- Process each dropped file.
	   For Each oneFile As String In _
	         e.Data.GetData(DataFormats.FileDrop)
	      ListBox1.Items.Add(oneFile)
	   Next oneFile
	End Sub
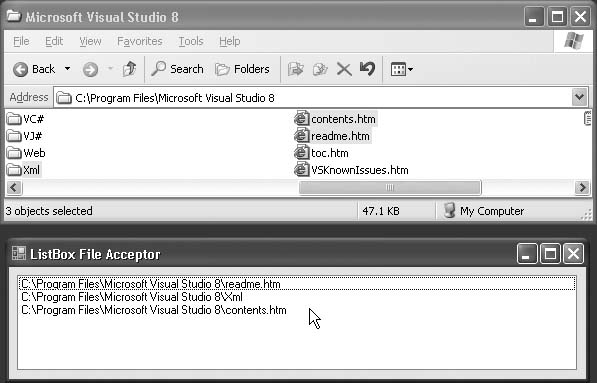
To test the program, run it, and then drag one or more files from Windows Explorer (or any other program that supports the dragging of files). Figure 14-12 shows the result of a multifile drag operation.
Accepting dragged files in a control is a two-step process:
Inform the sender of your acceptance criteria through the
DragEnterevent handler.Accept the files through the
DragDropevent handler.
In this recipe’s code, the DragEnter event examines the data being
dragged into the ListBox to
determine if it will accept the content. In this case, it looks for a
“file drop list” (identified by DataFormats.FileDrop). If it finds one, it
tells the sender that it will accept the files through a Copy
operation, setting the e.Effect
property. By default, e.Effect is
set to DragDropEffects.None, which
indicates that the content is not acceptable.
In the DragDrop event, the
dragged content exposed through e.Data is accessed, and its “file drop list”
content is extracted as a string array, which is then transferred to
the ListBox control.
If you are familiar with the clipboard operations exposed
through the My.Computer.Clipboard
object, you will recognize the use of the “file drop list” also
available through the clipboard.
See Also
Recipe 14.15
shows you how to perform inter-ListBox drag-and-drop operations.
14.15. Dragging and Dropping Between ListBox Controls
Problem
You have two ListBox controls
on a form, and you want the user to be able to drag and drop items between the lists.
Solution
Sample code folder: Chapter 14DragDropLists
Use code similar to that found in Recipe 14.14 in conjunction
with the ListBox control’s DoDragDrop() method to enable dragging and
dropping between ListBoxes.
Discussion
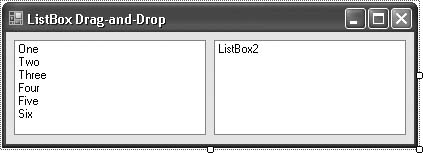
Create a new Windows Forms application, and add two ListBox controls named ListBox1 and ListBox2 to the form. In both controls, set
the AllowDrop property to True, and set the SelectionMode property to MultiExtended. In the properties for
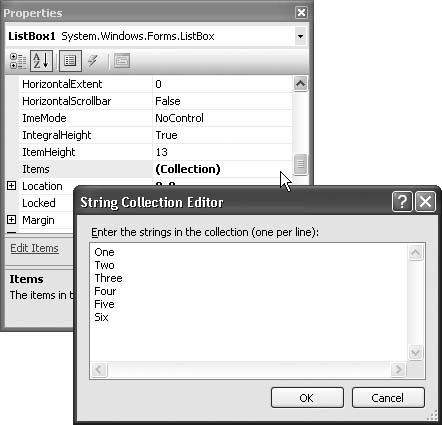
ListBox1, select the Items property, and click the “…” button in
its data value area. In the String Collection Editor window that
appears, enter multiple lines of text, separating them by pressing the
Enter key. (We entered the words “One” through “Six.”) Figure 14-13 shows this
process in action.
Close the String Collection Editor; you should have a form that looks like Figure 14-14.
Now add the following code to the form:
	Private
dragBounds As Rectangle
	Private dragMethod As String

	Private Sub ListBox1_DragEnter(ByVal sender As Object, _
	      ByVal e As System.Windows.Forms.DragEventArgs) _
	      Handles ListBox1.DragEnter
	   ' ----- Yes, we accept the items.
	   If (e.Data.GetDataPresent(ListBox2.SelectedItems. _
	         GetType( )) = True) Then _
	      e.Effect = DragDropEffects.Move
	End Sub

	Private Sub ListBox1_DragDrop(ByVal sender As Object, _
	      ByVal e As System.Windows.Forms.DragEventArgs) _
	      Handles ListBox1.DragDrop
	   ' ----- Accept the dropped items.
	   For Each oneItem As Object In _
	         e.Data.GetData(ListBox2.SelectedItems.GetType( ))
	      ListBox1.Items.Add(oneItem)
	   Next oneItem
	End Sub

	Private Sub ListBox1_MouseDown(ByVal sender As Object, _
	      ByVal e As System.Windows.Forms.MouseEventArgs) _
	      Handles ListBox1.MouseDown, ListBox2.MouseDown
	   ' ----- Prepare the draggable content.
	   If (CType(sender, ListBox).SelectedItems.Count = 0) _
	      Then Return

	   ' ----- Don't start the drag yet. Wait until we move a
	   '       certain amount.
	   dragBounds = New Rectangle(New Point(e.X - _
	      (SystemInformation.DragSize.Width / 2), _
	      e.Y - (SystemInformation.DragSize.Height / 2)), _
	      SystemInformation.DragSize)
	   If (sender Is ListBox1) Then
	      dragMethod = "1to2"
	   Else
	      dragMethod = "2to1"
	   End If
	End Sub

	Private Sub ListBox1_MouseMove(ByVal sender As Object, _
	      ByVal e As System.Windows.Forms.MouseEventArgs) _
	      Handles ListBox1.MouseMove
	   ' ----- Ignore if not dragging from ListBox1.
	   If (dragMethod <> "1to2") Then Return

	   ' ----- Have we left the drag boundary?
	   If (dragBounds.Contains(e.X, e.Y) = False) Then
	      ' ----- Start the drag-and-drop operation.
	      If (ListBox1.DoDragDrop(ListBox1.SelectedItems, _

DragDropEffects.Move) = _
	            DragDropEffects.Move) Then
	         ' ----- Successful move. Remove the items from
	         '       this list.
	         Do While ListBox1.SelectedItems.Count > 0
	            ListBox1.Items.Remove(ListBox1.SelectedItems(0))
	         Loop
	      End If
	      dragMethod = ""
	   End If
	End Sub

	Private Sub ListBox1_MouseUp(ByVal sender As Object, _
	      ByVal e As System.Windows.Forms.MouseEventArgs) _
	      Handles ListBox1.MouseUp, ListBox2.MouseUp
	   ' ----- End of drag-and-drop.
	   dragMethod = ""
	End Sub

	Private Sub ListBox2_DragEnter(ByVal sender As Object, _
	      ByVal e As System.Windows.Forms.DragEventArgs) _
	      Handles ListBox2.DragEnter
	   ' ----- Yes, we accept the items.
	   If (e.Data.GetDataPresent(ListBox1.SelectedItems. _
	         GetType( )) = True) Then _
	       e.Effect = DragDropEffects.Move
	End Sub

	Private Sub ListBox2_DragDrop(ByVal sender As Object, _
	      ByVal e As System.Windows.Forms.DragEventArgs) _
	      Handles ListBox2.DragDrop
	   ' ----- Accept the dropped items.
	   For Each oneItem As Object In _
	         e.Data.GetData(ListBox1.SelectedItems.GetType( ))
	      ListBox2.Items.Add(oneItem)
	   Next oneItem
	End Sub

	Private Sub ListBox2_MouseMove(ByVal sender As Object, _
	      ByVal e As System.Windows.Forms.MouseEventArgs) _
	      Handles ListBox2.MouseMove
	   ' ----- Ignore if not dragging from ListBox2.
	   If (dragMethod <> "2to1") Then Return

	   ' ----- Have we left the drag boundary?
	   If (dragBounds.Contains(e.X, e.Y) = False) Then
	      ' ----- Start the drag-and-drop operation.
	      If (ListBox2.DoDragDrop(ListBox2.SelectedItems, _
	            DragDropEffects.Move) = _
	            DragDropEffects.Move) Then
	         ' ----- Successful move. Remove the items from
	         '       this list.
	         Do While ListBox2.SelectedItems.Count > 0
	            ListBox2.Items.Remove(ListBox2.SelectedItems(0))
	         Loop
	      End If

dragMethod = ""
	   End If
	End Sub
If you look closely at this code, you will find that much of it
is replicated. To support two-way dragging, all code that applies to
ListBox1 appears again for ListBox2.
Run this program, and then drag items from one listBox to the other. You can also multiselect and move multiple items at once.
Many controls support the DoDragDrop() method. It accepts data content
to send and a set of allowed send methods:
	If (SomeControl.DoDragDrop(dataContent, _
	      DragDropEffects.Move) = DragDropEffects.Move) Then
	   ' ----- Successful move.
	End If
Calling this function is easy, and it can be done at any time. Most of the code in this sample deals with determining what content can be sent and when.
The DragDropEffects
enumeration, used for the second DoDragDrop() argument, indicates which
operations the supplier of the data is permitting with the supplied
content. Its Move, Copy, and
Link enumeration members can be
joined with a bitwise Or to
indicate multiple allowed features:
	' ----- Allow copy and move.
	Select Case SomeControl.DoDragDrop(dataContent, _
	      DragDropEffects.Move Or DragDropEffect.Copy)
	   Case DragDropEffects.None
	      ' ----- The target did not accept the content.
	   Case DragDropEffects.Copy
	      ' ----- The target copied the content.
	   Case DragDropEffects.Move
	      ' ----- The target moved the content.
	End Select
See Also
Recipe 14.14
shows you how to accept dragged-and-dropped files in a ListBox.
14.16. Disposing of Objects Appropriately
Problem
You’ve created an object that allocates its own resources, and you’re ready to get rid of it. What’s the correct method?
Solution
Visual Basic provides three primary methods for getting rid of
objects that implement the IDisposable interface:
Call the object’s
Dispose()method, exposed by theIDisposableinterface and implemented by the object’s type. This is the most direct method of freeing resources. The object should not be used onceDispose()has been called.Use Visual Basic’s
Usingstatement. This block statement automatically calls the object’sDispose()method on your behalf when the block ends, or execution jumps out of the block for any reason.Many of the GDI+ drawing objects implement
IDisposableand should be disposed of properly when no longer in use. ThePenobject is one such class. The following code uses theUsingstatement to declare and properly dispose of aPenobject:Using workPen As New Pen(Color.Red) ' ----- Add drawing code here using that red pen. End Using ' ----- workPen has been released and is unavailable.
Let the object go out of scope, or set it to
Nothing. This practice is usually undesirable because the garbage-collection process, and not you, will control when the additional resources get released.
Discussion
The constructor for a class may allocate shared resources that need to be properly released as quickly as possible when no longer needed. Some classes implement their own custom method for doing this, such as including a “release all resources” method. You must examine and follow the documented standards for such objects.
Fortunately, most objects that hold such external or shared
resources implement the System.IDisposable interface. This interface
exposes a standard Dispose() method
that your code or other standardized generic components can call to
free important resources. You can add IDisposable to your own classes, as
follows:
	Class SomeClass
	   Implements IDisposable

	   Protected Overridable Sub
Dispose( ) _
	         Implements IDisposable.Dispose
	      ' ----- Add cleanup code here.
	   End Sub
	End Class
For classes that do not allocate shared or external resources,
or where holding on to such resources for a long time will not degrade
application or system performance, the standard Finalize() deconstructor may be used to free
held resources. For such classes, no special processing is needed to
destroy the object. Simply wait for the object to be released on its
own, or set it to Nothing.
If you implement IDisposable
on a custom class, you should also override the Finalize() method to ensure that resources
are freed even if the user of the class forgets to call Dispose():
	Protected Overrides Sub Finalize( )
	   ' ----- Add cleanup guarantee here.
	End Sub
14.17. Fine-Tuning Garbage Collection
Problem
The .NET garbage-collection process is something of a mystery, a black box that has a mind of its own. Does a programmer have any control over the disposal process?
Solution
The System.GC object exposes several methods that
let you “help” the garbage-collection process, either for a specific
object or for the entire garbage system.
When you finish using an object by setting it to Nothing or by letting it otherwise become
unused (go out of scope), it is added to the garbage-collection system
for eventual finalization and disposal.
Finalization occurs when the object’s Finalize() method is called.
Disposal occurs when the memory allocated to the
object is finally reclaimed and made available for use by other
managed (or even unmanaged) uses.
Garbage collection occurs in waves, or
generations. When an object first enters the
system, it appears in Generation 0 (zero). If, after a while, the
object has not yet been finalized or disposed of, it is moved to the
next generation, Generation 1. Not all platforms support this system
of aging. Use the System.GC.MaxGeneration property to determine
the generation of the longest-lived object. This property always
returns zero on platforms that do not use aging.
Discussion
You can use the following members of System.GC to help manage the
garbage-collection system in memory-critical applications:
AddMemoryPressure()andRemoveMemoryPressure()The garbage-collection system concerns itself only with managed memory—memory allocated through .NET features. Unmanaged memory does not go through the collection process. However, the collection process does take the amount of available memory, both managed and unmanaged, into account when determining how quickly to free resources. The
AddMemoryPressure( )method accepts a byte count argument and tells the garbage collector, “Act as if this amount of unmanaged memory has actually been allocated.” Depending on the size of the pressure, the collection process will behave differently due to the perceived changes in available memory.You must later reverse the pressure allocation with the
RemoveMemoryPressure( )method, using the same byte count supplied with the original pressure request. You can have multiple pressure requests active at once.Collect( )This method forces the immediate collection (finalization and disposal) of garbage. By default, this method collects garbage in all generations. You can also pass it a generation number, and it will collect garbage only between Generation 0 and the generation number of the argument.
CollectionCount( )This method returns a count of the number of times garbage has been collected for a specific generation number. The generation number is passed as an argument.
GetGeneration( )If you have access to a reference object that has already entered the garbagecollection system, passing it as an argument to
GetGeneration( )returns the generation number in which that object appears.GetTotalMemory( )This method returns an estimate of the total allocated managed memory. It accepts a
Booleanargument that, ifTrue, allows garbage collection to occur before the estimate is calculated.KeepAlive( )Normally, when an object goes out of scope, you don’t care when the garbagecollection process destroys it. However, if you allocate some managed memory that you will share with or pass to an external or unmanaged process (such as an ActiveX DLL function), and that process will use the memory beyond your local use of it, the garbage collector should delay processing of the object until it is truly no longer in use. The
KeepAlive( )method helps you force such a delay.To use
KeepAlive( ), you pass it a reference to the object to retain, and you call this method when you no longer wish to retain it. That is, the call toKeepAlive( )says, “Keep the object alive, but only until this point; after this call, it can go to garbage collection.” For this reason, calls toGC.KeepAlive( )generally appear near the end of a method or block of code.SuppressFinalize( )andReRegisterForFinalize( )Passing an object reference to
SuppressFinalize( )tells the garbage collector, “Don’t call this object’sFinalize( )method before disposing of the object.” This method is most commonly used with objects that implement theSystem.IDisposableinterface. If you clean up all allocated resources during the call toDispose( ), such that there is nothing more for theFinalize( )method to do, adding a call toSuppressFinalize( )disables the unneeded call toFinalize( ).Visual Studio normally adds some template code to your class when you declare it using
Implements IDisposable. This template code includes a call toSuppressFinalize( ). You may or may not wish to retain this call, depending on your needs.If you use the
SuppressFinalize( )method but later find that you need to reenable the finalization process for an object, call theReRegisterForFinalize( )method.WaitForPendingFinalizers( )This method suspends execution of the application until all relevant objects in the garbage collector have had their
Finalize( )methods called.
Most of these methods are designed for applications with
advanced memory-allocation and processing needs. In most ordinary
applications, only the KeepAlive( )
and SuppressFinalize( ) methods
will find common use.
14.18. Moving the (Mouse) Cursor
Solution
Sample code folder: Chapter 14MoveMouse
Modify the Position property
of the System.Windows.Forms. Cursor object with a new System.Drawing.Point containing the new
location.
Discussion
Create a new Windows Forms project, and add two Button controls named Button1 and Button2. Now add the following code to the
form’s class:
	Private Sub Button1_Click(ByVal sender As System.Object, _
	      ByVal e As System.EventArgs) Handles Button1.Click
	   Windows.Forms.Cursor.Position = New Point( _
	      Me.PointToScreen(Button2.Location).X + _
	      Button2.Width / 2, _
	      Me.PointToScreen(Button2.Location).Y + _
	      Button2.Height / 2)
	End Sub
When you run the program and click on Button1, the cursor centers itself over
Button2.
All controls on a form use the client coordinate system for their positions. Each control’s X and Y locations are based on the upper-left corner of the form’s client area, the rectangle that is just inside of the form’s border. The cursor, however, is a screen-wide resource, and it uses the coordinates for the entire screen, with its X and Y positions offset from the upper-left corner of the screen. To move the cursor based on a screen position, you must translate between the two coordinate systems.
The form includes two methods to perform this translation:
PointToScreen(), which converts a client
rectangle location to a matching screen location, and PointToClient(), which translates in the
opposite direction. Actually, every control on the form also includes
these two methods. However, all points translated using a control’s
translation methods are based on the upper-left corner of the control
(that is, on its client area), and not on the upper-left corner of the
form’s client rectangle.
14.19. Intercepting All Key Presses on a Form
Problem
You have a form that needs to watch for certain keys and process them before any control on the form recognizes those keys.
Solution
Sample code folder: Chapter 14InterceptKeys
Use the form’s KeyPreview property to control access to the
form’s KeyDown, KeyUp, and KeyPress events.
Discussion
Create a new Windows Forms application, and add a single
TextBox control named TextBox1. Set the form’s KeyPreview property to True. Now add the following code to the
form’s class:
	Private Sub Form1_KeyDown(ByVal sender As Object, _
	      ByVal e As System.Windows.Forms.KeyEventArgs) _
	      Handles Me.KeyDown
	   If (e.KeyCode = Keys.F5) Then MessageBox.Show("Form: F5")
	   e.Handled = True
	End Sub

	Private Sub TextBox1_KeyDown(ByVal sender As Object, _
	      ByVal e As System.Windows.Forms.KeyEventArgs) _
	      Handles TextBox1.KeyDown
	   If (e.KeyCode = Keys.F5) Then MessageBox.Show("Text: F5")
	End Sub
Run the program, and press the F5 key when the input focus is in the text box. You should receive only the “Form: F5” message.
Modify the program by commenting out the e.Handled = True line in the form’s KeyDown event handler, and then run the
program again. This time, you will receive both messages when you
press F5.
Modify the program once again, setting the form’s KeyPreview property to False. When you run the program and press
F5, only the “Text: F5” message will appear.
Normally, a form ignores all keyboard input whenever a control
on that form has the input focus. But you can alter that behavior by
setting the KeyPreview property to
True. Once set, the program sends
all keyboard input first to the form’s key-focused event handlers, and
after that it sends those same key events to the active control.
Stopping processing at the form level is accomplished by setting the
e.Handled property to True in any of the form-level keyboard event
handlers.
14.20. Accessing the Registry
Problem
You wish to read or write keys and values in one of the registry hives.
Solution
Sample code folder: Chapter 14RegistryAccess
Use the My.Computer.Registry object and its members
to access and update portions of the registry.
Discussion
This recipe’s source code implements a read-only (and highly
simplified) version of the Windows RegEdit application. Create a new
Windows Forms application, and add the following controls to Form1:
A
TreeViewcontrol namedRegistryTree.A
ListBoxcontrol namedRegistryValues.A
TextBoxcontrol namedValueData. Set itsMultilineproperty toTrue, itsScrollBarsproperty toVertical, and itsReadOnlyproperty toTrue.
Add some informational labels if desired, and arrange the controls so the form looks like Figure 14-15.
Now add the following source code to the form’s code template:
	Private Sub Form1_Load(ByVal sender As System.Object, _
	      ByVal e As System.EventArgs) Handles MyBase.Load
	   ' ----- Load the root objects.
	   Dim rootNode As TreeNode
	   Dim childNode As TreeNode

	   rootNode = RegistryTree.Nodes.Add("My Computer")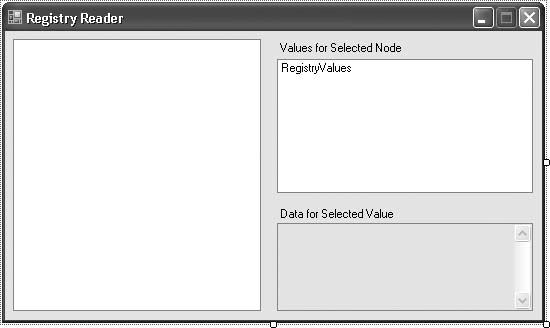
	   childNode = rootNode.Nodes.Add("HKEY_CLASSES_ROOT")
	   childNode.Nodes.Add("")

	   childNode = rootNode.Nodes.Add("HKEY_CURRENT_USER")
	   childNode.Nodes.Add("")

	   childNode = rootNode.Nodes.Add("HKEY_LOCAL_MACHINE")
	   childNode.Nodes.Add("")

	   childNode = rootNode.Nodes.Add("HKEY_USERS")
	   childNode.Nodes.Add("")

	   childNode = rootNode.Nodes.Add("HKEY_CURRENT_CONFIG")
	   childNode.Nodes.Add("")

	   rootNode.Expand( )
	End Sub

	Private Function BuildRegistryPath( _
	      ByVal fromNode As TreeNode) As String
	   ' ----- Traverse a tree backward, building the node path.
	   If (fromNode.Parent Is Nothing) Then
	      ' ----- This is the root node.
	      Return ""
	   Else
	      ' ----- This is an intermediate node.
	      Return BuildRegistryPath(fromNode.Parent) & _
	         "" & fromNode.Text
	   End If
	End Function

	Private Function GetHiveFromName(ByVal hiveName As String) _
	      As Microsoft.Win32.
RegistryKey
	   ' ----- Given the name of a hive, return its key.
	   Select Case hiveName
	      Case "HKEY_CLASSES_ROOT"
	         Return My.Computer.Registry.ClassesRoot
	      Case "HKEY_CURRENT_USER"
	         Return My.Computer.Registry.CurrentUser
	      Case "HKEY_LOCAL_MACHINE"
	         Return My.Computer.Registry.LocalMachine
	      Case "HKEY_USERS"
	         Return My.Computer.Registry.Users
	      Case "HKEY_CURRENT_CONFIG"
	         Return My.Computer.Registry.CurrentConfig
	      Case Else
	         Return Nothing
	   End Select
	End Function

	Private Function GetKeyFromNode(ByVal whichNode As TreeNode) _
	      As Microsoft.Win32.RegistryKey
	   ' ----- The user is just about to expand a node. If it
	   '       includes a blank node, retrieve the actual
	   '       child nodes from the registry.
	   Dim registryPath As String
	   Dim hiveName As String
	   Dim registryKey As Microsoft.Win32.RegistryKey

	   ' ----- Access this part of the registry.
	   registryPath = BuildRegistryPath(whichNode).Substring(2)
	   If (registryPath.Contains("") = True) Then
	      ' ----- Extract the hive and path parts.
	      hiveName = registryPath.Substring(0, _
	         registryPath.IndexOf(""c))
	      registryPath = registryPath.Substring( _
	         hiveName.Length + 1)
	   Else
	      ' ----- The active node is a hive.
	      hiveName = registryPath
	      registryPath = ""
	   End If

	   ' ----- Obtain the right hive.
	   registryKey = GetHiveFromName(hiveName)
	   If (registryKey Is Nothing) Then Return Nothing

	   ' ----- Obtain the right subkey, if needed.
	   If (registryPath <> "") Then _
	      registryKey = registryKey.OpenSubKey(registryPath)

	   ' ----- This is the right key.
	   Return registryKey
	End Function

	Private Sub
RegistryTree_AfterSelect( _
	      ByVal sender As Object, ByVal e As _
	      System.Windows.Forms.TreeViewEventArgs) _
	      Handles RegistryTree.AfterSelect
	   ' ----- Display the values associated with a node.
	   Dim registryKey As Microsoft.Win32.RegistryKey

	   ' ----- Clear any existing data.
	   RegistryValues.Items.Clear( )
	   ValueData.Clear( )

	   ' ----- Ignore if this is the root node.
	   If (e.Node.Parent Is Nothing) Then Return

	   ' ----- Get the registry key associated with this
	   '       tree node.
	   registryKey = GetKeyFromNode(e.Node)

	   ' ----- There is always a default value.
	   RegistryValues.Items.Add("(Default)")

	   ' ----- Get all of the values of this key, and add them
	   '       to the list.
	   Me.Cursor = Cursors.WaitCursor
	   Try
	      For Each oneValue As String In _
	            registryKey.GetValueNames( )
	         RegistryValues.Items.Add(oneValue)
	      Next oneValue
	   Finally
	      Me.Cursor = Cursors.Arrow
	   End Try

	   registryKey.Close( )
	End Sub

	Private Sub RegistryTree_BeforeExpand( _
	      ByVal sender As Object, ByVal e As _
	      System.Windows.Forms.TreeViewCancelEventArgs) _
	      Handles RegistryTree.BeforeExpand
	   ' ----- The user is just about to expand a node. If it
	   '       includes a blank node, retrieve the actual
	   '       child nodes from the registry.
	   Dim registryKey As Microsoft.Win32.RegistryKey
	   Dim keyNode As TreeNode

	   ' ----- Ignore if this node was already expanded.
	   If (e.Node.FirstNode.Text <> "") Then Return
	   e.Node.Nodes.Remove(e.Node.FirstNode)

	   ' ----- Get the registry key associated with this tree node.
	   registryKey = GetKeyFromNode(e.Node)

	   ' ----- Get all of the child keys of this key, and add them
	   '       to the tree.
	   Me.Cursor = Cursors.WaitCursor
	   Try
	     For Each oneKey As String In _

registryKey.GetSubKeyNames( )
	        keyNode = e.Node.Nodes.Add(oneKey)
	        keyNode.Nodes.Add("")
	     Next oneKey
	  Finally
	     Me.Cursor = Cursors.Arrow
	  End Try

	  registryKey.Close( )
	End Sub

	Private Sub RegistryValues_SelectedIndexChanged( _
	      ByVal sender As System.Object, _
	      ByVal e As System.EventArgs) _
	      Handles RegistryValues.SelectedIndexChanged
	   ' ----- Display the data associated with the selected list item.
	   Dim registryKey As Microsoft.Win32.RegistryKey
	   Dim actualValue As Object
	   Dim valueName As String

	   ' ----- Clear any existing data.
	   ValueData.Clear( )

	   ' ----- Ignore if nothing is active.
	   If (RegistryValues.SelectedIndex = _
	      ListBox.NoMatches) Then Return

	   ' ----- Ignore if this is the root node.
	   If (RegistryTree.SelectedNode.Parent Is Nothing) _
	      Then Return

	   ' ----- Get the registry key associated with this
	   ' tree node.
	   registryKey = GetKeyFromNode(RegistryTree.SelectedNode)

	   ' ----- Determine the value to retrieve.
	   valueName = RegistryValues.Text
	   If (valueName = "(Default)") Then valueName = ""

	   ' ----- Display the value.
	   actualValue = registryKey.GetValue(valueName)
	   If (actualValue IsNot Nothing) Then _
	      ValueData.Text = actualValue.ToString( )

	   registryKey.Close( )
	End Sub
To use the program, expand and select registry keys in the RegistryTree control, and select values in
the RegistryValues control. The
RegistryTree_BeforeExpand event
handler loads only those branches that have been expanded, so the
program doesn’t have to load the entire registry at once. The program
could be greatly enhanced to properly display nonstring and nonnumeric
data, and to manage security-and access-related errors.
The system registry is grouped into hives, although most of
the hives are simply shortcuts to specific portions of the master
HKEY_CLASSES_ROOT hive. The
My.Computer.Registry object
provides access to these hives through the following members, each of
which is an instance of Microsoft.Win32. RegistryKey:
ClassesRootprovides access to theHKEY_CLASSES_ROOThive.CurrentConfigprovides access to theHKEY_CURRENT_CONFIGhive.CurrentUserprovides access to theHKEY_CURRENT_USERhive.DynDataprovides access to theHKEY_DYNAMIC_DATAhive.LocalMachineprovides access to theHKEY_LOCAL_MACHINEhive.PerformanceDataprovides access to theHKEY_PERFORMANCE_DATAhive.Usersprovides access to theHKEY_USERShive.
The RegistryKey class for
each hive includes features that let you access the subordinate keys
and values associated with that hive or key. Fortunately, any
subordinate key you access can also appear as a RegistryKey instance, making it easy to
traverse the registry from any hive.
This recipe’s code uses the RegistryKey. OpenSubKey() method to access specific keys
below a hive root. For instance, to access the key \HKEY_CURRENT_USERSoftwareMicrosoft, you
would make the following function call:
	Dim microsoftKey As Microsoft.Win32.RegistryKey = _
	   My.Computer.Registry.CurrentUser.OpenSubKey( _
	   "SoftwareMicrosoft")
Each key includes zero or more values, including a default value
(which is actually named default).
To retrieve a value for a key, use the key’s GetValue() method, a feature also used in
the sample code. The registry can store data in a variety of formats,
so use the related GetValueKind()
method to determine the type of data stored. To access the default
value for a key, use an empty string for the value name.
To add or update a value for a key, use the RegistryKey.SetValue() method.
14.21. Running Procedures in Threads
Problem
You would like to perform some involved background data processing but keep the user interface for your application responsive to user interaction.
Solution
Sample code folder: Chapter 14UsingThreads
Use a BackgroundWorker control (or class) to manage
the interaction between the main process and a worker thread.
Discussion
This recipe’s sample code starts a background worker thread that
does some work, reporting its progress back to the main thread on a
regular basis. The main thread has the option to cancel the worker
thread. Create a new Windows Forms application, and add the following
controls to Form1:
A
Buttoncontrol namedStartWork. Change itsTextproperty toStart.A
Buttoncontrol namedStopWork. Change itsTextproperty toStop, and set itsEnabledproperty toFalse.A
Labelcontrol namedWorkStatus. Change itsTextproperty toNot started.A
ProgressBarcontrol namedWorkProgress.A
BackgroundWorkercontrol namedBackgroundActivity. Change both theWorkerReportsProgressandWorkerSupportsCancellationproperties toTrue.
Arrange the controls nicely so they look like Figure 14-16.
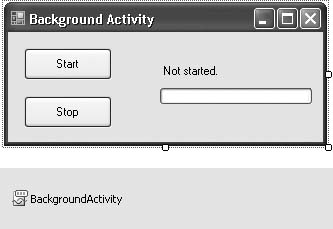
Add the following Imports
statement at the top of the source-code file for Form1:
Imports System.ComponentModel
Now add the following source code to the Form1 class:
	Private Sub BackgroundActivity_DoWork( _
	      ByVal sender As Object, ByVal e As _
	      System.ComponentModel.DoWorkEventArgs) _
	      Handles BackgroundActivity.DoWork
	   ' ----- The background work starts here.
	   Dim theBackground As BackgroundWorker

	   ' ----- Call the background thread.
	   theBackground = CType(sender, BackgroundWorker)
	   TheBusyWork(theBackground)

	   ' ----- Check for a cancellation.
	   If (theBackground.CancellationPending = True) Then _
	      e.Cancel = True
	End Sub

	Private Sub BackgroundActivity_ProgressChanged( _
	      ByVal sender As Object, ByVal e As _
	      System.ComponentModel.ProgressChangedEventArgs) _
	      Handles BackgroundActivity.ProgressChanged
	   ' ----- The background task updated its progress.
	   WorkProgress.Value = e.ProgressPercentage
	End Sub

	Private Sub BackgroundActivity_RunWorkerCompleted( _
	      ByVal sender As Object, ByVal e As _
	      System.ComponentModel.RunWorkerCompletedEventArgs) _
	      Handles BackgroundActivity.RunWorkerCompleted
	   ' ----- Finished.
	   If (e.Cancelled = True) Then
	      WorkStatus.Text = "Cancelled."
	   Else
	      WorkStatus.Text = "Complete."
	   End If
	   WorkProgress.Visible = False
	   WorkProgress.Value = 0
	   StopWork.Enabled = False
	   StartWork.Enabled = True
	End Sub

	Private Sub TheBusyWork(ByVal workerLink As BackgroundWorker)
	   ' ----- Perform some work.
	   For counter As Integer = 1 To 10
	      ' ----- See if we should jump out now.
	      If (workerLink.CancellationPending = True) Then _
	         Exit For

	      ' ----- Take a nap for 2 seconds.
	      Threading.Thread.Sleep(2000)
	      ' ----- Inform the primary thread that we've
	      '       made significant progress.
	      workerLink.ReportProgress(counter * 10)
	   Next counter
	End Sub

	Private Sub StartWork_Click(ByVal sender As System.Object, _
	      ByVal e As System.EventArgs) Handles StartWork.Click
	   ' ----- Start the background process.
	   StartWork.Enabled = False
	   StopWork.Enabled = True
	   WorkStatus.Text = "Progress…"
	   WorkProgress.Value = 0
	   WorkProgress.Visible = True
	   BackgroundActivity.
RunWorkerAsync( )
	End Sub

	Private Sub StopWork_Click(ByVal sender As System.Object, _
	      ByVal e As System.EventArgs) Handles StopWork.Click
	   ' ----- Tell the worker thread to stop.
	   BackgroundActivity.CancelAsync( )
	End Sub
Run the program, and click on the Start button. The progress will update as the background worker proceeds through its activity loop. You can interrupt the back-ground worker by clicking on the Stop button, although it won’t actually stop until the end of the current two-second sleep.
Processes running in Windows have the option of dividing their work among separate threads of execution within those processes. By default, Visual Basic processes include only a single thread: the process itself. However, you can start one or more background worker threads to perform some activity apart from the flow of the primary application.
The .NET Framework includes threading support through the System.Threading namespace, and specifically
through the Thread class in that
namespace. While using the Thread
class is relatively simple, you have to develop or enhance the class
if you want standardized interactions to occur between your primary
and worker threads.
The BackgroundWorker control,
part of the System.ComponentModel
namespace, implements a lot of these interaction features for you. To
use the control, simply add it to your form. You can also use it as a
class by declaring it using the WithEvents keyword:
	Private WithEvents BackgroundActivity _
	   As System.ComponentModel.BackgroundWorker
When you are ready to initiate the background work, call the
BackgroundWorker’s RunWorkerAsync() method. This triggers the
DoWork event. In this event
handler, call the method that will perform the background work. The
sample code passes the BackgroundWorker instance to the worker
method. You don’t have to pass this information, but it makes it
easier to communicate back to the primary thread if you do.
For example, if you want the worker thread to report its
progress, set the control’s WorkerReportsProgress property to True, then monitor the control’s ProgressChanged event. Calls to the
control’s ReportProgress() method
by the work trigger this event in the primary thread.
This communication works both ways. Setting the control’s
WorkerSupportsCancellation property
to True allows the primary thread
to request a cancellation of the work by calling the CancelAsync() method. This sets the
control’s CancellationPending
property, as viewed by the worker thread.
Threads make background processing easy, but interactions between threads can be problematic. The issue is that if two threads wish to update the same object instance, there is no guarantee that they will update them in a specific order. Consider a class with three members. Updating these three members occurs over multiple statements:
	Private SomeInstance As SomeClass
	Private Sub UpdateInstance(ByVal scalar As Integer)
	   SomeInstance.Member1 = 10 * scalar
	   SomeInstance.Member2 = 20 * scalar
	   SomeInstance.Member3 = 30 * scalar
	End Sub
But what happens when two different threads call the UpdateInstance() method at the same time
(assuming that they are sharing the SomeInstance variable)? Because of the way
that threading works, it’s possible that the calls could get
interleaved in ways that corrupt the data. Suppose thread #1 calls
UpdateInstance(2) and thread #2
calls UpdateInstance(3). It’s
possible the statements within UpdateInstance() could be called in this
order:
	SomeInstance.Member1 = 10 * 2 ' From Thread #1
	SomeInstance.Member1 = 10 * 3 ' From Thread #2
	SomeInstance.Member2 = 20 * 3 ' From Thread #2
	SomeInstance.Member2 = 20 * 2 ' From Thread #1
	SomeInstance.Member3 = 30 * 2 ' From Thread #1
	SomeInstance.Member3 = 30 * 3 ' From Thread #2
After this code, Member1 and
Member3 is set based on the call
from thread #2, but Member2 retains
the value from thread #1.
To prevent this from happening, Visual Basic includes a SyncLock statement that acts as a gatekeeper
around a block of code. (The .NET Framework also includes other
classes and features that perform a similar service.) Using SyncLock to fix the UpdateInstance() problem, you must create a
common object and use it as a locking mechanism:
	Private SomeInstance As SomeClass
	Private LockObject As New Object
	Private Sub UpdateInstance(ByVal scalar As Integer)
	   SyncLock LockObject
	      SomeInstance.Member1 = 10 * scalar
	      SomeInstance.Member2 = 20 * scalar
	      SomeInstance.Member3 = 30 * scalar
	   End SyncLock
	End Sub
As each thread enters UpdateInstance(),
SyncLock tries to exclusively lock the LockObject instance. Only when this is
successful does the thread proceed through the block of code.
14.22. Reading XML into a TreeView
Problem
You have some XML content in a file. You want to display it using a
TreeView control, so that you can
expand specific branches.
Solution
Sample code folder: Chapter 14XMLTreeView
There are many ways to go about this task, but one of the most
straightforward is to load the content into an XmlDocument object, then traverse this
object’s attributes and nodes. This recipe’s code loads an XML file
into a TreeView control.
Discussion
Create a new Windows Forms application, and add the following
controls to Form1:
A
TextBoxcontrol namedXMLFile.A
Buttoncontrol namedLoadFile. Set itsTextproperty toLoad.A
TreeViewcontrol namedXMLTree.
Add informational labels if desired, and arrange the controls so
that Form1 looks like the form in
Figure 14-17.
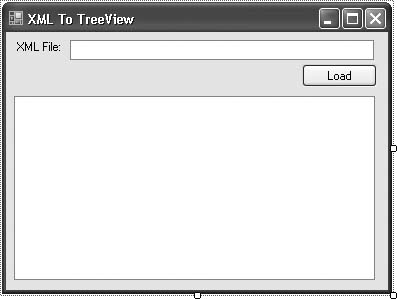
Now add the following source code to Form1’s class template:
	Private Sub LoadFile_Click(ByVal sender As System.Object, _
	      ByVal e As System.EventArgs) Handles LoadFile.Click
	   ' ----- Load an
XML file into the form's TreeView control.
	   Dim fileContent As
Xml.XmlDocument

	   ' ----- Make sure the file exists.
	   If (My.Computer.FileSystem.FileExists(XMLFile.Text) = _
	         False) Then
	      MsgBox("Please supply a valid file name.")
	      Return
	   End If

	   ' ----- Load the XML content into an XMLDocument object.
	   Try
	      fileContent = New Xml.XmlDocument
	      fileContent.Load(XMLFile.Text)
	   Catch ex As Exception
	      MsgBox("The XML file could not be loaded due to " & _
	         "the following error:" & vbCrLf & vbCrLf & _
	         ex.Message)
	      fileContent = Nothing
	      Return
	   End Try

	   ' ----- Remove any existing content in the TreeView.
	   XMLTree.Nodes.Clear( )

	   ' ----- Call a recursive method that will scan down
	   '       all branches of the XML file.
	   For Each oneNode As Xml.XmlNode In fileContent.ChildNodes
	      AddNodeToTree(oneNode, Nothing)
	   Next oneNode
	End Sub

	Private Sub AddNodeToTree(ByVal oneNode As Xml.XmlNode, _
	      ByVal fromNode As TreeNode)
	   ' ----- Add a node and all of its subordinate items.
	   Dim baseNode As TreeNode

	   ' ----- Ignore plain text nodes, as they are picked up
	   '       by the inner-text code below.
	   If (oneNode.NodeType = Xml.XmlNodeType.Text) Then Return

	   ' ----- Treat the "<?xml…" node specially.
	   If (oneNode.NodeType = Xml.XmlNodeType.XmlDeclaration) _
	         And (fromNode Is Nothing) Then
	      baseNode = XMLTree.Nodes.Add( _
	         oneNode.OuterXml.ToString( ))
	      Return
	   End If

	   ' ----- Add the node itself.
	   If (fromNode Is Nothing) Then
	      baseNode =
XMLTree.Nodes.Add(oneNode.Name)
	   Else
	      baseNode = fromNode.Nodes.Add(oneNode.Name)
	   End If

	   ' ----- Add the attributes.
	   If (oneNode.Attributes IsNot Nothing) Then
	      For Each oneAttr As
Xml.XmlAttribute In _
	            oneNode.Attributes
	         baseNode.Nodes.Add("Attribute: " & oneAttr.Name & _
	            " = """ & oneAttr.Value & """")
	      Next oneAttr
	   End If

	   ' ----- Add content if available.
	   If (oneNode.InnerText <> "") Then
	      baseNode.Nodes.Add("Content: " & oneNode.InnerText)
	   End If

	   ' ----- Add the child nodes.
	   If (oneNode.ChildNodes IsNot Nothing) Then
	      For Each subNode As Xml.XmlNode In oneNode.ChildNodes
	         AddNodeToTree(subNode, baseNode)
	      Next subNode
	   End If
	End Sub
To run the program, type a valid XML filename in the XMLFile field, and then click the Load
button. The XML content appears in the TreeView control, with branches collapsed.
This program was run using this recipe’s .vbproj
file for the input (it’s an XML file). Figure 14-18 shows the
results.
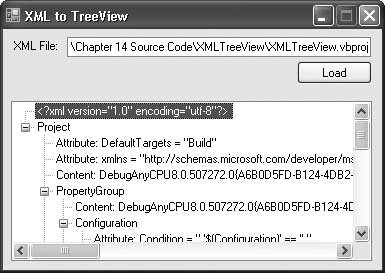
The TreeView control is designed to present
hierarchical data, which is precisely what you find in XML content. The System.Xml.XmlDocument object represents the
content of XML data by parsing the raw XML text and building distinct Xml.XmlNode objects for each element and
branch point within the content. Both XmlDocument and XmlNode include a ChildNodes collection that provides access
to the XML tags found immediately within the current tag. These
objects also include an Attributes
collection that lists the name and value of each tag attribute.
See Also
Recipes 14.23 and 14.24 discuss other methods of working with XML content.
14.23. Creating an XML Document
Problem
You need to build an XML file that contains important configuration or processing data, and you aren’t excited about doing all the string concatenation yourself.
Solution
Sample code folder: Chapter 14GenerateXMLContent
Use the XML document creation tools in the System.XML namespace to generate the XML.
This namespace includes a few different ways of building XML content.
One of the simplest methods is to fill in a System.Xml.XmlDocument object by building it
with distinct System.Xml.XmlElement
objects.
Discussion
This recipe’s sample code builds a simple program that outputs a list of email recipients in XML format. It groups recipients by the desired email format, either HTML or plain text. Here is a sample of the generated XML content:
	<?xml version="1.0"?>
	<emailData>
	  <emailRecipients mailType="HTML">
	    <recipient>
	      <name>John Smith</name>
	      <address>[email protected]</address>
	    </recipient>
	    <recipient>
	      <name>Jane Jones</name>
	      <address>[email protected]</address>
	    </recipient>
	  </emailRecipients>
	  <emailRecipients mailType="Text">
	    <recipient>
	      <name>Brenda Wong</name>
	      <address>[email protected]</address>
	    </recipient>
	  </emailRecipients>
	</emailData>
Create a new Windows Forms application, and add the following
controls to Form1:
A
ComboBoxcontrol namedEmailType. Set itsDropDownStyleproperty toDropDownList.A
TextBoxcontrol namedRecipientName.A
TextBoxcontrol namedRecipientAddress.A
ListBoxcontrol namedAllRecipients.A
Buttoncontrol namedAddEmail. Set itsTextproperty toAdd.A
Buttoncontrol namedDeleteEmail. Set itsTextproperty toDelete.A
Buttoncontrol namedSaveFile. Set itsTextproperty toSave.
Add informational labels if desired, and arrange the controls so
that Form1 looks like the form in
Figure 14-19.
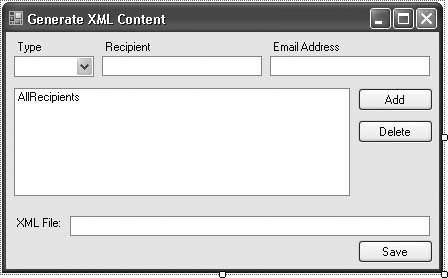
Now add the following source code to Form1’s class template:
	Public Class RecipientData
	   ' ----- A simple class to hold the basics of an address.
	   Public EmailType As String
	   Public EmailName As String
	   Public EmailAddress As String

	   Public Sub New(ByVal newType As String, _
	         ByVal newName As String, ByVal newAddress As String)
	      ' ----- Constructor to build the new record.
	      EmailType = newType
	      EmailName = newName
	      EmailAddress = newAddress
	   End Sub

	   Public Overrides Function ToString( ) As String
	      ' ----- Display a nicely formatted address.
	      Return EmailName & " <" & EmailAddress & ">"
	   End Function
	End Class

	Private Sub Form1_Load(ByVal sender As System.Object, _
	      ByVal e As System.EventArgs) Handles MyBase.Load
	   ' ----- Add the types of email content.
	   EmailType.Items.Add("HTML")
	   EmailType.Items.Add("Text")
	   EmailType.SelectedIndex = 0
	End Sub

	Private Sub DeleteEmail_Click(ByVal sender As System.Object, _
	      ByVal e As System.EventArgs) Handles DeleteEmail.Click
	   ' ----- Remove the selected email address.
	   If (AllRecipients.SelectedIndex <> ListBox.NoMatches) Then _
	      AllRecipients.Items.Remove(AllRecipients.SelectedItem)
	End Sub

	Private Sub AddEmail_Click(ByVal sender As System.Object, _
	      ByVal e As System.EventArgs) Handles AddEmail.Click
	   ' ----- Add an email recipient. Check for missing data.
	   If (RecipientName.Text.Trim = "") Then
	      MsgBox("Please supply a recipient name.")
	      Return
	   End If
	   If (RecipientAddress.Text.Trim = "") Then
	      MsgBox("Please supply a recipient address.")
	      Return
	   End If

	   ' ----- Add this recipient to the list.
	   AllRecipients.Items.Add(New RecipientData( _
	      EmailType.Text, RecipientName.Text, _
	      RecipientAddress.Text))

	   ' ----- Get ready for a new entry.
	   RecipientName.Clear( )
	   RecipientAddress.Clear( )
	   RecipientName.Focus( )
	End Sub

	Private Sub SaveFile_Click(ByVal sender As System.Object, _
	      ByVal e As System.EventArgs) Handles SaveFile.Click
	   ' ----- Save the
XML content.
	   Dim emailSet As Xml.XmlDocument
	   Dim emailDeclare As
Xml.XmlDeclaration
	   Dim emailRoot As Xml.XmlElement
	   Dim emailGroup As Xml.XmlElement
	   Dim emailRecipient As Xml.XmlElement
	   Dim emailDetail As Xml.XmlElement
	   Dim counter As Integer
	   Dim useType As String
	   Dim scanEmail As Object
	   Dim oneEmail As RecipientData

	   ' ----- Check for missing data.
	   If (AllRecipients.Items.Count = 0) Then
	      MsgBox("Please enter at least one recipient.")
	      Return
	   End If
	   If (XMLFile.Text.Trim = "") Then
	      MsgBox("Please specify the output file.")
	      Return
	   End If

	   ' ----- Warn if the file exists.
	   If (My.Computer.FileSystem.FileExists(XMLFile.Text)) Then
	      If (MsgBox("The file exists. Overwrite?", _
	         MsgBoxStyle.YesNo Or MsgBoxStyle.Question) <> _
	         MsgBoxResult.Yes) Then Return
	      Try
	         Kill(XMLFile.Text)
	      Catch ex As Exception
	         MsgBox("Could not replace the file. " & ex.Message)
	         Return
	      End Try
	   End If

	   ' ----- Start the XML document with an XML declaration.
	   emailSet = New Xml.XmlDocument
	   emailDeclare = emailSet.CreateXmlDeclaration("1.0", _
	      Nothing, String.Empty)
	   emailSet.InsertBefore(emailDeclare, _
	      emailSet.DocumentElement)

	   ' ----- Add in the root <emailData> element.
	   emailRoot = emailSet.CreateElement("emailData")
	   emailSet.InsertAfter(emailRoot, emailDeclare)

	   ' ----- Scan through the recipients, once for each type.
	   For counter = 0 To EmailType.Items.Count - 1
	      ' ----- Prepare for this pass.
	      useType = EmailType.Items(counter)
	      emailGroup = Nothing

	      For Each scanEmail In AllRecipients.Items
	         oneEmail = CType(scanEmail, RecipientData)
	         If (oneEmail.EmailType = useType) Then
	            ' ----- Found a recipient in this group.
	            '       Add the group if needed.
	            If (emailGroup Is Nothing) Then
	               emailGroup = emailSet.
CreateElement( _
	                  "emailRecipients")
	               emailGroup.SetAttribute("mailType", useType)
	               emailRoot.AppendChild(emailGroup)
	            End If

	            ' ----- Build the new output entry.
	            emailRecipient = emailSet.CreateElement( _
	               "recipient")
	            emailGroup.AppendChild(emailRecipient)

	            emailDetail = emailSet.CreateElement("name")
	            emailDetail.InnerText = oneEmail.EmailName
	            emailRecipient.AppendChild(emailDetail)

	            emailDetail = emailSet.CreateElement("address")
	            emailDetail.InnerText = oneEmail.EmailAddress
	            emailRecipient.AppendChild(emailDetail)
	         End If
	      Next scanEmail
	   Next counter

	   ' ----- Write out the
XML content.
	   Try
	      emailSet.Save(XMLFile.Text)
	      MsgBox("XML content saved.")
	   Catch ex As Exception
	      MsgBox("Could not write the XML content. " & _
	         ex.Message)
	   End Try
	End Sub
To use the program, select an email type (HTML or Text) from the Type drop-down list, enter in a recipient name and email address in the two text fields next to the drop-down, and then click the Add button to add the recipient to the list. Repeat as needed. When you have added enough recipients, supply an output filename in the XML File field, and then click the Save button.
Most of this recipe’s sample code lets you build the list of
email recipients in a ListBox
control. The embedded RecipientData
class helps organize the content stored in each ListBox item.
The real XML work happens in the Click event handler for the SaveFile button. After performing some quick
verification, the method creates a new XmlDocument to store the new XML content.
For each node in the output, it then creates XmlElement objects using the XmlDocument.CreateElement() method. This
method generates a generic XML element, representing a standard XML
tag. It adds attributes to the element via the XmlElement.SetAttribute() method. These
completed elements are then inserted into the existing XmlDocument structure relative to other
existing nodes.
The various uses of the InsertBefore(),
InsertAfter(), and AppendChild() methods in the sample code
show how you can position elements as you need them.
Besides CreateElement(), XmlDocument includes other Create… methods that generate a variety of
XML-specific content entities. For example, the CreateXmlDeclaration() method is used in the
sample code to generate the <?xml
version="1.0"?> tag at the start of the document:
	emailDeclare = emailSet.CreateXmlDeclaration("1.0", _
	   Nothing, String.Empty)
Once elements have been added to the XmlDocument, you can traverse them using any
of the supported XML tools, such as XPath.
See Also
Recipes 14.22 and 14.24 discuss other methods of working with XML content.
14.24. Validating an XML Document
Problem
You have an XML document that is supposed to adhere to a specific schema. How can you be sure the document is valid?
Solution
There are a variety of XML validation methods, including DTD and
both internal and external Schema definitions. If you are going to
read the XML content into a System.Xml.XmlDocument object, you can
verify it as it is read using any of these validation methods.
Normally, an XmlReader reads any
valid XML into an XmlDocument
object without validation. However, you can indicate the type of
validation to perform by setting the various properties of an XmlReaderSettings object and using it when
creating the XmlReader. Here is the
basic code used to process XML with custom settings:
	' ----- XML file contained in 'xmlFileName' variable.
	Dim readContent As Xml.XmlReader
	Dim xmlContent As Xml.XmlDocument
	Dim customSettings As New Xml.XmlReaderSettings
	' ----- Modify customSettings properties here, then…
	readContent = Xml.XmlReader.Create(xmlFileName, customSettings)
	xmlContent = New Xml.XmlDocument
	xmlContent.Load(readContent)
The code you add in the “Modify customSettings” area of the code depends on the type of verification or processing you wish to do. Include the following statements to validate the XML using a known external schema (.xsd) file:
	customSettings.ValidationType = Xml.ValidationType.Schema
	customSettings.Schemas.Add("urn:my-schema", "MySchema.xsd")
Discussion
The XmlReaderSettings class includes features
that control the processing of XML content during import, including
the handling of whitespace and embedded comments. It also determines
how to handle validation through its ValidationType property. In Visual Basic
2005, the allowed settings include None (for no validation, the default),
DTD (for included DTD content), and
Schema (for XSD processing, either
internal or external).
Care must be taken when performing DTD validation because malformed DTD entries can cause processing issues. Because of this, DTD processing is disabled by default. To enable it, you must alter two settings:
	customSettings.ValidationType = Xml.ValidationType.DTD
	customSettings.ProhibitDtd = False
If your XML content includes an XSD schema within the XML content (i.e., an inline schema), you must enable processing support:
	customSettings.ValidationType = Xml.ValidationType.Schema
	customSettings.ValidationFlags = _
	   customSettings.ValidationFlags Or _
	   Xml.Schema.XmlSchemaValidationFlags.ProcessInlineSchema
When you validate XML, any content that deviates from the schema
raises exceptions (System.Xml.XmlException) that emanate from
the call to XmlDocument.Load( ).
You can also capture problems through a ValidationEventHandler event, exposed by the
XmlReaderSettings class.
See Also
Recipes 14.22 and 14.23 discuss other methods of working with XML content.
14.25. Using Generic Collections
Problem
You need to store some objects in a collection, but you want to ensure that the collection allows only objects of a specific type.
Solution
Use one of the generic collections made available in .NET. They are
called “generic” because they are data-typed generically, allowing you
to replace nonspecific data-type placeholders with your own specific
data types. (“Specifics” might have been a better name.) All generic
collection classes appear in the System.Collections.Generic namespace.
As an example, the following code creates a stack (represented
by the System.Collections.Generic.Stack class) that
stores only Date objects. It then adds items to the stack:
	Dim dateStack As _
	   New System.Collections.Generic.Stack(Of Date)
	dateStack.Push(Today)
	dateStack.Push(DateAdd("d", 28, Today))
Discussion
The System.Collections.Generic namespace
includes several useful generic collections for your use:
Dictionary(Of TKey,
            TValue)
This class implements a basic lookup system, with value objects made available through unique keys. You can indicate the data types of both the key and the value at declaration; they can be different. This class stores items in the dictionary through the related
KeyValuePair(Of TKey, TValue)class.LinkedList(Of T)This class implements a doubly linked list, with immediate access to the first and last items in the list. Each list item—implemented through the related
LinkedListNode(Of T)class—includes aPreviousandNextlink to make traversal possible.List(Of T)This class implements a simple list of objects, providing access to items by index number. It includes methods to add, insert, and remove objects. It also includes many methods that locate items already in the list.
Queue(Of T)This class represents a generic queue of objects, a “First In, First Out” (FIFO) construct. Items are added to the queue through the
Enqueue( )method and later retrieved and removed from the queue with theDequeue( )method. ThePeek( )method retrieves the oldest object from the queue but does not remove it.SortedDictionary(Of TKey, TValue)This class implements a basic lookup system, with value objects made available through unique keys. It also keeps the records sorted using a binary search tree. You can indicate the data types of both the key and the value at declaration; they can be different. If the
TKeydata type implements theIComparerinterface, that type’s comparison rules are used for the sort. This class stores items in the dictionary through the relatedKeyValuePair(Of TKey, TValue)class.SortedList(Of TKey, TValue)This class implements an ordered list. Items in the list are sorted by key as they are added. It is identical to the
SortedDictionary(Of TKey, TValue)class, but it is optimized for fast insertion of previously sorted data. If theTKeydata type implements theIComparerinterface, that type’s comparison rules are used for the sort. This class stores items in the dictionary through the relatedKeyValuePair(Of TKey, TValue)class.Stack(Of T)This class represents a generic stack of objects, a “Last In, First Out” (LIFO) construct. Items are added to the stack through the
Push( )method and later retrieved and removed from the stack with thePop( )method. ThePeek( )method retrieves the top-most object from the stack, but does not remove it.
14.26. Creating a Screensaver
Problem
You have some down time between projects at work, and you want to implement a simple screensaver in Visual Basic.
Solution
Sample code folder: Chapter 14SimpleScreenSaver
Use this recipe’s sample code as an example of how to develop a screensaver using .NET. The code creates a simple screensaver that displays either the time or the date and time together in the center of the display.
Discussion
Create a new Windows Forms project, and name it SimpleScreenSaver. Change the name of the
main form from Form1.vb to
ScreenSaver.vb. Open that form, and set the
following properties:
Set
TexttoSimple Screen Saver.Set
FormBorderStyletoNone.Set
TopMosttoTrue.Set
WindowStatetoMaximized.
This form will serve as the screensaver view. Maximizing it and setting it as the top-most form forces it to consume the entire display.
Add a Label control named
CurrentTime to the form’s surface,
and set these properties:
Set
AutoSizetoFalse.Set
Sizeto240, 120.Set
Font.Sizeto28.Set
TextAligntoMiddleCenter.
Next, add a Timer control
named ClockTimer to the form. Set
its Interval property to 1000(which means 1000 milliseconds), and set
its Enabled property to True. The form should be somewhat bland and
have the general look of Figure 14-20.
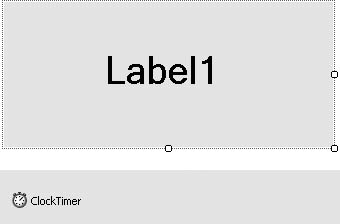
Add the following code to the form’s code template:
	Private LastMousePosition As New Point(-1, -1)

	Private Sub ClockTimer_Tick(ByVal sender As System.Object, _
	      ByVal e As System.EventArgs) Handles ClockTimer.Tick
	   ' ----- Show the time.
	   RefreshClock( )
	End Sub

	Private Sub RefreshClock( )
	   ' ----- Update the display when it changes.
	   If (IncludeDateFlag( ) = True) Then
	      CurrentTime.Text = Now.ToLongDateString & vbCrLf & _
	         Now.ToLongTimeString
	   Else
	      CurrentTime.Text = Now.ToLongTimeString
	   End If
	End Sub

	Private Sub ScreenSaver_FormClosing(ByVal sender As Object, _
	      ByVal e As System.Windows.Forms.FormClosingEventArgs) _
	      Handles Me.FormClosing
	   ' ----- Restore the mouse pointer.
	   Windows.Forms.Cursor.Show( )
	End Sub

	Private Sub ScreenSaver_KeyDown(ByVal sender As Object, _
	      ByVal e As System.Windows.Forms.KeyEventArgs) _
	      Handles Me.KeyDown
	   ' ----- Pressing any key stops the program.
	   Me.Close( )
	End Sub

	Private Sub
ScreenSaver_Load(ByVal sender As Object, _
	      ByVal e As System.EventArgs) Handles Me.Load
	   ' ----- Hide the mouse cursor.
	   Windows.Forms.Cursor.Hide( )
	   RefreshClock( )
	End Sub

	Private Sub ScreenSaver_MouseDown(ByVal sender As Object, _
	      ByVal e As System.Windows.Forms.MouseEventArgs) _
	      Handles Me.MouseDown
	   ' ----- Clicking stops the program.
	   Me.Close( )
	End Sub

	Private Sub ScreenSaver_MouseMove(ByVal sender As Object, _
	      ByVal e As System.Windows.Forms.MouseEventArgs) _
	      Handles Me.MouseMove
	   ' ----- Moving the mouse stops the program.
	   If (LastMousePosition <> New Point(-1, -1)) Then
	      ' ----- See if the mouse moved since last time.
	      If (LastMousePosition <> New Point(e.X, e.Y)) Then
	         Me.Close( )
	      End If
	   End If

	   ' ----- Record the current point.
	   LastMousePosition = New Point(e.X, e.Y)
	End Sub

	Private Sub ScreenSaver_Resize(ByVal sender As Object, _
	      ByVal e As System.EventArgs) Handles Me.Resize
	   ' ----- Center the label on the form.
	   CurrentTime.Location = New Point(0, (Me.Height - _
	      CurrentTime.Height) / 2)
	   CurrentTime.Size = New Size(Me.Width, CurrentTime.Height)
	End Sub
Add a new module to the project through the Project → Add Module menu command, and name the module file General.vb. Add the following two methods to this module’s source code:
	Public Sub Main( )
	   ' ----- The screen saver starts here.
	   Dim startOption As String = ""

	   ' ----- Check the command-line arguments. There are
	   '       three that we will look for:
	   '       /s = Start the screen saver
	   '       /c = Configure the screen saver (default)
	   '       /p = Show a preview (not implemented here)
	   If (My.Application.CommandLineArgs.Count > 0) Then _
	      startOption = My.Application.CommandLineArgs(0). _
	      ToUpper( )
	   If (startOption = "") Then startOption = "/C"
	   If (startOption.Substring(0, 2) = "/C") Then
	      Config.ShowDialog( )
	      Return
	   ElseIf (startOption.Substring(0, 2) <> "/S") Then
	      ' ----- Ignore all options besides "startup."
	      Return
	   End If

	   ' ----- Start the
screen saver.
	   ScreenSaver.ShowDialog( )
	End Sub

	Public Function IncludeDateFlag( ) As Boolean
	   ' ----- Get the current configuration value.
	   Dim configKey As Microsoft.Win32.RegistryKey
	   Dim theValue As Object

	   IncludeDateFlag = False
	   Try
	      ' ----- Load the setting from the registry.
	      configKey = My.Computer.Registry.CurrentUser. _
	         OpenSubKey("SoftwareMyCompanySimpleScreenSaver")
	      If (configKey IsNot Nothing) Then
	         theValue = configKey.GetValue("IncludeDate")
	         If (theValue IsNot Nothing) Then _
	            IncludeDateFlag = CBool(theValue)
	         configKey.Close( )
	      End If
	   Catch ex As Exception
	      ' ----- Don't show any error.
	   Finally
	      configKey = Nothing
	   End Try
	End Function
Finally, add a form that lets the user indicate whether to include the date on the screensaver display. Add the form through the Project → Add Windows Form menu command, and name the form file Config.vb. Set the following form properties:
Set
FormBorderStyletoFixedDialog.Set
TexttoConfigure Screen Saver.Set
ControlBoxtoFalse.Set
StartPositiontoCenterScreen.
Add a CheckBox control to the
form named IncludeDate, and set its
Text property to Include Date in Screen Saver Display. Also
add two Button controls named
ActOK and ActCancel, and set their Text properties to OK and Cancel, respectively.
Select the form again, and set its AcceptButton property to ActOK and its CancelButton property to ActCancel. The form should look like Figure 14-21.

That’s it for the main display and code design, but we still need to make a few changes to the project itself to prepare it for screensaver use. Open the Project Properties window. On the Application panel, set “Startup object” to Sub Main, and clear (uncheck) the “Enable application framework” field.
Build the project through the Build → Build SimpleScreenSaver menu command. In Windows Explorer, locate the executable file. It will appear in the binRelease directory within the project source-code directory. Rename the SimpleScreenSaver.exe file to SimpleScreenSaver.scr. Then, copy that file into your system’s WindowsSystem32 directory (the exact location will vary by system). The screensaver is ready to use. Open up the Display Properties within your system’s Control panel. On the Screen Saver tab, select SimpleScreenSaver from the Screen Saver drop-down list (Figure 14-22).
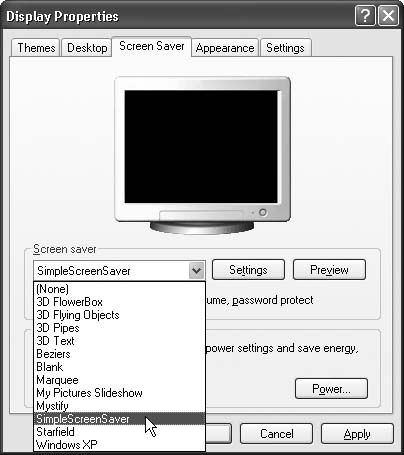
Clicking on the Settings button lets you configure the screensaver through the custom Config.vb form. The Preview button runs the screensaver immediately.
Screensavers are regular Windows applications, but they reside only in the WindowsSystem32 directory, and their file extension is .scr instead of .exe. What the user experiences as a screensaver is simply a maximized borderless form. You can add any controls you want to the form, and you can display any graphics or images you require to make the screen saver interesting.
Screensaver programs perform three distinct functions: main display, preview display, and configuration. (The sample program does not implement the preview display functionality.) The functionality you present depends on the command-line options supplied to the application:
The
/Scommand-line option tells the program to start the screensaver and continue until the user types a key or uses the mouse. (Actually, there is no firm rule about when to stop the screensaver. These are the traditional methods, but you can require the user to click a button on your main form if you wish.)The
/Ccommand-line option displays any configuration forms used to alter the behavior of the screensaver. In the sample application, the Config.vb form lets the user adjust a singleBooleanvalue, which is stored in a registry value.The
/Pcommand-line option updates the minipreview display window in the Control Panel Display Properties applet. The second command-line argument is an integer that indicates the Win32 window handle for the preview portion of the applet. Your program can display a preview version of the screensaver in this area if desired. Updating this area is beyond the scope of this recipe.
The recipe’s Sub Main routine
examines the command-line arguments and takes the appropriate action.
In the absence of any command-line arguments, the screensaver should
assume the /C argument.
This recipe’s code implements a very simple screensaver that
displays either the time or the combined date and time, updating the
display once per second through a Timer control. It determines whether to
display the date portion through a setting in the registry, located
at:
\HKEY_CURRENT_USERSoftwareMyCompanySimpleScreenSaverIncludeDate
The screensaver runs until it detects a key press (through the
Form.KeyPress event), a mouse click
(Form.MouseDown), or a mouse
movement (Form.MouseMove). It turns
out that each form receives a MouseMove message right when the form first
opens, whether the mouse is moving or not. Therefore, the code
includes some special code to ensure that the first MouseMove event call does not exit the
screensaver.
14.27. Localizing the Controls on a Form
Problem
You want to make your application available to speakers of other languages.
Solution
Sample code folder: Chapter 14MultiLanguage
Use the features built right into Visual Studio to assist you with the localization process. Windows applications have long supported multiple languages through inter-changeable language-specific resource files. When managing the display language for the fields on your application forms, you can have Visual Studio generate the resource files for you automatically.
Discussion
Create a new Windows Forms application, and add two Label controls to Form1, named Label1 and Label2. Set Label1’s Text property to The message is:, and set Label2’s Text property to Good day!. Arrange the controls as shown in
Figure 14-23.
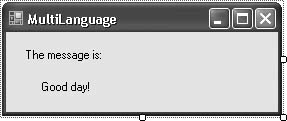
The English-language version of the application is ready to
compile and use. (Actually, the default-language version is ready to
use, and the default language happens to be English.) To enable
support for multiple languages on this form, set its Localizable property to True.
To enable French-language support, change the form’s Language property to French. You will see the form blink briefly.
Select Label2, and change its
Text property to Bon jour!, as shown in Figure 14-24.
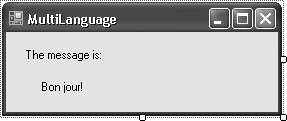
To test both language versions, change the language either to
the default language or to French when the program first starts. On
the Application tab of the Project Properties window, click the View
Application Events button to access the
ApplicationEvents.vb file. Add the following code
to the MyApplication class in this
file:
	Private Sub MyApplication_Startup(ByVal sender As Object, _
	      ByVal e As Microsoft.VisualBasic.ApplicationServices. _
	      StartupEventArgs) Handles Me.Startup
	   ' ----- Prompt to change the culture.
	   Dim newCulture As String

	   newCulture = InputBox("Enter new culture string.")
	   If (newCulture <> "") Then
	      Threading.Thread.CurrentThread.CurrentUICulture = _
	         New Globalization.CultureInfo(newCulture)
	   End If
	End Sub
Run the program. When prompted for a culture, leave the prompt
empty to default to English, or enter fr to use French. Then, enjoy the
results.
To see what’s really going on, build the program through the Build → BuildWindowsApplication1 menu command. Then locate the folder with the generated application (the binRelease directory within the project’s source-code directory). You will find a subdirectory named fr, which contains a “satellite assembly” containing the language-specific resources.
In addition to building language-specific resources when you
design your program, you can add them after release by using the
winres.exe application included with Visual
Studio. On our system, the link to this program is found in Start →
[All] Programs → Microsoft .NET Framework SDK v2.0 → Tools → Windows
Resource Localization Editor (see Figure 14-25). You must have
set the form’s Localizable property
to True to use this tool.
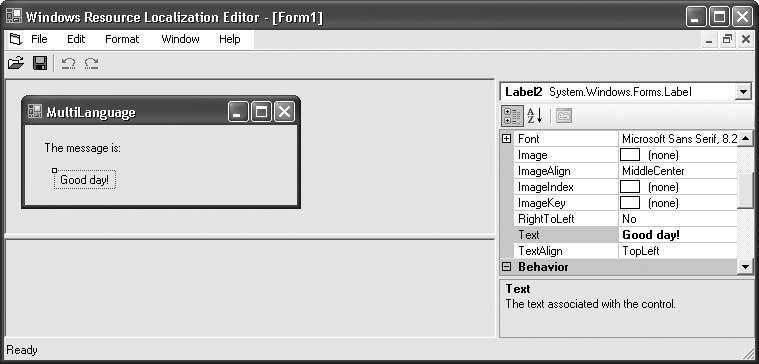
To use the tool, open the Form1.resx
resource file associated with the localized form, select each element
whose Text property needs to be
localized in turn, and enter in the new language-specific settings.
When saving the file, you are prompted for an output language. The
tool generates a separate language-specific resource file. We chose to
create a Japanese-specific resource file; the tool generated
Form1.ja.resx.
To generate the new resource’s satellite assembly, recompile the application. If this is not an option, you can generate the file manually. This is a two-step process, and it must be done on the command line. Open the Visual Studio–specific command line using the Start → [All] Programs → Microsoft Visual Studio 2005 → Visual Studio Tools → Visual Studio 2005 Command Prompt menu command. Change to the source-code directory that contains the new .resx resource file:
cd sourcedirectoryCompile the .resx file into a .resources file, using the resgen.exe application included with Visual Studio:
resgen.exe Form1.ja.resx
The directory now contains a Form1.ja.resources file. Compile it to a satellite assembly using the al.exe (Assembly Linker) program. Enter the command on a single line, not on four lines as shown here:
	al /t:lib /embed:Form1.ja.resources,
	   MultiLanguage.Form1.ja.resources /culture:ja
	   /out:MultiLanguage.resources.dll
	   /template:binReleaseMultiLanguage.exe
Now move the new MultiLanguage.resources.dll file to a culture-specific folder within the release directory. You may wish to move the file into a binReleaseja folder you create within the project directory. On deployment, the file should be installed in a ja folder within the release directory.
When you run the program again and enter ja for the culture, you’ll see the form in
Figure 14-26.
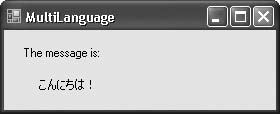
14.28. Adding Pop-up Help to Controls
Problem
Dialog boxes in Windows applications support pop-up help on controls. On such forms, clicking the question-mark button in the upper-right corner of the form and then clicking on a form control displays a tooltip-like message describing the use of the control. (See Figure 14-27 for an example.) You want to add a similar feature to controls on your form.
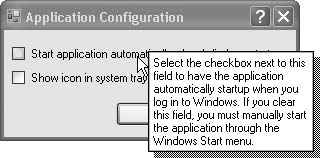
Solution
Sample code folder: Chapter 14PopupHelp
Include a HelpProvider control on your form, and use it
to enable the pop-up help.
Discussion
Create a new Windows Forms application, and add a Button control to the form. We’ll add pop-up
help to this button. Next, add a HelpProvider control to the form, which
you’ll find in the Components part of the Windows Forms Toolbox. This
control (HelpProvider1) appears in
the off-form area of the designer.
Change the form’s HelpButton
property to True. The button won’t
appear yet because it only appears when the Minimize and Maximize
buttons are hidden. Set both the MinimizeButton and MaximizeButton properties to False to make the help button appear. You’ll
see the standard Windows question-mark button.
To set the help message for the Button control, select it on the form. One
of the control’s properties is HelpString on HelpProvider1, which appears indirectly
through the HelpProvider1 control.
Add some text to this property.
To view the pop-up help, run the program, click on the
question-mark button, and then click on the Button control. The pop-up help will appear
until you click some-where else.
The HelpProvider control also
supports more standard online help methods. It can display help
through a web page that appears when the user presses the F1 key from
anywhere on the form. It can also display online help through a
compiled HTML Help 1.x (.chm) file.
To enable web-page-based help, add a HelpProvider control to your form, and
change its HelpNamespace property
to any valid web page.
To display help through HTML Help files, set the HelpProvider control’s HelpNamespace property to the help-file
path. Change the form’s HelpKeyword on
HelpProvider1 property (the name may vary based on the name
you gave to the help provider control) to the name of the page within
the compiled file as defined by your HTML Help editing tool. An
example may be html/EditorPage.htm.
Also change the form’s HelpNavigator on HelpProvider1 property to Topic.
The HelpNavigator on HelpProvider1 property includes other
methods with which you can access compiled help pages. For instance,
the TableOfContents and Index values, when used, bring up the Table
of Contents page and the Index page for the online help,
respectively.
14.29. Maintaining User-Specific Settings Between Uses of an Application
Problem
The user of your application is allowed to configure certain aspects of the application to suit her preferences. You would like to save these per-user settings so that the application uses them the next time it is run.
Solution
Sample code folder: Chapter 14UserSettings
Use the My.Settings feature of Visual Basic to enable
user-and application-specific settings.
Discussion
This recipe’s sample code remembers the position of the form on the screen from one use to the next, and it also displays the name of the last user, which it retains in local settings.
Create a new Windows Forms application. Add a Button control named ActPrefs, and set its Text property to Preferences… Then add a Label control named UserName, and set its Text property to Your name is not set. and its UseMnemonic property to False. Adjust the form to look like Figure 14-28.
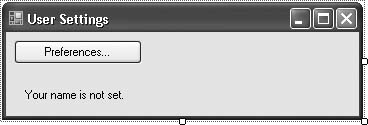
Open the Project Properties window, and select the Settings tab. This panel presents a grid of user-specific and application-specific settings. By filling in the grid, you automatically add settings that you can use in your application to retain user-preferred changes. Add two settings rows to this grid:
Add a setting named
PrefsUserName, and leave its Type asString.Add a setting named
MainFormLocation, and selectSystem.Drawing.Pointfor its Type.
Leave the Scope for both settings as User, and don’t provide any Value column
data. Close the Project Properties window and return to the
form.
Add the following source code to the form’s code template:
	Private Sub ActPrefs_Click(ByVal sender As System.Object, _
	      ByVal e As System.EventArgs) Handles ActPrefs.Click
	   ' ----- Prompt the user to change his/her preferred name.
	   Dim newName As String

	   newName = InputBox("Enter your name.")
	   If (newName.Trim( ) <> "") Then
	      ' ----- Save the user's preferences.
	      My.Settings.PrefsUserName = newName.Trim
	      UserName.Text = "Your name is " & newName.Trim & "."
	   End If
	End Sub

	Private Sub Form1_Load(ByVal sender As System.Object, _
	      ByVal e As System.EventArgs) Handles MyBase.Load
	   ' ----- Display the user-defined name, if available.
	   If (My.Settings.PrefsUserName <> "") Then
	      UserName.Text = "Your name is " & _
	         My.Settings.PrefsUserName & "."
	   End If
	End Sub
Return to the Form Designer, and select the form. Expand the
form’s (ApplicationSettings)
property, and change the Location
subproperty to MainFormLocation.
Tip
If Location does not appear
as a subproperty, select the (PropertyBinding) subproperty and click
its “…” button. On the Application Settings form that appears,
locate Location in the list, and
set its second column to MainFormLocation. Finally, click
OK.
Run the program to test it. Each time you exit and restart the program, it remembers where you moved the form on the display. If you click the Preferences button and enter your name when prompted, it also remembers this setting the next time the program runs.
The My.Settings object is new
in Visual Basic 2005. It provides a standard way to manage user-and
application-specific settings. Each time the program exits, it saves
any settings changes to an XML file, and it reads in that same file
the next time the program runs. The exact location of this file
varies, but its default location in Windows XP is:
	C:Documents and Setting<username>Local Settings
	   Application Data<projectname><specialhash>
	   <version>user.config
Application-specific settings, although not used in this sample program, are stored in an app.config file in the folder that contains your application assembly. Application-specific settings cannot be modified through the running application; you can only change them by changing the app.config file.
14.30. Verifying a Credit Card Number
Problem
You are writing an application that includes credit card processing and verification functionality. While the third-party credit card host will let you know when you have passed an invalid card number, you would like to catch invalid card numbers immediately when users enter them.
Solution
Sample code folder: Chapter 14LuhnAlgorithm
Use the Luhn Algorithm to determine if a credit card number is
valid or not. The Luhn Algorithm (or Luhn Formula) was invented by
Hans Peter Luhn of IBM in the 1960s as a method of verifying account
numbers of varying lengths. It is also called a “modulus 10” formula
because it uses the modulus 10 formula (x Mod
10 in Visual Basic) to confirm the number.
Discussion
Create a new Windows Forms application, and add the following
controls to Form1:
A
TextBoxcontrol namedCreditCard.A
Buttoncontrol namedActVerify. Set itsTextproperty toVerify.
Now add the following source code to the form’s code template:
	Private Sub ActVerify_Click(ByVal sender As System.Object, _
	      ByVal e As System.EventArgs) Handles ActVerify.Click
	   ' ----- Check for a valid credit card number.
	   Dim useCard As String = ""
	   Dim oneDigit As String
	   Dim counter As Integer

	   ' ----- Create a string with just the digits of the card,
	   '       just in case the user entered spaces or dashes
	   '       between digit blocks.
	   For counter = 1 To Len(CreditCard.Text)
	      oneDigit = Mid(CreditCard.Text, counter, 1)
	      If (IsNumeric(oneDigit) = True) Then _
	         useCard &= oneDigit
	   Next counter
	   If (useCard.Length = 0) Then
	      MsgBox("Invalid card number.")
	   ElseIf (VerifyCreditCard(useCard) = False) Then
	      MsgBox("Invalid card number.")
	   Else
	      MsgBox("Card verified.")
	   End If
	End Sub

	Private Function VerifyCreditCard(ByVal cardNumber _
	      As String) As Boolean
	   ' ----- Given a card number, make sure it is valid.
	   '       This method uses the Luhn algorithm to verify
	   '       the number. This routine assumes that cardNumber
	   '       contains only digits.
	   Dim counter As Integer
	   Dim digitTotal As Integer
	   Dim holdValue As Integer
	   Dim checkDigit As Integer
	   Dim calcDigit As Integer
	   Dim useCard As String

	   ' ----- Perform some initial checks.
	   useCard = Trim(cardNumber)
	   If (IsNumeric(useCard) = False) Then Return False

	   ' ----- Separate out the last digit, the check digit.
	   '       For cards with an odd number of digits,
	   '       prepend with a zero.

	   If ((Len(useCard) Mod 2) <> 0) Then _
	      useCard = "0" & useCard
	   checkDigit = useCard.Substring(Len(useCard) - 1, 1)
	   useCard = useCard.Substring(0, Len(useCard) - 1)

	   ' ----- Process each digit.
	   digitTotal = 0
	   For counter = 1 To Len(useCard)
	      If ((counter Mod 2) = 1) Then
	         ' ----- This is an odd digit position.
	         '       Double the number.
	         holdValue = CInt(Mid(useCard, counter, 1)) * 2
	         If (holdValue > 9) Then
	            ' ----- Process digits (16 becomes 1+6).
	            digitTotal += (holdValue  10) + _
	               (holdValue - 10)
	         Else
	            digitTotal += holdValue
	         End If
	      Else
	         ' ----- This is an even digit position.
	         '       Simply add it.
	         digitTotal += CInt(Mid(useCard, counter, 1))
	      End If
	   Next counter

	   ' ----- Calculate the 10's complement of both values.
	   calcDigit = 10 - (digitTotal Mod 10)
	   If (calcDigit = 10) Then calcDigit = 0
	   If (checkDigit = calcDigit) Then Return True Else _
	      Return False
	End Function
Run the program, enter a credit card number, and click the Verify button to see if the card number is valid.
14.31. Capturing a Console Application’s Output
Problem
You want to capture and process the output of a console application in your program.
Solution
Sample code folder: Chapter 14RedirectConsoleOutput
Use the StartInfo portion of
a Process object to redirect the
output of a console application into your code. The redirected output
appears as a standard StreamReader
object.
Discussion
This recipe’s sample code captures the network data generated by
the ipconfig command-line tool and
displays it in a ListBox
control.
Create a new Windows Forms application, and add three controls:
A
ListBoxcontrol namedOutputData.A
CheckBoxcontrol namedIncludeAll. Change itsTextproperty toUse the '/ all' flag to get all details.A
Buttoncontrol namedActProcess. Set itsTextproperty toProcess.
The controls should appear as in Figure 14-29.
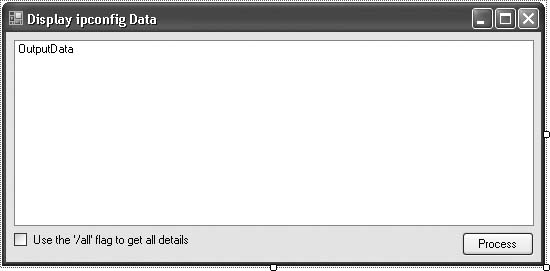
Next, add the following code to the form’s class template:
	Private Sub ActIPConfig_Click( _
	      ByVal sender As System.Object, _
	      ByVal e As System.EventArgs) _
	      Handles ActIPConfig.Click
	   ' ----- Load the output of ipconfig.exe into a ListBox.
	   Dim ipConfig As Process
	   Dim oneLine As String
	   Dim lineParts( ) As String

	   ' ----- Remove any existing items.
	   OutputData.Items.Clear( )

	   ' ----- Build and run the command.
	   ipConfig = New Process( )
	   ipConfig.StartInfo.FileName = "ipconfig.exe"
	   If (IncludeAll.Checked = True) Then _
	       ipConfig.StartInfo.Arguments = "/all"
	   ipConfig.StartInfo.UseShellExecute = False
	   ipConfig.StartInfo.RedirectStandardOutput = True
	   ipConfig.StartInfo.CreateNoWindow = True
	   ipConfig.Start( )

	   ' ----- Process each input line.
	   Do While Not ipConfig.StandardOutput.EndOfStream
	      ' ----- Ignore blank lines.
	      oneLine = ipConfig.StandardOutput.ReadLine( )
	      If (Trim(oneLine) = "") Then Continue Do

	      ' ----- Headings have no initial whitespace.
	      If (oneLine = oneLine.TrimStart) Or _
	            (InStr(oneLine, ":") = 0) Then
	         ' ----- A heading line or informational line.
	         OutputData.Items.Add(oneLine.Trim)
	      Else
	         ' ----- A detail line. The format is:
	         '       Title … : Data
	         lineParts = oneLine.Trim.Split(":"c)
	         lineParts(0) = Replace(lineParts(0), ". ", "")
	         lineParts(1) = lineParts(1).Trim
	         OutputData.Items.Add(vbTab & lineParts(0) & _
	            ":" & lineParts(1))
	      End If
	   Loop
	   ipConfig.WaitForExit( )
	   ipConfig.Dispose( )
	End Sub
Run the program, alter the IncludeAll field as desired, and click the
ActProcess button. The ListBox control will be filled with the data
output by the command-line ipconfig.exe program.
Figure 14-30 shows
some sample output for this program.
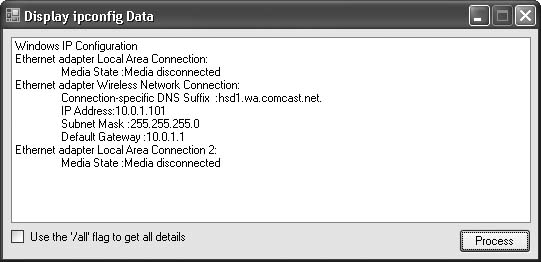
Some command-line programs, such as
dir.exe, aren’t really programs at all, but
rather commands embedded within the command processor. For these
programs, you need to use cmd.exe for the process
filename and pass the actual command as an
argument of the /c option:
	ipConfig.StartInfo.FileName = "cmd.exe"
	ipConfig.StartInfo.Arguments = "/c dir c:	emp"
Unfortunately, you cannot prevent the command window from momentarily appearing when using cmd.exe as the process program.
14.32. Reading an Assembly’s Details
Problem
You’re curious about the contents of an assembly, and it’s not because you want to find out its secrets.
Solution
Sample code folder: Chapter 14AssemblyManifest
Use the classes of the System.Reflection namespace to access the
contents of any assembly.
Discussion
This recipe’s sample code displays some basic information
contained within an assembly. Create a new Windows Forms application,
and add the following controls to Form1:
A
TextBoxcontrol namedAssemblyLocation.A
Buttoncontrol namedReadAssembly. Set itsTextproperty toShow.A
TextBoxcontrol namedAssemblyDetail. Set itsMultilineproperty toTrueand itsScrollBarsproperty toBoth. Also set itsWordWrapproperty toFalse. Size this control to fill much of the form, as it will display a lot of content.
The form should look like the one in Figure 14-31.
Now, add the following code to the form’s code template:
	Private Sub ReadAssembly_Click( _
	      ByVal sender As System.Object, _
	      ByVal e As System.EventArgs) _
	      Handles ReadAssembly.Click
	   ' ----- Given an assembly, display details from its
	   '       manifest.
	   Dim useAssembly As System.Reflection.Assembly
	   Dim displayContent As New System.Text.StringBuilder
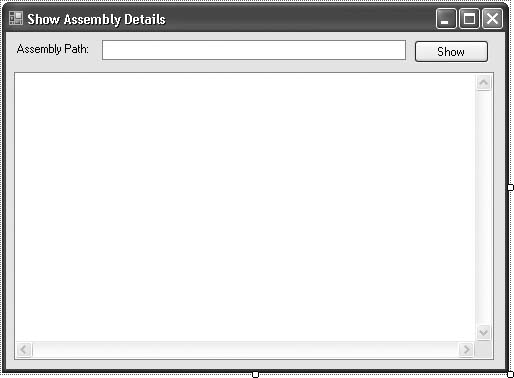
	   ' ----- Load this assembly.
	   If (My.Computer.FileSystem.FileExists( _
	         AssemblyLocation.Text) = False) Then
	      MsgBox("Please supply a valid assembly file name " & _
	         "with a valid path.")
	      Return
	   End If
	   Try
	      useAssembly = Reflection.Assembly.LoadFile( _
	         AssemblyLocation.Text)
	   Catch ex As System.Exception
	      MsgBox("Could not access the assembly: " & ex.Message)
	      Return
	   End Try

	   ' ----- Clear the existing content.
	   AssemblyDetail.Clear( )

	   ' ----- Show its full complex name.
	   displayContent.AppendLine("Full Name: " & _
	      useAssembly.FullName)

	   ' ----- List all of the resources.
	   displayContent.AppendLine( )
	   displayContent.AppendLine("Resources")
	   For Each oneName As String In _
	         useAssembly.GetManifestResourceNames( )
	       displayContent.AppendLine(" - " & oneName)
	   Next oneName

	   ' ----- List all of the exported types.
	   displayContent.AppendLine( )
	   displayContent.AppendLine("Exported Types")
	   For Each oneType As System.Type In _

useAssembly.GetExportedTypes( )
	      displayContent.AppendLine(" - " & oneType.Name)
	   Next oneType

	   ' ----- Process each module, and each type within
	   '       the module.
	   displayContent.AppendLine( )
	   displayContent.AppendLine("Modules")
	   For Each oneModule As Reflection.Module In _
	         useAssembly.GetLoadedModules( )
	      displayContent.AppendLine(" - " & oneModule.Name)
	      For Each oneType As System.Type In oneModule.GetTypes( )
	         ' ----- These types will be the primary
	         '       classes/forms in the assembly.
	         displayContent.AppendLine(" Type: " & _
	            oneType.Name)

	         ' ----- Show the fields included in each type.
	         For Each oneField As Reflection.FieldInfo In _
	               oneType.GetFields( )
	            displayContent.AppendLine("        Field: " & _
	               oneField.ToString( ))
	         Next oneField

	         ' ----- Show the methods included in each type.
	         For Each oneMethod As Reflection.MethodInfo In _
	               oneType.GetMethods( )
	            displayContent.AppendLine(" Method: " & _
	               oneMethod.ToString( ))
	         Next oneMethod
	      Next oneType
	   Next oneModule

	   ' ----- Display the results.
	   AssemblyDetail.Text = displayContent.ToString( )
	End Sub
To use the program, type a valid assembly file path into the
AssemblyLocation field, and then
click the Show button. The AssemblyDetail text box will be filled with
details from the specified assembly. For Windows Forms assemblies, you
will be amazed at the amount of content contained in even the simplest
program. Figure 14-32
shows this program used on itself.
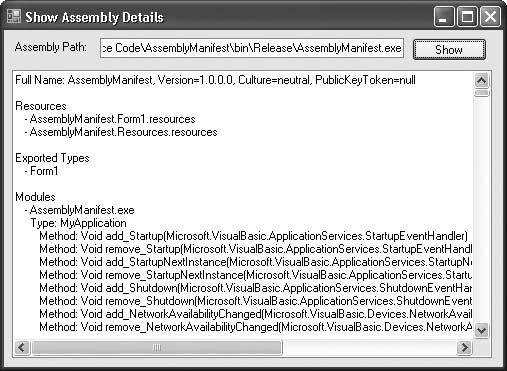
The .NET Framework includes a system called
reflection that lets you examine every
aspect of an assembly, if you have the proper security rights. You can
view the basic assembly details, such as the version number and
copyright name. You can also examine all classes, class methods,
method parameters, and even the Intermediate Language (IL) code within
a method. It’s all available through the System.Reflection namespace.
The code shown here uses only a small portion of the available
reflection features. The Reflection.Module class, for example, has
many properties and methods that fully describe a module, which is
typically an EXE or DLL file.
14.33. Performing Serial I/O
Problem
You need to communicate with a device connected to one of the serial ports on the user’s workstation.
Solution
Sample code folder: Chapter 14SerialIO
Use the My.Computer.Ports.OpenSerialPort() method to
create a bidirectional System.IO.Ports.SerialPort instance.
Discussion
The following method generically sends data out to the COM1 serial port:
	Public Sub OutToCOM1(ByVal serialData As String, _
	     ByVal useLineTermination As Boolean)
	   ' ----- Open COM1 and send the supplied data.
	   Dim com1Port As IO.Ports.SerialPort = Nothing

	   Try
	      ' ----- Access the port.
	      com1Port = My.Computer.Ports.OpenSerialPort("COM1")

	      ' ----- Write the data.
	      If (useLineTermination = True) Then
	         com1Port.WriteLine(serialData)
	      Else
	         com1Port.Write(serialData)
	      End If

	      ' ----- Finished with the port.
	      com1Port.Close( )
	   Catch ex As Exception
	      MsgBox("Error writing data to serial port: " & _
	         ex.Message)
	   Finally
	      If (com1Port IsNot Nothing) Then com1Port.Dispose( )
	      com1Port = Nothing
	   End Try
	End Sub
The opened serial port is bidirectional, so you can also read pending content:
For a single byte, use
com1Port.ReadByte().For multiple bytes, use
com1Port.Read().For a single character as an
Integer, usecom1Port.ReadChar().For a complete text line, use
com1Port.ReadLine().For all pending characters, use
com1Port.Existing().
When opening the serial port, different constructors allow you
to specify the various handshaking options, including baud rate and
stop bits. To access the list of available serial ports, use the
My.Computer.Ports.SerialPortNames
collection.
14.34. Rebooting the System
Problem
You want to programmatically restart the user’s workstation.
Solution
Sample code folder: Chapter 14ShutdownWindows
With all of the convenience features included in .NET, you would
think that there would be a ShutdownWindows() method in some convenient
class. But alas, there is nothing like that. To shut down Windows, you
must depend on some of the Win32 DLL features. This recipe’s sample
code lets you exit Windows in one of four ways:
Discussion
Create a new Windows Forms application. Add four Button controls to Form1, named ActLockWorkstation, ActLogoff, ActReboot,
and ActShutdown. Change their
Text properties to Lock Workstation, Log off, Reboot, and
Shut down, respectively. Then add
the following code to the form’s code template:
	Private Sub ActLockWorkstation_Click( _
	      ByVal sender As System.Object, _
	      ByVal e As System.EventArgs) _
	      Handles ActLockWorkstation.Click
	   GetOutOfWindows.ExitViaLockWorkstation( )
	End Sub

	Private Sub ActLogoff_Click(ByVal sender As System.Object, _
	      ByVal e As System.EventArgs) Handles ActLogoff.Click
	   GetOutOfWindows.ExitViaLogoff( )
	End Sub

	Private Sub ActReboot_Click(ByVal sender As System.Object, _
	      ByVal e As System.EventArgs) Handles ActReboot.Click
	   GetOutOfWindows.ExitViaReboot( )
	End Sub

	Private Sub ActShutdown_Click(ByVal sender As System.Object, _
	      ByVal e As System.EventArgs) Handles ActShutdown.Click
	   GetOutOfWindows.ExitViaShutdown( )
	End Sub
Add a new class to your project using the Project → Add Class menu command, giving its file the name GetOutOfWindows.vb. Use this code for the class body:
	Public Class GetOutOfWindows
	   ' ----- Windows constants used in shutdown permissions.
	   Const SE_PRIVILEGE_ENABLED As Integer = &H2
	   Const TOKEN_QUERY As Integer = &H8
	   Const TOKEN_ADJUST_PRIVILEGES As Integer = &H20
	   Const SE_SHUTDOWN_NAME As String = "SeShutdownPrivilege"

	   ' ----- Shutdown method flags.
	   Private Enum ShutdownMethods As Integer
	      Logoff = 0
	      Shutdown = 1
	      Reboot = 6
	   End Enum

	   <Runtime.InteropServices.StructLayout( _
	   Runtime.InteropServices.LayoutKind.Sequential, Pack:=1)> _
	   Private Structure TokenPrivileges
	      Public PrivilegeCount As Integer
	      Public Luid As Long
	      Public Attributes As Integer
	   End Structure

	   ' ----- External features needed to exit Windows.
	   Private Declare Ansi Function AdjustTokenPrivileges _
	      Lib "advapi32.dll" _
	      (ByVal tokenHandle As IntPtr, _
	      ByVal disableAllPrivileges As Boolean, _
	      ByRef newState As TokenPrivileges, _
	      ByVal bufferLength As Integer, _
	      ByVal previousState As IntPtr, _
	      ByVal returnLength As IntPtr) As Boolean

	   Private Declare Ansi Function ExitWindowsEx _
	      Lib "user32.dll" _
	      (ByVal flags As Integer, _
	      ByVal reason As Integer) As Boolean

	   Private Declare Ansi Function GetCurrentProcess _
	      Lib "kernel32.dll" ( ) As IntPtr

	   Private Declare Ansi Sub LockWorkStation _
	      Lib "user32.dll" ( )

	   Private Declare Ansi Function LookupPrivilegeValueA _
	      Lib "advapi32.dll" _
	      (ByVal
systemName As String, _
	      ByVal privilegeName As String, _
	      ByRef lookupID As Long) As Boolean

	   Private Declare Ansi Function OpenProcessToken _
	      Lib "advapi32.dll" _
	      (ByVal processHandle As IntPtr, _
	      ByVal desiredAccess As Integer, _
	      ByRef tokenHandle As IntPtr) As Boolean

	   Private Shared Sub PerformExit( _
	         ByVal usingMethod As Integer)
	      ' ----- Log off, reboot, or shut down the
system.
	      Dim shutdownPrivileges As TokenPrivileges
	      Dim processHandle As IntPtr
	      Dim tokenHandle As IntPtr = IntPtr.Zero

	      ' ----- Give ourselves the privilege of shutting
	      '       down the system. First, obtain the token.
	      processHandle = GetCurrentProcess( )
	      OpenProcessToken(processHandle, _
	         TOKEN_ADJUST_PRIVILEGES Or TOKEN_QUERY, tokenHandle)

	      ' ----- Adjust the token to enable shutdown permissions.
	      shutdownPrivileges.PrivilegeCount = 1
	      shutdownPrivileges.Luid = 0
	      shutdownPrivileges.Attributes = SE_PRIVILEGE_ENABLED
	      LookupPrivilegeValueA(Nothing, SE_SHUTDOWN_NAME, _
	         shutdownPrivileges.Luid)
	      AdjustTokenPrivileges(tokenHandle, False, _
	         shutdownPrivileges, 0, IntPtr.Zero, IntPtr.Zero)

	      ' ----- Now shut down the system.
	      ExitWindowsEx(usingMethod, 0)
	   End Sub

	   Public Shared Sub ExitViaLockWorkstation( )
	      ' ----- Lock the workstation.
	      LockWorkStation( )
	   End Sub

	   Public Shared Sub ExitViaLogoff( )
	      ' ----- Log off the current user.
	      PerformExit(ShutdownMethods.Logoff)
	   End Sub

	   Public Shared Sub ExitViaReboot( )
	      ' ----- Reboot the system.
	      PerformExit(ShutdownMethods.Reboot)
	   End Sub

	   Public Shared Sub ExitViaShutdown( )
	      ' ----- Shut down the system.
	      PerformExit(ShutdownMethods.Shutdown)
	   End Sub
	End Class
Run the program, and click one of the buttons on the form to take the related shutdown action. But be warned: this program will shut down Windows if you choose anything other than “Lock Workstation.” Make sure you save your work before running this program.
Most of this code gets into the heart of the Windows system, and how it really works is beyond the scope of this book (and beyond general human comprehension). But here’s the gist of it: before you can shut down Windows, you have to give yourself permission to do so. It must be a safety feature, because if you can give yourself permission, it’s really not a matter of security.
Still, if your application runs in a security-limited context imposed by the user or the system administrator, the attempt to shut down the system may fail.