Chapter 3. Application Organization
Introduction
This chapter shows you how some of the object-oriented programming (OOP) features in Visual Basic 2005 are used to build Visual Basic applications. These features include class constructors, namespaces, and support for overloading. While you will spend most of your coding life writing the basic logic of your functions, properties, and Sub procedures, you wouldn’t be able to do it without the basic container systems introduced here.
3.1. Creating a Code Module
Problem
You would like to add some general methods and fields that are accessible to your entire application.
Solution
Add a code module—a construct that is similar to a class, but
uses the Module key-word instead of
Class—to your application.
Discussion
Visual Basic includes three major code and value containers: classes, structures, and modules. All three types are based on the core definition of a class, but there are times when you’ll want to choose one over another. Modules are useful for storing functions, subroutines, constants, and variable fields that are considered “global” to your entire application. In pre-.NET versions of Visual Basic, most nonform-specific code was stored in a similar “module file” (with a " .bas” file extension). Modules in .NET provide some of that same functionality but in an object-oriented context.
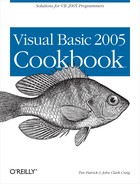
If you’ve already created a new project or opened an existing project in Visual Studio, you can add a new module through the Project → Add Module menu command. The Add New Item dialog (Figure 3-1) should already have the Module template selected. Simply give it a useful name in the Name field, then click the Add button.
Visual Studio presents you with the code for this new template:
	Module Module1

	End Module
You can start adding members to the module immediately.
Supported members include Sub
procedures, functions, properties, events, delegates, classes,
structures, and enumerations. Before coding each member, decide the
access you want to grant and prefix the definition with
the appropriate access keyword ( Public, Shared, or
Friend). For instance, the following block of
code adds a function to the module Module1 and assigns the function Public access:
	Module Module1
	   Public Function DoubleIt(ByVal origValue As Integer) _
	         As Integer
	      Return origValue * 2
	   End Function
	End Module
Modules specify their own access levels, using the Public or Friend keywords; the default is Friend. All members of a module act as if
they are marked with the Shared
keyword. That is, you can use any member of a module without creating
an instance of the module itself. And that’s a good thing because
Visual Basic will not allow you to create an instance of a
module.
You aren’t required to create separate source- code files for new modules (or for classes or structures, which are discussed in later recipes), although you should. Having a one-to-one correspondence between modules (or classes or structures) and source-code files makes things easier to manage. Still, you may need to double up constructs in a single source-code file. If you already have a file with a class defined, you can include a module definition in the same file, outside the class:
	Class SomeClass
	   ' ----- Class members go here.
	End Class
	Module SomeModule
	   ' ----- Module members go here.
	End Module
If you try to do this in a form class file for a desktop application project, the Visual Studio Form Designer looks only at the first class in the file. If you insert a module (or a structure or another class) before the form-derived class in the file, Visual Studio can’t display the form.
All members of a module are shared and can be used immediately
throughout the application. You can limit a member to just the code
within the module by using the Private access-level keyword with that
member:
	Module Module1
	   Private Sub InModuleUseOnly()
	   End Sub
	End Module
This is commonly done with so-called helper methods that can be accessed only by other, more prominent methods in the same module.
See Also
Recipes 3.2 and 3.3 introduce classes and structures, the two other major type constructs in Visual Basic.
3.2. Creating a Class
Problem
You need to add a new class to your Visual Basic application.
Solution
To add a new project class to your application, select the Project → Add Class menu command, and complete the Add New Item dialog.
Discussion
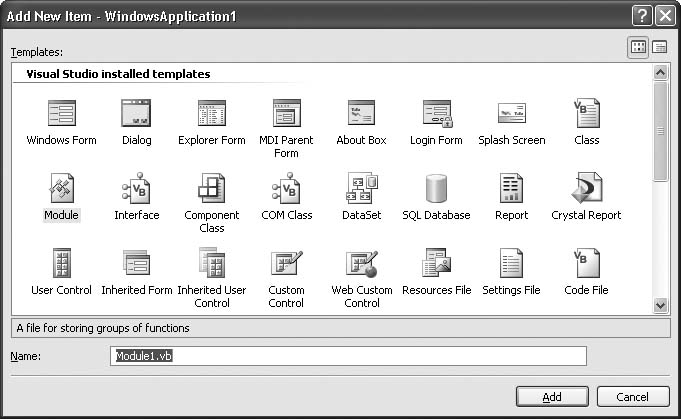
The Add New Item dialog, shown in Figure 3-2, prompts you by selecting the Class template.
Give your class a new name, and then click the Add button. Visual Basic displays your newly added class in a code editor window. For example, providing “Class1.vb” for the new class filename adds the class source-code file and displays the following empty class template:
	Public Class Class1

	End Class
Of the various object types included with Visual Basic
( classes, structures, and modules), classes have the most flexibility and the least
restrictions on use. You can add pretty much any supported member
type, including Sub procedures,
functions, fields, constants, enumerations, events, delegates, other
classes and structures, and proper-ties. Here is a simple class that
uses many of those features:
	Public Class Employee
	   ' ----- Basic employee information fields.
	   Public LastName As String
	   Public FirstName As String
	   Public HireDate As Date
	   Public JobType As EmployeeJobType
	   Private CurrentSalary As Decimal

	   ' ----- Supplies values to the JobType public field.
	   Public Enum EmployeeJobType
	      CLevel
	      Manager
	      NonManager
	      Contractor
	   End Enum

	   ' ----- Used by the SalaryChanged event arguments.
	   Public Class SalaryChangedEventArgs
	      Inherits System.EventArgs
	      Public OldSalary As Decimal
	      Public NewSalary As Decimal
	   End Class

	   ' ----- Argument signature for the SalaryChanged event.
	   Public Delegate Sub SalaryChangedDelegate( _
	      ByVal sender As Object, _
	      ByVal e As SalaryChangedEventArgs)

	   ' ----- Issued when private CurrentSalary field changes.
	   Public Event SalaryChanged As SalaryChangedDelegate

	   Public Function GetFullName( ) As String
	      ' ----- Return a nicely formatted name.
	      Return FirstName & " " & LastName
	   End Function

	   Public Sub GiveRaise(ByVal percentIncrease As Decimal)
	      ' ----- To raise 10%, set percentIncrease to 0.10.
	      Dim changeDetail As New SalaryChangedEventArgs

	      ' ----- Record the new salary, keeping track
	      '       of the change.
	      changeDetail.OldSalary = CurrentSalary
	      CurrentSalary += (CurrentSalary * percentIncrease)
	      changeDetail.NewSalary = CurrentSalary

	      ' ----- Inform anyone who may be interested.
	      RaiseEvent SalaryChanged(Me, changeDetail)
	   End Sub

	   Public Property Salary( ) As Decimal
	      Get
	         ' ----- Report the current salary level.
	         Return CurrentSalary
	      End Get
	      Set(ByVal value As Decimal)
	         ' ----- Update the private CurrentSalary field.
	         Dim changeDetail As New SalaryChangedEventArgs

	         ' ----- Ignore negative salaries.
	         If (value < 0@) Then Exit Property

	         ' ----- Record the new salary, keeping track
	         '       of the change.
	         changeDetail.OldSalary = CurrentSalary
	         CurrentSalary = value
	         changeDetail.NewSalary = value

	         ' ----- Inform anyone who may be interested.
	         RaiseEvent SalaryChanged(Me, changeDetail)
	      End Set
	   End Property
	End Class
One source-code file may include multiple classes, structures, and modules:
	Class Class1
	   ' ----- First class members go here.
	End Class
	Class Class2
	   ' ----- Second class members go here.
	End Class
If you attempt this in a form class file, the Visual Studio Form Designer looks only at the first class in the file. If you insert a class (or structure or module) before the form-derived class in the file, Visual Studio can’t display the form.
Classes are the basic building blocks of Visual Basic applications. The two other major types— structures and modules—are variations of the basic class type, with certain restrictions that make them useful in certain cases.
The code for a class usually appears in a source-code file all its own, although you can divide a class into multiple files (see Recipe 3.9). You can also store multiple classes in a single source-code file, but this can quickly clutter your code.
See Also
Recipes 3.1 and 3.3 introduce modules and structures, the two other major type constructs in Visual Basic.
3.3. Creating a Structure
Problem
You would like to add a new structure to your Visual Basic application.
Solution
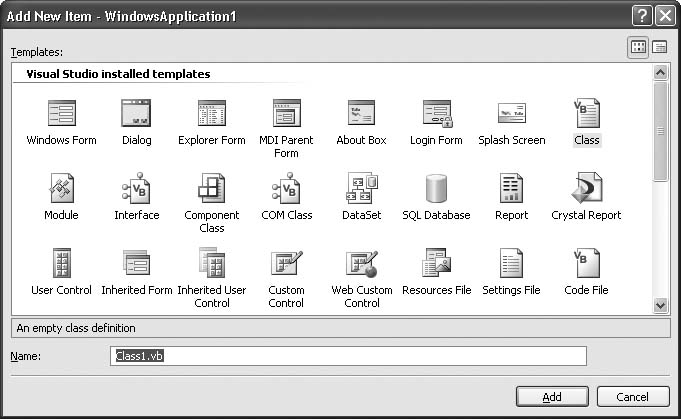
Visual Studio does not include an Add Structure menu command, or even a structure-focused template available via the Project → Add New Item menu command. If you want to include a structure in a file all its own, use the Project → Add New Item menu command, and select the Code File template in the Add New Item dialog, as shown in Figure 3-3. You can also simply type a new structure construct in any existing source-code file.
Discussion
The syntax for a structure is very similar to that of a class:
	Structure Structure1

	End Structure
Add members to your structure just as you would in a class.
Since structures cannot be used to derive other structures, some keywords that support derived classes
(such as the Protected and MustOverride keywords) cannot be
used.
Structures must have at least one public instance member or event definition.
The .NET Framework defines two categories of types: reference types and value types. Value types contain basic data
at the memory location assigned for a specific instance. If you looked
at the memory location assigned to an Integer value type instance, you would find
the Integer value that the program
last assigned to that variable.
Reference types store their data indirectly. The memory location assigned to a reference type contains another memory address that identifies the true storage area of the data. (This is similar to the pointer used in programming languages such as C.)
In Visual Basic, classes define reference types, while
structures define value types. All classes and
structures ultimately derive from the common System.Object class, but value types go
through the related System.ValueType class on the way to
System.Object.
Because structures store their data directly, they are sometimes faster to use (by the CPU) than classes, and their data can be stored on the application stack. Classes always require one or more trips to main memory. However, structures do have some limitations not placed on classes. Structures cannot be used as bases for other structures, nor can a structure derive from other structures or classes. Also, structures do not support destructors, which are special methods included in classes that perform final cleanup of resources whenever a class instance is being destroyed.
See Also
Recipes 3.1 and 3.2 introduce modules and classes, the two other major type constructs in Visual Basic.
3.4. Creating Other Item Types
Problem
Are there any other types of files or items I can add to a Visual Basic project?
Solution
The Add New Item dialog, accessed through the Project → Add New Item menu command, includes a large selection of template choices. Select the one that meets your needs. Some templates use a different default file extension than the standard .vb extension.
Discussion
Here are the Visual Basic–specific template choices installed by default with Visual Studio 2005 Professional Edition:
- Windows Form
Adds a blank Windows form, derived from
System.Windows.Forms.Form.- Dialog
Adds a new Windows “dialog-style” form to your project, derived from
System.Windows.Forms.Form. The form includes basic OK and Cancel buttons and is con-figured for typical dialog presentation.- Explorer Form
Adds a new Windows form to your project that has the basic look and functionality of the Windows File Explorer (explorer.exe). The main area of the form combines
TreeViewandListViewcontrols that provide an interface to the file system.- MDI Parent Form
If you are designing a Multi Document Interface (MDI) application, this form represents the parent that will include the various child “document” forms.
- About Box
Adds a new “About” form to your project. This is a standard Windows form, pre-designed to look like a typical About form. It automatically fills in application-specific details such as the version number. You must add the code elsewhere in your project to display this form.
- Login Form
Adds a new “Login” form to your project. This form includes the “look and feel” of a login form only; you must supply authentication code on your own.
- Splash Screen
Adds a new “Splash Screen” form to your project. This form appears as your application performs basic initialization during startup.
- Class
Adds a new class file to your project, containing an empty class definition named according to the filename you provide.
- Module
Adds a new module file to your project, containing an empty module definition named according to the filename you provide.
- Interface
Adds a new interface file to your project, containing an empty interface definition named according to the filename you provide. By custom, interface names always begin with a capital letter “I.”
- Component Class
Adds a new “component” to your project, derived from
System.ComponentModel.Component. The .NET component model provides basic interaction services for classes defined as components. All Windows Forms controls are components.- COM Class
Adds a new class file to your project that exposes COM interface features. This is done via the
ComClassAttributeattribute. All exposed interfaces have to be marshaled across the managed .NET boundary, although .NET performs most of the difficult work for you.- Data Set
Adds a new data set to your project with an .xsd file extension. These data sets provide a visual design experience to underlying data stores, such as databases. You can include queried data from several data sources.
- SQL Database
Adds a new SQL Server database file with an .mdf file extension. This file is managed by SQL Server, and you must have that product installed to use this item type.
- Report
Visual Studio includes its own banded report writer that you can use to create data reports. This item adds a new report with an .rdlc file extension. The report designer interacts with data sources defined in your application.
- Crystal Report
Crystal Reports is a third-party banded reporting tool included with Visual Studio. This item adds a new Crystal Report to your application with an " .rpt” file extension. Enhanced versions of the Crystal Reports product are available from its vendor, Business Objects. (Crystal Reports has passed through several owner-ship changes since its initial version. Business Objects is the owner as of this writing.)
- User Control
Adds a new user control file to your application, derived from
System.Windows.Forms.UserControl. User controls contain full user interaction functionality, similar to the controls already included in the Visual Studio Toolbox. You can build your control from other controls in the Toolbox or from scratch by managing all input and display needs.- Inherited Form
Adds a new form based on another form already found in your project. When selected, Visual Studio displays the Inheritance Picker dialog with a list of all forms in your project. Visual Studio must be able to create an instance of each potential form. Therefore, you must have built your project at least once, including the form to be inherited. Also, the Inheritance Picker will exclude any form marked as
MustInherit. You can manually create inherited forms using theInheritskeyword.- Inherited User Control
Adds a new user control based on another user control already found in your project. When selected, Visual Studio displays the Inheritance Picker dialog with a list of all user controls in your project. Visual Studio must be able to create an instance of each potential user control. Therefore, you must have built your project at least once, including the user control to be inherited. Also, the Inheritance Picker will exclude any user control marked as
MustInherit. You can manually create inherited controls using theInheritskeyword.- Custom Control
Creates a new user control but with more emphasis on controls that will contain no existing subordinate controls. You will manage the full display of the control yourself.
- Web Custom Control
Creates a new web control for use in ASP.NET applications that’s similar to the controls supplied with the Web Forms package. You are responsible for all HTML rendering code.
- Resources File
Adds a new resource file to your project, with an .resx file extension. New Windows Forms projects already include a project-focused resource file.
- Settings File
Adds a " .settings” file to your application that stores application-or user-specific settings. Windows Forms applications already include both kinds of settings support.
- Code File
Adds a blank code file to your project. The file will be completely empty, waiting for you to add a class, module, structure, or other content.
- Class Diagram
Adds a new class diagram file with a .cd file extension. Class diagrams let you define classes, structures, interfaces, and other basic types using a visual designer interface. Visual Studio manages the other files in your application as you make changes to the class diagram.
- XML File
Adds a new XML (Extensible Markup Language) file with an .xml file extension. Visual Studio includes basic IntelliSense support for editing XML files.
- XML Schema
Adds a new XSD (XML Schema Definition) file with an .xsd file extension. XSD files can be used to validate XML data.
- XSLT File
Adds a new XSLT (Extensible Stylesheet Language Transformation) file with an .xslt file extension. XSLT files are used to transform XML data into another format (either XML or any other format).
- Text File
Adds a blank text file to your project with a .txt file extension. You can add any text to this file that you wish.
- HTML Page
Adds a new HTML file with an .htm file extension. Visual Studio includes extended support for editing web pages.
- Bitmap File
Adds a new bitmap file with a .bmp file extension that you can edit directly in Visual Studio.
- Cursor File
Adds a new icon file with a .cur file extension that you can edit directly in Visual Studio.
- Icon File
Adds a new icon file with an .ico file extension that you can edit directly in Visual Studio.
- Application Configuration File
Adds a new .config settings file to your application. This file is often used to con-figure an application from .NET’s point of view. To store application-and user-specific usage settings, consider a settings file instead.
- Transactional Component
Adds a new transactional component that manages the lifetime of some data, resource, or activity. These components inherit from the
System.EnterpriseServices.ServicedComponentclass and exist mainly to interact within COM+ environments.- Installer Class
Adds an installer class you can use to create custom installation scenarios for .NET applications. For typical .NET applications, you should consider creating a standard deployment project instead.
- Windows Service
Adds a class that supports the creation of a Windows Service. Services have no direct user interface, so you should not add this template to a Windows Forms application.
If you use one of the other Visual Studio editions, such as the Express Edition, the list of available templates may differ. If you have installed third-party products that enhance Visual Studio, you may see additional templates related to those products.
The My Templates section of the Add New Item dialog includes custom file templates that you have added yourself, primarily through the Export Template Wizard available through the File → Export Template menu command.
See Also
This recipe does not discuss the types of items you can add to an ASP.NET web project. See the recipes in Chapter 17 for additional information on creating web projects.
3.5. Creating Object Instances
Problem
You need to create an instance of a class or structure.
Solution
Use the New keyword to create
a new class or structure instance.
Discussion
There are three basic places you use the New keyword:
When you declare a new instance of a type. The
Dimstatement offers a few different variations when using theNewkeyword. Both of the following examples create a new instance of a project-specificEmployeeclass. Other than the minor syntax differences, the two lines are functionally identical:Dim someEmployee As New Employee Dim someEmployee As Employee = New Employee
When you assign new instances to existing variables. Once you have a variable defined, you can assign it an instance using
New:Dim someEmployee As Employee someEmployee = New Employee
In-line, whenever you need an instance that you don’t capture in a variable. Sometimes you simply need a class to exist only within a statement, perhaps as an argument to another function. This is quite common when working with GDI+ graphic elements, such as pens. The following code block draws a line on a form during its
Paintevent. It creates a newPenobject that disappears once the call toDrawLine() ends:Private Sub Form1_Paint(ByVal sender As Object, _ ByVal e As System.Windows.Forms.PaintEventArgs) _ Handles Me.Paint e.Graphics.DrawLine(
NewPen(Color.Red), 0, 0, 100, 100) End Sub
All three uses of New can be
intermixed within the same block of code, and you can choose what best
fits the needs and logic of the code block.
See Also
The New keyword is also used
in a different context to create class constructors. See Recipe 3.6 for additional
details.
3.6. Initializing a Class Instance with Data
Problem
You want to ensure that some of the fields of a class are initialized before any of the exposed members of the class are used.
Solution
Add one or more custom constructors to your class.
Discussion
Constructors are Sub
procedures named New:
	Public Sub New()

	End Sub
A constructor with no arguments implements the default constructor. This is the constructor that is called anytime a new instance of the class is requested without additional initialization:
Dim someEmployee As New Employee
' Custom constructors include one or more
arguments. This sample accepts an initial employee name and assigns it
to the public Name field:
	Class Employee
	   Public Name As String = "Unknown"

	   Public Sub New(ByVal fullName As String)
	      If (Trim(fullName) <> "") Then Name = fullName
	   End Sub
	End Class
One feature of classes is overloaded methods, which use the special
Overloads key-word. This feature lets you use
the same method name more than once in the same class, but have each
method accept a different set of arguments. (See Recipe 3.14 for more
information.) Constructors can also be overloaded, but they don’t
require the Overloads
keyword:
	Class Employee
	   Public Name As String = "Unknown"
	   Public Salary As Decimal = 0@

	   Public Sub New(ByVal fullName As String)
	      If (Trim(fullName) <> "") Then Name = fullName
	   End Sub

	   Public Sub New(ByVal fullName As String, _
	         ByVal startingSalary As Decimal)
	      If (Trim(fullName) <> "") Then Name = fullName
	      If (startingSalary >= 0@) Then Salary = startingSalary
	   End Sub
	End Class
Visual Basic calls the appropriate constructor based on the argument signature:
	' ----- Uses the one-argument constructor.
	Dim someEmployee As New Employee("John Smith")
	' ----- Uses the two-argument constructor.
	Dim someEmployee As New Employee("John Smith", 50000@)
As an alternative way of doing the same thing, this sample class could have used an optional argument on a single constructor:
	Class Employee
	   Public Name As String = "Unknown"
	   Public Salary As Decimal = 0@

	   Public Sub New(ByVal fullName As String, _
	         Optional ByVal startingSalary As Decimal = 0@)

	      If (Trim(fullName) <> "") Then Name = fullName
	      If (startingSalary >= 0@) Then Salary = startingSalary
	   End Sub
	End
Class
If you don’t supply a default constructor but do supply
constructors with arguments, any use of the class requires constructor
arguments. If you want the arguments to be optional, either use the Optional keyword or include a default
constructor with no arguments.
All classes must have a constructor, even classes that perform no specific initialization. Consider this empty class:
	Class Employee

	End Class
Although you don’t see a specific constructor, a default constructor is there, supplied on your behalf by the Visual Basic compiler. Any constructor you supply, default or with arguments, replaces the one added by Visual Basic.
All classes (except System.Object) derive from some other class.
The default constructor for the base class is called implicitly from a
derived class’s constructor. Derived classes can also use a specific
base-class constructor by calling it directly:
	Class Manager
	   Inherits Employee

	   Public Sub New()
	      MyBase.New("Unnamed New Employee")
	   End Sub
	End Class
You can create instances of either classes or structures in your code. Modules cannot be instantiated, and therefore they do not use constructors.
See Also
Recipe 3.7 discusses destructors, which handle the end of an instance’s lifetime instead of its beginning.
3.7. Releasing an Instance’s Resources
Problem
Your class instance allocates resources during its lifetime, and you want to ensure that those resources are freed when the object is destroyed.
Solution
Add a Finalize( ) method to your class that includes any cleanup code
you need to run before .NET destroys the class instance. Finalize() is a method included in the
System.Object base class. To use it
in your code, you must override it:
	Protected Overrides Sub
Finalize()
Because a base class from which you derive may need to perform
its own cleanup, you should always call its Finalize() method:
	Protected Overrides Sub Finalize()
	   ' ----- Perform my cleanup, then…
	   MyBase.Finalize()
	End Sub
Discussion
.NET includes a process, known as garbage collection, which automatically
releases all memory associated with a class instance. However, it
doesn’t know what processing is required to release any acquired
external resources, such as database connections. Therefore, you must
provide that logic in a special method, implemented through an
override of the Finalize() method.
This special method is known as the class’s
destructor.
The garbage collector in .NET runs as needed, so there is no
guarantee that your Finalize()
method will be called at the moment you release all references to an
instance. It may be called one second, ten seconds, or ten minutes
later, possibly long after your application has stopped running. If
you need resources to be released in a timelier manner, combine the
destructor with the IDisposable interface. This interface defines
features that help release resources on a schedule you determine. More
specifically, resources are released whenever the related Dispose() method is called on your instance.
(You could simply include your own custom FreeResources() method in your class, but
using IDisposable allows Visual
Basic to get more involved in the cleanup process.)
To enable IDisposable in your
class, add an Implements statement
at the top of the class:
	Class ResourceUsingClass
	   Implements IDisposable
	End Class
When you add that Implements
line to your class, Visual Studio automatically adds a template of
features:
	Class ResourceUsingClass
	   Implements IDisposable

	   ' To detect redundant calls
	   Private disposedValue As Boolean = False
	   ' IDisposable
	   Protected Overridable Sub Dispose( _
	         ByVal disposing As Boolean)
	      If Not Me.disposedValue Then
	         If disposing Then
	            ' TODO: free unmanaged resources when
	            '       explicitly called
	         End If

	         ' TODO: free shared unmanaged resources
	      End If
	      Me.disposedValue = True
	   End Sub

	#Region " IDisposable Support "
	   ' This code added by Visual Basic to correctly
	   ' implement the disposable pattern.
	   Public Sub Dispose() Implements IDisposable.Dispose
	      ' Do not change this code. Put cleanup code in
	      ' Dispose(ByVal disposing As Boolean) above.
	      Dispose(True)
	      GC.SuppressFinalize(Me)
	   End Sub
	#End Region

	End Class
Fill in the “TODO” parts of the code with your resource-freeing logic.
When using the IDisposable
interface, you should still implement the Finalize()destructor just in case someone
forgets to call Dispose(). Maintain
a flag in your class that indicates whether resources have been
properly freed or not. The disposedValue variable that Visual Studio
generated serves this purpose.
Some Visual Basic features call Dispose() automatically when working with
IDisposable-enabled objects. The
Visual Basic Using statement exists
to destroy objects when they are no longer needed, and it calls
Dispose() automatically:
	Using externalResources As New ResourceUsingClass
	   ' ----- Work with the externalResources instance here.
	End Using
	' ----- At this point, externalResources.Dispose has been
	'       called automatically by the End
Using statement.
See Also
Recipe 3.6 discusses constructors, the opposite of destructors.
3.8. Using Namespaces
Problem
You want to place your classes within a specific .NET namespace.
Solution
Use the Namespace statement together with the default
namespace identified in a project’s properties.
Discussion
Every Visual Basic application resides within a default
namespace, what we’ll call the “absolute namespace position” for your
application. Visual Studio automatically sets this to a top-level
namespace with the same name as your project. For instance, if you
just accept the default “WindowsApplication1” name for a new Windows
Forms application, the namespace is also named WindowsApplication1. Since it’s a top-level
namespace, it resides at the same hierarchy position as the System namespace.
To alter the namespace for your project, open the Project
Properties window, and change the “Root namespace” field on the
Application tab. You can change it to use an existing namespace, such
as System.Windows.Forms, but then
you must take care to avoid naming conflicts with your classes.
When generating a full .NET application (EXE), your choice of
namespace is not too problematic because that namespace exists only
within the view of your program and its lifetime. Two applications
using the WindowsApplication1
namespace will not conflict with each other. However, if you generate
a .NET library (DLL) for general distribution to others
outside your organization, you should select a namespace that will
avoid conflicts with others. Microsoft recommends that you use a
combination of your company name and the product name, as they did
with the Microsoft.VisualBasic
namespace.
Beyond the absolute namespace position, you can place your classes and other types in a “relative namespace position” within the larger default absolute namespace. When you add a class (or other type) to your project, it appears in the absolute namespace position:
	Class Class1

	End Class
If your project uses WindowsApplication1 as its absolute
namespace, this class appears as WindowsApplication1.Class1. In relative
positioning, you can insert a new namespace between the absolute
position and the class:
	Namespace CoolClasses
	   Class Class1

	   End Class
	End Namespace
Now, Class1 is fully
referenced as WindowsApplication1.CoolClasses.Class1.
The Namespace keyword may
include multiple namespace components (separated by periods), and you
can nest them as well:
	Namespace CoolClasses
	   Namespace SomewhatCool.BarelyCool
	      Class Class1

	      End Class
	   End Namespace
	End Namespace
This Class1 lives at WindowsApplication1.CoolClasses.SomewhatCool.BarelyCool.
3.9. Splitting a Class Across Multiple Files
Problem
You have a class that is simply too much to manage reasonably in a single sourcecode file, and you would like to split it up.
Solution
Use the Partial keyword on a class to enable
splitting the implementation of that class across multiple physical
source files:
Partial Class Class1

	End Class
Discussion
Visual Basic now includes a partial class
feature that Visual Studio uses to separate automatically generated
code from nongenerated code. This feature is available to use in your
own classes. Before Visual Basic 2005, if you tried to split a class
by using the Class statement
multiple times on the same class name, the program would not compile.
But now you can break up your class into separate sections:
	Class Class1
	   ' ----- Some class members are defined here.
	End Class
	Partial Class Class1
	   ' ----- More class members are defined here.
	End Class
The key is the word Partial.
Adding the keyword Partial to at
least one of the class components tells the Visual Basic compiler to
collect all the parts and put them together before it builds the
compiled version of your program, even if those parts exist in
different files.
You do not need to include Partial on every part of the class, just on
one of the parts. Also, if your class inherits from another class or
implements an interface, you need to include only the Inherits or Implements keyword in one of the class
portions.
All class parts must exist in the context of the same namespace. If you create different class definitions with the same name but in different namespaces, they will be distinct and unrelated classes.
3.10. Creating a Form Based on Another Form
Problem
You’ve created a basic form, and you would like to use it to create other forms that extend the functionality of the basic form.
Solution
Create an inheritance relationship between the original form (the “base” class) and the form with the extended features (the “inherited” class). There are a few different ways to accomplish this, but the easiest is to let Visual Studio establish the inheritance relationship for you through the Inheritance Picker dialog.
Discussion
Use the Project → Add Windows Form menu command to add the new form to a new or existing Windows Forms project. When the Add New Item dialog appears, select Inherited Form from the list of templates, type your new form’s filename in the Name field, and then click the Add button. As long as there are other forms defined in your application, you will see the Inheritance Picker dialog (Figure 3-4).
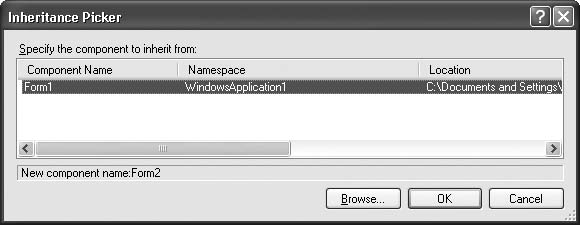
To establish the inheritance relationship, select the base form from the list of available forms, and then click the OK button. Visual Studio will add a new form that is derived from the selected base form.
All forms added to your Windows Forms project use inheritance.
By default, new forms derive from System.Windows.Forms.Form, but you can
indicate another base form from your own project. If you look in the
“designer” file associated with the form, you will see the following
statements in standard forms:
	Partial Class Form2
	   Inherits System.Windows.Forms.Form
When you alter the base class through the Inheritance Picker, these statements change to reflect the selected base form:
	Partial Class Form2
	   Inherits WindowsApplication1.Form1
(A form’s designer file is hidden by default. Click on the Show All Files button in the Solution Explorer, and then expand the branch for a form to see its designer file.)
You can manually establish the inheritance relationship by
modifying the Inherits statement
yourself to include the correct base class.
Visual Studio must be able to create an instance of the base form before it can show you the derived form through the Form Designer (or even list the form in the Inheritance Picker). This requires that a compiled version of that base form exists. Before using the Inheritance Picker to establish form relationships, build your project using the Build → Build WindowsApplication1 (or similar) menu command.
See Also
Although it’s not covered in a separate recipe in this chapter, creating inherited user controls follows the same process. Select Inherited User Control in the Add New Item dialog’s template list to establish such a relationship.
3.11. Passing and Returning Structures and Other Objects
Problem
You need to pass complex data types to a function, or return an equally complex type.
Solution
Just pass the data. Complex data in .NET is really no different from simple data in how it is passed to or returned from functions.
Discussion
Arrays are probably the most cumbersome, only because you have
to add two extra characters in the function definition. The following
function definition accepts an Integer array and returns a related String array:
	Public Function ConvertIntArrayToString( _
	      ByVal origArray() As Integer) As String( )
	   ' ----- Take a basic Integer array, and return a
	   '       String equivalent.
	   Dim newArray(UBound(origArray)) As String

	   For counter As Integer = 0 To UBound(origArray)
	      newArray(counter) = CStr(origArray(counter))
	   Next counter

	   Return newArray
	End Function
In some non-.NET languages—including earlier versions of Visual Basic—it is not always obvious how you pass complex data types, such as complete arrays, into and out of functions. In .NET, it’s a snap. All complex data types—instances of structures and classes—are simple variables that can be passed freely through arguments or return values. An array is a standard reference type, even if it contains value type elements.
3.12. Creating and Using an Enumeration
Problem
You want to add a set of related constants to your project and establish variables based on that set of constants.
Solution
Add an enumeration to your namespace, class, or other type using
the Enum statement. Then use the
name of the enumeration just as you would any other .NET integral data
type.
Discussion
Enum lets you build a list of
related integer values:
	Enum StorageMedia
	   Floppy
	   CD
	   DVD
	   FlashRAM
	   Paper
	End Enum
In this enumeration, all elements are of type Integer, with values ranging from 0 (Floppy) to 4
(Paper). You can select a different type through an As clause, and you can indicate specific
numeric values:
	Enum StorageMedia As Short
	   Floppy = 100
	   CD
	   DVD
	   FlashRAM
	   Paper = 500
	End Enum
After you’ve created your enumeration, refer to individual members by combining the enumeration name and the member name:
storageType = StorageMedia.FlashRAM
Creating variables of an enumeration type is just as simple:
Dim storageType As StorageMedia
Although storageType might
act like a Short or Integer (as defined through the underlying
Enum statement), it is truly a
variable of type StorageMedia, a
new data type all its own.
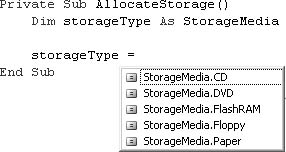
Without enumerations, the only way to create a related set of integer values is to define multiple constants and trust yourself to use them as a set. Enumerations bundle like elements, making it easier to keep track of the relationships. Visual Studio also picks up on this relationship, using enumerations to enhance IntelliSense, as shown in Figure 3-5.
Although enumeration variables are typed to the specific
Enum, Visual Basic allows you to
assign any numeric values (limited to the underlying type of the
Enum) to those variables. For
instance, Visual Basic doesn’t stop you from assigning the value
700 to the storageType variable, even though none of
the StorageMedia enumeration
members have a value of 700.
3.13. Converting Between Numeric and String Enumeration Values
Problem
While you intend to use an enumeration through its members and their numeric equivalents, you also need to be able to get the string name of an enumeration member and convert it back to numeric form from that string.
Solution
Use the string conversion features of the System.Enum class and its derived
enumerations to manipulate the members through strings.
Discussion
Moving from a numeric member to string form is simple, and you’ve probably already done something similar for other types. Let’s reuse the enumeration from Recipe 3.12:
	Enum StorageMedia
	   Floppy
	   CD
	   DVD
	   FlashRAM
	   Paper
	End Enum
If you’ve created an enumeration variable:
Dim storageType As StorageMedia = StorageMedia.FlashRAM
you can convert its value to string form using the ToString() member:
	Dim stringForm As String = storageType.
ToString()
	MsgBox(stringForm) ' Displays "FlashRAM"
Converting back from a string is just slightly more indirect.
Use the System.Enum class’s
Parse() method to restore a string
back to its original numeric value:
	storageType = System.Enum.
Parse(GetType(StorageMedia), "DVD")
	MsgBox(CInt(storageType))     ' Displays 2
	MsgBox(storageType.ToString)  ' Displays "DVD"
Visual Basic compiles the full name of each enumeration member into the target application. You can take advantage of these stored names to shuttle enumeration values between their integer and string forms.
If you pass an invalid string to the Parse() method, an error will occur, so keep
an eye on that enumerated data.
3.14. Creating a Method That Accepts Different Sets of Arguments
Problem
You have a great function that generates its results based on one type of data, but you’d like to reuse that function with other data types or argument signatures.
Discussion
You may sometimes write applications that communicate with
Oracle databases. Supplying dates to Oracle SQL statements is
frequently done using Oracle’s TO_DATE function. When building SQL
statements in my .NET application, you can prepare a Date variable for
use in Oracle by first wrapping it in a TO_DATE function. There are other times when
all you have is a date in a user-entered string format, and you need
to prepare that date for use by Oracle. To support both original date
and string data values, you can use an overloaded Oracle preparation
function:
	Public
Overloads Function ToOracleDate( _
	      ByVal origDate As Date) As String
	   Return "TO_DATE('" & Format(origDate, "MM/dd/yyyy") & _
	      "', 'MM/DD/YYYY')"
	End Function

	Public Overloads Function ToOracleDate( _
	      ByVal origDate As String) As String
	   If (Trim(origDate) = "") Then
	      Return "NULL"
	   Else
	      Return ToOracleDate(CDate(origDate))
	   End If
	End Function
The Overloads keyword informs
Visual Basic that you are trying to overload a single function name
with two different argument signature variations. In this example, the
string version calls the date version for some of its processing. This
sharing of processing logic can help keep your code simple even when
using multiple overloads.
The .NET Framework makes extensive use of method overloading, including over-loads of some Visual
Basic features. The InStr()
function, which locates a smaller string within a larger one, uses
overloading to support the interesting syntax it inherited from Visual
Basic 1.0. The basic syntax uses two strings, the one being searched
and the one being sought:
	Public Function InStr(ByVal String1 As String, _
	   ByVal String2 As String) As Integer
The second variation inserts an Integer starting position as the first
argument:
	Public Function InStr(ByVal Start As Integer, _
	   ByVal String1 As String, ByVal String2 As String) As Integer
Since Visual Basic does not support optional arguments anywhere but at the end of an argument list, this function uses overloading to support the argument variety.
Overloading is different from overriding. Overriding occurs only in inheritance relationships, when a function in a derived class alters or replaces the logic for an identical function in a base class. Overridden functions must have the same argument signature in both the base and derived classes.
There are no fixed limits on the number of overloads you can use
in a single method. And while constructors (Sub New procedures) also use a form of
overloading, they do not use the Overloads keyword.
See Also
See Recipe 3.6 for information on overloading using class constructors.
3.15. Using Standard Operators for Nonstandard Purposes
Problem
The basic Visual Basic operators, such as the addition operator (+), seem so useful that you would like to use them for your own custom classes.
Solution
Use operator overloading, a new feature in Visual Basic 2005, to allow your own classes to interact with each other through the standard Visual Basic operators.
Discussion
Operator overloading extends method overloading to include the standard Visual Basic operators. In a way, it treats operators such as +, *, and Or as method names. Consider a class that manages scientific specimens:
Class Specimen
If your application supports the idea of combining two specimens, resulting in a merged yet single larger specimen, it would be great to be able to use the addition operator to merge two distinct specimens into a single combined specimen:
	Dim part1 As New Specimen
	Dim part2 As New Specimen
	Dim combinedParts As Specimen
	'…later…
	combinedParts = part1 + part2
To add support for addition to this class, overload the +
operator by adding an Operator definition to the class:
	Public Shared Operator +(ByVal firstPart As Specimen, _
	      ByVal secondPart As Specimen) As Specimen
	   Dim mergedSpecimen As New Specimen

	   ' ----- Add logic to merge the two parts, then…
	   Return mergedSpecimen
	End Operator
You can include different input or output types in the overloaded function, as long as at least one input or output matches the class in which the overload appears:
	Public Shared Operator +(ByVal singlePage As Page, _
	      ByVal sourceBook As Book) As Book
	   ' ----- Adds a page to a book.

	End Operator
All overloaded operators must include the Shared keyword in the definition.
For unary operators, such as the Not operator, only a single argument is sent
to the overloaded function. Table 3-1 lists the
overloadable operators.
You can overload overloaded operators. That is, you can include multiple overloads
for, say, the addition (+) operator
in a single class, as long as the argument signatures differ.
While operator overloading can make your code more straightforward, it can also add a level of confusion, since you will be using operators in a way that is not part of the standard language usage. Where there is the possibility of confusion, add meaningful comments to the code to guide the reader through the rough spots.
See Also
Recipe 3.14 discusses standard method overloading.
3.16. Enforcing Strong Data Typing in an Otherwise Weakly Typed Collection
Problem
You have created a generic collection class that is quite useful
and will support data of any class or type. You want to ensure that
data types are never mixed within a single instance of the collection.
That is, if a collection contains String values, you never want Integer values added to that same
collection.
Discussion
Generics allow you to make substitutions of generic data-type placeholders with actual data types. Consider this simple class:
	Class MultiShow
	   Public DisplayValue As String
	   Public InterValue As String
	   Public Sub ShowDouble()
	      ' ----- Display two copies of the value.
	      MsgBox(DisplayValue & InterValue & DisplayValue)
	   End Sub
	   Public Sub ShowTriple()
	      ' ----- Display three copies of the value.
	      MsgBox(DisplayValue & InterValue & DisplayValue & _
	         InterValue & DisplayValue)
	   End Sub
	End Class
This class facilitates the display of some stored string value.
But what if you wanted to display Integer data? You would have to rewrite the
class, redefining DisplayValue and
InterValue as Integer types. And that wouldn’t help you
much if you then wanted to use Date
values. You could replace String
with Object, but this approach
would not help you if you needed to ensure that DisplayValue and InterValue were the same data type.
Generics allow you to treat a class in a generic manner where
data types are concerned. Adding generics to our MultiShow class results in the following
code:
	Class MultiShow(Of T)
	   Public DisplayValue As T
	   Public InterValue As T
	   Public Sub ShowDouble( )
	      ' ----- Display two copies of the value.
	      MsgBox( _
	         DisplayValue.ToString() & InterValue.ToString( ) & _
	         DisplayValue.ToString( ))
	   End Sub
	   Public Sub ShowTriple( )
	      ' ----- Display three copies of the value.
	      MsgBox( _
	         DisplayValue.ToString() & InterValue.ToString( ) & _
	         DisplayValue.ToString() & InterValue.ToString( ) & _
	         DisplayValue.ToString( ))
	   End Sub
	End Class
The Of T clause enables
generics on the class. T acts like a placeholder (you don’t have to
use T; you can give the placeholder
any name you want) for a data type used somewhere in the class. In this example,
we used T twice to set the data
types for the public fields:
	Public DisplayValue As T
	Public InterValue As T
To use this class, include an Of datatype
clause in your reference declaration:
Dim dataShow As New MultiShow(Of String)
In the dataShow instance,
String is used anywhere T appears in the class definition. It’s as
if Visual Basic generated a String-specific version of the MultiShow class for you. To generate an
Integer version, just update the
declaration:
Dim dataShow As New MultiShow(Of Integer)
Each instance variation of a generic class you define is truly a
distinct data type. You cannot pass data freely between instances of
MultiShow(Of Integer) and MultiShow(Of String) without conversion,
just as you cannot pass data between Date and Integer data types without
conversion.
You can include multiple data-type placeholders by separating them with commas:
	Class MultiShow(Of T1, T2)
	   Public DisplayValue As T1
	   Public InterValue As T2
Now you can provide either identical or distinct data types for
T1 and T2:
	Dim dataShowUnited As New MultiShow(Of String, String)
	Dim dataShowDivided As New MultiShow(Of String, Integer)
In addition to simple data-type placeholders, you can include
restrictions on each placeholder to limit the types of data used by
the class. You can design a generic class that will limit the
data-type substitution to just the Form class or any class derived from
Form:
	Class FunForms(Of T As System.Windows.Forms.Form)

	End Class
Interface-specific limits work as well:
	Class ThrowAways(Of T As System.IDisposable)

	End Class
If you want to create new instances of T (whatever it is) within your class, use
the As New restriction in the
generic definition:
	Class EntryManager(Of T As New)
	   Public Function BuildNewEntry() As T
	      ' ----- Create a new object.
	      Dim result As New T
	      …
	      Return result
	   End Function
	End Class
This works only if the data type replacing T includes a default constructor (that is, a
constructor with no arguments).
Each data-type placeholder in the generic definition can include multiple constraints, all surrounded with curly braces:
	Class FunForms(Of T As {System.Windows.Forms.Form, New})

	End Class
The list of multiple restrictions can include multiple
interfaces if needed, but only one standard class (such as System.Windows.Forms.Form) is permitted per
placeholder.
Generics are useful when defining collection classes. Adding a
generic restriction to a collection ensures that objects of only a
single type can be added to the collection, a restriction that may be
useful in some cases. For example, a Collection(Of String) allows only String values to be added to the
collection.
See Also
Chapter 14 includes recipes that show you how to use specific generic collection classes.