Advanced Compile Options
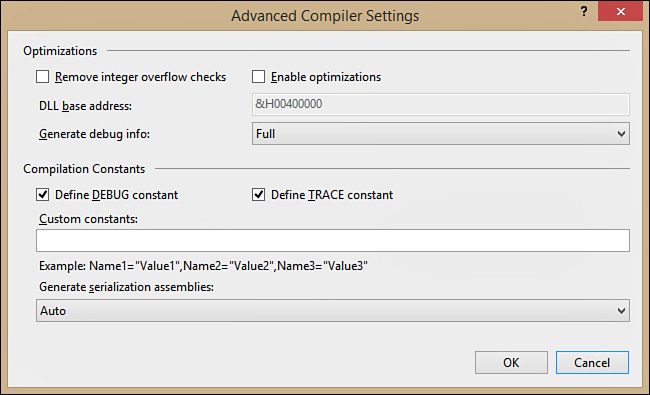
You can specify advanced settings for the build process. To accomplish this, you need to click the Advanced Compile Options button in the Compile tab to open the Advanced Compiler Settings window (see Figure 2.29).
Compiler Settings and Configurations
Advanced compiler settings occur at the configuration level. This means the Debug configuration has its own advanced settings, the Release configuration has its own settings, and your custom configurations have their own settings. Please remember this when providing advanced settings.
You use the Advanced Compiler Settings window to set compiler options that drive the build process. The following sections discuss these options in detail.
Optimizations
The Optimizations section of the Advanced Compiler Settings window offers options that can potentially lead to building a smaller and faster executable. This section provides four options:
![]() Remove Integer Overflow Checks—When you make calculations in your code against
Remove Integer Overflow Checks—When you make calculations in your code against Integer or Integer-style data types, the Visual Basic compiler checks that the result of the calculation falls within the range of that particular data type. By default, this option is turned off so that the compiler can do this kind of check. If you select this check box, the compiler does not check for such overflows, and the application execution might occur faster. Be careful about this choice, especially if your code implements calculations.
![]() Enable Optimizations—When this check box is selected, the compiler basically removes some opcodes that are required for interacting with the debugger. Moreover, the just-in-time compilation is optimized because the Runtime knows that a debugger will not be attached. On the other hand, this can result in major difficulties when debugging applications. For example, you might not use breakpoints at specific lines of code and, consequently, you might perform debugging tasks even though the optimization process could produce a smaller and faster executable.
Enable Optimizations—When this check box is selected, the compiler basically removes some opcodes that are required for interacting with the debugger. Moreover, the just-in-time compilation is optimized because the Runtime knows that a debugger will not be attached. On the other hand, this can result in major difficulties when debugging applications. For example, you might not use breakpoints at specific lines of code and, consequently, you might perform debugging tasks even though the optimization process could produce a smaller and faster executable.
![]() DLL Base Address—This option, which is available when you’re developing class libraries and user controls, provides the ability to specify the base address for the assembly. The base address is the location in memory where a .dll file is loaded. By default, Visual Studio assigns a base address in hexadecimal format. If you need to provide a custom base address, this is where you can do it.
DLL Base Address—This option, which is available when you’re developing class libraries and user controls, provides the ability to specify the base address for the assembly. The base address is the location in memory where a .dll file is loaded. By default, Visual Studio assigns a base address in hexadecimal format. If you need to provide a custom base address, this is where you can do it.
![]() Generate Debug Information—Generating debug information when building a project allows you to use the debugger against your application. By default, this option is set to Full, which means that full debug information is generated so that the debugger can be fully used to debug an application. (This is the case with the Debug configuration.) If you set this option to None, no debug information will be generated; if you set this option to pdb-only, the compiler will produce just a .pdb file that contains debug symbols and project state information.
Generate Debug Information—Generating debug information when building a project allows you to use the debugger against your application. By default, this option is set to Full, which means that full debug information is generated so that the debugger can be fully used to debug an application. (This is the case with the Debug configuration.) If you set this option to None, no debug information will be generated; if you set this option to pdb-only, the compiler will produce just a .pdb file that contains debug symbols and project state information.
Compilation Constants
You can use compilation constants to conditionally compile blocks of code. Conditional compilation relies on the evaluation to True of constants that will be included in the final assembly. The Visual Basic compiler defines some default constants you can evaluate within your code; you can also declare custom constants. In the Advanced Compiler Settings window, you can specify whether the compiler needs to include the DEBUG and TRACE constants. The DEBUG constant enables you to understand whether the application is running in debug mode (that is, if the application has been compiled using the Debug configuration). The TRACE constant is also related to debugging tasks; in particular, the .NET Framework exposes the Trace class, which is used in debugging and can send the tracing output to the Output window when the TRACE constant is defined. If TRACE is not used, no output is generated because invocations against the Trace class are ignored.
For a full list of built-in constants, head to the MSDN Library, at http://msdn.microsoft.com/en-us/library/dy7yth1w(v=vs.120).aspx. Evaluating constants in code is simple. You can use the #If, #Else, #ElseIf, and #EndIf directives. For example, if you want to evaluate whenever an application has been compiled with the Debug configuration, you could use the following code:
#If DEBUG Then
Console.WriteLine("You are in Debug configuration")
#Else
Console.WriteLine("You are not in Debug configuration")
#End If
This essentially verifies whether the constant is defined and takes some action at that point. In our example, if the DEBUG constant is defined in the assembly, this means that it has been built via the Debug configuration.
Custom Constants
You can define custom constants in two different ways. The first is to add custom constants in the appropriate field of the Advanced compiler settings window. Each constant must have the form of Name="Value", and constants are separated by commas. The second way is to add a #Const directive in your code. For example, the following line of code
#Const TestConstant = True
defines a constant named TestConstant whose value is set to True. The big difference in using a #Const directive is that it defines just private constants that are visible within the code file that defines them. Custom constants are also very useful with shared projects, where you can use #if directives to detect which project is running the shared code. (See Chapter 17, “Working with Objects: Visual Tools and Code Sharing,” for more details.)
Generating Serialization Assemblies
As you’ll learn in Chapter 39, “Serialization,” serialization in .NET development is a technique that allows you to persist the state of an object. Among several alternatives, this can be accomplished using a class called XmlSerializer. In such situations, the Visual Basic compiler can optimize applications that use the XmlSerializer class, generating additional assemblies for better performances. By default, this option is set to Auto so that Visual Studio generates serialization assemblies only if you are effectively using XML serialization in your code. Other options are On and Off.