Seeing is believing. | ||
| --Proverb | ||
Form ever follows function. | ||
| --Louis Henri Sullivan | ||
Intelligence ...is the faculty of making artificial objects, especially tools to make tools. | ||
| --Henri-Louis Bergson | ||
In this chapter you’ll learn:
<objective>The basics of the Visual Studio Integrated Development Environment (IDE) that assists you in writing, running and debugging your Visual C# programs.
</objective> <objective>Visual Studio’s help features.
</objective> <objective>Key commands contained in the IDE’s menus and toolbars.
</objective> <objective>The purpose of the various kinds of windows in the Visual Studio 2010 IDE.
</objective> <objective>What visual programming is and how it simplifies and speeds program development.
</objective> <objective>To create, compile and execute a simple Visual C# program that displays text and an image using the Visual Studio IDE and the technique of visual programming.
</objective> </feature><feature> <supertitle>Outline</supertitle> </feature>Visual Studio 2010 is Microsoft’s Integrated Development Environment (IDE) for creating, running and debugging programs (also called applications) written in various .NET programming languages. This chapter provides an overview of the Visual Studio 2010 IDE and shows how to create a simple Visual C# program by dragging and dropping predefined building blocks into place—a technique known as visual programming.
There are several Visual Studio versions. This book’s examples are based on the Visual C# 2010 Express Edition. See the Before You Begin section that follows the Preface for information on installing the software. We assume that you’re familiar with Windows.
We use the > character to indicate the selection of a menu item from a menu. For example, we use the notation File > Open File... to indicate that you should select the Open File... menu item from the File menu.
To start Microsoft Visual C# 2010 Express Edition, select Start > All Programs > Microsoft Visual Studio 2010 Express > Microsoft Visual C# 2010 Express. Once the Express Edition begins execution, the Start Page displays (Fig. 2.1). Depending on your version of Visual Studio, your Start Page may look different. The Start Page contains a list of links to Visual Studio 2010 IDE resources and web-based resources. At any time, you can return to the Start Page by selecting View > Start Page.
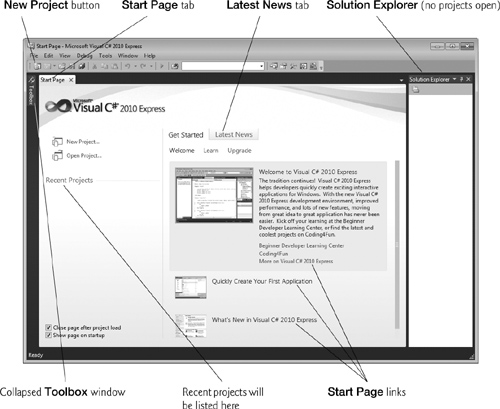
The Start Page links are organized into sections—Recent Projects, Get Started and Latest News—that contain links to helpful programming resources. Clicking any link on the Start Page displays relevant information associated with the specific link. [Note: An Internet connection is required for the IDE to access some of this information.] We refer to single clicking with the left mouse button as selecting or clicking. We refer to double clicking with the left mouse button simply as double clicking.
The Recent Projects section contains information on projects you’ve recently created or modified. You can also open existing projects or create new ones by clicking the links above this section. The Get Started section focuses on using the IDE for creating programs and learning Visual C#.
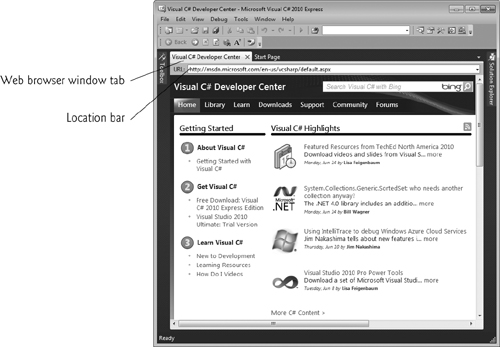
The Latest News tab provides links to the latest Visual C# developments (such as updates and bug fixes) and to information on advanced programming topics. To access more extensive information on Visual Studio, you can browse the MSDN (Microsoft Developer Network) library at msdn.microsoft.com/en-us/library/default.aspx. The MSDN site contains articles, downloads and tutorials on technologies of interest to Visual Studio developers. You can also browse the web from the IDE by selecting View > Other Windows > Web Browser. To request a web page, type its URL into the location bar (Fig. 2.2) and press the Enter key—your computer, of course, must be connected to the Internet. The web page that you wish to view appears as another tab in the IDE (Fig. 2.2).
To begin programming in Visual C#, you must create a new project or open an existing one. Select either File > New Project... to create a new project or File > Open Project... to open an existing project. From the Start Page, above the Recent Projects section, you can also click the links New Project... or Open Project.... A project is a group of related files, such as the Visual C# code and any images that might make up a program. Visual Studio 2010 organizes programs into projects and solutions, which contain one or more projects. Multiple-project solutions are used to create large-scale programs. Most of the programs we create in this book consist of a single project.
When you select File > New Project... or click the New Project... link on the Start Page, the New Project dialog (Fig. 2.3) displays. Dialogs are windows that facilitate user–computer communication.

Visual Studio provides several templates (Fig. 2.3). Templates are the project types users can create in Visual C#—Windows Forms applications, console applications, WPF applications and others. In this chapter, we build a Windows Forms Application. Such an application executes within a Windows operating system (such as Windows 7) and typically has a graphical user interface (GUI)—the visual part of the program with which the user interacts. Windows applications include Microsoft software products like Microsoft Word, Internet Explorer and Visual Studio; software products created by other vendors; and customized software that you and other programmers create.
By default, Visual Studio assigns the name WindowsFormsApplication1 to a new Windows Forms Application project and solution (Fig. 2.3). Select Windows Forms Application, then click OK to display the IDE in Design view (Fig. 2.4), which contains the features that enable you to create programs.
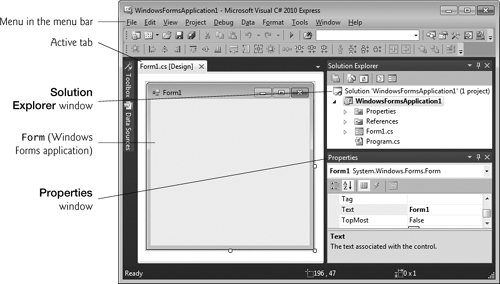
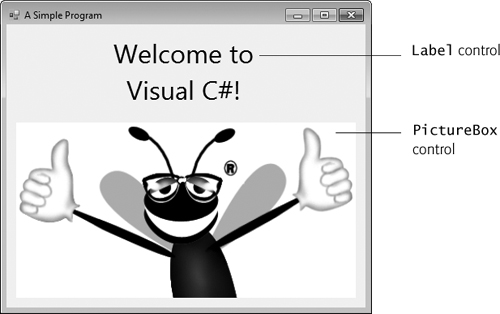
The rectangle in the Design area titled Form1 (called a Form) represents the main window of the application that you’re creating. Visual C# applications can have multiple Forms (windows)—however, most applications you’ll create in this text will use only one Form. You’ll learn how to customize the Form by adding GUI controls—in this example, you’ll add a Label and a PictureBox (as you’ll see in Fig. 2.25). A Label typically contains descriptive text (for example, "Welcome to Visual C#!"), and a PictureBox displays an image, such as the Deitel bug mascot. Visual C# Express has many preexisting controls and other components you can use to build and customize your programs.
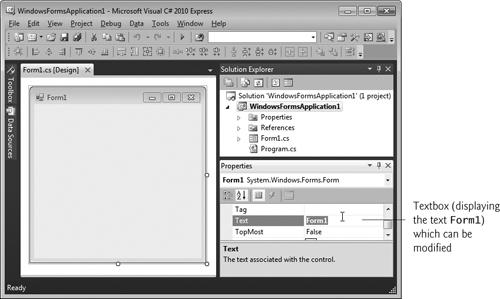
In this chapter, you’ll work with preexisting controls from the .NET Framework Class Library. As you place controls on the Form, you’ll be able to modify their properties. For example, Fig. 2.5 shows where the Form’s title can be modified and Fig. 2.6 shows a dialog in which a control’s font properties can be modified.

Collectively, the Form and controls make up the program’s GUI. Users enter data (inputs) into the program by typing at the keyboard, by clicking the mouse buttons and in a variety of other ways. Programs use the GUI to display instructions and other information (outputs) for users to view. For example, the New Project dialog in Fig. 2.3 presents a GUI where the user clicks the mouse button to select a template type, then inputs a project name from the keyboard (the figure is still showing the default project name WindowsFormsApplication1 supplied by Visual Studio).
Each open file name is listed on a tab. To view a document when multiple documents are open, click its tab. Tabs facilitate easy access to multiple open documents. The active tab (the tab of the currently displayed document) is highlighted in yellow (for example, Form1.cs [Design] in Fig. 2.4).
Commands for managing the IDE and for developing, maintaining and executing programs are contained in menus, which are located on the menu bar of the IDE (Fig. 2.7). The set of menus displayed depends on what you’re currently doing in the IDE.
Menus contain groups of related commands (also called menu items) that, when selected, cause the IDE to perform specific actions. For example, new projects are created by selecting File > New Project.... The menus depicted in Fig. 2.7 are summarized in Fig. 2.8.
Table 2.8. Summary of Visual Studio 2010 IDE menus.
Menu | Description |
|---|---|
File | Contains commands for opening, closing, adding and saving projects, as well as printing project data and exiting Visual Studio. |
Edit | Contains commands for editing programs, such as cut, copy, paste, undo, redo, delete, find and select. |
View | Contains commands for displaying IDE windows (for example, Solution Explorer, Toolbox, Properties window) and for adding toolbars to the IDE. |
Project | Contains commands for managing projects and their files. |
Debug | Contains commands for compiling, debugging (that is, identifying and correcting problems in programs) and running programs. |
Data | Contains commands for interacting with databases (that is, organized collections of data stored on computers), which we discuss in Chapter 18, Databases and LINQ. |
Format | Contains commands for arranging and modifying a |
Tools | Contains commands for accessing additional IDE tools and options for customizing the IDE. |
Window | Contains commands for hiding, opening, closing and displaying IDE windows. |
Help | Contains commands for accessing the IDE’s help features. |
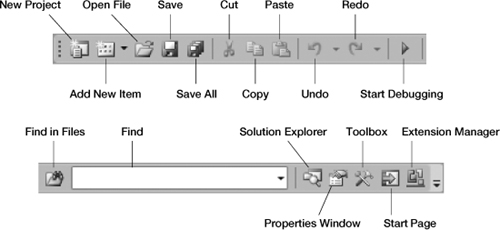
You can access many of the more common menu commands from the toolbar (Fig. 2.9), which contains graphics, called icons, that graphically represent commands. By default, the standard toolbar is displayed when you run Visual Studio for the first time—it contains icons for the most commonly used commands, such as opening a file, adding an item to a project, saving files and running applications (Fig. 2.9). The icons that appear on the standard toolbar may vary, depending on the version of Visual Studio you’re using. Some commands are initially disabled (grayed out or unavailable to use). These commands are enabled by Visual Studio only when they’re necessary. For example, Visual Studio enables the command for saving a file once you begin editing a file.
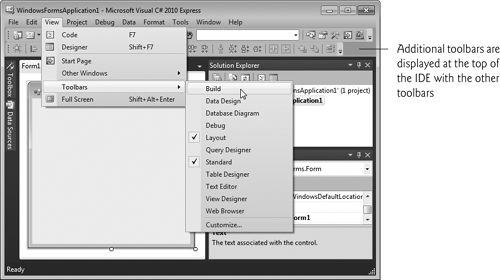
You can customize the IDE’s toolbars. Select View > Toolbars (Fig. 2.10). Each toolbar you select is displayed with the other toolbars at the top of the Visual Studio window. To execute a command via the toolbar, click its icon. Some icons contain a down arrow that you can click to display related commands, as shown in Fig. 2.11.

It can be difficult to remember what each toolbar icon represents. Hovering the mouse pointer over an icon highlights it and, after a brief pause, displays a description of the icon called a tool tip (Fig. 2.12). Tool tips help you become familiar with the IDE’s features and serve as useful reminders for each toolbar icon’s functionality.

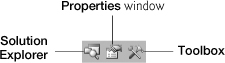
The IDE provides windows for accessing project files and customizing controls. This section introduces several windows that you’ll use frequently when developing Visual C# programs. These windows can be accessed via the toolbar icons (Fig. 2.13) or by selecting the desired window’s name from View > Other Windows.
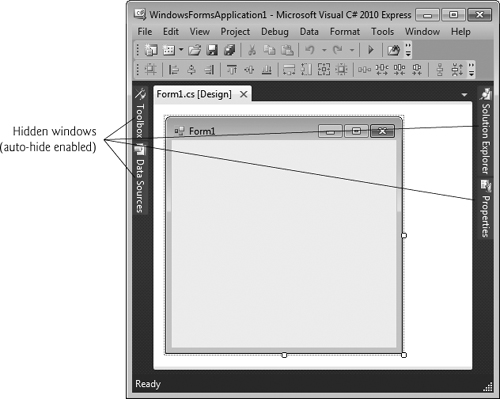
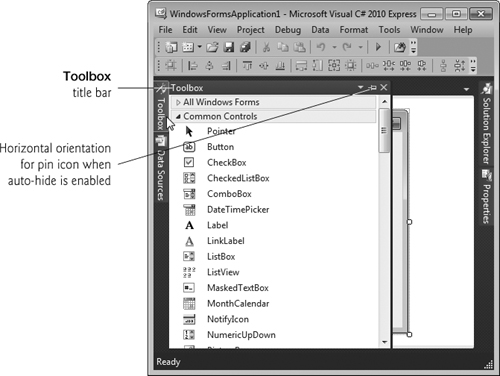
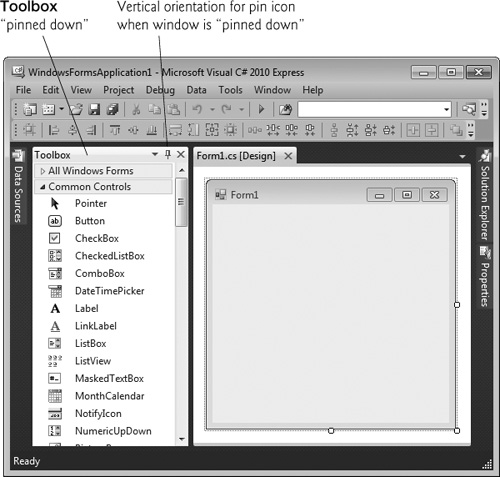
Visual Studio provides a space-saving feature called auto-hide. When auto-hide is enabled, a tab appears along either the left, right or bottom edge of the IDE window (Fig. 2.14). This tab contains one or more icons, each of which identifies a hidden window. Placing the mouse pointer over one of these icons displays that window (Fig. 2.15). Moving the mouse pointer outside the window’s area hides the window. To “pin down” a window (that is, to disable auto-hide and keep the window open), click the pin icon. When auto-hide is enabled, the pin icon is horizontal (Fig. 2.15)—when a window is “pinned down,” the pin icon is vertical (Fig. 2.16).
The next few sections cover three of Visual Studio’s main windows—the Solution Explorer, the Properties window and the Toolbox. These windows display project information and include tools that help you build your programs.
The Solution Explorer window (Fig. 2.17) provides access to all of a solution’s files. If it’s not shown in the IDE, click the Solution Explorer icon in the IDE (Fig. 2.13), select View > Other Windows > Solution Explorer or type <Ctrl> <Alt> L. When you open a new or existing solution, the Solution Explorer displays the solution’s contents.
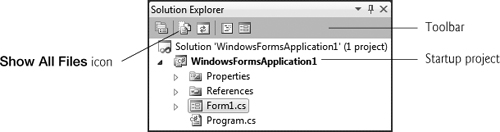
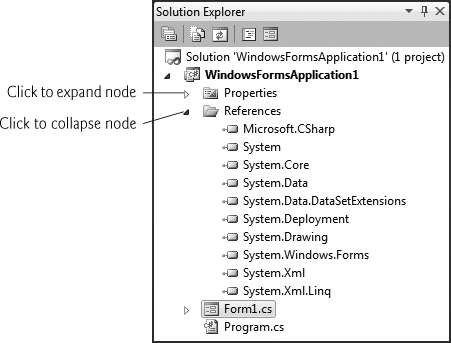
The solution’s startup project is the one that runs when you select Debug > Start Debugging (or press the F5 key). For a single-project solution like the examples in this book, the startup project is the only project (in this case, WindowsFormsApplication1) and the project name appears in bold text in the Solution Explorer window. When you create an application for the first time, the Solution Explorer window lists entries for the project’s Properties and References, and the files Form1.cs and Program.cs (Fig. 2.17). The Visual C# file that corresponds to the Form shown in Fig. 2.4 is named Form1.cs (selected in Fig. 2.17). Visual C# files use the .cs file-name extension.
By default, the IDE displays only files that you may need to edit—other files that the IDE generates are hidden. The Solution Explorer window includes a toolbar that contains several icons. Clicking the Show All Files icon (Fig. 2.17) displays all the solution’s files, including those generated by the IDE. Clicking the arrows to the left of a file or folder expands or collapses the project tree’s nodes. Try clicking the arrow to the left of References to display items grouped under that heading (Fig. 2.18). Click the arrow again to collapse the tree. Other Visual Studio windows also use this convention.
The Toolbox (View > Other Windows > Toolbox) contains icons representing controls used to customize Forms (Fig. 2.19). With visual programming, you can “drag and drop” controls onto the Form and the IDE will write the code that creates the controls for you. This is faster and simpler than writing this code yourself. Just as you do not need to know how to build an engine to drive a car, you do not need to know how to build controls to use them. Reusing preexisting controls saves time and money when you develop programs. You’ll use the Toolbox when you create your first program later in the chapter.
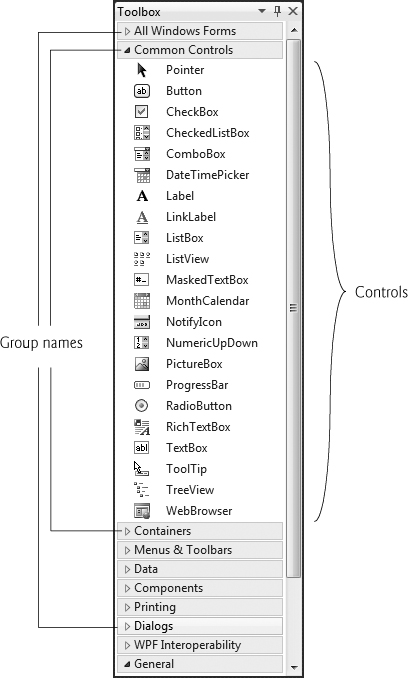
The Toolbox groups the prebuilt controls into categories—All Windows Forms, Common Controls, Containers, Menus & Toolbars, Data, Components, Printing, Dialogs, WPF Interoperability and General are listed in Fig. 2.19. Again, note the use of arrows, which can expand or collapse a group of controls. We discuss many of the Toolbox’s controls and their functionality throughout the book.
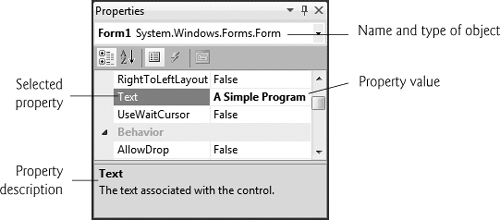
To display the Properties window, select View > Other Windows > Properties Window or click the Properties window toolbar icon shown in Fig. 2.13. The Properties window displays the properties for the currently selected Form (Fig. 2.20), control or file in Design view. Properties specify information about the Form or control, such as its size, color and position. Each Form or control has its own set of properties—a property’s description is displayed at the bottom of the Properties window whenever that property is selected.

Figure 2.20 shows Form1’s Properties window. The left column lists the names of the Form’s properties—the right column displays the current value of each property. You can sort the properties either alphabetically (by clicking the Alphabetical icon) or categorically (by clicking the Categorized icon). The properties can be sorted alphabetically from A to Z or Z to A—sorting by category groups the properties according to their use (that is, Appearance, Behavior, Design, etc.). Depending on the size of the Properties window, some of the properties may be hidden from view on the screen. Users can scroll through the list of properties by dragging the scrollbox up or down inside the scrollbar, or by clicking the arrows at the top and bottom of the scrollbar. We show how to set individual properties later in this chapter.
The Properties window is crucial to visual programming—it allows you to modify a control’s properties visually, without writing code. You can see which properties are available for modification and, in many cases, can learn the range of acceptable values for a given property. The Properties window displays a brief description of the selected property, helping you understand its purpose. A property can be set quickly using this window, and no code needs to be written.
At the top of the Properties window is the component selection drop-down list, which allows you to select the Form or control whose properties you wish to display in the Properties window (Fig. 2.20). Using the component selection drop-down list is an alternative way to display a Form’s or control’s properties without clicking the actual Form or control in the GUI.
Microsoft provides extensive help documentation via the Help menu. Using Help is an excellent way to get information quickly about Visual Studio, Visual C# and more.
Before using Help the first time, you must configure it as follows:
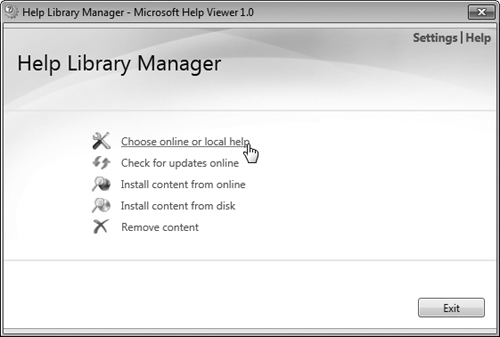
Select Help > Manage Help Settings to display the Help Library Manager. The first time you do this, the dialog in Fig. 2.21 will appear. Simply click OK to select the default location for help content that’s stored on your local computer. If a dialog appears with the message Do you want to allow the following program to make changes to this computer?, click Yes.
In the Help Library Manager window, click Choose online or local help (Fig. 2.22). Accessing online help requires an Internet connection, but gives you access to the most up-to-date documentation, as well as tutorials, downloads, support, forums and more. Accessing local help requires that you first download the help files, which can take considerable time and use a significant amount of disk space. If possible, we recommend that you use the online help.
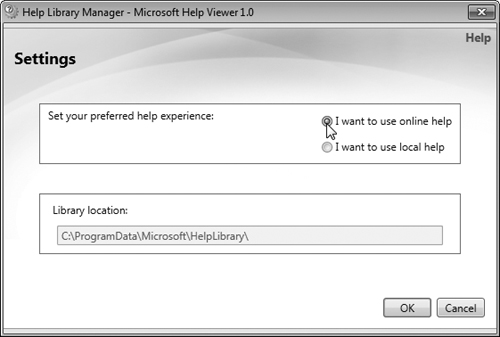
If it’s not already selected, select I want to use online help, then click OK; otherwise, click Cancel. Next, click Exit in the Help Library Manager window. Your IDE is now configured to use online help.???

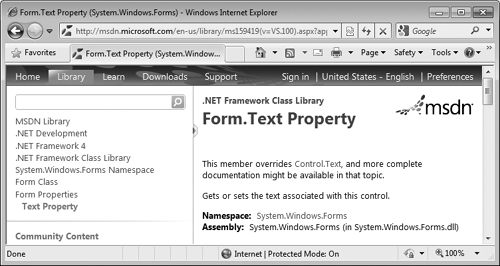
Visual Studio provides context-sensitive help pertaining to the “current content” (that is, the items around the location of the mouse cursor). To use context-sensitive help, click an item, such as the Form, then press the F1 key. The help documentation is displayed in a web browser window. To return to the IDE, either close the browser window or select the icon for the IDE in your Windows task bar. Figure 2.24 shows the help page for a Form’s Text property. You can view this help by selecting the Form, clicking its Text property in the Properties window and pressing the F1 key.
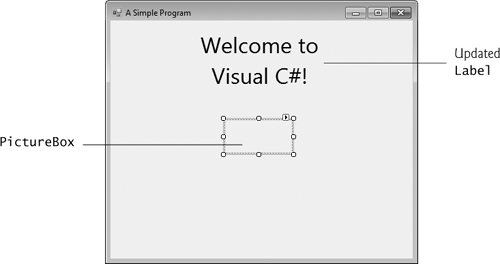
Next, we create a program that displays the text "Welcome to Visual C#!" and an image of the Deitel & Associates bug mascot. The program consists of a single Form that uses a Label and a PictureBox. Figure 2.25 shows the result of the program as it executes. The program and the bug image are available with this chapter’s examples, which you can download from www.deitel.com/books/csharp2010htp/. We assume the examples are located at C:examples on your computer.
You won’t write a single line of program code. Instead, you’ll use visual programming techniques. Visual Studio processes your actions (such as mouse clicking, dragging and dropping) to generate program code. Chapter 3 begins our discussion of writing program code. Throughout the book, you produce increasingly substantial and powerful programs that usually include a combination of code written by you and code generated by Visual Studio. The generated code can be difficult for novices to understand—but you’ll rarely need to look at it.
Visual programming is useful for building GUI-intensive programs that require a significant amount of user interaction. To create, save, run and terminate this first program, perform the following steps:
Closing the open project. If a project is already open, close it by selecting File > Close Solution. A dialog asking whether to save the current solution might appear. Click Save to save your changes or Discard to ignore them.
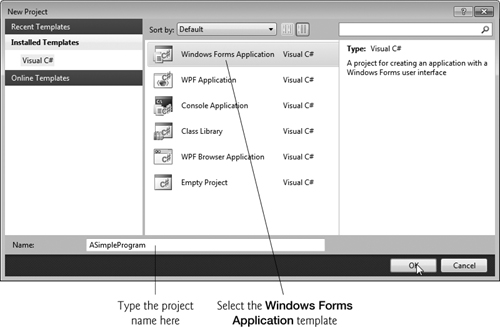
Creating the new project. To create a new Windows Forms application for the program, select File > New Project... to display the New Project dialog (Fig. 2.26). Select Windows Forms Application. Name the project ASimpleProgram and click OK.
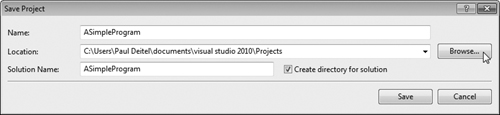
Saving the project. We mentioned earlier in this chapter that you must set the directory in which the project is saved. To specify the directory in Visual C# 2010 Express, select File > Save All to display the Save Project dialog (Fig. 2.27). By default, projects are saved to your user directory in the folder
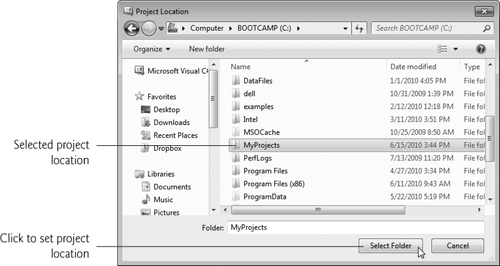
My Documentsvisual studio 2010Projects. To change the project location, click the Browse... button, which opens the Project Location dialog (Fig. 2.28). Navigate through the directories, select one in which to place the project (in our example, we use the directory C:MyCSharpProjects) and click Select Folder to close the dialog. Click Save in the Save Project dialog (Fig. 2.27) to save the project and close the dialog.
When you first begin working in the IDE, it is in design mode (that is, the program is being designed and is not executing). This provides access to all the environment windows (for example, Toolbox, Properties), menus and toolbars, as you’ll see shortly.
Setting the text in the
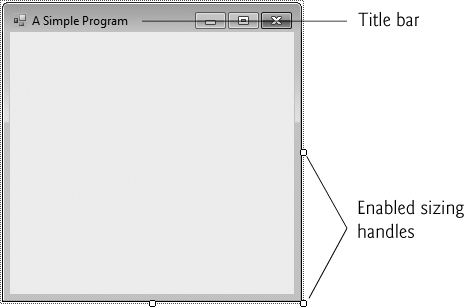
Form’s title bar. The text in theForm’s title bar is determined by theForm’sTextproperty (Fig. 2.29). If the Properties window is not open, click the properties icon in the toolbar or select View > Other Windows > Properties Window. Click anywhere in theFormto display theForm’s properties in the Properties window. In the textbox to the right of theTextproperty, typeA Simple Program, as in Fig. 2.29. Press the Enter key—theForm’s title bar is updated immediately (Fig. 2.30).Resizing the
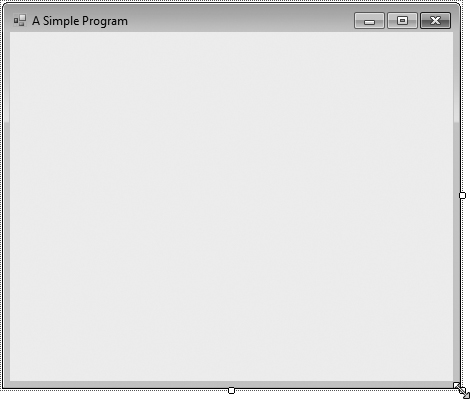
Form. Click and drag one of theForm’s enabled sizing handles (the small white squares that appear around theForm, as shown in Fig. 2.30). Using the mouse, select the bottom-right sizing handle and drag it down and to the right to make theFormlarger (Fig. 2.31).Changing the
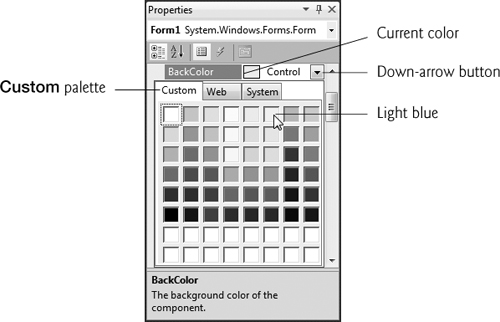
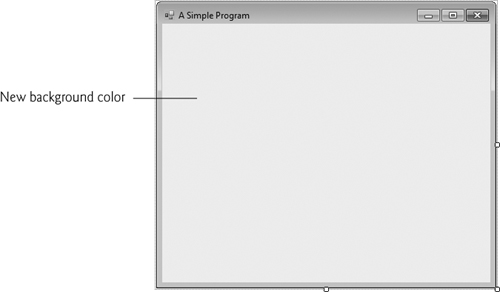
Form’s background color. TheBackColorproperty specifies aForm’s or control’s background color. ClickingBackColorin the Properties window causes a down-arrow button to appear next to the value of the property (Fig. 2.32). When clicked, the down-arrow button displays other options, which vary depending on the property. In this case, the arrow displays tabs for Custom, Web and System (the default). Click the Custom tab to display the palette (a grid of colors). Select the box that represents light blue. Once you select the color, the palette closes and theForm’s background color changes to light blue (Fig. 2.33).Adding a
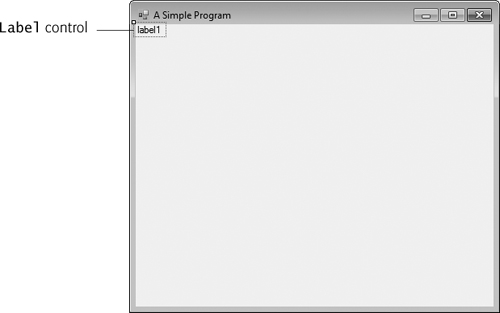
Labelcontrol to theForm. If the Toolbox is not already open, select View > Other Windows > Toolbox to display the set of controls you’ll use for creating your programs. For the type of program we’re creating in this chapter, the typical controls we use are located in either the All Windows Forms group of the Toolbox or the Common Controls group. If either group name is collapsed, expand it by clicking the arrow to the left of the group name (the All Windows Forms and Common Controls groups are shown in Fig. 2.19). Next, double click theLabelcontrol in the Toolbox. This action causes aLabelto appear in the upper-left corner of theForm(Fig. 2.34). [Note: If theFormis behind the Toolbox, you may need to hide the Toolbox to see theLabel.] Although double clicking any Toolbox control places the control on theForm, you also can “drag” controls from the Toolbox to theForm—you may prefer dragging the control because you can position it wherever you want. TheLabeldisplays the text label1 by default. TheLabel’s background color is the same as theForm’s background color. When a control is added to theForm, itsBackColorproperty is set to theForm’sBackColor. You can change theLabel’s background color by changing itsBackColorproperty.Customizing the
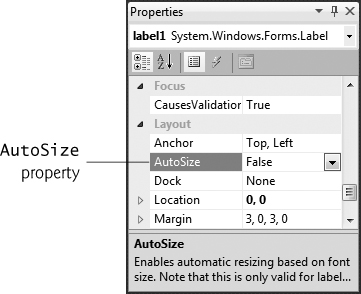
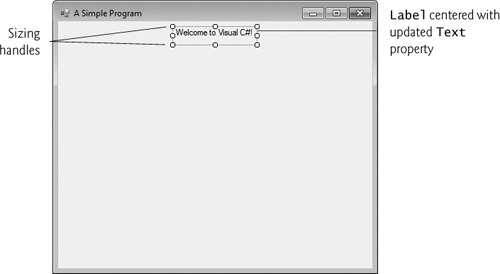
Label’s appearance. Select theLabelby clicking it. Its properties now appear in the Properties window. TheLabel’sTextproperty determines the text (if any) that theLabeldisplays. TheFormandLabeleach have their ownTextproperty—Forms and controls can have the same types of properties (such asBackColor,Text, etc.) without conflict. Set theLabel’sTextproperty toWelcome to Visual C#!. TheLabelresizes to fit all the typed text on one line. By default, theAutoSizeproperty of theLabelis set toTrue, which allows theLabelto update its size to fit all of the text if necessary. Set theAutoSizeproperty toFalse(Fig. 2.35) so that you can resize theLabelon your own. Resize theLabel(using the sizing handles) so that the text fits. Move theLabelto the top center of theFormby dragging it or by using the keyboard’s left and right arrow keys to adjust its position (Fig. 2.36). Alternatively, when theLabelis selected, you can center theLabelcontrol horizontally by selecting Format > Center In Form > Horizontally.Setting the
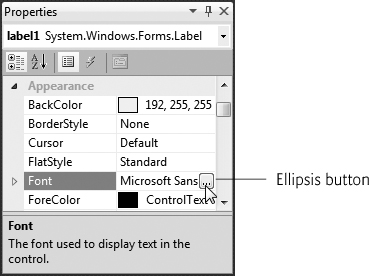
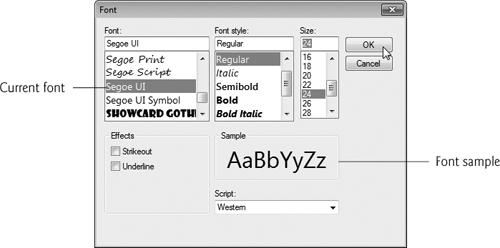
Label’s font size. To change the font type and appearance of theLabel’s text, select the value of theFontproperty, which causes an ellipsis button to appear next to the value (Fig. 2.37). When the ellipsis button is clicked, a dialog that provides additional values—in this case, the Font dialog (Fig. 2.38)—is displayed. You can select the font name (the font options may be different, depending on your system), font style (Regular, Italic, Bold, etc.) and font size (16, 18, 20, etc.) in this dialog. The Sample text shows the selected font settings. Under Font, select Segoe UI, Microsoft’s recommended font for user interfaces. Under Size, select 24 points and click OK. If theLabel’s text does not fit on a single line, it wraps to the next line. Resize theLabelso that it appears as shown in Fig. 2.25 if it’s not large enough to hold the text. You may need to center theLabelhorizontally again after resizing.Aligning the
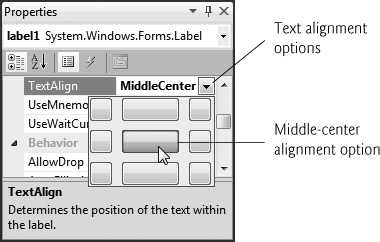
Label’s text. Select theLabel’sTextAlignproperty, which determines how the text is aligned within theLabel. A three-by-three grid of buttons representing alignment choices is displayed (Fig. 2.39). The position of each button corresponds to where the text appears in theLabel. For this program, set theTextAlignproperty toMiddleCenterin the three-by-three grid—this selection causes the text to appear centered in the middle of theLabel, with equal spacing from the text to all sides of theLabel. The otherTextAlignvalues, such asTopLeft,TopRight, andBottomCenter, can be used to position the text anywhere within aLabel. Certain alignment values may require that you resize theLabellarger or smaller to better fit the text.Adding a
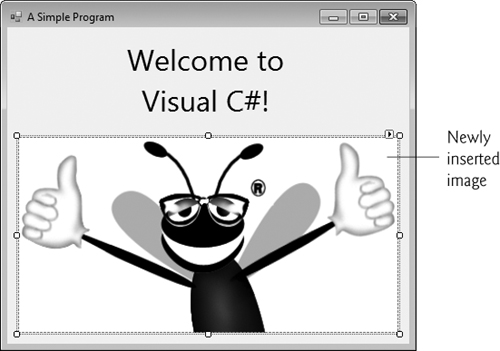
PictureBoxto theForm. ThePictureBoxcontrol displays images. The process involved in this step is similar to that of Step 7, in which we added aLabelto theForm. Locate thePictureBoxin the Toolbox (Fig. 2.19) and double click it to add it to theForm. When thePictureBoxappears, move it underneath theLabel, either by dragging it or by using the arrow keys (Fig. 2.40).Inserting an image. Click the
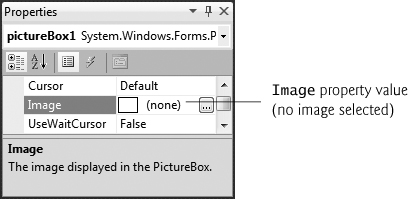
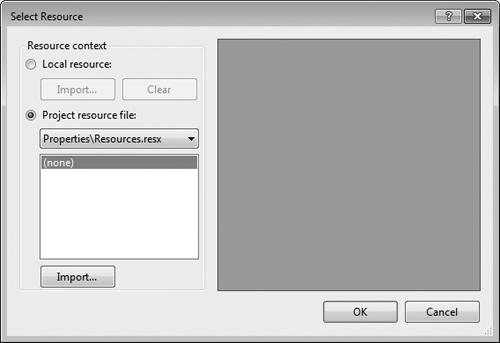
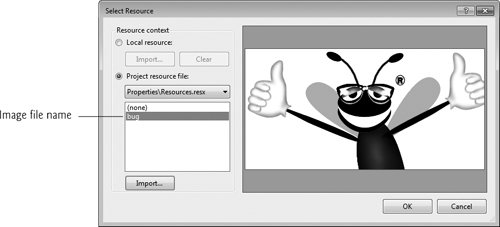
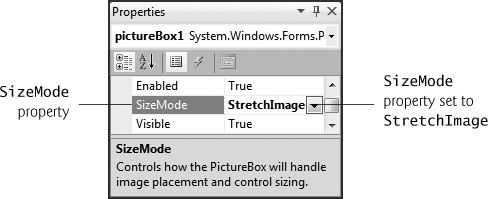
PictureBoxto display its properties in the Properties window (Fig. 2.41). Locate theImageproperty, which displays a preview of the selected image or (none) if no image is selected. Click the ellipsis button to display the Select Resource dialog (Fig. 2.42), which is used to import files, such as images, for use in a program. Click the Import... button to browse for an image to insert, select the image file and click OK. We usedbug.pngfrom this chapter’s examples folder. The image is previewed in the Select Resource dialog (Fig. 2.43). Click OK to use the image. Supported image formats include PNG (Portable Network Graphics), GIF (Graphic Interchange Format), JPEG (Joint Photographic Experts Group) and BMP (Windows bitmap). To scale the image to thePictureBox’s size, change theSizeModeproperty toStretchImage(Fig. 2.44). Resize thePictureBox, making it larger (Fig. 2.45).Saving the project. Select File > Save All to save the entire solution. The solution file (which has the file name extension
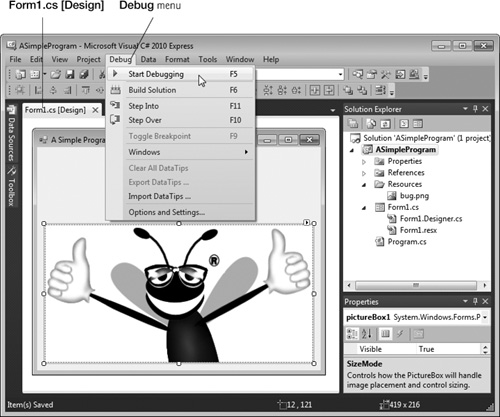
.sln) contains the name and location of its project, and the project file (which has the file name extension.csproj) contains the names and locations of all the files in the project. If you want to reopen your project at a later time, simply open its.slnfile.Running the project. Recall that up to this point we have been working in the IDE design mode (that is, the program being created is not executing). In run mode, the program is executing, and you can interact with only a few IDE features—features that are not available are disabled (grayed out). The text Form1.cs [Design] in the project tab (Fig. 2.46) means that we’re designing the
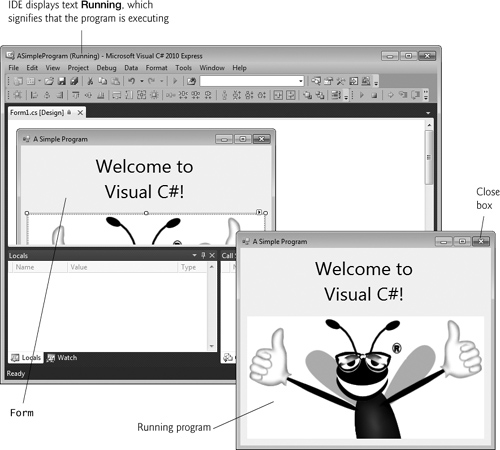
Formvisually rather than programmatically. If we had been writing code, the tab would have contained only the text Form1.cs. If there’s an asterisk (*) at the end of the text in the tab, the file has been changed and should be saved. Select Debug > Start Debugging to execute the program (or you can press the F5 key). Figure 2.47 shows the IDE in run mode (indicated by the title-bar text ASimpleProgram (Running) – Microsoft Visual C# 2010 Express Edition). Many toolbar icons and menus are disabled, since they cannot be used while the program is running. The running program appears in a separate window outside the IDE as shown in the lower-right portion of Fig. 2.47.Terminating execution. Click the running program’s close box (
 ) in the top-right corner of the running program’s window. This action stops the program’s execution and returns the IDE to design mode. You can also select Debug > Stop Debugging to terminate the program.
In this chapter, we introduced key features of the Visual Studio Integrated Development Environment (IDE). You used the technique of visual programming to create a working Visual C# program without writing a single line of code. Visual C# programming is a mixture of the two styles: Visual programming allows you to develop GUIs easily and avoid tedious GUI programming. Conventional programming (which we introduce in Chapter 3) allows you to specify the behavior of your programs.
You created a Visual C# Windows Forms application with one Form. You worked with the Solution Explorer, Toolbox and Properties windows, which are essential to developing Visual C# programs. The Solution Explorer window allows you to manage your solution’s files visually.
You explored Visual Studio’s help features. You learned how to set Help options to display help resources internally or externally in a web browser. We also demonstrated context-sensitive help, which displays help topics related to selected controls or text.
You used visual programming to design the GUI portions of a program quickly and easily, by dragging and dropping controls (a Label and a PictureBox) onto a Form or by double clicking controls in the Toolbox.
In creating the ASimpleProgram program, you used the Properties window to set the Text and BackColor properties of the Form. You learned that Label controls display text and that PictureBoxes display images. You displayed text in a Label and added an image to a PictureBox. You also worked with the AutoSize, TextAlign and Font properties of a Label and the Image and SizeMode properties of a PictureBox.
In the next chapter, we discuss “nonvisual,” or “conventional,” programming—you’ll create your first programs that contain Visual C# code that you write, instead of having Visual Studio write the code. You’ll study console applications (programs that display only text and do not have a GUI). You’ll also learn memory concepts, arithmetic, decision making and how to use a dialog to display a message.
Please take a moment to visit each of these sites briefly.
This site provides access to the Microsoft Visual C# forums, which you can use to get your Visual C# language and IDE questions answered.
This site lists many of the key web resources we used as we were preparing to write this book. There’s lots of great stuff here to help you become familiar with the world of Visual C# 2010.
This site is the home page for Microsoft Visual Studio. The site includes news, documentation, downloads and other resources.
This site provides information on the newest release of Visual C#, including downloads, community information and resources.
Visual Studio is Microsoft’s Integrated Development Environment (IDE) for creating, running and debugging programs written in a variety of .NET programming languages.
Creating simple programs by dragging and dropping predefined building blocks into place is called visual programming.
The Start Page contains links to Visual Studio 2010 IDE resources and web-based resources.
A project is a group of related files that compose a program.
The Visual Studio 2010 IDE organizes programs into projects and solutions—a solution may contain one or more projects.
Dialogs are windows that facilitate user–computer communication.
Visual Studio provides templates for the project types you can create, including Windows Forms applications and console applications.
A
Formrepresents the main window of the Windows Forms application that you’re creating.Collectively, the
Formand controls constitute the program’s graphical user interface (GUI), which is the visual part of the program with which the user interacts.
Commands for managing the IDE and for developing, maintaining and executing programs are contained in the menus, which are located on the menu bar.
Menus contain groups of commands (menu items) that, when selected, cause the IDE to perform actions (for example, open a window, save a file, print a file and execute a program).
Tool tips help you become familiar with the IDE’s features.
The Solution Explorer window lists all the files in the solution.
The Toolbox contains controls for customizing
Forms.By using visual programming, you can place predefined controls onto the
Forminstead of writing the code yourself.Moving the mouse pointer over a hidden window’s icon opens that window. Moving the mouse out of that window hides it. This feature is known as auto-hide. To “pin down” a window (that is, to disable auto-hide), click the pin icon.
The Properties window displays the properties for a
Form, control or file (in Design view). Properties are information about aFormor control, such as size, color and position. The Properties window allows you to modifyForms and controls visually, without writing code.Each control has properties. The Properties window shows the property names and values. The window’s toolbar contains options for organizing properties alphabetically or categorically.
Extensive help documentation is available via Help menu.
Context-sensitive help brings up a list of relevant help articles. To use context-sensitive help, select an item and press the F1 key.
Visual C# programming usually involves a combination of writing a portion of the program code and having Visual Studio generate the remaining code.
The text that appears at the top of the
Form(the title bar) is specified in theForm’sTextproperty.To resize the
Form, click and drag one of theForm’s enabled sizing handles (the small squares around theForm). Enabled sizing handles appear as white boxes.The
BackColorproperty specifies the background color of aForm. TheForm’s background color is the default background color for any controls added to theForm.Double clicking any Toolbox control icon places a control of that type on the
Form. Alternatively, you can drag and drop controls from the Toolbox to theForm.The
Label’sTextproperty determines the text (if any) that theLabeldisplays. TheFormandLabeleach have their ownTextproperty.A property’s ellipsis button, when clicked, displays a dialog containing additional options.
In the Font dialog, you can select the font for a
Form’s orLabel’s text.The
TextAlignproperty determines how the text is aligned within aLabel’s boundaries.The
PictureBoxcontrol displays images. TheImageproperty specifies the image to display.Select File > Save All to save the entire solution, including all of its files.
A program that is in design mode is not executing.
In run mode, the program is executing—you can interact with only a few IDE features.
When designing a program visually, the name of the Visual C# file appears in the project tab, followed by [Design].
Terminate execution by clicking the close box.
2.3 | Fill in the blanks in each of the following statements:
|
2.4 | State whether each of the following is true or false. If false, explain why.
|
2.5 | Some features that appear throughout Visual Studio perform similar actions in different contexts. Explain and give examples of how the ellipsis buttons, down-arrow buttons and tool tips act in this manner. Why do you think the Visual Studio IDE was designed this way? |
2.6 | Fill in the blanks in each of the following statements:
|
2.7 | Briefly describe each of the following terms:
[Note: In the following exercises, you’re asked to create GUIs using controls that we have not yet discussed in this book. The exercises give you practice with visual programming only—the programs do not perform any actions. You place controls from the Toolbox on a |
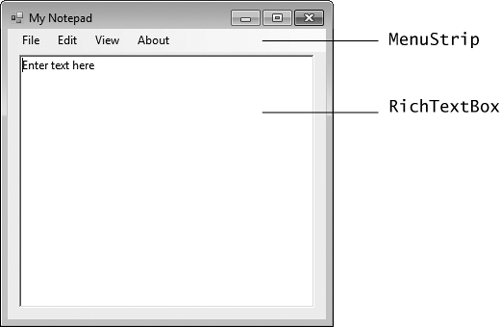
2.8 | (Notepad GUI) Create the GUI for the notepad as shown in Fig. 2.48. |
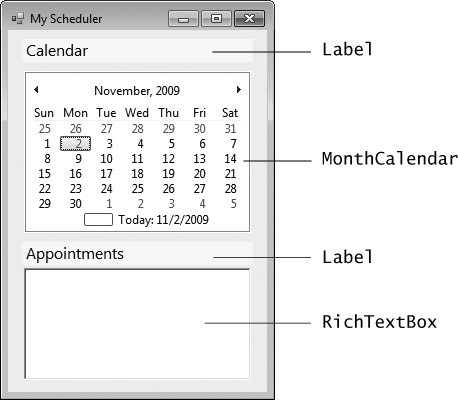
2.9 | (Calendar and Appointments GUI) Create the GUI for the calendar as shown in Fig. 2.49. |
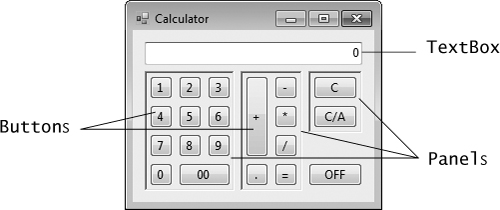
2.10 | (Calculator GUI) Create the GUI for the calculator as shown in Fig. 2.50. |
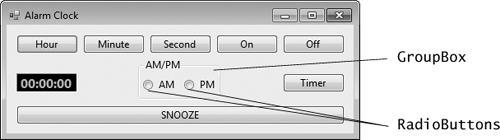
2.11 | (Alarm Clock GUI) Create the GUI for the alarm clock as shown in Fig. 2.51. |
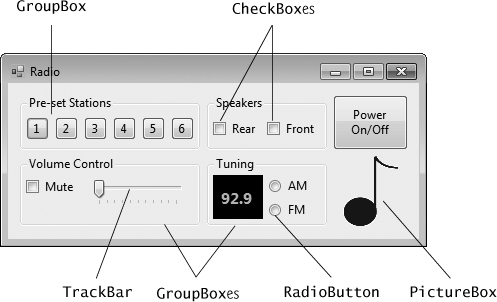
2.12 | (Radio GUI) Create the GUI for the radio as shown in Fig. 2.52. [Note: The image used in this exercise is located in the examples folder for Chapter 2.] |