4. Camera Raw

In This Chapter
Opening photos into Camera Raw
Cropping and straightening photos
Choosing default workflow options
Using the Adjustment Brush tool
Using the Lens Corrections tab
Using the Graduated Filter tool
Saving and applying Camera Raw settings
Synchronizing Camera Raw settings
Converting, opening, and saving Camera Raw files
Using the powerful and wide-ranging controls in the Adobe Camera Raw plug-in, you can apply corrections to your photos before opening them into Photoshop. In this comprehensive chapter, you’ll learn about the Camera Raw tools and tabs; choose workflow options for Camera Raw; apply cropping and straightening; and correct photos for defects, such as poor contrast, under or overexposure, color casts, blurriness, geometric distortion, and noise. You will also learn how to enhance your photos with special effects, such as a vignette, grain texture, or tint; retouch blemishes; access Camera Raw controls from Photoshop; save and synchronize Camera Raw settings among related photos; then finally, open your corrected photos into Photoshop.
Note: The Camera Raw plug-in, which we refer to simply as “Camera Raw,” is included with Photoshop. Some users also refer to the plug-in as “ACR,” short for Adobe Camera Raw.
Why use Camera Raw?
Amateur-level digital cameras store images in the JPEG or TIFF format, whereas advanced amateur and pro models offer the option to save images as raw data files, which offers substantial advantages. Cameras apply internal processing to photos that are captured as JPEG or TIFF, such as sharpening, automatic color adjustments, and a white balance setting. With raw files, you get only the original raw information that the lens captured onto the camera’s digital sensor, leaving you with full control over subsequent image processing and correction.
These are some basic facts about Camera Raw:
![]() Camera Raw can process raw, TIFF, and JPEG photos from most digital camera models.
Camera Raw can process raw, TIFF, and JPEG photos from most digital camera models.
![]() Camera Raw offers powerful controls for correcting problems in your photos, such as over- and underexposure and color casts, and for applying enhancements, such as a vignette or a grain texture.
Camera Raw offers powerful controls for correcting problems in your photos, such as over- and underexposure and color casts, and for applying enhancements, such as a vignette or a grain texture.
![]() Camera Raw saves edits to TIFF and JPEG files in the file itself, whereas edits to raw files are saved as instructions (in a separate “sidecar” file or in the Camera Raw database). When you open a photo from Camera Raw into Photoshop, the instructions are applied to a copy of the file, and the original raw file is preserved.
Camera Raw saves edits to TIFF and JPEG files in the file itself, whereas edits to raw files are saved as instructions (in a separate “sidecar” file or in the Camera Raw database). When you open a photo from Camera Raw into Photoshop, the instructions are applied to a copy of the file, and the original raw file is preserved.
![]() To any image layer in Photoshop, you can apply some Camera Raw features via the Filter > Camera Raw Filter command.
To any image layer in Photoshop, you can apply some Camera Raw features via the Filter > Camera Raw Filter command.
More reasons to use Camera Raw
In case you’re not fully sold on the benefits of correcting your digital photos in Camera Raw before opening them into Photoshop, consider these points:
Ability to preview raw files: The only way to preview a raw photo is in Camera Raw (or other software that converts raw files). Note: The photo that you view on the LCD screen of your digital camera is merely a JPEG preview of the raw capture, not the “actual” raw capture.
Great correction features: Camera Raw offers many unique adjustment controls that you simply won’t find in Photoshop.
Less destructive edits: When applying corrections to a photo, the goal is to preserve as much of the image quality as possible. Adjustments that you make to a photo in Camera Raw (and that are applied automatically when the photo is opened in Photoshop) cause less data loss than similar adjustment commands in Photoshop.
Preserves 16 bits per channel: To preserve more of the original pixel data in a raw photo, Camera Raw keeps the bit depth as 16 bits per channel. This helps offset the data loss from subsequent image edits in Photoshop, and results in a better-quality photo.
Tonal redistribution: The sensor in a digital camera captures and records the existing range of tonal values in a scene as is, in a linear fashion, without skewing the data toward a particular tonal range.A That sounds fine on paper, but the reality is that the human eye is more sensitive to lower light levels than to higher light levels. In other words, we’re more likely to notice if shadow areas lack detail and less likely to notice extra details in highlight areas. The result is that digital photos typically contain more data than necessary for the highlight values in a scene and insufficient data for the lower midtone and shadow values. In a Camera Raw conversion, data is shifted more into the midtone and shadow ranges of your photo. This not only helps compensate for the peculiarities of human vision, but also helps prepare your photos for subsequent image edits in Photoshop.B If you apply tonal adjustments in Photoshop to a photo that contains insufficient shadow data, the result is posterization and a noticeable loss of detail; if you apply the same edits to a good-quality photo that has been converted in Camera Raw, the destructive edits will be far less noticeable.
Capturing Tonal Values: Your Camera Versus the Human Eye

A The digital sensor in a camera captures tonal values in a linear fashion, from light to dark, without altering the incoming data. A light value of 50% is located at the midpoint of the tonal range.

B Camera Raw redistributes some of the captured tonal values to the shadows and midtones, shifting the 50% light value past the midpoint. As a result, the lower tonal values — the range the human eye tends to be more sensitive to — contain more data.
Superior noise reduction and sharpening: Not to knock Photoshop, but the noise reduction and sharpening features in Camera Raw cause less data loss than similar features in Photoshop.
Learning the Camera Raw features will give you a head start: The tonal and color controls in Camera Raw are similar to many of the adjustment controls in Photoshop (e.g., Levels, Curves, and Hue/Saturation) that are discussed in later chapters. As you proceed through the lessons in this book, you will apply and build on the skills you have mastered in this chapter.
Unfortunately, Camera Raw can’t correct deficiencies in digital JPEG and TIFF photos as fully as it can in raw photos, for several reasons. First, cameras reduce digital JPEG and TIFF photos to a bit depth of 8 bits per channel, and in so doing discard some of the captured pixels. Cameras save raw photos at a bit depth of 16 bits per channel, and preserve all the captured pixels.
Second, cameras apply color and tonal corrections to JPEGs and TIFFs (called “in-camera” processing). Camera Raw must reinterpret this processed data, with less successful results than when it has access to the raw, unprocessed data.
All of the above notwithstanding, if your camera doesn’t shoot raw photos or you acquire JPEG or TIFF photos from other sources, you can still use practically all of the outstanding correction and adjustment features in Camera Raw to process them.
Note: In this chapter, we focus only on processing raw and JPEG files in Camera Raw — not TIFF files. The JPEG format is mentioned only when a particular feature treats a JPEG differently than a raw file.
![]() Factoid: Each digital camera manufacturer creates its own version of a raw file and attaches a different extension to the names of its raw files, such as .nef for Nikon and .crw or .cr2 for Canon.
Factoid: Each digital camera manufacturer creates its own version of a raw file and attaches a different extension to the names of its raw files, such as .nef for Nikon and .crw or .cr2 for Canon.
JPEG ...
![]() JPEG files have a smaller storage size than raw files, so your digital camera can store more of them.
JPEG files have a smaller storage size than raw files, so your digital camera can store more of them.
![]() In sports, nature, and other fast-action photography, speed is a necessity. Photo sequences can be captured more rapidly as JPEG files (due to their smaller storage size) than raw files.
In sports, nature, and other fast-action photography, speed is a necessity. Photo sequences can be captured more rapidly as JPEG files (due to their smaller storage size) than raw files.
![]() Most software programs can read JPEG files, but only a few programs can read raw files.
Most software programs can read JPEG files, but only a few programs can read raw files.
![]() The JPEG format discards some captured pixels due to its lower bit depth of 8 bits per channel.
The JPEG format discards some captured pixels due to its lower bit depth of 8 bits per channel.
![]() The JPEG compression methods destroy some image data and can produce defects, such as artifacts, banding, and loss of detail.
The JPEG compression methods destroy some image data and can produce defects, such as artifacts, banding, and loss of detail.
![]() The pixel data in JPEG photos is processed internally by the camera. Although Camera Raw can be used to improve your JPEG photos, it won’t have access to the original pixel data (nor will you).
The pixel data in JPEG photos is processed internally by the camera. Although Camera Raw can be used to improve your JPEG photos, it won’t have access to the original pixel data (nor will you).
... COMPARED TO RAW
![]() The raw compression methods are nondestructive.
The raw compression methods are nondestructive.
![]() Raw files have a higher bit depth of 16 bits per channel.
Raw files have a higher bit depth of 16 bits per channel.
![]() Raw files contain the original, unprocessed pixel data and full range of tonal levels that were captured by the camera. Camera Raw is given all that image data to work with, and the result is a higher-quality image — even after adjustments.
Raw files contain the original, unprocessed pixel data and full range of tonal levels that were captured by the camera. Camera Raw is given all that image data to work with, and the result is a higher-quality image — even after adjustments.
![]() Because the white point setting isn’t applied to your raw photo (it’s merely stored in the metadata of the file), you can adjust that setting at any time in Camera Raw.
Because the white point setting isn’t applied to your raw photo (it’s merely stored in the metadata of the file), you can adjust that setting at any time in Camera Raw.
![]() Camera Raw does a better job of redistributing tonal values in raw files than in JPEG files, making raw files better candidates for Photoshop edits.
Camera Raw does a better job of redistributing tonal values in raw files than in JPEG files, making raw files better candidates for Photoshop edits.
![]() Raw files have larger storage sizes than JPEG files.
Raw files have larger storage sizes than JPEG files.
![]() Digital cameras create and store raw files more slowly than JPEG files, a potential drawback in fast-action photography (although as camera technology improves, this may become less of an issue).
Digital cameras create and store raw files more slowly than JPEG files, a potential drawback in fast-action photography (although as camera technology improves, this may become less of an issue).
Opening photos into Camera Raw
For a smooth workflow, we recommend setting the proper preferences so your raw photos (and JPEG or TIFF photos, if any) will open directly into Camera Raw.
To set a preference so your raw photos open directly into Camera Raw:
1. In Photoshop, go to Edit/Photoshop > Preferences (Ctrl-K/Cmd-K) > File Handling.
2. Under File Compatibility, check Prefer Adobe Camera Raw for Supported Raw Files, then click OK. When you double-click a raw file, it will open into Camera Raw (as opposed to other software that can be used to convert raw files).
To set a preference so your JPEG or TIFF photos open directly into Camera Raw:
1. In Bridge, choose Edit/Adobe Bridge CC > Camera Raw Preferences.
2. At the bottom of the dialog, from the JPEG menu, choose Automatically Open JPEGs with Settings.
3. If you shoot digital TIFF photos, from the TIFF menu, choose Automatically Open TIFFs with Settings; or if you shoot only raw or JPEG photos (not TIFF photos), choose Disable TIFF Support.
4. Click OK.
When you want to open a JPEG or TIFF photo into Camera Raw that has not yet been edited (doesn’t have Camera Raw settings), click the thumbnail in Bridge, then click the Open in Camera Raw button ![]() or press Ctrl-R/Cmd-R.
or press Ctrl-R/Cmd-R.
To open a JPEG or TIFF photo that has been edited previously in Camera Raw (that is “with Settings”), double-click its thumbnail or press Ctrl-R/Cmd-R.
![]() If you enable both “Automatically Open” options (steps 2–3, above), but there is an occasion when you want to open a JPEG or TIFF photo directly into Photoshop instead of Camera Raw, click the thumbnail, then press Ctrl-O/Cmd-O. This shortcut will work only if the file hasn’t yet been edited in Camera Raw.
If you enable both “Automatically Open” options (steps 2–3, above), but there is an occasion when you want to open a JPEG or TIFF photo directly into Photoshop instead of Camera Raw, click the thumbnail, then press Ctrl-O/Cmd-O. This shortcut will work only if the file hasn’t yet been edited in Camera Raw.
![]() If the Open in Camera Raw button
If the Open in Camera Raw button ![]() is available when you click a thumbnail in Bridge, it’s a sign that the file can be opened into Camera Raw.
is available when you click a thumbnail in Bridge, it’s a sign that the file can be opened into Camera Raw.
You can set a preference to have either Bridge or Photoshop host the Camera Raw plug-in when you open a raw or JPEG photo. In the case of Photoshop, the program will launch, if it’s not already running. Also, when Bridge is the host for Camera Raw, the default (highlighted) button for exiting that dialog is labeled Done, whereas when Photoshop is the host for Camera Raw, the default exit button is Open Image or Open Object, depending on a setting in the Workflow Options dialog (see step 9 on page 58).
To choose a host for Camera Raw:
1. In Bridge, choose Edit/Adobe Bridge CC > Preferences (Ctrl-K/Cmd-K), then show the General pane.
2. Check Double-Click Edits Camera Raw Settings in Bridge if you want Camera Raw to be hosted by Bridge when you double-click a thumbnail in Bridge (a raw photo or a JPEG that was previously edited in Camera Raw), or uncheck this option to have the file open into Camera Raw hosted by Photoshop. Click OK.
Recognizing the Badge
In Bridge, the thumbnail for a file that has been opened and edited previously in Camera Raw will display this badge ![]() in the upper-right corner, and the thumbnail and preview will reflect the current settings. Another clue: If the currently selected file has been edited in Camera Raw, you will see a Camera Raw category in the Metadata panel.
in the upper-right corner, and the thumbnail and preview will reflect the current settings. Another clue: If the currently selected file has been edited in Camera Raw, you will see a Camera Raw category in the Metadata panel.
After setting the necessary preferences, and before learning the particulars of Camera Raw, you should familiarize yourself with this basic workflow.
To open a raw or JPEG digital photo into Camera Raw:
1. Launch Bridge, display the thumbnail for a raw or JPEG photo, then do either of the following:
For a raw photo, double-click the thumbnail.
For a raw or JPEG photo, click the thumbnail, then press Ctrl-R/Cmd-R or click the Open in Camera Raw button on the Bridge toolbar ![]() (or right-click the photo and choose Open in Camera Raw).
(or right-click the photo and choose Open in Camera Raw).
2. The Camera Raw dialog opens.A An alert symbol ![]() may display in the upper-right corner of the preview while Camera Raw reads in the image data, and will disappear when it’s done.
may display in the upper-right corner of the preview while Camera Raw reads in the image data, and will disappear when it’s done.

A The Camera Raw dialog
Information about your photo (taken from the metadata that was embedded into it by the camera) is listed in several locations: the camera model in the title bar at the top of the dialog; the file name below the preview; and the camera settings used to take the photo (aperture, shutter speed, ISO, and focal length) below the histogram.
The adjustment features are located in 10 tabs: Basic, Tone Curve, Detail, HSL/Grayscale, Split Toning, Lens Corrections, Effects, Camera Calibration, Presets, and Snapshots. Switch among the tabs to correct your photo (we cover most of the tabs in depth in this chapter).
3. When you’re done correcting the photo, you can either click Open Image to open the photo into Photoshop or click Done to close Camera Raw without opening the photo. In either case, the Camera Raw settings will stick to the photo, and the original data will be preserved. (Note: If you want to open the photo into Photoshop as a Smart Object, see the Note on page 95.)
A file that you open from Camera Raw into Photoshop as a Smart Object can be reedited using the full array of features in Camera Raw at any time. A standard image layer in a Photoshop document can also be edited using most — but not all — of the Camera Raw features by way of the Camera Raw Filter, as described in the task below. If you convert the image layer to a Smart Object first (an optional step), you will be able to edit the filter settings at any time. Note: To learn about layers, which are used in this task, see Chapter 8. To learn more about Smart Objects, see pages 264–275. See also the first Note on page 95.
Among the Camera Raw features that aren’t available via the Camera Raw Filter are the Crop and Straighten tools, the rotate buttons, the Workflow Options dialog, the Snapshots tab, and some options on the Camera Raw Settings menu. Don’t be dissuaded by this list of “nos,” however — the filter gives you access to the essential Camera Raw features.
To open and edit a Photoshop image layer in Camera Raw:
1. In an RGB document in Photoshop, display the Layers panel. ![]() Click the image layer (or the Background) that you want to edit in Camera Raw, then press Ctrl-J/Cmd-J to duplicate it. Keep the duplicate layer selected.A
Click the image layer (or the Background) that you want to edit in Camera Raw, then press Ctrl-J/Cmd-J to duplicate it. Keep the duplicate layer selected.A

A We duplicated an image layer.
2. Optional (but recommended): To keep your Camera Raw settings editable, choose Filter > Convert for Smart Filters, or right-click the duplicate image layer and choose Convert to Smart Object.B If an alert dialog appears, click OK.
B We converted the duplicate layer to a Smart Object.
3. With the image layer or Smart Object selected, choose Filter > Camera Raw Filter (Ctrl-Shift-A/Cmd-Shift-A).
4. The image layer opens in Camera Raw. Apply the needed corrections.
5. Click OK (a progress bar may display while the filter is processing).
6. If you applied the filter to a Smart Object, on the Layers panel, you will see a Camera Raw Filter listing below a Smart Filters listing.C To edit the Camera Raw settings at any time, double-click the Camera Raw Filter listing. To learn more about Smart Filters, see pages 360–364.

C We applied the Camera Raw Filter to the Smart Object. A Smart Filters listing appeared below the Smart Object.
![]() To create a document via the Merge to HDR Pro command, and adjust the new document via the Camera Raw Filter, see pages 250–253.
To create a document via the Merge to HDR Pro command, and adjust the new document via the Camera Raw Filter, see pages 250–253.
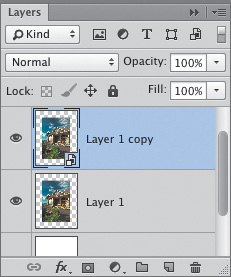
In the upper-left corner of the dialog, click the Zoom tool, ![]() then click the image preview to zoom in or Alt-click/Option-click it to zoom out.
then click the image preview to zoom in or Alt-click/Option-click it to zoom out.
Use the Hand tool ![]() to move a magnified preview image in the window (if another tool is selected, hold down the Spacebar for a temporary Hand tool).
to move a magnified preview image in the window (if another tool is selected, hold down the Spacebar for a temporary Hand tool).
For the White Balance tool, ![]() see the sidebar on page 62.
see the sidebar on page 62.
Choose the Color Sampler tool, ![]() then click in the image preview to place up to nine samplers. A breakdown of the RGB components below each sampler in the photo displays in a readout below the tool box; the readouts will update as you make color and tonal adjustments. To reposition a sampler, drag it with the Color Sampler tool. To remove a sampler, hold down Alt/Option and click it. To remove all samplers, click Clear Samplers.
then click in the image preview to place up to nine samplers. A breakdown of the RGB components below each sampler in the photo displays in a readout below the tool box; the readouts will update as you make color and tonal adjustments. To reposition a sampler, drag it with the Color Sampler tool. To remove a sampler, hold down Alt/Option and click it. To remove all samplers, click Clear Samplers.
For the Targeted Adjustment tool ![]() (or TAT for short), see pages 68–69 and 73.
(or TAT for short), see pages 68–69 and 73.
For the Crop tool, ![]() see page 56.
see page 56.
For the Straighten tool, ![]() see page 57.
see page 57.
For the Spot Removal tool, ![]() see pages 90–91.
see pages 90–91.
The Red Eye Removal tool ![]() works like the Red Eye tool in Photoshop (see page 309).
works like the Red Eye tool in Photoshop (see page 309).
For the Adjustment Brush tool, ![]() see pages 74–78.
see pages 74–78.
For the Graduated Filter tool, ![]() see pages 86–87.
see pages 86–87.
For the Radial Filter tool, ![]() see pages 88–89.
see pages 88–89.
Note: If tool settings are displaying on the right side of the Camera Raw dialog (if, say, you were using the Adjustment Brush tool) and you want to redisplay the row of tab icons, click one of the first seven tools.
![]() The tools in Camera Raw are “memory-loaded,” meaning that you can toggle them. Press a tool shortcut to select a different tool, then press the same key again to return to the original tool.
The tools in Camera Raw are “memory-loaded,” meaning that you can toggle them. Press a tool shortcut to select a different tool, then press the same key again to return to the original tool.
Other buttons at the top of the dialog:
![]() The Open Preferences Dialog button
The Open Preferences Dialog button ![]() (or press Ctrl-K/Cmd-K) opens the Camera Raw Preferences dialog.
(or press Ctrl-K/Cmd-K) opens the Camera Raw Preferences dialog.
![]() The Rotate 90° Counterclockwise button
The Rotate 90° Counterclockwise button ![]() and the Rotate 90° Clockwise button
and the Rotate 90° Clockwise button ![]() rotate the image. The results preview in the dialog.
rotate the image. The results preview in the dialog.
More Ways to Zoom in the Preview
![]() Hold down Alt/Option-Spacebar and click to zoom out, or hold down Ctrl/Cmd-Spacebar and click to zoom in.
Hold down Alt/Option-Spacebar and click to zoom out, or hold down Ctrl/Cmd-Spacebar and click to zoom in.
![]() Press Ctrl –/Cmd – (hyphen) to zoom out or Ctrl- +/Cmd- + to zoom in.
Press Ctrl –/Cmd – (hyphen) to zoom out or Ctrl- +/Cmd- + to zoom in.
![]() Use the zoom buttons (– or +) or the Zoom Level menu, located below the image preview.
Use the zoom buttons (– or +) or the Zoom Level menu, located below the image preview.
![]() Double-click the Zoom tool to set the zoom level to 100%.
Double-click the Zoom tool to set the zoom level to 100%.
![]() Double-click the Hand tool to fit the image in the preview window.
Double-click the Hand tool to fit the image in the preview window.
Cropping and straightening photos
With the Crop and Straighten tools, you can control which portion of a photo opens into Photoshop. You can readjust the crop box at any time without losing any image data, and the outlying areas will remain available even after you click Save, Done, or Open.
To crop a photo:
1. Open a photo into Camera Raw A (see step 1 on page 53).

A This is the original photo, in Camera Raw.
2. Choose the Crop tool ![]() (C).
(C).
3. Drag in the preview to make a crop box appear.B

B With the Crop tool, we drew a crop box in the preview window. Here, we are resizing the box.
4. Optional: To move the crop box, drag inside it. To resize the box, drag a handle.
5. To preview the results of the Crop tool, press Enter/Return or click any tool except the Crop or Straighten tool.C
C We pressed Enter/Return to preview the results.
![]() To redisplay the current crop box after exiting crop mode, click the Crop tool. If you want to remove the box and redisplay the whole image, press Esc.
To redisplay the current crop box after exiting crop mode, click the Crop tool. If you want to remove the box and redisplay the whole image, press Esc.
To straighten a crooked photo automatically: ![]()
1. Open a photo into Camera Raw, then double-click the Straighten tool ![]() (A); or choose the Straighten tool, then double-click anywhere in the image.
(A); or choose the Straighten tool, then double-click anywhere in the image.
2. Press Enter/Return.
![]() To turn the Crop tool into a temporary Straighten tool, hold down Ctrl/Cmd.
To turn the Crop tool into a temporary Straighten tool, hold down Ctrl/Cmd.
To straighten a crooked photo manually:
1. Open a photo into Camera Raw, then choose the Straighten tool ![]() (A).
(A).
2. Drag along an edge in the photo that you want to align to the horizontal or vertical axis.A A crop box will display, aligned to the angle you drew.B

A With the Straighten tool, we are dragging along an edge that we want to align to the vertical axis.

B A crop box displays.
3. To preview the straighten results, press Enter/Return.C

C We pressed Enter/Return to preview the results.
![]() To change the straighten results after exiting crop mode, choose the Straighten tool (A), then drag again.
To change the straighten results after exiting crop mode, choose the Straighten tool (A), then drag again.
![]() If you want to remove the crop box, choose the Crop tool (C), then press Esc.
If you want to remove the crop box, choose the Crop tool (C), then press Esc.
Choosing default workflow options
Via the Workflow Options dialog, you can resize or sharpen a photo, or change its color space or bit depth, before opening it into Photoshop — the original raw or JPEG file isn’t altered. Note that the choices that you make in this dialog become the new default settings, so they apply not only to the current photo, but also to subsequent photos that you open into Camera Raw. The dialog contains new Color Space and Preset options (see this page and the next), as well as Image Sizing options (see page 60).
To choose settings in the Workflow Options dialog: ![]()
1. Open a photo into Camera Raw, then below the large image preview, click the underlined link. The Workflow Options dialog opens (A).
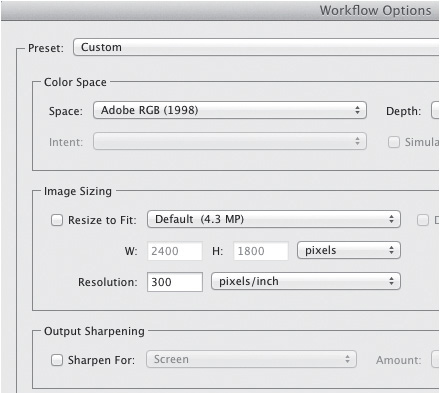
A Via the Workflow Options dialog, you can choose Preset, Color Space, Image Sizing, and Output Sharpening settings for the current and future photos.
2. If you want to apply a user-saved preset, choose it from the Preset menu (B).![]() Next, either click OK to exit the dialog, or choose custom options, as in the remaining steps.
Next, either click OK to exit the dialog, or choose custom options, as in the remaining steps.

B From the Preset menu in the Workflow Options dialog, you can choose a user-saved workflow preset.
3. From the Space menu, choose a color profile to be used for converting the raw file to RGB: Adobe RGB (1998), ColorMatch RGB, ProPhoto RGB, or sRGB IEC61966-2.1 (or “sRGB,” for short). The menu also lists preset RGB and CMYK output profiles for printers and displays, as well as any other profiles that you have installed in your system.![]() In Chapter 1, you assigned Adobe RGB (1998) as the default color space for color management, so for optimal color consistency, we recommend also choosing that option here.
In Chapter 1, you assigned Adobe RGB (1998) as the default color space for color management, so for optimal color consistency, we recommend also choosing that option here.
4. The Intent options control how colors will change in a photo when it is converted to the chosen profile. If you chose any profile from the Space menu except one of the first five, from the Intent menu, choose Perceptual or Relative. If your photos tend to contain many colors that are outside the gamut of the chosen color space, Perceptual is the best choice because it attempts to preserve the appearance of colors as it shifts them into gamut. If your photos contain few colors that are out of gamut, Relative is the best choice, as it preserves more of the original colors. Your photo will display as a soft proof (a simulation of print output from your target device).![]()
5. To control the amount of color and tonal information in your photos, from the Depth menu, choose 8 Bits/Channel or 16 Bits/Channel. If you choose 16 Bits/Channel, more of the original capture information will be preserved in your photos as you edit them in Photoshop, but they will also have a larger file size and will require a large hard disk and a fast system with a lot of RAM for processing (see page 17).
6. If you chose a printer profile, check Simulate Paper & Ink to preview the photo using the range of black values that can be produced by that printer, on a simulation of white printing paper.
7. In a standard workflow, you can keep Resize to Fit unchecked. If, on the other hand, you need to resize the current photo and other photos that you open into Camera Raw, keep the dialog open after step 12, and follow the task on page 60.
8. Camera Raw applies a Resolution of 300 ppi ![]() to all photos as they are opened into Photoshop. If needed, you can choose a different value here.
to all photos as they are opened into Photoshop. If needed, you can choose a different value here.
9. Optional: Use options under Output Sharpening to apply predefined sharpening. Check Sharpen For, then from the Sharpen For menu, choose an output medium of Screen, Glossy Paper, or Matte Paper; and from the Amount menu, choose the desired level of sharpening (Standard is a good all-purpose choice).
![]() The sharpening values that Camera Raw applies via this dialog aren’t listed anywhere. If you want to control specific values when sharpening, uncheck Sharpen For and use the sliders in the Detail tab (see pages 70–71).
The sharpening values that Camera Raw applies via this dialog aren’t listed anywhere. If you want to control specific values when sharpening, uncheck Sharpen For and use the sliders in the Detail tab (see pages 70–71).
10. The Open in Photoshop as Smart Objects option converts the Open Image button in the main Camera Raw dialog to an Open Object button, which opens your photo into Photoshop as a Smart Object.
![]() If you leave this workflow option unchecked, you can convert the Open Image button to Open Object in the main Camera Raw dialog (for any photo) by holding down Shift. Learn about Smart Objects on pages 264–275.
If you leave this workflow option unchecked, you can convert the Open Image button to Open Object in the main Camera Raw dialog (for any photo) by holding down Shift. Learn about Smart Objects on pages 264–275.
11. Optional: To save your current, custom Workflow Options settings as a preset that can be applied to any photo, from the Preset menu, choose New Workflow Preset.![]() Enter a descriptive name for the preset, then click OK.
Enter a descriptive name for the preset, then click OK.
12. Optional: If you chose a preset and then changed any of the settings in the dialog, the word “(edited)” is now listed in the preset name. If you want to permanently update the current preset with your new custom settings, from the Preset menu, choose Update [preset name].![]()
13. Click OK. Your chosen workflow settings will be applied to the current photo and to all photos that you subsequently open into Camera Raw.
![]() To rename a user-saved Workflow Options preset, from the Preset menu in the dialog, choose the preset to be renamed, choose Rename [preset name], type the desired name, then click OK.
To rename a user-saved Workflow Options preset, from the Preset menu in the dialog, choose the preset to be renamed, choose Rename [preset name], type the desired name, then click OK.![]()
Using the Gamut Warning Button in the Camera Raw Histogram ![]()
If you choose a printer profile from the Space menu in the Workflow Options dialog, instead of two clipping warning buttons on the histogram in the main Camera Raw dialog, you will see just one Gamut Warning button ![]() (O). When this button is activated, areas of the photo that are outside the gamut of the chosen output device will display as red in the preview. If you need to bring those errant colors back into gamut, you can use either the Vibrance slider in the Basic tab or the Saturation sliders in the HSL/Grayscale tab.
(O). When this button is activated, areas of the photo that are outside the gamut of the chosen output device will display as red in the preview. If you need to bring those errant colors back into gamut, you can use either the Vibrance slider in the Basic tab or the Saturation sliders in the HSL/Grayscale tab.
Quick and Easy Way to Apply a Workflow Options Preset ![]()

If you need to resize multiple photos according to a specific criterion, such as the dimension of a long or short side of one of the photos, use the Resize to Fit feature in the Workflow Options dialog. If you don’t require the original high-megapixel count of your photos for image editing or output, shrinking them is an acceptable option. Enlarging photos, on the other hand, should be done only when necessary, as it diminishes their quality (preferably, don’t enlarge your photos by more than 25% or 30%).
Note: To resize or change the resolution of an individual photo for a particular output medium, instead of using the options dialog in Camera Raw, we recommend using the Image Size dialog in Photoshop after you exit Camera Raw (see pages 136–139). The latter offers many image resizing options, including choices for resampling, with a document preview.
To resize images via the Workflow Options dialog: ![]()
1. Open one or more photos into Camera Raw, then click the Workflow Options link. Under Image Sizing, check Resize to Fit.
2. Optional: Check Don’t Enlarge if you want to prevent your photos from being enlarged.
3. Under Image Sizing, from the Resize to Fit menu,A do one of the following (Camera Raw will resize all your photos proportionately, whether or not you enter proportionate values):
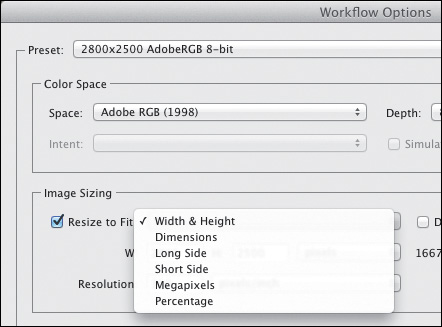
A From the Resize to Fit menu in the Workflow Options dialog, choose a criterion for resizing your photos.
Choose Width & Height, then enter the desired maximum W and H values within which the current and future photos will be resized. For resizing to occur, both of these values must be either larger or smaller than the original dimensions of the current photo.
Choose Dimensions,B then enter the desired maximum values in the two fields within which Camera Raw will resize your photos. Camera Raw will fit the longer dimension of each photo to the larger of the two values (regardless of the orientation of the photo). You could use this option to resize a series of horizontal or vertical photos to the same long dimension.

B If you choose Dimensions as the Resize to Fit option, you must then enter pixel values in the two fields below the menu.
![]() If the Width & Height or Dimensions option produces unexpected resizing results in your photos, try entering the same value in both fields, thereby providing a larger resizing area, or use the Long Side or Short Side option instead (see the next option).
If the Width & Height or Dimensions option produces unexpected resizing results in your photos, try entering the same value in both fields, thereby providing a larger resizing area, or use the Long Side or Short Side option instead (see the next option).
Choose Long Side or Short Side, then enter the desired value for that dimension.
Choose Megapixels, then enter the desired total pixel count value. All photos will be resized to that value.
Choose Percentage, then enter a percentage by which you want your photos to be resized (preferably, less than 130%, and not more).
![]() When you use the Resize to Fit option, the new dimensions and megapixel (MP) count are listed in the right side of the Image Sizing area. If you want to learn the original dimensions of the current photo, uncheck Resize to Fit; the original dimensions will display in the dimmed W and H fields; now recheck the box.
When you use the Resize to Fit option, the new dimensions and megapixel (MP) count are listed in the right side of the Image Sizing area. If you want to learn the original dimensions of the current photo, uncheck Resize to Fit; the original dimensions will display in the dimmed W and H fields; now recheck the box.
4. Click OK. Note: Because the current settings in the Workflow Options dialog are applied to all photos that you open into Camera Raw, after using the dialog to resize the desired photos, exit Camera Raw. Upon reopening Camera Raw, be sure to open the Workflow Options dialog and uncheck Resize to Fit.
Using the Camera Raw tabs
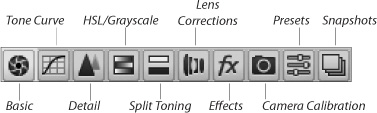
The Camera Raw tabs
To access a panel of related settings in Camera Raw, click one of the tab icons (shown above). We perform most of our work in the first four tabs, and recommend that you do the same. Use the other tabs for specialty corrections or enhancements, as needed.
Basic: Adjust the white balance and exposure (see pages 63–67).
Tone Curve: Fine-tune a specific tonal range, such as the upper or lower midtones (see pages 68–69).
Detail: Apply capture sharpening and reduce unwanted noise (see pages 70–71).
HSL/Grayscale: Adjust the hue, saturation, and luminance of individual colors (see pages 72–73).
Split Toning: Apply one color tint to the highlight areas of a photo and a second tint to the shadow areas (see page 79).
Lens Corrections: Correct a photo for the effects of lens distortion, such as geometric distortion (e.g., a building that is tilted backward or isn’t level), under- or overexposure at the edges (an unwanted vignette), chromatic aberration, and color fringes.
Effects: As a special effect, apply a grain texture or a light or dark vignette (see pages 84–85).
Camera Calibration: The Process menu in this tab lets you update a file to the latest Camera Raw processing (see the sidebar on the next page). If the profile that Camera Raw provides for your camera model doesn’t produce satisfactory color results, use the sliders in this tab to tweak the settings manually.
Presets: Create a custom preset of the current Camera Raw settings for future application to any other photos (see page 92).
Snapshots: For flexibility in editing, save interim versions of a photo as you make corrections. When necessary, you can restore the photo to any snapshot version (see the sidebar on page 92).
Using the Scrubbies
If you find a need to undo or reset your slider settings as you work in Camera Raw, you can use any of the methods below. (To learn about related options on the Camera Raw Settings menu, see the next page.)
To restore default settings to sliders in the Camera Raw tabs:
Do any of the following:
Double-click a slider to reset it to its default value (usually 0).
Shift-double-click a slider in the Basic tab to reset it to the Auto value.
Click Default in the Basic or HSL/Grayscale tab to reset all the sliders in just that tab to 0.
Hold down Alt/Option and click Reset at the bottom of the dialog (Cancel becomes Reset) to restore the settings, in all tabs, that were in effect when you opened the dialog.
Using the Preview Buttons ![]()
From the Before/After Views menu ![]() below the preview, choose a preview option. For instance, Before/After Left/Right displays the original photo on the left (or displays the photo with the settings that were copied to the button, see below), and the photo with the current Camera Raw settings on the right. Before/After Top/Bottom Split displays the two versions in top and bottom halves of one image. Or if you prefer to cycle through the menu settings, click (and keep clicking) the Before/After Views button
below the preview, choose a preview option. For instance, Before/After Left/Right displays the original photo on the left (or displays the photo with the settings that were copied to the button, see below), and the photo with the current Camera Raw settings on the right. Before/After Top/Bottom Split displays the two versions in top and bottom halves of one image. Or if you prefer to cycle through the menu settings, click (and keep clicking) the Before/After Views button ![]() (Q). To customize the views, choose Preview Preferences from the menu.
(Q). To customize the views, choose Preview Preferences from the menu.
![]() To swap the positions of the previews, click the Swap Before/After Settings button
To swap the positions of the previews, click the Swap Before/After Settings button ![]() (P).
(P).
![]() To save the current Camera Raw settings as the Before state of the image, click the Copy Current Settings to Before button
To save the current Camera Raw settings as the Before state of the image, click the Copy Current Settings to Before button ![]() (Alt-P/Option-P). There-after, when you choose a Before/After view, those settings will display in the top or left part of the preview.
(Alt-P/Option-P). There-after, when you choose a Before/After view, those settings will display in the top or left part of the preview.
When you open a photo into Camera Raw, by default, it’s adjusted according to the built-in profile for your camera model, and all the sliders in the Basic tab are set to 0. At any time, you can assign a different collection of settings to your file, or restore the original settings.
To restore settings via the Camera Raw Settings menu:
From the Camera Raw Settings menu, ![]() choose one of these options: A
choose one of these options: A

A Use options on the Camera Raw Settings menu to restore default settings to your photo or to reapply the prior settings.
Image Settings to restore the settings that were attached to the file during the initial photo shoot or, if the photo was previously edited in Camera Raw, from the last Camera Raw session. When a photo is opened for the first time into Camera Raw, these settings will match the Camera Raw Defaults settings.
Camera Raw Defaults to remove all custom settings and reapply the default settings for your camera model, your specific camera, or the ISO setting that was used to take the photo.
Previous Conversion to apply the settings from the prior image that was adjusted in Camera Raw.
Custom Settings to reapply the custom settings that you have chosen since opening the photo into Camera Raw.
If a user-saved preset is applied to the current photo, that preset will also be listed as an option on this menu (see page 92).
Toggling the ACR Default Settings ![]()
To quickly toggle between the current (custom) settings and the Adobe Camera Raw Default settings for your photo, click the rightmost button below the preview ![]() (Ctrl-Alt-P/Cmd-Option-P). If the photo is displayed in a divided preview, the default settings will display in just the “After” section.
(Ctrl-Alt-P/Cmd-Option-P). If the photo is displayed in a divided preview, the default settings will display in just the “After” section.
Updating Legacy Photos and the Camera Raw Sliders
When you bring an unprocessed photo into Camera Raw 8.x, the dialog uses its most up-to-date profiles for noise reduction, de-mosaicing, sharpening, color calibration, and other processing. If you want to update a raw photo that was already processed in Camera Raw 6 or earlier using the new profiles, and also update the sliders in the Basic and other tabs to the newest versions (as described in this chapter), before applying any custom adjustments, click the Update to Current Process (2012) ![]() icon at the bottom right of the preview window. The Process menu in the Camera Calibration tab
icon at the bottom right of the preview window. The Process menu in the Camera Calibration tab ![]() changes to the setting of 2012 (Current). Note: If you want to preserve access to the older rendering of the photo, take a snapshot of it before you update it (see the sidebar on page 92).
changes to the setting of 2012 (Current). Note: If you want to preserve access to the older rendering of the photo, take a snapshot of it before you update it (see the sidebar on page 92).
Setting the White Balance
There are a few ways to adjust the white balance of a photo in Camera Raw. Note: Before adjusting the white balance, make sure your display is properly calibrated.
![]() Our recommended method is to drag the Temperature and Tint sliders in the Basic tab, choosing settings based on how the photo looks to your eye (see the next page).
Our recommended method is to drag the Temperature and Tint sliders in the Basic tab, choosing settings based on how the photo looks to your eye (see the next page).
![]() For photos that are shot in controlled lighting, such as in a studio, another method is to use the White Balance tool
For photos that are shot in controlled lighting, such as in a studio, another method is to use the White Balance tool ![]() (I). Drag (don’t click) to define a rectangle on a medium to light gray area of the photo — if you can find one. Camera Raw will set the White Balance based on pixel values in the sampled area. Note that although the White Balance tool is improved, sampling a larger area of “nearly gray” pixels than before,
(I). Drag (don’t click) to define a rectangle on a medium to light gray area of the photo — if you can find one. Camera Raw will set the White Balance based on pixel values in the sampled area. Note that although the White Balance tool is improved, sampling a larger area of “nearly gray” pixels than before,![]() the resulting color temperature and tint correction may still not be adequate, and may need further adjustment.
the resulting color temperature and tint correction may still not be adequate, and may need further adjustment.
![]() Here’s an iffy, but quick, method: Shift-double-click the Temperature slider, and Shift-double-click the Tint slider. Camera Raw will apply auto settings for those controls.
Here’s an iffy, but quick, method: Shift-double-click the Temperature slider, and Shift-double-click the Tint slider. Camera Raw will apply auto settings for those controls.![]()
Using the Basic tab
As its name implies, the Basic tab contains the most essential correction features of Camera Raw — and it displays first, by default, when you open the dialog. We have divided the use of this tab into several tasks, beginning with setting the White Balance, on this page, then proceeding through exposure, contrast, and saturation adjustments, on pages 64–67.
To apply white balance adjustments via the Basic tab:
1. With a photo open in Camera Raw, click the Basic tab. ![]() A If the whole photo isn’t visible in the preview, double-click the Hand tool
A If the whole photo isn’t visible in the preview, double-click the Hand tool ![]() in the toolbox.
in the toolbox.


A When a photo is opened for the first time into Camera Raw, the White Balance menu in the Basic tab is set to As Shot. This photo has a high Temperature value and looks too warm (yellowish).
2. Do either of the following:
From the White Balance menu, choose a preset that best describes the lighting conditions in which the photo was taken, such as Daylight or Shade. (Choose As Shot, if needed, to restore the original camera settings. Note that only As Shot and Custom are available for JPEG and TIFF files.)
Lower the Temperature value to add blue and make the image look cooler,B or raise it to add yellow and make the image look warmer.C To fine-tune the temperature correction, move the Tint slider slightly to the left to add a bit of green or to the right to add magenta. (The White Balance menu setting changes to Custom, to indicate that you have chosen manual settings.)

B We lowered the Temperature value too much. Now the photo looks too cool (has a bluish cast).

C A Temperature value of 5500 strikes a good balance between warm and cool.
On the histogram in the Camera Raw dialog, the red, green, and blue areas represent the three color channels in a photo, and the white areas represent the areas where those three colors overlap. Clipping, the shifting of tonal values to absolute black or white in a photo, occurs if the tonal range of a scene is wider than the range that can be captured by the camera. You can tell that pixels are clipped in a photo if the vertical bars are primarily clustered in taller peaks at one or both ends of the histogram (shadow pixels on the left, highlight pixels on the right). You can also drag in the histogram to apply tonal adjustments.![]()
As you make slider adjustments in Camera Raw, your goal is to bring the pixels into the range of your chosen RGB color space and minimize clipping. When tonal values are redistributed, the histogram updates accordingly. Note: Remember, we recommended that you choose Adobe RGB as the color space both for your camera (see page 5) and for photos that you open into Camera Raw (see page 58).
To turn on the histogram clipping warnings for the preview:
In the top-left corner of the histogram, click the Shadow Clipping Warning button (U);A clipped shadows display in the preview as blue. In the top-right corner, click the Highlight Clipping Warning button (O); clipped highlights display in the preview as red. (When a button is activated, it has a white border.)
In the two tasks that follow this one, we show you how to use a number of sliders in the Basic tab. Once you learn the function of the sliders, remember that you can also make adjustments by dragging in the histogram, as described here.
To make tonal edits via the histogram: ![]()
1. In Camera Raw, display the Basic tab, ![]() then roll over the histogram.A As you move the pointer, one of five vertical gray drag zones will appear. The drag zone, as well as the data in the info area below the histogram, corresponds to one of these five sliders: Blacks, Shadows, Exposure, Highlights, or Whites.
then roll over the histogram.A As you move the pointer, one of five vertical gray drag zones will appear. The drag zone, as well as the data in the info area below the histogram, corresponds to one of these five sliders: Blacks, Shadows, Exposure, Highlights, or Whites.

A When we rolled over an area of the histogram, a drag zone appeared, and the corresponding Basic slider name and setting appeared in the info area.
2. Drag horizontally in a drag zone to adjust that tonal range; the corresponding slider will shift accordingly.B
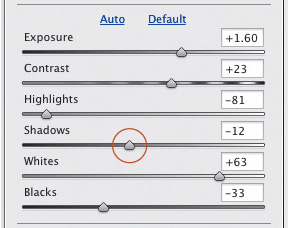
B When we positioned our pointer within the drag zone for the Shadows range in the histogram, then dragged horizontally, the corresponding Shadows slider in the Basic tab shifted accordingly.
Use the middle batch of sliders in the Basic tab to apply tonal corrections to your photo, preferably in the order listed in the dialog (there’s a logic to their sequence). At first, all the sliders are set to 0 and the underlined word “Default” is dimmed.
To apply exposure and contrast adjustments via the Basic tab:
1. Turn on the Clipping Warning buttons.
2. Use the Exposure slider to lighten or darken the entire photo, as needed.
3. Use the Contrast slider to increase or reduce the color intensity and tonal contrast (A–B).

A This original photo was underexposed (too dark), causing the colors to look dull. The blue warning color in the preview indicates the shadow areas in the photo that are clipped.

B Our first goal is to lighten the overall photo and recover details in the midtones and shadows without washing out the highlights. In the Basic tab, we increased the Exposure value,* then increased the Contrast value to intensify the highlights, shadows, and color saturation. We’re not concerned that the photo is still too dark, as it can be lightened with further adjustments.
*We chose an Exposure value of +0.60 for the raw version of this photo. If you are working with the JPEG version that we have supplied for downloading, use an Exposure value of +0.80 instead.
4. If you increased the contrast, the highlights and shadows probably now need to be adjusted:
To restore details in the highlights, move the Highlights slider to the left until only a smidgen remains of the red highlight warning color.
To restore details in the shadows, move the Shadows slider to the right until only a smidgen remains of the blue shadow warning color.A Or if you need to darken the shadows, move this slider to the left.

A We reduced the Highlights value to recover details in the sky and increased the Shadows value to recover details in the shadows and lower midtones. The colors and detail in the midtones, and the overall balance of lights and darks, are improved. However, reducing the Highlights value caused the white areas to look dull.
5. Now that details have been restored to the midtones and highlights, you’re ready to adjust the whites and blacks:
Increase the Whites value to brighten the white areas in the photo. This slider also has the effect of lightening the upper midtones and brightening the colors.
Use the Blacks slider to lighten or darken the black areas (A). This slider may also affect the color brightness.

A We increased the Whites value to lighten the upper midtones and brighten the whites, and increased the Blacks value to recover more details in the shadows. Overall, the brightness, as well as the colors, are much improved.
![]() If the colors are now washed out as a result of your increasing the Whites or Blacks value, you could try increasing the Contrast value.
If the colors are now washed out as a result of your increasing the Whites or Blacks value, you could try increasing the Contrast value.
![]() To further adjust the tonal values in the midtones, see pages 68–69.
To further adjust the tonal values in the midtones, see pages 68–69.
![]() To have Camera Raw set the Whites or Blacks value automatically, hold down Shift while double-clicking one of those sliders.
To have Camera Raw set the Whites or Blacks value automatically, hold down Shift while double-clicking one of those sliders.![]()
Remove Clipping in Threshold Preview
To apply edge contrast and color saturation adjustments using the Basic tab:
1. To add depth by intensifying the edge contrast in the midtones, increase the Clarity value; or for a deliberate soft-focus effect (such as in a portrait or landscape), reduce the Clarity value.
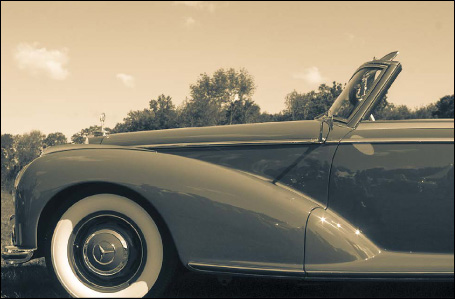
2. Change the Vibrance value to adjust the color saturation.B

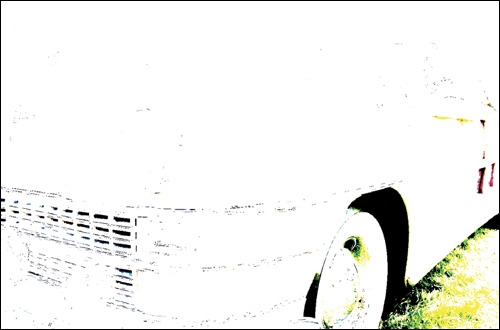
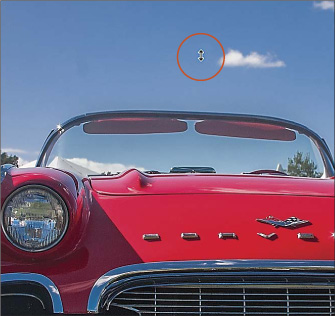
B Finally, we increased the Clarity value slightly to sharpen the details and increased the Vibrance value slightly to boost the color saturation (note the change on the car body). Our cumulative adjustments to this photo improved the contrast, clarified the details, and produced richer color. Vroom, vroom!
3. Turn off both clipping warnings by pressing U, then O.
![]() We recommend using the Vibrance slider instead of the Saturation slider to adjust color saturation because the former is less likely to cause oversaturation (and it protects skin tones), whereas the latter is more likely to cause oversaturation and highlight clipping. To view the effect of this, drag the Saturation slider to the far right.
We recommend using the Vibrance slider instead of the Saturation slider to adjust color saturation because the former is less likely to cause oversaturation (and it protects skin tones), whereas the latter is more likely to cause oversaturation and highlight clipping. To view the effect of this, drag the Saturation slider to the far right.
Using the Tone Curve tab
After using the Basic tab, a next logical step is to make a more refined adjustment of the upper and lower midtones, which we recommend doing individually via the Parametric sliders in the Tone Curve tab.
Note: We avoid manipulating the curve in the nested Point tab, because a misshapen curve can cause a photo to look posterized. The sliders in the Parametric tab don’t cause this problem.
To apply tonal adjustments using the Parametric sliders in the Tone Curve tab:
1. With a photo open in Camera Raw,A click the Tone Curve tab, ![]() then the nested Parametric tab. Behind the curve you’ll see a static display of the current histogram.
then the nested Parametric tab. Behind the curve you’ll see a static display of the current histogram.

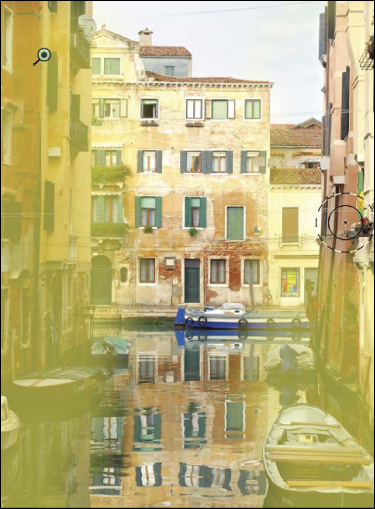
A In this photo, the midtones are too dark — few details are visible in those areas.
2. Do either of the following:
If you have already adjusted the Highlights and Shadows sliders in the Basic tab, leave the Highlights or Shadows sliders in this tab alone and just tweak the upper and lower midtones using the Lights and Darks sliders. If you didn’t adjust the Highlights and Shadows sliders in the Basic tab, you can use the sliders here to lighten or darken any individual tonal range: Highlights, Lights (upper midtones), Darks (lower midtones), or Shadows. As you move a slider, the corresponding portion of the curve will be raised above or lowered below the diagonal line (A–B).
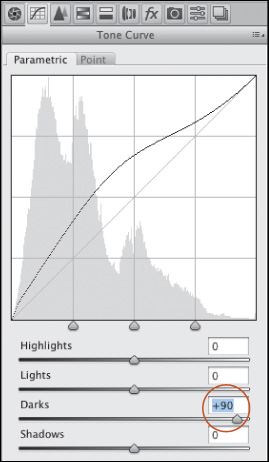
A To lighten the lower midtones, we increased the Darks value. This adjustment raised the middle of the curve.

B More details are now visible in the lightened midtones, such as on the sides of the buildings and on the side and surface of the canal. However, the sky looks a bit dull.
Click the Targeted Adjustment tool ![]() (T). Drag within a tonal range of the photo that needs adjustment (C). As you do this, the slider and curve that correspond to the tonal range under the pointer will move accordingly.
(T). Drag within a tonal range of the photo that needs adjustment (C). As you do this, the slider and curve that correspond to the tonal range under the pointer will move accordingly.

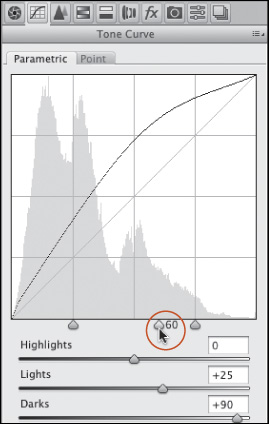
C To lighten the upper midtones (and thereby brighten the clouds, sky, and trees), we dragged upward over a light midtone area with the Targeted Adjustment tool; ![]() the Lights value increased automatically.
the Lights value increased automatically.
![]() To boost the contrast in a photo, try moving the Lights slider to the right and the Darks slider to the left.
To boost the contrast in a photo, try moving the Lights slider to the right and the Darks slider to the left.
3. To control the range of tonal values that are affected by the slider adjustments you made in the preceding step, move any of the region controls (located below the graph). The left region control affects the Shadows slider, the right region control affects the Highlights slider, and the middle region control affects both the Lights and Darks sliders (D–E). Move a control to the left to raise the curve and lighten adjacent tonal ranges, or move a control to the right to lower the curve and darken adjacent tonal ranges.
D Finally, we moved the middle region control slightly to the right, which had the effect of increasing the contrast and lightening the sky.

E Now the tonal values in the image look just right.
![]() To use one shortcut to get to the nested Parametric tab in the Tone Curve tab and select the Targeted Adjustment tool, press Ctrl-Alt-Shift-T/Cmd-Option-Shift-T.
To use one shortcut to get to the nested Parametric tab in the Tone Curve tab and select the Targeted Adjustment tool, press Ctrl-Alt-Shift-T/Cmd-Option-Shift-T.
Using the Detail tab
Via the Sharpening sliders in the Detail tab, you can adjust the sharpness of your photo (a process called “capture” sharpening), and via the Noise Reduction sliders, you can reduce any unwanted color noise.
To sharpen a photo using the Detail tab:
1. Click the Detail tab ![]() A and choose a zoom level of 100%. In the preview, drag to reveal an area of the photo that has some detail (hold down the Spacebar for a temporary Hand tool).
A and choose a zoom level of 100%. In the preview, drag to reveal an area of the photo that has some detail (hold down the Spacebar for a temporary Hand tool).
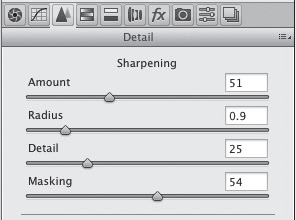
A These are the Sharpening controls in the Detail tab.
Note: If the words “Sharpening (Preview Only)” display at the top of the Detail tab, click the Open Preferences Dialog button ![]() in the toolbox. In the Camera Raw Preferences dialog, choose Apply Sharpening To: All Images, then click OK.
in the toolbox. In the Camera Raw Preferences dialog, choose Apply Sharpening To: All Images, then click OK.
2. Under Sharpening, adjust the Amount value for the degree of edge definition. For subject matter that needs a lot of sharpening, such as hard-edged objects or buildings, try a value of 100; if less sharpening is needed, try a value of 50–60. (For a raw photo, the default Amount value is 25; for a JPEG photo, the default value is 0.)
![]() To better evaluate the Amount value via a grayscale preview, Alt-drag/Option-drag the slider.
To better evaluate the Amount value via a grayscale preview, Alt-drag/Option-drag the slider.
3. Use the Radius slider to control how many pixels surrounding each sharpened edge are modified. We keep this value between 1 and 1.3.
4. Alt-drag/Option-drag the Detail slider slightly to the right to emphasize edge details and textures.
5. Alt-drag/Option-drag the Masking slider to around 50 to protect low-contrast areas with a black mask, and thereby sharpen only high-contrast areas.
All digital cameras produce some luminance (grayscale) noise and color artifacts (randomly colored pixels). Although budget cameras tend to produce the most noise, it can also be produced by a high-end camera if it’s used with a high ISO (light sensitivity) setting in a poorly lit scene. It’s a good practice to remove as much noise from your photos as possible in Camera Raw, because it can become accentuated by image editing in Photoshop.
As you follow these steps, you’ll discover that after you shift one slider, another slider will need adjusting.
To reduce luminance and color noise using the Detail tab:
1. With a photo open in Camera Raw (A), click the Detail tab ![]() and choose a zoom level of 200–300% for the preview.
and choose a zoom level of 200–300% for the preview.
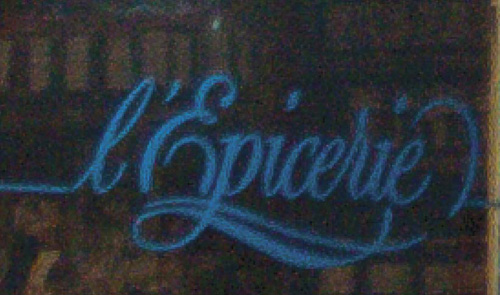
A This is a close-up of a photo of a shop window (viewed at a zoom level of 300%), with the Noise Reduction: Luminance and Color sliders in the Detail tab set to 0 (no noise reduction applied). Grayscale noise is evident in the signage, and color artifacts are evident on the poorly lit interior surfaces behind the letters.
2. To reduce grayscale noise (graininess), increase the Luminance value (B). Try a value between 20 and 70.
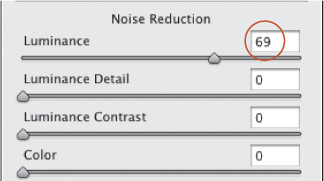
B To remove noise from the letters, we increased the Luminance value to 69, but this also diminished the edge definition.
3. Increasing the Luminance can cause high-contrast edges in a photo to lose definition. To resharpen edges, raise the Luminance Detail value — but not so much that you reintroduce noise (C).
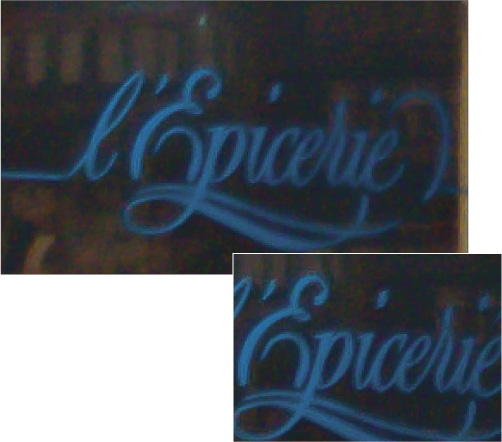
C To resharpen the edges of the letters, we increased the Luminance Detail value to 65.
![]() To move a different area of the photo into view, hold down the Spacebar and drag.
To move a different area of the photo into view, hold down the Spacebar and drag.
4. Raise the Luminance Contrast value to restore some edge contrast. The effect of this slider is most noticeable in photos that contain a lot of noise.
5. Color artifacts and random speckling tend to be most noticeable in solid-color areas of a photo (e.g., flat surfaces), especially in shadow areas. To reduce these defects in a raw photo, increase the Color value to around 40–50, depending on the subject matter (for a JPEG photo, which has a default Color value of 0, use a lower Color value).
6. Raising the Color value may lower the intensity of colors in areas of the photo that were poorly lit. To restore some saturation and intensity to those areas, increase the Color Detail value from the default value of 50 to around 75, or just until the color saturation looks good (D).


D To remove color artifacts from the dark areas, we increased the Color value to 40; this also had the effect of desaturating the colors. To revive the colors and produce the final version of the image (shown at left), we increased the Color Detail value to 60.
7. To help reduce color mottling and artifacts in dark, low-contrast (low-frequency) areas of the photo, use the Color Smoothness slider.![]()
8. Lower the zoom level for the preview to judge the overall effect of the Detail settings.
Using the HSL/Grayscale tab
Using the powerful sliders in the HSL/Grayscale tab, you can adjust the hue, saturation, and luminance of each color component of a photo individually.
To adjust individual colors via the HSL sliders:
1. Click the HSL/Grayscale tab, ![]() and double-click the Hand tool
and double-click the Hand tool ![]() to fit the image in the preview.A
to fit the image in the preview.A

A In the original photo, the sky lacks contrast and the reds on the car body are slightly undersaturated.
2. Click the nested Hue tab. Move any slider to shift that color into adjacent hues, as shown in the bar. For example, you could shift the Greens slider toward yellow to make a landscape look warmer, or toward aqua to make it look cooler.
3. Click the Saturation tab. Move any slider to the left to desaturate that color (add gray to it) or to the right to make it more vivid (pure).B–C Avoid oversaturating the photo, to keep it looking realistic and so it stays printable.
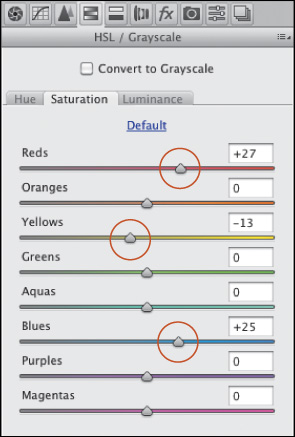
B In the nested Saturation tab of the HSL/Grayscale tab, we reduced the saturation of the Yellows and increased the saturation of the Reds and Blues.

C The Saturation adjustments intensified the reds in the car (particularly in the upper midtones) and intensified the blues in the sky.
![]() To make a bluish sky more vivid, increase the saturation of the Blues and Aquas. To make a sunset look warmer, increase the saturation of the Oranges or Yellows.
To make a bluish sky more vivid, increase the saturation of the Blues and Aquas. To make a sunset look warmer, increase the saturation of the Oranges or Yellows.
4. Click the Luminance tab.A–B Move a slider to the left to darken that color (add black) or to the right to lighten it (add white). Avoid lightening any of the colors too much, to prevent the highlights from being clipped.

A In the nested Luminance tab, we lightened the Oranges and darkened the Reds, Yellows, Greens, and Blues. (Tip: Reducing the Blues value can make a photo look as if it was shot with a polarizing filter on the camera.)

B Decreasing the luminance of the Blues darkened the colors in the sky, while decreasing the luminance of the Reds and increasing the luminance of the Oranges produced a brighter, richer red on the car body. Now the colors are equally intense in the upper and lower areas of the photo.
![]() For a more accurate rendering of your adjusted pixels, choose a zoom level of 66% or 100% for the Camera Raw preview.
For a more accurate rendering of your adjusted pixels, choose a zoom level of 66% or 100% for the Camera Raw preview.
Using the Targeted Adjustment Tool
To apply local color adjustments to a photo, hold down Ctrl-Alt-Shift/Cmd-Option-Shift and press H, S, or L. The nested Hue, Saturation, or Luminance tab in the HSL/Grayscale tab displays and the Targeted Adjustment tool ![]() becomes selected. Drag upward or to the right over a color area to increase the slider values specifically for that area, or downward or to the left to decrease those values. The sliders that correspond to the color under the pointer will shift automatically.
becomes selected. Drag upward or to the right over a color area to increase the slider values specifically for that area, or downward or to the left to decrease those values. The sliders that correspond to the color under the pointer will shift automatically.
Using the Adjustment Brush tool
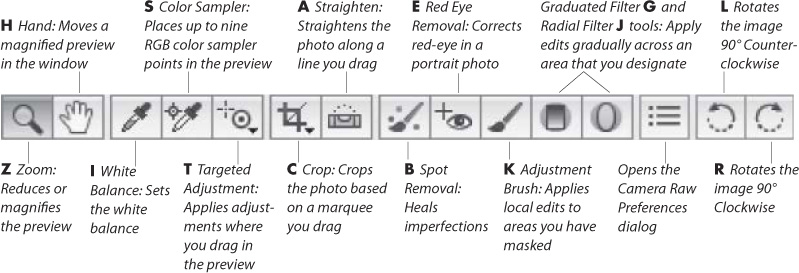
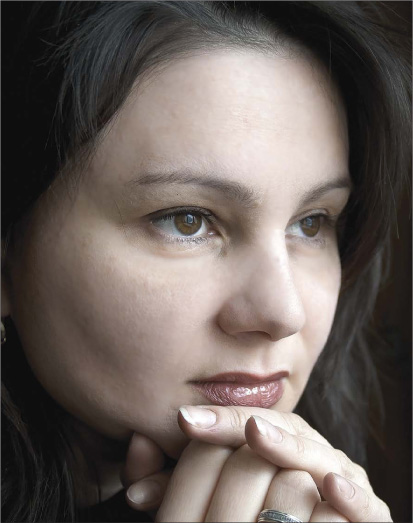
Unlike corrections that are made in the Camera Raw tabs, which apply to the overall photo, corrections made with the Adjustment Brush tool are “local” (affect specific areas of the photo). You apply a mask in the preview to define which areas are going to be affected by the adjustment, then you apply the correction via the sliders. Use this tool after you have finished your broad, overall corrections, to fix a few specific areas or to accentuate some details.A Awesome feature!

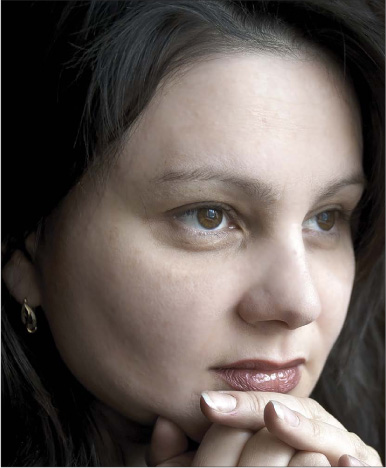
A We studied this photo and decided what improvements to make: Smooth the skin, sharpen the eyelashes, darken the eyebrows, and minimize the under-eye circles.
To apply local edits with the Adjustment Brush tool:
1. After making adjustments in the Basic and Tone Curve tabs, click the Adjustment Brush tool ![]() (K). The sliders for the tool display (some are like the sliders in the Basic tab).
(K). The sliders for the tool display (some are like the sliders in the Basic tab).
2. Click the + or – button for any slider to “zero out” all the sliders except the one you click.
3. For the brush settings (the last four sliders), try a Feather value of 50–95 (to allow the edits to fade into surrounding areas), a Flow value of 60 (for the amount of adjustment produced by each stroke), and a Density value of 60 (for the level of transparency in the stroke).
4. Check Mask (Y) (scroll down in the settings area if you don’t see this option), adjust the brush size by pressing [ or ], then draw strokes over areas of the photo that need the same adjustment. A tint covers the areas where you apply strokes, and a pin appears where you started dragging.B

B We clicked the Adjustment Brush tool, zeroed out the sliders, checked Mask, then drew strokes on the broad areas of the face in the preview, being careful to avoid the key facial features.
![]() The brush size is represented by the solid circle in the pointer; the feather value is represented by the black-and-white dashed circle.
The brush size is represented by the solid circle in the pointer; the feather value is represented by the black-and-white dashed circle.
5. Uncheck Mask, then use the sliders to apply adjustments to the masked areas (A).

A We hid the mask, then chose a higher Tint value to add magenta to the skin tones, higher Exposure and Shadows values to lighten the skin tones, and lower Clarity and Sharpness values to smooth the skin texture. The results are shown at right.
![]() To show or hide all the pins, press V or check or uncheck Overlay.
To show or hide all the pins, press V or check or uncheck Overlay.
![]() To display the mask for an existing pin temporarily, with your mouse or stylus, roll over the pin.
To display the mask for an existing pin temporarily, with your mouse or stylus, roll over the pin.
6. To apply different adjustment settings to another area of the photo, click New, then repeat steps 2–5 B–C (and A–E).
B To sharpen the eyelashes, we clicked New, showed the mask, then covered the lashes using a small brush.

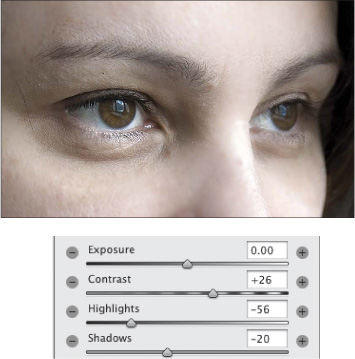
C We hid the mask, then chose higher Contrast, Clarity, and Sharpness values to accentuate the masked areas, and a lower Exposure value to darken them.

A To darken the eyebrows, we clicked New, checked Mask, then masked those areas.
B We hid the mask, then chose a higher Contrast value to define the hairs more crisply against the skin, and lower Highlights and Shadows values for a darkening effect.

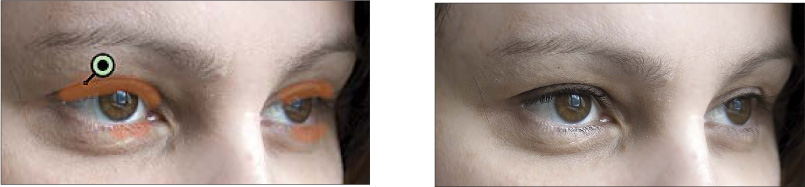
C To minimize the dark circles under the eyes, we clicked New, checked Mask, then applied a mask to those areas.

D We hid the mask again, then reduced the Temperature value to cool the redness of the skin tones; increased the Exposure, Highlights, and Shadows values to lighten the skin; and reduced the Clarity and Sharpness values to soften the skin texture.
E This final image shows the cumulative results of all the local corrections that we applied via the Adjustment Brush tool.
If you want to duplicate a pin and its mask, hold down Ctrl-Alt/Cmd-Option and drag the pin (you don’t have to click it first). Or click a pin, right-click it and choose Duplicate from the context menu, then drag the new pin.![]()
7. To redisplay the main Camera Raw tabs, press H (Hand tool).
To edit an Adjustment Brush tool correction:
1. Choose the Adjustment Brush tool ![]() (K).
(K).
2. Check Mask (Y) and Overlay (V).
3. Click a pin. A black dot appears in the center of the pin.
4. Do any of the following:
To add areas to the mask, drag with the brush in the image preview.A–B

A After using the Adjustment Brush tool in this photo, we clicked an existing pin, and checked Mask to display the mask associated with that pin (we changed our mask color to yellow).

B We dragged with the Adjustment Brush tool to add an area to the mask for the currently selected pin (note the brush cursor on the right side of the photo).
To move the mask to a different area of the photo, drag its pin. ![]()
To adjust the correction for the current pin, uncheck Mask (Y), then move the sliders.
Using the Auto Mask Option with the Adjustment Brush Tool
![]() If you want to change the mask overlay color, click the Mask Overlay Color swatch, then choose a color in the Color Picker.
If you want to change the mask overlay color, click the Mask Overlay Color swatch, then choose a color in the Color Picker.

To remove Adjustment Brush tool edits:
1. Choose the Adjustment Brush tool ![]() (K).
(K).
2. Check Mask (Y) and Overlay (V).
3. Do either of the following:
To remove adjustments locally, click a pin, click the Erase button (or hold down Alt/Option), then apply strokes where you want to erase the mask. A
A We clicked an existing Adjustment Brush pin, and checked Mask to display the mask associated with that pin. Next, we clicked the Erase button, then dragged with the brush to remove an area from the selected mask.
To remove a pin and its adjustments, click the pin, then press Backspace/Delete; or right-click a selected pin, then choose Delete from the context menu; B or hold down Alt/Option and click a selected or unselected pin (note the scissors pointer).![]()

B To remove a selected Adjustment Brush pin, we right-clicked it and chose Delete from the context menu.
![]() To remove all Adjustment Brush tool edits from the current photo and reset the tool mode to New, click the Clear All button.
To remove all Adjustment Brush tool edits from the current photo and reset the tool mode to New, click the Clear All button.
Using the Split Toning tab
Using the Split Toning controls, you can apply one color tint, or tone, to the highlight areas of a photo and a different tint to the shadow areas. For the best results with this technique (and to mimic its traditional origins), convert the colors in your photo to grayscale first. We’ve gotten good results on photos of metallic objects, such as the antique car shown here.A

A This is the original, full-color photo.
To apply a color tint to a grayscale version of a photo:
1. Click the HSL/Grayscale tab, ![]() then check Convert to Grayscale.
then check Convert to Grayscale.
2. Click the Basic tab, and adjust the exposure and contrast.
3. Click the Split Toning tab. ![]()
4. Move both of the Saturation sliders approximately halfway across the bar to make it easier to judge the colors you will apply in the next step (don’t worry that the photo looks awful).
5. Move the Highlights Hue slider to tint the highlights B and the Shadows Hue slider to tint the shadows.

B After converting the colors in the photo to grayscale, we used the Split Toning tab to tint the highlights with a brownish yellow hue.
6. Readjust the Saturation value for each hue.
7. Reduce the Balance setting to apply more of the Shadows tint to the entire photo, or increase it to apply more of the Highlights tint to the entire photo.C–D

C Next, we tinted the shadows with blue, then moved the Balance slider to the right to favor the highlight color more.
D This is the final result of our Split Toning adjustments. Applying separate tints to the highlights and shadows accentuated the lines and graceful curves of this sleek antique.
Using the Lens Corrections tab
Via the Lens Corrections tab in Camera Raw, you can correct a photo for various adverse effects of lens distortion. You can straighten out an architectural feature, such as a building or fence, that looks as if it’s leaning toward or away from the viewer, or that is tilted horizontally (isn’t level); and you can correct for under- or overexposure at the edges of a photo (vignetting). The corrections can be applied using a preset profile (this page) or manually (pages 81–83).
To correct geometric distortion and vignetting via Profile settings:
1. Click the Lens Corrections tab. ![]() Double-click the Hand tool
Double-click the Hand tool ![]() to fit the image in the preview.
to fit the image in the preview.
2. To access predefined lens profiles, click the Profile tab, then check Enable Lens Profile Corrections.
3. From the Setup menu,A do the following:

A Check Enable Lens Profile Corrections, then choose Auto from the Setup menu ...
Choose Auto to have Camera Raw read the EXIF metadata in the photo and attempt to select the proper lens make, model, and predefined profile.
If an error message indicates that the Auto option was unable to locate a profile, choose your lens manufacturer from the Make menu.B Camera Raw will locate a matching lens model and list it on the Model menu, and will locate a predefined profile and list it on the Profile menu. If the Model menu lists more than one model, choose the one with which the photo was shot.

B ... or choose your lens maker from the Make menu. Regardless of the Setup option, if necessary, adjust the Distortion value.
4. Under Correction Amount, do the following:
Set the Distortion value to control the amount of correction.
Set the Vignetting value to correct for under- or overexposure at the edges of the photo.
5. Optional: If Camera Raw managed to locate your lens profile (step 3), you can save that profile and any custom Correction Amount settings as your new default profile by choosing Save New Lens Profile Defaults from the Setup menu. In future Camera Raw editing sessions, if you choose Default from the Setup menu, and the current photo was taken with this lens, the saved profile and settings will be applied. (To restore the Adobe predefined settings for your chosen lens, from the Setup menu, choose Reset Lens Profile Defaults.)
6. Optional: If you want to further correct any lens distortion manually, see the next task.
![]() When applying lens corrections to a Smart Object in Photoshop, we use the Lens Corrections tab in Camera Raw (accessed via Filter > Camera Raw Filter) because it has more extensive manual controls than the Lens Correction filter in Photoshop.
When applying lens corrections to a Smart Object in Photoshop, we use the Lens Corrections tab in Camera Raw (accessed via Filter > Camera Raw Filter) because it has more extensive manual controls than the Lens Correction filter in Photoshop.
To correct geometric distortion or vignetting via the Manual tab:
1. Click the Lens Corrections tab, ![]() and double-click the Hand tool
and double-click the Hand tool ![]() to fit the image in the preview.A
to fit the image in the preview.A

A The original photo (above) shows signs of lens distortion: The house looks as if it’s tilting away from the camera, and it’s not level.
2. Click the Manual tab.B

B We clicked the Manual tab (under Lens Corrections) to access these menu options and sliders.
3. In the Upright area, click a button to apply a preset correction:
Auto ![]() to apply level correction and fix horizontal and vertical convergence, balanced with as little distortion as possible.C
to apply level correction and fix horizontal and vertical convergence, balanced with as little distortion as possible.C
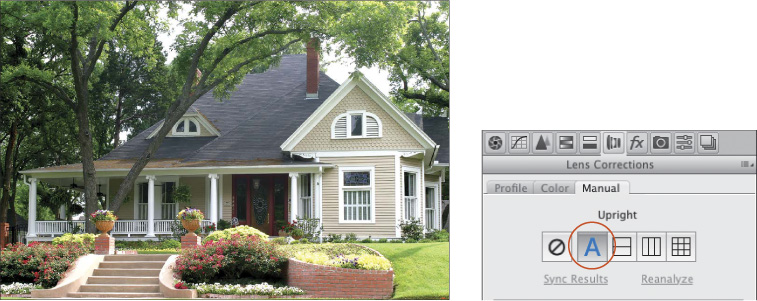
C Under Upright, we clicked the Auto button for a balanced correction. This partially corrected the vertical lines and vertical tilt, but the left side of the house still looks as if it’s farther away from the viewer than the right side.
Level ![]() to apply only level correction (not fix horizontal or vertical convergence).
to apply only level correction (not fix horizontal or vertical convergence).
Vertical ![]() to apply level correction and fix vertical convergence (but not horizontal convergence).
to apply level correction and fix vertical convergence (but not horizontal convergence).
Full ![]() for a stronger correction of horizontal and vertical convergence, in addition to level correction (A).
for a stronger correction of horizontal and vertical convergence, in addition to level correction (A).

A We clicked the Full button instead, which successfully made the house level and upright. To lighten the outer areas of the photo, we increased the Amount value (under Lens Vignetting).
4. If further manual correction is needed, do any of the following:
To spread the image out (fix pincushion distortion), lower the Distortion value; or to pinch the image inward (fix barrel distortion), increase the Distortion value.
![]() To display a grid over the image so you can check the alignment, check Show Grid or press V. Adjust the grid size via the slider.B
To display a grid over the image so you can check the alignment, check Show Grid or press V. Adjust the grid size via the slider.B


B We made some minor Vertical and Rotate adjustments, with Show Grid checked to help us gauge the effect.
To widen the top of the image, (correct keystoning) reduce the Vertical value; to widen the bottom of the image, increase the Vertical value. Readjust the Distortion value, if needed.
To widen the left edge of the image, reduce the Horizontal value; to widen the right edge of the image, increase the Horizontal value.
To rotate the image, change the Rotate value.
To enlarge or shrink the photo, change the Scale value. Note: You could crop the photo instead.
To stretch the image horizontally or vertically, change the Aspect value. This option is useful for correcting strong perspective distortion in photos taken with a wide-angle lens (A–B).


A We tried increasing the Aspect value, but this setting exaggerated and distorted the verticals of the house too much.

B Instead, we set the Aspect value to –5, which exaggerated the horizontal proportion only slightly. The final settings we chose for the image are shown at right.
![]() If you moved the Distortion slider, you can click Reanalyze (below the buttons) to force a recalculation of the Upright correction based on the Distortion value. If you want to turn off (but preserve) all your Upright corrections, click the Off button.
If you moved the Distortion slider, you can click Reanalyze (below the buttons) to force a recalculation of the Upright correction based on the Distortion value. If you want to turn off (but preserve) all your Upright corrections, click the Off button. ![]() If you click a different Upright button, as an alert will inform you, all the Transform sliders (except Distortion) will be reset to 0.
If you click a different Upright button, as an alert will inform you, all the Transform sliders (except Distortion) will be reset to 0.
5. To correct or apply Lens Vignetting (lighten or darken the outer areas of the photo), set the Amount value for the strength of the correction, then set the Midpoint value to expand the vignette inward or outward. Readjust the Amount value, if needed.
Syncing Lens Corrections to Multiple Photos
![]() If the photos don’t require exactly the same corrections, click one photo, choose settings in the Manual tab of Lens Corrections, then on the left side of the dialog, click Select All, then click Synchronize. In the dialog, choose Lens Corrections from the menu, check only Transform and Lens Vignetting, then click OK. Camera Raw will analyze and correct each photo separately (see also page 94).
If the photos don’t require exactly the same corrections, click one photo, choose settings in the Manual tab of Lens Corrections, then on the left side of the dialog, click Select All, then click Synchronize. In the dialog, choose Lens Corrections from the menu, check only Transform and Lens Vignetting, then click OK. Camera Raw will analyze and correct each photo separately (see also page 94).
![]() If the photos do require exactly the same correction (e.g., bracketed shots of the same subject), click one photo, then click an Upright button in Lens Corrections. Click Select All on the left side of the dialog, then click Sync Results in Lens Corrections. The first photo will be analyzed according to the chosen Upright mode, then the same correction will be applied to all the other photos.
If the photos do require exactly the same correction (e.g., bracketed shots of the same subject), click one photo, then click an Upright button in Lens Corrections. Click Select All on the left side of the dialog, then click Sync Results in Lens Corrections. The first photo will be analyzed according to the chosen Upright mode, then the same correction will be applied to all the other photos.
Using the Effects tab
In traditional photography, the faster the film speed, the larger and more apparent the grain. As an intentional effect, you can simulate this grainy texture via the Grain controls in Camera Raw. Choose a photo that won’t suffer aesthetically when its details lose definition.
To add a grain texture to a photo:
1. Click the Effects tab, ![]() and double-click the Hand tool
and double-click the Hand tool ![]() to fit the image in the preview.A
to fit the image in the preview.A

A This photo is a good candidate for the Grain effect because we won’t mind if the details are softened and it contains muted colors.
2. To create a noticeable grain, under Grain, choose an Amount value of around 50.
3. To emulate the fine grain of slow film or the coarse grain of fast film, do as follows:
Set the Size value for the size of the grain particles.B When this value is greater than 25, a small degree of blurring is also applied, to help blend the grain with the imagery.
B The first settings we chose were Grain Amount 50 and Size 80 (we left the Roughness control at the default value of 50). The food textures are beginning to blend with the soft background.
Reduce the Roughness value below the default value of 50 for a more uniform grain, or increase it for an uneven, coarse grain.C Zoom in to examine the grain, then readjust the Amount value, if needed.

C We increased the Amount to 75, the Size to 60, and the Roughness to 65. The coarser grain unifies the highlights and background with the food textures even more. Please pass the Parmesan...
Using the Post Crop Vignetting controls, you can apply a light or dark vignette to a photo (lighten or darken the outer areas). If you crop the photo subsequently in Camera Raw, the vignette will reconform to the new dimensions.
To apply a vignette to a photo:
1. Click the Effects tab, ![]() and double-click the Hand tool
and double-click the Hand tool ![]() to fit the image in the preview.A
to fit the image in the preview.A
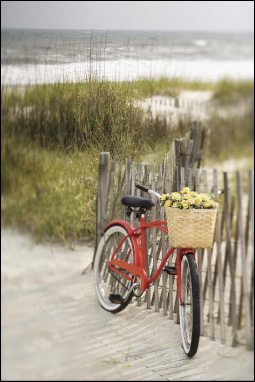
A This is the original image.
2. Under Post Crop Vignetting, do all of the following: B–D

B In the Effects tab, under Post Crop Vignetting, we chose the values above.
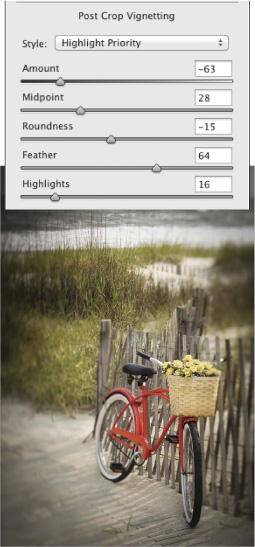
C We lowered the Midpoint value and raised the Feather and Highlights values.
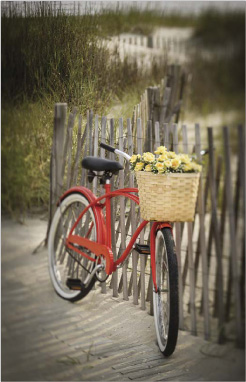
D When we cropped the image, the vignette readjusted automatically.
Choose Style: Highlight Priority.
Choose a negative Amount value for a dark vignette or a positive value for a light vignette.
Adjust the Midpoint value to expand the vignette inward or outward.
Adjust the Roundness value to make the vignette shape more oval or more like a rounded rectangle.
Adjust the Feather setting to control the softness of the transition to the nonvignetted areas.
Adjust the Highlights setting to control the brightness of the highlights within the vignette area.
Using the Graduated Filter tool
When shooting landscapes, you may have run into this common predicament: You set the proper exposure for the foreground, and the sky winds up being overexposed. To solve this problem on site, you can reduce the light on the upper part of the lens with a graduated neutral-density filter. To darken a sky in a photo that is shot without such a filter (Plan B!), you can use the Graduated Filter tool in Camera Raw.
With this tool, you create an overlay to define the area to be edited, then you apply the adjustment via any of a dozen sliders. The slider options are the same as for the Adjustment Brush tool.
To adjust an area of a photo using the Graduated Filter tool:
1. After adjusting your photo via the Basic and Tone Curve tabs,A choose the Graduated Filter tool ![]() (G). The sliders for the tool display in the right panel.
(G). The sliders for the tool display in the right panel.
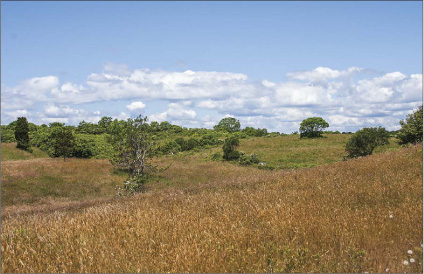
A Despite our applying Basic and Tone Curve adjustments, the sky in this photo looks overexposed (washed out).
2. Click the + or – button for any slider to “zero out” all the sliders except the one you click.
3. To define where the filter edits will be applied, Shift-drag over an area in the photo, beginning from the location where you want the adjustment to be strongest. The filter will be applied fully at the green dashed border of the overlay, gradually diminishing to nil at the red dashed border. Note: If you want to draw the overlay on a diagonal, don’t hold down Shift while dragging.
4. Do either or both of the following:
Use the Temperature and/or Tint slider to make the filtered area warmer or cooler.
Use other sliders to adjust such characteristics as the exposure, sharpness, or noise in the filtered area (A–C).

A After zeroing out the sliders for the Graduated Filter tool, we Shift-dragged downward in the photo (as shown by the arrow above), then chose slider settings to darken the exposure within the overlay area.

B To add more blue to the upper area of sky, we lowered the Temperature value.

C In the final image, the adjustment is strongest in the sky, fading to nil in the upper part of the ground.
5. To redisplay the main tabs, press H (for the Hand tool).
![]() At any time, you can lengthen or shorten the filter overlay by dragging or Shift-dragging the green or red dot. To reposition the whole overlay, drag the line that connects the two dots.
At any time, you can lengthen or shorten the filter overlay by dragging or Shift-dragging the green or red dot. To reposition the whole overlay, drag the line that connects the two dots.
![]() To apply a separate overlay to another area of the photo, click New, then repeat steps 2–4. If you want to clone an overlay, hold down Ctrl-Alt/Cmd-Option and drag the dashed line that connects the two pins; or right-click a selected overlay and choose Duplicate from the context menu, then move the duplicate overlay.
To apply a separate overlay to another area of the photo, click New, then repeat steps 2–4. If you want to clone an overlay, hold down Ctrl-Alt/Cmd-Option and drag the dashed line that connects the two pins; or right-click a selected overlay and choose Duplicate from the context menu, then move the duplicate overlay.![]()
![]() To hide the filter overlay, uncheck Overlay or press V.
To hide the filter overlay, uncheck Overlay or press V.
![]() To remove a filter overlay, right-click a selected pin then choose Delete from the context menu; or hold down Alt/Option and click the overlay (note the scissors pointer);
To remove a filter overlay, right-click a selected pin then choose Delete from the context menu; or hold down Alt/Option and click the overlay (note the scissors pointer);![]() or click the overlay, then press Backspace/Delete.
or click the overlay, then press Backspace/Delete.
Editing a Graduated or Radial Filter Mask with a Brush ![]()
![]() Create or select a filter overlay. Click the Brush button at the top of the panel (Shift-K) to display brush options, then click the Brush + (add to) or Brush – (erase from) button. Press [ or ] to size the brush, then apply strokes in the preview. (You can also toggle the plus and minus buttons for the brush by holding down Alt/Option.) If you want to choose different sizes for the plus and minus functions of the brush, check Separate Eraser Size on the panel menu.
Create or select a filter overlay. Click the Brush button at the top of the panel (Shift-K) to display brush options, then click the Brush + (add to) or Brush – (erase from) button. Press [ or ] to size the brush, then apply strokes in the preview. (You can also toggle the plus and minus buttons for the brush by holding down Alt/Option.) If you want to choose different sizes for the plus and minus functions of the brush, check Separate Eraser Size on the panel menu.
![]() In the panel, you can set the Feather value to control how much the brush edits fade into surrounding areas, and the Flow value to control the amount of adjustment. Check Auto Mask (M) to mask only the areas that match the first color area the brush touches (see also the sidebar on page 77).
In the panel, you can set the Feather value to control how much the brush edits fade into surrounding areas, and the Flow value to control the amount of adjustment. Check Auto Mask (M) to mask only the areas that match the first color area the brush touches (see also the sidebar on page 77).
![]() To remove all manual brush strokes from the currently selected overlay, click Clear.
To remove all manual brush strokes from the currently selected overlay, click Clear.
Using the Radial Filter tool
With the Radial Filter tool, you define an elliptical area with an overlay, then apply adjustments via sliders to the area either inside or outside the overlay.
To darken an area of a photo via the Radial Filter tool:
1. After adjusting your photo via the Basic and Tone Curve tabs,A click the Radial Filter tool ![]() (J). The sliders for the tool display.
(J). The sliders for the tool display.

A Although the exposure in this photo is well balanced, we want to spotlight the spa products more.
2. Click the + or – button for any slider to “zero out” all the sliders except the one you click. At the bottom of the panel, click Effect: Outside or Inside to control where the filter effect will occur relative to the overlay you will draw in the next step.
3. Drag over an area in the photo to produce an overlay.B If you want to reposition the overlay as you create it, drag with the Spacebar held down.

B We zeroed out the sliders for the Radial Filter tool, then dragged in the preview to create an overlay.
4. Use any of the sliders to adjust the filtered area (A–C). If the Effect setting is Outside, the adjustment will be at full strength outside the overlay, then diminish gradually to no adjustment at the dashed border. If the Effect setting is Inside, the adjustment will be at full strength at the center of the overlay and diminish gradually to no adjustment at the dashed border.

A We used the first four sliders to darken the filtered area and the Clarity and Sharpness sliders to soften the image details.
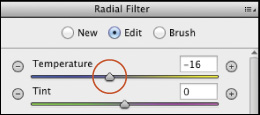
B To make the lighting in the darkened areas cooler, we reduced the Temperature value (added blue).
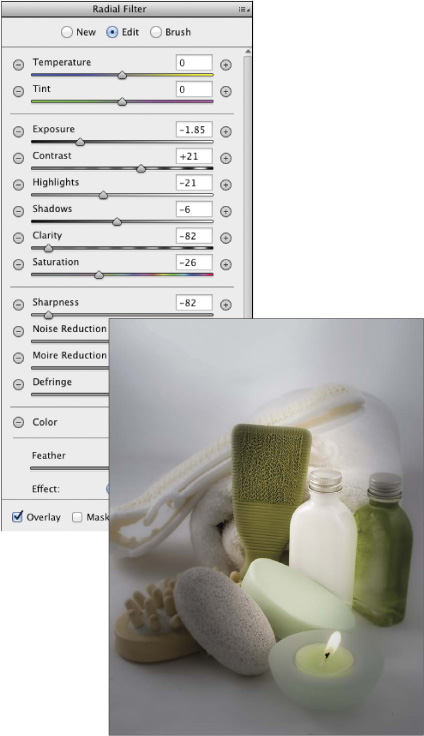
C The tonal, temperature, and sharpness adjustments helped to accentuate the candle, soap, and white bottle.
5. To control how gradual the adjustment is at the edge of the overlay, use the Feather slider.
6. To hide the overlay(s) to gauge the adjustment, uncheck Overlay or press V. Redisplay the overlay for the next step.
7. To edit the overlay, do any of the following (all optional):
To reposition the overlay, drag inside it.
To reshape the overlay, drag one of its handles.
To resize the overlay, Shift-drag a handle.
To swap the adjustment from Outside to Inside the overlay, or vice versa, click the unselected Effect button or press X.
8. Optional: To add another overlay, click New, then follow steps 2–7. To clone an overlay, hold down Ctrl-Alt/Cmd-Option and drag its center pin; or right-click the pin and choose Duplicate from the context menu, then drag the new pin.![]() Note: Adjustments are cumulative where overlays overlap; to edit adjustment settings, click a pin first.
Note: Adjustments are cumulative where overlays overlap; to edit adjustment settings, click a pin first.
9. To redisplay the main tabs, press H (Hand tool).
![]() To delete an overlay, select its center pin, then right-click the pin and choose Delete from the context menu; or hold down Alt/Option and click the pin (scissors pointer);
To delete an overlay, select its center pin, then right-click the pin and choose Delete from the context menu; or hold down Alt/Option and click the pin (scissors pointer);![]() or click the pin, then press Backspace/Delete.
or click the pin, then press Backspace/Delete.
![]() To expand an overlay to the edges of a photo, double-click inside it; or to do this when creating a new overlay, double-click in the preview.
To expand an overlay to the edges of a photo, double-click inside it; or to do this when creating a new overlay, double-click in the preview.
Using the Spot Removal tool
Use the Spot Removal tool to remove imperfections from a photo, such as spots caused by dust on the camera lens, blemishes in a portrait, or insects on flowers. You can let Camera Raw locate a source area for the repair automatically, or you can choose a source area.
The Spot Removal tool does an improved job of locating a source area automatically, especially when used to heal nonsmooth textures (Adobe mentions bark, rocks, and foliage as examples of textures in which healing results are improved). Also, if you use this tool on a photo that you cropped in Camera Raw, the tool will look for source areas within the crop boundary first.![]()
To remove blemishes or spots:
1. Choose the Spot Removal tool ![]() (B).
(B).
2. Zoom in on an area to be repaired.
3. Press [ or ] to size the brush cursor, then do one of the following:
Ctrl-Alt-drag/Cmd-Option-drag outward from the center of a blemish to create and scale a target circle A; or click a blemish; or if you want to control which area Camera Raw uses as the source, Ctrl-drag/Cmd-drag from the target area to the desired source area. When you release the mouse, a red dashed circle surrounds the target region and a green dashed circle surrounds the source area.B

A With the Spot Removal tool, we held down Ctrl-Alt/Cmd-Option and dragged to create a target circle around a blemish.
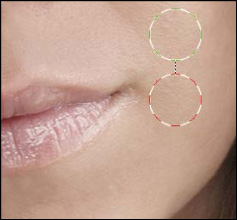
B The tool created a linked source circle in a similar area and repaired the blemish.
Drag across a blemish to create a target region. When you release the mouse, a border with a red pin surrounds the target region and a border with a green pin surrounds a source region.C–E
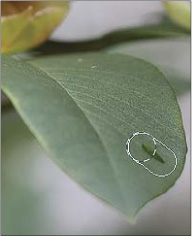
C To remove an imperfection from a leaf, we’re dragging to create a target region.

D The tool created a source region and two pins.

E The line is eliminated from the leaf.
![]() To display a black-and-white version of the photo to help you pinpoint dust spots or other irregularities, check Visualize Spots (Y). Adjust the black-to-white threshold via the slider. Press Y to return to the normal display.
To display a black-and-white version of the photo to help you pinpoint dust spots or other irregularities, check Visualize Spots (Y). Adjust the black-to-white threshold via the slider. Press Y to return to the normal display.
4. Optional: To soften the transition between the current target area and surrounding areas, adjust the Feather value. A–C Or to adjust the Feather value interactively (within the current size of the brush cursor), with Shift and right-click held down, drag horizontally in the preview. The new Feather value will display within the selected target area. The Feather value is sticky, meaning the current value will persist for future editing sessions until you change it.![]()

A The shed in this photo is a distracting element.

B Using the Spot Removal tool, we dragged outward from the center of the shed. With the Feather value for the tool set to 100%, the healing is fading around the rim of the circle, and sections of the original background aren’t replaced.

C We changed the Feather slider for the tool to 10%. Now the shed is more fully replaced with tree pixels, with minimal fading along the rim of the target region.
5. From the Type menu, choose Heal to blend source pixels into the texture and luminosity values of the target pixels (often the best choice), or Clone to copy the source pixels exactly without any healing.
Optional: To cycle through alternative source locations that Camera Raw detects, press (and keeping pressing) /.
6. To hide all regions and circles at any time in order to judge the Spot Removal results, uncheck Overlay (V). Recheck it for the remaining steps.
7. Select a target or source region by clicking its pin, or select a circle by clicking inside it, then do any of the following optional steps:
To reposition a region or circle, drag inside it.
To control the opacity of the repair, change the Opacity value in the panel.
To resize a pair of target and source circles (not irregular-shaped regions), drag the dashed border.
To add to an existing region (or to convert a circle to a region), position the pointer just outside it, then hold down Shift and click or drag.
8. Optional: Create more regions or circles to correct other blemishes.
To remove a pair of circles or regions, hold down Alt/Option and click in the target or source area; or to delete multiple circles and/or regions, Alt/Option drag a marquee across them; or to remove all Spot Removal circles and regions, click Clear All.
9. To redisplay the main tabs, press H (Hand tool).
![]() To redisplay the current Spot Removal overlays at any time, choose the tool again (press B).
To redisplay the current Spot Removal overlays at any time, choose the tool again (press B).
Saving and applying Camera Raw settings
After carefully choosing custom settings for a photo in Camera Raw, you’ll be glad to know that you can save those settings as a preset and then apply the preset to other photos that need the same or similar corrections.
To save Camera Raw settings as a preset:
Method 1 (Camera Raw Settings menu)
1. With your corrected photo open in Camera Raw, choose Save Settings from the Camera Raw Settings menu. ![]()
2. The Save Settings dialog opens.A

A In the Save Settings dialog, check which categories of custom Camera Raw settings are to be saved in a preset.
3. Choose Subset: All Settings, then check the categories of settings you want saved in the preset. If you want to filter which boxes are checked for a subset, choose a tab name from the Subset menu, then check/uncheck boxes. For any menu choice, you can also click Check All or Check None; or to select one box exclusively, hold down Alt/Option and click it.![]()
4. Click Save. A different Save Settings dialog opens (yes, it’s confusing that the two dialogs have the same name). Enter a name (preferably one that describes the function of the preset), keep the location as the Settings folder, then click Save.
5. The saved settings preset is now available in the Presets tab ![]() for any open photo.
for any open photo.
Method 2 (Presets tab)
1. With your corrected photo open in Camera Raw, click the Presets tab, ![]() then click the New Preset button.
then click the New Preset button. ![]()
2. In the New Preset dialog, enter a name for the preset. Follow step 3, above.
3. Click OK. Your new preset is now available in the Presets tab for any open photo.
![]() To delete a user-saved preset, click the preset name, then click the Delete button.
To delete a user-saved preset, click the preset name, then click the Delete button. ![]()
You can apply a user-defined preset (saved collection of settings) to a single photo via Camera Raw (see below), to multiple photos via Bridge (see the following page), or to multiple thumbnails via the Synchronize option in Camera Raw (see page 94).
To apply a Camera Raw preset to a photo:
With a photo open in Camera Raw, click the Presets tab, ![]() then click a preset name.
then click a preset name.
![]() You can also apply a preset via the Apply Preset submenu on the Camera Raw Settings menu.
You can also apply a preset via the Apply Preset submenu on the Camera Raw Settings menu.
Taking Snapshots of Your CR Settings
A snapshot is a record of the current Camera Raw settings that you have chosen for a photo. By saving snapshots of your photo periodically while editing it, you preserve the option to restore the photo to those earlier settings. Unlike snapshots on the History panel in Photoshop, snapshots save with the Camera Raw file. Click the Snapshots tab, ![]() then click the New Snapshot button.
then click the New Snapshot button. ![]() In the New Snapshot dialog, enter a name, then click OK. To restore the photo to a snapshot at any time, click a snapshot name in the Snapshots tab. (For other ways to restore Camera Raw settings, see pages 61–62.)
In the New Snapshot dialog, enter a name, then click OK. To restore the photo to a snapshot at any time, click a snapshot name in the Snapshots tab. (For other ways to restore Camera Raw settings, see pages 61–62.)
![]() To update an existing snapshot with the current settings, right-click the snapshot listing and choose Update with Current Settings from the context menu.
To update an existing snapshot with the current settings, right-click the snapshot listing and choose Update with Current Settings from the context menu.
The settings presets that you save in the Presets tab of the Camera Raw dialog can also be applied to multiple photos via the Develop Settings submenu in Bridge. In fact, as a strategy, you could save separate presets for settings in individual Camera Raw tabs and then assign them to multiple photos in succession (e.g., a preset for the Basic tab first, then a preset for the Tone Curve tab, and so on). If you haven’t saved the needed settings as presets, a quick alternative method is to copy and paste all the current settings from one photo into one or more other photos.
To apply Camera Raw settings to multiple photos via Bridge:
Method 1 (apply a preset)
1. In Bridge, Ctrl-click/Cmd-click multiple photo thumbnails (or Shift, then Shift-click a consecutive series of thumbnails).
2. To apply settings, from the Edit > Develop Settings submenu, choose a preset; or right-click a selected thumbnail and choose a preset from the Develop Settings submenu on the context menu.A Choose additional presets, if needed.

A Using commands on the Develop Settings submenu in Bridge, you can apply one or more saved settings presets to multiple selected thumbnails, or copy and paste the current settings from one thumbnail to other thumbnails.
Method 2 (copy and paste settings from a photo)
1. Click the thumbnail for a photo that has the desired settings, then choose Edit > Develop Settings > Copy Camera Raw Settings (Ctrl-Alt-C/Cmd-Option-C), or right-click the selected thumbnail and choose Develop Settings > Copy Settings from the context menu.
2. Click another thumbnail (or Ctrl-click/Cmd-click multiple thumbnails), then choose Edit > Develop Settings > Paste Camera Raw Settings (Ctrl-Alt-V/Cmd-Option-V), or right-click the selected thumbnail and choose Develop Settings > Paste Settings from the context menu.
3. The Paste Camera Raw Settings dialog opens. Uncheck any settings you don’t want to paste; or choose a tab name from the Subset menu, then remove or add any check marks; or to select one box exclusively, hold down Alt/Option and click it.![]() Click OK.
Click OK.
![]() To remove all Camera Raw settings from a selected photo thumbnail in Bridge, choose Edit > Develop Settings > Clear Settings or right-click the thumbnail and choose Develop Settings > Clear Settings from the context menu.
To remove all Camera Raw settings from a selected photo thumbnail in Bridge, choose Edit > Develop Settings > Clear Settings or right-click the thumbnail and choose Develop Settings > Clear Settings from the context menu.
Synchronizing Camera Raw settings
When you open multiple photos into Camera Raw, they are represented by thumbnails in a panel on the left side of the dialog. After adjusting one photo, you can click Synchronize to apply those settings to one or more of the other photos. Because it’s unlikely that every single adjustment needed for one photo will be perfectly suited to all the others (even photos taken during the same shoot), a more practical approach is to adjust subsets of the grouping. For instance, you could apply a settings preset or some Basic tab adjustments to one photo (say, to correct the white balance and exposure), apply those settings to most or all of the other photos, then select incrementally smaller numbers of photos and apply more targeted or specialty adjustments.
To synchronize the Camera Raw settings among multiple photos:
1. In Bridge, select two or more photo thumbnails, preferably ones that were shot under the same lighting conditions and that require the same kind of correction (for the most accurate and consistent corrections, select all raw files or all JPEG files). Double-click one of the selected thumbnails.
2. In the filmstrip panel on the left side of the Camera Raw dialog, click one of the thumbnails.A

A We opened four photos into Camera Raw. The thumbnails for the images display in the filmstrip panel on the left side of the dialog.
3. Make the needed adjustments to the selected image (including cropping, if you want to crop all the images in exactly the same way). You can apply adjustments via the tabs or tools or by clicking a preset in the Presets tab. ![]()
4. Click Select All at the top of the filmstrip panel or Ctrl-click/Cmd-click the thumbnails to which you want to apply corrections, then click Synchronize.
5. The Synchronize dialog opens (it looks like the Save Settings dialog, which is shown on page 92). Check only the settings you want to apply to all the selected thumbnails; or choose a category from the Synchronize menu, then remove or add any check marks. Click OK.
![]() To cycle through the photos in the filmstrip panel, click the left or right arrowhead below the preview (in the lower right). If more than one thumbnail is selected, Camera Raw will cycle among only the selected photos.
To cycle through the photos in the filmstrip panel, click the left or right arrowhead below the preview (in the lower right). If more than one thumbnail is selected, Camera Raw will cycle among only the selected photos.
Converting, opening, and saving Camera Raw files
Still with us? At long last, you get to open your Camera Raw file into Photoshop.
To open a photo from Camera Raw into Photoshop:
1. After applying adjustments to your photo in Camera Raw, click Open Image; or if you opened and corrected multiple files, select them on the left side of the dialog, then click Open Images.
2. The photo appears as the Background in a new Photoshop document (or documents). Save the file(s) in the Photoshop (PSD) format.
Note: If Open in Photoshop as Smart Objects is checked in the Workflow Options dialog (see step 10 on page 58), the Open Image button is labeled Open Object and a photo opens as a Smart Object in a new Photoshop document. To learn about Smart Objects, see pages 264–275 (to edit the Camera Raw settings of a Smart Object, see page 268). If the workflow option is off, you can convert the Open Image button to Open Object by holding down Shift.
![]() To close the Camera Raw dialog without opening your file, but save your settings to the file as instructions, click Done. The settings will redisplay if you reopen the file in Camera Raw.
To close the Camera Raw dialog without opening your file, but save your settings to the file as instructions, click Done. The settings will redisplay if you reopen the file in Camera Raw.
To open a copy of a Camera Raw file:
In the Camera Raw dialog, hold down Alt/Option and click Open Copy (Open Image or Open Object becomes Open Copy).
Settings in the Workflow Options dialog are assigned automatically to all photos that you open into Camera Raw (see pages 58-60). If you want to convert and save a copy of an individual photo in the Digital Negative (DNG), JPEG, TIFF, or Photoshop (PSD) format using custom file naming, format, color space, sizing, or sharpening settings instead, use the Save Options dialog, as described below. New Color Space, Image Sizing, and Preset features, found in the Workflow Options dialog, are also available in the Save Options dialog.![]()
When you save a copy of a photo in the Digital Negative format via Save Options, the Camera Raw settings it inherits from the original file remain accessible and editable in Camera Raw. See also the sidebar on this page.
When you save a photo in the JPEG, TIFF, or PSD format via Save Options, the Camera Raw settings are applied to the copy of the photo permanently. Although you can open and edit the resulting JPEG or TIFF file in Camera Raw, you will see that the sliders are reset to their default values. PSD files can’t be opened into Camera Raw.
Note: Settings that you choose in the Save Options dialog are independent of — and have no effect on — the settings in the Workflow Options dialog.
To save a copy of a Camera Raw file in the DNG, JPEG, TIFF, or PSD format:
1. Open and adjust a photo in Camera Raw, then in the lower-left corner of the dialog, click Save Image.
2. The Save Options dialog opens (A). For the Destination, choose Save in Same Location or Save in New Location. For the latter, choose a location in the Select Destination Folder dialog, then click Select.
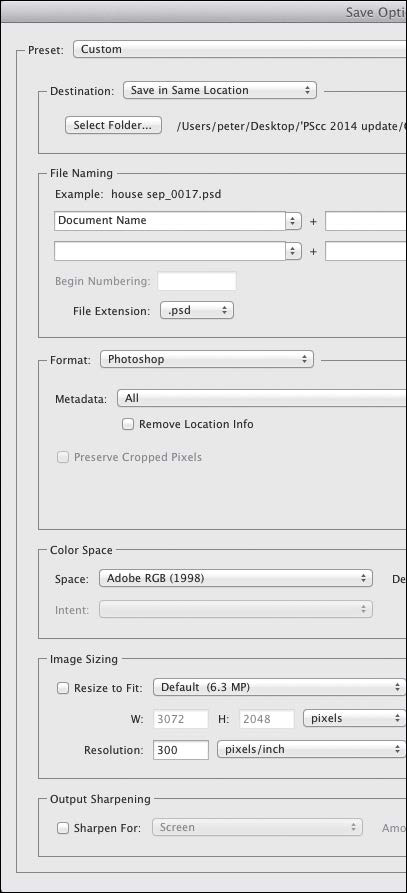
A In the Save Options dialog, choose Destination, File Naming, Format, Color Space, Image Sizing, and Output Sharpening settings.
3. Under File Naming, choose a naming or numbering convention from the menu or enter a file name. If desired, you can also choose an additional naming or numbering convention from the adjacent menu.
4. Choose a Format of Digital Negative, JPEG, TIFF, or Photoshop, then choose related options. For instance, if you cropped the photo in Camera Raw and then choose the Photoshop format here, you will need to decide whether to check Preserve Cropped Pixels.
5. For a photo in the JPEG, TIFF, or Photoshop format, choose an option from the Metadata menu to control what metadata will be saved with the file. And via the Remove Location Info check box, control whether you want location information for the file to be preserved.
6. For a photo in the JPEG, TIFF, or Photoshop format, you can choose options under Color Space,![]() Image Sizing,
Image Sizing,![]() and Output Sharpening. For Color Space, see step 3 on page 58; for Image Sizing, see page 60; and for Output Sharpening, see step 9 on page 58.
and Output Sharpening. For Color Space, see step 3 on page 58; for Image Sizing, see page 60; and for Output Sharpening, see step 9 on page 58.
7. Optional: To save the current dialog settings as a preset for future use on any photo, from the Preset menu,![]() choose New Save Options Preset. In the dialog, enter a name, then click OK.
choose New Save Options Preset. In the dialog, enter a name, then click OK.
8. Click Save. A copy of the file appears in the designated location. The original file, with its current settings, remains open in Camera Raw.
![]() User-created presets are available on the Preset menu. Once you choose a preset, the menu also provides Delete [preset name] and Rename [preset name] commands.
User-created presets are available on the Preset menu. Once you choose a preset, the menu also provides Delete [preset name] and Rename [preset name] commands.
![]() When you assign a color space and an intent to a photo via the Workflow Options dialog, those settings display as a soft proof in the main Camera Raw dialog, whereas when you choose color space and an intent options in the Save Options dialog, no soft proof displays.
When you assign a color space and an intent to a photo via the Workflow Options dialog, those settings display as a soft proof in the main Camera Raw dialog, whereas when you choose color space and an intent options in the Save Options dialog, no soft proof displays.