5. Workspaces
In This Chapter
Now that you know how to create and open documents, you’re ready to customize the Photoshop workspace for your needs. In this chapter, you’ll learn how to use the main features of the Photoshop interface, such as the Application frame and document tabs. You’ll change the zoom level and screen mode, rotate the canvas view, configure the panels, choose a workspace, save custom workspaces, and use the Options bar. Note: The individual panels (including the Tools panel) are described and illustrated in the next chapter.
Using the Application frame
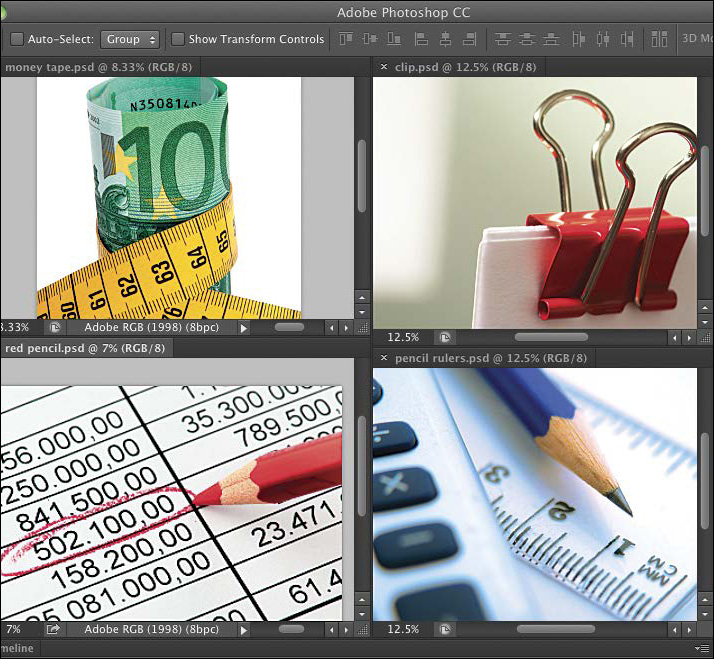
In Windows, all the Photoshop features are housed in an Application window. It contains a menu bar and Options bar along the top; panels (including the Tools panel); and any open documents, which by default are docked as tabs.A
A This is the onscreen environment for Photoshop in Windows.
The Application frame in the Mac OS serves the same purpose as the Application window in Windows: It holds the Options bar (see page 110), panels, and open documents (which are docked as tabs).A Although the Application frame is an optional feature in the Mac OS, there are good reasons for using it. It keeps all the Photoshop features neatly organized and readily accessible (and hides Desktop clutter!). If the frame is hidden, choose Window > Application Frame. We use and refer to it throughout this book.
A This is the Application frame in the Mac OS.
Note: For the sake of simplicity, we also refer to the Windows application window generically as the “Application frame.”
![]() To resize the Application frame, drag an edge or a corner.
To resize the Application frame, drag an edge or a corner.
![]() To minimize the Application frame and any tabbed documents in the Mac OS, click the Minimize button in the upper-left corner; in Windows, click the Minimize button in the upper-right corner.
To minimize the Application frame and any tabbed documents in the Mac OS, click the Minimize button in the upper-left corner; in Windows, click the Minimize button in the upper-right corner.
We recommend docking all open document windows as tabs (the default setting for Photoshop) rather than floating them as separate windows outside the frame (the only option in early versions of Photoshop). With documents docked as tabs, you will be able to keep the documents you’re not working on out of view but readily accessible. To display a document that is docked as a tab, simply click the tab.
If documents aren’t docking as tabs automatically, we recommend resetting the preference so that they do.
To set a preference to have documents open as tabs:
1. Choose Edit/Photoshop > Preferences, then click Interface on the left to display that pane.
2. Check Open Documents as Tabs, then click OK.
If you inadvertently (or out of curiosity) drag a document out of the tab area, and thereby turn a tabbed document into a floating one, follow these instructions to bring it home.
To dock floating document windows as tabs:
Do either of the following:
To dock one floating document window manually, drag its title bar to the tab area (just below the Options bar) of the Application frame, and release when the blue drop zone border appears.A–B
A To dock a floating document window as a tab manually, drag its title bar to the tab area of the Application frame and release the mouse when the blue drop zone border appears.
B Our document is now docked within the Application frame.
To dock all floating documents as tabs via a command, choose Window > Arrange > Consolidate All to Tabs; or if at least one document is docked as a tab, right-click a tab and choose Consolidate All to Here from the context menu.
![]() To cycle among all currently open documents, press Ctrl-Tab/Control-Tab or Ctrl- ~ (tilde)/Cmd- ~.
To cycle among all currently open documents, press Ctrl-Tab/Control-Tab or Ctrl- ~ (tilde)/Cmd- ~.
![]() One of the drawbacks to floating document windows when using the Application frame is that if you click in the frame, your floating documents will be hidden behind it. If you insist on floating your documents, consider at least docking them together by dragging the title bar of one window just below the title bar of another.
One of the drawbacks to floating document windows when using the Application frame is that if you click in the frame, your floating documents will be hidden behind it. If you insist on floating your documents, consider at least docking them together by dragging the title bar of one window just below the title bar of another.
Tiling multiple documents
If you need to view or edit multiple documents simultaneously, you can arrange them in a preset layout, such as two documents side by side or in a vertical format, or four or six documents in a grid.
To tile multiple documents:
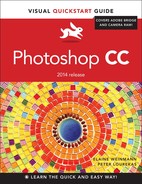
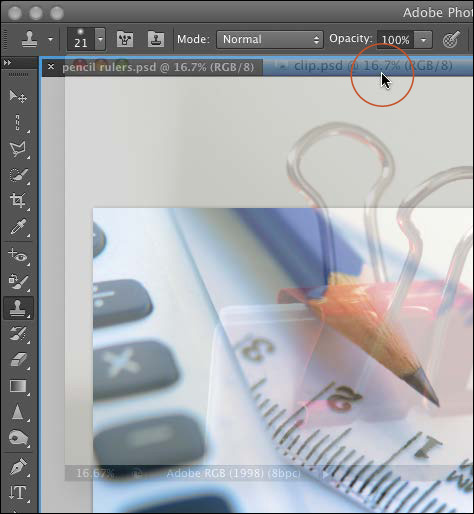
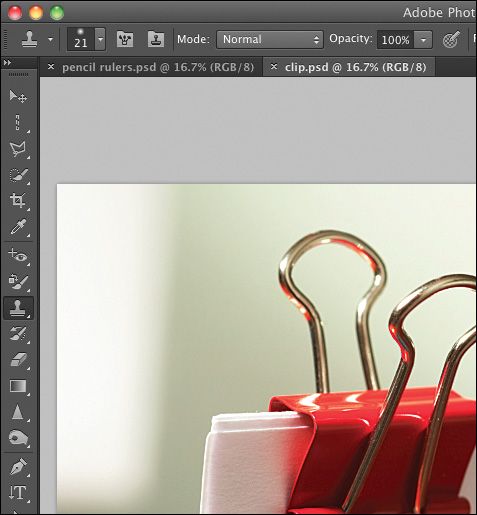
1. From the Window > Arrange submenu, choose a tiling command, such as 2-Up Vertical or 4-Up.A The availability of commands will vary depending on how many documents are open.

A To arrange these tabbed documents in quadrants, we chose 4-Up on the Window > Arrange submenu.
![]() To resize a window, drag either the bar between two windows or the lower-right corner. To reduce the number of visible windows by one, drag the tab of a document to the tab of another document, and release when the blue drop zone border appears.
To resize a window, drag either the bar between two windows or the lower-right corner. To reduce the number of visible windows by one, drag the tab of a document to the tab of another document, and release when the blue drop zone border appears.
2. When you’re ready to view just one document at a time, do either of the following:
Choose Window > Arrange > Consolidate All to Tabs.
Right-click a tab and choose Consolidate All to Here from the context menu.
![]() If any open documents are floating when you choose a tiling command, they will be docked as tabs automatically.
If any open documents are floating when you choose a tiling command, they will be docked as tabs automatically.
Changing the zoom level
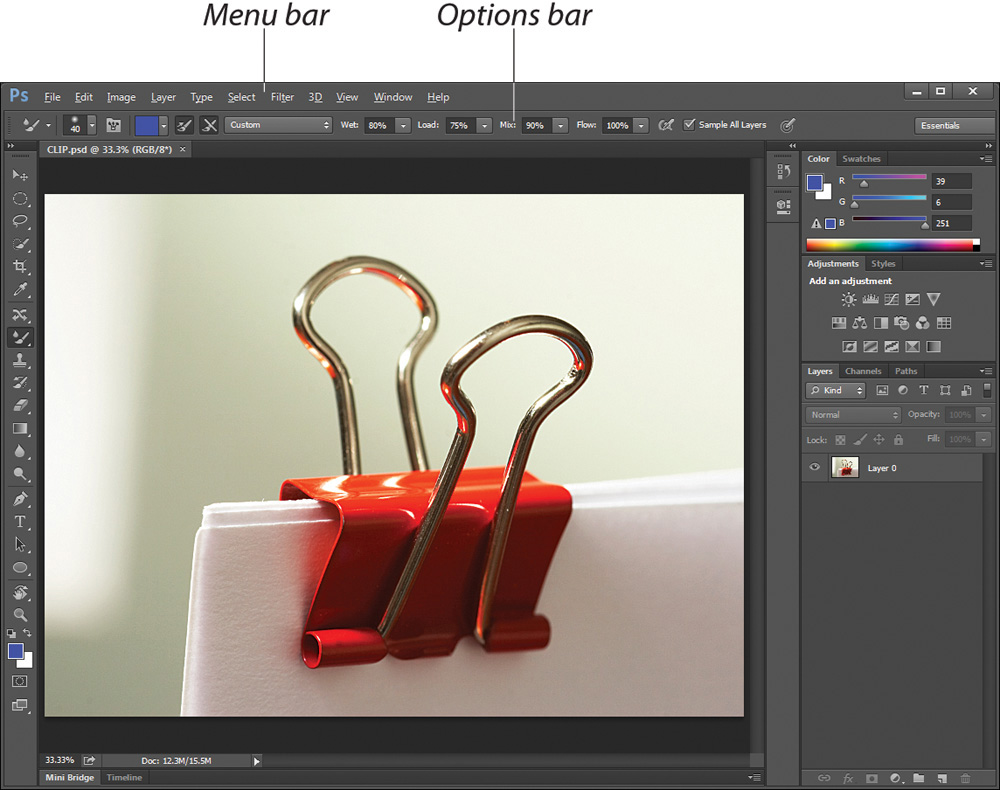
You can easily switch between displaying the entire live canvas area of an image in the document window and magnifying just part of the image to concentrate on a small detail. The current zoom level percentage is listed in three locations: on the document tab, in the lower-left corner of the document window, and on the Navigator panel (if showing).
Note: For smoother and more continuous zooming, in Edit/Photoshop > Preferences > General, check Animated Zoom. Also, to use both the Animated Zoom and Scrubby Zoom features, Use Graphics Processor must be checked in Preferences > Performance. For more Zoom preferences, see page 458.
To change the zoom level with the Zoom tool:
1. Choose the Zoom tool, ![]() or to spring-load the Zoom tool (select it temporarily) if another tool is selected, hold down Z.
or to spring-load the Zoom tool (select it temporarily) if another tool is selected, hold down Z.
2. Do one of the following:
Check Scrubby Zoom on the Options bar, then in the image, drag to the right to zoom in A or to the left to zoom out.

A With the Zoom tool, and with Scrubby Zoom checked on the Options bar, we’re dragging to the right to zoom in.
Click and hold (don’t drag) in the image to zoom in, or hold down Alt/Option and click and hold to zoom out. This is the Animated Zoom feature, also known as bird’s-eye zooming.
Click in the image to zoom in, or hold down Alt/Option and click to zoom out.
Right-click in the image and choose a zoom option from the context menu, or click one of these buttons on the Options bar: 100%; Fit Screen to display the entire image at the largest size that can fit in the window; or Fill Screen to have the image completely fill the window (only part of the image may be visible).
![]() The View > 100% and View > 200% commands are new; View > Actual Pixels is gone.
The View > 100% and View > 200% commands are new; View > Actual Pixels is gone.
A View for Users of Retina Displays
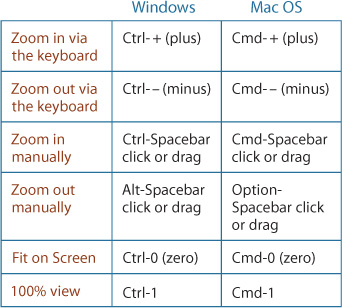
Shortcuts for Zooming In and Out
The Navigator panel has two functions. You can use it to change the zoom level of an image or to reposition the image in the document window (to bring an area you want to edit or examine into view).
To change the zoom level or reposition the image in the window via the Navigator panel:
1. Display the Navigator panel. ![]() A
A
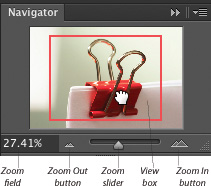
A You can use the Navigator panel to change the zoom level of your document and, if the image is magnified, to move it in the document window.
2. To change the zoom level, in the Navigator panel, do any of the following:
Ctrl-drag/Cmd-drag across part of the image thumbnail to target that area for magnification.
Double-click the existing value in the zoom field, type the desired percentage, then press Enter/Return. Or to zoom to a value and rehighlight the field, enter the desired value, then press Shift-Enter/Shift-Return.
Drag the Zoom slider.
Click the Zoom Out or Zoom In button.
3. If the image is magnified to the degree that areas are hidden outside the document window, you can reposition it by dragging the view box on the panel.
![]() You can also change the zoom level by entering a percentage in the Zoom Level field in the lower-left corner of the document window.
You can also change the zoom level by entering a percentage in the Zoom Level field in the lower-left corner of the document window.
A magnified image can also be moved in the document window by using the Hand tool.
To reposition a magnified image with the Hand tool:
Do one of the following:
Choose the Hand tool ![]() (H) or hold down the Spacebar for a temporary Hand tool, then drag in the document window.
(H) or hold down the Spacebar for a temporary Hand tool, then drag in the document window.
Choose the Hand tool ![]() (H) or hold down the Spacebar for a temporary Hand tool, do a quick little drag in the document, then release. The image will float across the screen (this is called “flick panning”); click again to stop the motion. Note: For this to work, Use Graphics Processor must be checked in Edit/Photoshop > Preferences > Performance before you open your document and Enable Flick Panning must be checked in Preferences > General.
(H) or hold down the Spacebar for a temporary Hand tool, do a quick little drag in the document, then release. The image will float across the screen (this is called “flick panning”); click again to stop the motion. Note: For this to work, Use Graphics Processor must be checked in Edit/Photoshop > Preferences > Performance before you open your document and Enable Flick Panning must be checked in Preferences > General.
To access the Hand tool temporarily if you have another tool selected, hold down the H key, press the mouse to display a wireframe view box, drag the view box over the area of the image you want to show, then release the mouse.
![]() If a document is in a tabbed window in the Application frame and is magnified, you can overscroll it — that is, drag it far off to the side (farther than you can drag an image in a floating window).
If a document is in a tabbed window in the Application frame and is magnified, you can overscroll it — that is, drag it far off to the side (farther than you can drag an image in a floating window).
![]() You can also move a magnified image in the document window by dragging the scroll bar at the right and/or bottom edge of the window.
You can also move a magnified image in the document window by dragging the scroll bar at the right and/or bottom edge of the window.
If you have multiple documents open (say, in a 2-Up or 3-Up layout), you can save time by scrolling or zooming all of them simultaneously.
To scroll or zoom in multiple document windows:
1. Open two or more documents, then on the Window > Arrange submenu, choose a Tile command or a 2-Up, 3-Up, 4-Up, 5-Up, or 6-Up command.
2. When using the Hand tool ![]() (H), check Scroll All Windows on the Options bar; or when using the Zoom tool,
(H), check Scroll All Windows on the Options bar; or when using the Zoom tool, ![]() check Zoom All Windows on the Options bar. Alternatively, when using either tool, you can leave the above-mentioned options unchecked and enable them temporarily by holding down Shift.
check Zoom All Windows on the Options bar. Alternatively, when using either tool, you can leave the above-mentioned options unchecked and enable them temporarily by holding down Shift.
Rotating the canvas view
Unlike the Image > Image Rotation commands, which rotate an image permanently, the Rotate View tool tilts the canvas temporarily so you can draw, paint, or perform other edits at a more comfortable angle.
Note: To use the Rotate View tool, Use Graphics Processor must be checked in Edit/Photoshop > Preferences > Performance. If the preference is off, check it, then reopen the document.
To rotate the canvas view:
1. Change the zoom level, if necessary, so the entire image is showing in the document window.
2. Choose the Rotate View tool ![]() (R) or hold down R to spring-load the tool, then drag in the image (a compass displays temporarily).A
(R) or hold down R to spring-load the tool, then drag in the image (a compass displays temporarily).A
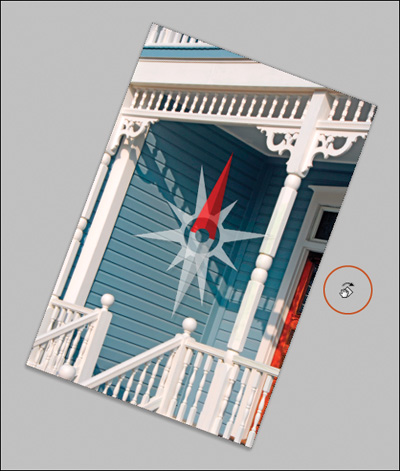
A With the Rotate View tool, we’re dragging to tilt the canvas to the desired angle.
![]() When the Rotate View tool is selected, you can also change the rotation angle on the Option bar (use the scrubby slider, or enter a value, or move the dial.
When the Rotate View tool is selected, you can also change the rotation angle on the Option bar (use the scrubby slider, or enter a value, or move the dial.
To reset the canvas view to the default angle:
1. Choose the Rotate View tool ![]() (R) or hold down R to spring-load the tool.
(R) or hold down R to spring-load the tool.
2. On the Options bar, click Reset View.
Changing the screen mode
The three screen modes control which Photoshop interface features display onscreen.
To change the screen mode:
Press F to cycle through the screen modes, or choose a mode from the Screen Mode menu ![]() at the bottom of the Tools panel: A
at the bottom of the Tools panel: A
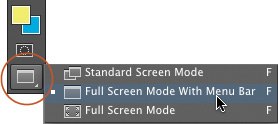
A Choose an option from the Screen Mode menu on the Tools panel.
Standard Screen Mode (the default mode) to display the full Photoshop interface, including the Application frame, Photoshop menu bar, Options bar, current document, document tabs, and panels — with the Desktop (and any other open application windows) visible outside it.
Full Screen Mode with Menu Bar to display the current document on a full-screen background with all of the above-mentioned interface features showing, but with the Application frame, document tabs, Desktop, and other windows hidden.B
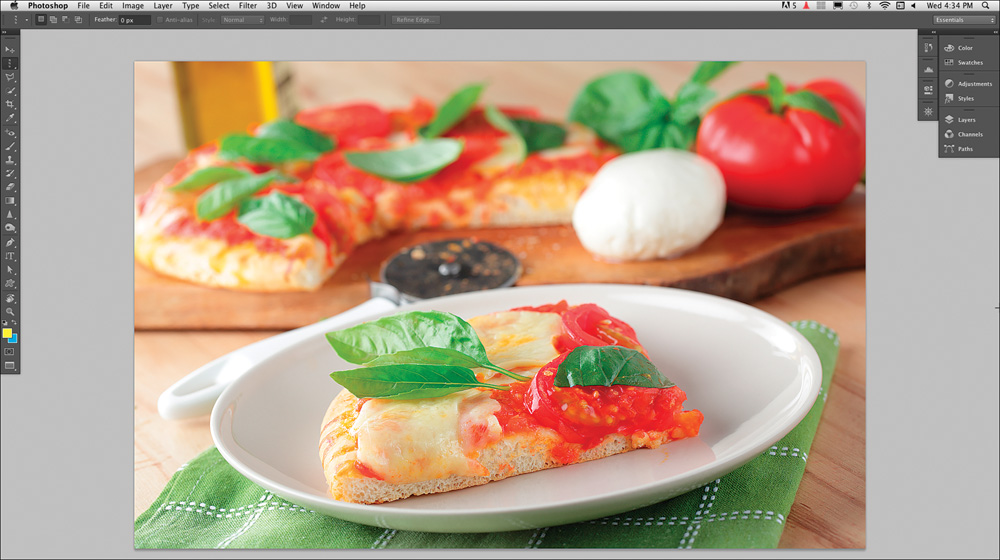
B When performing color correction work, we use the screen mode option of Full Screen Mode with Menu Bar.
Full Screen Mode to display only the current document on a full-screen background with all the Photoshop interface features hidden and the panels visible only upon rollover (see “To make hidden panel docks reappear” on the next page).
Choosing a workspace
To change your panel setup quickly, choose one of the predefined workspaces, which are designed for different kinds of tasks, or choose a user-defined workspace (see pages 108–109).
To choose a workspace:
From the Workspace menu on the right side of the Options bar C or from the Window > Workspace submenu, choose a predefined workspace, such as Essentials (Default), What’s New, Painting, Photography, or Typography, or a user-defined workspace.
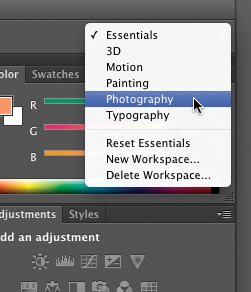
C We’re choosing a workspace from the Workspace menu on the Options bar.
Customizing the Background
![]() To quickly change the background shade around the canvas area for the current screen mode, right-click the background, then on the context menu, choose default, Black, or a shade of gray. Although you could choose Select Custom Color (then choose a custom color via the Color Picker), we recommend sticking with neutral gray or black because it provides the best setting for judging color and tonal adjustments.
To quickly change the background shade around the canvas area for the current screen mode, right-click the background, then on the context menu, choose default, Black, or a shade of gray. Although you could choose Select Custom Color (then choose a custom color via the Color Picker), we recommend sticking with neutral gray or black because it provides the best setting for judging color and tonal adjustments.
![]() In the Interface panel of the Edit/Photoshop > Preferences dialog, for the canvas area in each of the three screen modes, you can choose a background color or shade and a border style of Line, Drop Shadow, or None (see page 460).
In the Interface panel of the Edit/Photoshop > Preferences dialog, for the canvas area in each of the three screen modes, you can choose a background color or shade and a border style of Line, Drop Shadow, or None (see page 460).
Configuring the panels
If you have chosen Standard Screen Mode or Full Screen Mode with Menu Bar and you want to fully maximize your screen space, you can hide all your open panels (see the shortcuts below) and make them reappear only when needed (see the next task). If you put your document into Full Screen mode, in which panels are hidden by default, you can also use these shortcuts to show the panels and keep them visible.
To hide (or show) the panels:
Do either of the following:
Press Tab to hide (or show) all the currently open panels, including the Tools panel.
Press Shift-Tab to hide (or show) all the currently open panels except the Tools panel.
![]() To open an individual panel when the panels are hidden, choose the panel name from the Window menu.
To open an individual panel when the panels are hidden, choose the panel name from the Window menu.
To make hidden panel docks reappear:
1. Hide the panels as described above, or choose Full Screen Mode from the Screen Mode menu ![]() on the Tools panel.
on the Tools panel.
2. If your document is in Standard Screen mode, let the pointer hover over the dark gray vertical bar at the left or right edge of the Application frame. If your document is in either one of the Full Screen modes, let the pointer hover at the edge of your monitor; the dark gray vertical bar appears, then the docks appear.A
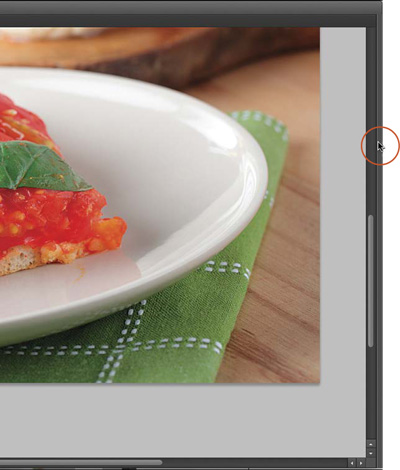
A If the panels are hidden, let the pointer pause just inside the right edge of the monitor or Application frame ...
The panel docks will redisplay temporarily (freestanding panels will remain hidden).B Move the pointer away from the panels, and they’ll disappear again.
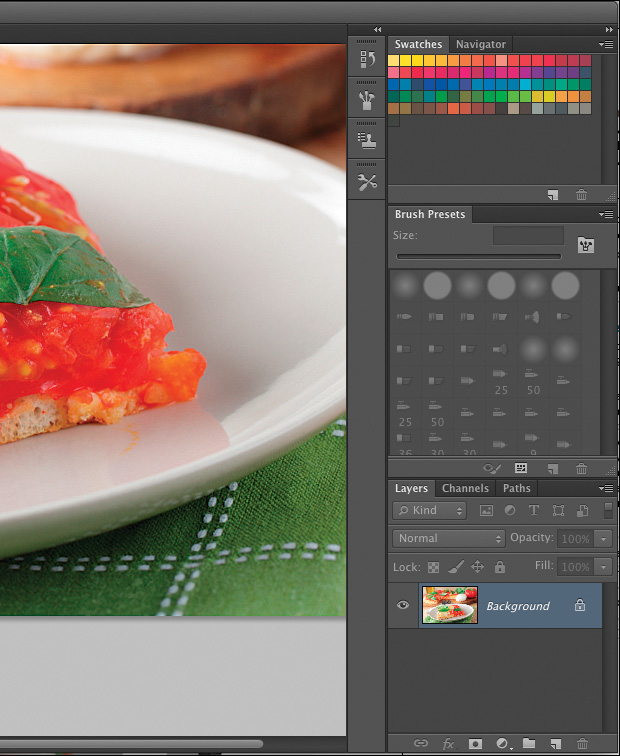
B ... to make the panel docks appear temporarily. (Move the pointer away from the panels, and away they go.)
Note: If this mechanism doesn’t appear to be working, right-click any panel tab or icon and check Auto-Show Hidden Panels on the context menu. That should do the trick.
![]() If you prefer to keep your panels visible onscreen, but you want to minimize how much space they occupy, shrink them to icons (see the last paragraph on the next page).
If you prefer to keep your panels visible onscreen, but you want to minimize how much space they occupy, shrink them to icons (see the last paragraph on the next page).
Most of the edits that you make in Photoshop will require the use of at least one of the panels — and more likely several. Fortunately, the panels are easy to hide, collapse, and expand so they don’t intrude on your document space when you’re not using them.
In the predefined workspaces, panels are arranged in docks on the right side of your screen, except for the Tools panel, which is on the left side. Each dock can hold one or more panels or panel groups, and you can customize how they’re configured. (To save your custom workspaces, see pages 108–109.)
To reconfigure the panel groups and docks:
Show or hide a panel: Show a panel by choosing its name from the Window menu. The panel will display either in its default group and dock or in its last open location. To bring a panel to the front within its group, click its tab (panel name).
Expand a panel that’s collapsed to an icon: Click the icon or panel name. If Auto-Collapse Iconic Panels is checked in Edit/Photoshop > Preferences > Interface and you open a panel from an icon, it collapses to an icon when you click outside it. With this preference off, the panel stays expanded; to collapse it back to an icon, click the Collapse to Icons button ![]() on the panel bar (the horizontal gray bar to the right of the panel tab) or click the panel icon in the dock.
on the panel bar (the horizontal gray bar to the right of the panel tab) or click the panel icon in the dock.
![]() To quickly access the Auto-Collapse Iconic Panels option via a context menu, right-click any panel tab, bar, or icon.
To quickly access the Auto-Collapse Iconic Panels option via a context menu, right-click any panel tab, bar, or icon.
Maximize or minimize an expanded panel or group vertically (to toggle the full panel to just a panel tab, or vice versa): Double-click the panel tab or bar.
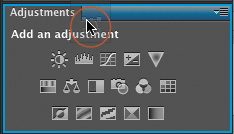
Use a panel menu: Click the ![]() icon to access the menu for the panel that is currently in front in its group.
icon to access the menu for the panel that is currently in front in its group.
Close a panel or group: To close a panel, right-click the panel tab and choose Close from the context menu. To close a whole panel group, choose Close Tab Group from the same context menu. To close a floating panel, you can click the close button in the upper-left corner.
Collapse a whole dock to icons, or to icons with names: Click the Collapse to Icons button ![]() at the top of the dock; or double-click the topmost bar; A–B or right-click a panel tab, bar, or icon and choose Collapse to Icons from the context menu. To expand icons to icons with names, or to reduce icons with names to just icons, drag the vertical edge of the dock horizontally.C
at the top of the dock; or double-click the topmost bar; A–B or right-click a panel tab, bar, or icon and choose Collapse to Icons from the context menu. To expand icons to icons with names, or to reduce icons with names to just icons, drag the vertical edge of the dock horizontally.C
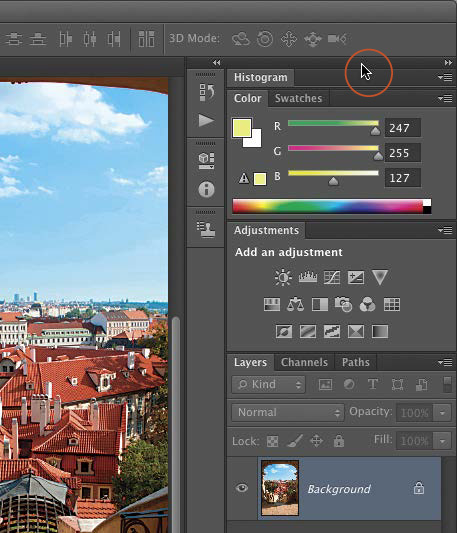
A In this workspace, panels in the left dock are collapsed to icons, whereas the panels in the right dock are expanded. The Histogram panel is minimized vertically. We are double-clicking the bar for the rightmost dock ...
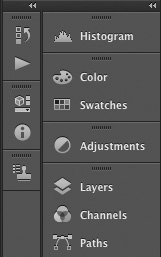
B ... to shrink that dock to icons. Note that the panel groups were preserved.
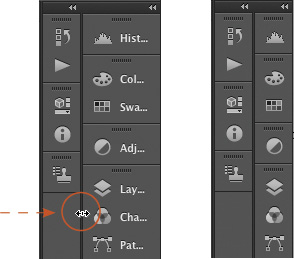
C Here we’re dragging the edge of the rightmost dock to shrink that dock to just icons.
Widen or narrow a dock (and panels): Position the pointer over the vertical edge of the dock (![]() cursor), then drag horizontally.
cursor), then drag horizontally.
Move a panel into a different group: Drag the panel tab over the panel bar of the desired group, and release when the blue drop zone border appears.A
A A blue drop zone border appears as we drag a panel into a different group.
Move a panel to a different slot in the same group: Drag the panel tab (name) to the left or right.
Move a panel group upward or downward in a dock: Drag the panel bar, then release it when the horizontal blue drop zone bar appears in the desired location.B
B A blue horizontal drop zone bar appears as we move our Layers/Channels panel group upward within the same dock.
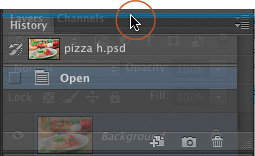
Create a new dock: Drag a panel tab or bar sideways to the vertical edge of the dock,C and release the mouse when the blue vertical drop zone bar appears.
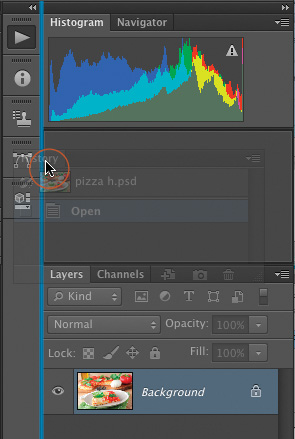
C A blue vertical drop zone bar appears as we create a new dock for the History panel.
Reconfigure a dock that’s collapsed to icons: Use methods like those you would use for an expanded group. Drag the double dotted line ![]() to the edge of a dock to create a new dock, or drag it vertically between groups to restack the group (release when the horizontal drop zone line appears), or drag it into another group to move it to that group (release when the blue drop zone border appears).
to the edge of a dock to create a new dock, or drag it vertically between groups to restack the group (release when the horizontal drop zone line appears), or drag it into another group to move it to that group (release when the blue drop zone border appears).
Float a docked panel or group: Drag the panel tab, icon, or bar out of the dock. To stack floating panels or groups together, drag the bar of one to the bottom of another (release when the horizontal blue drop zone line appears). To resize a floating panel, drag an edge or the resize box ![]() ; not all panels are resizable.
; not all panels are resizable.
To redock floating panels into the Application frame: If there is no existing dock, create one by dragging the topmost panel bar of a floating group or stack to the right edge of the Application frame, and release the mouse when the pointer is over the edge of the frame and a vertical blue drop zone line appears. If there is an existing dock, follow the instruction in “Create a new dock,” above, or drag the panel bar of a floating panel, group, or stack into an existing dock (release when the horizontal blue drop zone line appears).
![]() To prevent a floating panel from docking as you move it, drag it with Ctrl/Cmd held down.
To prevent a floating panel from docking as you move it, drag it with Ctrl/Cmd held down.
![]() When using a tool that uses brushes, you can show the Brush panel by clicking the Toggle Brush Panel button
When using a tool that uses brushes, you can show the Brush panel by clicking the Toggle Brush Panel button ![]() on the Options bar or on the Brush Presets panel. Similarly, when using a type tool, you can show the Character/Paragraph panel group by clicking this toggle button
on the Options bar or on the Brush Presets panel. Similarly, when using a type tool, you can show the Character/Paragraph panel group by clicking this toggle button ![]() on the Options bar.
on the Options bar.
Saving custom workspaces
Now that you have learned how to personalize your workspace for Photoshop, the next step is to save some custom workspaces for various kinds of editing work you do in Photoshop. Your custom workspaces should reflect your normal work habits (and by this we don’t mean working late and sleeping late!). For example, to set up a type-related workspace, you could open the Character, Paragraph, Paragraph Styles, and Character Styles panels, hide the panels you don’t normally use when you work with type, and assign color labels to your favorite commands on the Type menu.
The current panel locations are included automatically when you save a custom workspace. Optionally, you can also include custom keyboard shortcuts and/or menu sets (menu sets control the color label and visibility settings for menu commands).
To save a custom workspace:
1. Do any or all of the following:
Open and position all the desired panels in groups and docks.A
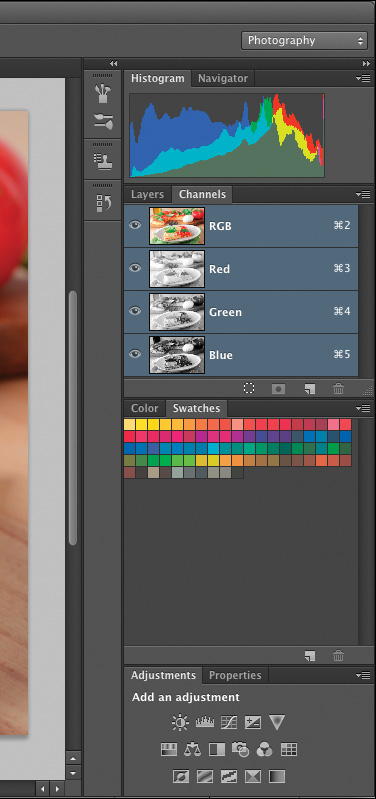
A This is the panel setup in one of our custom workspaces.
Collapse the panels you use occasionally to icons, and close the ones you rarely use. Or if you prefer to keep all your panels collapsed to icons or icons with names, set them up that way.
Resize any of the panels, as well as any of the pickers that open from the Options bar.
Choose Edit > Menus (Ctrl-Alt-Shift-M/Cmd-Option-Shift-M) and use the dialog to assign visibility settings and/or color labels to menu commands (for quick identification). Save your changes in a new menu set. (To learn about customizing the Photoshop keyboard shortcuts, see Photoshop Help.)
2. From the Workspace menu on the Options bar, choose New Workspace.
3. In the New Workspace dialog, enter a Name for the workspace (include your name, if desired).B
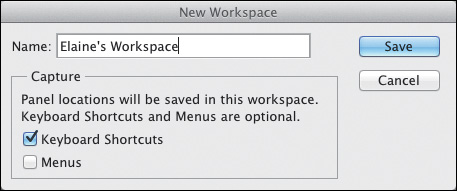
B In the New Workspace dialog, enter a Name for your workspace and check either or both of the Capture options.
4. Under Capture, if you customized the Keyboard Shortcuts or the Menus, check those options.
5. Click Save. Your workspace will appear at the top of the Workspace menu on the Options bar (A) and on the Window > Workspace submenu.
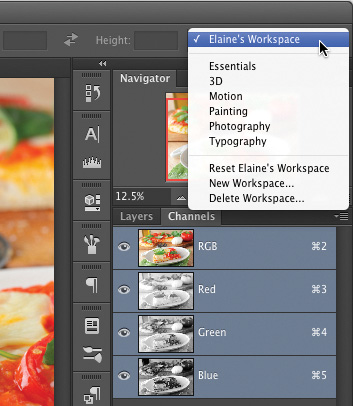
A Our new workspace (named “Elaine’s Workspace”) appeared on the Workspace menu on the Options bar.
![]() To edit a saved workspace, display the workspace to be edited, make the desired changes to the Photoshop interface, choose the New Workspace command, retype the same name, click Save, then click Yes in the alert dialog.
To edit a saved workspace, display the workspace to be edited, make the desired changes to the Photoshop interface, choose the New Workspace command, retype the same name, click Save, then click Yes in the alert dialog.
![]() If you have dual displays, you can distribute freestanding panel groups or stacks between them and save that arrangement as a new workspace.
If you have dual displays, you can distribute freestanding panel groups or stacks between them and save that arrangement as a new workspace.
![]() All the panels that are open when you exit/quit Photoshop will display in the same location upon relaunch.
All the panels that are open when you exit/quit Photoshop will display in the same location upon relaunch.
To delete a workspace:
1. From the Workspace menu on the Options bar, choose any workspace except the one you want to delete.
2. From the same menu, choose Delete Workspace.
3. In the Delete Workspace dialog, choose the name of the workspace to be deleted,B click Delete, then click Yes in the alert dialog.
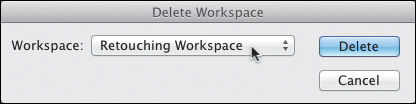
B In the Delete Workspace dialog, choose the user-saved workspace you want to get rid of.
![]() To restore all the default workspaces, see the last task on this page.
To restore all the default workspaces, see the last task on this page.
Resetting workspaces
Say you chose a workspace and then rearranged some panels manually. If you were to switch to another workspace and then back to your original one, your manual changes would redisplay (in other words, the manual changes are “sticky”). Perform the first task below to restore the original settings to an individual workspace, or the second task to restore the factory-default settings to all the predefined (non-user-defined) workspaces.
To reset the current workspace:
From the Workspace menu on the Options bar, choose Reset [workspace name].
To reset all non-user-defined workspaces:
1. To open the Interface pane of the Preferences dialog, right-click any panel tab, bar, or icon and choose Interface Options from the context menu.
2. Under Options, click Restore Default Workspaces. If an alert dialog appears, click OK, then click OK to exit the Preferences dialog.
Using the Options bar
If the Options bar is hidden and you want to show it, choose Window > Options. You will use this bar primarily to choose settings for the current tool. For instance, for the Clone Stamp tool, you can choose a brush; a blending mode; opacity, flow, alignment, and sampling settings; and settings for a stylus, if you’re using one. For a type tool, you can choose a font family, style, and size; anti-aliasing and alignment settings; and a color. The current Options bar settings remain in effect for each individual tool until you change them.
To open a picker, which displays one or more libraries of presets (e.g., brushes or gradients), click the picker icon or arrowhead.A To close a preset picker or other pop-up panel, either click outside it or click the arrowhead on the Options bar.
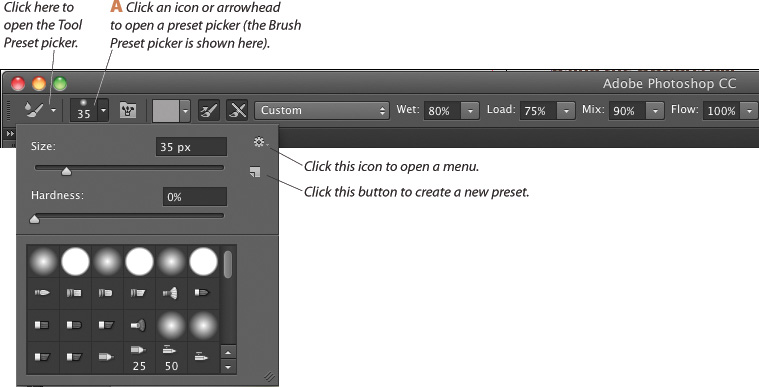
Here the Options bar is displaying settings for the Mixer Brush tool.
To cancel a value you have entered on the Options bar and exit the bar, press Esc (this also works for some pickers).
Features on the Options bar change depending on what tool is selected and the way it is being used in the document. For instance, if you begin to apply a transformation with the Move tool, Cancel Transform ![]() and Commit Transform
and Commit Transform ![]() buttons will appear on the Options bar. If you click either button to exit transformation mode, those buttons will disappear.
buttons will appear on the Options bar. If you click either button to exit transformation mode, those buttons will disappear.
The Workspace menu (not shown below) is located on the right side of the Options bar; see pages 104 and 108–109.
Note that some tool settings can also — or only — be chosen in a panel or dialog. For instance, for the type tools, you will find additional options on the Character and Paragraph panels; for the Brush or Pencil tool, you will need to choose a Foreground color via the Color panel, Swatches panel, or Color Picker.