7. Pixel Basics

Before applying adjustment commands or other edits to an image in Photoshop, you need to make sure it has the proper resolution and dimensions. At any point, you can also crop or rotate it. In this chapter, you will learn how to change the resolution, dimensions, and canvas size of a file, and how to crop, straighten, flip, and rotate it.
Changing the document resolution and/or dimensions
In this chapter, you will encounter three related terms:
![]() The pixel count (pixel dimensions) of a file is arrived at by multiplying its pixel height and width values (as in 3000 × 2000 pixels equals 6 megapixels).
The pixel count (pixel dimensions) of a file is arrived at by multiplying its pixel height and width values (as in 3000 × 2000 pixels equals 6 megapixels).
![]() The resolution (or “res,” for short) of a file — the fineness of detail — is measured in pixels per inch, or ppi (as in 250 or 300 ppi).
The resolution (or “res,” for short) of a file — the fineness of detail — is measured in pixels per inch, or ppi (as in 250 or 300 ppi).
![]() The process of changing a file’s pixel count (adding or deleting pixels) is called “resampling.” More specifically, the process of adding pixels is called “upscaling,” and the process of deleting pixels is called “downsampling.”
The process of changing a file’s pixel count (adding or deleting pixels) is called “resampling.” More specifically, the process of adding pixels is called “upscaling,” and the process of deleting pixels is called “downsampling.”
Some input devices (e.g., digital cameras that capture 10 megapixels of data or more, as well as high-end scanners) produce files with a higher pixel count than is necessary for most standard printing devices. If your Photoshop file falls into that category, you will be able to resize it via the Image Size dialog without having to resample it. Because its pixel count remains the same, its image quality is preserved.
If your file contains too low a pixel count for your target output device, you will need to resize it with resampling via the Image Size dialog. As you increase its resolution or dimensions, its pixel count and storage size will also increase. Although resampling is sometimes necessary, it reduces the image sharpness. For print output, this is a concern, but it can be compensated for somewhat by applying a sharpening filter afterward (see pages 334–338). Resampling is not a concern for Web output.
Using the Image Size dialog (and its large preview), we’ll show you how to resize a file for print output without resampling, how to upscale a file for print output, and how to downsample a file for print or Web output.
When setting the proper resolution of an image for print output, you need to decide whether to permit resampling. For a digital photo that is shot with a digital SLR camera, the ideal scenario of no resampling is possible because it contains a sufficient number of pixels for high-quality output. However, such a photo will initially have a low resolution (usually 72 to 180 ppi) and very large width and height dimensions, so you will need to increase its resolution to the required value, as in these steps. Photos from a 16-megapixel camera can be output as high-quality prints up to 16″ × 11″, and photos from a 12-megapixel camera can be output as high-quality prints up to 14″ × 9″.
To change the resolution of an image for print output (no resampling):
1. With your photo open in Photoshop, choose Image > Image Size (Ctrl-Alt-I/Cmd-Option-I). The Image Size dialog opens.
2. Optional: To enlarge the dialog and preview, drag any side or corner. You can Ctrl-click/Cmd-click in the preview to zoom in, or Alt-click/Option-click it to zoom out, or roll over the preview and click the – or + button. To bring a different area of a magnified image into view, either drag in the preview or click in the document.
3. From the menu next to the Width field, choose Inches (or a unit that is suitable for your output device); the same unit will be chosen automatically for the Height. Note: In this new dialog interface, there is only one set of Width and Height fields.
4. Uncheck Resample because the image contains a sufficient number of pixels for you to increase its resolution without resampling.A

A In the Image Size dialog, we unchecked Resample to make the Width, Height, and Resolution values interdependent (note the lines linking the Resolution to the Width and Height).
5. Enter a Resolution of 300. The Width and Height values will change, but the document proportions and pixel count will stay the same (A).

A When we increased the resolution value to 300, the Width and Height values changed automatically, but the Dimensions remained the same. We noted in the preview that the image quality was preserved.
6. Click OK. No pixels were eliminated from the image, so you don’t need to resharpen it.
Preserving Image Size Settings
![]() The current Resample and units menu settings (and dialog size) that you choose in the Image Size dialog stick for the application until you change them.
The current Resample and units menu settings (and dialog size) that you choose in the Image Size dialog stick for the application until you change them.
![]() The Fit To menu lists preset image sizes (width, height, and resolution) in three categories: display sizes, paper sizes, and photo print sizes. To add the current dialog values as a new preset, choose Save Preset from the Fit To menu, enter a name, then click Save; the preset appears on the menu.
The Fit To menu lists preset image sizes (width, height, and resolution) in three categories: display sizes, paper sizes, and photo print sizes. To add the current dialog values as a new preset, choose Save Preset from the Fit To menu, enter a name, then click Save; the preset appears on the menu.
If a file lacks a sufficient number of pixels to produce a medium-size, good-quality print, such as an 8 × 10 (e.g., the file has both small dimensions and a resolution of 200 ppi or below), you will need to upscale it so it has the necessary pixel count, as in the steps below. (For a smaller print, see the first task on page 139 instead.)
To upscale an image for print output:
1. Use File > Save As to copy your file.
2. Choose Image > Image Size (Ctrl-Alt-I/Cmd-Option-I). The Image Size dialog opens. Follow steps 2–3 on the preceding page.
3. Check Resample, and from the Dimensions menu, ![]() choose Pixels. To preserve the width-to-height ratio of the image (prevent distortion), click the Constrain Aspect Ratio button
choose Pixels. To preserve the width-to-height ratio of the image (prevent distortion), click the Constrain Aspect Ratio button ![]() to activate it.
to activate it.
4. In the Resolution field, enter 300.
5. In the Width or Height field, enter the dimension needed for the print.
6. From the Resample menu, choose the method you want Photoshop to use to reassign color values to added pixels based on the values of existing pixels:
Automatic to let Photoshop choose and apply the best method.
Preserve Details (Enlargement) to improve the sharpness and detail in the enlarged image. Also increase the Noise value until any artifacts that were produced by the detail enhancement are reduced (A–C).
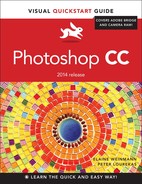
A As indicated by the original values shown in this Image Size dialog, this photo doesn’t contain enough pixels, nor a high enough resolution, to produce a large, high-quality print.

B We checked Resample, increased the Width value (the Height changed automatically), increased the Resolution value, chose the Resample method of Preserve Details (Enlargement), and set the Noise value to 60. In the preview (set to 100% view), we noted that the edges and lines were softened, such as on the ruler and graph paper.

C To resharpen the edge details, we reset the Noise value to 0.
Bicubic Smoother (Enlargement).
![]() In the preview, zoom to 100%, and compare the results of choosing different Resample methods. Also use this zoom level to gauge the Noise setting (if you chose the Preserve Details option).
In the preview, zoom to 100%, and compare the results of choosing different Resample methods. Also use this zoom level to gauge the Noise setting (if you chose the Preserve Details option).
7. Click OK. Because the image was resampled, the next step is to resharpen it (see pages 334–338).
![]() To restore all the original settings that were in effect when you opened the Image Size dialog, either choose Original Size from the Fit To menu or hold down Alt/Option and click Reset (Cancel becomes Reset).
To restore all the original settings that were in effect when you opened the Image Size dialog, either choose Original Size from the Fit To menu or hold down Alt/Option and click Reset (Cancel becomes Reset).
Using Auto Resolution
Scaling Styles
If your document contains layer styles and you want to permit them to be scaled as you change the Image Size, on the menu in that dialog, ![]() make sure Scale Styles is checked (see Chapter 20).
make sure Scale Styles is checked (see Chapter 20).
Say your photo was shot with a high-megapixel camera (and therefore has a high pixel count), but you want to print it at a smaller size, such as 5” × 8”. If you downsample (a copy of) it first, its data will transfer more efficiently to your printer.
To downsample a photo for a smaller print size:
1. Use File > Save As to copy your file, then choose Image > Image Size (Ctrl-Alt-I/Cmd-Option-I). The Image Size dialog opens.A If you want to enlarge the dialog and preview, drag any side or corner.

A These are the original settings for our high-resolution photo (note the Image Size and Dimensions values).
2. Check Resample, and click the Constrain Aspect Ratio button ![]() to activate it.
to activate it.
3. If the Resolution value isn’t 300 ppi, enter that value now.
4. From the Resample menu, choose Automatic (this tells Photoshop to use the best method).
5. From the menu next to the Width field, choose Inches, then enter the Width or Height value needed for your print.B

B We checked Resample and activated the Constrain Aspect Ratio button, then changed the Width value to 8 inches. The Image Size and Dimensions shrank accordingly.
6. Click OK. Because the image was resampled, you should resharpen it (see pages 334–338).
To produce a GIF, JPEG, PNG, or SVG file from a Photoshop layer for output to the Web or a mobile device, we use the Generator plug-in; see pages 489–494. It’s an easy process. If you need to specify a resolution, and width or height values, for a file while downsampling it (that is, lower its pixel count to enable it to download efficiently), before using Generator to create assets from it in one of the above-mentioned formats, follow the steps below.
To downsample an image for Web output:
1. Follow step 1 in the preceding task.
2. Check Resample, and to preserve the width-to-height ratio of the image (prevent it from becoming distorted), click the Constrain Aspect Ratio button ![]() to activate it.
to activate it.
3. From the Resample menu, choose Automatic (this enables Photoshop to use the best method).C

C These are typical Image Size values of a digital photo that has not been resized or resampled.
4. Enter a Resolution of 72 ppi.
5. From the menu next to the Width field, choose Pixels, then enter the desired Width or Height value.D

D We checked Resample, then set the Resolution to 72 and the Width to 600 pixels. The result was a much smaller image size.
6. Click OK.
Changing the canvas size
The canvas area is the live, editable part of a document. By using the Canvas Size command, you can add or delete pixels from one, two, three, or all four sides of the canvas. Adding pixels would be useful, say, if you want to make room for some type, as in the example shown here, or to accommodate imagery from other documents in a multilayer collage (see Chapter 13).
To change the canvas size of a document:
1. Choose Image > Canvas Size (Ctrl-Alt-C/Cmd-Option-C). The Canvas Size dialog opens.
2. From the Width menu, choose a unit of measure.
3. Do either of the following:
Enter new Width and/or Height values. The dimensions work independently; changing one won’t affect the other.A–B
A This is the original image.

B To add canvas area to the top of this image, in the Canvas Size dialog, we increased the Height value, then clicked the bottom middle Anchor square to shift the black dot downward.
Check Relative, then increase or reduce the Width and/or Height values to alter the ratio between those dimensions.
4. Optional: The black dot in the center of the Anchor arrows represents the existing image area. Click a square to reposition the image relative to the canvas. The arrows point to where canvas area will be added or deleted.
5. If you’re adding to the canvas, from the Canvas Extension Color menu, choose a color option for the new area. Or to choose a custom color, choose Other or click the color square next to the menu, then choose a color in the Color Picker (see pages 204–205) or by clicking in the document window. Note: If the image doesn’t have a Background (take a peek at the Layers panel), this menu won’t be available, and the added canvas area will be filled with transparency.
6. Click OK.C If your settings made the canvas smaller, an alert dialog may appear. Click Proceed.

C After adding pixels to the top of the canvas, we created an editable type layer.
![]() To enlarge the canvas area manually with the Crop tool, see page 146. To enlarge the canvas to include all layer content, including any content that is hidden outside it, choose Image > Reveal All.
To enlarge the canvas area manually with the Crop tool, see page 146. To enlarge the canvas to include all layer content, including any content that is hidden outside it, choose Image > Reveal All.
2. Choose one of the following options, either from the Aspect Ratio (first) menu on the Options bar or from the context menu (right-click in the image):
To crop the image without constraints, on the Options bar, choose Ratio, then click Clear; or choose Clear Ratio from the context menu.
To preserve the original proportions of the document while cropping it, choose Original Ratio.
Choose a ratio preset, such as 5 : 7 (or enter custom width and height ratio values on the Options bar).
3. To preserve the cropped areas, uncheck Delete Cropped Pixels on the Options bar.
4. Define which part of the image you want to keep by dragging a handle or an edge of the crop box.A–B Areas outside the crop box will be covered with a tinted shield (see the next page).

A We’re dragging a handle on the crop box with the Ratio option chosen on the Aspect Ratio menu.

B Here we’re dragging a handle on the crop box with the Original Ratio option chosen on the Aspect Ratio menu.
![]() To resize the crop box from the center, drag a handle with Alt/Option held down.
To resize the crop box from the center, drag a handle with Alt/Option held down.
![]() To preserve the current ratio (even if the ratio fields on the Options bar are blank), Shift-drag a corner handle.
To preserve the current ratio (even if the ratio fields on the Options bar are blank), Shift-drag a corner handle.
5. Do any of the following optional steps:
To reposition the part of the image that is going to be preserved, drag inside the box.
To rotate the image in the crop box, position the cursor just outside the box, then drag in a circular direction. (To change the locus from which the image rotates, drag the reference point away from the center of the box before rotating.)
To hide, then show, the areas outside the crop box, press H.
To switch the orientation of the crop box, click the Swap Width and Height button ![]() on the Options bar.
on the Options bar.
6. To accept the crop edits, double-click inside the crop box or press Enter/Return. You should resharpen the image, as you have just changed its pixel count.
Note: Because you used the Crop tool with the Delete Cropped Pixels option off (step 3), the Background was converted to a layer; see the next chapter. You can drag the hidden cropped areas into view with the Move tool ![]() (see page 257).
(see page 257).
Clear, Reset, and Original Ratio
To restore the crop box to the edges of the canvas, reset the image rotation to the x/y axis (if it was rotated), and release the Crop tool from any ratio constraints, either click the Reset button ![]() on the Options bar or right-click in the image and choose Reset Crop.
on the Options bar or right-click in the image and choose Reset Crop.
To choose preview and shield options for the Crop tool:
Choose the Crop tool ![]() (C or Shift-C), click to open the Crop Options menu
(C or Shift-C), click to open the Crop Options menu ![]() on the Options bar,A then check any or all of these options:
on the Options bar,A then check any or all of these options:

A From the Crop Options menu, choose preview and shield options for the Crop tool.
Show Cropped Area (H) to display the image areas outside the crop box.
Auto Center Preview to allow the image to shift in the opposite direction as you drag a handle on the crop box.
Enable Crop Shield to display a tint over the cropped areas. From the Color menu, choose Match Canvas (the least obtrusive option); set the Opacity value for the tint; and check Auto Adjust Opacity to let the tint display in a reduced opacity while you drag to edit the crop box.
![]() To use the updated crop features of Photoshop, as described here, keep Use Classic Mode unchecked.
To use the updated crop features of Photoshop, as described here, keep Use Classic Mode unchecked.
![]() If you crop an image nondestructively (with Delete Cropped Pixels unchecked), then reselect the Crop tool and click in the image (Show Cropped Area option checked), the cropped areas will redisplay.
If you crop an image nondestructively (with Delete Cropped Pixels unchecked), then reselect the Crop tool and click in the image (Show Cropped Area option checked), the cropped areas will redisplay.
The preset geometric guide lines that you can use with the Crop tool are based on timeless design principles.
To use guide lines with the Crop tool:
1. Choose the Crop tool ![]() (C or Shift-C).
(C or Shift-C).
2. From the Overlay menu ![]() B on the Options bar, do the following:
B on the Options bar, do the following:
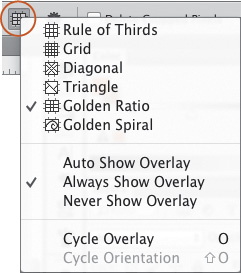
B On the Overlay menu, click an icon and a display option.
Choose an overlay icon/option. Your choice will display as the current menu icon.
Choose Auto Show Overlay to display the overlay only while the mouse button is pressed or Always Show Overlay to have the overlay stay visible after you click in the image with the Crop tool.
3. As you drag a handle of the crop box or reposition the image within it, let one or more key elements or shapes in your photo fall below a guide line (or areas within the guide lines) C–D (and A–D). (When you’re done using the overlay, you can hide it by choosing Auto Show Overlay or Never Show Overlay from the Overlay menu.)
Golden Ratio

C Using the Golden Ratio option, we’re positioning the horizontal guide lines at natural divisions in the landscape, and at an intersection over the red buildings. (The Rule of Thirds, a simplified form of the Golden Ratio, has equal divisions.)

D This is the result.
Triangle

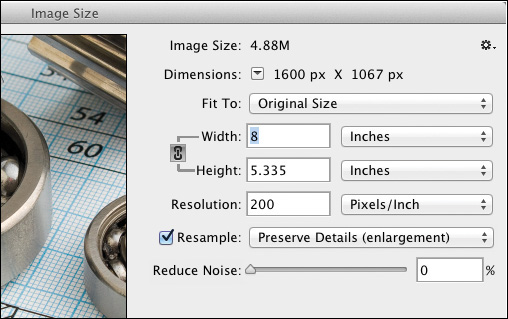
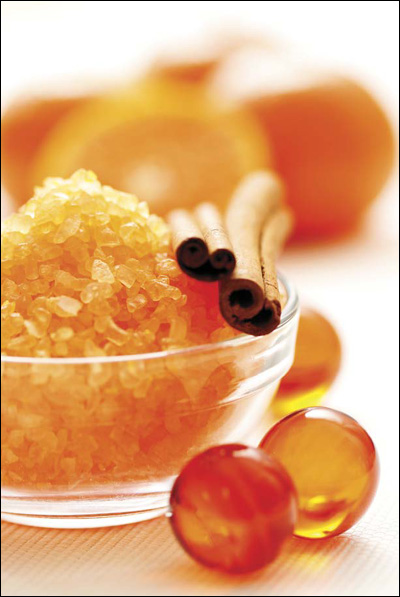
A Here we’re using the Overlay option of Triangle (on the Options bar, the Aspect Ratio menu is set to Ratio). Note where key features of the photo are located within the overlay: the chef’s hands and skillet in one triangle and the plates in another triangle.
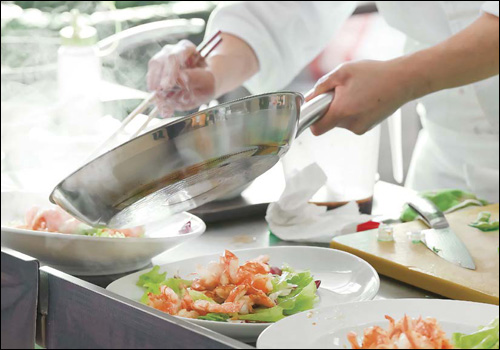
B This is the result.
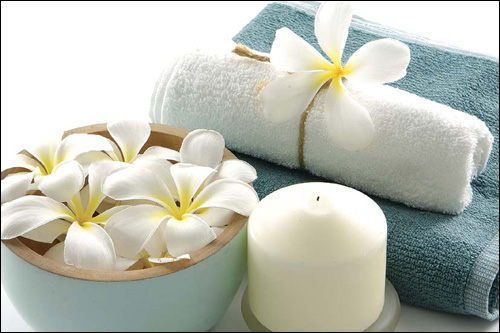
Golden Spiral

C Using the Overlay option of Golden Spiral, we’re positioning the center of the spiral over what we consider to be the key element of the photo.

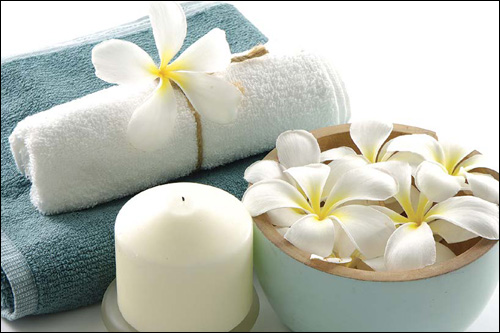
D This is the result.
![]() To cycle through the six guide options, choose the Crop tool, choose Always Show Overlay from the Overlay menu, click in the image, then keep pressing the letter O. To swap the orientation of the Triangle or Golden Spiral guide lines, press Shift-O.
To cycle through the six guide options, choose the Crop tool, choose Always Show Overlay from the Overlay menu, click in the image, then keep pressing the letter O. To swap the orientation of the Triangle or Golden Spiral guide lines, press Shift-O.
Cropping multiple images
Because the Crop tool keeps its current settings until you change them, you can easily apply the same aspect (width-to-height) ratio, size, or resolution values to multiple images, such as photos taken during the same shoot. In the first task below, we’ll show you how to crop documents using the same aspect ratio. The dimensions of the images can vary.
To crop one or more images according to an aspect ratio:
1. Open one or more images, then click in one of them. Choose the Crop tool ![]() (C or Shift-C).
(C or Shift-C).
2. Do one of the following:
Right-click in the image and choose Use Front Image Aspect Ratio from the context menu.
Choose a ratio preset (e.g., 5 : 7) from the Aspect Ratio menu on the Options bar, or enter width and height ratio values in the fields.
Resize the crop box, then right-click in the image and choose Use Crop Box Aspect Ratio from the context menu.
3. Values for the current document will be listed on the Options bar and will stick with the Crop tool until you change them. Size the crop box, if desired, then double-click inside the box or press Enter/Return to accept it.
4. Click the tab of another open document. Resize the crop box, then accept the crop edits; or to accept the crop without resizing it, press Enter/Return twice. Repeat this entire step for any other open images.
Here you will crop multiple documents to specific resolution and dimensions values.
To crop multiple images to a specified size and resolution:
1. Open two or more images, then click in one of them. Choose the Crop tool ![]() (C or Shift-C).
(C or Shift-C).
2. On the Options bar, do either of the following:
From the Aspect Ratio menu, choose W × H × Resolution, then enter the desired width, height, and resolution values.
From the Aspect Ratio menu, choose a W × H × Resolution preset (e.g., 4 × 5 in 300 ppi).
3. Optional: Resize the crop box (the specified dimensions and resolution will still apply to the crop box, regardless of its size).
4. To accept the crop edits, either double-click inside the box or press Enter/Return.
5. Click the tab of another open document. Resize the crop box, then accept the crop; or to accept the crop without resizing it, press Enter/Return twice. Repeat this entire step for any other open documents.
![]() To correct perspective problems in a photo resulting from camera lens distortion, we recommend using the Lens Corrections tab in Camera Raw (see pages 80–83). Using those controls, you can preview the results, whereas with the Perspective Crop tool, you cannot.
To correct perspective problems in a photo resulting from camera lens distortion, we recommend using the Lens Corrections tab in Camera Raw (see pages 80–83). Using those controls, you can preview the results, whereas with the Perspective Crop tool, you cannot.
You can also crop multiple images to the dimensions and resolution of an existing document (this task), or to a crop box and resolution (next task).
To crop multiple images to the size and resolution of a document:
1. Open two or more images, and click in the one that has the desired dimensions and resolution.
2. Choose the Crop tool ![]() (C or Shift-C).
(C or Shift-C).
3. From the Aspect Ratio menu, choose Front Image; or right-click in the image and choose Use Front Image Size & Resolution from the context menu (A). The document’s width, height, and resolution display on the Options bar.

A With the Crop tool, we right-clicked in the “tomatoes” image (which has the desired width, height, and resolution values) and chose Use Front Image Size & Resolution from the context menu.
4. Click the tab of another open image (B). Resize the crop box, if desired, then accept the crop edits; or to accept the crop without editing it, press Enter/Return twice. Repeat this entire step for any other documents.

B We clicked another document tab. The width, height, and resolution of the front image are still displaying in the fields on the Options bar. If we were to accept the crop, this “pizza” image would adopt the values of the “tomatoes” image.
To crop multiple images to a crop box in, and resolution of, a document:
1. Open two or more images, including one that has the desired resolution.
2. Choose the Crop tool ![]() (C or Shift-C).
(C or Shift-C).
3. In the document that has the desired resolution, resize the crop box to the desired proportions, then right-click in the image and choose Use Crop Box Size & Resolution from the context menu.
4. To accept the crop edits, either double-click inside the box or press Enter/Return.
5. Click the tab of another open document. Resize the crop box, if desired, then accept the crop edits; or to accept the crop without editing it, press Enter/Return twice. Repeat this entire step for any other documents.
To save the current settings of the Crop tool as a preset:
1. Choose the Crop tool ![]() (C or Shift-C) and the desired values and settings, then from the Aspect Ratio menu, choose New Crop Preset.
(C or Shift-C) and the desired values and settings, then from the Aspect Ratio menu, choose New Crop Preset.
2. In the New Crop Preset dialog, keep the name or change it, then click OK. Your new preset will appear on the menu.
Another use of the Crop tool is to increase the canvas size, say, to add a blank area or to reveal imagery that is hidden outside the canvas. This is similar to the Canvas Size command, except here you use manual controls. All the layers in a document are affected.
To enlarge the canvas area with the Crop tool:
1. To display more of the work canvas (gray area) around the image, enlarge the Application frame or lower the zoom level of your document.
2. Choose the Crop tool ![]() (C or Shift-C).
(C or Shift-C).
3. On the Options bar, click Clear.
4. Drag a handle of the box outside the canvas area.A

A With the Crop tool, we’re dragging the right midpoint handle outside the canvas, to add more canvas area to that side of the image.
5. On the Options bar, check whether you want Photoshop to Delete Cropped Pixels or preserve them. On all layers, regardless of this setting, any added areas that don’t contain content will be filled with transparency. If the document has a Background and you check Delete Cropped Pixels, you should choose a Background color for the added canvas area now (see Chapter 11). With Delete Cropped Pixels off, the Background will convert to a layer and the added area will fill with transparency (for layers, see the next chapter).
6. To accept the crop edits, either press Enter/Return or double-click inside the crop box.B

B When we released the mouse, because Delete Cropped Pixels was checked for the tool, the added canvas area filled automatically with the current Background color (brown). We accepted the crop edit.
The Trim command trims away any excess transparent or solid-color areas from the perimeter of all the layers in a document, while preserving existing imagery, type, and shapes. Of course, the document remains rectangular.
To trim areas from around an image:
1. If you want to trim transparent areas from a document that contains layers, on the Layers panel, ![]() hide the Background by clicking its visibility icon.
hide the Background by clicking its visibility icon. ![]()
2. Choose Image > Trim.
3. In the Trim dialog, click a Based On option:
Transparent Pixels trims transparent pixels from the edges of the image. If Photoshop doesn’t detect any such areas in the image, this option won’t be available.
Top Left Pixel Color removes any border areas that match the color of the left uppermost pixel in the image.
Bottom Right Pixel Color removes any border areas that match the color of the bottommost right pixel in the image.
4. Check which edges of the image you want Photoshop to Trim Away: Top, Bottom, Left, and/or Right.
5. Click OK.
Straightening a crooked image
When you straighten a crooked image with the Crop tool, all the layers in the document are affected.
To straighten a crooked image with the Crop tool:
1. Choose the Crop tool ![]() (C or Shift-C). The crop box displays.
(C or Shift-C). The crop box displays.
2. Read step 5 of the first task on the preceding page, and either check Delete Cropped Pixels on the Options bar or not.
3. Do either of the following:
On the Options bar, click Straighten or the Straighten icon. ![]()
Hold down Ctrl/Cmd.
4. Drag along a shape in the image that you want Photoshop to align to the horizontal or vertical axis, then release.A

A This image is slightly askew. We chose the Crop tool, clicked Straighten on the Options bar, then dragged downward along one of the columns.
5. Optional: To tweak the rotation angle, drag outside the crop box. You can also edit the crop box via the usual controls.
6. Press Enter/Return, or double-click inside the box.B

B When we accepted the crop, the image was reoriented along the angle we defined.
![]() To cancel the straighten and crop edits while the Crop tool is still selected, click the Reset button
To cancel the straighten and crop edits while the Crop tool is still selected, click the Reset button ![]() on the Options bar.
on the Options bar.
When you straighten a crooked image with the Ruler tool, only the current layer is affected, and any pixels that lie outside the live canvas area on that layer are preserved.
To straighten a crooked layer with the Ruler tool:
1. Click the Background or a layer. If you select the Background, the Straighten Layer command will convert it to a layer.
2. Choose the Ruler tool ![]() (I or Shift-I).
(I or Shift-I).
3. Drag along a shape in the image that you want Photoshop to align to the horizontal or vertical axis. The angle will be listed as the A value on the Options bar.
4. Optional: To change the angle of the line, move either one of its endpoints.
5. On the Options bar, click Straighten Layer.
6. Optional: Reposition the layer with the Move tool.
Flipping or rotating an image
You can flip or rotate all the layers in an image, or just one layer at a time. (To learn about layers, see the next chapter.)
To flip all the layers in an image:
Choose Image > Image Rotation > Flip Canvas Horizontal A–B or Flip Canvas Vertical.
A This is the original image.
B This is the same image after we chose the Flip Canvas Horizontal command.
![]() If you flipped a whole image that contains type, and the letters are now reading backwards, don’t flip out! Just “unflip” the type layer using the Flip Horizontal command (see the next task). We’ve noticed photos in magazines and catalogs that were obviously flipped, because the lettering (e.g., in a stack of books) was unreadable.
If you flipped a whole image that contains type, and the letters are now reading backwards, don’t flip out! Just “unflip” the type layer using the Flip Horizontal command (see the next task). We’ve noticed photos in magazines and catalogs that were obviously flipped, because the lettering (e.g., in a stack of books) was unreadable.
To flip one layer:
1. Click a layer on the Layers panel. ![]()
2. Choose Edit > Transform > Flip Horizontal or Flip Vertical. Note: Any layers that are linked to the selected layer or layers will also flip.
To rotate all the layers in an image:
Do either of the following:
Choose Image > Image Rotation > 180°, 90° CW (clockwise), or 90° CCW (counterclockwise).
Choose Image > Image Rotation > Arbitrary. Enter an Angle value, click °CW (clockwise) or °CCW (counterclockwise), then click OK. Any exposed areas on the Background will be filled with the current Background color (see Chapter 11).
![]() If you want any areas that are exposed by a rotation command to be filled with transparency instead of a solid color, click the lock icon
If you want any areas that are exposed by a rotation command to be filled with transparency instead of a solid color, click the lock icon ![]() in the Background listing to convert it to a layer before applying the command.
in the Background listing to convert it to a layer before applying the command.
To rotate one layer:
1. On the Layers panel, ![]() click a layer.
click a layer.
2. Choose Edit > Transform > Rotate 180°, Rotate 90° CW, or Rotate 90° CCW.