25. Print & Export

In This Chapter
Proofing document colors onscreen
Outputting a file to an inkjet printer
Preparing a file for commercial printing
Getting Photoshop files into Adobe InDesign and Illustrator
Saving a file in the PDF format
Saving a file in the TIFF format
Saving multiple files in the JPEG, PSD, or TIFF format
Generating image assets from Photoshop layers
When you’re done editing your Photoshop image, you can output it to a desktop inkjet printer, prepare it for commercial printing, export it to another application (such as Adobe InDesign), or generate assets from any of its individual layers for display on the Web and mobile devices.
In the first task in this chapter, you will view your document as a simulation of three different kinds of output: an inkjet print, a commercial press print, and display on the Web. This simulation, called a soft proof, will give you useful feedback so you can apply some final tweaks and adjustments to your document.
Once your document is finalized, you will learn how to output it from Photoshop to an inkjet device, and how to convert it to CMYK Color mode for commercial printing. We offer guidelines for exporting files to Adobe InDesign and Adobe Illustrator, give instructions for saving files in the versatile TIFF and PDF formats, and finally, show you how to generate image assets from Photoshop layers for output to the Web and mobile devices.
Important note: If you’re planning to output your document to a desktop inkjet printer, keep it in RGB Color mode. Although desktop printers print using six or more process ink colors, their drivers are designed to receive RGB data, and they perform the conversion to printer ink colors internally. One less thing for you to worry about!
Proofing document colors onscreen
In this phase of color management, you’ll create a custom proof setting for your specific inkjet printer and paper, and use it to view a soft proof (onscreen simulation) of the document as if it were output to print. Although this proof won’t be perfectly accurate, it will give you a rough idea of how your colors will look, without costing you a cent.
To proof a document as an inkjet print onscreen:
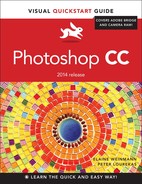
1. Open an RGB image. From the View > Proof Setup submenu, choose Custom. The Customize Proof Condition dialog opens. In the following steps, you will choose proofing settings for your specific output device.
2. Check Preview, then from the Device to Simulate menu, choose the correct color profile for your inkjet printer and paper — the profile that you either downloaded from the manufacturer’s website or installed with your printer driver file (see page 11).A
A To generate a soft proof of our document, from the Device to Simulate menu in the Customize Proof Condition dialog, we chose the profile for our Canon Pixma inkjet printer.
3. Uncheck Preserve RGB Numbers, if available, to allow Photoshop to simulate how the colors will look when converted to the output profile.
4. Choose a Rendering Intent to control how colors will change as the image is shifted to the output profile (see the sidebar on the next page). We recommend choosing either Perceptual or Relative Colorimetric. To compare these options, choose them one by one and look at your document onscreen—or even better, output a test print for each one and compare the results.
Check Black Point Compensation to allow adjustments to be made for differences in the black point among different color spaces. With this option chosen, the full dynamic range of the image color space is mapped to the full dynamic range of the color space of your output device. With this option off, black areas in the image may display or print as grays. For an inkjet proof, we recommend checking this option.
5. Optional: For Display Options (On-Screen), check Simulate Paper Color to preview the white of the printing paper, as defined in the chosen printer profile, or if you’re going to print the file on uncoated paper, check Simulate Black Ink to preview the full range of black values that the printer profile can produce.
6. To save your custom proof setup, click Save, enter a name, keep the .psf extension, keep the default location (the Proofing folder), then click Save.
7. Your newly saved proof setup appears on the Custom Proof Condition menu. Click OK. The setup is now also available on the View > Proof Setup submenu for use at any time, and View > Proof Colors is checked automatically so you can study the soft proof onscreen. (While Proof Colors is checked, the color profile that is currently chosen on the Proof Setup submenu is also listed in the document tab.)
Remember, the Proof Setup options control only how Photoshop simulates colors onscreen. Colors in the file won’t actually be converted to the chosen profile until you physically output the document to an inkjet printer or convert it to a different color mode (such as from RGB to CMYK).
Choosing a Rendering Intent
![]() Perceptual changes colors in a way that seems natural to the human eye, while attempting to preserve the appearance of the overall image. It’s a good choice for continuous-tone images.
Perceptual changes colors in a way that seems natural to the human eye, while attempting to preserve the appearance of the overall image. It’s a good choice for continuous-tone images.
![]() Saturation changes colors with the intent of preserving vivid colors. It is a good choice for charts and graphics, which typically contain a limited number of colors, but it can compromise the color fidelity of continuous-tone images.
Saturation changes colors with the intent of preserving vivid colors. It is a good choice for charts and graphics, which typically contain a limited number of colors, but it can compromise the color fidelity of continuous-tone images.
![]() Absolute Colorimetric maintains the color accuracy only of colors that fall within the destination color gamut (i.e., the color range of your printer), but in so doing it sacrifices the accuracy of colors that are outside that gamut.
Absolute Colorimetric maintains the color accuracy only of colors that fall within the destination color gamut (i.e., the color range of your printer), but in so doing it sacrifices the accuracy of colors that are outside that gamut.
![]() Relative Colorimetric, the default intent for all the Adobe predefined settings in the Color Settings dialog, compares the white, or highlight, of your document’s color space to the white of the destination color space (the white of the paper, in the case of print output), shifting colors where needed. This is the best rendering intent choice for documents in which most of the colors fall within the color range of the destination gamut, because it preserves most of the original colors.
Relative Colorimetric, the default intent for all the Adobe predefined settings in the Color Settings dialog, compares the white, or highlight, of your document’s color space to the white of the destination color space (the white of the paper, in the case of print output), shifting colors where needed. This is the best rendering intent choice for documents in which most of the colors fall within the color range of the destination gamut, because it preserves most of the original colors.
Do the Research
![]() When preparing files for commercial printing, ask your output service provider which settings and formats you should select in Photoshop.
When preparing files for commercial printing, ask your output service provider which settings and formats you should select in Photoshop.
![]() For more specialized technical information that is beyond the scope of this chapter, refer to the documentation for your specific printer model, and to Photoshop Help.
For more specialized technical information that is beyond the scope of this chapter, refer to the documentation for your specific printer model, and to Photoshop Help.
![]() Regardless of the output medium, you can learn from trial and error. Output a file, study the print, make adjustments to the file, then output it again. The experts become so by learning from both their successes and their failures.
Regardless of the output medium, you can learn from trial and error. Output a file, study the print, make adjustments to the file, then output it again. The experts become so by learning from both their successes and their failures.
In this task, you will choose a Proof Setup preset, then turn on the soft-proof feature so you can preview onscreen how the colors in your file will look if printed using CMYK inks or viewed online on a Windows or older Macintosh display.
To proof colors onscreen for commercial printing or online output:
1. From the View > Proof Setup submenu, choose the preset for the output display type that you want Photoshop to simulate:
Working CMYK to simulate colors for the type of commercial press that is currently selected on the CMYK menu under Working Spaces in the Edit > Color Settings dialog in Photoshop.
![]() If your file will be sent to a commercial print shop, ask them for a .csf or .icc profile. After you install the profile, it will be available on, and should be chosen from, the Settings menu in the Color Settings dialog (see page 11). If you’re not given a profile, ask your print shop to suggest which predefined CMYK profile you should choose instead (see page 8).
If your file will be sent to a commercial print shop, ask them for a .csf or .icc profile. After you install the profile, it will be available on, and should be chosen from, the Settings menu in the Color Settings dialog (see page 11). If you’re not given a profile, ask your print shop to suggest which predefined CMYK profile you should choose instead (see page 8).
Legacy Macintosh RGB (Gamma 1.8) to simulate colors for online output using the legacy Mac gamma setting of 1.8 as the proofing space, or Internet Standard RGB (sRGB) to simulate online output using the more common Windows gamma of 2.2.
Monitor RGB to simulate colors using the current display profile that is assigned to your monitor.
2. View > Proof Colors will be checked automatically, so you can examine your document for any color changes.
When you’re ready to turn off soft proofing, uncheck it on the menu or press Ctrl-Y/Cmd-Y.
Outputting a file to an inkjet printer
In this section, you’ll learn how to output your file to an inkjet printer so the results match, as closely as possible, the document you have been editing and viewing onscreen. We have divided the steps for using this dialog into three parts: Choose settings for your printer driver, choose settings for printing (including color management), and finally, verify that color management has been turned off for the printer and print the file from Windows or the Mac OS.
Phase 1
In this phase, you will tell Photoshop what type of printer you’re going to use via the Print Settings dialog, then use the print dialog for your operating system to specify the paper size, paper type, and other options for your printer.
To choose settings for your printer driver:
1. Open the RGB file to be printed, then choose File > Print (Ctrl-P/Cmd-P). The Photoshop Print Settings dialog opens.A (You can enlarge the dialog to increase the preview size.)

A In the Photoshop Print Settings dialog, choose your inkjet device from the Printer menu, then click Print Settings.
2. From the Printer menu, choose your target inkjet device.
3. Click Print Settings to open the [Printer Name] Properties/Print dialog for your operating system.
4. The menu names will vary depending on the chosen printer model and your operating system, so we refer to them here generically:
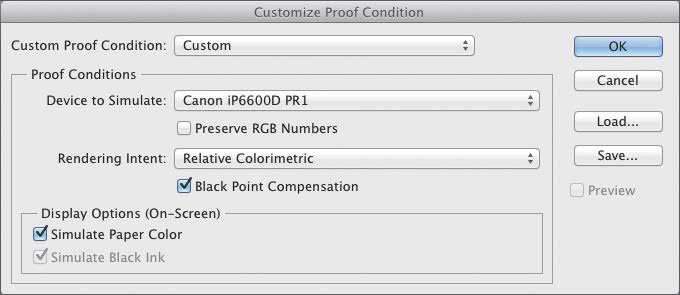
In Windows, in the Main (or other) tab, choose the best-quality option for photo printing. For the paper options, choose the source for your paper, the specific type of paper to be used, and the paper size (A).
A This is the Print Settings > [Print Name] Properties dialog for an Epson printer in Windows 8. We chose a Quality Option and Paper Options.
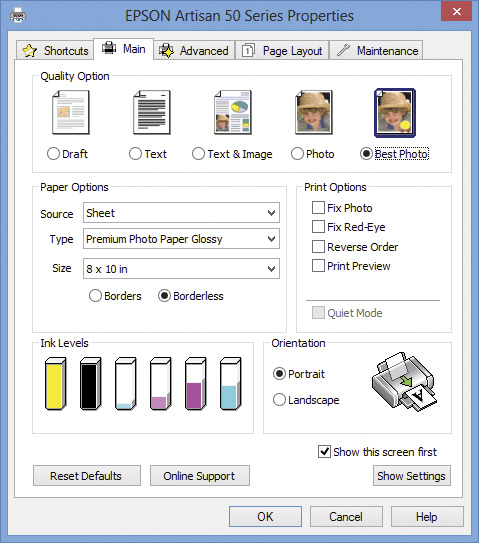
In the Mac OS, if necessary, click Show Details to display the full dialog. The inkjet printer you chose in step 2 will be listed on the Printer menu. Choose the desired paper size for the print (for a borderless print, pick a size that includes the word “borderless”). From the fourth menu, choose the category (e.g., Quality & Media or Print Settings) that lets you choose media type and print quality settings). From the media or paper type menu, choose the type of paper you will be using,B and from another menu, choose a print quality option.C

B This is the Print Settings > Print dialog for an Epson printer in the Mac OS. We chose Print Settings from the fourth menu, and are choosing a specific paper type from the Media Type menu.
C Next, in the same dialog, we clicked Mode: Advanced and chose a Print Quality option.
![]() In Windows and the Mac OS, the printer and paper type should match the printer profile you have downloaded and installed (see page 11).
In Windows and the Mac OS, the printer and paper type should match the printer profile you have downloaded and installed (see page 11).
5. Click OK/Save to close the print dialog for your operating system and return to the Photoshop Print Settings dialog. Keep the latter dialog open and follow the steps on the next page to choose print settings for Photoshop.
![]() The gray background in the preview matches the current background in the Photoshop document window. If you want to change that shade, right-click the gray area in the preview and choose a shade from the context menu.
The gray background in the preview matches the current background in the Photoshop document window. If you want to change that shade, right-click the gray area in the preview and choose a shade from the context menu.
After choosing print settings as described on the preceding two pages, the next step is to choose color management, position, scale, and other output options in Photoshop Print Settings dialog.
To choose Photoshop print settings:
1. In the Photoshop Print Settings dialog (A), click the portrait ![]() or landscape
or landscape ![]() Layout button.
Layout button.

A Choose settings in the various expandable categories in the Photoshop Print Settings dialog.
2. Expand the Color Management category. The current document profile is listed at the top.
From the Color Handling menu, choose Photoshop Manages Colors to let Photoshop handle the color conversion, for optimal color management (see the sidebar on the next page).
3. From the Printer Profile menu, choose the custom printer/ink/paper profile that you downloaded from the printer or paper manufacturer’s website and installed in your system (see page 11). This is the last phase of the color management workflow that you began in Chapter 1. Note: All installed profiles for the currently selected printer are listed on the top part of the menu.
4. If the chosen device has the capacity to output a 16-bit file (and your document is 16-bit), you can check Send 16-Bit Data to produce a print with finer details and smoother color gradations.
5. From the next menu, choose Normal Printing.
From the Rendering Intent menu, choose the same intent that you used when you created the soft-proof setting for your inkjet printer, which most likely was either Perceptual or Relative Colorimetric (see the sidebar on page 475).
![]() You can run one test print for the Perceptual intent and one for the Relative Colorimetric intent, and see which one yields better results.
You can run one test print for the Perceptual intent and one for the Relative Colorimetric intent, and see which one yields better results.
6. Check Black Point Compensation. This option maps the full color range of the document profile to the full range of the printer profile, to preserve shadow details and the darkest blacks.
7. Expand the Position and Size category.
Under Position, check Center to print the image in the center of the paper. Or to reposition the image on the paper, uncheck Center and choose new Top and Left values (note the change in the preview) or drag the image in the preview.
8. Optional: To scale the print output slightly, under Scaled Print Size, do either of the following:
Check Scale to Fit Media to fit the image automatically on the paper size you chose in step 4 on pages 476–477.
Uncheck Scale to Fit Media, then change the Scale percentage or enter specific Height and Width values (you can change the unit via the Units menu). These three values are interdependent; changing one causes the other two to change.
Note: Use these features to scale the print by only a small amount (i.e., a fraction of an inch or 5–10 percentage points). If a greater scale change is needed, cancel out of the dialog, use Image > Image Size to scale the image (see pages 137–139), then resharpen it.
9. Uncheck Print Selected Area to reset the margins to the chosen paper size, or check it to adjust the margins for the current printout. If you check this option, drag a margin control ![]() to adjust the top, bottom, left, or right margin for the printout; or Alt/Option-drag a margin control to move the top and bottom, or left and right, margins in unison; or Ctrl/Cmd-drag a margin control to move all four margins simultaneously.
to adjust the top, bottom, left, or right margin for the printout; or Alt/Option-drag a margin control to move the top and bottom, or left and right, margins in unison; or Ctrl/Cmd-drag a margin control to move all four margins simultaneously.
10. Below the preview, do the following:
Check Match Print Colors to display a color-managed soft proof of the image in the preview, based on the current printing device and printer profile settings.
Uncheck Gamut Warning. Monitoring out-of-gamut colors (shown as gray in the preview) is beneficial only when printing to a commercial CMYK printer.
Check Show Paper White to have Photoshop simulate the paper color in any white areas in the preview, based on the current printer profile.
11. Next, you need to verify that color management has been turned off for your output device. For Windows, see page 481; for the Mac OS, see page 482. To print from the same device in the future, you can just click Print here and skip that last task.
![]() If you want to save all of your settings for the current file and close the dialog without printing the file, click Done in the Photoshop Print Settings dialog, then save your file.
If you want to save all of your settings for the current file and close the dialog without printing the file, click Done in the Photoshop Print Settings dialog, then save your file.
Benefits to Letting Photoshop Manage Your Document Colors
![]() If you choose Photoshop Manages Colors (the option we recommend), you will be able to select a profile that matches the paper type you selected in the Print Settings dialog. Choose either the printer and paper profile that you downloaded from your paper or print manufacturer’s website or a profile that was installed for your printing device. Photoshop will adjust your document colors to fit that profile, then send the data to the printer. Using the profile preserves your color-managed workflow and allows Photoshop to produce the best possible color.
If you choose Photoshop Manages Colors (the option we recommend), you will be able to select a profile that matches the paper type you selected in the Print Settings dialog. Choose either the printer and paper profile that you downloaded from your paper or print manufacturer’s website or a profile that was installed for your printing device. Photoshop will adjust your document colors to fit that profile, then send the data to the printer. Using the profile preserves your color-managed workflow and allows Photoshop to produce the best possible color.
![]() If you choose Printer Manages Colors, the printer driver will handle the color conversion instead of Photoshop. This may limit the print quality, for two reasons. First, the printer won’t be aware of your custom paper choice and custom printer profile. And second, the color conversion will be subject to the printer’s ability to convert colors rather than the color management settings you have established. If you’re still not convinced that it’s a good idea to avoid this setting, at least resist the temptation to adjust the amount of individual ink colors used by the printer (in the Print Settings dialog), which would override the printer settings.
If you choose Printer Manages Colors, the printer driver will handle the color conversion instead of Photoshop. This may limit the print quality, for two reasons. First, the printer won’t be aware of your custom paper choice and custom printer profile. And second, the color conversion will be subject to the printer’s ability to convert colors rather than the color management settings you have established. If you’re still not convinced that it’s a good idea to avoid this setting, at least resist the temptation to adjust the amount of individual ink colors used by the printer (in the Print Settings dialog), which would override the printer settings.
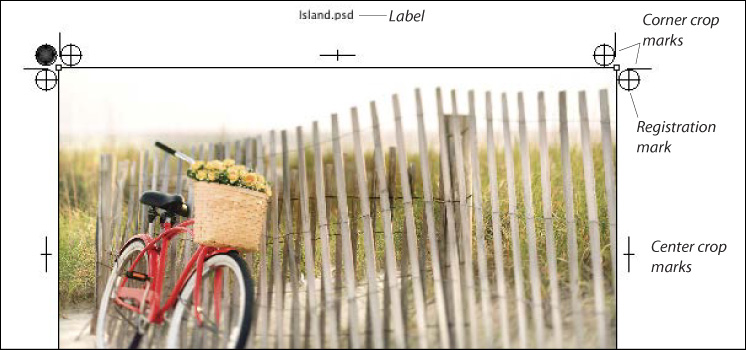
Choosing Output Options
![]() Corner Crop Marks and Center Crop Marks print short little lines that a print shop uses as guide lines when trimming the final print.
Corner Crop Marks and Center Crop Marks print short little lines that a print shop uses as guide lines when trimming the final print.
![]() Registration Marks prints marks that a print shop uses to align color separations.
Registration Marks prints marks that a print shop uses to align color separations.
![]() Description prints user data below the image. Click Edit in this category to enter or edit a description (you can also enter data in the Description field of the Description tab in the File > File Info dialog).
Description prints user data below the image. Click Edit in this category to enter or edit a description (you can also enter data in the Description field of the Description tab in the File > File Info dialog).
![]() Labels prints the file name on each page (outside the image area).
Labels prints the file name on each page (outside the image area).
![]() Calibration Bars prints a grayscale and/or color calibration strip outside the image area.
Calibration Bars prints a grayscale and/or color calibration strip outside the image area.
![]() Include Vector Data prints vector objects (such as type, shapes, or imported vector art) at the printer resolution, not at the document resolution. This option is checked automatically (and should be kept checked) if the file contains type or vector art.
Include Vector Data prints vector objects (such as type, shapes, or imported vector art) at the printer resolution, not at the document resolution. This option is checked automatically (and should be kept checked) if the file contains type or vector art.
![]() Keep Interpolation unchecked.
Keep Interpolation unchecked.
Outputting a Quasi Hard Proof

The final step before outputting a file to an inkjet printer is to verify that color management is turned off for that device, to enable Photoshop to manage the color conversion from RGB color to actual inks. (Remember, you chose Photoshop Manages Colors in step 2 on page 478.) Note: Mac OS users, your instructions are on the next page.
Color management options in the Photoshop Print Settings dialog vary depending on the printer driver for the chosen output device, and also differ for each operating system. In the following steps, we describe how to verify that color management is turned off for an Epson device. If your output device is a different brand, or you see different options in the dialog, do some research on how to access print quality and color management settings for your printer, and use these steps just as general guidelines.
Windows: To verify that color management is turned off for your printer, then print the file:
1. In the Photoshop Print Settings dialog, click Print Settings to get to the [Printer Name] Properties dialog for your Windows system.
2. Click the Advanced tab.A These options include controls for color management.

A In the Print Settings > Properties dialog for an Epson printer in Windows, we clicked the Advanced tab to display these Color Management options.
3. In the Color Management area, click ICM, if it’s not already selected, to switch control of color management from the Epson driver to the color management system that’s built into Windows.
4. Below the ICM button, make sure Off (No Color Adjustment) is checked.B
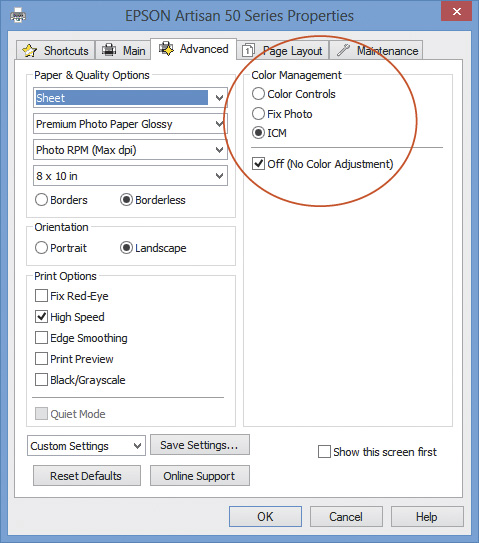
B We verified that ICM was selected, and that Off (No Color Adjustment) was checked.
5. Click OK to close the Properties dialog and return to the Photoshop Print Settings dialog.
6. Click Print. Phew! You made it.
In the Photoshop Print Settings dialog (step 2 on page 478), you were instructed to choose the Color Handling option of Photoshop Manages Colors. This option gives Photoshop control over color management (lets Photoshop manage the color conversion from RGB color to actual inks in your printer), and turns off the color management settings for a Mac OS printer driver automatically (dialog options for the driver are dimmed). Once you have verified that color management is turned off for your particular device, for future output, after choosing the desired settings in the Photoshop Print Settings dialog, you can skip the task below and simply click Print. If you discover, upon following the steps below, that color management is on for your printer driver, be sure to turn it off (see step 3).
Color management options in the Photoshop Print Settings dialog vary depending on the printer driver for the chosen output device, and also differ for each operating system. In the following steps, we describe how to verify that color management is turned off for an Epson device. If your output device is a different brand, or you see different options in the dialog, do some research on how to access print quality and color management settings for your printer, and use these steps just as general guidelines.
Mac OS: To verify that color management is turned off for your printer, then print the file:
1. In the Photoshop Print Settings dialog, click Print Settings to open the Print dialog for your Mac operating system.
2. From the fourth menu, choose Color Management.A

A In the Print dialog (which we accessed by clicking Print Settings in the Photoshop Print Settings dialog) for an Epson printer in the Mac OS, we chose Color Management from the fourth menu.
3. Verify that Off (No Color Adjustment) is selected.B Note that with color management turned off for the printer, depending on the printer model, the color controls and the Advanced Settings sliders either won’t display at all or will be dimmed.

B We verified that Off (No Color Adjustment) was selected.
4. Click Save to return to the Photoshop Print Settings dialog.
5. Click Print. Congratulations!
Preparing a file for commercial printing
Computer monitors display additive colors by projecting red, green, and blue (RGB) light, whereas commercial presses print subtractive colors using CMYK (cyan, magenta, yellow, and black) and/or spot color (mixed) inks. Obtaining high-quality CMYK color reproduction from a commercial press is an art that takes experience and know-how.
When preparing a file to be sent to a print shop for output to a commercial press, you need to establish the correct CMYK working space in Photoshop. Ask your print shop to give you the necessary color settings file, then be sure to save it in the correct folder (see page 11) so it’s available in the Color Settings dialog for the CMYK conversion.
To convert your file from RGB to CMYK Color mode:
1. Use the File > Save As dialog to save a flattened copy of your file (uncheck the Layers option).
2. Choose Edit > Color Settings (Ctrl-Shift-K/Cmd-Shift-K).
3. To specify which profile will be used to control the conversion of your image to CMYK Color mode, do one of the following:
From the Settings menu, choose the .csf profile that you received from your commercial printer and installed in your system.
Click Load, locate the .csf profile that you received from your commercial printer and copied to your hard drive, then click Open.
In the Working Spaces area, from the CMYK menu, choose either the .icc prepress profile that you received from your print shop, or the predefined profile your print shop says is the closest match to their press and paper.A

A In the Color Settings dialog, from the CMYK menu in the Workspace Spaces area, choose the correct CMYK profile.
4. Click OK.
5. Choose Image > Mode > CMYK Color. If an alert appears, click OK.
6. Save the file.
Getting Photoshop files into Adobe InDesign and Illustrator
Photoshop to Adobe InDesign
Files in the Photoshop PSD and Photoshop PDF formats can be imported directly into Adobe InDesign using the File > Place command.
InDesign can color-separate RGB and CMYK files, it can read embedded ICC color profiles, and it works with Bridge, for file and color management. Photoshop layers (and layer comps) are preserved, and you can turn their visibility on or off in InDesign; alpha channels, layer masks, and transparency are also preserved. If you want to import just an area of a Photoshop image into InDesign, see our easy steps on the next page.
Photoshop to Adobe Illustrator
Photoshop and Illustrator files are compatible in many, but not all, respects. Here are some ways to get Photoshop content into Illustrator (note that a 16-bit file will be imported as an 8-bit file):
Method 1
Arrange your Photoshop and Illustrator windows so they’re both visible. With the Move tool, ![]() drag and drop a selection or layer or layer group from the Photoshop document window into the Illustrator document. In Windows, the imagery will appear on the Layers panel as an image layer; in the Mac OS, it will appear as an image layer within a layer group. Nondefault opacity settings are reset to 100% (but are preserved visually), nondefault blending modes are ignored, the effects of any layer or vector masks are applied, and transparent areas are filled with white. Type and vector shapes are rasterized.
drag and drop a selection or layer or layer group from the Photoshop document window into the Illustrator document. In Windows, the imagery will appear on the Layers panel as an image layer; in the Mac OS, it will appear as an image layer within a layer group. Nondefault opacity settings are reset to 100% (but are preserved visually), nondefault blending modes are ignored, the effects of any layer or vector masks are applied, and transparent areas are filled with white. Type and vector shapes are rasterized.
Method 2
Select all or part of an image layer in Photoshop, copy it, then paste it into Illustrator. The effects of any layer or vector masks, nondefault blending modes, and opacity settings are ignored.
Method 3
In Illustrator, use File > Place to import either a whole Photoshop image or one layer comp. If you place a Photoshop image with the Link option checked, the image will appear on the Layers panel on a single image layer, and any masks will be applied. If you embed the Photoshop image as you place it (uncheck the Link option), then Shift-click in the document with the loaded graphics pointer, you will be given the option via the Photoshop Import Options dialog to Convert Layers to Objects (Make Text Editable Where Possible) or Flatten Layers to a Single Image (Preserves Text Appearance).
If you click Convert Layers to Objects, each Photoshop layer will appear on a separate nested layer within a group. Opacity values are preserved, whereas only the blending modes that have matching names on the Transparency panel in Illustrator will remain editable in Illustrator. Both transparency and modes are listed as editable appearances. Layer masks become opacity masks. Layer effects are applied to the layer, and their visual appearance is preserved.
If you click Flatten Layers to a Single Image, the effect of all opacity settings, blending modes, and layer masks will be preserved visually, but won’t be editable in Illustrator.
Check Import Hidden Layers if you want Illustrator to include any hidden image layers from the Photoshop file.
Method 4
In Illustrator, use File > Open to open a Photoshop image as a new Illustrator document. See also the information regarding the Link, Convert Layers, and Flatten Layers options in Method 3, above.
Notes
![]() If a Photoshop file contains visible adjustment layers, or a layer that contains layer effects, those layers won’t arrive as individual layers when opened or placed into Illustrator. Before importing the file, hide or merge down any adjustment layers, and reset the blending mode to Normal.
If a Photoshop file contains visible adjustment layers, or a layer that contains layer effects, those layers won’t arrive as individual layers when opened or placed into Illustrator. Before importing the file, hide or merge down any adjustment layers, and reset the blending mode to Normal.
![]() Any shape layers that contain layer effects will be rasterized.
Any shape layers that contain layer effects will be rasterized.
![]() A layer mask in the Photoshop document won’t convert to an opacity mask in Illustrator if the layer containing the mask also contains layer effects.
A layer mask in the Photoshop document won’t convert to an opacity mask in Illustrator if the layer containing the mask also contains layer effects.
![]() Via the Effect menu in Illustrator, Photoshop (raster) effects and Illustrator (vector) effects can be applied to an imported Photoshop image.
Via the Effect menu in Illustrator, Photoshop (raster) effects and Illustrator (vector) effects can be applied to an imported Photoshop image.
![]() When you open or place a TIFF, EPS, or PSD file into Illustrator, it adopts the color mode of the Illustrator file automatically.
When you open or place a TIFF, EPS, or PSD file into Illustrator, it adopts the color mode of the Illustrator file automatically.
To place just a portion of a Photoshop PSD image into InDesign or Illustrator, you need to isolate that area onto a separate layer or by using a layer mask, then save a copy of the file.
To isolate part of an image layer in Photoshop:
1. Do either of the following:
Select an area of a layer, then create a layer mask.A

A In Photoshop, we hid part of an image layer via a layer mask.
Select the area to be isolated, and put it on its own layer by pressing Ctrl-J/Cmd-J.B

B Alternatively, we could have copied a selected area to a new layer.
2. Using File > Save As, save a copy of the file in the Photoshop format. In the dialog, check As a Copy and keep Layers checked.
3. Follow the steps on this page for InDesign or Illustrator.
To place a Photoshop layer into InDesign:
1. In InDesign, open or create a document, then choose File > Place. In the Place dialog, click the Photoshop file, uncheck Show Import Options, then click Open. Drag with the loaded graphics pointer.
2. Choose Object > Object Layer Options.
3. In the dialog, check Preview, show the layer that contains transparency or a mask, hide all other layers (click their visibility icons), then click OK.
To open or place Photoshop layers into Illustrator:
1. In Illustrator, do either of the following:
Use File > Open to open the Photoshop file.
Open a file, then use File > Place to import the Photoshop file (Link option unchecked). In the document, Shift-click with the loaded graphics pointer.
2. The Photoshop Import Options dialog opens. Click Convert Layers to Objects, then click OK. The Open command converts each Photoshop layer to a separate layer in Illustrator, whereas the Place command nests the layers within a group.C–D

C In Illustrator, we used the Place command to import the Photoshop file, then clicked the visibility icon on the Layers panel to hide the Background.

D This is how the imported Photoshop file looks in Illustrator (you have to take our word for it!).
Saving a file in the PDF format
PDF (Portable Document Format) files can be opened in many Windows and Macintosh applications and in all of the Acrobat programs (Adobe Reader, Acrobat Standard, and Acrobat Pro). This format saves 8-bit and 16-bit files (but not 32-bit files) in any color mode except Multichannel.
If you want to preserve image, font, layer, and vector data in the PDF file, and have it include just one image, you should check Preserve Photoshop Editing Capabilities in the Save Adobe PDF dialog. (If you need to save multiple images in one PDF file, see “Creating a PDF presentation of images” on pages 444–445.)
If you want Photoshop to produce a generic PDF file, similar to a PDF that is produced by a drawing or page layout application, uncheck the Preserve Photoshop Editing Capabilities option. The image will be flattened and rasterized, so your ability to re-edit it in Photoshop will be very limited.
To save a file in the PDF format:
1. Choose File > Save As, enter a file name or keep the current name in the File Name/Save As field, choose a location for the file, choose Save As Type/Format: Photoshop PDF, then click Save. If an alert dialog appears, click OK.
2. From the Adobe PDF Preset menu in the Save Adobe PDF dialog,A choose a preset that’s best suited to your target output medium.

A In the Save Adobe PDF dialog, choose a preset from the Adobe PDF Preset menu.
Note: The High Quality Print and Press Quality presets produce a large Photoshop PDF file, compress the file using JPEG compression and an Image Quality setting of Maximum, embed all fonts automatically, and preserve transparency. The Preserve Photoshop Editing Capabilities option is checked. For commercial printing, ask your shop for advice regarding these settings.
High Quality Print (the default preset) creates PDF files that are suitable for desktop printers and color proofing devices. The color conversion is handled by the printer driver. The file won’t be PDF/X-compliant (see the PDF/X presets below).
Press Quality is designed for high-quality prepress output. Colors are converted to CMYK.
Note: Preserve Photoshop Editing Capabilities isn’t available for the PDF/X presets and is unchecked for the Smallest File Size preset, so these presets produce generic PDF files:
PDF/X-1a:2001, PDF/X-3:2002, and PDF/X-4:2008 create PDF files that will be checked for compliance with specific printing standards, to help prevent printing errors.
Smallest File Size uses high levels of JPEG compression to produce very compact PDF files for output to the Web and mobile devices. All colors are converted to sRGB.
3. Click Save PDF, then click Yes if an alert dialog appears.
![]() To learn more about the PDF format, see Photoshop Help.
To learn more about the PDF format, see Photoshop Help.
Saving a file in the TIFF format
TIFF files are versatile in that they can be imported into most applications and are usable in many color management scenarios. If your target application can’t read a Photoshop PSD or Photoshop PDF file, this is the next-best option. Both InDesign and QuarkXPress can color-separate a CMYK color TIFF.
Note: Although Photoshop files as large as 4 GB can be saved in the TIFF format, most other applications can’t read a TIFF file that is larger than 2 GB.
To save a file in the TIFF format:
1. If you have arranged for your document to be printed on a four-color press and your commercial printer requests that you convert it to CMYK Color mode, choose Image > Mode > CMYK Color (see page 483).
2. Choose File > Save As, enter a name or keep the current one, choose Save as Type/Format: TIFF, and choose a location for the file.
3. In the Save area:
Check As a Copy to keep the existing file open onscreen and save a copy of it to disk.
Uncheck Layers to flatten the file (or check this option if you must preserve layers). Note that few other image or layout programs can work with layered TIFFs, and those that don’t are going to either flatten the layers without your choice or ignore the layer data.
If you need to save Alpha Channels, Notes, or Spot Colors in the file, check any of those options.
4. Check ICC Profile/Embed Color Profile to include the embedded color profile (if any) with the file. For more about color management, see Chapter 1.
5. Click Save. The TIFF Options dialog opens.A

A This is the TIFF Options dialog in the Mac OS.
6. If the file is going to be color-separated (e.g., from InDesign), under Image Compression, click None (output service providers prefer to receive uncompressed files). If you need to reduce the storage size of the file, click LZW or ZIP; these methods are non-lossy, meaning that they don’t discard image data. Note that some programs can’t read a ZIP-compressed TIFF, so that’s something to investigate. Avoid the JPEG compression option, which causes data loss.
Optional: Check Save Image Pyramid to save multiple resolutions of the image in one file, for faster previewing at different zoom levels. Photoshop doesn’t offer options for opening image pyramids, whereas Adobe InDesign does.
Under Pixel Order, keep the default setting of Interleaved (RGBRGB).
Under Byte Order, click IBM PC or Macintosh, for the platform on which the file will be used.
If the bottommost layer in the file is a layer (not a Background), and has an opacity setting below 100% and/or contains some transparent pixels, you can preserve that transparency by checking Save Transparency. If an alert dialog appears, click Yes.
If the file contains layers, under Layer Compression, click a compression method.
7. Click OK.
Saving multiple files in the JPEG, PSD, or TIFF format
If you want to save copies of multiple files in a different format (or formats), you can get the job done quickly via the Image Processor command. And while you’re at it, if needed, you can also run an action.
To save multiple files in the JPEG, PSD, or TIFF format:
1. In Bridge, open a folder that contains multiple PSD or JPEG files or raw photos. (If desired, you can Ctrl-click/Cmd-click to select specific thumbnails.) Choose Tools > Photoshop > Image Processor. The Image Processor dialog opens.A
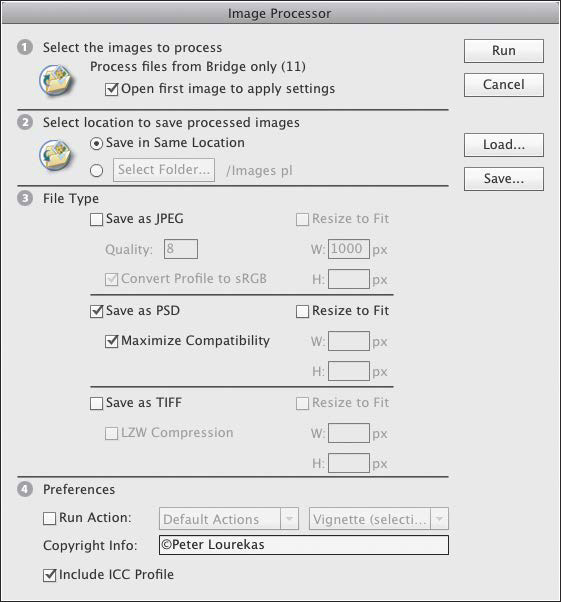
A Using the Image Processor command, you can quickly save multiple files in the JPEG, PSD, or TIFF format.
2. Optional: If you selected a series of raw photos, check Open First Image to Apply Settings to have the Camera Raw dialog open for the first selected raw photo, giving you the opportunity to choose settings. Check this option only if you’re certain all the other raw photos you have selected need the same adjustments.
3. To choose a location for the new files, do either of the following:
Click Save in Same Location.
Click the button next to Select Folder, click Select Folder, navigate to the desired folder, then click Open.
4. Click the desired File Type (or types) and applicable settings, as needed.
5. Under Preferences, do the following:
Optional: Check Run Action, then choose an action set and action to be played on all the files.
Optional: Enter Copyright Info (such as your name), to be added to the files’ metadata.
Check Include ICC Profile to include each file’s color profile so its display and output can be color-managed.
6. Click Run. If a file opens into Camera Raw, choose settings, then click Open Image (your settings will be applied to that file and to the processed copies of all the raw files). After Photoshop finishes opening, processing, and closing the new files, they will appear in one or more new folders (labeled with the chosen file format), in the location you designated.
![]() Via the Save button in the Image Processor dialog, you can save the current settings as a preset. To apply a preset to other images, use the Load button.
Via the Save button in the Image Processor dialog, you can save the current settings as a preset. To apply a preset to other images, use the Load button.
Creating a Compressed ZIP File
![]() To create a ZIP file in Windows, right-click a file and choose Send To > Compressed (Zipped) Folder from the context menu. A compressed version of the file will appear in a new folder within the current folder.
To create a ZIP file in Windows, right-click a file and choose Send To > Compressed (Zipped) Folder from the context menu. A compressed version of the file will appear in a new folder within the current folder.
![]() To create a ZIP file in the Mac OS, right-click a file name in the Finder and choose Compress [file name] from the context menu.
To create a ZIP file in the Mac OS, right-click a file name in the Finder and choose Compress [file name] from the context menu.
Generating image assets from Photoshop layers
Choosing a file format for output to the Web and mobile devices
Using the Generator plug-in, you can produce an image asset in the GIF, JPEG, PNG, or SVG* file format from a Photoshop layer, for output to the Web or mobile devices.
*In case you’re wondering, GIF stands for Graphics Interchange Format, JPEG stands for Joint Photographic Experts Group (the group that created the format), PNG stands for Portable Network Graphics, and SVG stands for Scalable Vector Graphics.
By entering a quality setting for a JPEG or PNG asset, you can control to what degree it is compressed, and thereby control its resulting quality. The ultimate goal is to compress a file to the point that it downloads quickly, while keeping its quality as high as possible.
The pixel dimensions of an asset affect how large it looks when displayed in a Web browser or on a mobile device. The Photoshop file from which you create asset files should have a resolution of 72 ppi (we’ll remind you about this later).
Before learning how to produce image assets via Generator (pages 490–494), see the following comparison of file formats.
GIF
![]() GIF preserves flat colors and sharp edges of a layer (such as a type or shape layer) better than JPEG, although not as well as SVG.
GIF preserves flat colors and sharp edges of a layer (such as a type or shape layer) better than JPEG, although not as well as SVG.
![]() GIF is an 8-bit format, meaning that it can save no more than 256 colors in a file. This color restriction makes it a good choice for a layer that contains a limited number of solid colors.
GIF is an 8-bit format, meaning that it can save no more than 256 colors in a file. This color restriction makes it a good choice for a layer that contains a limited number of solid colors.
![]() GIF preserves existing transparency in an image or gradient layer, but note that because the resulting asset will have an 8-bit depth, it won’t have smooth transitions between opaque and transparent areas.
GIF preserves existing transparency in an image or gradient layer, but note that because the resulting asset will have an 8-bit depth, it won’t have smooth transitions between opaque and transparent areas.
JPEG
![]() The JPEG format preserves the full 24-bit color depth — and therefore the color fidelity — of photos, gradients, and other continuous-tone image layers, which contain countless colors and tonal values.
The JPEG format preserves the full 24-bit color depth — and therefore the color fidelity — of photos, gradients, and other continuous-tone image layers, which contain countless colors and tonal values.
![]() The JPEG format can shrink an image significantly. The lower the quality setting you specify, the more compression is applied, and the greater is the resulting data loss; the higher the quality setting, the less the asset is compressed, but the larger will be its resulting file size.
The JPEG format can shrink an image significantly. The lower the quality setting you specify, the more compression is applied, and the greater is the resulting data loss; the higher the quality setting, the less the asset is compressed, but the larger will be its resulting file size.
![]() The JPEG format doesn’t preserve transparency.
The JPEG format doesn’t preserve transparency.
PNG
![]() PNG doesn’t cause data loss (it’s “lossless”).
PNG doesn’t cause data loss (it’s “lossless”).
![]() The PNG format supports bit-depth values of 8, 24, and 32. If you generate an asset from a continuous-tone layer and assign it an 8-bit depth, no more than 256 colors will be preserved, whereas if you assign the asset a bit depth of 24 or 32, the original color fidelity will be preserved (this is similar to the JPEG format).
The PNG format supports bit-depth values of 8, 24, and 32. If you generate an asset from a continuous-tone layer and assign it an 8-bit depth, no more than 256 colors will be preserved, whereas if you assign the asset a bit depth of 24 or 32, the original color fidelity will be preserved (this is similar to the JPEG format).
![]() The PNG format preserves existing transparency in an image by using an alpha channel. A PNG asset that you assign an 8-bit depth will have non-smooth transitions between opaque and transparent areas. A PNG asset that you assign a 24- or 32-bit depth will have smooth transitions between those areas, making this file format a good choice for a layer that contains a transparent background.
The PNG format preserves existing transparency in an image by using an alpha channel. A PNG asset that you assign an 8-bit depth will have non-smooth transitions between opaque and transparent areas. A PNG asset that you assign a 24- or 32-bit depth will have smooth transitions between those areas, making this file format a good choice for a layer that contains a transparent background.
SVG
![]() Unlike the three bitmap formats described above, SVG is vector based, making it the best choice for generating assets from shape and type layers (vector-based layers).
Unlike the three bitmap formats described above, SVG is vector based, making it the best choice for generating assets from shape and type layers (vector-based layers).
![]() SVG files are not only compact, but also resolution independent, meaning that they output at the resolution of the current output medium — whether that medium is the Web, a mobile device, or a printing device.
SVG files are not only compact, but also resolution independent, meaning that they output at the resolution of the current output medium — whether that medium is the Web, a mobile device, or a printing device.
The Generator plug-in for Photoshop enables you to quickly produce a JPEG, PNG, GIF, or SVG asset file from the content of a specific layer or layer group in a Photoshop PSD document.
This method for creating asset files from individual layers is faster than copying layer content to separate files. You can import the asset files into another program manually, for output to the Web or mobile devices.
Another benefit of using Generator is a more efficient editing workflow between Photoshop and Adobe Edge Reflow, a Creative Cloud application that produces scalable, HTML-based layouts for the Web and mobile devices. After using Generator to connect a Photoshop file to an Edge Reflow file, you can then import a whole folder of generated asset files into Edge Reflow in one step. And because the imported asset files remain linked to their Photoshop layers, any subsequent edits to those layers will appear automatically and immediately in the Edge Reflow document. In the future, you can expect other Web layout applications to be upgraded to allow for a similar linkage.
Note: In this section, you will learn how to generate assets. To learn how to manage assets between Edge Reflow and Photoshop, search for “Edge Reflow Photoshop plugin tutorial” in Photoshop Help.
To use the Generator plug-in, it must be enabled. Once enabled, the plug-in will load automatically whenever you launch Photoshop.
To enable the Generator plug-in: ![]()
1. Choose Edit/Photoshop > Preferences > Plug-ins.
2. Check Enable Generator, then click OK.
To generate image assets from Photoshop layers: ![]()
1. Open or create a copy of a Photoshop PSD file that contains multiple layers, and that has a resolution of 72 ppi (see the second task on page 139). Make sure the name of each layer and layer group is descriptive (not the default names Layer 1, Layer 2, etc.),A and that it doesn’t include spaces, a : (colon), or an * (asterisk).

A While creating a Web page design (shown at left), we put related elements into layer groups, and assigned a descriptive name to each group.
2. Save the file.
3. Choose File > Generate > Image Assets to activate the command (it should now have a check mark).
4. On the Layers panel, double-click the name of a layer or layer group to activate the field. At the end of the name, type the .jpg, .png, or .gif file format extension (or for a vector or a type layer that doesn’t contain any applied layer effects, use the .svg extension), then press Enter/Return or click outside the field. Repeat for each layer or layer group that you want to export as an asset (A).

A We added the .png file extension to each layer group name. Generator produced a single, flattened file from each group. (We also added .png to the solo, non-grouped layer.)
![]() If you add a format extension to a layer group, a single, flattened file will be generated from the content of all the nested layers in the group.B Similarly, if you add a format extension to the base layer name of a clipping mask, a flattened file will be generated from the content of the base layer and all the nested (masked) layers.
If you add a format extension to a layer group, a single, flattened file will be generated from the content of all the nested layers in the group.B Similarly, if you add a format extension to the base layer name of a clipping mask, a flattened file will be generated from the content of the base layer and all the nested (masked) layers.
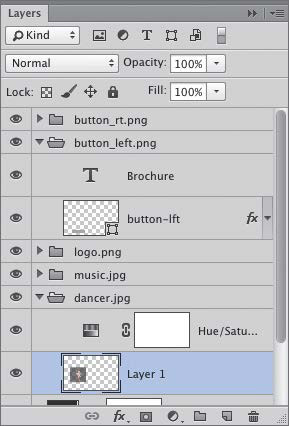
B Here one of the layer groups is expanded to demonstrate that although assets were generated from the Photoshop layer groups, the layers remain accessible for potential future editing.
5. Optional: By default, Generator will put all the asset files in a new folder. If you want an asset to appear in a subfolder within that new folder, in front of the file name and format extension within the layer listing, type a subfolder name, followed by a slash (e.g., special-assets/shape1.png).
6. Optional: By default, Generator produces JPEG assets with a quality setting of 90%, and PNG assets with a bit depth of 32. If you want to change either of these parameters, on the Layers panel, double-click the name of a layer that has a .jpg or .png extension, click at the end of the name, then do either the following: C

C To each layer and layer group to which we added a .jpg or .png extension, we also added a quality setting value.
For a .jpg layer, type a number (1–10) or a percentage (1–100%), then press Enter/Return. For instance, you could change .jpg to .jpg6 or .jpg70%.
For a .png layer, type a bit-depth value of 8, 24, or 32, then press Enter/Return. For instance, you could change .png to .png24.
![]() You can change the quality or bit depth of an existing JPEG or PNG asset file at any time via the method described above.
You can change the quality or bit depth of an existing JPEG or PNG asset file at any time via the method described above.
Note: You can’t add a quality parameter to a .gif layer.
7. The asset files will appear in a new folder, named “[Photoshop file name] – assets,” within the same folder as the Photoshop PSD document from which they were generated. If you typed a subfolder name in any layer names, those asset files will appear in a subfolder, bearing that name, within the above-mentioned “–assets” folder.
8. At any time, if you edit the contents of a layer or layer group from which an asset was produced, the linked asset file will update instantly with your edits (that is, provided the Image Assets command is enabled; see the sidebar on this page) (A–D). Be sure to edit the layer or layer group in your Photoshop document, though — don’t change the name or location of the asset files or edit them directly.

A This Web page design contains two plain, solid-color buttons, each of which is a separate shape layer. To create an asset file from each shape, we added the .png file extension to their layer listings.

B The asset files display as thumbnails in the Content panel in Bridge.

C To give the buttons a 3D appearance, we applied styles (from the Glass Buttons library) to each button shape layer.

D Our layer edits appeared automatically in the linked asset files. We were able to quickly monitor those edits by looking at the asset thumbnails in Bridge.
![]() If you generate a GIF, JPEG, or PNG asset from a layer or layer group that contains editable type or a shape, those features will be rasterized and flattened automatically in the generated asset (but not in your Photoshop file), whereas in an SVG asset, type and shapes are preserved as vector objects. If a layer contains any transparency or layer styles, those elements will be flattened and applied to the asset.
If you generate a GIF, JPEG, or PNG asset from a layer or layer group that contains editable type or a shape, those features will be rasterized and flattened automatically in the generated asset (but not in your Photoshop file), whereas in an SVG asset, type and shapes are preserved as vector objects. If a layer contains any transparency or layer styles, those elements will be flattened and applied to the asset.
![]() The entire contents of a layer will be included in an asset file, including any pixels that extend beyond the canvas area. If you want to exclude pixel areas from an asset file, add a layer mask to the Photoshop layer before or after adding the file extension.
The entire contents of a layer will be included in an asset file, including any pixels that extend beyond the canvas area. If you want to exclude pixel areas from an asset file, add a layer mask to the Photoshop layer before or after adding the file extension.
![]() To generate assets from the content of an individual layer or layer group in multiple file formats, type the layer name in the name field multiple times, each time adding a different extension and a comma. For example, if we were to enter the layer name “buttons.png, buttons.jpg”, the plug-in would generate two separate asset files (one .png, one .jpg).
To generate assets from the content of an individual layer or layer group in multiple file formats, type the layer name in the name field multiple times, each time adding a different extension and a comma. For example, if we were to enter the layer name “buttons.png, buttons.jpg”, the plug-in would generate two separate asset files (one .png, one .jpg).
You can scale a generated image asset by adding a size parameter to the Photoshop layer name.
To scale a generated image asset: ![]()
1. On the Layers panel, double-click a layer name that contains the .jpg, .gif, or .png extension, then click to the left of the first character.
2. Do either of the following:
Enter width and height values for the asset, followed by a space (e.g., “300 × 200 toy.png”). If you don’t specify a measurement unit, the value will be calculated in pixels; or if you want to specify a unit, enter the abbreviation of in, px, cm, or mm after the value.
Enter a percentage value for scaling, followed by a space.
![]() You must type a space between the size parameter and the layer name, but when specifying dimensions, you don’t have to type a space before or after the “x”.
You must type a space between the size parameter and the layer name, but when specifying dimensions, you don’t have to type a space before or after the “x”.
(Continuing with our example, by adding “300 × 200” to our “toy.png” layer name, we sized the PNG asset file to 300 pixels wide by 200 pixels high. If we were to rename the layer “55% toy.jpg,” the JPEG asset file would be scaled to 55% of the original layer content.)
![]() To generate two assets of different sizes from one layer or layer group, enter two names for the layer, each with a different scale value, separated by a comma and a space. For instance, to generate one asset at 100% scale (for a nonretina computer display) and a second asset at 200% scale (for a retina display), we typed “100% toy.png, 200% toy2.png”. Note that because both assets have the same file extension (.png), in order to generate two separate files, we had to enter two different file names (“toy” and “toy2”).
To generate two assets of different sizes from one layer or layer group, enter two names for the layer, each with a different scale value, separated by a comma and a space. For instance, to generate one asset at 100% scale (for a nonretina computer display) and a second asset at 200% scale (for a retina display), we typed “100% toy.png, 200% toy2.png”. Note that because both assets have the same file extension (.png), in order to generate two separate files, we had to enter two different file names (“toy” and “toy2”).
Using the Package command
The Package command gathers a copy of every linked Smart Object file that is being used in your document, and puts the copies in a destination folder of your choice.
To gather copies of linked Smart Objects: ![]()
1. Choose File > Package. The Choose Package Destination dialog opens.
2. Choose a location for the package folder or create a new folder, then click Choose. A copy of the Photoshop file will appear in a new folder (labeled with the Photoshop file name) inside the folder you designated. Within this new folder you will also find a subfolder labeled “Links,” containing a copy of all the files that you linked to the Photoshop document, as well as copies of any files that were linked into those linked files.