8. Layer Essentials

Practice on an Image
You can download the file shown at left (see page viii). When you open it, click next to a layer name, then hide that layer by clicking the visibility icon. ![]() Click again to redisplay the icon and layer.
Click again to redisplay the icon and layer.
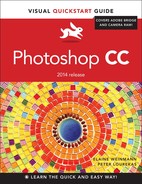
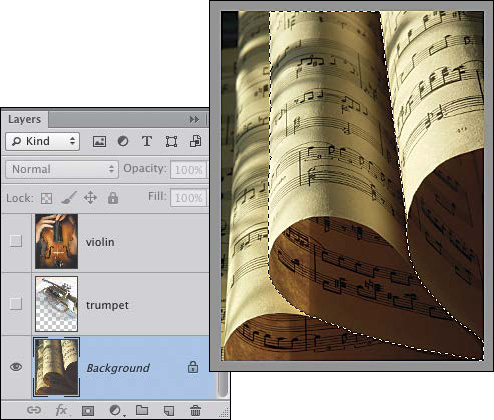
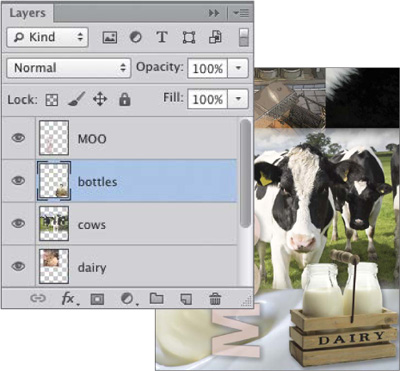
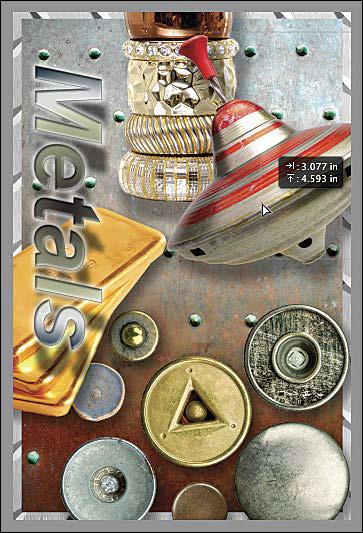
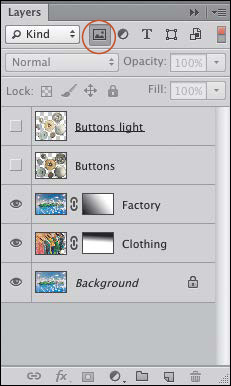
In a standard Photoshop document, the image is listed as the Background on the Layers panel. By adding layers of various kinds on top of the Background, you can build complexity and flexibility into your documents. A
A This document contains a type layer and five image layers, all of which are stacked above the Background.
For example, above the Background, you could add some editable text on one layer and perhaps a shape or some imagery surrounded by transparency on another layer. Layers can be added, deleted, or hidden when needed, and they can be edited individually.
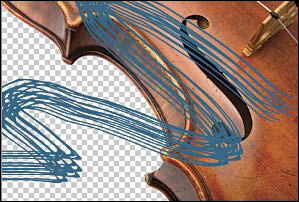
Unlike the Background, which stays fully opaque and is stacked at the bottom of the Layers panel, ![]() a layer can contain partially or fully transparent areas and can be moved upward or downward in the stack. Within the transparent areas in a layer, you can see through to underlying layers. Photoshop uses a checkerboard pattern to represent transparent areas.
a layer can contain partially or fully transparent areas and can be moved upward or downward in the stack. Within the transparent areas in a layer, you can see through to underlying layers. Photoshop uses a checkerboard pattern to represent transparent areas.
Because the Layers panel is so essential to image editing in Photoshop, we have devoted this whole chapter to helping you master its features. By the end of this chapter, you will know how to create, duplicate, select, restack, group, delete, hide, show, move, lock, filter, merge, and flatten layers, as well as change their opacity. Those techniques, along with the selection and masking techniques in the next chapter, will give you the necessary foundation for future tasks in this book.
Creating layers
If you open a digital photo from Camera Raw into Photoshop using the Open Image button, the image will appear on the Background. If you create a document via the File > New dialog and choose the option of Background Contents: White or Background Color, your new document will have a Background; or if you choose Background Contents: Transparent instead, the document will contain a layer and no Background. Note: In this book, we identify the Background in a Photoshop document with an initial cap “B,” to distinguish it from the general background (versus foreground) area of an image.
In these steps, you will learn how to create a new, blank image layer. To that layer, you can add pixels by applying brush strokes, cloning imagery, pasting into a selection, or performing other edits. You may add as many layers to a file as you like, but remember that a large image containing many image layers will utilize a fair amount of storage space and system memory.
Note: In other chapters, you will create adjustment, type, Smart Object, and shape layers.
To add a new, blank layer to a document:
1. Display the Layers panel. ![]()
2. Click a layer or the Background. The new layer is going to appear above this selected one.
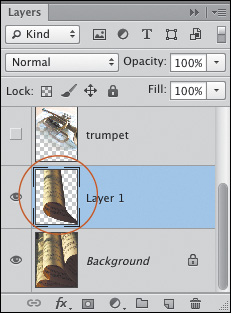
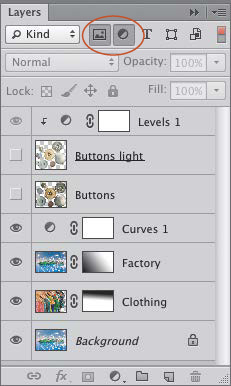
3. Click the New Layer button ![]() at the bottom of the panel.A The new layer will have the default blending mode of Normal and the default setting for both Opacity and Fill of 100%.B
at the bottom of the panel.A The new layer will have the default blending mode of Normal and the default setting for both Opacity and Fill of 100%.B
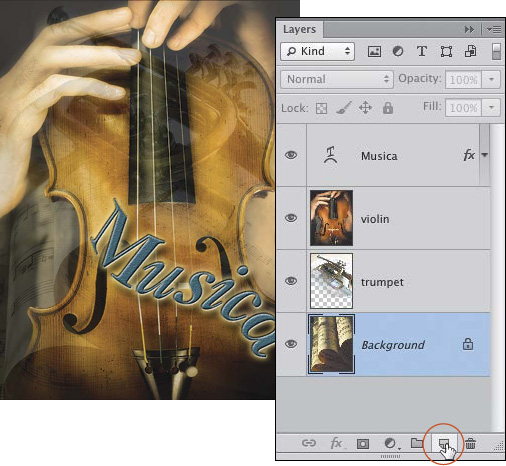
A We clicked the Background, then clicked the New Layer button.
B A new blank layer (Layer 1) appeared above the Background.
![]() To choose options for a layer as you create it, Alt-click/Option-click the New Layer button
To choose options for a layer as you create it, Alt-click/Option-click the New Layer button ![]() or press Ctrl-Shift-N/Cmd-Shift-N. In the New Layer dialog, you can enter a layer Name and choose a nonprinting Color for the area on the Layers panel behind the visibility icon
or press Ctrl-Shift-N/Cmd-Shift-N. In the New Layer dialog, you can enter a layer Name and choose a nonprinting Color for the area on the Layers panel behind the visibility icon ![]() (see “To color-code a layer” on page 159).
(see “To color-code a layer” on page 159).
![]() To rename a layer right on the panel, see the sidebar on page 152.
To rename a layer right on the panel, see the sidebar on page 152.
Another way to create a layer is by copying or cutting imagery from an existing layer or the Background and transferring it to a new layer. This can be done easily via a simple command.
To turn a selection of pixels into a layer:
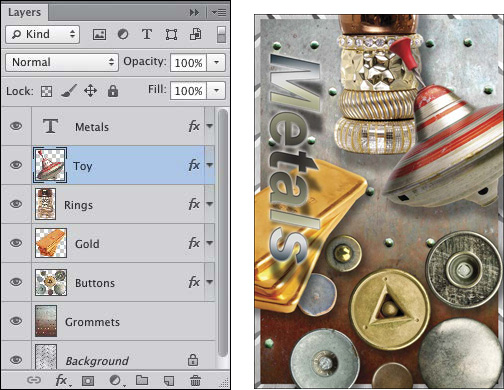
1. On the Layers panel, ![]() click an image layer or the Background, then create a selection in the document (if you’re new to Photoshop, see the steps on page 168).A
click an image layer or the Background, then create a selection in the document (if you’re new to Photoshop, see the steps on page 168).A
A We selected an area of the Background in this document.
2. Do either of the following:
To put a copy of the selected pixels onto a new layer while leaving the original layer unchanged, right-click in the document and choose Layer via Copy, or press Ctrl-J/Cmd-J.B
B When we pressed Ctrl-J/Cmd-J, a copy of the selected pixels appeared on a new layer (Layer 1).
To put the selected pixels on a new layer and remove them from the original layer, right-click in the document and choose Layer via Cut, or press Ctrl-Shift-J/Cmd-Shift-J. If you cut pixels from a layer, Photoshop will fill the exposed area on the original layer with transparency; if you cut pixels from the Background, the exposed area will be filled with the current Background color (see pages 203 and 255).
Follow these steps to duplicate a layer or layer group, or to turn a copy of the Background into a layer. (To learn about layer groups, see pages 154–155.)
To duplicate a layer or layer group:
On the Layers panel, do one of the following:
Click a layer or a layer group, or Ctrl-click/Cmd-click multiple layers, then press Ctrl-J/Cmd-J.
Drag a layer, a layer group, or the Background over the New Layer button. ![]() The duplicate will appear above the one you dragged.
The duplicate will appear above the one you dragged.
To name the new layer as you create it, right-click a layer, a layer group, or the Background and choose Duplicate Layer or Duplicate Group. In the dialog, change the name in the “As” field (ignore the Destination field), then click OK.
![]() To control whether Photoshop adds the word “copy” to duplicate layer names automatically, choose Panel Options from the Layers panel menu, then check or uncheck Add “Copy” to Copied Layers and Groups.
To control whether Photoshop adds the word “copy” to duplicate layer names automatically, choose Panel Options from the Layers panel menu, then check or uncheck Add “Copy” to Copied Layers and Groups.
![]() When you duplicate a layer, any masks and/or effects on that layer are also duplicated.
When you duplicate a layer, any masks and/or effects on that layer are also duplicated.
There are many things that can be done to a layer that can’t be done to the Background. For example, you can’t move the Background upward in the layer stack; change its blending mode, Opacity, or Fill setting; attach a mask to it; or embellish it with layer effects. You can, however, convert the Background to a layer, at which time it will adopt all the functions of a normal layer.
To convert the Background to a layer:
On the Layers panel, do either of the following:
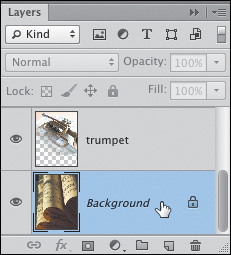
To convert the Background to a layer without choosing options, click the Lock icon ![]() in the Background listing.
in the Background listing.![]()
Double-click the Background A to open the New Layer dialog,B then do any of the following: Change the Name, choose a Color for the area behind the visibility icon, or change the blending Mode or Opacity setting. Click OK.C
A We double-clicked the Background in this image.
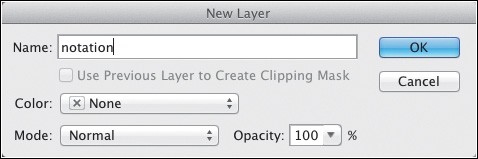
B We typed a name for the layer in the New Layer dialog.
C The former Background is now a full-fledged layer.
You can also do the reverse of the preceding instructions, which is to convert any layer to the Background. This will come in handy, say, if you use the Crop tool with the Delete Cropped Pixels option off (which converts the Background to a layer), then decide you want to make the bottommost layer into the Background again.
To convert a layer to the Background:
1. Click the layer to be converted.
2. Choose Layer > New > Background from Layer. The new Background will appear as the bottom listing (its standard stacking position) on the panel.
Renaming Layers and Layer Groups
![]() To rename a layer or layer group, double-click the layer or layer group name, type a new name, then press Enter/Return or click outside the field.
To rename a layer or layer group, double-click the layer or layer group name, type a new name, then press Enter/Return or click outside the field.
![]() After double-clicking a layer name, you can press Tab to highlight the name of the next listing below it, or press Shift-Tab to highlight the listing above it (don’t include the Background in the cycle).
After double-clicking a layer name, you can press Tab to highlight the name of the next listing below it, or press Shift-Tab to highlight the listing above it (don’t include the Background in the cycle).
Selecting layers
There are good habits and bad habits. Here’s a good one: Before applying a filter, brush stroke, or other image edit to your document, select the listing for the layer that you want Photoshop to alter. Easy to do, easy to forget! When a layer or layer group listing is selected, it has a blue highlight and the layer or group name appears in the document tab.
To select layers via the Layers panel:
Do one of the following:
To select a layer or layer group, click either the layer thumbnail or the blank area to the right of the layer or group name.A
A To select a layer, just click it.
To select multiple layers, click a layer, then Shift-click the last in a series of consecutively listed layers, or Ctrl-click/Cmd-click individual layers (not their thumbnails). If you need to deselect an individual layer, Ctrl-click/Cmd-click it.
To select all the layers in your document (but not the Background), choose Select > All Layers or press Ctrl-Alt-A/Cmd-Option-A.
To select a layer or layer group with the Move tool:
1. Choose the Move tool ![]() or hold down V.
or hold down V.
2. Do either of the following:
To select a layer that contains nontransparent pixels below the pointer, right-click in the document window and choose a layer or layer group name from the context menu.B (Adjustment layers may also be listed on the menu; see Chapter 12.)
B From the context menu, choose the name of the layer you want to select.
On the Options bar, check Auto-Select and choose Group or Layer from the adjacent menu. Next, click a visible pixel area in the document. The Background can’t be selected via this method.
![]() When the Move tool is selected and Show Transform Controls is checked on the Options bar, a bounding box surrounds the nontransparent content of the currently selected layer. If you find the box to be distracting, uncheck the option. To transform a layer via its bounding box (e.g., scale or skew it), see pages 348–349.
When the Move tool is selected and Show Transform Controls is checked on the Options bar, a bounding box surrounds the nontransparent content of the currently selected layer. If you find the box to be distracting, uncheck the option. To transform a layer via its bounding box (e.g., scale or skew it), see pages 348–349.
Restacking layers
When you restack a layer listing, the layer contents shift forward or backward in the document.
To restack layers:
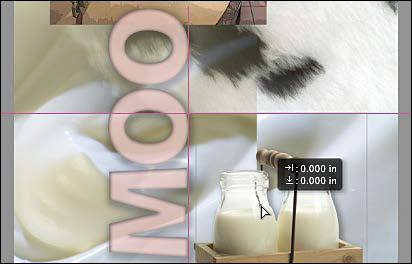
Drag a layer or group name upward or downward on the Layers panel, and release the mouse when a double horizontal line appears in the desired stacking position.A–B
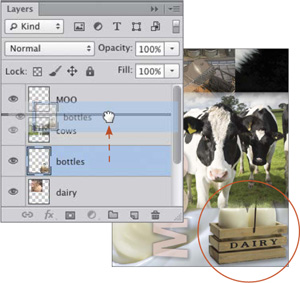
A We’re moving the “bottles” layer upward in the stack.
B Now the “bottles” layer is above the “cows” layer.
![]() To move the Background upward on the list, you must convert it to a layer first (see page 152). Layers can’t be stacked below the Background.
To move the Background upward on the list, you must convert it to a layer first (see page 152). Layers can’t be stacked below the Background.
![]() You can also restack a selected layer via commands on the Layer > Arrange submenu (or via the shortcuts that are listed on that submenu).
You can also restack a selected layer via commands on the Layer > Arrange submenu (or via the shortcuts that are listed on that submenu).
Creating layer groups
Putting layers in groups is more than just a convenient way to streamline and organize the listings on your Layers panel. You can also move, transform, duplicate, restack, hide, show, lock, or change the blending mode, Opacity, or Fill setting of all the layers in a group simultaneously. When you add a layer mask to a layer group, the mask applies to all the layers in the group (see page 190). You can also nest groups inside other groups.
To create a layer group:
Method 1 (from existing layers)
1. Click a layer, then Shift-click or Ctrl-click/Cmd-click one or more additional layers.C The layers can be nonconsecutive or hidden, and they can be different kinds.
C We selected three layers.
2. Do either of the following:
Press Ctrl-G/Cmd-G.
Right-click one of the selected layers in the panel and choose Group from Layers from the context menu (or choose New Group from Layers from the panel menu). In the dialog, type a Name for the group, then click OK.D
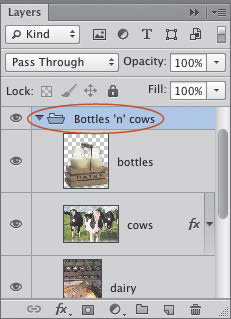
D We used the New Group from Layers command to put those layers in a group.
3. Optional: To add more layers to the group, follow step 2 on the next page.
![]() The default blending mode for a group is Pass Through; we recommend keeping that setting.
The default blending mode for a group is Pass Through; we recommend keeping that setting.
Method 2 (create a group, then add layers)
1. On the Layers panel, do either of the following:
To create a group without choosing settings for it, click the layer above which you want the group to appear, then click the New Group button. ![]()
To name the group as you create it, Alt-click/Option-click the New Group button or choose New Group from the panel menu. In the dialog, enter a Name, then click OK.
2. Do either of the following:
Drag layers into the new group listing, releasing the mouse when the drop zone border appears around it.
Click the arrowhead to expand the group list, then drag layers into the group, releasing the mouse when the double lines appear in the desired stacking position.A
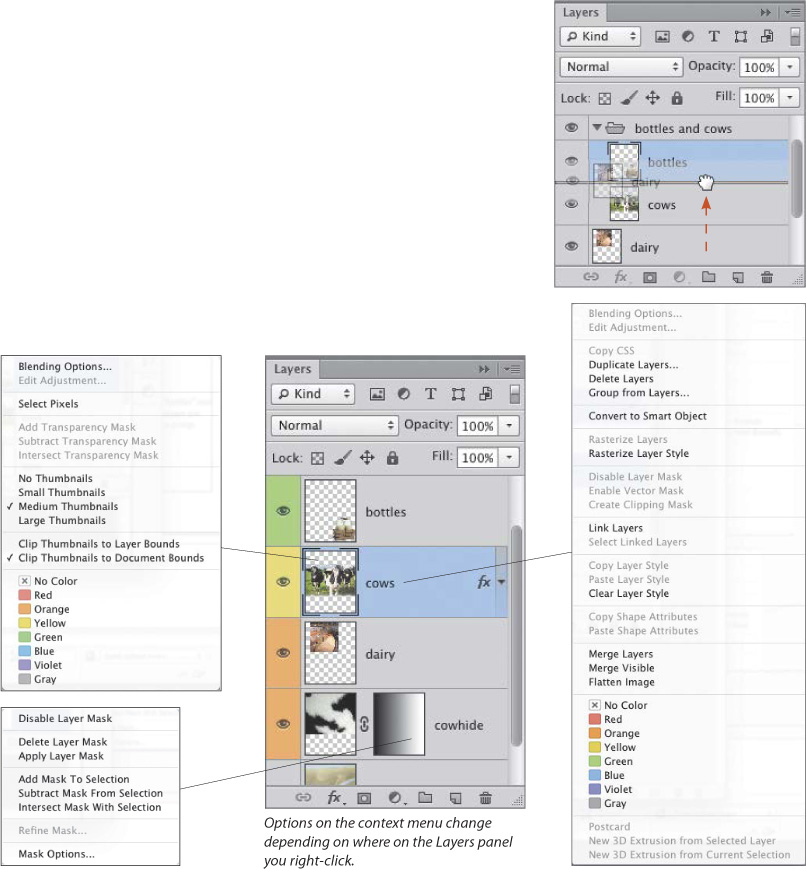
Using Context Menus on the Layers Panel
A We’re moving a layer upward into an existing group.
![]() To expand or collapse a group, including any and all subgroup, effect, and Smart Filter listings within it, Alt-click/Option-click the arrowhead.
To expand or collapse a group, including any and all subgroup, effect, and Smart Filter listings within it, Alt-click/Option-click the arrowhead.
Moving Layers Out of a Group
![]() To move a layer out of a group, expand the group listing, then drag a layer above or below the group.
To move a layer out of a group, expand the group listing, then drag a layer above or below the group.
![]() To move a layer from one group to another, expand the source group, then drag a layer over the target group (a border appears around it); or if the target listing is expanded, you can release the layer in the desired stacking position.
To move a layer from one group to another, expand the source group, then drag a layer over the target group (a border appears around it); or if the target listing is expanded, you can release the layer in the desired stacking position.
Deleting layers and groups
To delete a layer:
1. If there is an active selection in your document, deselect (press Ctrl-D/Cmd-D).
2. Click the layer to be deleted, then press Backspace/Delete.
![]() Change your mind? Choose Edit > Undo immediately, or click the prior state on the History panel.
Change your mind? Choose Edit > Undo immediately, or click the prior state on the History panel.
![]() To delete a selected layer another way, click the Delete Layer button,
To delete a selected layer another way, click the Delete Layer button, ![]() then click Yes in the alert dialog; or to bypass the alert, Alt-click/Option-click the Delete Layer button.
then click Yes in the alert dialog; or to bypass the alert, Alt-click/Option-click the Delete Layer button.
You can delete a layer group and its layers or merely disband the group while preserving the layers.
To delete or ungroup a layer group:
On the Layers panel, do one of the following:
To delete a group and its contents, click the group, then press Backspace/Delete.
Right-click a group and choose Delete Group from the context menu (or click a group, then click the Delete Layer button ![]() ). In the alert dialog, click Group Only or Group and Contents.
). In the alert dialog, click Group Only or Group and Contents.
To ungroup a layer group without deleting its layers, click the group, then press Ctrl-Shift-G/Cmd-Shift-G. The group icon disappears from the panel and the layer listings are no longer indented.
Hiding and showing layers
You can hide any layer you’re not currently working on, either because it’s getting in the way of your editing or to eliminate it as a visual distraction. Hidden layers don’t print. The instructions below apply both to layers and the Background.
To hide or show layers:
On the Layers panel, do one of the following:
To hide or show one layer or layer group, click in the visibility column. ![]() A–B
A–B
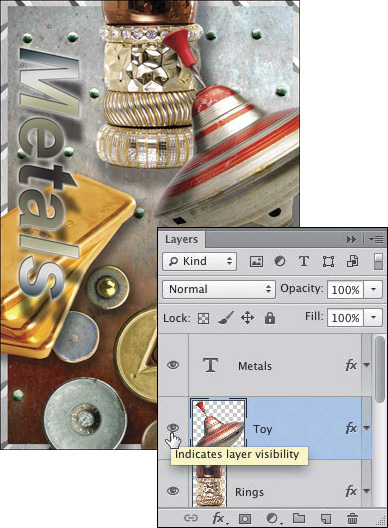
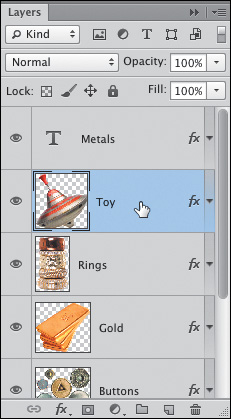
A We’re clicking in the visibility column to hide the “Toy” layer.
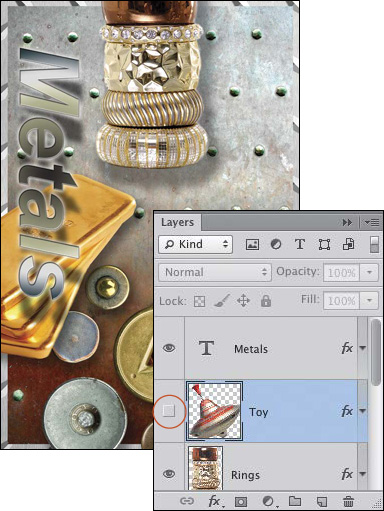
B The visibility icon disappears and the “Toy” layer is hidden.
To hide or show multiple layers, drag upward or downward in the visibility column.
To hide all layers and layer groups except one, Alt-click/Option-click the visibility column for the layer or layer group that you want to keep visible. Repeat to redisplay all the layers (except for layers that were hidden before you used the command).
Repositioning layer content
You can reposition a selected layer or group of layers in your document.
To reposition layers manually:
Do either of the following:
On the Layers panel, click a layer or layer group, or Shift-click or Ctrl-click/Cmd-click multiple layers, hold down V to spring-load the Move tool, then drag in the document.A–B
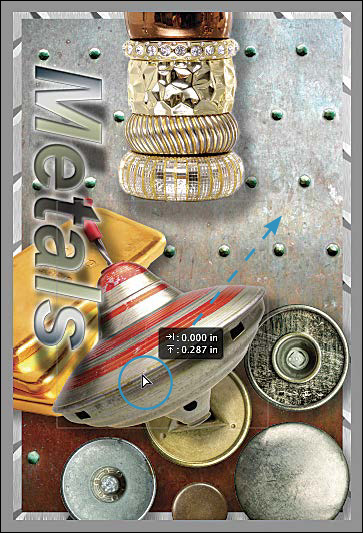
A We’re dragging the “Toy” layer with the Move tool.
B Now the “Toy” layer is on the right side of the image.
Hold down V to spring-load the Move tool. On the Options bar, check Auto-Select, choose Group or Layer from the adjacent menu, then drag a nontransparent area in the document.
![]() If you move part of the layer or layers outside the canvas area, not to worry — those pixels will save with the document and can be moved back into view at any time. See “Working with pixels outside the canvas area” on page 257.
If you move part of the layer or layers outside the canvas area, not to worry — those pixels will save with the document and can be moved back into view at any time. See “Working with pixels outside the canvas area” on page 257.
![]() To nudge a selected layer by one pixel at a time, choose the Move tool, then press an arrow key. Or press Shift-arrow to move a layer by 10 screen pixels at a time. (Don’t press Alt-arrow/Option-arrow — unless you want to duplicate the layer.)
To nudge a selected layer by one pixel at a time, choose the Move tool, then press an arrow key. Or press Shift-arrow to move a layer by 10 screen pixels at a time. (Don’t press Alt-arrow/Option-arrow — unless you want to duplicate the layer.)
![]() For a more precise way to reposition layers, use the align buttons on the Options bar. See page 281.
For a more precise way to reposition layers, use the align buttons on the Options bar. See page 281.
Aligning Layer Content Using Smart Guides
Changing the layer opacity
The Opacity setting on the Layers panel controls whether a layer is semitransparent or opaque.
To change the opacity of a layer or layer group:
1. Select one or more layers or a layer group.
2. Change the Opacity percentage on the Layers panel (we like to use the scrubby slider).A–B
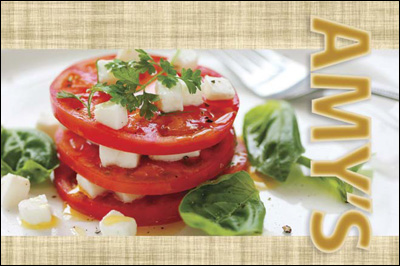
A In this image, all the layers have an opacity of 100%.

B We reduced the opacity of the tomatoes layer to 49%.
![]() To learn about the Fill slider, see page 399.
To learn about the Fill slider, see page 399.
![]() In the Transparency Settings area of Edit/Photoshop > Preferences > Transparency & Gamut, you can change the size or color of the gray and white checkerboard pattern that Photoshop uses to represent transparent pixels (or to hide the pattern, choose None from the Grid Size menu).
In the Transparency Settings area of Edit/Photoshop > Preferences > Transparency & Gamut, you can change the size or color of the gray and white checkerboard pattern that Photoshop uses to represent transparent pixels (or to hide the pattern, choose None from the Grid Size menu).
![]() To change the Opacity setting of the currently selected layer or layer group via the keyboard (standard or extended), choose a nonediting tool (such as the Move or Eyedropper tool or a selection tool), then press a digit between 0 and 9 (e.g., 2 = 20%) or quickly type a percentage (such as “38” for 38%). Press 0 to set the opacity to 100% or 00 to set it to 0%.
To change the Opacity setting of the currently selected layer or layer group via the keyboard (standard or extended), choose a nonediting tool (such as the Move or Eyedropper tool or a selection tool), then press a digit between 0 and 9 (e.g., 2 = 20%) or quickly type a percentage (such as “38” for 38%). Press 0 to set the opacity to 100% or 00 to set it to 0%.
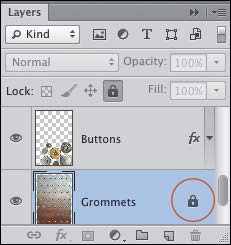
Using the lock options
The Lock Transparent Pixels button on the Layers panel prevents or allows the editing of transparent pixels by any command or tool. In these steps, you will use this feature with the Brush tool, just to learn how it works in practice.
To limit edits by locking transparent pixels:
1. Click an image layer (not an editable type layer) that contains some transparent pixels.
2. Choose the Brush tool ![]() (B or Shift-B). To change the brush diameter, press [ or ].
(B or Shift-B). To change the brush diameter, press [ or ].
3. Show the Swatches panel, ![]() then click a color.
then click a color.
4. On the Layers panel, click the Lock Transparent Pixels button, ![]() then draw a few brush strokes in the document.C Only nontransparent pixels will be recolored.
then draw a few brush strokes in the document.C Only nontransparent pixels will be recolored.
C With the Lock Transparent Pixels option on, our brush strokes can recolor only nontransparent pixels.
5. Deactivate the Lock Transparent Pixels button by clicking it again or by pressing /.
6. Apply a few more brush strokes to the layer. Note that both transparent and opaque parts of the layer can be recolored.D
D With Lock Transparent Pixels off, our brush strokes can recolor transparent and opaque pixels.
To prevent layer characteristics from being edited, there are three other lock options on the Layers panel, in addition to the Lock Transparent Pixels button.
To lock one or more layers or a layer group:
1. Select one or more layers or a layer group.
2. Click any of the following:
The Lock Image Pixels button ![]() prevents image layer pixels from being edited, such as by filters or brush strokes. Note: You can still move or restack the layer or change its layer style settings (blending mode, opacity, and effects).
prevents image layer pixels from being edited, such as by filters or brush strokes. Note: You can still move or restack the layer or change its layer style settings (blending mode, opacity, and effects).
The Lock Position button ![]() locks only the location of the layer. The layer content (e.g., pixels, type characters) can be edited as usual.
locks only the location of the layer. The layer content (e.g., pixels, type characters) can be edited as usual.
The Lock All button ![]() prevents the layer from being moved and edited.A Unlike the other lock options, this button is also available for layer groups.
prevents the layer from being moved and edited.A Unlike the other lock options, this button is also available for layer groups.
A When the Lock All button option is activated for a layer, the padlock icon is black.
When any lock button is activated for a layer, a padlock icon displays next to the layer name.
Choosing Layers panel options
To choose thumbnail options for the Layers panel:
Right-click any layer thumbnail and choose any of the following:
Small Thumbnails, Medium Thumbnails, or Large Thumbnails. Note: Turning off thumbnails by choosing No Thumbnails can help boost Photoshop’s performance, but frankly, it’s pretty darn hard to work productively without them.
Clip Thumbnails to Layer Bounds to preview, in the panel thumbnails, only the layer content,B or Clip Thumbnails to Document Bounds to preview the layer content relative to the full canvas size.
B For our Layers panel display options, we chose Large Thumbnails and Clip Thumbnails to Layer Bounds.
You can assign a color to the area behind the visibility icons to categorize your layers or make them easier to identify (or just to make the panel look pretty).
Click a layer (or Ctrl-click/Cmd-click multiple layers), then right-click the visibility column (or the layer thumbnail or listing) and choose a color label from the context menu.C
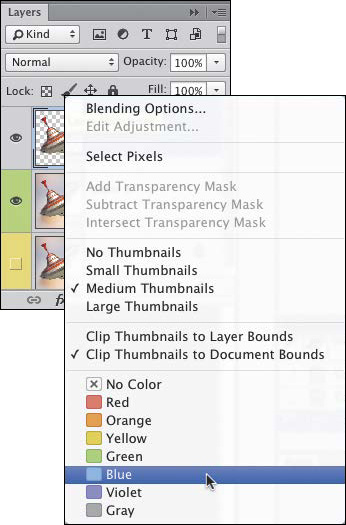
C Click a layer, then from the context menu, choose a color.
Filtering listings on the Layers panel
When you first start working in Photoshop, your Layers panel may look relatively spare, but before you know it, you will be adding image, adjustment, and type layers, Smart Objects, Smart Filters, and layer styles, and the number of listings will grow considerably. Finding the layers you need will require you to either scroll in the panel (a pain in the butt) or enlarge the panel to display all the listings (uses too much screen space).A Via the filtering features, you can reduce the listings that display on the panel at a given time to just the categories of layers you need to work on.

A This is the Layers panel for the image shown above, with all the listings showing (unfiltered).

To filter the listings on the Layers panel:
At the top of the Layers panel, do one of the following:
Set the Filter Type menu to the default option of Kind, then click the Filter for Pixel Layers, ![]() Filter for Adjustment Layers
Filter for Adjustment Layers ![]() (A–B), Filter for Type Layers,
(A–B), Filter for Type Layers, ![]() Filter for Shape Layers,
Filter for Shape Layers, ![]() or Filter for Smart Objects
or Filter for Smart Objects ![]() button. Only listings in that chosen category will display. Optional: Click another of those buttons to display more listings.
button. Only listings in that chosen category will display. Optional: Click another of those buttons to display more listings.
A We clicked the Filter for Pixel Layers button: Only image layers are displaying.
B We also clicked the Filter for Adjustment Layers button: Now both image and adjustment layers are displaying.
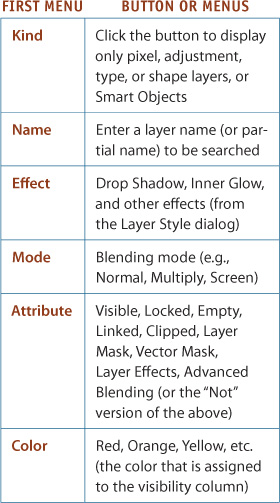
From the Filter Type menu, choose Name, Effect, Mode, Attribute, Color, or Smart Object. Next, choose a criterion from the adjacent menu (C–F); or for the Name option, start typing a word that appears in one or more layer names; or for the Smart Object option, click the Up-to-Date Linked Smart Objects, ![]() Out-of-Date Linked Smart Objects,
Out-of-Date Linked Smart Objects, ![]() Missing Linked Smart Objects,
Missing Linked Smart Objects, ![]() or Embedded Smart Objects button.
or Embedded Smart Objects button. ![]()
![]() For example, to display only layers that contain a layer mask, choose Attribute from the Filter Type menu and Layer Mask from the second menu. See also the sidebar on the next page.
For example, to display only layers that contain a layer mask, choose Attribute from the Filter Type menu and Layer Mask from the second menu. See also the sidebar on the next page.
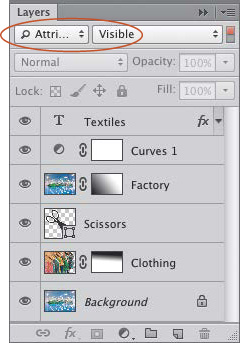
C We chose Attribute from the Filter Type menu and Visible from the second menu: Only layers that have a visibility icon are displaying.
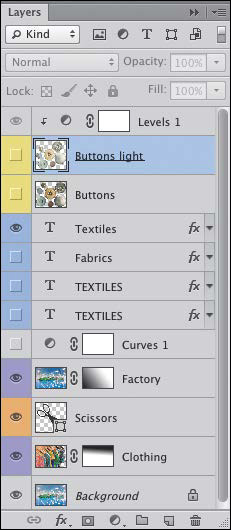
D We assigned colors to the visibility column of most of the layers.

E We chose Color from the Filter Type menu and Yellow from the second menu.
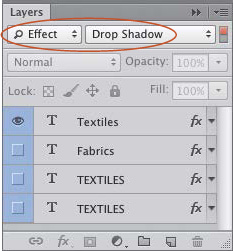
F We chose Effect from the Filter Type menu and Drop Shadow from the adjacent menu.
For the Selected option on the Filter Type menu, see pages 162–163.
To deactivate layer filtering:
To deactivate layer filtering, in the upper-right corner of the Layers panel, click the Layer Filtering On/Off button. ![]() (If you click the button again, the last settings will be restored.)
(If you click the button again, the last settings will be restored.)
![]() Layer filtering settings remain in effect only while a file is open, and while the Layer Filtering On/Off button is activated on the Layers panel. When you close and then reopen your file, filtering is reset to none.
Layer filtering settings remain in effect only while a file is open, and while the Layer Filtering On/Off button is activated on the Layers panel. When you close and then reopen your file, filtering is reset to none.
The Layer Filtering Criteria
Unlike the filtering controls that are discussed on the prior two pages, the Isolate Layers feature lets you pick and choose which layers remain accessible (and they can be a mixture of different types). It’s easier to select, then isolate, the layers you want to edit than it is to hide the layers you want to ignore. Like the other layer filtering controls, this feature is especially useful if you’re working on a complex document that contains many layers.
Isolated layers can be edited as usual. For example, you can click any individual listing to edit just that layer; or select multiple layers of the same type and apply related edits (e.g., a fill or stroke color to multiple shape layers, or a font family to multiple type layers); or select multiple layers of the same or different types, and apply other edits, such as transformations.
While the Isolate Layers option is on, all the Layers panel features (except for a few buttons) are fully functional, such as the blending mode menu, the Opacity and Fill sliders, and the ability to restack, group, copy, and delete layers (among the ones that are isolated).
To isolate selected layers:
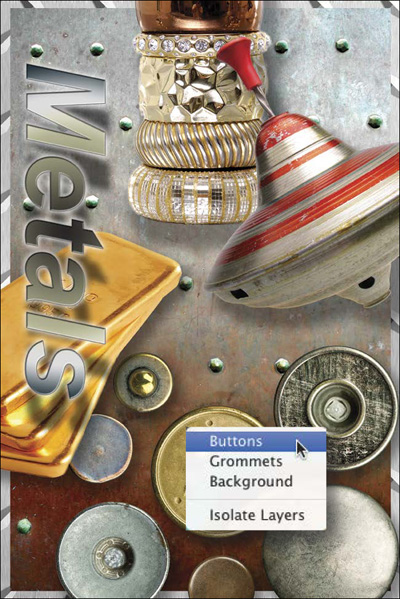
1. On the Layers panel, hold down Ctrl/Cmd and click the layers you want to keep editable.A The layers can be of any kind.

A This image contains multiple layers.
2. Do either of the following:
From the Filter Type menu at the top of the Layers panel, choose Selected.B
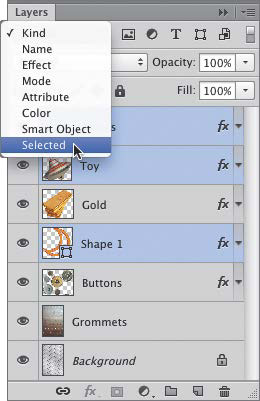
B We selected three layers, then chose Selected from the Filter Type menu.
If you’re using the Move, Path Selection, or Direct Selection tool or a pen tool, right-click in the document and choose Isolate Layers from the context menu.
3. As you edit the isolated layers, the nonisolated ones will remain visible in the document but will be uneditable (A–B).
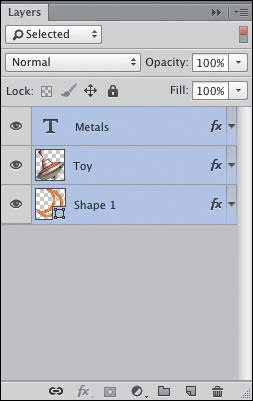
A Only the listings for the layers that we isolated displayed on the panel.

B Using the Free Transform command, we scaled down the three isolated layers simultaneously, while the nonisolated layers remained visible but uneditable.
4. Optional: To release an individual layer from isolation, click the listing for the layer to be released, then right-click it and choose Release from Isolation from the context menu.
5. Optional: To change which layers are isolated, on the Layers panel, click the Layer Filtering On/Off button ![]() (to deactivate layer filtering). All the document layers will redisplay on the Layers panel. Change the selection of layers (e.g., Ctrl/Cmd click a layer to add it to the selection, or click any selected layer to deselect it), then click the Layer Filtering On/Off button again to reactivate it.
(to deactivate layer filtering). All the document layers will redisplay on the Layers panel. Change the selection of layers (e.g., Ctrl/Cmd click a layer to add it to the selection, or click any selected layer to deselect it), then click the Layer Filtering On/Off button again to reactivate it.
If you want to add an existing layer to the ones that are isolated (without having to use the Layers panel), choose the Move tool ![]() (V). Right-click in the document, then from the context menu, choose the name of the additional layer you want to isolate.
(V). Right-click in the document, then from the context menu, choose the name of the additional layer you want to isolate.
![]() If you add a layer to your document while the Isolate Layers feature is on, the new layer will also be isolated. This includes fill and adjustment layers.
If you add a layer to your document while the Isolate Layers feature is on, the new layer will also be isolated. This includes fill and adjustment layers.
![]() Layer filtering settings, including isolation mode, remain in effect only while a document is open (and while the Layer Filtering On/Off button is activated on the Layers panel). When you close and then reopen your document, layer filtering is reset to the default setting of no filtering.
Layer filtering settings, including isolation mode, remain in effect only while a document is open (and while the Layer Filtering On/Off button is activated on the Layers panel). When you close and then reopen your document, layer filtering is reset to the default setting of no filtering.
![]() To learn about isolating shape layers, see page 412.
To learn about isolating shape layers, see page 412.
![]() In Photoshop, nonisolated layers display at their full opacity, whereas in Isolation Mode in Adobe Illustrator, nonisolated objects are dimmed.
In Photoshop, nonisolated layers display at their full opacity, whereas in Isolation Mode in Adobe Illustrator, nonisolated objects are dimmed.
When you exit isolation mode, you can either make all the layers in the document accessible again, or revert to a prior layer filtering setting.
To exit isolation mode:
Do either of the following:
To exit isolation mode and also clear any other layer filtering, choose the Move, Path Selection, Direct Selection tool, or a pen tool, then right-click in the document and uncheck Isolate Layers on the context menu.![]() This command works regardless of the current state of the Layer Filtering On/Off button.
This command works regardless of the current state of the Layer Filtering On/Off button. ![]() (You can also exit isolation mode by unchecking Isolate Layers on the Select menu.)
(You can also exit isolation mode by unchecking Isolate Layers on the Select menu.)
To exit isolation mode by switching to a different filtering mode, make sure the Layer Filtering On/Off button is activated, ![]() then from the Filter Type menu at the top of the Layers panel, choose any filtering option except Selected.
then from the Filter Type menu at the top of the Layers panel, choose any filtering option except Selected.
Merging layers
The Merge Down command merges the current layer into the layer directly below it. The other merge commands — Merge Layers and Merge Visible — merge two or more selected layers into the bottommost of the selected layers. You can apply any of these commands periodically during the editing process to reduce the file size of your document or to declutter your Layers panel — just remember that you can’t unmerge layers after you merge them except by using the History panel.
Note: Compare the merge commands with the Flatten Image command (see page 166), which is typically applied to a copy of a file as a final step before output.
To merge select layers:
1. Do one of the following:
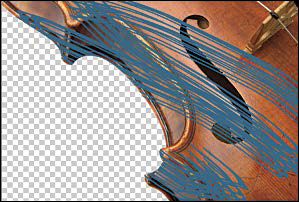
Click the upper layer of two layers to be merged.A The bottom one must be an image layer or the Background; it can’t be fully locked (the Lock All button can’t be activated) and it can’t be a group.
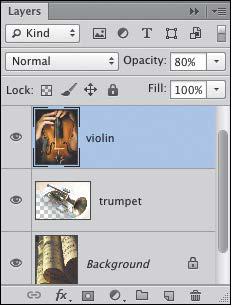
A We clicked the “violin” layer.
Ctrl-click/Cmd-click multiple layers. The layers can be solo, within a group, or a combination thereof.
Click a group. (All the layers in the group will be merged — but just with one another.)
Note: You can merge an adjustment layer into an image layer, but you can’t merge adjustment layers into one another. If you merge a shape layer, an editable type layer, or a Smart Object, it will be rasterized into the underlying image layer.
2. Do either of the following:
Right-click the selected layer or group, or one of the selected layers, and choose Merge Down, Merge Layers, or Merge Group from the context menu.
Press Ctrl-E/Cmd-E (this is the only method that works for a type layer).B

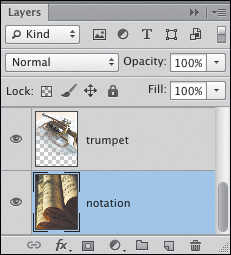
B We chose the Merge Down command, which merged the “violin” layer into the “trumpet” layer.
Note: If only one layer is selected and you merge it downward into an underlying layer that contains a layer mask, an alert dialog will appear. Click Preserve to keep the mask editable, or click Apply to apply the mask effect but discard the mask.
![]() If you merge a group, the group icon will disappear from the panel.
If you merge a group, the group icon will disappear from the panel.
![]() To merge an editable type layer into a shape layer, or vice versa, select both, then press Ctrl-E/Cmd-E.
To merge an editable type layer into a shape layer, or vice versa, select both, then press Ctrl-E/Cmd-E.
The Merge Visible command merges all the currently visible layers into the bottommost visible layer while preserving any hidden layers. By hiding the layers you don’t want to merge before choosing this command, you can control which ones will be merged.
To merge all visible layers:
1. Make sure the layers that you want to merge are visible (have eye icons), and the layers that you don’t want to merge are hidden.A
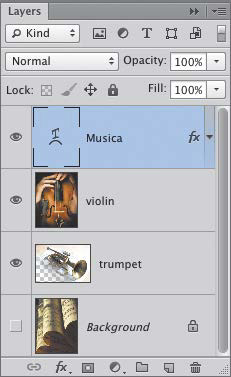
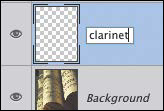
A In this document, we hid the Background because we didn’t want our layers to merge into it.
2. Right-click one of the visible layers (not a type layer) and choose Merge Visible (Ctrl-Shift-E/Cmd-Shift-E).B
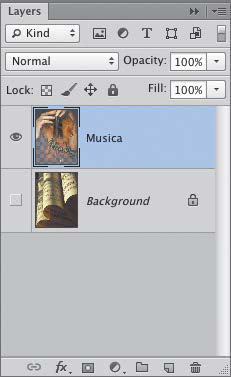
B The Merge Visible command merged all the layers except the Background, which was preserved and stayed hidden.
Note: This sort of goes without saying, but if you merge down an editable type layer, shape, or adjustment layer, the specific features of that kind of layer (such as the font and other character settings for a type layer, or the settings for an adjustment layer) will no longer be editable.
Both of the commands in this task will copy and merge (“stamp”) two or more selected layers into a new layer in one step, while preserving the original, separate layers. This might come in handy, say, if you want to test some edits (such as filters or transformations) on multiple layers simultaneously; use one of these commands first, then apply your edits to the newly merged layer. The Note above also applies to these commands.
To copy and merge layers:
Do either of the following:
Ctrl-click/Cmd-click the layers (not the Background) to be copied or merged into a new layer, then press Ctrl-Alt-E/Cmd-Option-E.
To copy and merge all the currently visible layers into a new layer, including the Background (if visible), click any visible layer, then press Ctrl-Alt-Shift-E/Cmd-Option-Shift-E.
![]() If any layers and the Background are selected when you use the first shortcut listed above, content from the selected layers will be stamped into the Background, and no new layer will be created.
If any layers and the Background are selected when you use the first shortcut listed above, content from the selected layers will be stamped into the Background, and no new layer will be created.
![]() For an alternative to the merge commands, see the sidebar on the preceding page.
For an alternative to the merge commands, see the sidebar on the preceding page.
![]() To create a document from one or more selected layers, from the Layers panel menu, choose Duplicate Layers. From the Document menu in the dialog, choose New, enter a document Name, then click OK. Save the new file.
To create a document from one or more selected layers, from the Layers panel menu, choose Duplicate Layers. From the Document menu in the dialog, choose New, enter a document Name, then click OK. Save the new file.
Flattening layers
When you flatten all the layers in a document, you reduce its file storage size and free up space on your hard disk (see the sidebar at right). Flattening layers may also be a necessary step when preparing a file for output or export. Although multiple layers are preserved by several formats (Photoshop PDF, Photoshop, Large Document, Dicom, and TIFF), if the application into which you’re planning to import your file doesn’t read or accept layers, you will have to produce a flattened copy of it, as in these steps. Any transparency in the bottommost layer will be converted to fully opaque white.
To save a flattened copy of a document:
1. Choose File > Save As (Ctrl-Shift-S/Cmd-Shift-S). The Save As dialog opens.
2. Do all of the following:
Change the file name.
Choose a location.
Uncheck Layers (the As a Copy option becomes checked automatically; keep it that way).
Choose a file format from the Format menu.
Click Save.
Note: The layered version will remain open; the flattened version will be saved to disk.
If you’re confident that your image is totally complete, finis, you can use the Flatten Image command instead of saving a flattened copy. This command merges all currently visible layers (including type, Smart Object, and adjustment layers) into the bottommost visible layer, rasterizes all type and shape layers, and applies the effect of all masks and layer styles to the document. Note: This command discards all hidden layers!
To flatten all the layers in a document:
1. Make sure all the layers and layer groups you want to flatten are visible (have eye icons).A It doesn’t matter which layer is selected.
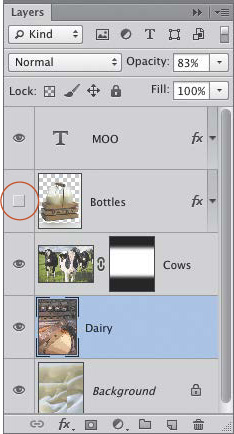
A In this document, the “Bottles” layer is hidden.
2. Right-click any layer name (not a type layer) and choose Flatten Image.
3. If the file contains any hidden layers, an alert dialog will appear; click OK. Any formerly transparent areas in the bottommost layer are now opaque white.B

B The Flatten Image command flattened all the visible layers into the Background and discarded the hidden layer.
Layers Increase the File Size