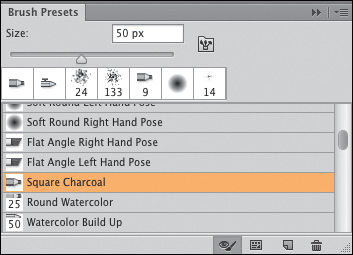
14. Painting
In This Chapter
In this chapter, you will paint with the Brush tool, customize your brush using a wide assortment of controls, and manage brush presets. You will also create bristle, erodible, and airbrush tips for the Mixer Brush tool, use the Mixer Brush to transform a photo into a painting, and use the History Brush tool to restore areas of an image.
Note: Although we recommend using a stylus and tablet for the instructions in this chapter, it’s not a requirement.
Using the Brush tool
Before delving into the complexities of the Brush panel, take a few minutes to familiarize yourself with the Brush tool. To do this, you will choose a brush preset for the tool and choose Options bar settings to control its behavior.
To use the Brush tool:
1. Click an image layer or create a new, blank layer. Optional: To confine your brush strokes to a specific area of the layer, create a selection.
2. Choose the Brush tool ![]() (B or Shift-B).
(B or Shift-B).
3. Choose a Foreground color.
4. Right-click in the image to display the Brush Preset picker, then either click a brush in the scrolling window,A or click a recently used brush in the horizontal tray.![]()
A On the Brush Preset picker, click a brush and, if desired, change any of the brush settings temporarily.
Optional: Change the brush Size or Hardness setting, drag the arrowhead on the circle to change the brush angle, or drag one of the little circles to change the roundness (see also pages 128–129).
Note: You can also open the Brush Preset picker by clicking the arrowhead or thumbnail on the Options bar.
5. On the Options bar, do the following:
Choose a blending Mode.
Choose an Opacity percentage. At 100%, the stroke will completely cover the underlying pixels.
Choose a Flow percentage for the rate at which “pigment” is applied (for thick or thin coverage).
6. Optional: If you’re using a stylus and tablet, you can activate the Pressure for Opacity button ![]() and/or the Pressure for Size button
and/or the Pressure for Size button ![]() on the Options bar.
on the Options bar.
7. Optional: If you want to edit only nontransparent pixels on the current layer, activate the Lock Transparent Pixels button ![]() on the Layers panel.
on the Layers panel.
8. Draw brush strokes in the image. Feel free to change the Options bar settings between strokes.
![]() To choose custom settings for the Brush tool — beyond the basics that are covered in this task — see the next section.
To choose custom settings for the Brush tool — beyond the basics that are covered in this task — see the next section.
![]() To draw a straight stroke with a painting tool (e.g., the Brush tool), hold down Shift while dragging.
To draw a straight stroke with a painting tool (e.g., the Brush tool), hold down Shift while dragging.
![]() To sample a color with a temporary Eyedropper, Alt-click/Option-click in the document.
To sample a color with a temporary Eyedropper, Alt-click/Option-click in the document.
![]() Via the Brush Presets panel menu, you can change the panel view.
Via the Brush Presets panel menu, you can change the panel view.
Shopping for Brush Tips
Customizing a brush
On pages 128–129, you learned how to set basic size, hardness, and opacity settings for a brush preset. Here you will use a wide array of features on the Brush panel to further customize the characteristics of a brush. Brushes are used with the Brush, Mixer Brush, Eraser, and History Brush tools (all of which are featured in this chapter), as well as with the Pencil, Clone Stamp, Pattern Stamp, Art History Brush, Blur, Sharpen, Smudge, Dodge, and Burn tools.
On the Brush panel, most of the settings for customizing brushes are organized into option sets; a few lone options are simply switched on or off. Many of the options add randomness or variation to a stroke, such as to its shape, texture, or color.
The availability of options varies depending on the currently chosen tool and tip, and some options apply only to a graphics tablet and stylus (when an option set is unavailable, the set name is dimmed). The choices are vast, so we’ll just focus on a few of our favorites. With practice, you’ll learn which options and settings suit your painting style.
To customize a brush via the Brush panel:
1. To see the greatest differences among the settings, choose the Brush tool ![]() or Mixer Brush tool
or Mixer Brush tool ![]() (B or Shift-B). You could also choose one of the tools that we listed in the first paragraph of this section.
(B or Shift-B). You could also choose one of the tools that we listed in the first paragraph of this section.
2. To show the Brush panel, click the panel tab or icon, ![]() or click the Toggle Brush Panel button
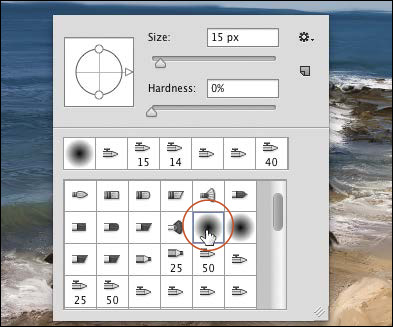
or click the Toggle Brush Panel button ![]() on the Options bar or Brush Presets panel. Click Brush Tip Shape in the top-left corner of the panel, and for this task, click a round or static tip (see the sidebar on this page) (A).
on the Options bar or Brush Presets panel. Click Brush Tip Shape in the top-left corner of the panel, and for this task, click a round or static tip (see the sidebar on this page) (A).
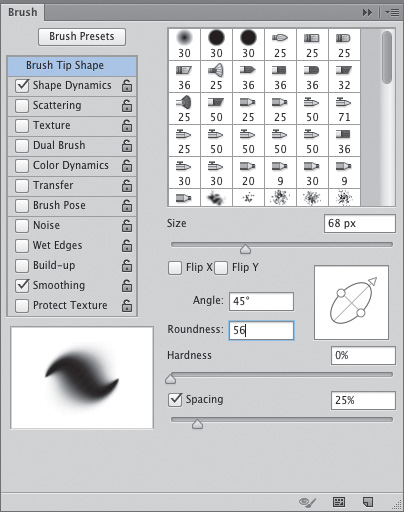
A In the Brush panel, you can select a brush tip, customize it via an assortment of options, and save it as a preset. The preview updates dynamically as you change the settings.
3. As you adjust settings for the tip, keep an eye on the stroke preview at the bottom of the panel:
To change the brush Size (diameter), use the slider or scrubby slider.
![]() To restore the original size to a static tip, click the Restore Original Size button.
To restore the original size to a static tip, click the Restore Original Size button. ![]()
To change the Angle (slant) of an elliptical tip, use the scrubby slider, or drag the arrowhead around the circle, or enter a specific angle.
To change the Roundness of the tip (make it more oval or more circular),B use the scrubby slider or drag either of the two small dark circles on the ellipse inward or outward.

B 100% Roundness

20% Roundness
To change the Hardness of the tip (feather or sharpen its edge),C use the scrubby slider.

C 100% Hardness

4% Hardness
To control the distance between marks within the stroke, check Spacing, then move the slider,D–E or turn this option off to let the speed of your brush stroke control the spacing.

D With the Spacing option checked, the spacing is uniform: 25% Spacing (top) and 150% Spacing (bottom).
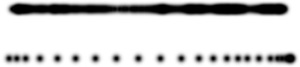
E With the Spacing option unchecked, the spacing is uneven: A slow stroke (top) and a fast stroke (bottom).
![]() If you’re going to paint with a mouse and you want to produce variations in the stroke via the Jitter and Minimum sliders (found in other sections of this panel), set the Spacing value above 10.
If you’re going to paint with a mouse and you want to produce variations in the stroke via the Jitter and Minimum sliders (found in other sections of this panel), set the Spacing value above 10.
4. Next you’ll customize the behavior variations for the brush using five of the option sets on the panel. Checking the box for an option set activates the current settings for that set; clicking the set name both activates the current settings and displays the set options.
To control the amount of allowable variation in the brush tip shape, click Shape Dynamics, then do any of the following:

100% Size Jitter, 25% spacing
Choose Size Jitter,A Angle Jitter, and Roundness Jitter values to establish an allowable amount of random variation for those attributes. For more noticeable variation, increase the Spacing value in the Brush Tip Shape option set.

A 0% Size Jitter
Check Brush Projection to enable round and static tips to respond to stylus movement, or to Tilt and Rotation settings in the Brush Pose option set. Note that enabling Brush Projection disables the Roundness Jitter option.
If you’re using a stylus, from each of the Control menus, choose which stylus feature is to control the variation for that option. Note that variations will occur even when this setting is Off.
Choose Minimum Diameter and Minimum Roundness percentages.
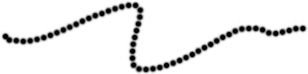
0% Scatter, 100% Spacing
500% Scatter, the Both Axes option checked
5. To control the placement of pigment in the stroke, click Scattering, then do any of the following:
Check Both Axes to scatter pigment along and perpendicular to the stroke you draw, or uncheck this option to scatter pigment only perpendicular to the stroke.B For a stylus, choose a Control option.

B 500% Scatter, the Both Axes option unchecked
Choose a Scatter percentage to control how far the pigment can stray from the stroke. The lower the Scatter percentage, the more solid the stroke.
Choose a Count value to control the number of marks in the stroke (you may need to increase the Spacing value to see any effect).
0% Count Jitter, 100% Spacing
Choose a Count Jitter percentage to control the amount of variation in the Count.C

C 100% Count Jitter: The Count varies randomly from 1% to 100% of the Count value.
6. For the Brush tool, you can use the Color Dynamics option set to control the variation in hue, saturation, and brightness. Check Apply per Tip to allow jitter settings to display randomly in each tip mark in a stroke, for a multicolor effect.
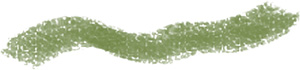
7. To display a texture in the stroke, click Texture, then do all of the following:
Click the Pattern picker thumbnail, then click a pattern swatch. (Via the picker menu, you can load the Artist Surfaces or Artists Brushes Canvas library.)
Choose a Scale value for the pattern.
Choose values for Brightness and Contrast. For a more prominent texture, choose a low Brightness value and a high Contrast value.
Choose a Depth value to simulate the depth of a fibrous drawing surface. High values produce more ridges and therefore a more noticeable texture.A

A Canvas pattern, 200% Scale, –90 Brightness, 80 Contrast
8. To control how randomly the overall stroke opacity can vary as you use the tool, and to make the Texture option more pronounced,B click Transfer, then do either or both of the following:
B The same Texture settings as above with Transfer: 60% Opacity Jitter, 60% Flow Jitter
Choose an Opacity Jitter percentage for the amount the opacity can vary.C–D To control the fading, for a stylus, choose a Control option, or for a mouse, choose Off or Fade.
C 10% Opacity Jitter, 10% Flow Jitter
D 80% Opacity Jitter, 80% Flow Jitter
Choose a Flow Jitter percentage to control the rate at which paint is applied. A high Flow Jitter will make the stroke dry and blotchy, but that may be the look you’re after. For a stylus, choose a Control option; for a mouse, choose Off or Fade.
9. Beware! The custom settings that you have chosen are only temporary. To save them as a preset for future use, click the New Brush button ![]() at the bottom of the Brush panel. Enter a descriptive name in the Brush Name dialog, check Capture Brush Size in Preset (if desired), then click OK. Your saved preset will appear at the bottom of the Brush Presets panel and the Brush Preset picker.
at the bottom of the Brush panel. Enter a descriptive name in the Brush Name dialog, check Capture Brush Size in Preset (if desired), then click OK. Your saved preset will appear at the bottom of the Brush Presets panel and the Brush Preset picker.
10. You’re ready to paint with your customized brush!
![]() Click the open
Click the open ![]() or closed
or closed ![]() lock icon for an option set to prevent or allow the settings in that set from being edited, regardless of the current preset.
lock icon for an option set to prevent or allow the settings in that set from being edited, regardless of the current preset.
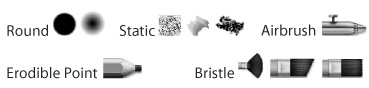
An Erodible Point tip behaves like a soft pencil: The beginning of the stroke is sharp and then it gradually wears down (widening and becoming more blunt) toward the end of the stroke.
To use an Erodible Point tip:
1. Choose the Brush tool ![]() or Mixer Brush tool.
or Mixer Brush tool. ![]()
2. On the left side of the Brush panel, click Brush Tip Shape, then click an Erodible Point tip ![]() in the scrolling window.
in the scrolling window.
3. Activate the Live Tip Brush Preview button ![]() (see the sidebar at right).
(see the sidebar at right).
4. Choose a Size value to set the width of the end of the stroke (where the tip is worn down), and choose a Softness value to control how quickly the tip erodes. Lower values keep the tip more sharp.A
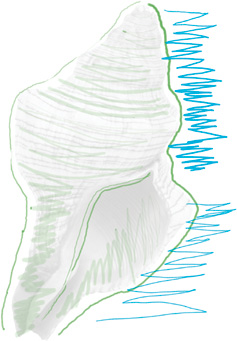
A We used the Pencil brush preset (an Erodible Point tip) to create the blue lines in this drawing. A high Softness value was used for the upper stroke; a very low Softness value was used for the lower one.
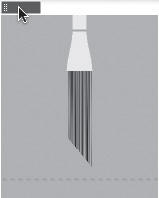
Using the Live Tip Brush Preview
To display a schematic of the current brush tip that updates dynamically as you change the settings, activate the Live Tip Brush Preview button ![]() on the Brush or Brush Presets panel. For this feature to work, Use Graphics Processor must be checked in Edit/Photoshop > Preferences > Performance. Note: The Live Tip Brush Preview doesn’t display for round or static tips.
on the Brush or Brush Presets panel. For this feature to work, Use Graphics Processor must be checked in Edit/Photoshop > Preferences > Performance. Note: The Live Tip Brush Preview doesn’t display for round or static tips.
![]() To reposition the preview, move the pointer over the top-left corner, then drag the black bar.
To reposition the preview, move the pointer over the top-left corner, then drag the black bar.
![]() To view the current tip at various angles, keep clicking in the preview.
To view the current tip at various angles, keep clicking in the preview.
5. From the Shape menu, choose a preset shape.
6. Optional: To display some texture in the stroke, click the Texture option set and choose a burlap or canvas texture in the Pattern picker (see step 7 on pages 292–294).
![]() To change the tilt of a tip when drawing with a mouse, adjust the Tilt Y value in the Brush Pose option set.
To change the tilt of a tip when drawing with a mouse, adjust the Tilt Y value in the Brush Pose option set.
![]() Once you start painting with an Erodible tip (Shape: Point or Round and an increased Softness setting), you can resharpen the tip by clicking Sharpen Tip.
Once you start painting with an Erodible tip (Shape: Point or Round and an increased Softness setting), you can resharpen the tip by clicking Sharpen Tip.
Note: To produce long strokes when using an Erodible Point tip or Airbrush tip with the Mixer Brush tool, choose the Dry, Heavy Load preset from the Useful Mixer Brush Combinations menu on the Options bar.B To learn more about this tool, see pages 296–297.
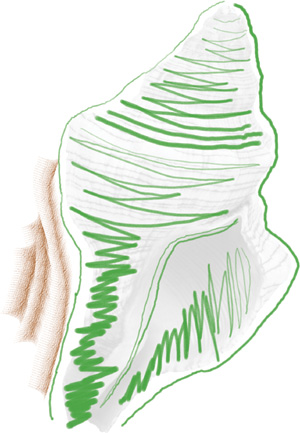
B We drew the green lines with the Charcoal Pencil preset and the brown strokes with the Triangle Pastel preset.
The Airbrush tips simulate the look of paint that is sprayed from an airbrush device. Via panel options, you can control the degree of graininess and feathering.
To use an Airbrush tip:
1. Choose the Brush tool ![]() or Mixer Brush tool.
or Mixer Brush tool. ![]()
2. On the left side of the Brush panel, click Brush Tip Shape, then click one of the Airbrush tips ![]() in the scrolling window.
in the scrolling window.
3. Activate the Live Tip Brush Preview button. ![]()
4. Change any of the following settings:
Choose a Size value to set the size of the stroke.
Choose a Hardness value to control the amount of feathering at the edges of the stroke.
Increase the Granularity value to make the stroke look more speckly, and set a Spatter Size and Spatter Amount to control the size and number of droplets in the stroke.C
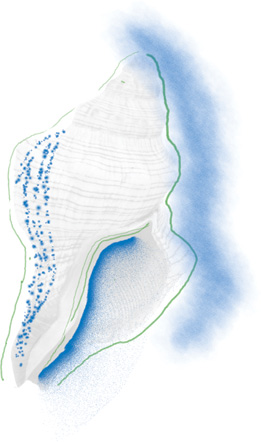
C We used the Watercolor Spatter Big Drops preset (which has a high Granularity value) to draw the dotted stroke on the left, the Airbrush Soft High Density Grainy preset to draw the blue line in the center, and the Watercolor Wash brush preset to draw the wide blue stroke on the right.
![]() All of the presets used here are in the default library. To identify them by name, choose either of the List views from the Brush Presets panel menu.
All of the presets used here are in the default library. To identify them by name, choose either of the List views from the Brush Presets panel menu.
(See the Note, above, regarding the Mixer Brush.)
![]() If you’re going to paint with a mouse, display the Brush Pose option set. To spray a conical stroke from the point where you click, change one or both Tilt values; to widen the stroke, lower the Pressure value. To further elongate a conical shape, in the Brush Tip Shape option set, choose a high Distortion value. (See also the sidebar on page 296.)
If you’re going to paint with a mouse, display the Brush Pose option set. To spray a conical stroke from the point where you click, change one or both Tilt values; to widen the stroke, lower the Pressure value. To further elongate a conical shape, in the Brush Tip Shape option set, choose a high Distortion value. (See also the sidebar on page 296.)
Managing brush presets
The Brush Presets panel stores and displays presets, like the Brush Preset picker, plus it offers several additional features. You can use this panel to save and choose brush presets, resize the current preset, save and load brush preset libraries, and access the Preset Manager.A Unlike the Brush Preset picker, the Brush Presets panel can be kept open.
A Use the Brush Presets panel to select a preset from the current library, change the brush size, load a different library, create a new library, or access Preset Manager.
To use the Brush Presets panel:
1. Choose a tool that uses brushes, such as the Brush, Mixer Brush, or Pencil.
2. To show the Brush Presets panel, click the panel tab or icon ![]() (Window > Brush Presets), or click Brush Presets in the upper-left corner of the Brush panel.
(Window > Brush Presets), or click Brush Presets in the upper-left corner of the Brush panel.
3. On the panel, do any of the following:
Click a brush to use with the chosen tool: either a recently used preset in the tray at the top of the panel (the last-used brush is shown first),![]() or a preset in the scrolling window. If the tray is hidden, check Show Recent Brushes on the panel menu.
or a preset in the scrolling window. If the tray is hidden, check Show Recent Brushes on the panel menu.
Change the brush Size (diameter). Note: You can restore the original size to a static tip by clicking the Restore Original Size button. ![]()
Activate the Live Tip Brush Preview button ![]() (if available) to display a schematic of the brush tip.
(if available) to display a schematic of the brush tip.
To load different presets onto the panel, choose a library name from the panel menu, then click Append or OK (see also page 131). (Via the panel menu, you can also choose a different thumbnail or list option for the panel display.)
To save the current brush and settings as a preset, click the New Brush button, ![]() add to or change the name in the Brush Name dialog (use a descriptive name), then click OK.
add to or change the name in the Brush Name dialog (use a descriptive name), then click OK.
To save all the presets that are currently on the panel as a library, choose Save Brushes from the panel menu, type a name for the library, keep the default location, then click Save (see also page 131).
To access the Preset Manager dialog, from which you can append, replace, and reset the items that load onto the Brush and Brush Presets panels and the Brush Preset picker upon launch, click the Open Preset Manager button, ![]() then see “Using the Preset Manager” on page 133. (This button is also available on the Brush panel.)
then see “Using the Preset Manager” on page 133. (This button is also available on the Brush panel.)
To delete the currently selected preset from the panel (but not from its library), click the Delete Brush button, then click OK in the alert dialog. ![]()
![]() If you click a preset and then customize its settings via the Brush panel, its listing on the Brush Presets panel will have an orange highlight, indicating that it was modified. If you click a recently used brush in the tray, then modify and use it, a new icon will display in the tray, with “(modified)” in its name. If you modify just the Size value for a preset, the preset must include a size value (a numeral in its panel listing) for it to be designated as “modified.”
If you click a preset and then customize its settings via the Brush panel, its listing on the Brush Presets panel will have an orange highlight, indicating that it was modified. If you click a recently used brush in the tray, then modify and use it, a new icon will display in the tray, with “(modified)” in its name. If you modify just the Size value for a preset, the preset must include a size value (a numeral in its panel listing) for it to be designated as “modified.” ![]()
Quick Access to the Brush Panels
![]() From the Brush panel, you can open the Brush Presets panel by clicking this button:
From the Brush panel, you can open the Brush Presets panel by clicking this button: ![]()
![]() From the Brush Presets panel, you can open the Brush panel by clicking the Toggle Brush panel button:
From the Brush Presets panel, you can open the Brush panel by clicking the Toggle Brush panel button: ![]()
Resetting the Presets
Tool Presets Store More Settings
Using the Mixer Brush tool
By choosing brush characteristics for the Mixer Brush tool, you can mimic different types of natural bristle brushes, such as oil paint or gouache. You can also control the wetness of the paint, the paint flow, and the degree to which existing colors mix with new strokes. Photoshop “paint” lacks the viscosity of traditional oils, but you can achieve some nice effects with it nevertheless.
To build a bristle brush:
1. Choose the Mixer Brush tool ![]() (B or Shift-B).
(B or Shift-B).
2. Display the Brush panel. ![]() If you don’t see any bristle tips
If you don’t see any bristle tips ![]()
![]()
![]()
![]() on the panel, click Brush Presets. From the Brush Presets panel menu, choose Reset Brushes. Click OK in the alert dialog, then click the Toggle Brush Panel button
on the panel, click Brush Presets. From the Brush Presets panel menu, choose Reset Brushes. Click OK in the alert dialog, then click the Toggle Brush Panel button ![]() to return to the Brush panel.
to return to the Brush panel.
3. Click Brush Tip Shape, then click a bristle tip in the scrolling window.A The shape name is listed on the Shape menu.
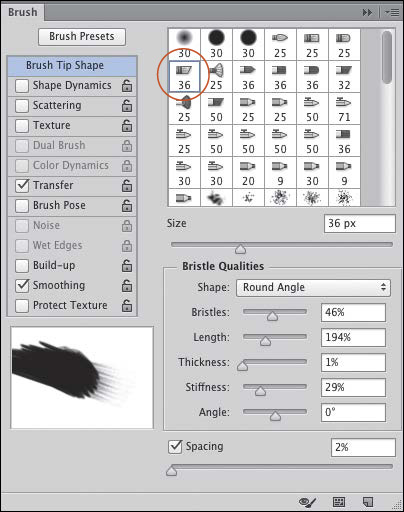
A When the Mixer Brush tool and a bristle tip are selected, Bristle Qualities options display on the Brush panel.
4. Activate the Live Tip Brush Preview button. ![]()
5. To pare down the number of options that will affect your brush, either uncheck all the options on the left side of the panel except Smoothing or choose Clear Brush Controls from the panel menu.
6. Use the Bristle Qualities sliders to choose these physical characteristics for the tip, while noting the changes in the preview:
Bristles controls the number (density) of bristles.
Length controls the length of the bristles.
Thickness controls the width of the bristles (and therefore affects the overall density of the stroke).
Stiffness controls how easily the bristles bend. Choose a low value for smooth, fluid strokes or a high value for scratchy, dry bristle marks.
Angle controls the brush angle if you’re using a mouse. Angle variations are most noticeable when a “Flat” shape is chosen for the tip.
7. Before using the Mixer Brush tool, choose Options bar settings, as in the steps on the next page.
![]() You can record the creation of a painting or drawing via an action, and then replay the process again at any time. The artwork will reappear onscreen, stroke by stroke. See Chapter 22.
You can record the creation of a painting or drawing via an action, and then replay the process again at any time. The artwork will reappear onscreen, stroke by stroke. See Chapter 22.
Using the Brush Pose Option Set for a Mouse
![]() Use Tilt X or Tilt Y to tilt the entire brush as you apply brush strokes, and thereby mix colors with only part of the tip.
Use Tilt X or Tilt Y to tilt the entire brush as you apply brush strokes, and thereby mix colors with only part of the tip.
![]() Use a high Pressure value to bend the brush bristles more, mimicking the way a brush presses into the surface of the paper or canvas, for a darker stroke (akin to decreasing the Stiffness), or lower the Pressure value for a lighter stroke.
Use a high Pressure value to bend the brush bristles more, mimicking the way a brush presses into the surface of the paper or canvas, for a darker stroke (akin to decreasing the Stiffness), or lower the Pressure value for a lighter stroke.
![]() Uncheck the Override boxes, which are for use with a stylus.
Uncheck the Override boxes, which are for use with a stylus.
Before using the bristle brush that you have just chosen qualities for, you also need to choose settings to control how the brush applies pigment.
To choose paint options for a bristle brush:
1. After following the instructions on the preceding page, and with the Mixer Brush tool still selected, on the Options bar, do both of the following:
Activate the Load Brush After Each Stroke button ![]() to have the current Foreground color reload onto the brush after each stroke.
to have the current Foreground color reload onto the brush after each stroke.
Activate the Clean Brush After Each Stroke button ![]() to have a clean Foreground color reload after each stroke, or deactivate this option to allow the last colors in the brush to mix with the current Foreground color.
to have a clean Foreground color reload after each stroke, or deactivate this option to allow the last colors in the brush to mix with the current Foreground color.
2. To choose a Foreground color, click the Current Brush Load thumbnail ![]() on the Options bar, then use the Color Picker; or click a color on the Swatches or Color panel.
on the Options bar, then use the Color Picker; or click a color on the Swatches or Color panel.
3. From the Useful Mixer Brush Combinations menu, choose a preset combination of settings. The Dry presets are good for defining object details and edges (because they set the wet value to 0% and thereby disable the Mix option), the Moist presets allow for moderate paint mixing, and the Wet and Very Wet presets work well for blending new strokes with existing ones.
If you prefer to choose custom options (or to refine the settings from a preset), do any of the following:
Choose a Wet value to control the wetness of the existing paint and the extent to which your brush can pick it up in the stroke.A–B

A Options bar settings of Wet 10 and Mix 10: The stroke barely blended with the existing color.

B Wet 90 and Mix 10: The stroke blended somewhat with the existing color.
Choose a Load value to control how much paint is supplied to the brush (how quickly the brush runs out of paint), most noticeable with a low Mix value.
Choose a Mix value to control the degree to which new strokes mix or smear with existing strokes (including any white from the Background).C–D
C Wet 10 and Mix 90: The stroke blended and smeared more with the existing color.

D Wet 90 and Mix 90: The stroke blended and smeared almost entirely with the existing color.
Choose a Flow value to control the rate at which paint is applied (the amount of coverage).
Check Sample All Layers to allow the brush to mix with and pick up paint from all layers. With this option checked, the current Foreground color may not appear in your brush strokes.
4. Create a new, blank layer (it can be above an image layer). It’s time to paint!
Use this method if you want to wipe a brush clean or reload color to the brush manually, on a one-time basis — that is, override inactivated Load Brush After Each Stroke and Clean Brush After Each Stroke buttons.
To wipe a bristle brush clean:
With the Mixer Brush tool selected, click the Current Brush Load menu ![]() on the Options bar, click Clean Brush, then click Load Brush.
on the Options bar, click Clean Brush, then click Load Brush.
Picking Up Colors from an Image
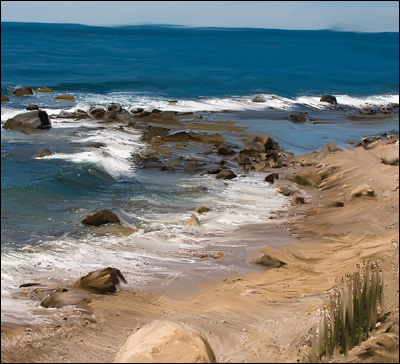
In this exercise, you will reinterpret shapes in a photo with the Mixer Brush tool, to produce a digital painting. This is a fun exercise.
To turn a photo into a painting:
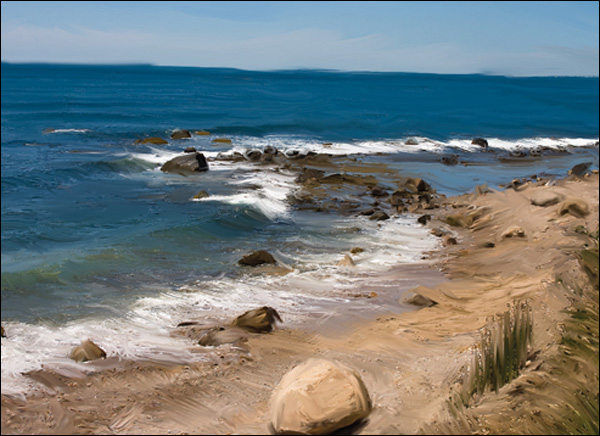
1. Open a photo A and duplicate the Background.
A This is the original photo — a quintessential New England landscape.
2. Hide the duplicate layer, click the original Background, then use Edit > Fill to fill it with White. To add a texture, use Edit > Fill again, except this time choose Use: Pattern, choose the Canvas pattern (Artist Surfaces library) from the Pattern picker menu, set the Opacity to 75%, uncheck Scripted Patterns, then click OK.
3. Click the Background copy, and make it visible again. Create several blank layers, and keep one of them selected.B
B This is how the Layers panel looked by the end of step 3 on this page.
4. Choose the Mixer Brush tool ![]() (B or Shift-B).
(B or Shift-B).
5. On the Brush Presets panel, ![]() click a bristle preset, such as a flat, blunt preset
click a bristle preset, such as a flat, blunt preset ![]() to fill in broad areas or a flat, pointed preset
to fill in broad areas or a flat, pointed preset ![]() to draw fine lines.
to draw fine lines.
6. On the Options bar, do all of the following:
From the Useful Mixer Brush Combinations menu, choose a preset to control the character of the paint. The Wet and Very Wet presets are good for painting broad areas, such as backgrounds, and for picking up colors from a photo; the Moist and Dry presets are better for defining details.
Check Sample All Layers to allow the brush to pick up and mix colors from all the underlying layers (strokes will appear only on the selected layer).
If you’re using a stylus and tablet, activate the Pressure Controls Size button. ![]()
7. To transform your photo into a painting, do either of the following:
To reinterpret the photo with a “clean” brush, deactivate the Load Brush After Each Stroke button ![]() on the Options bar and activate the Clean Brush After Each Stroke button
on the Options bar and activate the Clean Brush After Each Stroke button ![]() (now the current Load value will have no effect and the Foreground color isn’t applied). As you apply brush strokes in the image, start each new stroke over the desired color (A).
(now the current Load value will have no effect and the Foreground color isn’t applied). As you apply brush strokes in the image, start each new stroke over the desired color (A).
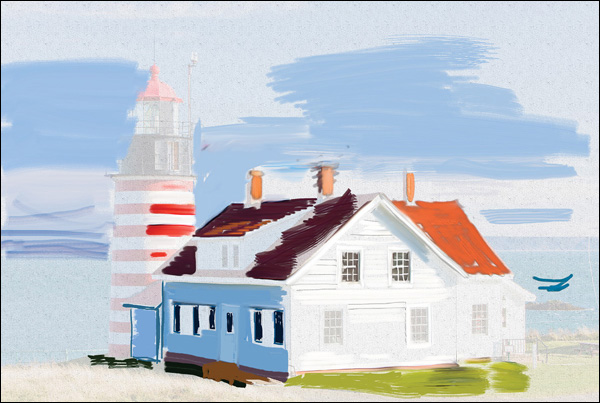
A For the Mixer Brush tool, we deactivated the Load Brush After Each Stroke option so we could pick up colors from the photo layer, chose “Wet, Heavy Mix” from the Useful Mixer Brush Combinations menu, then applied brush strokes on a few blank layers.
To sample a color from the photo, activate the Load Brush After Each Stroke and Clean Brush After Each Stroke buttons on the Options bar, then hold down I (temporary Eyedropper tool) and click in the photo. Click a paint layer, then paint with the sampled color (B–C, and A–B, page 300). Repeat.
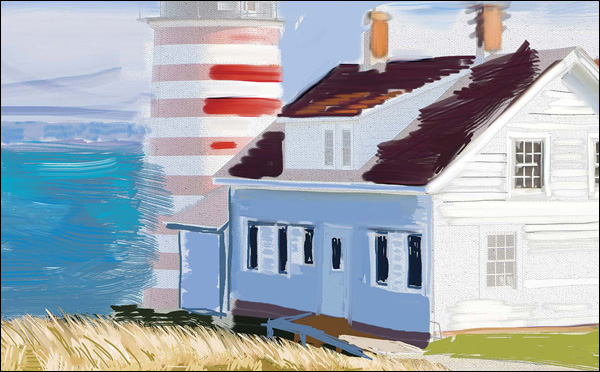
B We activated Load Brush After Each Stroke, sampled a color in the photo, clicked another blank layer, then painted with a couple of the Moist preset combinations and a couple of the Wet ones.
![]() To view just your brush strokes in the document (as shown here), lower the opacity of the photo layer. To resume sampling colors, reset the photo layer opacity to 90%–100%.
To view just your brush strokes in the document (as shown here), lower the opacity of the photo layer. To resume sampling colors, reset the photo layer opacity to 90%–100%.
C Next, we painted the sky with the Round Fan Stiff Thin Bristles and Flat Point Medium Stiff presets, painted the water with the Round Blunt Medium Stiff and Round Point Stiff presets, and painted the siding on the building with the Round Point Stiff preset and the Dry, Heavy Load combination.
![]() All the presets mentioned above are in the default brush library. To view the preset names, choose Small or Large List from the Brush Presets panel menu.
All the presets mentioned above are in the default brush library. To view the preset names, choose Small or Large List from the Brush Presets panel menu.
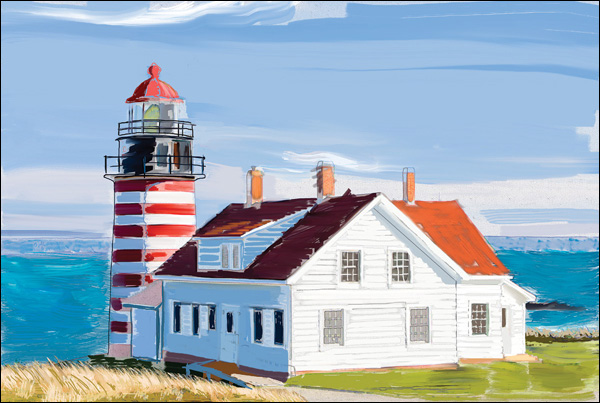
A Finally, we applied brush strokes on the topmost layer using the Round Point Stiff preset, with the Dry combination chosen to prevent the final line work from blending with the other paint layers. Now the image looks like an artist’s painting. Note that we didn’t slavishly replicate every tiny detail in the photo — that’s what artistic license is all about!
B We transformed this photo in a similar way to the one shown above, using the Mixer Brush tool, a bristle tip, and a few different Useful Combination presets.
![]() Paint the picture in sections, each one on a separate blank layer. To erase any unwanted strokes, use the Eraser tool (see page 300). To view just your brush work, lower the opacity of the photo layer temporarily.
Paint the picture in sections, each one on a separate blank layer. To erase any unwanted strokes, use the Eraser tool (see page 300). To view just your brush work, lower the opacity of the photo layer temporarily.
![]() As you apply brush strokes, mimic the direction of shapes in the photo. To add variety to your paint, switch bristle tips and change the brush size occasionally between strokes.
As you apply brush strokes, mimic the direction of shapes in the photo. To add variety to your paint, switch bristle tips and change the brush size occasionally between strokes.
Using the Eraser tool
The Eraser tool removes image pixels permanently, so it should be used only to delete areas from a duplicate layer or from a layer that contains, say, just retouching or painting edits that were made via the Sample All Layers option. Don’t use it on the original Background!
To use the Eraser tool:
1. Choose the Eraser tool ![]() (E or Shift-E).
(E or Shift-E).
2. On the Options bar, do the following:
Click a Soft Round brush on the Brush Preset picker.
Choose a Mode (shape) of Brush, Pencil, or Block.
For Brush or Pencil mode, choose an Opacity percentage; for Brush mode, deactivate the Airbrush button ![]() and keep the Flow setting at 100%.
and keep the Flow setting at 100%.
3. Click a layer, make sure the Lock Transparent Pixels button ![]() is deactivated, adjust the brush size by pressing [ or ], then drag to erase pixels.
is deactivated, adjust the brush size by pressing [ or ], then drag to erase pixels.
![]() Instead of erasing image pixels permanently, an option that we prefer is to hide them via an editable layer mask (see pages 190–191).
Instead of erasing image pixels permanently, an option that we prefer is to hide them via an editable layer mask (see pages 190–191).
Using the History Brush tool
When you apply strokes to a document with the History Brush tool, pixels below the pointer are restored from whichever state or snapshot you have designated as the history source.
Note: Photoshop prevents the use of the History Brush tool if you apply certain kinds of edits after opening your document, such as changing the document color mode or canvas size or cropping. Also, the tool can’t be used to recover pixels from a layer that you have deleted, and it works only on 8-bit images.
To use the History Brush tool:
1. Click an image layer (or duplicate the Background), and apply some edits, such as a filter or brush strokes (but none of the edits listed in the Note above). A–C
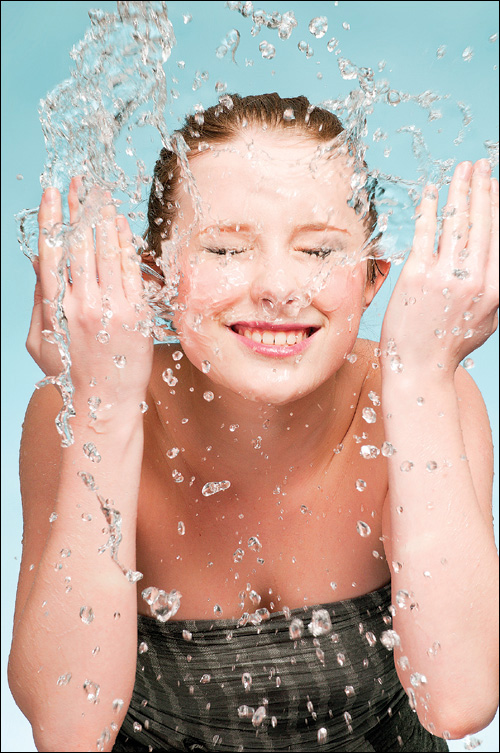
A This is the original image.

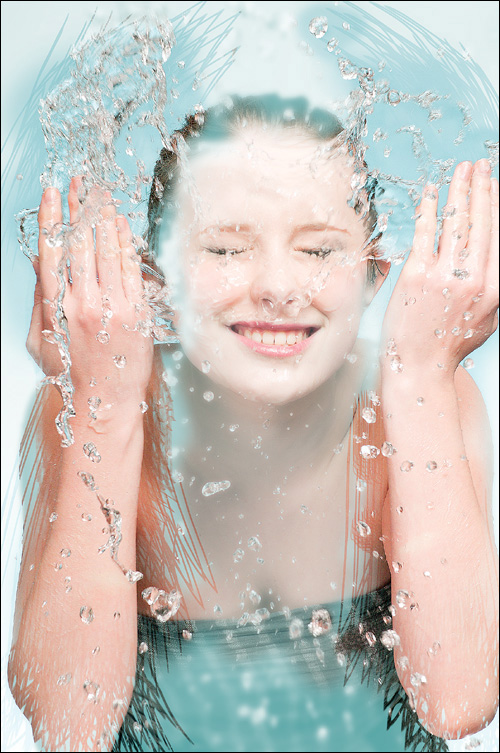
B We duplicated the image layer via Ctrl-J/Cmd-J, then applied the Gaussian Blur filter to the duplicate layer.

C We used a Hue/Saturation adjustment layer (Colorize option) to apply a blue-green tint, then merged that layer into the duplicate image layer.
2. Choose the History Brush tool ![]() (Y or Shift-Y).
(Y or Shift-Y).
3. On the Options bar, do all of the following:
Click the Brush Preset picker arrowhead, then click a brush on the picker.
Choose a blending Mode, Opacity percentage, and Flow percentage.
4. On the Layers panel, click the layer you edited, and make sure the Lock Transparent Pixels button ![]() is deactivated.
is deactivated.
5. On the History panel, click in the leftmost column for a state, to designate it as the source for the History Brush tool. The history source icon ![]() appears in that slot.A Note: If you added a layer during the course of editing (step 1), set the history source to the New Layer or Layer via Copy state.
appears in that slot.A Note: If you added a layer during the course of editing (step 1), set the history source to the New Layer or Layer via Copy state.
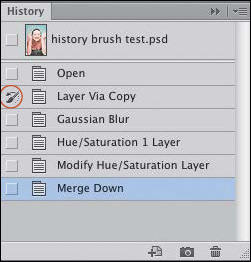
A To set the history source icon, we clicked in the leftmost column for the state in which we duplicated the image layer.
6. Apply strokes to the image. Pixel data from the source state will replace the current data where you apply strokes.B–C

B We set the Opacity for the History Brush to 70% and chose the Round Blunt Medium Stiff bristle preset. We applied strokes to selectively restore the original, unedited image in scratchy strokes.
C Finally, with a Soft Round tip and the History Brush Opacity set to 50%, we partially restored some areas of the model’s face and neck from the original Background image.
![]() We recommend using the History Brush immediately after applying edits that you want to remove selectively. This way, it will be easier for you to identify which state you want to use as a source.
We recommend using the History Brush immediately after applying edits that you want to remove selectively. This way, it will be easier for you to identify which state you want to use as a source.