16. Refocusing
In This Chapter
Applying a filter in the Blur Gallery
Applying the Smart Sharpen filter
Applying the Unsharp Mask filter
Applying the Shake Reduction filter
In Photoshop, just as in photography, you can use focusing techniques to enhance a scene, such as a shallow depth of field to differentiate a subject from its background or blurriness to convey a sense of motion. And you can use sharpening methods to counteract the effects of resampling, to remedy blurring from camera shake, or to prepare a file for output.
In this chapter, you’ll blur areas of an image using the Field Blur, Iris Blur, Tilt-Shift, Path Blur, and Spin Blur filters (collectively called the Blur Gallery). And you will apply sharpening via the Smart Sharpen, Unsharp Mask, and Shake Reduction filters, and via the Sharpen tool.
Note: For lens corrections, we recommend using the Lens Correction tab in Camera Raw (instead of the Lens Correction filter in Photoshop), either before you open your photo into Photoshop, or by way of Filter > Camera Raw Filter in Photoshop. See pages 80–83.
Applying a filter in the Blur Gallery
The Field Blur, Iris Blur, Tilt-Shift, Path Blur,![]() and Spin Blur
and Spin Blur ![]() filters provide powerful and flexible on-canvas and panel controls for blurring parts of an image.
filters provide powerful and flexible on-canvas and panel controls for blurring parts of an image.
Note: To apply filters in the Blur Gallery, Use Graphics Processor must be checked in Edit/Photoshop > Preferences > Performance. You will see a more accurate preview while making on-canvas adjustments if your system has a graphics card with 1 GB or more of VRAM or an embedded HD graphics processing unit.
To apply a filter in the Blur Gallery: ![]()
1. Open an image (preferably one that is all or mostly in focus). To keep the filter settings nondestructive and editable, convert a duplicate of an image layer or the Background to a Smart Object.
Optional: To mask the filter effect partially, create a selection. The selection area will appear in the Smart Filters mask when you exit the gallery.
2. Choose Filter > Blur Gallery > Field Blur to produce multiple blur areas, Iris Blur to blur areas around a focus ellipse, Tilt-Shift to apply blurring in straight bands across portions of the image, or Spin Blur to create an effect of radial motion within a circular area. To apply the Path Blur filter, see pages 330–331.
3. A default pin with controls appears in the image, and panels with option settings appear in a dock on the right. On the Options bar, make sure Preview is checked (P).
To control the degree of blurring for a Field, Iris, or Tilt-Shift blur, either adjust the Blur slider in the dock; or in the image, drag around the blur ring that surrounds the pin (add more black to the ring to reduce the blur, or reduce black to increase the blur).
4. For a Field Blur, add another pin by clicking in the image. Set the Blur value for one pin to 0% (full focus), then click the other pin and give it a higher Blur value (blurring). To use the full potential of this filter, add more pins, some with a Blur value of 0 and some with a Blur value greater than 0 (A–C).
For an Iris Blur, do any of the following: To adjust the shape of the focus ellipse, drag one of the small outer round handles; to scale the ellipse uniformly, drag its edge; to rotate the ellipse, drag outside one of the small handles (double-arrow pointer); to reposition where the blurring begins, drag one of the feather handles (or to move one feather handle separately, drag it while holding down Alt/Option); to change the ellipse to a rounded rectangle, drag the square Roundness knob outward (A–D, page 328).
For a Tilt-Shift Blur, do any of the following: To adjust where the blurring begins, drag either or both of the solid focus lines; to adjust the transition between the in-focus and blurred areas, drag either or both of the dashed feather lines; to rotate the focus area, drag a rotation handle slightly to the left or right (A–C, page 329).
For a Spin Blur,![]() do any of the following: To reshape the focus ellipse, drag one of the outer round handles; to scale the ellipse uniformly, drag its edge; to adjust the angle, drag around the blur ring or change the Blur Angle value in the panel; to move the blur, drag anywhere inside the ellipse; or to reposition the rotation point (say, to make it look as if subject was shot at an angle), drag the point with Alt/Option held down). See C–D, page 331.
do any of the following: To reshape the focus ellipse, drag one of the outer round handles; to scale the ellipse uniformly, drag its edge; to adjust the angle, drag around the blur ring or change the Blur Angle value in the panel; to move the blur, drag anywhere inside the ellipse; or to reposition the rotation point (say, to make it look as if subject was shot at an angle), drag the point with Alt/Option held down). See C–D, page 331.
5. You can also do any of the following optional steps:
To add a pin, click in the image.
To reposition a pin, drag its center point. You can move a pin outside the canvas area.
To delete a pin, click its center point, then press Backspace/Delete.
To copy a pin, drag its center point with Alt-Ctrl/Option-Cmd held down.
To control the amount of focus within the currently selected ellipse for an Iris Blur, or between the two feather lines for a Tilt-Shift blur, adjust the Focus setting on the Options bar.
6. To hide the on-canvas controls to judge the blurring effect, press and hold down H (then release).
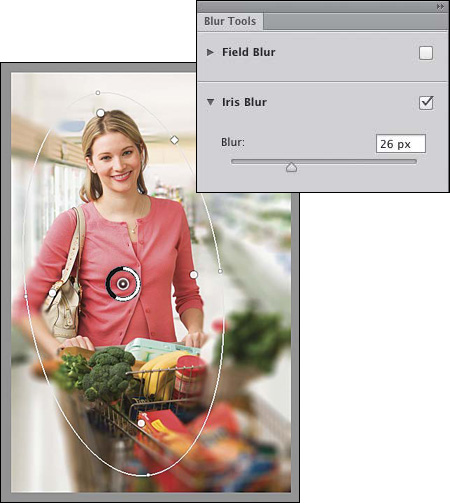
7. Optional: To brighten the blur highlights to the point that they become abstract, colored orbs, for a Field, Iris, or Tilt-Shift Blur, click a pin, check Bokeh in the Blur Effects panel, then adjust the settings (A–C, page 332).
8. Optional: To save the blur mask that Photoshop created for the filter to an alpha channel, check Save Mask to Channels on the Options bar (A–D, page 333). To preview the mask, press and hold down M (then release).
9. To accept your blur filter edits, press Enter/Return or click OK on the Options bar. To edit the blur settings or to mask the results, see pages 360–362.
![]() To remove all blur pins from an image, click the Remove All Pins button
To remove all blur pins from an image, click the Remove All Pins button ![]() on the Options bar.
on the Options bar.
![]() To switch to a different filter in the Blur Tools panel, uncheck the box for the current filter, then expand the category for the desired one.
To switch to a different filter in the Blur Tools panel, uncheck the box for the current filter, then expand the category for the desired one.
![]() To the same Smart Object, you can also apply nonblur filters. We don’t recommend applying multiple Blur Gallery filters to an image (except possibly to add a small Field Blur ring to a sharp area), as doing so is likely to blur the whole photo.
To the same Smart Object, you can also apply nonblur filters. We don’t recommend applying multiple Blur Gallery filters to an image (except possibly to add a small Field Blur ring to a sharp area), as doing so is likely to blur the whole photo.
Using a Selection with a Blur Filter
![]() If you create a selection before applying a Blur Gallery filter to a Smart Object, the selection area will appear as the white area in the editable mask for the Smart Filter. If desired, you can click the mask thumb-nail on the Layers panel, then feather the edge of the mask via the Properties panel (Mask options).
If you create a selection before applying a Blur Gallery filter to a Smart Object, the selection area will appear as the white area in the editable mask for the Smart Filter. If desired, you can click the mask thumb-nail on the Layers panel, then feather the edge of the mask via the Properties panel (Mask options).
![]() If you create a selection before displaying the Blur Gallery controls for a standard layer (not a Smart Object), you can control how gradually the blurring bleeds to the edge of the selection via the Selection Bleed slider on the Options bar.
If you create a selection before displaying the Blur Gallery controls for a standard layer (not a Smart Object), you can control how gradually the blurring bleeds to the edge of the selection via the Selection Bleed slider on the Options bar.
Use the Field Blur filter when you need the most flexibility and control in blurring specific areas of an image (such as the hair, arms, and background in the photo on this page), while keeping other, more important, areas in sharp focus. Use as many pins as you like, but be sure to place a few pins with a Blur value of 0% in areas that you want to keep in focus, and place other pins with a Blur value between 5% and 100% in areas that you want to blur (the blurring occurs between the high and low values).A–C You can reposition any pin individually by dragging it in the image. This is one of our favorite features of Photoshop!
A This is the original image.
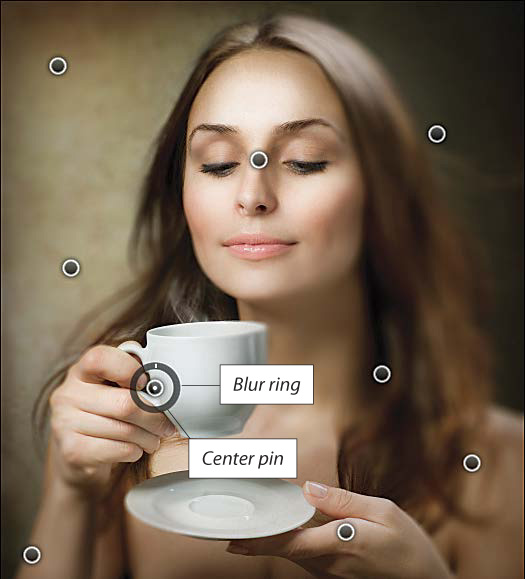
B We applied the Field Blur filter using a Blur value of 0% for the pins on the woman’s face and hands to keep those areas in focus, and Blur values above 10% for all the other pins.
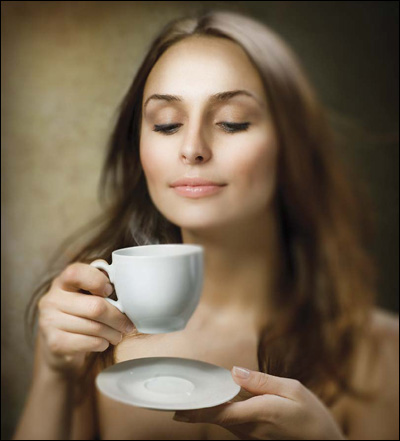
C This is the result.
The Iris Blur filter applies blurring around a focus ellipse. You can use just a single pin or click in the image to create additional ones.A–D

A This is the original image.
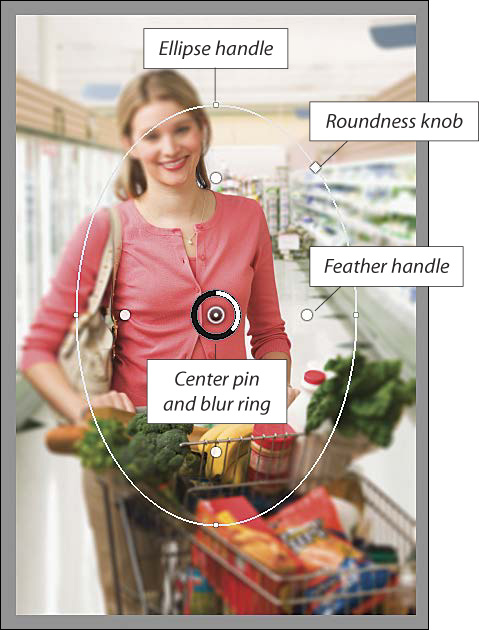
B When we chose the Iris Blur filter, the default on-canvas controls displayed.
C We moved the ellipse slightly to the left by dragging the pin, elongated the ellipse, rotated it slightly to match the angle of the figure, then held down Alt/Option and dragged just the top feather handle upward to keep the woman’s face in full focus.

D In the final image, the figure and part of the shopping cart are in focus, while the background is blurred.
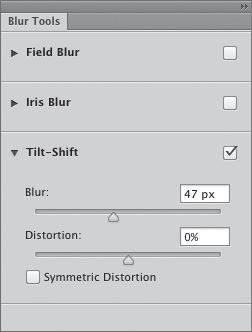
The Tilt-Shift filter applies blurring in two straight bands across the image, while keeping a band in the center in focus. You can control the width of the blurred area by dragging either or both of the focus lines, adjust the amount of feathering by dragging either or both of the feather lines, or shift the whole widget to a new angle by dragging a rotation handle slightly.A–C You can also choose a negative Distortion value to distort a blurred area along imaginary lines that curve around the pin, or a positive value to distort a blurred area along lines that radiate outward from the pin. Additionally, you can check Symmetric Distortion to apply the distortion in both sides.

A This is the original image.
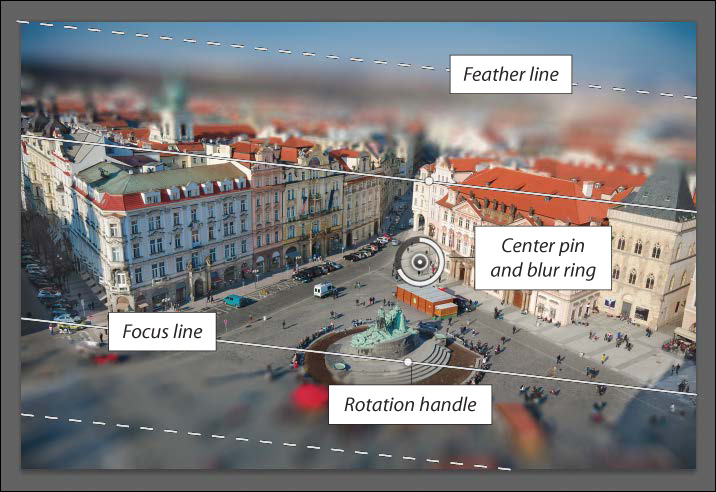
B We chose the Tilt-Shift filter settings shown at right, rotated the pin, and dragged the feather and focus lines.
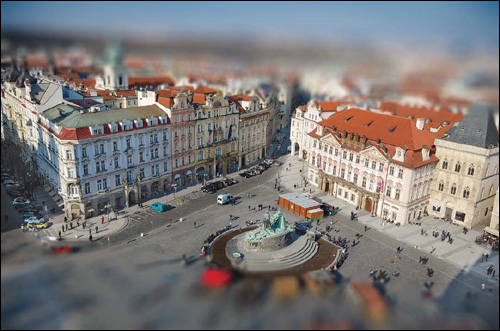
C This is the result of our applying the Tilt-Shift filter.
The Path Blur filter applies a motion blurring effect to a path. You can edit the path to control the shape of the blur, say, to mimic the result of camera movement.
To apply the Path Blur filter: ![]()
1. On the Layers panel, click a Smart Object.
2. Choose Filter > Blur Gallery > Path Blur. A blue path appears on the image. The arrow on the path indicates the direction of motion.
3. After doing any of the following, you can press and hold down H to hide the on-canvas controls:
To change the length or angle of the path, drag either endpoint.
To produce a curve, drag the center point or a straight segment.A
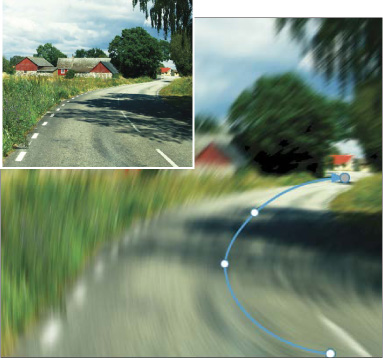
A To create an illusion of fast motion, we repositioned the two endpoints on the blue path for a Path Blur, then dragged to curve the path to match the road. To minimize blurring at the end of the road, we set the right endpoint to an End Point Speed of 0%. (The original image is shown in the inset.)
To add more curve points, drag a segment.
To convert a curve point to a corner point, or to convert a corner point to a curve point, hold down Alt/Option and click it.
To produce another (straight) path, drag in the image.B Or to produce a path that has multiple segments, hold down Alt/Option and click several times, then to end the path, press Enter/Return or Esc, or click the last point you created. To produce multiple curve segments, click without Alt/Option.
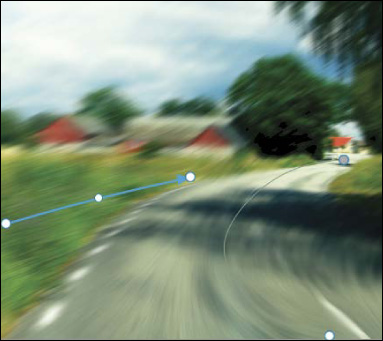
B To straighten the blurring on the left side of the road, we dragged to create a new, straight path.
To control the speed of the blur, adjust the Speed value in the panel. To control how gradually the blur fades, use the Taper slider. These settings affect all Path Blurs in the image (A).
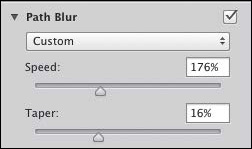
A We chose these Speed and Taper settings for all of our Path Blur paths.
Check Centered Blur for a more uniform, anchored blur; or uncheck this option for a more malleable blur, and to let imagery move more fluidly as you drag paths or blur shapes.
To move a path, hold down Ctrl/Cmd and drag it.
You can also move the midpoint along the length of a path (you can’t delete the midpoint).
To delete a point or path, click it, then press Backspace/Delete.
To further manipulate a blur shape, click an endpoint, check Edit Blur Shapes in the panel, then drag the white dot at the end of the red guide to rotate just that guide.
To change the blur speed, raise the End Point Speed value on the panel; or with Edit Blur Shapes checked in the panel, drag the end of the red guide to lengthen or shorten it.
To remove the blur from a blue endpoint, hold down Ctrl/Cmd and click the endpoint; or click the endpoint, then set the End Point Speed value in the panel to 0 (zero) (B). The red guide disappears and the endpoint becomes gray.

B To eliminate blurring from the background, we dragged to create another Path Blur, then set the End Point Speed for both endpoints on that path to 0 px.
4. Keep High Quality checked to help prevent the blur from looking jagged.
5. Follow steps 8–9 on page 326.
After choosing the Spin Blur filter, roll over the image to make the on-image controls appear.C–D
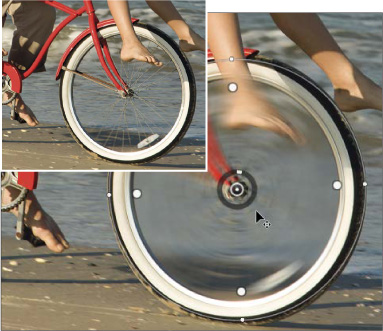
C We chose the Spin Blur filter, set the Blur Angle to 15°, and enlarged the focus ring by dragging its edge. (The original image is shown in the inset.)
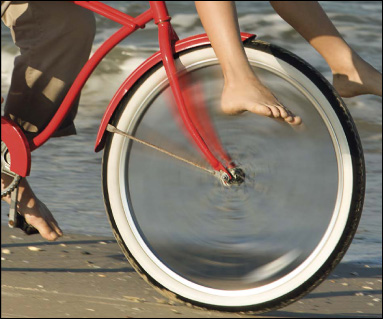
D After exiting the Blur Gallery, we clicked the Smart Filters mask thumbnail, then applied brush strokes to the bike frame and foot to mask the Spin Blur filter effect from those areas.
Adding a Strobe-and-Flash Effect
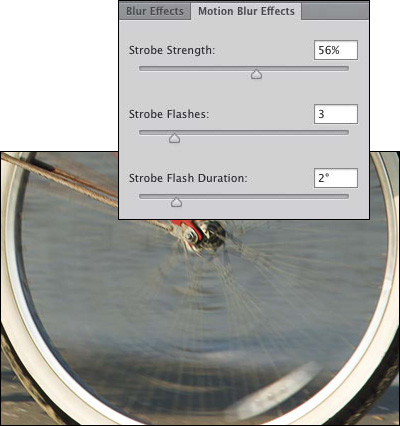
![]() Strobe Strength controls how much blur is visible between flash exposures. The higher the strength, the stronger the strobe effect.
Strobe Strength controls how much blur is visible between flash exposures. The higher the strength, the stronger the strobe effect.
![]() Strobe Flashes controls the number of exposures in the image (positions where a blurred shape is captured).
Strobe Flashes controls the number of exposures in the image (positions where a blurred shape is captured).
![]() Strobe Flash Duration (for a Spin Blur only) controls the amount of rotation that is captured in each strobe flash. The shorter the duration, the more distinct the shapes in the blur.
Strobe Flash Duration (for a Spin Blur only) controls the amount of rotation that is captured in each strobe flash. The shorter the duration, the more distinct the shapes in the blur.
Using the Bokeh Options in the Blur Gallery
To achieve good results from the Bokeh feature in the Blur Gallery, you may need to experiment with various images and settings (it took us a number of tries).
The bokeh will be more pronounced in some areas of an image than in others; you will see this if you drag a pin to a different part of the image. Also, if you change the Blur value for a pin, the size of the bokeh is also affected.
![]() To control the brightness of the bokeh, adjust the Light Bokeh value.A–C
To control the brightness of the bokeh, adjust the Light Bokeh value.A–C
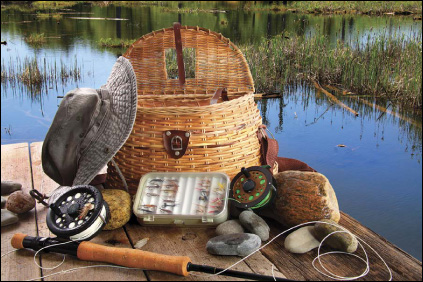
A This is the original image.
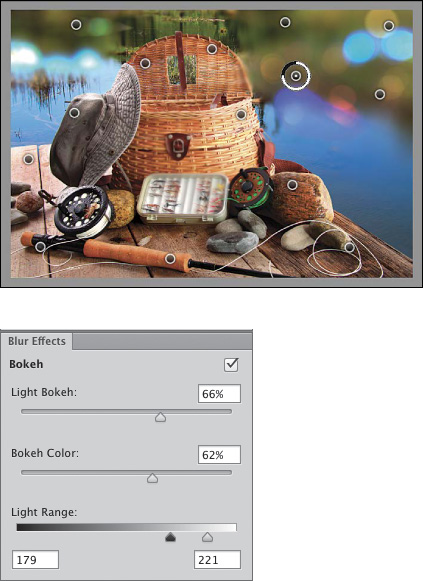
B We created multiple pins for the Field Blur filter, checked Bokeh, increased the Light Bokeh value to brighten the bokeh, increased the Bokeh Color to intensify the color saturation, and moved the Light Range sliders near each other at the right end of the bar to limit the effect to the image highlights.
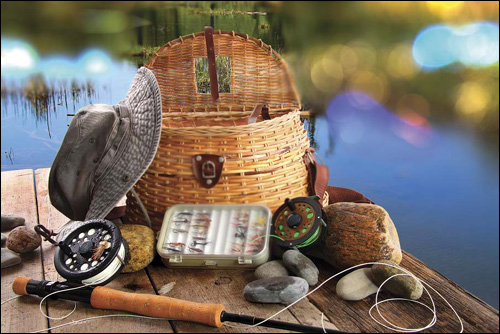
C This is the final image.
![]() To control the amount of color variation in the bokeh, adjust the Bokeh Color value.
To control the amount of color variation in the bokeh, adjust the Bokeh Color value.
![]() To control the range of brightness values in which the bokeh can appear, drag the Light Range sliders. For smaller bokeh spots, position the sliders near each other at either end of the bar.
To control the range of brightness values in which the bokeh can appear, drag the Light Range sliders. For smaller bokeh spots, position the sliders near each other at either end of the bar.
![]() For higher-quality bokeh (but slower rendering), check High Quality on the Options bar.
For higher-quality bokeh (but slower rendering), check High Quality on the Options bar.
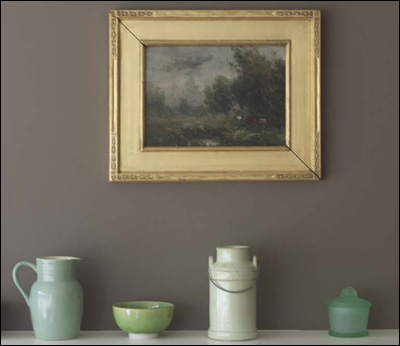
Using the Mask from a Blur Gallery Filter
As we stated in step 8 on page 326, while applying a filter in the Blur Gallery, you can save the blur mask to an alpha channel by clicking Save Mask to Channels on the Options bar. After accepting the filter, save your file.
To use the mask in your document, before applying an image edit (such as an adjustment layer, artistic filter, or brush strokes), hold down Ctrl/Cmd and click the alpha channel thumbnail on the Channels panel ![]() to load the mask as a selection. It will protect the nonblurred areas of the layer.A–D
to load the mask as a selection. It will protect the nonblurred areas of the layer.A–D

A When we applied the Iris Blur filter to this image, we checked Save Mask to Channel.
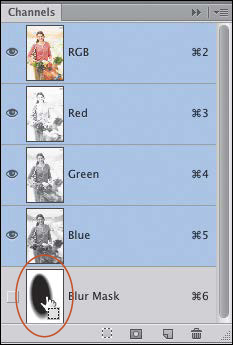
B We held down Ctrl/Cmd and clicked the alpha channel thumbnail to load the Blur Mask as a selection.
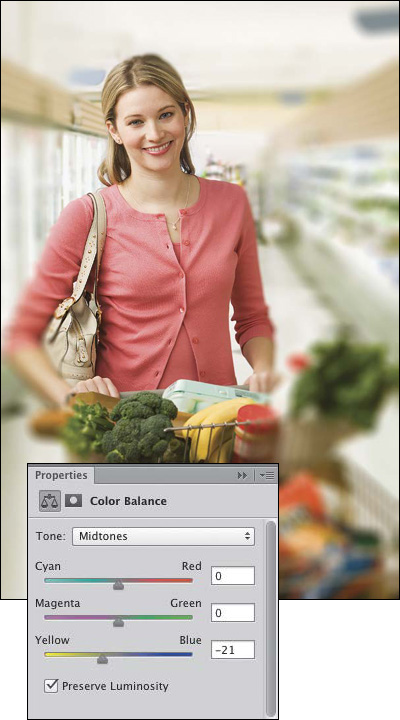
C We created a Color Balance adjustment layer, then moved the Yellow slider to the left to make the image slightly warmer.
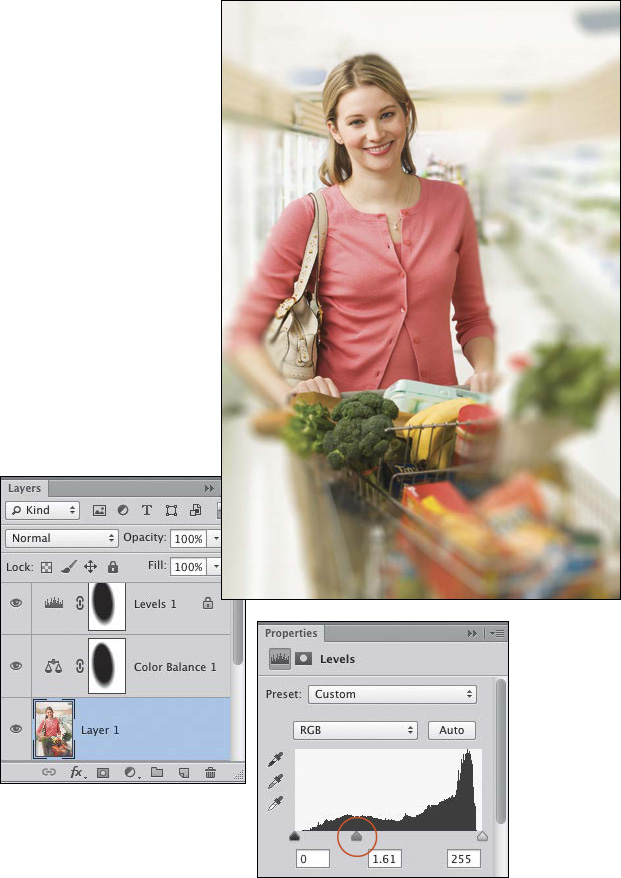
D Finally, we reloaded the selection, then used a Levels adjustment to lighten the image. The mask on each adjustment layer is hiding the adjustment from the center of the image.
Applying the Smart Sharpen filter
Most digital photos need to be sharpened, and the need increases if you change a file’s dimensions or resolution with the Resample Image option checked, convert a file to CMYK Color mode, or apply a transformation command.
To sharpen an image, you can use either the Smart Sharpen filter or the Unsharp Mask filter (the latter, despite its name, has a sharpening effect; see pages 337–338). Be aware that these filters can introduce noise, and therefore should be applied as a final step before output, after all image editing is completed.
High-resolution commercial printing also causes some minor blurring due to dot gain. You can anticipate and compensate for this by sharpening the image again as you prepare it for output. With practice, you will learn how much sharpening is needed.
The Smart Sharpen filter has several unique features that you won’t find in the Unsharp Mask dialog (see the sidebar below), but both are powerful commands. We typically use the Smart Sharpen filter for targeted sharpening, as it helps to minimize noise in soft, low-contrast areas, among other benefits, and use the Unsharp Mask filter for output sharpening. Regardless of which command you use, be sure to sharpen, period!
Smart Features of the Smart Sharpen Filter
![]() It lets you sharpen (then fade the sharpening) separately in the shadow and highlight areas of an image.
It lets you sharpen (then fade the sharpening) separately in the shadow and highlight areas of an image.
![]() It detects edges, and therefore produces fewer color halos than Unsharp Mask.
It detects edges, and therefore produces fewer color halos than Unsharp Mask.
![]() With its Reduce Noise option, the filter sharpens edges without sharpening noise.
With its Reduce Noise option, the filter sharpens edges without sharpening noise.
![]() Smart Sharpen lets you choose from three algorithms (to correct Gaussian blur, lens blur, or motion blur), whereas Unsharp Mask corrects only Gaussian blur.
Smart Sharpen lets you choose from three algorithms (to correct Gaussian blur, lens blur, or motion blur), whereas Unsharp Mask corrects only Gaussian blur.
![]() Smart Sharpen lets you save and reuse your settings, for greater speed and consistency in your workflow.
Smart Sharpen lets you save and reuse your settings, for greater speed and consistency in your workflow.
To apply the Smart Sharpen filter:
1. Open a photo that needs sharpening.A To protect the original layer, on the Layers panel, click an image layer or the Back ground, then press Ctrl-J/Cmd-J to duplicate it. Right-click the duplicate layer and choose Convert to Smart Object.
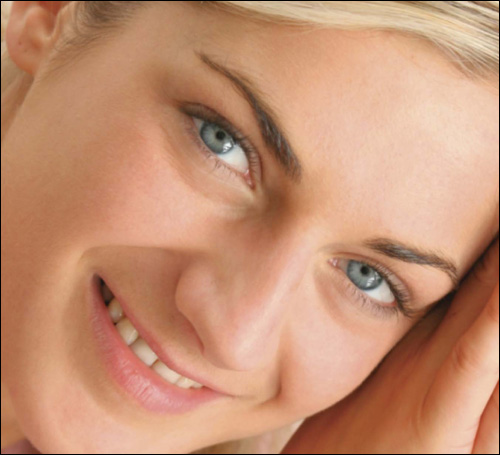
A We’ll use the Smart Sharpen filter to sharpen specific tonal areas in this blurry portrait (the resolution of this image is 300 ppi).
2. Choose Filter > Sharpen > Smart Sharpen. The Smart Sharpen dialog opens. The dialog is resizable.
![]() Set the zoom level for the preview to 100%. To bring a different area of the image into view, either drag in the preview or click in the document. On the menu in the dialog,
Set the zoom level for the preview to 100%. To bring a different area of the image into view, either drag in the preview or click in the document. On the menu in the dialog, ![]() make sure Use Legacy is unchecked.
make sure Use Legacy is unchecked.
3. From the Preset menu, choose Default.
4. Lower the Reduce Noise slider to around 5% to view the full sharpening effect.
5. Choose an Amount value for the strength of the sharpening (for a 300 ppi document, set this value to 250–350%). Increase the Radius value until halo effects display along sharp edges, then reduce it just enough to remove the halos. Don’t worry if the image now looks too sharp (A).
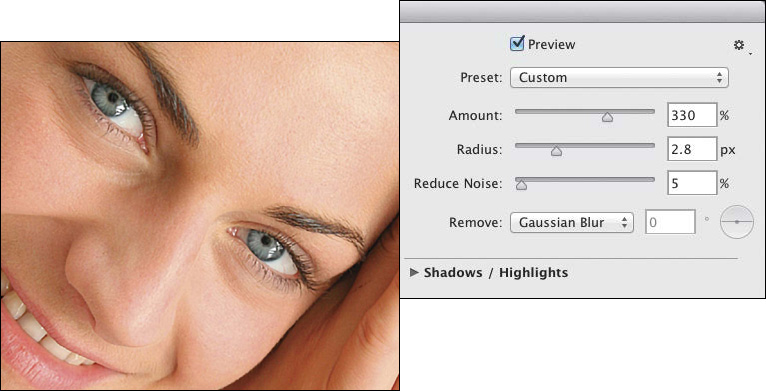
A The settings we chose in the Smart Sharpen dialog successfully sharpened the key details, such as the eyes and lips, but in the process also oversharpened the skin (now the pores look too pronounced). Note that we chose Remove: Gaussian Blur because we used that filter to soften this photo originally.
6. From the Remove menu, choose an algorithm for the correction: Gaussian Blur is a good all-purpose choice; Lens Blur sharpens details with fewer resulting halos (we prefer this option); Motion Blur is useful for correcting blurring due to slight movement of the camera or subject, but to use this option effectively, you need to enter the correct angle of movement.
7. Increase the Reduce Noise value to lessen the amount of noise that is produced by the sharpening. Keep this value between 10% and 20% so image details aren’t softened too much.
8. Expand the Shadows/Highlights category. To reduce the amount of sharpening in the shadow areas, drag in the preview to display an area of the image that contains both shadows and midtones, then under Shadows, make these adjustments: B Choose a Radius value (between 10 and 25) to control how many neighboring pixels will be compared to each adjusted pixel. The higher the Radius, the larger the area that Photoshop uses for comparison.
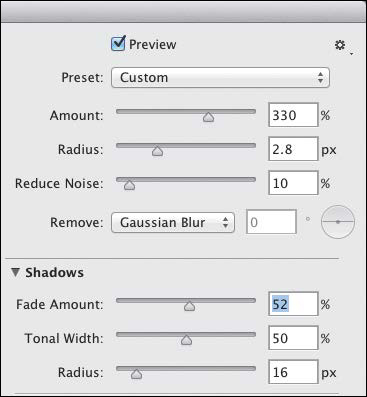
B Under Shadows, we chose a moderate Fade Amount to soften the sharpening and noise in the shadows (such as in the area between the woman’s face and hands), and we chose a moderate Tonal Width value to sharpen the shadows fully and the midtones only partially (to keep the midtones looking smooth).
Move the Fade Amount slider until you see the desired reduction of oversharpening in the shadows.
Choose a Tonal Width value to control the range of midtones that are affected by the Fade Amount.
The higher the Tonal Width, the wider the range of midtones that are affected, and the more gradually the sharpening fades into the shadows. At a low value (5–20%) only very dark shadow areas will be sharpened.
9. To reduce the amount of sharpening in the highlight areas, drag the image in the preview to display an area that contains both highlights and midtones, then under Highlights,A adjust the Radius, Fade Amount, and Tonal Width values (in that order), as you did in the preceding step.
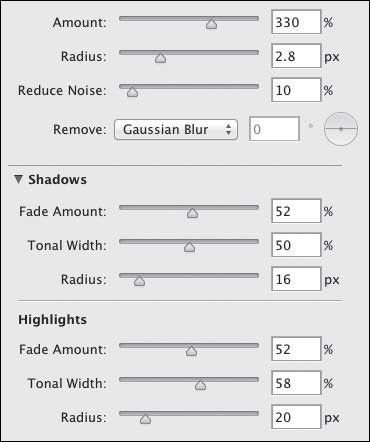
A Finally, under Highlights, we chose a moderate Fade Amount to soften the sharpening in the highlights, and a higher Tonal Width value to extend the softened sharpening into the midtones (the broad, flat areas, such as the forehead, cheeks, and chin).
10. To compare the unsharpened and sharpened versions of the image, press on the dialog preview, then release. Hopefully, the image details are sufficiently sharp. If the overall image looks too sharp, either reduce the uppermost Radius value slightly or raise the Reduce Noise value slightly.
11. Optional: To save the current settings as a preset, choose Save Preset from the Preset menu, enter a name, then click Save. Saved presets are available on the Preset menu for any image.
12. Click OK.B–C
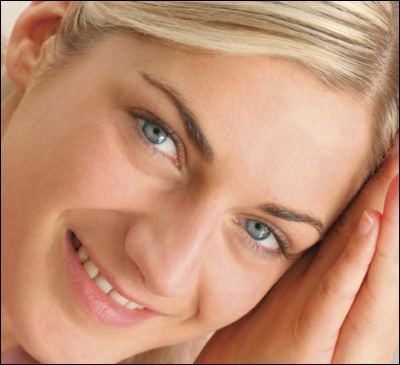
B Compare this original image to the final image, which is shown at right.

C The Smart Sharpen filter improved the clarity of the facial features without applying unflattering sharpening to the cheeks and forehead.
![]() To modify the Smart Sharpen results, double-click the Smart Sharpen listing for the Smart Object.
To modify the Smart Sharpen results, double-click the Smart Sharpen listing for the Smart Object.
Applying the Unsharp Mask filter
In order to do its job of sharpening, the Unsharp Mask filter increases the contrast between adjacent pixels. To control the level of contrast, you will choose settings for three variables: Amount, Radius, and Threshold.
To apply the Unsharp Mask filter:
1. Choose a zoom level of 50–100% for your image.
2. Duplicate an image layer (Ctrl-J/Cmd-J),A then right-click the duplicate layer and choose Convert to Smart Object.
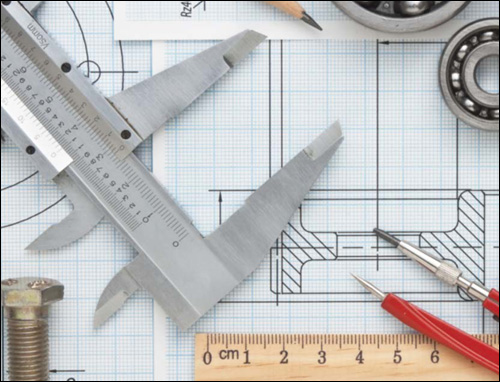
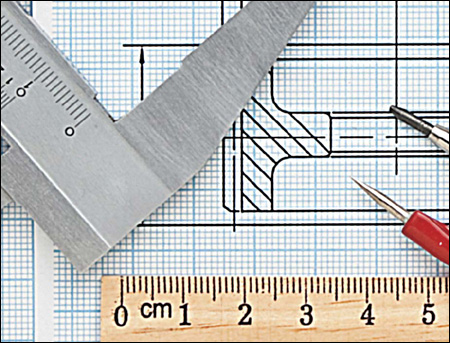
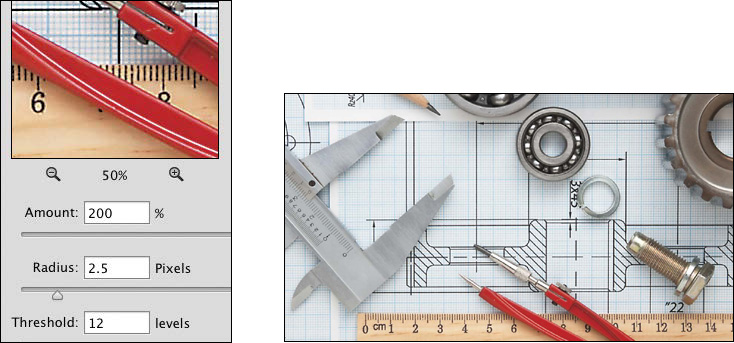
A This original 300 ppi image is slightly blurry.
3. With the Smart Object layer selected, choose Filter > Sharpen > Unsharp Mask.
4. In the dialog, choose an Amount percentage to control how much the contrast will be increased.B For some recommended settings, see the sidebar on this page.
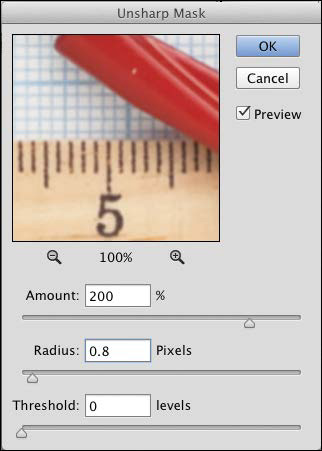
B A high Amount value and a low Radius value for the Unsharp Mask filter barely sharpened the image.
![]() Press P to toggle the Preview off, then on, to compare the original and sharpened images. To bring a different area of the image into view, drag in the preview or click in the document.
Press P to toggle the Preview off, then on, to compare the original and sharpened images. To bring a different area of the image into view, drag in the preview or click in the document.
5. The Radius setting controls how many neighboring pixels around high-contrast edges the filter affects. When setting a value, consider the pixel count of the image and its subject matter. The higher the pixel count, the higher the Radius value needed.C For a low-contrast image that contains large, simple objects and smooth transitions, try a high Radius of 2; for an intricate, high-contrast image that contains many sharp transitions, try a lower Radius of around 1.
C A high Radius value of 4.0, on the other hand, produced ugly halos around the numerals on the ruler and on the blue lines of the graph paper.
Suggested Settings for Unsharp Mask
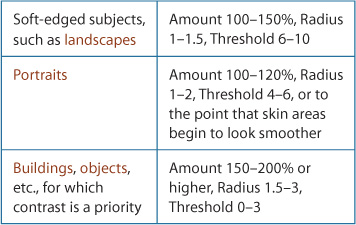
Note: The Amount and Radius settings are interdependent, meaning that if you raise the Radius, you’ll need to lower the Amount, and vice versa.
6. Choose a Threshold value to establish how different in value an area of pixels must be from an adjacent area for it to be affected by the filter.A Start with a Threshold value of 0 (to sharpen the entire image), then increase it gradually. At a Threshold of 5–10, high-contrast areas will be sharpened and areas of lesser contrast will be sharpened much less. When increasing the Threshold, you can also increase the Amount and Radius to sharpen edges.
A At a high Threshold value of 12, the Unsharp Mask filter sharpened only the high-contrast edges. The lower-contrast (light blue) lines on the graph paper remained blurry.
A proper Threshold setting will prevent the filter from oversharpening low-contrast areas.
7. Click OK.B To adjust the filter settings at any time, double-click the Unsharp Mask listing on the Layers panel.
![]() If the sharpening produced color halos along the edges of some of the objects, choose Luminosity as the blending mode for the Smart Object. This mode will limit the sharpening to just the luminosity (light and dark) values and remove it from the hue and saturation (color) values.
If the sharpening produced color halos along the edges of some of the objects, choose Luminosity as the blending mode for the Smart Object. This mode will limit the sharpening to just the luminosity (light and dark) values and remove it from the hue and saturation (color) values.
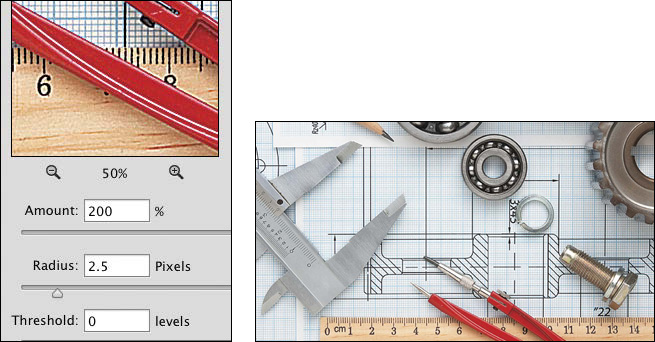
B A low Threshold value of 0–1 worked better for this image because it contains a lot of flat surfaces, hard edges, and fine lines.
Applying the Shake Reduction filter
The Shake Reduction filter detects, then resharpens, edges in a photo that were blurred due to slight shaking of the camera. The filter produces better quality results on indoor shots of a static subject taken in good natural lighting with a slow shutter speed and no flash, or on indoor or outdoor photos taken with a long focal length. The photos should contain few bright highlights and minimal noise.
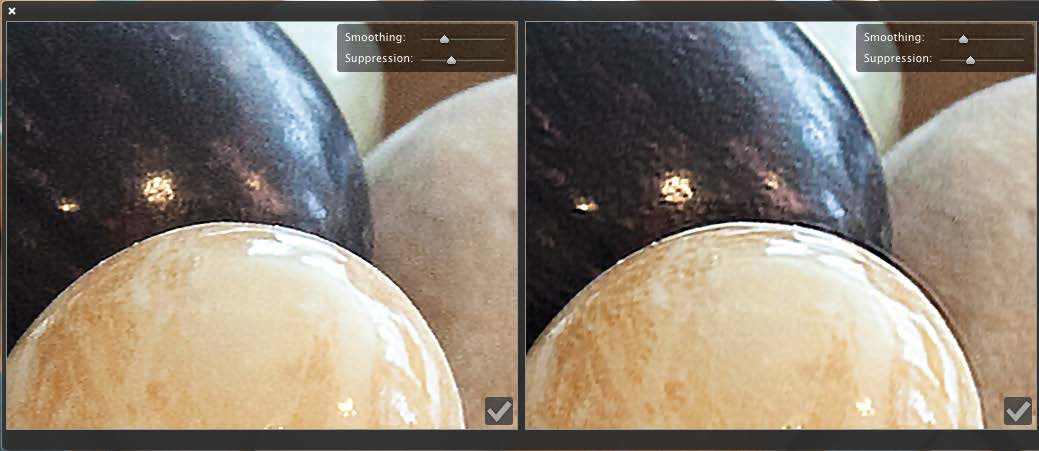
Improvements to the Shake Reduction filter include a new check box that disables or enables Artifact Suppression, as well as controls for adjusting the length or direction of a blur trace path. You can compare and adjust the Smoothing and Suppression settings for any pair of blur trace regions via sliders in a loupe. The dialog preview provides support for retina displays, and the preview on large monitors is also improved.
To apply the Shake Reduction filter:
Part 1 — Choose basic settings
1. Do either of the following: For the best results, open a raw photo into Camera Raw; correct for noise; apply minimal exposure adjustments, if necessary; then hold down Shift and click Open Object.A Open an RGB photo into Photoshop. Duplicate the photo layer (Ctrl-J/Cmd-J), then right-click the duplicate layer and choose Convert to Smart Object from the context menu.
A This original photo is blurred due to camera movement.
2. Choose Filter > Sharpen > Shake Reduction. To let the filter evaluate the amount of noise in the image, keep the Source Noise menu set to Auto.
3. An area of the photo in which the filter detects blurred edges displays in a loupe (enlarged detail).B If the loupe is docked and you want to float it over the image, click the Undock Detail button ![]() (Q) in the Detail area; or if the loupe is floating and you want to dock it in the panel, click its close (X) button. It works the same in both locations.
(Q) in the Detail area; or if the loupe is floating and you want to dock it in the panel, click its close (X) button. It works the same in both locations.
B The Shake Reduction filter chose a location for the loupe.
4. You can change the area that the filter evaluates for the correction. If the loupe is floating, drag it to a new location; if the loupe is docked, drag within it. Or choose the Blur Estimation tool ![]() (E), then click another area of the image. To optimize the filter results based on the new area, click the Enhance At Loupe Location button
(E), then click another area of the image. To optimize the filter results based on the new area, click the Enhance At Loupe Location button ![]() in the lower-left corner of the loupe. The blur and ghosting correction will render first within the loupe, then in the overall preview.
in the lower-left corner of the loupe. The blur and ghosting correction will render first within the loupe, then in the overall preview.
5. To try out a few Blur Trace Bounds values, drag the slider to the lower portion of its range, then release to preview the results; next, drag the slider to the middle portion of its range, then release to preview; and finally, do the same for the upper portion of its range (A). Set the slider to the value that produced the best results.
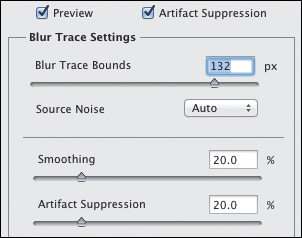
A We tried out low-, mid-, and high-range Blur Trace Bounds values before deciding on a high value of 132 px.
6. If you’re satisfied with the filter results, click OK. If not, continue with Parts 2 through 7...
![]() To compare the sharpened and unsharpened versions of the image, press P, then press P again. You can also press and hold on the loupe, then release.
To compare the sharpened and unsharpened versions of the image, press P, then press P again. You can also press and hold on the loupe, then release.
1. Check Artifact Suppression; the Artifact Suppression slider appears. To eliminate noise artifacts in low- and medium-contrast areas of the image, set the slider to a medium value (30–50%). (If you leave Artifact Suppression off, the image may look sharper, but will also contain more artifacts.)
2. The Smoothing option reduces noise in an image, but in so doing also makes the image look less sharp. With artifacts now remedied by Artifact Suppression, we suggest that you reduce the Smoothing value until noise begins to reappear. The lower Smoothing value will make the edges look sharper.
3. If you’re satisfied with the results, click OK. If not, continue with Part 3, below.
In its standard mode, the Shake Reduction filter analyzes just one region. To enable it to analyze more than one region, follow these steps.
Part 3 — Create multiple blur trace regions
1. If the Advanced area isn’t expanded, click the arrowhead. Click the Add Suggested Blur Trace button ![]() to add a new blur estimation region.B Another thumbnail appears in the side panel.
to add a new blur estimation region.B Another thumbnail appears in the side panel.
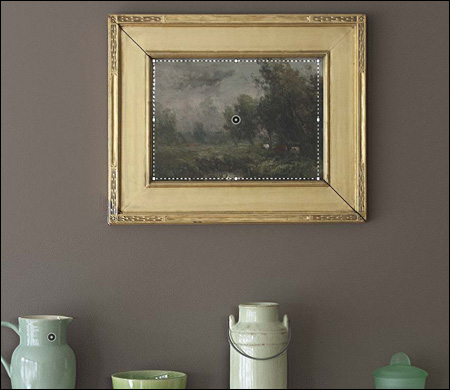
B When we clicked the Add Suggested Blur Trace button, the estimation region created by the filter straddled the edge of the picture frame and produced more ghosting.
2. If you need to reposition the estimation region, drag the pin in its center. If you need to resize the region, drag any handle.C
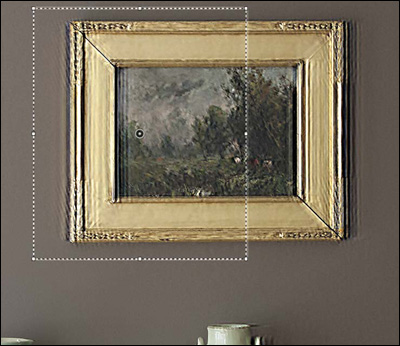
C To prevent the high-contrast edges of the picture frame from being analyzed, we sized the blur estimation region to fit the oil painting. By manually designating the region to be analyzed, we obtained better results.
3. To designate the region the filter will use to optimize the sharpening, check the box under one or both thumbnails. If you check both boxes, the filter will optimize the sharpening for each region, then apply a combination of those settings to other areas of the image (A).
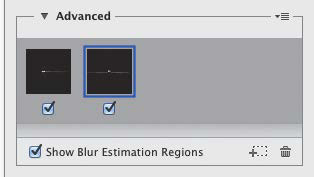
A To produce a combined sharpening result, we checked both thumbnails in the Advanced area. The white shapes in the thumbnails indicate the shape and direction of a blur that was caused by camera shake.
![]() To remove a blur estimation region, click its thumbnail, then press Backspace/Delete; or right-click the thumbnail or its pin in the preview, and choose Delete Blur Trace from the context menu.
To remove a blur estimation region, click its thumbnail, then press Backspace/Delete; or right-click the thumbnail or its pin in the preview, and choose Delete Blur Trace from the context menu.
Part 4 — Create and adjust a blur trace path ![]()
1. Zoom to around 200–300% in an area that shows ghosting from camera shake. Choose the Blur Direction tool ![]() (R), then drag a very short distance from the ghosted edge to the spot where you want it to be relocated. Another blur trace thumbnail appears in the side panel. Check Preview.
(R), then drag a very short distance from the ghosted edge to the spot where you want it to be relocated. Another blur trace thumbnail appears in the side panel. Check Preview.
![]() If you want to select (and then adjust) an existing path that you drew with the Blur Direction tool, in the Advanced area, click a blur trace thumbnail (a thumbnail that has a padlock icon), then make sure the box below the thumbnail is checked.
If you want to select (and then adjust) an existing path that you drew with the Blur Direction tool, in the Advanced area, click a blur trace thumbnail (a thumbnail that has a padlock icon), then make sure the box below the thumbnail is checked.
2. Under Blur Trace Settings,B move the Blur Trace Length slider to adjust the length of the path (to match the distance that edges in the photo were moved, and therefore blurred, by the camera shake). If needed, also rotate the Blur Trace Direction dial to adjust the angle of the path.
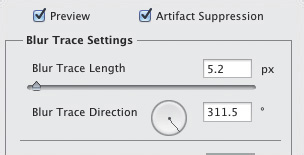
B Using the controls under Blur Trace Settings, you can customize any user-created blur trace path.
![]() Remember, if you want to compare the sharpened and unsharpened versions of the image at any time, press P (then press P again).
Remember, if you want to compare the sharpened and unsharpened versions of the image at any time, press P (then press P again).
3. Click OK to apply the filter settings and exit the dialog, or continue with another part of this task.
Part 5 — Compare and adjust blur trace settings in a loupe ![]()
1. If you haven’t already done so, create two or more blur estimation regions in the preview either by clicking the Add Suggested Blur Trace button, ![]() or by dragging twice in the preview with the Blur Estimation tool
or by dragging twice in the preview with the Blur Estimation tool ![]() (E). Adjust the blur trace settings for each region.
(E). Adjust the blur trace settings for each region.
2. In the Advanced area, hold down Ctrl/Cmd and click two blur trace thumbnails for which you want to compare and adjust settings. The results of the current settings for the selected thumb-nails will display side by side in a large loupe.C
C We held down Ctrl/Cmd and clicked two blur trace thumbnails: The adjustment results for the two regions displayed side by side in a large loupe.
3. Adjust the Smoothing and [Artifact] Suppression sliders in either or both panels of the loupe.
4. Optional: To compare and adjust the tracing results while viewing a different part of the image, drag in either panel of the loupe.
5. To close the loupe, click the close box (X) in its upper-left corner or press Esc.
Part 6 — Save your Shake Reduction settings for future use ![]()
1. From the Advanced menu In the Shake Reduction dialog, choose Save Workspace to save the current estimation regions, blur trace thumbnails, and slider settings; or choose Save Blur Trace to save just the currently selected blur trace thumbnail and its settings.A
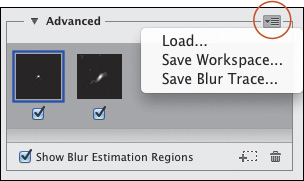
A Via the menu in the Advanced area of the Shake Reduction dialog, you can save and load your custom settings.
2. In the Save Workspace or Save Blur Trace dialog, enter a file name (keep the default extension), choose a location, then click Save.
To access a saved Shake Reduction workspace or saved blur trace settings at any time, choose Load from the Advanced menu, locate the saved workspace or blur trace file, then click Open.
![]() To restore the default settings to the dialog at any time, hold down Alt/Option and click Reset (Cancel becomes Reset).
To restore the default settings to the dialog at any time, hold down Alt/Option and click Reset (Cancel becomes Reset).
Part 7 — Exit the Shake Reduction dialog
When you’re satisfied with the filter results, click OK.
Using the Sharpen tool
When used with the Protect Detail option checked on the Options bar, the Sharpen tool enhances details without introducing noticeable artifacts. With this tool, you can sharpen areas selectively without having to use a mask.
To use the Sharpen tool:
1. Create a new, blank layer to contain the sharpened pixels, and keep it selected.B
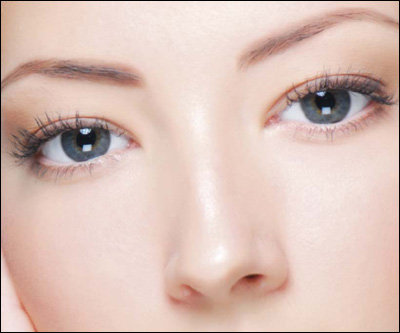
B The eyes in this photo look too soft.
2. Choose the Sharpen tool ![]() (it’s on the same fly-out menu as the Blur tool).
(it’s on the same fly-out menu as the Blur tool).
3. On the Options bar, choose a Strength value, and check Sample All Layers and Protect Detail.
4. Press [ or ] to adjust the brush diameter, then drag across the areas that need sharpening.C For stronger sharpening, drag again in the same area.

C With the Sharpen tool, we quickly sharpened just the eyes.
5. Optional: To reduce the overall effect of the sharpening, lower the opacity of the new layer.