18. Filters
In This Chapter
Creating and editing Smart Filters
Hiding, copying, and deleting Smart Filters
Working with the Smart Filters mask
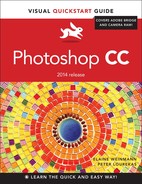
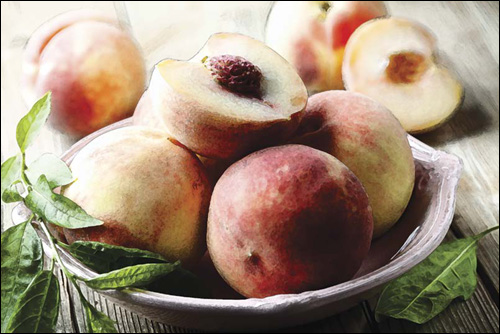
You may already have used a filter or two in Photoshop (perhaps as a step in an earlier chapter). In this chapter, filters are the star players. Depending on which filters you apply and which settings you choose, the results can range from a subtle change to a total morph.A–B You can make an image look (almost) as if it’s hand painted, silkscreened, or sketched; apply distortion; add a pattern, texture, or noise; create a mosaic or a patchwork of tiles — the creative possibilities are infinite. Once you start using the Filter Gallery, you’ll see ... time will fly by.

A This is the original image.

B We applied the Charcoal filter.
Using this chapter, you will learn techniques for applying filters, including using the Filter Gallery, Smart Filters, and the Smart Filters mask. We also suggest some ways to use filters creatively, to whet your appetite. (To locate tasks in other chapters in which individual filters are used, see “Filter menu” in the index.)
Applying filters
You can apply filters to a whole layer or just to a selection on a layer. Most of the Photoshop filters are applied either via the Filter Gallery or via an individual dialog. A small handful of them, such as Clouds and Blur, are applied in one step simply by choosing the filter name from a submenu on the Filter menu. If you apply a filter to a Smart Object, it becomes an editable, removable Smart Filter (see pages 360–364).
If you try to select a filter and discover that it’s not available, the likely cause is that it’s incompatible with the current document color mode or bit depth. All the Photoshop filters are available for RGB files, most of the filters are available for Grayscale files, fewer are available for CMYK Color, Lab Color, and 16-bits-per-channel files, still fewer are available for 32-bits-per-channel files, and none are available for Bitmap and Indexed Color files.
Most of the Photoshop filters are housed conveniently under one roof in the Filter Gallery dialog. There you can preview dozens of filters and filter settings, show and hide each filter effect that you’ve previewed, and change the sequence in which Photoshop applies them to your document.
To use the Filter Gallery:
1. Open an 8-bit, RGB image. Click an image layer; or for more flexibility, work on a duplicate image layer or a Smart Object (see “To apply a Smart Filter,” on page 360).
2. Optional: To limit the filter to a specific area of the image, create a selection.
3. The Foreground and/or Background colors are used by many filters (see the sidebar on this page), and you must choose those colors now, before opening the Filter Gallery.
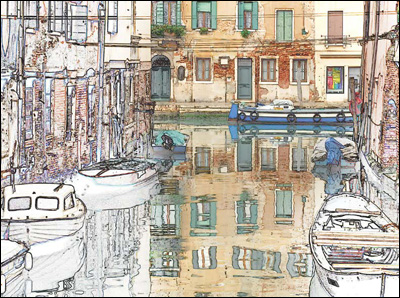
4. Choose Filter > Filter Gallery. The resizable gallery opens (A).
A The Filter Gallery dialog includes a preview area, filter categories (with thumbnails), settings for the currently selected filter effect, and a listing of the currently applied effects.
5. To change the zoom level for the preview, hold down Ctrl/Cmd and press – or + . (If the preview is magnified, you can drag it in the window.)
6. Do either of the following:
In the middle pane of the dialog, click an arrowhead to expand any of the six filter categories, then click a filter thumbnail.
Choose a filter name from the menu on the right.
7. On the right side of the dialog, choose settings for the filter. Note: Some effects and settings take longer to process than others (a progress bar may display below the preview).
8. To edit the list of effects (bottom-right portion of the dialog), do any of these optional steps:
To apply an additional filter effect, click the New Effect Layer button, ![]() click a filter thumbnail in any category, then choose settings.
click a filter thumbnail in any category, then choose settings.
To replace one filter effect with another, click a filter effect name on the scroll list (don’t click the New Effect Layer button), then choose a replacement filter and settings.
To hide (or show) a filter effect, click in the visibility ![]() column next to the effect name. To hide or show the previews for all but one filter effect, Alt-click/Option-click a visibility icon.
column next to the effect name. To hide or show the previews for all but one filter effect, Alt-click/Option-click a visibility icon.
To remove a filter effect from the list, click it, then click the Delete Effect Layer button.![]()
To change the stacking position of a filter effect to produce a different result in the image, drag the effect name upward or downward on the list.
9. Click OK.
![]() To remove a non-Smart Filter edit from an image, use the History panel.
To remove a non-Smart Filter edit from an image, use the History panel.
![]() In Edit/Photoshop > Preferences > Plug-Ins, uncheck Show All Filter Gallery Groups and Names to list, on the submenus on the Filter menu, only filters that are not in the Filter Gallery, or check this option to list all Photoshop filters on the submenus, including those that are in the Filter Gallery (the gallery opens when you choose a filter name).
In Edit/Photoshop > Preferences > Plug-Ins, uncheck Show All Filter Gallery Groups and Names to list, on the submenus on the Filter menu, only filters that are not in the Filter Gallery, or check this option to list all Photoshop filters on the submenus, including those that are in the Filter Gallery (the gallery opens when you choose a filter name).
![]() The filter effects in the Filter Gallery are sticky, meaning that the last-used settings will redisplay when you open the dialog.
The filter effects in the Filter Gallery are sticky, meaning that the last-used settings will redisplay when you open the dialog.
Filters that Use the Foreground and Background Colors
![]() Artistic > Colored Pencil (Background color), Neon Glow (Foreground and Background colors)
Artistic > Colored Pencil (Background color), Neon Glow (Foreground and Background colors)
![]() Distort > Diffuse Glow (Background color)
Distort > Diffuse Glow (Background color)
![]() Pixelate > Pointillize (Background color)
Pixelate > Pointillize (Background color)
![]() Render > Clouds, Difference Clouds, Fibers (Foreground and Background colors)
Render > Clouds, Difference Clouds, Fibers (Foreground and Background colors)
![]() Sketch > Bas Relief, Chalk & Charcoal, Charcoal, Conté Crayon, Graphic Pen, Halftone Pattern, Note Paper, Photocopy, Plaster, Reticulation, Stamp, Torn Edges (Foreground and Background colors)
Sketch > Bas Relief, Chalk & Charcoal, Charcoal, Conté Crayon, Graphic Pen, Halftone Pattern, Note Paper, Photocopy, Plaster, Reticulation, Stamp, Torn Edges (Foreground and Background colors)
![]() Stylize > Tiles (Foreground or Background color)
Stylize > Tiles (Foreground or Background color)
![]() Texture > Stained Glass (Foreground color)
Texture > Stained Glass (Foreground color)
Reapplying the Last Filter Quickly
![]() To reapply the last-used filter(s) using the same settings, choose Filter > [last filter name or Filter Gallery] (Ctrl-F/Cmd-F).
To reapply the last-used filter(s) using the same settings, choose Filter > [last filter name or Filter Gallery] (Ctrl-F/Cmd-F).
![]() To reopen either the last-used filter dialog or the Filter Gallery showing the last-used settings, press Ctrl-Alt-F/Cmd-Option-F.
To reopen either the last-used filter dialog or the Filter Gallery showing the last-used settings, press Ctrl-Alt-F/Cmd-Option-F.
Using the Preview in an Individual Filter Dialog
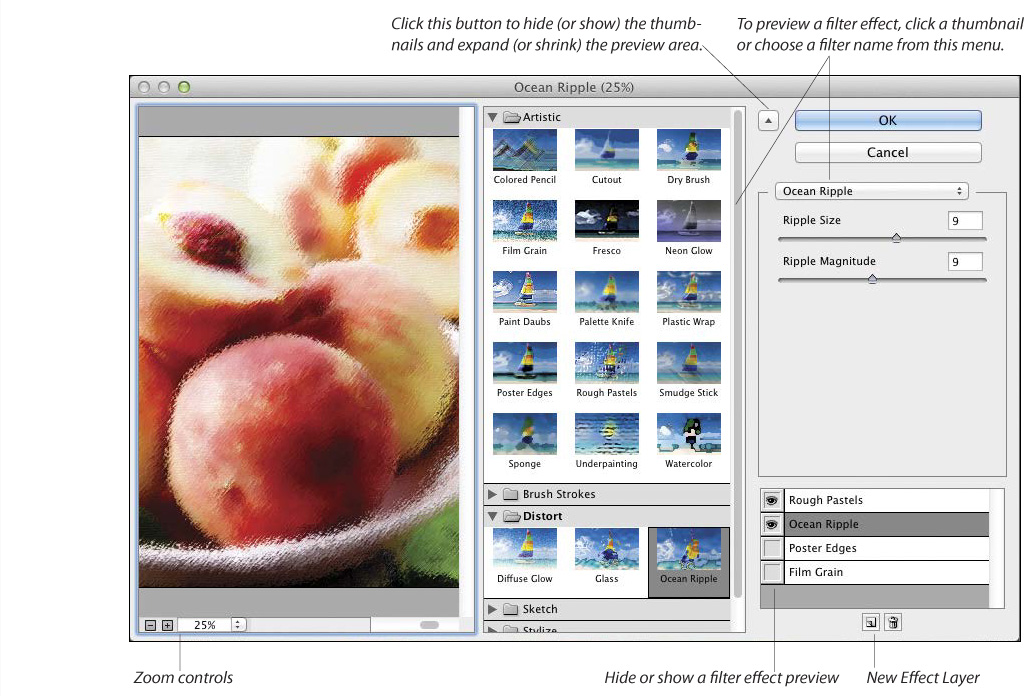
![]() For individual filter dialogs that have a preview window, you can click the + button to zoom in or the – button to zoom out (we usually do the latter). Most of the individual dialogs also have a Preview check box.
For individual filter dialogs that have a preview window, you can click the + button to zoom in or the – button to zoom out (we usually do the latter). Most of the individual dialogs also have a Preview check box.
![]() In some filter dialogs (such as Blur > Gaussian Blur and Motion Blur), if you click in the document window (square pointer), that area of the image will appear in the preview window. You can drag the image inside the preview window.
In some filter dialogs (such as Blur > Gaussian Blur and Motion Blur), if you click in the document window (square pointer), that area of the image will appear in the preview window. You can drag the image inside the preview window.
![]() To compare the image with and without the current filter effect, click and hold on the preview, then release.
To compare the image with and without the current filter effect, click and hold on the preview, then release.
Creating and editing Smart Filters
When you apply a filter to a Smart Object, it becomes what is called a Smart Filter. You can edit or remove a Smart Filter at any time, apply multiple filters to the same Smart Object, hide individual filters while keeping others visible, and move or copy filters from one Smart Object to another. You can also edit the filter mask (which is created automatically), change the stacking order of the filters, and edit the Smart Object itself. To learn about Smart Objects, see pages 264–275.
The file formats that support Photoshop layers — such as PSD, PDF, and TIFF — also support Smart Filters. Some third-party (non-Adobe) filters can also be applied as Smart Filters.
1. On the Layers panel, ![]() do either of the following: Click an existing Smart Object.
do either of the following: Click an existing Smart Object.
Click an image layer, then choose Filter > Convert for Smart Filters (or right-click the layer and choose Convert to Smart Object). If an alert appears, click OK.
2. Optional: To limit the filter effect, create a selection. (The selection area will appear in the filter mask after you apply a filter in the next step.)
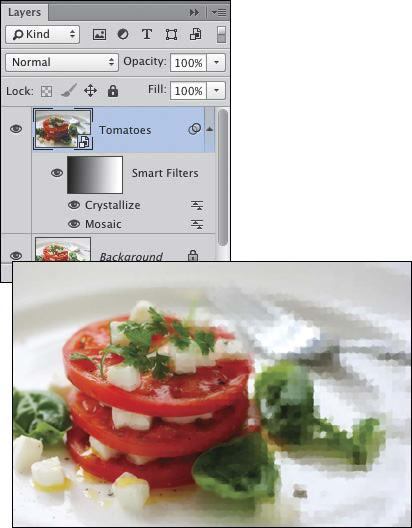
3. Apply a filter. A Smart Filters listing, mask thumb-nail, and filter listing will appear on the Layers panel.A
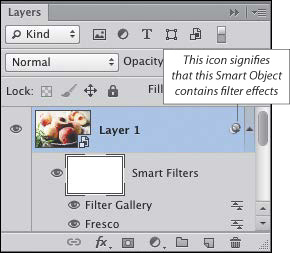
A If you apply a Smart Filter by choosing Filter > Filter Gallery, the filter will be listed as “Filter Gallery,” whereas if you apply a Smart Filter by choosing its individual name, it will be listed by its name (see also the second tip on page 358).
The most significant advantage to using Smart Filters is that you can edit the filter settings at any time.
To edit the settings for a Smart Filter:
1. Do either of the following:
Double-click on or next to the Smart Filter name on the Layers panel.
Right-click the Smart Filter name and choose Edit Smart Filter from the context menu.
2. If any Smart Filters are listed above the one you’re editing, an alert will appear, indicating that those filter effects will be hidden until you exit the Filter Gallery or filter dialog.B Check Don’t Show Again to prevent the warning from appearing again (if desired), then click OK. Note: The settings for filters that aren’t in the Filter Gallery cannot be edited in this way.
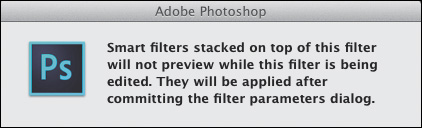
B If you edit a Smart Filter and other filters are listed above it on the same layer, this alert dialog will appear.
3. Make the desired changes in the filter dialog, then click OK.
Changing the Color Mode or Bit Depth
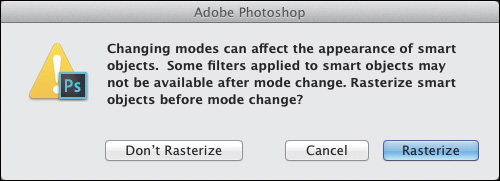
When changing the document color mode or bit depth, if the image contains Smart Filters that aren’t supported in the new mode or depth, an alert will appear (shown below). If you click Don’t Rasterize and then click Don’t Flatten or Don’t Merge, this symbol ![]() will display next to the names of filters on the Layers panel that have become inaccessible. If you then convert the file to a mode or depth that does support the filter — and respond to the alerts in the same way — the icon will disappear and the filter settings will be editable again.
will display next to the names of filters on the Layers panel that have become inaccessible. If you then convert the file to a mode or depth that does support the filter — and respond to the alerts in the same way — the icon will disappear and the filter settings will be editable again.
Not only can you change the blending mode and opacity of a Smart Object, you can also change the blending mode and opacity setting of each Smart Filter that is applied to that object. Granted, this can be a lot to keep track of. And unfortunately, there is no indicator on the Layers panel to let you know if those settings have been changed from the defaults.
To edit the blending options for a Smart Filter:
1. Double-click the Blending Options icon ![]() next to a filter name on the Layers panel,A–B then click OK if an alert dialog appears.
next to a filter name on the Layers panel,A–B then click OK if an alert dialog appears.

A We applied the Fresco and Dry Brush filters to this image.

B We double-clicked the Blending Options icon for the Fresco filter on the Layers panel.
2. The Blending Options dialog opens.C Check Preview and, if desired, lower the zoom level. Change the blending Mode and/or Opacity (use the latter to fade the filter effect), then click OK.D
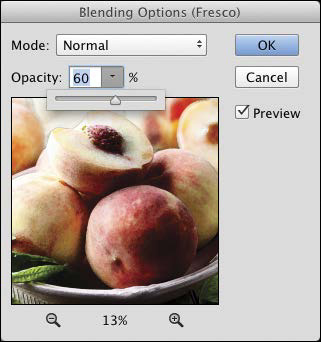
C Via the Blending Options dialog, we lowered the opacity of the Fresco filter.
D Now more of the Dry Brush filter is showing through.
![]() For another way to lower the intensity of a filter effect, see page 345.
For another way to lower the intensity of a filter effect, see page 345.
Hiding, copying, and deleting Smart Filters
To hide (or show) Smart Filter effects:
On the Layers panel, do either of the following:
Click the visibility icon ![]() for the Smart Filters listing to hide all the Smart Filters on that layer.
for the Smart Filters listing to hide all the Smart Filters on that layer.
Click the visibility icon ![]() for any individual Smart Filter. This change may take longer to process than clicking the visibility icon for all the filters.
for any individual Smart Filter. This change may take longer to process than clicking the visibility icon for all the filters.
Click where the icon formerly was to redisplay the hidden filter effect(s).
To copy Smart Filters from one Smart Object to another:
1. Expand the list of Smart Filters for a Smart Object.
2. Alt-drag/Option-drag either the Smart Filters listing or an individual filter listing to another Smart Object.
![]() You can restack any Smart Filter within a Smart Object list (pause for the edit to process).
You can restack any Smart Filter within a Smart Object list (pause for the edit to process).
![]() If you drag a filter or the Smart Filters listing from one Smart Object to another without holding down Alt/Option, the filters will be removed from the source layer and added to the target layer. Any preexisting filters on the target layer will be preserved. Pause for the edit to process.
If you drag a filter or the Smart Filters listing from one Smart Object to another without holding down Alt/Option, the filters will be removed from the source layer and added to the target layer. Any preexisting filters on the target layer will be preserved. Pause for the edit to process.
If you delete a Smart Filter from a Smart Object that contains multiple filters, it may take a moment or two for Photoshop to update the display.
To delete a Smart Filter:
On the Layers panel, ![]() do either of the following:
do either of the following:
Right-click a Smart Filter listing and choose Delete Smart Filter.
Drag a Smart Filter listing to the Delete Layer button. ![]()
Working with the Smart Filters mask
When you apply a filter to a Smart Object, a filter mask appears on the layer automatically. If you create a selection before applying the first filter to a Smart Object, the selection will appear as the white area in the mask. A filter mask can also be edited using the same methods as for a layer mask.A
A A gradient in the Smart Filters mask is hiding the filter effects fully on the left side of this image, and reveals gradually more of the effects on the right.
To edit a filter mask:
1. In a Smart Filters listing on the Layers panel, click the filter mask thumbnail.
2. Do either of the following:
Click the Brush tool, ![]() then apply strokes with black to hide the filter effect, or with white to reveal areas you’ve hidden. For a partial mask, use black and lower the tool opacity (A–E). To hide the filter effect gradually from one side of the image to the other, click the Gradient tool,
then apply strokes with black to hide the filter effect, or with white to reveal areas you’ve hidden. For a partial mask, use black and lower the tool opacity (A–E). To hide the filter effect gradually from one side of the image to the other, click the Gradient tool, ![]() then drag across the image (A–C, page 364).
then drag across the image (A–C, page 364).
Working with Smart Filters: An Example
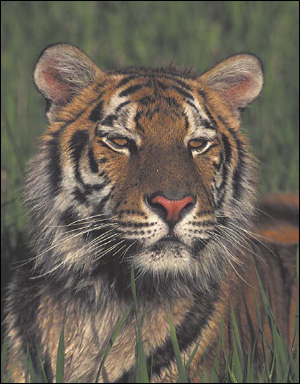
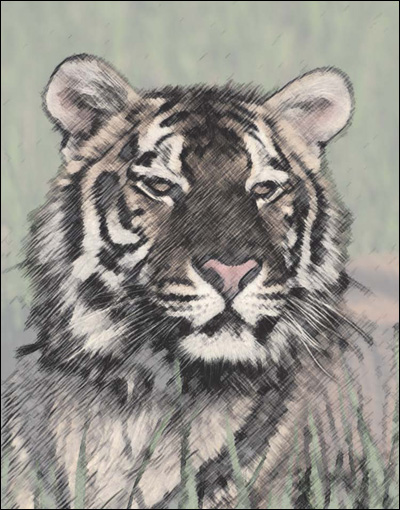
A This is the original image.

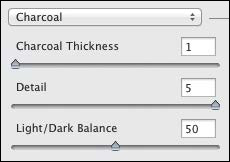
B We duplicated the Background, converted the copy to a Smart Object, pressed D to reset the default Foreground and Background colors, then applied Filter Gallery > Sketch > Charcoal (values at left).
C We reduced the Opacity of the Smart Object to 62%.
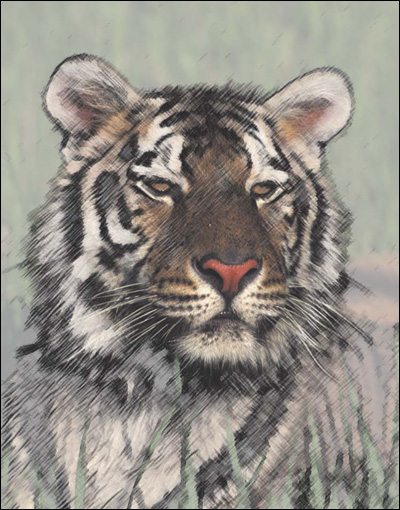
D We clicked the filter mask, then with the Brush tool at 50% Opacity and black as the Foreground color, applied strokes to partially restore the tiger’s face to its virgin state.
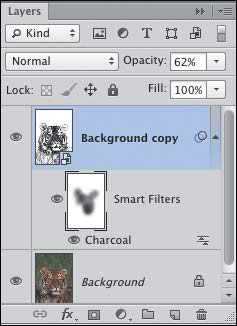
E This is the Layers panel for the image shown at left.

A Next, to wipe the filter mask clean so we could try a different approach, we clicked the filter mask thumbnail, pressed Ctrl-A/Cmd-A to select the whole mask, pressed Backspace/Delete, then pressed Ctrl-D/Cmd-D to deselect.
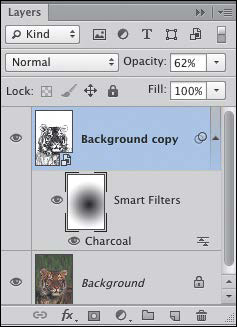
B With the Gradient tool (100% Opacity, “Black,White” preset, radial type), we dragged from the center of the image outward. The filter effect is at full strength where the mask is white, and it fades to nil where the mask is black.

C The gradient in the filter mask is diminishing the impact of the filter in the center of the image — the tiger’s face — right where we want the focal point to be.
![]() To display the filter mask by itself in the document, Alt-click/Option-click the mask; repeat to redisplay the full Smart Object.
To display the filter mask by itself in the document, Alt-click/Option-click the mask; repeat to redisplay the full Smart Object.
![]() To soften the transition between black and white areas in a filter mask, click the filter mask thumb-nail, then on the Properties panel,
To soften the transition between black and white areas in a filter mask, click the filter mask thumb-nail, then on the Properties panel, ![]() adjust the Feather value. To control the overall opacity of the mask, use the Density slider.
adjust the Feather value. To control the overall opacity of the mask, use the Density slider.
If for some reason a filter mask is deleted and you want to restore it, do as follows.
To create a filter mask:
1. Optional: Create a selection.
2. Right-click the Smart Filters listing on the Layers panel and choose Add Filter Mask.
To deactivate a filter mask temporarily:
Shift-click the mask thumbnail (a red X appears over the thumbnail). Repeat to reactivate the mask.
To delete a filter mask:
Do either of the following:
Drag the filter mask thumbnail to the Delete Layer button ![]() on the Layers panel.
on the Layers panel.
Right-click a Smart Filter listing and choose Delete Filter Mask.
Filters and an Adjustment Layer
More filter techniques
If you apply filters to a Smart Object, you will be able to change the settings easily — and will feel more free to experiment. If you come up with a filter formula that you like, consider recording your steps in an action so you can apply it to other images. Here are a few more suggestions:
![]() Filters tend to make an image more abstract, reducing recognizable elements to line work, or to fewer or flatter areas of color. Start with an image that has a strong composition. Look for shapes that contrast in scale and have interesting contours, which will carry more weight once you apply filters.
Filters tend to make an image more abstract, reducing recognizable elements to line work, or to fewer or flatter areas of color. Start with an image that has a strong composition. Look for shapes that contrast in scale and have interesting contours, which will carry more weight once you apply filters.
![]() Fine-tune the resulting luminosity levels or colors via an adjustment layer above the filtered layer.A–D
Fine-tune the resulting luminosity levels or colors via an adjustment layer above the filtered layer.A–D
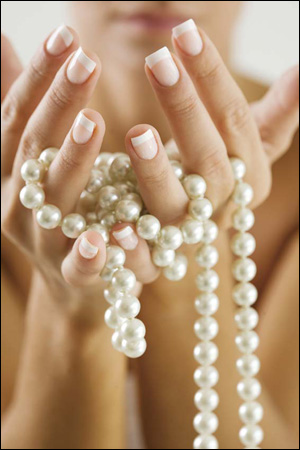
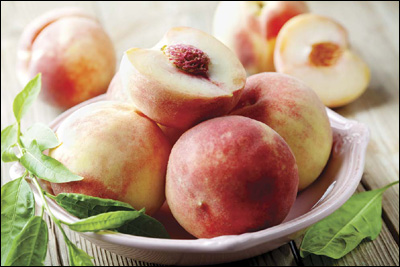
A We duplicated the Background in this image, then converted the duplicate layer to a Smart Object.
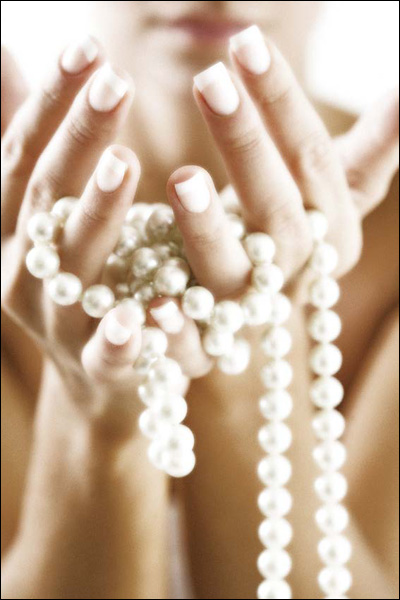
B We applied Filter > Filter Gallery > Distort > Diffuse Glow.
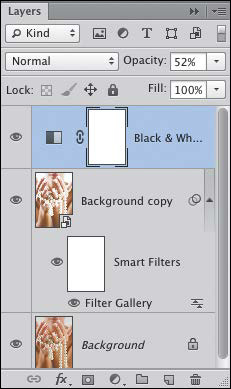
C We created a Black & White adjustment layer, then lowered the Opacity of that layer to 52%.
D This is the final image.
![]() Apply filters separately to a Smart Object one by one (not by creating multiple effects in the Filter Gallery), then via the Blending Options dialog, lower the opacity of the topmost filter and/or change its blending mode. You can also apply filters to separate layers, then change the layer opacity or blending mode of any layer (A–E).
Apply filters separately to a Smart Object one by one (not by creating multiple effects in the Filter Gallery), then via the Blending Options dialog, lower the opacity of the topmost filter and/or change its blending mode. You can also apply filters to separate layers, then change the layer opacity or blending mode of any layer (A–E).
Filters, an Adjustment Layer, and Blending Modes
A We converted a duplicate of the Background to a Smart Object.
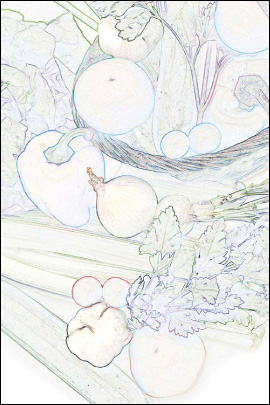
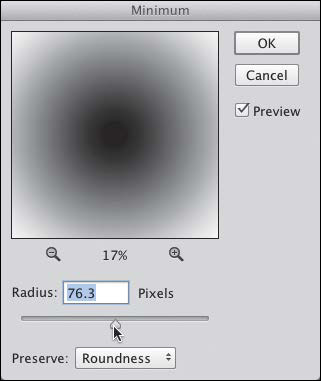
B We applied Filter > Other > Minimum (Radius 1), then Filter > Stylize > Find Edges.
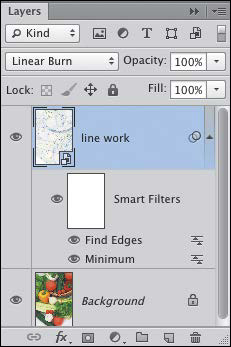
C We changed the blending mode of the Smart Object to Linear Burn.
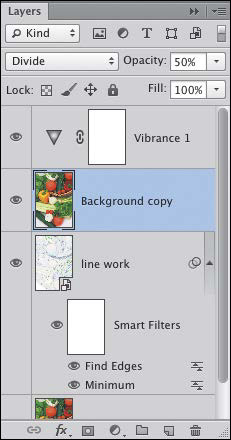
D We created a second duplicate of the Background, moved the duplicate to the top of the Layers panel, changed the blending mode of that layer to Divide, and lowered its Opacity to 50%. Finally, we used a Vibrance adjustment to boost the colors slightly.
E This is the final image.
![]() For less predictable and “machine made” results, apply two or more filters that have contrasting or complementary effects. For instance, you could apply one filter that reduces shapes to line work (such as Poster Edges) and another filter that changes the color or applies an overall texture, such as Grain > Texturizer.
For less predictable and “machine made” results, apply two or more filters that have contrasting or complementary effects. For instance, you could apply one filter that reduces shapes to line work (such as Poster Edges) and another filter that changes the color or applies an overall texture, such as Grain > Texturizer.
![]() For a personal touch, apply some paint strokes (A–B, page 367).
For a personal touch, apply some paint strokes (A–B, page 367).
A Texture Filter and Paint Strokes
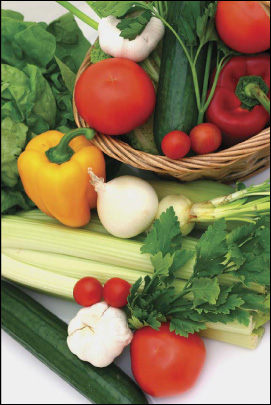
A This is the original image.
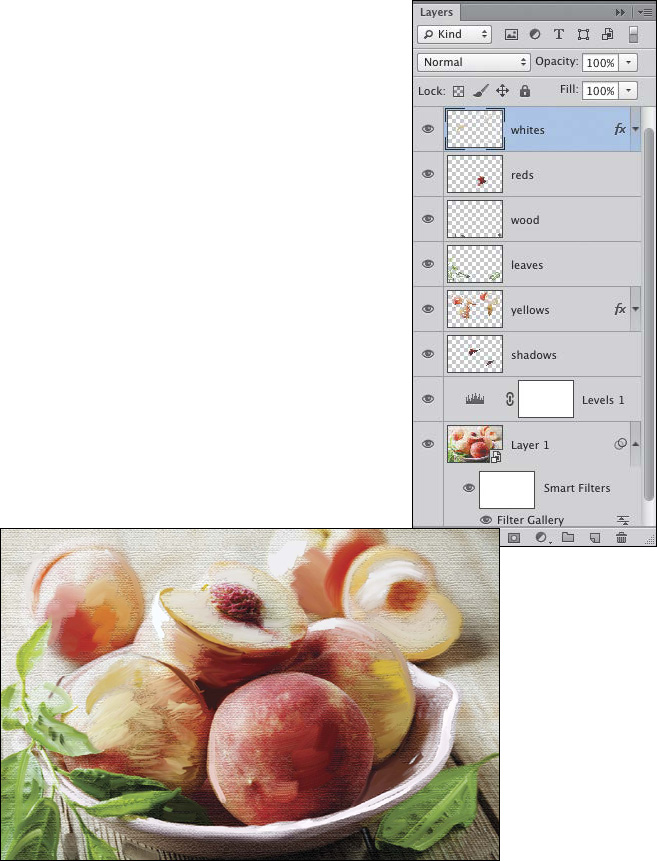
B This is the image and the Layers panel after we converted a duplicate image layer to a Smart Object, applied the Texturizer filter (Burlap texture) via the Filter Gallery, and used the Mixer Brush tool (Sample All Layers checked) to apply paint strokes to six new layers. We also applied the Drop Shadow effect to a couple of the paint layers for added depth, and a Levels adjustment to heighten the contrast in the underlying image.
In these steps, you’ll turn a photo into a watercolor by applying a series of filters. Try devising some of your own formulas, too!
To turn a photo into a tinted drawing:
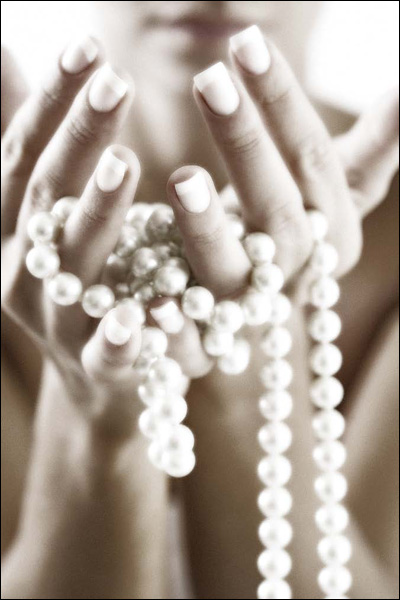
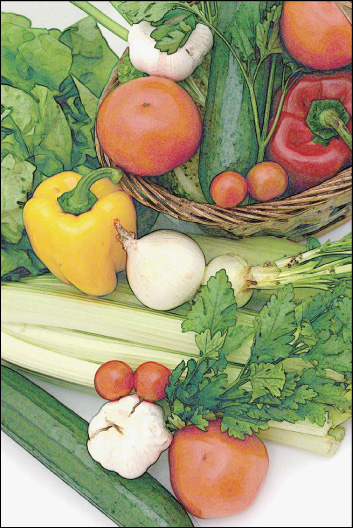
1. Duplicate an image layer in a high-resolution photo.A
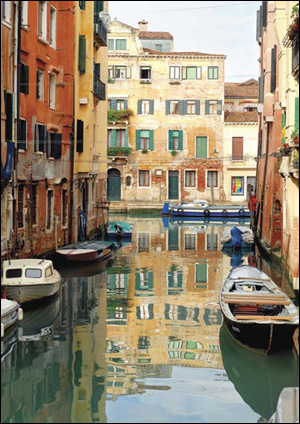
A We duplicated the Background in this original image.
2. Choose Filter > Stylize > Find Edges.B
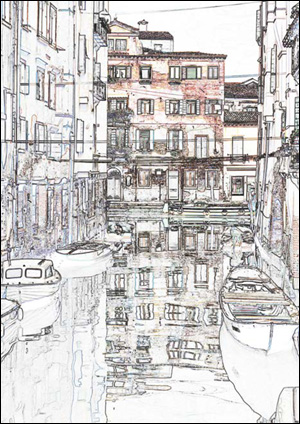
B We applied the Find Edges filter to the duplicate layer.
3. Choose the Brush tool. ![]() On the Options bar, choose a Soft Round brush, Normal mode, and an Opacity below 40%.
On the Options bar, choose a Soft Round brush, Normal mode, and an Opacity below 40%.
4. Click the Add Layer Mask button ![]() on the Layers panel, and keep the layer mask thumbnail selected.
on the Layers panel, and keep the layer mask thumbnail selected.
5. Make sure the Foreground color is black, size the brush cursor, then apply strokes to the image to reveal areas of the underlying layer.
6. Do any of the following optional steps:
Lower the opacity of the duplicate layer.
Change the blending mode of the duplicate layer (try Lighter Color, Hard Light, Pin Light, or Luminosity).C–D
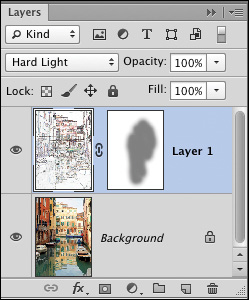
C This is the Layers panel for the final image, which is shown at right.
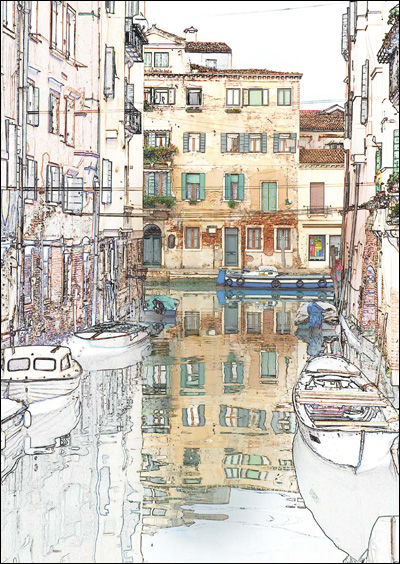
D We applied brush strokes to the layer mask to reveal some of the underlying image, and chose Hard Light as the blending mode for the duplicate layer.
Intensify the contrast via a Levels adjustment layer.