Appendix. Syncing Photoshop settings via the Creative Cloud
Via the Adobe Creative Cloud, you can sync Photoshop presets and application preferences between two computers (e.g., a desktop computer and a laptop); manage your files (e.g., post them publicly); and acquire program updates immediately when they are released.
Adobe permits each user to activate his or her licensed copy of Photoshop on two computers. For a more consistent workflow, you can sync your Photoshop presets, workspaces, preferences, and other settings between two computers. To do this, you will upload your Photoshop preferences and panel settings from one of your computers to the Cloud, then sync your settings from the Cloud to your other computer. The computers don’t have to be connected to each other, but you must be signed in to your Cloud account. In these tasks, we’ll refer to the two machines as the first and second computer, but you can sync from either computer to the Cloud.
To upload settings from your first computer to the Creative Cloud: ![]()
1. Choose settings in the Preferences dialog and/or in any Photoshop panels or pickers. For example, you could add swatches to the Swatches panel or gradients to the Gradient picker, define custom shapes, create brushes or actions, or load Adobe default or user-created libraries onto any panels. You can also create and save custom workspaces.
2. To verify that you are currently signed in to your Creative Cloud account, click the Edit/Photoshop menu; your account name should be listed.
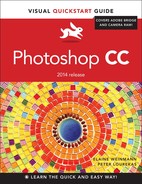
3. To choose or change which categories of settings are synced, choose Edit/Photoshop > Preferences > Sync Settings.A From the What To Sync menu, choose Everything or Custom. If you chose Custom, check boxes for the categories of settings that you want to sync (Workspaces is a new option). Click Upload.
A To upload our Photoshop settings to the Creative Cloud, we clicked Upload in the Sync Settings panel of the Preferences dialog.
4. While the settings are being uploaded, a progress bar displays in the dialog. A list of the settings, and their individual time of upload, will appear in the Log window (the latest one is at the top of the list). Only user-created, non-default settings and libraries that are currently on the pickers and panels will be uploaded. Any existing presets and workspaces in the Cloud that have the same names as those that are being uploaded will be overwritten with the settings from your current computer. Note: When you exit/quit Photoshop, the Log window will be cleared.
5. Click OK.
![]() To upload Photoshop settings from your computer to the Cloud at any time using the current What To Sync settings (bypassing the Preferences dialog), choose Edit/Photoshop > [your Adobe ID] > Upload Settings.
To upload Photoshop settings from your computer to the Cloud at any time using the current What To Sync settings (bypassing the Preferences dialog), choose Edit/Photoshop > [your Adobe ID] > Upload Settings.
![]() To stop an upload (or download) while it’s in progress, click Stop.
To stop an upload (or download) while it’s in progress, click Stop.
![]() Workspace settings that you create on one operating system can’t be downloaded to a computer that has a different operating system.
Workspace settings that you create on one operating system can’t be downloaded to a computer that has a different operating system.
![]() If you need to deactivate the Sync Settings feature, from the What To Sync menu in the Sync Settings panel of the Preferences dialog, choose Nothing (all categories will be unchecked).
If you need to deactivate the Sync Settings feature, from the What To Sync menu in the Sync Settings panel of the Preferences dialog, choose Nothing (all categories will be unchecked).
Once you have uploaded your settings from your first computer to the Cloud, you can sync (download) those settings to your second computer at any time.
Note: If any of your panels or pickers contain unsaved presets that you want to preserve, save them as a library before following the steps below (see page 131); otherwise, when you follow those steps, your unsaved presets will be overwritten with settings from the Cloud. If you have made edits to any user-created preset library, save it under a new name. Also, if you have reconfigured any default or user-created workspace, save it under a new name (see page 108).
To download settings from the Creative Cloud to your second computer: ![]()
1. On your second computer, launch Photoshop, and verify that you’re signed in to your Creative Cloud account.
2. Choose Edit/Photoshop > Preferences > Sync Settings. From the What To Sync menu, choose Everything or Custom. If you chose Custom, check the boxes for the categories of settings that you want to download.
3. Click Download. While the settings are being downloaded, a list of those settings, and their individual time of download, will appear in the Log window. Any existing presets and workspaces on your current computer that have the same names as those that are being downloaded will be replaced by the settings in the Cloud.
4. Click OK.
![]() To download Photoshop settings from the Cloud to your current computer at any time using the current What To Sync settings (bypassing the Preferences dialog), choose Edit/Photoshop > [your Adobe ID] > Download Settings.
To download Photoshop settings from the Cloud to your current computer at any time using the current What To Sync settings (bypassing the Preferences dialog), choose Edit/Photoshop > [your Adobe ID] > Download Settings.
Managing files via the Creative Cloud
One of the benefits of having a Creative Cloud subscription is that you are allotted space on your page to store your files (as of this writing, up to 20 GB). Once they’re stored in the Cloud, you can access them from any computer, post them publicly, or transmit them via email. You can get to your Creative Cloud page directly from Photoshop.
To upload files to the Creative Cloud: ![]()
1. Launch the Creative Cloud app. ![]()
2. Click Files, then click View on Web.
3. Your personal Creative Cloud page displays in your browser. Do either of the following:
From the Actions menu, choose Upload. In the dialog, locate and click a file name (or Ctrl/Cmd click multiple file names), then click Choose.
Move the Creative Cloud window slightly to the side, then drag a file thumbnail (or multiple selected thumbnails) from Bridge into the Creative Cloud window.
4. A progress bar will display at the top of your Cloud page while the files are uploading. When the uploading is finished, a thumbnail of the chosen file(s) will display on your page.
To share, rename, move, or archive files via the Creative Cloud: ![]()
1. Follow steps 1–2 in the preceding task.
2. From the View menu at the top of your Creative Cloud page, choose Mosaic or List.
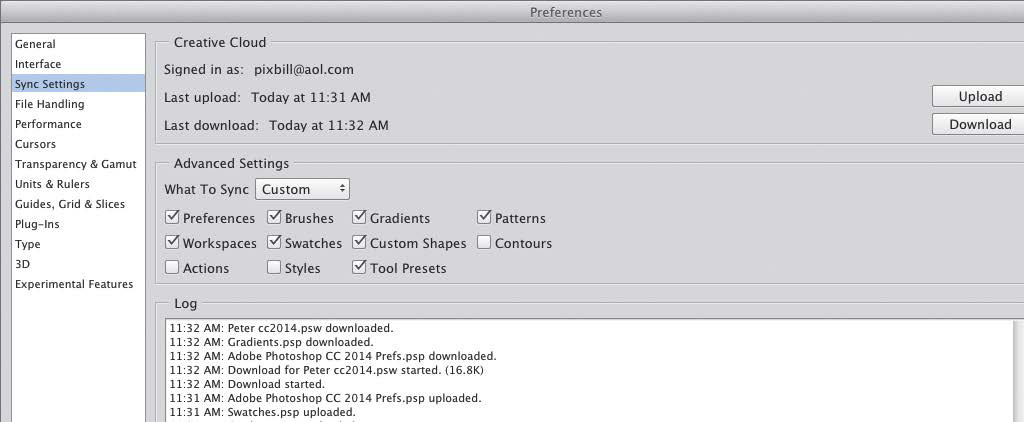
3. From the menu in the lower-right corner of any file thumbnail, choose one of these options: A
A You can post, send, move, rename, or archive any individual file from your Creative Cloud page via commands on the menu in the lower-right corner of the file thumbnail.
To share the file via Behance, choose Post Publicly (if available for the current file format). To learn more about Behance, see the sidebar on this page.
To email the file, choose Send Link. Click Create Public Link to unlock the file; check Allow File Download, if desired; enter the email address of the recipient; then click Send Link.
To put the file into a folder on your Creative Cloud page, choose Move, click a folder name in the dialog, then click Move [number of] Items. (If you need to create a new folder first, from the Actions menu above the image thumbnails, choose Create Folder, enter a name, then click Create Folder.)
To rename the file, choose Rename, enter the desired name, then click Rename.
To archive the file (remove it from your main page and move it to an Archive page, for potential future deletion from the Cloud), click Archive, then click Archive again. To display all your archived files, click Archive in the menu bar. Check the box next to the files that you want to restore or delete, click Permanently Delete or Restore (at the top of the list), then click the button of the same name. To return to your personal page, click Creative Cloud Files.
More Creative Cloud Resources
![]() To display a dialog that provides links to Creative Cloud Apps, Assets, and Community, click your name on the menu bar.
To display a dialog that provides links to Creative Cloud Apps, Assets, and Community, click your name on the menu bar.
![]() To display a panel that indicates how much of your current Creative Cloud Storage is occupied, and also contains links for you to Manage your Desktop Sync Settings and access Creative Cloud Help, click the gear icon
To display a panel that indicates how much of your current Creative Cloud Storage is occupied, and also contains links for you to Manage your Desktop Sync Settings and access Creative Cloud Help, click the gear icon ![]() above the image thumbnails. To learn more about Behance, click Find Answers to Common Questions Here, then click a Behance topic under Tutorials for Creative Cloud or Community.
above the image thumbnails. To learn more about Behance, click Find Answers to Common Questions Here, then click a Behance topic under Tutorials for Creative Cloud or Community.
To manage an individual file via other commands on the Creative Cloud: ![]()
1. On your Creative Cloud page, click a file thumbnail.
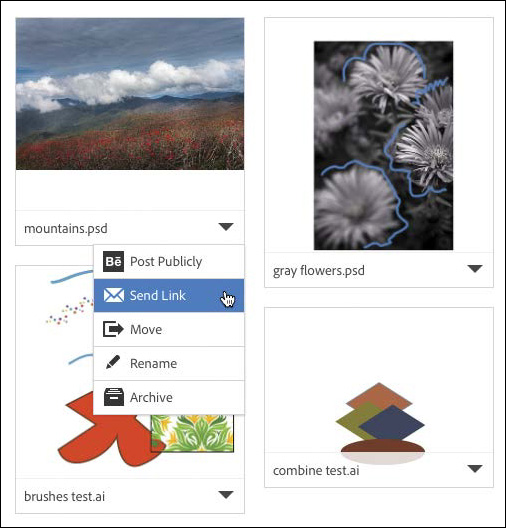
2. The file displays in an enlarged view, and information about the file displays under Details on the right.A
A On our personal Creative Cloud page, we clicked a file thumbnail to enlarge its display size and to view its file details.
3. Do any of the following:
To change the visibility of layers in the file, click the Layers button ![]() above the image, then click the visibility icon for the layer(s) you want to show or hide. (If the file doesn’t contain layers, that icon won’t display.) If you want to restore all layers to the visibility settings that were saved in the file, click Reset Layers.
above the image, then click the visibility icon for the layer(s) you want to show or hide. (If the file doesn’t contain layers, that icon won’t display.) If you want to restore all layers to the visibility settings that were saved in the file, click Reset Layers.
![]() Via the Share menu, you can access the Post Publicly and Send Link commands. And via the Actions menu, you can access the Download, Rename, Archive, and Replace commands.
Via the Share menu, you can access the Post Publicly and Send Link commands. And via the Actions menu, you can access the Download, Rename, Archive, and Replace commands.
To load swatches of colors that are found in the current image into Adobe Kuler (kuler.adobe.com), an Adobe website that is used for browsing and creating color themes, click the swatches bar under Made With. The swatches will display on the Create page at Adobe Kuler. To learn about Kuler, search for “Kuler” in Photoshop Help.
To manage comments about the file, click Activity. To add a comment, click in the field, type your remarks, then click Add Comment. To delete a comment, roll over the comment and click the X, then click Delete Comment.
4. To return to viewing your personal page of thumbnails, click either Files on the menu bar, or click the back arrow to the left of the file name.
To sign out of your Creative Cloud page: ![]()
Click your name on the menu bar, then in the dialog click Sign Out.