2. Creating Files
In This Chapter
Calculating the correct file resolution
Creating a new, blank document
Editing 16-bit files in Photoshop
In Photoshop, you can edit a single photo to your heart’s content, create a complex montage of imagery that you gather from multiple files, or paint an image entirely from scratch. Photoshop generously accepts and reads files in a wide assortment of file formats, so your imagery can be gathered from a variety of sources, such as from a digital camera, scanner, or drawing application.
In this chapter, you will learn how to create a new, blank document, create document presets for your favorite settings, understand the characteristics of 16-bits-per-channel files, save and generate new versions of a file, use the Status bar, and close up shop.
Just to give you an idea of where you’re headed, in the next chapter, you will learn how to download photos from a camera and use Bridge to open and manage files, and, in Chapter 4, you will learn how to correct photos in Camera Raw, and open them into Photoshop.
Calculating the correct file resolution
Resolution and dimensions for Web output
Choosing the correct resolution for Web output is a no-brainer: Set the resolution for your file to 72 ppi.
Choosing the correct dimensions for Web output requires a little more forethought, because you need to calculate how your Photoshop document is going to be used in the Web page layout. The easiest way to create a document with the proper dimensions and resolution for Web output is by choosing a preset, as described in step 3 on page 15.
To determine a maximum custom size for a Photoshop image that is going to be displayed on a Web page, you need to estimate how large the average user’s browser window is likely to be, then calculate how much of that window the image is going to fill. On a desktop computer, viewers commonly have their browser window open to a width of approximately 1000 pixels. Subtract the space that is occupied by the menu bar, scroll bars, and other controls in the browser interface, and you’re left with an area around 950 pixels wide by 600 pixels high; you can use those dimensions as a guideline. In the more likely event that your Photoshop file is going to be used as a small element within a Web page layout, you can choose smaller dimensions.
Most digital cameras provide a choice: You can let the camera capture and save all the pixels as raw files (recommended) or you can let the camera process, compress, and save the data into small, medium, or large JPEG files. We prefer raw files, for reasons that we explain in Chapter 4. When using a scanner to acquire images for Photoshop, you can set the input resolution in the scanner software to control how many pixels the device captures.
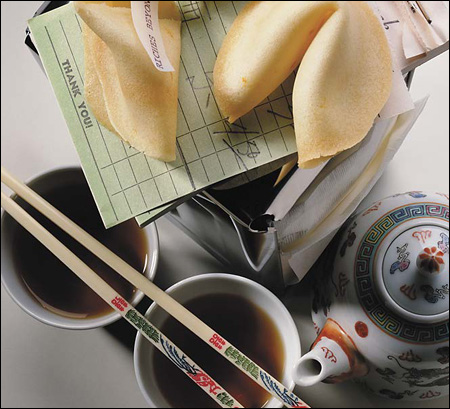
Your image files should contain the minimum resolution needed to obtain quality output from your target output device, at the desired output size. High-resolution photos contain more pixels, and therefore finer details, than low-resolution photos, but they also have a larger file size, take longer to render onscreen, require more processing time to edit, and are slower to print. Low-resolution images, however, look coarse and jagged and lack detail, most noticeably when printed. Your goal is to set an appropriate resolution — one that is neither too high nor too low.A–C

A 72 ppi
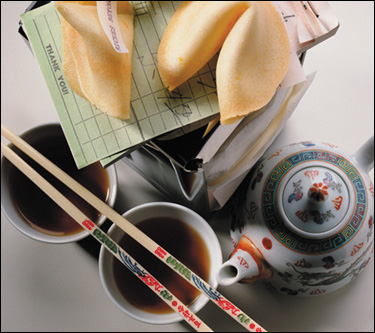
B 150 ppi
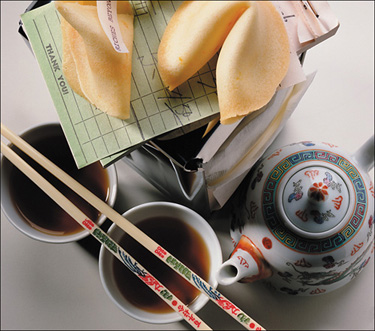
C 300 ppi
There are three ways to set the resolution value for a digital file:
![]() If you use Camera Raw to process a raw or JPEG photo, as we recommend, you can specify an image resolution in its Workflow Options dialog (see page 58).
If you use Camera Raw to process a raw or JPEG photo, as we recommend, you can specify an image resolution in its Workflow Options dialog (see page 58).
![]() When scanning a photo, you should set the image resolution using the scanning software for that device.
When scanning a photo, you should set the image resolution using the scanning software for that device.
![]() After opening a file into Photoshop, you can change the image resolution via the Image Size dialog (see pages 136–139).
After opening a file into Photoshop, you can change the image resolution via the Image Size dialog (see pages 136–139).
The print resolution for digital images is measured in pixels per inch, or ppi for short. For output to a desktop inkjet printer, an appropriate file resolution is between 240 and 300 ppi. For commercial printing, the first step is to ask your print shop what resolution you should set your document to for their press. If you are told only the halftone screen frequency (lines per inch, or lpi) setting, you can use that number to quickly calculate the correct resolution for your files. For a grayscale image, set the resolution to approximately one-and-a-half times the lpi setting of the output device (usually a resolution of around 200 ppi); for a color image, set the resolution to approximately twice the lpi (usually a resolution of around 250–350 ppi).
Creating a new, blank document
Although in most cases you are going to open existing photos into Photoshop, you still need to know how to create a new, blank document, as we show you in these steps. To create image content, you can drag and drop or copy and paste imagery into the document from other files, draw or paint imagery by hand using brushes, create shapes with vector tools, or enter type.
To create a new, blank document:
1. Do either of the following:
Choose File > New (Ctrl-N/Cmd-N).
Right-click the tab of an existing open document and choose New Document.
2. The New dialog opens.A Type a name in the Name field.
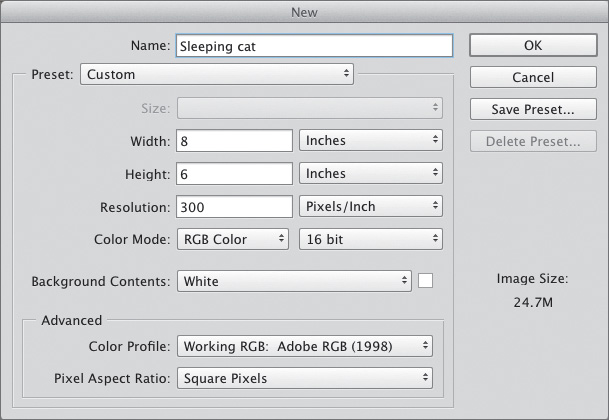
A In the New dialog, enter a file Name; either choose a Preset size or enter custom Width, Height, and Resolution values; also choose RGB Color mode, a Background Contents option, and a Color Profile.
3. Do either of the following:
From the Preset menu, depending on your output medium, choose Default Photoshop Size, U.S. Paper, International Paper, Photo, Web, Mobile & Devices, or Film & Video. Next, from the Size menu, choose a specific size for the preset.
Choose a unit of measure from the menu next to the Width field; the same unit will be chosen automatically for the Height (or to change the unit for just one dimension, hold down Shift while choosing it). Enter custom Width and Height values (or use the scrubby sliders).
4. Enter the Resolution required for your target output device. For Web output, enter 72; for print output, see the preceding page.
5. Choose a document Color Mode (we recommend RGB Color), then from the adjacent menu, choose 8 bit or 16 bit as the color depth (see page 17).
6. Note the current Image Size on the right side of the dialog. If you need to reduce that size, you can choose smaller dimensions, a lower resolution, or a lower bit depth.
7. From the Background Contents menu, choose White (the option we recommend if you’re a new Photoshop user), or choose Transparent if you want the bottommost tier of the document to be a transparent layer (see Chapter 8). If you are familiar with Photoshop’s color controls, you can click the color square and choose a custom color.![]()
8. Under Advanced, choose a Color Profile. The list of available profiles will vary depending on the document Color Mode. If you chose RGB Color in step 5, we recommend choosing Adobe RGB (1998) here. (Note: You can also assign or change the profile at a later time via the Edit > Assign Profile dialog. To learn more about color profiles, see pages 10–12.)
For Web or print output, leave the Pixel Aspect Ratio on the default setting of Square Pixels. For video output, choose an applicable option (see Photoshop Help).
9. Click OK. A new, blank document window appears onscreen. To save the file, see page 18.
![]() To force the New dialog settings to display the specs of an existing open document, from the bottom of the Preset menu, choose the name of the document that has the desired dimensions.
To force the New dialog settings to display the specs of an existing open document, from the bottom of the Preset menu, choose the name of the document that has the desired dimensions.
![]() If the Clipboard contains image data (say, from artwork that you copied from Adobe Photoshop or Illustrator), the New dialog will automatically display the dimensions of that content. Those dimensions will also display if you choose Clipboard from the Preset menu in the New dialog. If you want to prevent the Clipboard dimensions from displaying (and have the dialog show the last-used file dimensions instead), hold down Alt/Option as you choose File > New.
If the Clipboard contains image data (say, from artwork that you copied from Adobe Photoshop or Illustrator), the New dialog will automatically display the dimensions of that content. Those dimensions will also display if you choose Clipboard from the Preset menu in the New dialog. If you want to prevent the Clipboard dimensions from displaying (and have the dialog show the last-used file dimensions instead), hold down Alt/Option as you choose File > New.
Creating document presets
If you tend to choose the same custom document size, color mode, and other settings over and over in the New dialog, here’s a way to streamline your workflow and save yourself some startup time. Create a preset for each “group” of settings. Then, as you create a new document, choose one of your presets from the menu in the New dialog.
To create a document preset:
1. Choose File > New or press Ctrl-N/Cmd-N. The New dialog opens.
2. Choose settings, including the width, height, resolution, color mode, bit depth, background contents, color profile, and pixel aspect ratio. Ignore any setting that you don’t want to include in the preset; you’ll exclude it from the preset in step 4.
3. Click Save Preset. The New Document Preset dialog opens.A
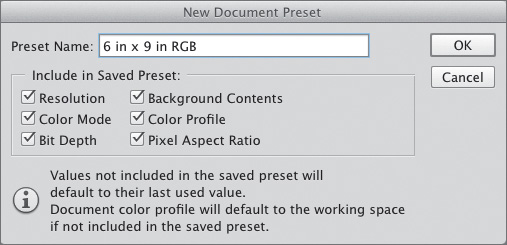
A Use the New Document Preset dialog to name your new preset and to control which of the current settings in the New dialog it will contain.
4. Enter a Preset Name. Under Include in Saved Settings, uncheck any New dialog settings that you don’t want to save in the preset. Click OK. Your new preset is now listed on the Preset menu in the New dialog.
![]() To delete a user-created preset, choose it from the Preset menu, click Delete Preset, then click Yes (this cannot be undone).
To delete a user-created preset, choose it from the Preset menu, click Delete Preset, then click Yes (this cannot be undone).
Editing 16-bit files in Photoshop
The 16-bit advantage
To get high-quality output from Photoshop, a wide range of tonal values must be captured by the input device (e.g., your camera or a scanner). The wider the dynamic range of your chosen input device, the finer the subtleties of color and shade in the resulting images.
Most advanced amateur and professional digital SLR cameras capture 12 bits or more of accurate data per channel. Like cameras, scanners range widely in quality: Low-end models capture approximately 10 bits of accurate data per channel, whereas high-end models capture up to 16 bits of accurate data per channel. If your camera can capture 12 to 16 bits per channel, or you work with high-resolution scans, your images will be higher quality, because they will contain an abundance of pixels in all levels of the tonal spectrum. Details (or a lack thereof) will be more noticeable in the shadow areas, because those are the hardest areas for a device to capture well.
The editing and resampling commands in Photoshop (and in particular, tonal adjustment commands, such as Levels and Curves), remove pixel data from a photo and alter the distribution of pixels across the tonal spectrum. Signs of pixel loss from these destructive edits are more visible, for example, in a high-end print of an 8-bit image than in one of a 16-bit image.A–B Because 16-bit images contain more pixels in all parts of the tonal spectrum at the outset, more tonal values are preserved, even after editing (it’s like extra “padding”).
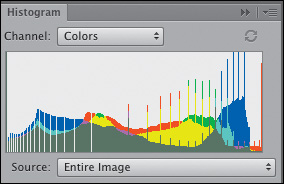
A A Levels adjustment that we applied to this 8-bit image caused some image data to be discarded, as shown by the spikes and gaps in the histogram.
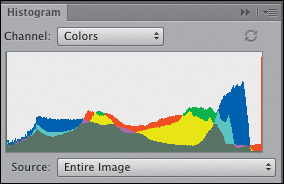
B Here we applied the same Levels adjustment to a 16-bit version of the same image. Due to the higher bit depth, the smooth tonal transitions were preserved.
Working with 16-bit files
Photoshop can open files that contain 8, 16, or 32 bits per channel. All the Photoshop commands, modes, and tools are available for 8-bit files, whereas most but not all commands, modes, and tools are available for 16-bit files. 16-bit files are higher quality, so we recommend downgrading them only when necessary. When editing a 16-bit file, you can access all the filters in the top part of the Filter menu (e.g., Camera Raw, Lens Correction), but not the Filter Gallery. On the submenus, you can access all filters except Blur > Smart Blur; Render > Lighting Effects; and Stylize > Extrude, Tiles, and Wind.![]() 32-bit files can be edited using only a limited number of Photoshop commands, so they are not a practical choice.
32-bit files can be edited using only a limited number of Photoshop commands, so they are not a practical choice.
If system or storage limitations prevent you from working with 16-bit images in Photoshop, try this two-stage approach: Perform your initial tonal corrections on the 16-bits-per-channel image, then via the Image > Mode menu, convert the file to 8 Bits/Channel mode for further editing.
If your output service provider requests that you submit an 8-bit file instead of a 16-bit one, and your computer setup allows you to work with 16-bit files, do all your editing on the higher-quality file, then save a copy of it in the lower bit depth for output.
16-bit files can be saved in many formats, such as Photoshop (.psd), Large Document (.psb), Photoshop PDF (.pdf), PNG (.png), TIFF (.tif), and JPEG 2000 (.jpf).
Finally, 16-bit files can be printed as 16-bit from Photoshop, provided the target output device supports 16-bit printing.
Saving your document
Although Photoshop lets you create, open, edit, and save files in over a dozen different formats, you’ll probably encounter or use just a few of them, such as Photoshop (the native Photoshop file format, or PSD for short), Photoshop PDF, JPEG, and TIFF. If you’re not sure what format to use, stick with the Photoshop format (we use it for most of our work).
To save an unsaved document:
1. If your document contains any content, you can choose File > Save (Ctrl-S/Cmd-S); if it’s completely blank, choose File > Save As (Ctrl-Shift-S/Cmd-Shift-S). The Save As dialog opens.
2. Type a name in the File Name field (Windows) or the Save As field (Mac OS).
3. Choose a location for the file.
In Windows, if you need to navigate to a different folder or drive, use the Navigation pane on the left side of the dialog.
In the Mac OS, click a drive or folder in the Sidebar panel on the left side of the window, then click a subfolder in one of the columns, if necessary. To locate a recently used folder, use the menu below the Save As field.
4. From the Save as Type/Format menu, choose a file format (A–B). The Photoshop (PSD), Large Document Format (PSB), Photoshop PDF, and TIFF formats support layers, a feature that you will be using extensively in Photoshop (learn about flattening layers on page 166).
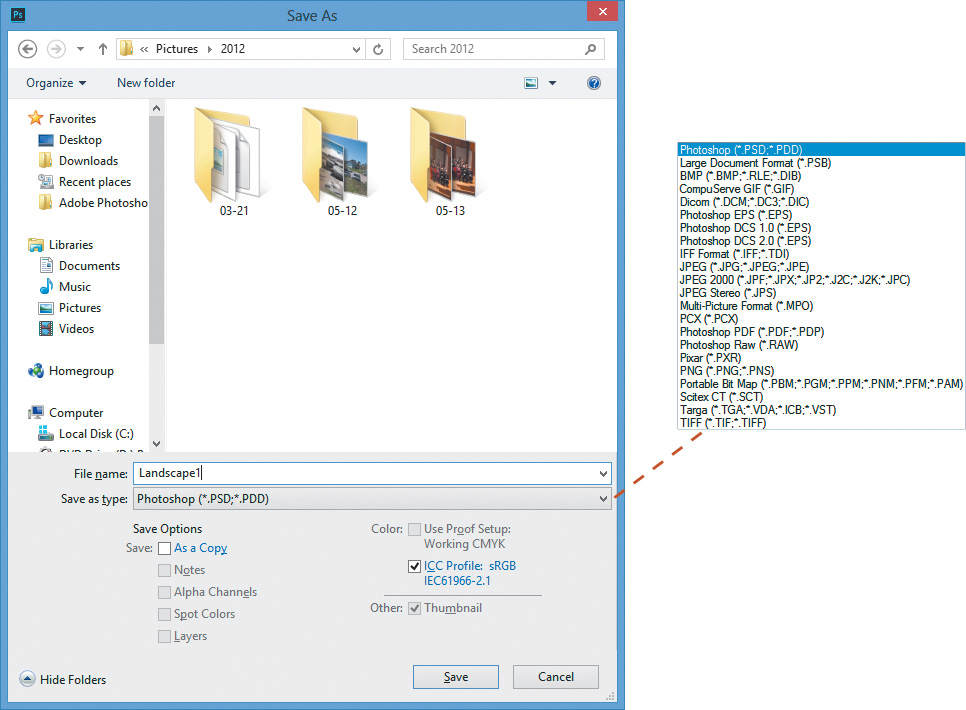
A This is the Save As dialog in Windows.
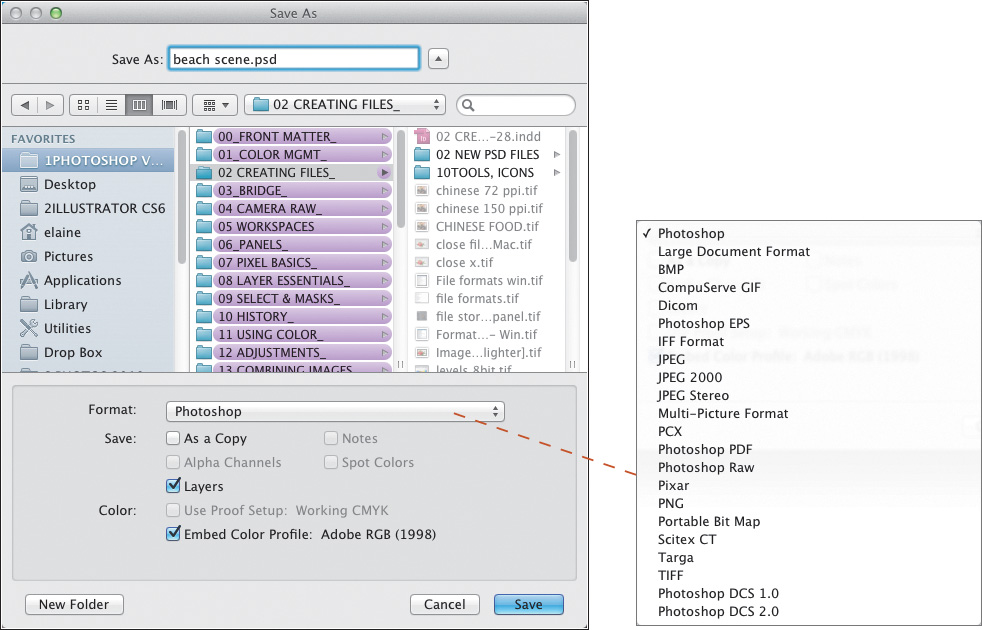
B This is the Save As dialog in the Mac OS.
5. If you’re not yet familiar with the features listed in the Save area, leave the settings as they are. For the As a Copy option, see step 5 on page 20.
6. If the file contains an embedded color profile and the format you have chosen supports profiles, in the Color area, you can check ICC Profile [profile name] (in Windows) or Embed Color Profile [profile name] (in the Mac OS) to save the profile with the file. (To learn about embedded profiles, see pages 7–8, 10, and 12.)
7. Click Save.
![]() In the Mac OS, to have Photoshop append a three-character extension (e.g., .tif, .psd) to the file name automatically when a file is saved for the first time, in Edit/Photoshop > Preferences > File Handling, choose Append File Extension: Always. Extensions are required when exporting Macintosh files to the Windows platform and when posting files to a Web server.
In the Mac OS, to have Photoshop append a three-character extension (e.g., .tif, .psd) to the file name automatically when a file is saved for the first time, in Edit/Photoshop > Preferences > File Handling, choose Append File Extension: Always. Extensions are required when exporting Macintosh files to the Windows platform and when posting files to a Web server.
![]() To learn about the Maximize PSD and PSB File Compatibility option in the File Handling panel of the Preferences dialog, see page 462.
To learn about the Maximize PSD and PSB File Compatibility option in the File Handling panel of the Preferences dialog, see page 462.
Once a file has been saved for the first time, each subsequent use of the Save command overwrites (saves over) the previous version.
To save a previously saved document:
Choose File > Save (Ctrl-S/Cmd-S).
![]() An asterisk on a document tab or title bar indicates that the document contains unsaved changes.
An asterisk on a document tab or title bar indicates that the document contains unsaved changes.
![]() To learn about the automatic save recovery feature in Photoshop, see page 462.
To learn about the automatic save recovery feature in Photoshop, see page 462.
The simple Revert command restores your document to the last-saved version.
Note: We know you can’t learn everything at once, but keep in mind for the near future that the History panel, which is covered in Chapter 10, serves as a full-service multiple undo feature. In fact, each use of the Revert command is listed as a separate state on the History panel, so you can undo any revert by clicking an earlier history state.
To revert a document to the last saved version:
Choose File > Revert.
![]() To undo the last edit, choose Edit > Undo [name of edit] (Ctrl-Z/Cmd-Z). Not all edits can be undone by this command.
To undo the last edit, choose Edit > Undo [name of edit] (Ctrl-Z/Cmd-Z). Not all edits can be undone by this command.
![]() For more undo and redo commands, see the sidebar on page 111.
For more undo and redo commands, see the sidebar on page 111.
Using the Save As command, you can save a copy of a file under a new name (say, to create a design or tonal adjustment variation), save it with different options chosen (e.g., with or without alpha channels or layers), or save a flattened copy of it in a different format for export to another application (a necessity when exporting to most non-Adobe applications, which can’t import Photoshop PSD files or read Photoshop layers).
To save a new version of a file:
1. Choose File > Save As (Ctrl-Shift-S/Cmd-Shift-S). The Save As dialog opens.
2. Change the name in the File Name/Save As field (if you’re planning to change only the file format, this step is unnecessary).
3. Choose a location for the new version of the file from the Navigation pane in Windows or by using the Sidebar panel and columns in the Mac OS.
4. Optional: From the Save as Type/Format menu, choose a different file format. Only formats that are available for a file’s current color mode and bit depth are listed. Note: If you try to save a 16-bit file in the JPEG (.jpg) format, Photoshop will produce a flattened, 8-bit copy of the file automatically.
Beware! If you choose a format that doesn’t support layers, the Layers option is dimmed automatically, a yellow alert icon displays, and layers in the new version will be flattened.
5. Check any available options in the Save area that you deem necessary. For example, you could check As a Copy to have the copy of the file remain closed and the original file stay open onscreen, or uncheck this option to have the original file close and the copy stay open.
In Edit/Photoshop > Preferences > File Handling, under File Saving Options, we choose the setting of Image Previews: Always Save to have Photoshop include file previews automatically. If you choose Ask When Saving as the preference, this preview option will display in the Save As dialog instead; see page 462. For the Append File Extension option (Mac OS only), we also choose the setting of Always.
6. In the Color area, check ICC Profile/Embed Color Profile: [profile name], if available, to include the current profile, for good color management (see pages 7–8, 10, and 12).
7. Click Save. Depending on the file format you have chosen, another dialog may appear. For the PDF format, see page 486; for the TIFF format, see page 487; for other formats, see Photoshop Help.
![]() If you fail (or forget) to change the file name or format in the Save As dialog, but you do proceed to click Save, an alert will appear.A Click Yes/Replace to replace the original file, or click No/Cancel to return to the Save As dialog, where you should change the file name or format.
If you fail (or forget) to change the file name or format in the Save As dialog, but you do proceed to click Save, an alert will appear.A Click Yes/Replace to replace the original file, or click No/Cancel to return to the Save As dialog, where you should change the file name or format.
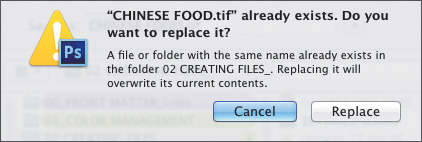
A If you try to save a file via the Save As command without changing the file name or format, you will get this friendly warning.
![]() To have the location in the Save As dialog always default to the location of the current file, go to Edit/Photoshop > Preferences > File Handling, and check Save As to Original Folder.
To have the location in the Save As dialog always default to the location of the current file, go to Edit/Photoshop > Preferences > File Handling, and check Save As to Original Folder.
![]() For Web output, learn how to create GIF, JPEG, PNG, and SVG image assets from Photoshop layers on pages 489–494.
For Web output, learn how to create GIF, JPEG, PNG, and SVG image assets from Photoshop layers on pages 489–494.
Using the Status bar
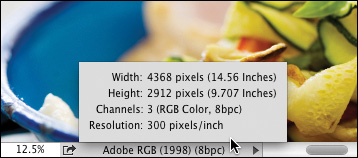
Using the Status bar and menu at the bottom of the document window, you can read data pertaining to the current document or find out how Photoshop is currently using available memory. Note: To view more detailed data about a file, use the Metadata panel in Bridge; see page 26.
To use the Status bar:
Open a document, then from the menu adjacent to the Status bar at the bottom of the Application frame, choose the type of data you want Photoshop to display on the bar:
Document Sizes to list the approximate file storage size of a flattened version of the file if it were to be saved in the PSD format (the value on the left) and the storage size of the file including all its current layers and any alpha channels (the value on the right). Note: For the most accurate file size value, view the file listing in Explorer/Finder.
Document Profile to list the color profile that is embedded in the current file and the number of bits per channel.A If the document doesn’t have an embedded profile, it will be listed as untagged.
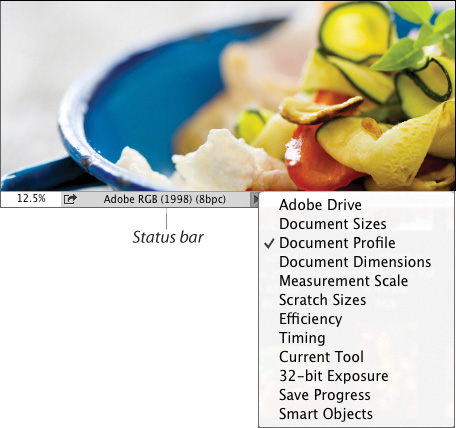
A From the menu for the Status bar, choose the type of data you want Photoshop to display on the bar.
Document Dimensions to list the image dimensions (width and height) and resolution.
Measurement Scale to list the current pixel scale ratio for the document, as set via the Measurement Log panel.
Scratch Sizes to list the amount of RAM that Photoshop is using to process all the currently open files (the value on the left) and the amount of RAM that is currently available to Photoshop (the value on the right). When Photoshop is utilizing virtual memory on the scratch disk, the first value is greater than the second one.
Efficiency to list the percentage of program operations that are being done in RAM as opposed to on the scratch disk (see page 464). When the scratch disk is being used, this value is below 100.
Timing to list the duration of the last operation.
Current Tool to list the name of the current tool.
32-Bit Exposure to display a slider that you can drag to adjust the preview of an HDR image that has 32 bits per channel.
Save Progress to have a dynamic percentage value display as a file is being saved (e.g., “Saving 88%”).
Smart Objects to list the number of Missing and Changed (modified) linked Smart Objects in the document.![]()
Getting Document Info Fast
Click the X in a document tab.A
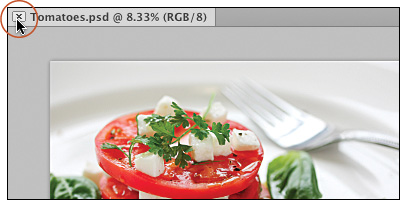
A To close a document that is docked as a tab, click the X on the tab in the Mac OS or in Windows.
Choose File > Close (Ctrl-W/Cmd-W).
Click the Close (X) button in the upper-right corner of a floating document window in Windows,B or click the Close button in upper-left corner of a floating document window in the Mac OS.C
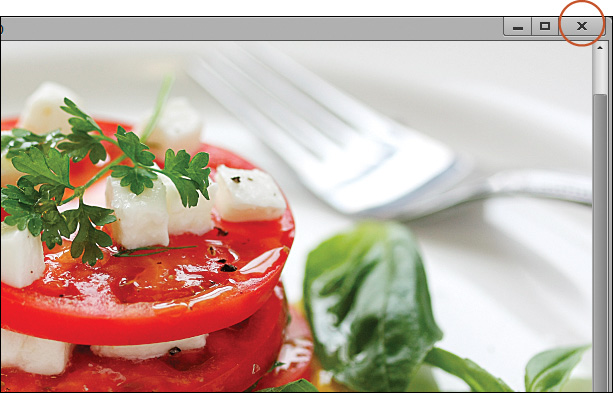
B To close a floating document window in Windows, click the Close button.

C To close a floating document window in the Mac OS, click the Close (red) button.
2. If you try to close a file that was modified since it was last saved (as indicated by an asterisk in the document tab), an alert dialog will appear.D Click No (N)/Don’t Save (D) to close the file without saving it, or click Yes (Y)/Save (S) to save the file before closing it (or click Cancel or press Esc to dismiss the Close command).
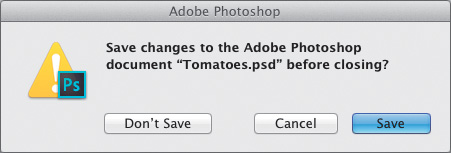
D If you try to close a file that contains unsaved changes, this alert prompt will appear. A similar prompt will appear if you exit/quit Photoshop and any of your open files contain unsaved changes.
![]() To quickly close all (multiple) open documents, press Ctrl-Alt-W/Cmd-Option-W. If an alert dialog appears, you can check Apply to All, if desired, to have just one response apply to all the open documents, then click No/Don’t Save or Yes/Save.
To quickly close all (multiple) open documents, press Ctrl-Alt-W/Cmd-Option-W. If an alert dialog appears, you can check Apply to All, if desired, to have just one response apply to all the open documents, then click No/Don’t Save or Yes/Save.
![]() In Photoshop, to close a file and launch or go to Bridge, choose File > Close and Go to Bridge or press Ctrl-Shift-W/Cmd-Shift-W.
In Photoshop, to close a file and launch or go to Bridge, choose File > Close and Go to Bridge or press Ctrl-Shift-W/Cmd-Shift-W.
To exit/quit Photoshop and close all open files:
1. In Windows, choose File > Exit (Ctrl-Q) or click the Close button for the application frame.
In the Mac OS, choose Photoshop > Quit Photoshop (Cmd-Q).
2. If any open files contain unsaved changes, an alert dialog will appear for each one. Click No (N)/Don’t Save (D) to close the file without saving it, or click Yes (Y)/Save (S) to save it before exiting/quitting Photoshop (or click Cancel or press Esc to dismiss the Exit/Quit command).