Chapter 2. “Hello, World!” (Sort of)
How does it, um-- how does it work?
King Arthur
In Chapter 1, I introduced the first program most people write in a new programming language or technology when I discussed asm.js. We call that program a “Hello, World!” example in a nod to the program used in Kernighan and Ritchie’s seminal book, The C Programming Language. Many quality programming books1 begin with that example because it gives the reader a taste of what is going on without delving too far down into the details. It is fun, empowering and a good way to make sure the reader has her tools set up correctly.
Example 2-1. The typical “Hello, World!” program as expressed in C.
#include <stdio.h>intmain(){printf("Hello, World!");return0;}
Unfortunately, WebAssembly has no way of printing to the console, so we cannot start that way.
Wait, what?
I will give you a moment to digest that sentence, perhaps re-reading it a few times to make sure it says what you think it says.
Convinced? Confused?
Yes, it is fair to say that there is no way for WebAssembly to print to the console, read a file or open a network connection… unless you give it a way to do so.
If you examine Example 2-1, you will get a hint about what the issue is. In order for that program to work, it needs a working copy of the printf() function which can be found in the standard library. Part of what makes C programs so portable, is the existence of standard libraries such as this on a variety of platforms. So-called Portable Operating System Interface (POSIX)2 libraries extend these common features beyond printing to the console to include file manipulation, signal handling, message passing and more. An application will write to an API such as POSIX, but the executable will need either a static or a dynamic library that provides the behavior of the invoked methods suitable for running in the target platform. This will be in the native executable format for the operating system you are planning to use.
This is why I say that WebAssembly makes code portable, but we will need something else to help us make applications portable. We will revisit this topic throughout the book, but for now it is enough for you to know that there is no direct way for WebAssembly to write to the console.
I promise you we will honor Kernighan and Ritchie in Chapter 5 by running that exact program, but I want to take a different approach to introducing you to how WebAssembly works. I want to start at the bottom and work our way up to the higher level languages you will ultimately use. I still want you to have a “Hello, World!” experience here, however, so we will pick something else to write and run.
WebAssembly Text Format (Wast)
We have mentioned that the binary format (Wasm) is designed to make it faster to transfer, load and verify WebAssembly modules. There is also a text format that describes the behavior of a module that is easier for humans to read. While there is nothing stopping you from writing code like this by hand, you are unlikely to do so. This format is called Wast (although the suffix is .wat) and we will start with it.
In Example 2-2 we see a fully-formed, valid Wasm module expressed using the S-expression3 version of Wast. This Lisp-like format has functions expressed via their signatures and a collection of stack machine instructions. The WebAssembly abstract machine is a virtual stack machine which assists with the compact expression and portability. Normally instruction sets require values and locations of those values to manipulate them. When it is converted into native instructions, it will invariably be run on a register-based system which will have a finite number of registers that have to be named. This makes the instruction set more verbose. A stack machine always looks to the top of the stack for what it needs, so we generally only need the instructions and not the locations. Some machine architectures have more registers than others, however, so the stack abstraction also allows us to ignore those details in this portable form.
This module has one function defined that takes two integer parameters and returns another integer. As defined in the Minimum Viable Product (MVP) 4, WebAssembly is a 32-bit environment. That is being relaxed over time. By the time this book is available, it is likely that 64-bit Wasm environments will be available in some form. That being said, WebAssembly supports 32- and 64-bit integers (known as i32 and i64) and 32- and 64-bit floating point numbers (known as f32 and f64). That is it.
At this level, there are no strings, objects, dictionaries, or other data types you would expect. Please do not worry, we will address how to overcome these issues later, but this is among the reasons why we are not doing a typical “Hello, World!” application. There are no strings! It is easier just to deal with numbers until we introduce some more ideas. So, in the spirit of this style of program, we are showing you enough to see it work without overwhelming you.
Example 2-2. A simple WebAssembly text file.
(module(func$how_old(param$year_nowi32)(param$year_borni32)(resulti32)get_local$year_nowget_local$year_borni32.sub)(export"how_old"(func$how_old)))

The internal function $how_old

The exported function _how_old
The function shown here is called $how_old and it is not visible outside of this module until we explicitly export it. Note the name distinction. The internal name starts with a $. The exported version does not. It will simply execute the inner function if someone calls it externally.
The purpose of this function is to calculate how old someone is based upon what year they were born and what year it is. At this point, you may not be surprised to hear that WebAssembly has no concept of dates nor any ability to request the current time by default. I am expecting that you are wondering what exactly WebAssembly can do! Happily, it can do math. If you give it the current year and the year someone was born, it can absolutely subtract the one from the other and produce a result. Please do not be underwhelmed, we are just isolating things to be clear about what is being provided by which part of the system.
As you may know, a stack is a convenient and widely-used data structure in the software world. It is often described as being like a stack of trays in a cafeteria. The workers will place clean trays on top of any other trays. Customers will take one from the top.
Consider an empty stack as shown in Figure 2-1. We say we push something to the top of the stack and pop it off of the top of the stack. We only ever manipulate this location, so this is not an appropriate data structure if you need to traverse a list. At the same time, there is only one place to look for the things we are interested in, so we do not need to specify locations, indices or keys. It is a fast and efficient structure to manipulate.

Figure 2-1. An empty stack
Look back to the list of instructions in our function in Example 2-2. The first one is get_local. The WebAssembly host environment will retrieve the value of the parameter named $year_now and then pushes it to the stack. Assuming the current year is 2021, the result is shown in Figure 2-2.

Figure 2-2. A stack with one value
At this point, the WebAssembly host environment will advance to the second instruction. It is also a get_local instruction and will retrieve the value of the parameter named $year_born and push it to the stack. The stack will now have two values on it, but the top of the stack points to the newest value pushed. Assuming the person who invoked the function was born in 2000, the stack will look like what we see in Figure 2-3.

Figure 2-3. A stack with two values
The execution environment will press on as there is another instruction. This one is i32.sub. It represents the arithmetic subtraction of one i32 value from another. As it needs two values to make sense, it will consult the top two values on the stack by popping them off resulting in an empty stack looking again like Figure 2-1. It then subtracts the second parameter from the first and pushes the result back to the top of the stack. The result is seen in Figure 2-4.

Figure 2-4. The result of the substraction pushed back to the stack
At this point, there are no more instructions to execute and we are left with a single value at the top of the stack. In Example 2-2 we see that our function defines an i32 return value. Whatever is at the top of the stack will be returned via this mechanism.
Converting Wast to Wasm
Anyone who has been a programmer for more than a short time will notice all manner of potential problems with our implementation. We do not handle the case of someone inverting the parameters so that the function would return a negative number. In the interest of keeping the example simple, we are simply ignoring these realities. While this is not a super exciting function, we have investigated the mechanics of expressing some basic behavior via WebAssembly’s native text format. The next step is to turn it into its binary executable form. You have several options for doing this, but we will focus on two approaches.
The first does not require you to install anything. In fact, you can go ahead and invoke your function to see it work! If you go to https://tinyurl.com/wa-wabt-demo you will see a multi-panel site. The upper left corner represents a .wat file. The upper right corner represents an annotated hex dump of the compiled .wat file. The lower left corner represents JavaScript code to invoke the behavior using the API we will introduce more fully later. The lower right corner represents the output from executing the code.
Copy and paste the code from Example 2-3 into the upper left panel labeled WAT. This will cause the text format to be converted into the binary format. Assuming you do not have any typos, you will also be able to download the binary format by pressing the Download button on that same panel. Do not worry about doing that yet.
Now, copy the following code into the lower left panel. This will invoke the WebAssembly JavaScript API available in most modern browsers (and Node.js). We will discuss it more later, but for now we are retrieving the bytes of the binary module (available here via the wasmModule variable) and getting a reference to the how_old function so we can call it. As you can see, this function can be invoked like any other JavaScript function. The result of doing so will be printed out via console.log to the lower right panel.
Example 2-3. Some JavaScript to invoke our function
constwasmInstance=newWebAssembly.Instance(wasmModule,{});const{how_old}=wasmInstance.exports;console.log(how_old(2021,2000));
If everything goes well, you should see something like the screen shot in Figure 2-5. Try changing the dates for the current year and birth year parameters and make sure that our math is correct.
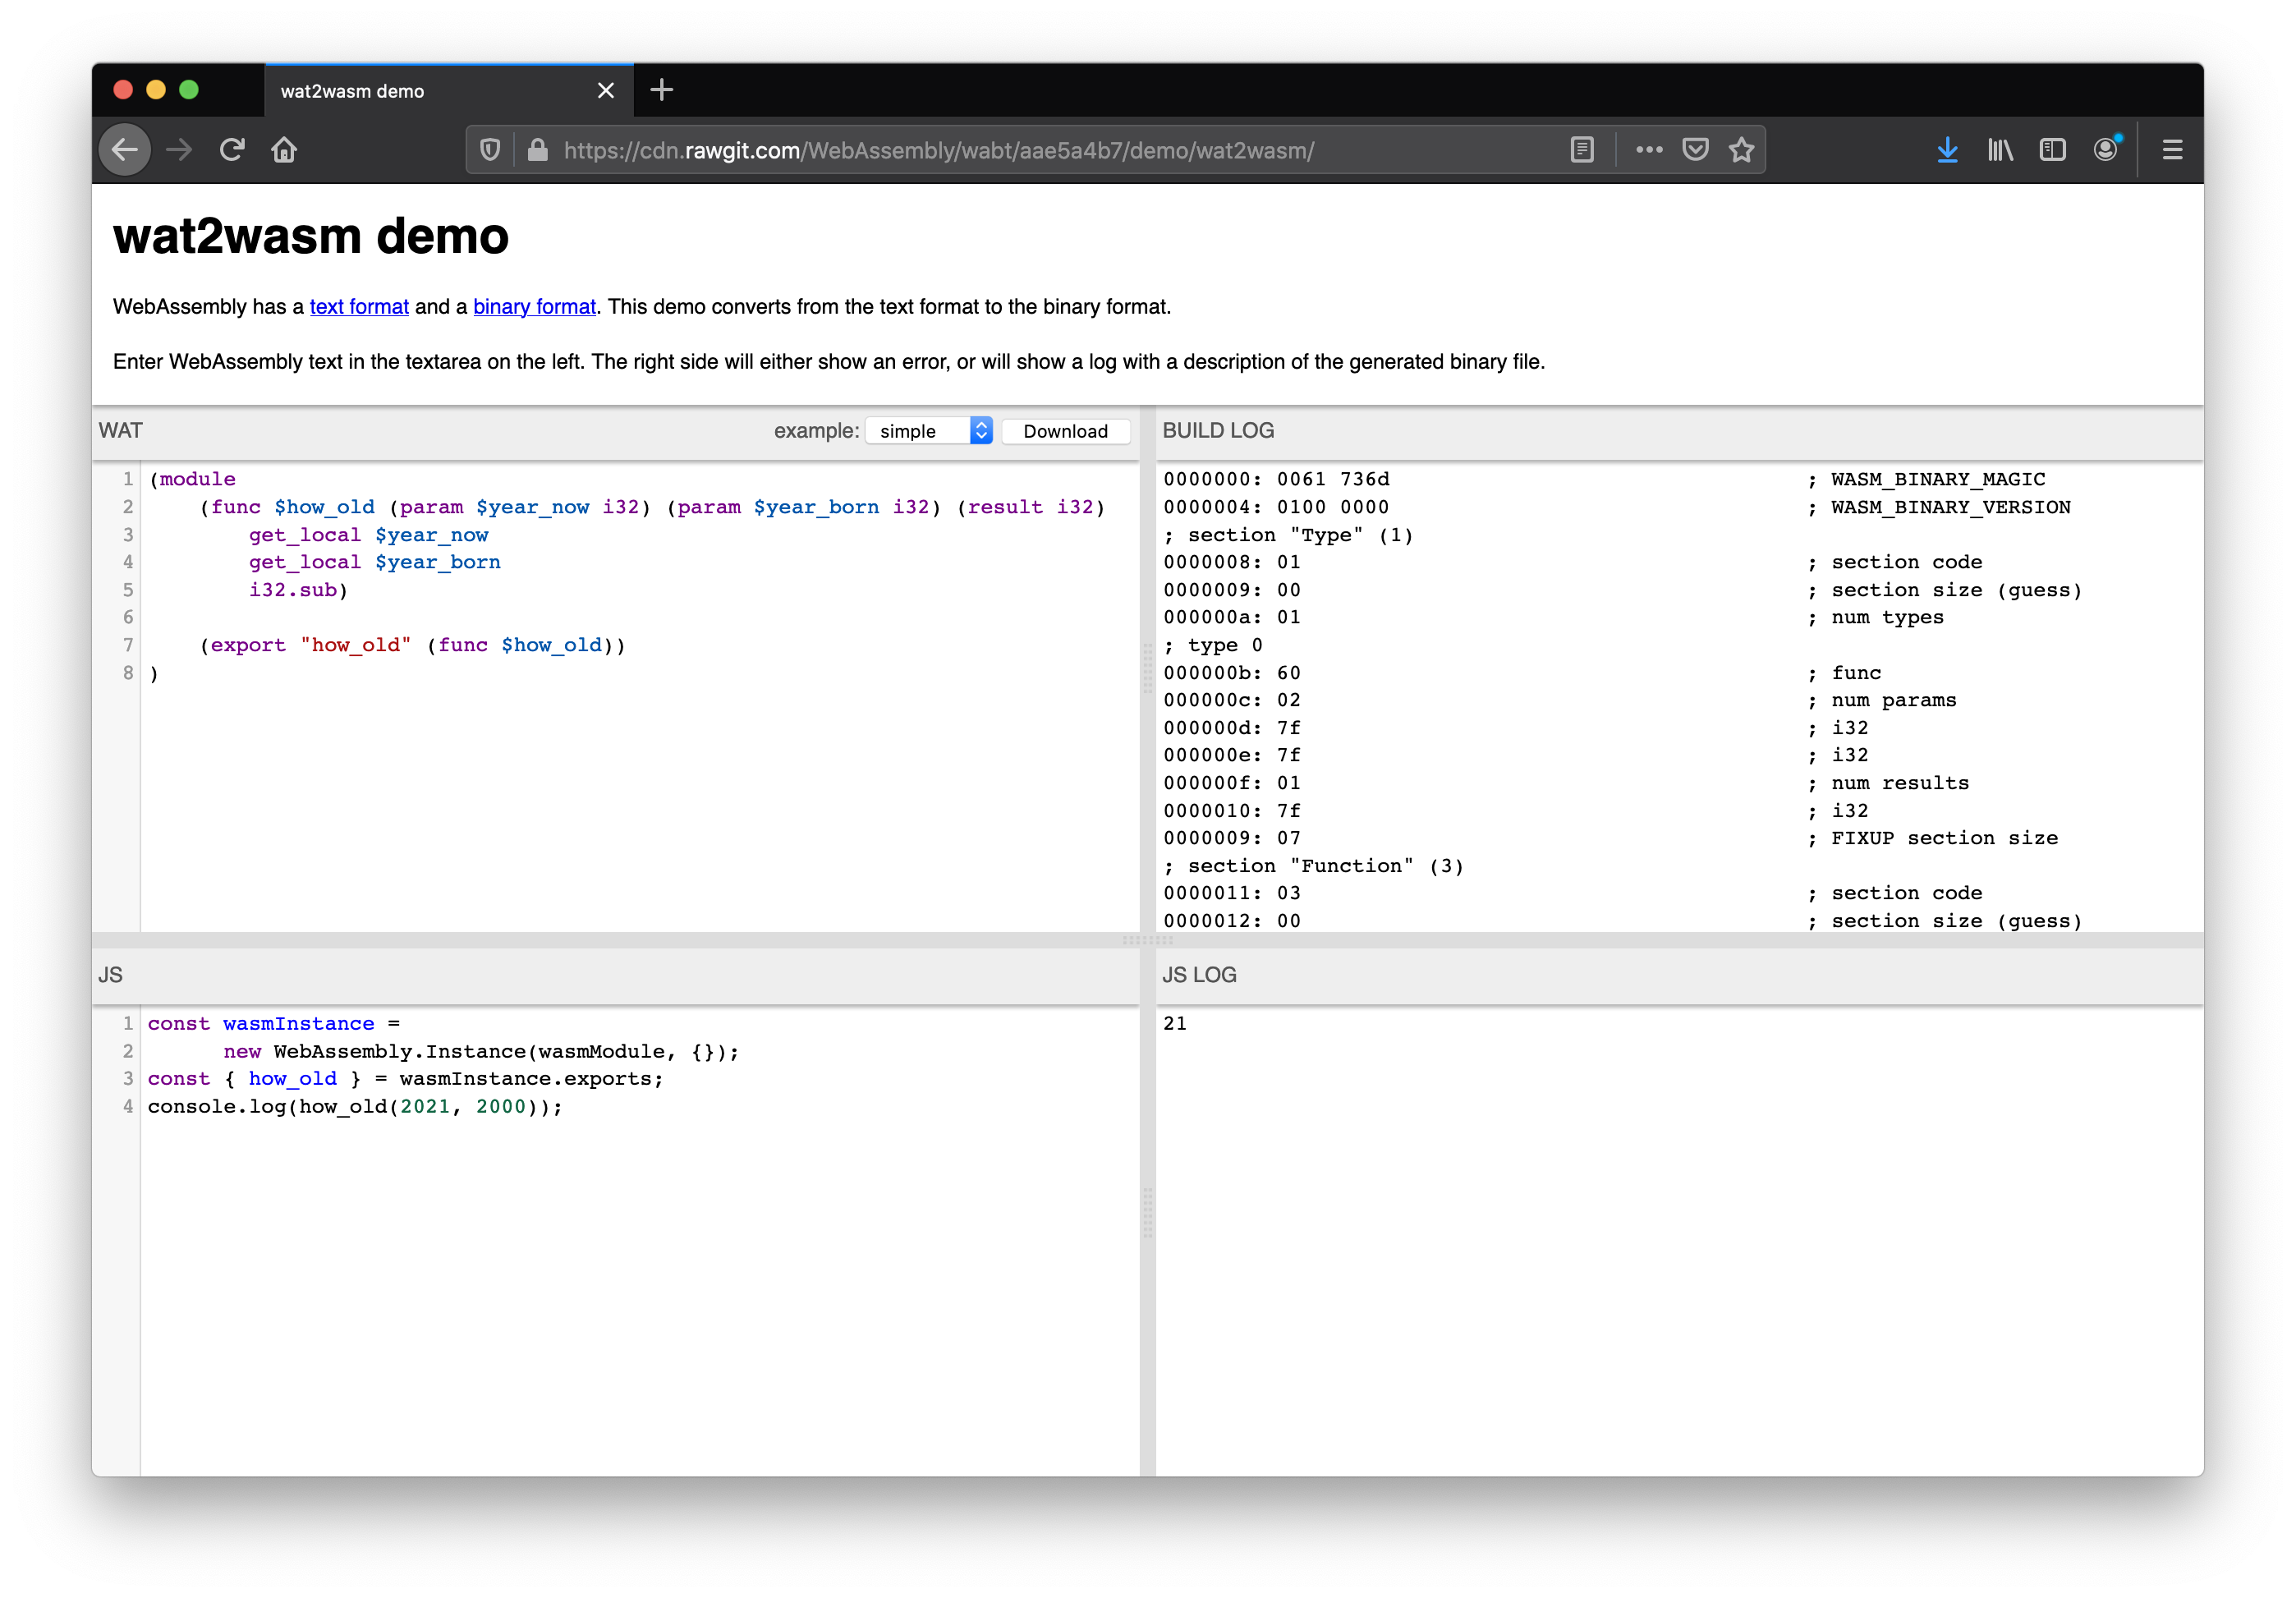
Figure 2-5. Converting a WebAssembly text file into a binary file and executing it
At this point, you can download the binary version of the file. By default it will be called test.wasm but you can rename it to whatever you like. We will call it hello.wasm.
Another option you have to generate this binary form is to use the WebAssembly Binary Toolkit (WABT)5 Consult Appendix A for instructions on installing WABT and other tools we will be using throughout the book.
Included with this installation is a command called wat2wasm. It does what the name says and converts the text file to the binary format.
brian@tweezer ~/g/w/s/ch02 (master) [1]> wat2wasm hello.wat
brian@tweezer ~/g/w/s/ch02 (master)> ls -alF
total 24
drwxr-xr-x  5 brian  staff  160 Sep 13 12:54 ./
drwxr-xr-x  3 brian  staff   96 Sep 13 12:05 ../
-rw-r--r--  1 brian  staff   76 Sep 13 12:07 hello.c
-rw-r--r--  1 brian  staff   45 Sep 13 12:54 hello.wasm
-rw-r--r--  1 brian  staff  200 Sep 13 12:52 hello.wat
Look closely. Your eyes are not deceiving you. It does not do a whole lot, but the binary format is only 45 bytes long! I used to do more Java programming. I have had class names that were longer than that. We need a way of executing our function now that we are not in a browser. This is easy enough to do with the JavaScript API in Node.js, but we will use a different approach.
Running Wasm in a Repl
Another tool I show you how to install in Appendix A is wasm3, 6 a WebAssembly interpreter written in C. It allows you to run Wasm modules and functions either on the command line or via an interactive mode conventionally called a “repl”7 by the cool kids.
Once I execute the following command, I am given a wasm3 prompt. I pointed it to my Wasm file so there is only one function I can call, but if there were other exported functions in the module, they would be available too.
brian@tweezer ~/g/w/build (master)> ./wasm3 --repl $HOME/hello.wasm
wasm3> how_old 2021 2000
Result: 21
wasm3> how_old 2021 1980
Result: 41
Notice that I am only able to invoke the exported functions, not the inner functions. Also notice that we will fail poorly if we invert the order of parameters as anticipated. When you are building Wasm modules with higher level languages, those will make it easier to do the right thing (although it is certainly possible to write this error-checking by hand, life is too short for that kind of nonsense). To get out of the repl, you can simply type CTRL-C or CTRL-D.
wasm3> $how_old 2021 2000
Error: function lookup failed ('$how_old')
wasm3> how_old 1980 2021
Result: 4294967255
wasm3>
Let’s review what we just did though. We expressed some arbitrary functionality via an instruction set that targets an abstract machine. We ran it in a browser. It should work with any of the major browser on any of the major operating systems. Well, so should JavaScript. But we have also run it in a C executable running in an interactive mode on a macOS machine.
brian@tweezer ~/g/w/build (master) [SIGINT]> file wasm3
wasm3: Mach-O 64-bit executable x86_64
Here is it is running in the same application compiled as a Linux binary:
brian@bbfcfm:~/git-others/wasm3/build$ ./wasm3 --repl $HOME/hello.wasm
wasm3> how_old 2021 2000
Result: 21
wasm3> ^C
brian@bbfcfm:~/git-others/wasm3/build$ file wasm3

wasm3: ELF 64-bit LSB shared object, x86-64, version 1 (SYSV),
dynamically linked, interpreter /lib64/ld-linux-x86-64.so.2,
BuildID[sha1]=b5e98161d08d2d180d0725f973b338c2a340d015, for GNU/Linux
3.2.0, not stripped
There are actually several standalone WebAssembly environments written in python, Rust, Scala, OCaml, Ruby and more. Our function should be available and work in any of them.
Running Wasm in the Browser
For our next demonstration, I will show you how to invoke the behavior in a browser using the JavaScript API. We will not introduce the API just yet, but you will see a basic example. There are more sophisticated ways of compiling the modules and parameterizing them, but first we crawl, then we walk, then we run.
In Example 2-4, we see a reusable bit of code for instantiating a WebAssembly module instance. The JavaScript API for doing so is available in any environment supporting the WebAssembly MVP, but there are other environments that do not require JavaScript such as the wasm3 runtime we just used. This code, however, will work in any WebAssembly-friendly browser8 or Node.js. Notice the use of the Promise-based approach. If your JavaScript environment supports async/await, you could obviously use those too.
Example 2-4. Instantiating a Wasm module in JavaScript
functionfetchAndInstantiate(url,importObject){returnfetch(url).then(response=>response.arrayBuffer()).then(bytes=>WebAssembly.instantiate(bytes,importObject)).then(results=>results.instance);}
Once the function is available, it is easy enough to use from HTML. In Example 2-5 you can see how that process works.
Example 2-5. Instantiating a Wasm module from a web page
<!doctype html><htmllang="en"><!-- Latest compiled and minified CSS --><linkrel="stylesheet"href="bootstrap.min.css"><head><metacharset="utf-8"><scriptsrc="utils.js"></script></head><body><title>Hello, World! (Sort of)</title><divclass="container"><h1>Hello, World! (Sort of)</h1>I think you are<spanid="age"></span>years old.</div><script>fetchAndInstantiate('hello.wasm').then(function(instance){varho=instance.exports.how_old(2021,2000);varageEl=document.getElementById('age');ageEl.innerText=ho;});</script></body></html>
In this example, we establish a <span> with an id of “age”. It is currently empty. We are going to fill it with the result of invoking our WebAssembly function. There is nothing strange about the rest of our HTML file. We include our reusable instantiation code in the <head> element. Toward the bottom of this file we see an embedded <script> element which calls the fetchAndInstantiate function. It passes in a local reference to the hello.wasm file so we will have to serve that up over HTTP as well.
The function returns a Promise. When that resolves, we receive a copy of the instantiated Wasm module instance and are able to invoke a method exposed through the module’s exports section. Notice we are passing in regular JavaScript numeric literals, but these will be just fine to pass into the function. The number 21 is returned through the process and then stored in the innerText of the empty <span> we noted earlier.
We need to serve the HTML, JavaScript and Wasm module over HTTP to run in a browser. You can do that however you like, but with python3 (or just python on non-Macs probably) you can start up a server and specify which port to listen on.
brian@tweezer ~/g/w/s/ch02 (master)> python3 -m http.server 10003
Serving HTTP on :: port 10003 (http://[::]:10003/) ...
You should see something along the lines of Figure 2-6 in your browser. Feel free to change the parameters in the embedded <script> element and verify that it continues to work.

Figure 2-6. Invoking an exported WebAssembly module function from JavaScript in a web page
We obviously have a lot left to learn, but you have now seen the equivalent of a “Hello, World!” example and hopefully understand the basics of how WebAssembly can work.
1 And most WebAssembly tutorials!
2 https://en.wikipedia.org/wiki/POSIX
3 https://en.wikipedia.org/wiki/S-expression
4 https://github.com/WebAssembly/design/blob/master/MVP.md
5 Pronounced wabbit like that wascal, Bugs Bunny.
6 https://github.com/wasm3/wasm3