
What’s New in Java 12?
Introduction
Java started out strong in 2019. On March 19, the Java team shipped the latest major version release, Java 12. If you follow the latest developments in the Java world, you might know that you can expect two major Java releases per year. This is great news for everyone committed to the idea of shipping early and often. Ultimately, you’ll be able to get your hands on new features and bug fixes on a regular basis.
In comparison to the last Long-Term Release (LTS) Java 11, version 12 contains fewer features but also fewer breaking changes. If you haven’t caught up with Java 11 yet, I’d recommend reading the report “What’s New in Java 11?”.
This edition of the report condenses everything you need to know about Java 12 into a few pages to help you determine whether it’s worthwhile to upgrade now or if you should hold off. We begin by introducing the shiny new features. Later, we touch on removals and deprecations and then conclude with a discussion of performance and security enhancements. Let’s get started!
New Features
Let’s explore the new functionality through an example. To test it out, we’ll write some JUnit tests that apply the new APIs and verify the correct behavior for different use cases. We begin by having a look at the latest addition to the Stream API.
Teeing Collectors
Since its introduction in Java 8, the Stream API provides methods for transforming elements in a Stream instance with the help of Collectors. The latest version of Java adds a new method to the API called Collectors.teeing(Collector, Collector, BiFunction). This method uses two different collectors to transform the elements of a Stream and then combine the result, as shown in Figure 1-1.

Figure 1-1. Merging the result of two Stream Collector operations
It sounds abstract. When would you want to use this? I hear you. This method is best explained by example. Imagine that you work in the accounting department of a big corporation. Your task is to determine the minimum and maximum salary being paid to any of your employees. That’s usually fairly easy to achieve with the help of an SQL query, but what if you had to express this “query” as Java code? The teeing collector can help you solve this problem.
Example 1-1 defines a Stream instance containing elements that represent salaries paid to employees. The collect method called on the Stream instance is provided with a Collector implementation created by the teeing method. As parameters, the teeing method call determines the minimum salary and the maximum salary as well as a Function that brings together the result as a representation of a SalaryRange, a POJO containing both values as Optional.
Example 1-1. Merging the results of two independent Stream collectors
importjava.util.Optional;importjava.util.stream.Stream;importstaticjava.util.stream.Collectors.*;@TestvoidcanCollectStreamFromTwoCollectorsAndMergeResult(){SalaryRangesalaryRange=Stream.of(56700,67600,45200,120000,77600,85000).collect(teeing(minBy(Integer::compareTo),maxBy(Integer::compareTo),SalaryRange::fromOptional));assertEquals("Salaries range between 45200 and 120000.",salaryRange.toString());}privatestaticclassSalaryRange{privatefinalIntegermin;privatefinalIntegermax;privateSalaryRange(Integermin,Integermax){this.min=min;this.max=max;}publicstaticSalaryRangefromOptional(Optional<Integer>min,Optional<Integer>max){if(min.isEmpty()||max.isEmpty()){thrownewIllegalStateException("Minimum and "+"maximum salaries cannot be null");}returnnewSalaryRange(min.get(),max.get());}@OverridepublicStringtoString(){return"Salaries range between "+min+" and "+max+".";}}

-
Use of the teeing operation as input for a
collectmethod call. 
-
Collectors participating in the operation.

-
The function that merges two results into a single one.
In the next section, you will learn about the new methods that have been introduced to the String API.
String API Enhancements
One of the most anticipated features planned for Java 12, JDK Enhancement Proposal (JEP) 326: Raw String Literals, has been dropped because it wasn’t considered ready for prime time. The proposal captures a feature for declaring a multiline String without the need to add new line characters. An SQL query with a SELECT, FROM, and WHERE statements per line is a typical use case for a multiline String.
JEP 326 also came with a couple of supporting features. One of those features actually shipped with Java 12, the method String.indent(int).
Indenting a String
The indent method helps with (surprise!) changing the indentation of a String. You can either pass a positive value or a negative value depending on whether you want to add more white spaces or remove existing white spaces.
There are various use cases for wanting to use the new indentation method. It’s very common for structured markup formats like XML, HTML, or YAML to indent nested elements. Figure 1-2 shows a multiline YAML file that is only valid by adhering to proper indentation.

Figure 1-2. Indenting a String in Java 12
What does this look like in code? Example 1-2 constructs and indents a YAML file represented as a multiline String. You can see that we are building the String with the help of a StringBuilder. Many lines added to the builder have been indented to construct the expected YAML data structure. If you look closely at the assertion, you might notice that the indent method automatically adds a newline character if it hasn’t been provided yet. That’s to be expected and is a feature of the new method.
Example 1-2. Indenting a multiline String by two or four white spaces
@TestvoidcanIndentString(){StringBuilderyaml=newStringBuilder();yaml.append("spec: ");yaml.append("containers: ".indent(2));yaml.append("- name: nginx ".indent(2));yaml.append("image: nginx:1.7.9".indent(4));assertEquals("spec: "+" containers: "+" - name: nginx "+" image: nginx:1.7.9 ",yaml.toString());}
-
Indenting a
Stringby two white spaces. TheStringalready contains a new line character. -
Indenting a
Stringby four white spaces. The next line character will be added.
Transforming a String
Another enhancement to the String API is the String.transform(Function) method. The method takes a String and transforms it into a new String with the help of a Function.
Suppose that you wanted to clean up a String representing a URL by running it through a transformation pipeline comprising multiple Functions. The first pass ensures that the String doesn’t contain any leading or trailing white spaces by calling Java’s own String.strip(String) method. In the next pass, you encode all query parameters that might exist for a URL by using a method you implemented yourself. Figure 1-3 shows the workflow.

Figure 1-3. Step-by-step transformation of a String
Now, there’s nothing stopping you from implementing the transformation by nesting multiple method calls, but I think we can agree that the logic is somewhat difficult to read and understand:
URLCleaner.encodeQueryParams("http://google.com/".strip());
How does this look in code using the transform method? Example 1-3 provides a cleaner approach that can be easily enhanced by additional transformations without losing its conciseness and readability.
Example 1-3. Transforming a String by chaining multiple functions
importjava.io.UnsupportedEncodingException;importjava.net.URLEncoder;importjava.util.ArrayList;importjava.util.List;@TestvoidcanTransformString(){List<String>urls=List.of(" http://google.com/","http://my.search.com?query=java server&page=1");List<String>transformedUrls=newArrayList<>();for(Stringurl:urls){StringtransformedUrl=url.transform(String::strip).transform(URLCleaner::encodeQueryParams);transformedUrls.add(transformedUrl);}assertEquals(List.of("http://google.com/","http://my.search.com?query%3Djava+server%26page%3D1"),transformedUrls);}privatestaticclassURLCleaner{publicstaticStringencodeQueryParams(StringrawURL){try{if(rawURL.contains("?")){String[]splitURL=rawURL.split("\?");returnsplitURL[0]+"?"+URLEncoder.encode(splitURL[1],"UTF-8");}returnrawURL;}catch(UnsupportedEncodingExceptionex){thrownewRuntimeException("UTF-8 not supported",ex);}}}
-
Transforms a
Stringby removing leading and trailing white space characters. -
Transforms the query portion of a URL
Stringwith the help of a custom method.
String constants
If you dug through the String API, you might have noticed two additional methods marked with @since 12. Both methods are relevant for implementing the “JVM Constants API” proposal shipped with Java 12. The JEP models runtime artifacts such as classes and methods that are loadable from the constant pool.
That being said, you might ask yourself, “Are those methods relevant to me?” Probably not. They are low-level APIs meant for libraries and tools providing bytecode parsing and generation functionality, for example, Byte Buddy. Nevertheless, I’ll quickly describe what they do so that you can reference them if needed.
The method String.describeConstable(), provided by the interface java.lang.constant.Constable, returns a type whose values are constants that can be represented in the constant pool of a Java class file as described in JVMS 4.4.
String.resolveConstantDesc(MethodHandles.Lookup) is similar to describeConstable with the difference being that this method returns an instance of java.lang.constant.ConstantDesc instead.
This concludes the coverage on the String API. Next up, let’s have a look at the enhancement made to the Files API.
Comparing Files
Sometimes, you want to determine whether two files have the same content. That’s particularly useful if you have to write developer tools, for example, determining whether files have changed between two different commits in a Git repository.
One of the new enhancements to the Java API is Files.mismatch(Path, Path). The method compares two file paths. The return type of the comparison is not a boolean, as you might expect. It is a long. The long indicates the position of the first mismatched byte in the content of the two files. The return value will be –1 if the files are “equal.”
It’s probably easier to visualize the behavior with the help of an example. The following test case sets up three different text files, each with its own content. As you can see in Example 1-4, comparing a file with itself returns the value –1. All other comparisons return a value greater than or equal to 0.
Example 1-4. Different outcomes when comparing files
importjava.io.IOException;importjava.nio.file.Files;importjava.nio.file.Path;@TestvoidcanMatchFiles(@TempDirPathtempDir)throwsIOException{PathhelloWorld=tempDir.resolve("helloworld.txt");createFile(helloWorld,"Hello World!");Pathjava12=tempDir.resolve("java12.txt");createFile(java12,"Released on March 19th, 2019");PathhelloJava=tempDir.resolve("hellojava.txt");createFile(helloJava,"Hello Java!");assertEquals(-1,Files.mismatch(helloWorld,helloWorld));assertEquals(0,Files.mismatch(helloWorld,java12));assertEquals(6,Files.mismatch(helloWorld,helloJava));}privatestaticvoidcreateFile(Pathpath,Stringcontent){try{Files.write(path,content.getBytes());}catch(IOExceptione){thrownewRuntimeException("Failed to write "+"content to file",e);}}
-
Comparing a file with itself returns –1.
-
Comparing two completely different files indicates that the first byte mismatches.
-
Comparing partially different files indicates the first mismatching byte.
As the last enhancement to the library API, we take a look at a nifty method for formatting numbers in a more compact form.
Compact Number Formatting
Large numbers rendered by a user interface or a command-line tool are always difficult to parse. It is far more common to use the abbreviated form of a number. Compact number representations are much easier to read and require less space on the screen without losing the original meaning. The following table shows US-typical full and compact number representations side by side:
| Full format | Compact format | |
|---|---|---|
| Revenues | 3,603,301 | 3.6 M |
| Discount | 104.56 | 104.56 |
| Labor | 256,335.35 | 256 K |
Number formats are Locale-specific. Each Locale usually has its own abbreviated form of a number. Figure 1-4 compares the number formatting for the US and Germany Locales.
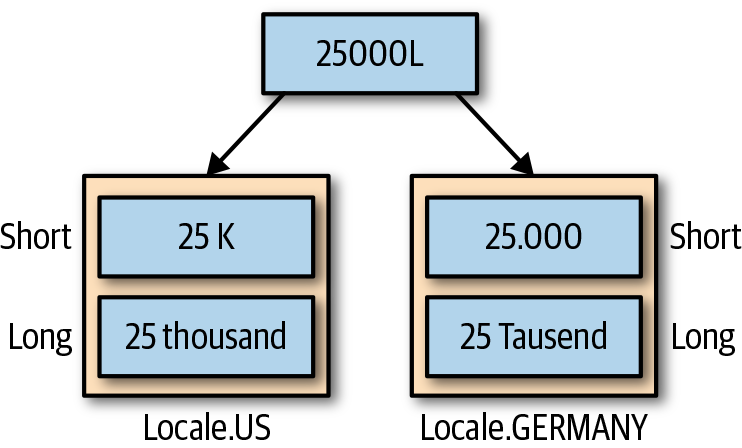
Figure 1-4. Number formatting per Locale in short and long form
Java 12 introduces a convenient method called NumberFormat.getCompactNumberInstance(Locale, NumberFormat.Style) for creating a compact number representation. Example 1-5 demonstrates how to format a number in its short and long form representation for different locales.
Example 1-5. Formatting numbers in short and long form
importjava.text.NumberFormat;importjava.util.Locale;@TestvoidcanFormatNumbersInDifferentLocales(){finalLongtwentyFiveThousand=25000L;// US number formattingNumberFormatnumberFormatUsShort=NumberFormat.getCompactNumberInstance(Locale.US,NumberFormat.Style.SHORT);NumberFormatnumberFormatUsLong=NumberFormat.getCompactNumberInstance(Locale.US,NumberFormat.Style.LONG);assertEquals(numberFormatUsShort.format(twentyFiveThousand),"25K");assertEquals(numberFormatUsLong.format(twentyFiveThousand),"25 thousand");// German number formattingNumberFormatnumberFormatDeShort=NumberFormat.getCompactNumberInstance(Locale.GERMANY,NumberFormat.Style.SHORT);NumberFormatnumberFormatDeLong=NumberFormat.getCompactNumberInstance(Locale.GERMANY,NumberFormat.Style.LONG);assertEquals(numberFormatDeShort.format(twentyFiveThousand),"25.000");assertEquals(numberFormatDeLong.format(twentyFiveThousand),"25 Tausend");}
-
Usage of the US short- and long-form number format.
-
Usage of the German short- and long-form number format.
Many of the default compact number formats will likely suit your needs; however, you can even implement your own custom number formatter by creating an instance of java.text.CompactNumberFormat.
Java follows the trend and tries to update its support for the latest Unicode specification. Java 11 updated its internals to Unicode 10, and Java 12 already incorporated Unicode 11. Let’s next take a look at Unicode support.
Adoption of Unicode 11
In a time in which emojis play a crucial role in communicating on social media channels, it’s more important than ever to support the latest Unicode specification. Java 12 has kept pace and supports Unicode 11.
Unicode 11 adds 684 characters, for a total of 137,374 characters. These additions include seven new scripts, for a total of 146 scripts. The test case in Example 1-6 demonstrates the use of the “cold face” emoji, one of the 66 emojis introduced with Unicode 11.
Example 1-6. Using the “cold face” emoji introduced in Unicode 11
@TestvoidcanUseColdFaceEmoji(){StringunicodeCharacter="uD83EuDD76";assertEquals(""unicodeCharacter);}

I’ve covered the stable features in Java 12. The latest version of Java 12 also introduces “preview features,” which are usable but not quite ready for prime time. The next section explains everything you need to know about this new concept.
Preview Features
Java moves at a rapid pace. Every two months the community receives a new version loaded with features and bug fixes. Despite detailed specifications, clear implementation plans, and extensive test suites, it’s extremely difficult to make a new feature user friendly and intuitive at an increased speed of delivery.
Preview features are like feature toggles (aka feature flags). They have been captured by JEP 12 to indicate to users that a feature is fully functional but might change in a future release based on feedback.
It’s important to understand that preview features are not production ready and should be avoided when writing mission-critical production code. You turn on preview features by providing the JVM flag --enable-preview.
The exciting new preview feature that ships with Java 12 is “switch expressions.” Before jumping into the new semantics of the feature, let’s first look at the pain points it tries to address.
The Traditional Way to Define Switch Statements
Switch statements have been part of the Java language specification from the beginning. The purpose of the language construct is to avoid laborious and clunky if, else if, or else statement blocks for code that needs to make a conditional decision.
Example 1-7 shows the use of a traditional switch statement. The code returns an appropriate URI instance based on an enum representing a storage type. For example, the cloud storage type will retrieve data from the URI http://mycloud.com/data.
Example 1-7. The use of a traditional switch statement
@DisplayName("Can use traditional switch statement")@ParameterizedTest@MethodSource("storageTypes")voidcanUseSwitchStatement(StorageTypestorageType,Stringtarget)throwsURISyntaxException{URIresult;switch(storageType){caseLOCAL_FILE:result=newURI("file://~/storage");break;caseCLOUD:result=newURI("http://mycloud.com/data");break;default:thrownewIllegalArgumentException("Unknown storage type");}assertEquals(newURI(target),result);}privateenumStorageType{LOCAL_FILE,CLOUD}privatestaticStream<Arguments>storageTypes(){returnStream.of(Arguments.of(StorageType.LOCAL_FILE,"file://~/storage"),Arguments.of(StorageType.CLOUD,"http://mycloud.com/data"));}
What’s the problem with this code, you ask? Functionally, there are no issues, but semantically we can observe various shortcomings.
One potential issue stands out right away. If you forget to define a break statement per case block, Java will continue to execute the next code block. I confess that this has happened to me before when writing switch statements. The only way to prevent it is to write a test case that covers all decision points. Alternatively, you could also break out of the switch statement by using a return keyword, but that would require the code to be externalized to its own method.
The other gripe you might have with this code is how the “return” value is captured per case block. As you can see in the example code, the URI is assigned to the result variable. Again, it’s easy to forget that you need to make the assignment for every case block.
Another, rather cosmetic aspect of switch statements is the readability of multiline case blocks. Most of the time, they are difficult to parse and therefore more difficult to understand due to the required formatting.
In the next section, you learn how switch expressions can make your life easier.
Switch Expressions
Switch expressions address many of the issues prevalent in the traditional switch statements. Instead of having to define a break statement per case block, you can simply use the arrow syntax. The arrow syntax semantically looks like a lambda and separates the case label from the expression. As a bonus, there’s no longer any need to define a break statement. It simply returns the value of the expression.
Of course, you will usually want to do something with the return value of a case expression. With the new switch expressions, you can directly assign the switch statement to a variable, as demonstrated by Example 1-8.
Example 1-8. Switch expressions using the arrow syntax
@DisplayName("Can use switch arrow syntax "+"and avoid break statement")@ParameterizedTest@MethodSource("storageTypes")voidcanUseSwitchArrowSyntaxToAvoidBreakStatement(StorageTypestorageType,Stringtarget)throwsURISyntaxException{URIresult=switch(storageType){caseLOCAL_FILE->newURI("file://~/storage");caseCLOUD->newURI("http://mycloud.com/data");default->thrownewIllegalArgumentException("Unknown storage type");};assertEquals(newURI(target),result);}
-
A switch expression can be assigned to a variable to capture the return value.
-
Arrow syntax per
caseblock to avoidbreakstatements.
What about multiline case statements? That’s possible, as well. The syntax looks slightly different, though. On top of the arrow syntax, you need to put your code into curly braces. And, surprise! The break statement is back. In this context, it acts as the return statement for a case block. Example 1-9 defines a multiline case statement as a test case.
Example 1-9. Multiline switch expressions using break keyword to return value
@DisplayName("Can use switch arrow syntax "+"and break with return value")@ParameterizedTest@MethodSource("storageTypes")voidcanUseSwitchArrowSyntaxAndReturnWithBreakStatement(StorageTypestorageType,Stringtarget)throwsURISyntaxException{URIresult=switch(storageType){caseLOCAL_FILE->{System.out.println("Retrieving the local file "+"storage URI");breaknewURI("file://~/storage");}caseCLOUD->{System.out.println("Retrieving the cloud storage URI");breaknewURI("http://mycloud.com/data");}default->thrownewIllegalArgumentException("Unknown storage type");};assertEquals(newURI(target),result);}
We’ve seen two expressive examples for the new preview feature “switch expression.” When actually running the code, remember that you have to explicitly instruct the JVM that you want use a preview feature. To ensure a smooth entry into the realm of preview features, let’s look at their use from build tools and IDEs.
Enabling Preview Features from Build Tools
The two prominent build tools in the Java space are Maven and Gradle. First, let’s have a look at a typical Maven POM file. Most of the time, you will want to add the --enable-preview flag to the compiler plugin and the surefire plugin. If you use switch expressions in your production source without defining the JVM flag, the compiler will complain with the following error message:
[ERROR] /Users/bmuschko/dev/projects/whats-new-in-java-12/
        src/test/java/com/bmuschko/java12/library/
        SwitchExpressionTest.java:[38,22] switch
        expressions are a preview feature and are
        disabled by default.
[ERROR]   (use --enable-preview to enable switch expressions)
Accordingly, if you use switch expressions in test code, you will need to instruct the test JVM to use the flag, as well, to avoid an error message. The Maven build script in Example 1-10 shows the configuration for both plugins.
Example 1-10. Enabled preview features for Maven plugins
<projectxmlns="http://maven.apache.org/POM/4.0.0"xmlns:xsi="http://www.w3.org/2001/XMLSchema-instance"xsi:schemaLocation="http://maven.apache.org/POM/4.0.0 http://maven.apache.org/maven-v4_0_0.xsd">...<build><pluginManagement><plugins><plugin><groupId>org.apache.maven.plugins</groupId><artifactId>maven-compiler-plugin</artifactId><configuration><compilerArgs>--enable-preview</compilerArgs></configuration></plugin><plugin><groupId>org.apache.maven.plugins</groupId><artifactId>maven-surefire-plugin</artifactId><configuration><argLine>--enable-preview</argLine></configuration></plugin></plugins></pluginManagement></build></project>
-
Adds the flag to the Java compiler.
-
Adds the flag when executing tests.
The configuration for a Gradle build looks slightly different, but the effect is the same. The build script in Example 1-11 uses the Groovy DSL to pass the --enable-preview flag to all compilation tasks of the project. Additionally, it provides the flag to the forked JVM used to execute tests.
Example 1-11. Enabled preview features for Gradle compilation and test tasks
tasks.withType(JavaCompile){options.compilerArgs<<'--enable-preview'}tasks.withType(Test){jvmArgs'--enable-preview'}
-
Adds the flag to the Java compiler.
-
Adds the flag when a new JVM is forked for test execution.
Rarely do developers just work from the command line, except for the hardcore vim/emacs faction. Most developers live and breathe in the IDE, so how do you enable the preview flag there? The next section touches on the support for Java 12 in IntelliJ IDEA and Eclipse.
Enabling Preview Features in the IDE
At the time of this writing, Java 12 is still cutting edge. The most prominent IDEs in the Java space have kept up with the latest developments and can already support preview and stable features delivered with Java 12. This section looks at the configuration steps required to get started with Java 12.
Java 12 support in IntelliJ IDEA
To support the latest features in Java 12, you will need to use IntelliJ IDEA 2019.1 or higher. First, you’ll need to configure the Java 12 SDK. That’s pretty straightforward and works the same way as other JDK versions. Open the project settings and create a new project SDK via the New button.
To ensure that the compiler enables the preview features, select “12 (Preview) - Switch expressions” for the project language level, as shown in Figure 1-5.
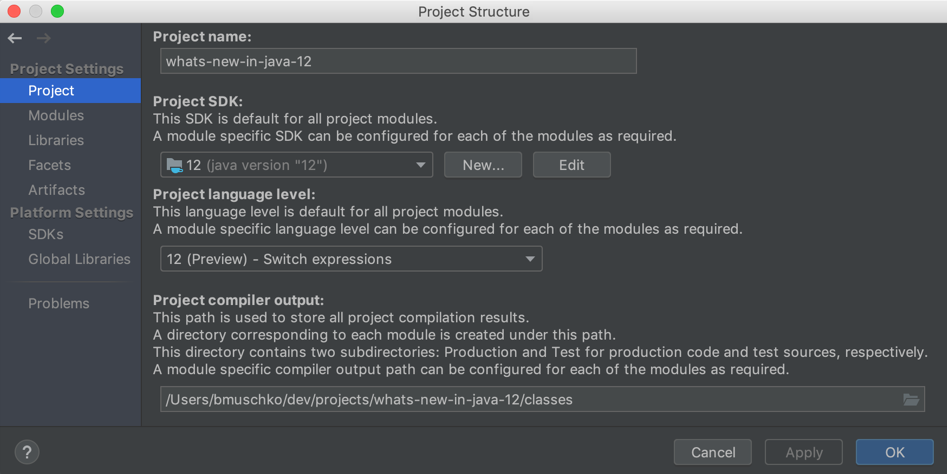
Figure 1-5. Configuring the Java 12 SDK and appropriate language level
After applying the configuration, also check the module settings by clicking Modules in the lefthand menu bar. Verify that the language level uses the same option, “12 (Preview) - Switch expressions,” as shown in Figure 1-6.
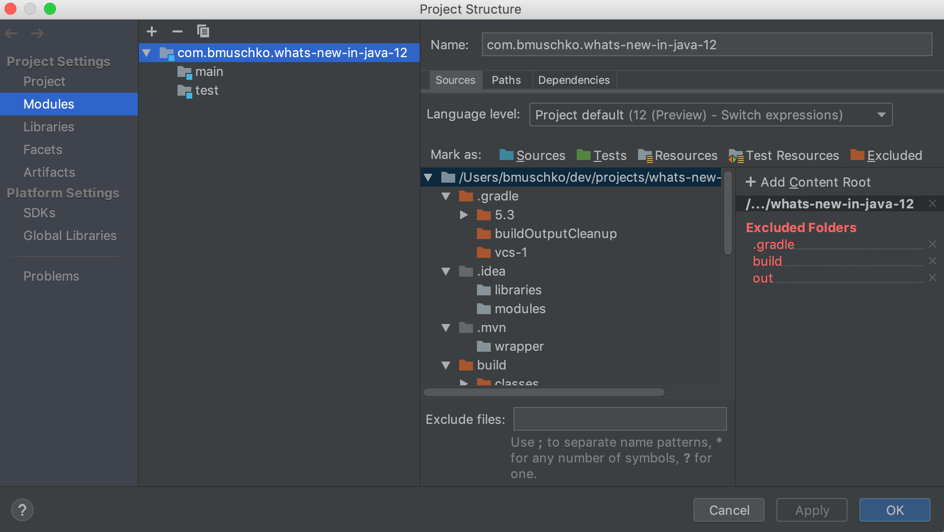
Figure 1-6. Ensuring that the Java 12 language level propagates to the IDEA module
That’s all there is to it. You are ready to explore the Java 12 preview features. You can find additional information on the use of Java 12 in IntelliJ IDEA in a blog post by JetBrains.
Java 12 support in Eclipse
The latest, production-ready version of Eclipse, 2019-03, does not come with Java 12 support out of the box. To equip the IDE with the Java 12 compiler option, you need to manually install the feature from the marketplace. It seems safe to assume that future releases of Eclipse will have Java 12 support preinstalled.
To install the Java 12 feature, retrieve the update site URL from the Download button from the marketplace. On the top-level menu in Eclipse, copy the URL and click Help > Install New Software. Paste the URL into the input box named “Work with:” and then press Enter. On the list that appears, select the feature “Eclipse Java 12 support for 2019-03 development stream,” as shown in Figure 1-7, and then click the Finish button. Eclipse informs you that you need to restart the program in order to be able to use the Java 12 features.

Figure 1-7. Installing the Java 12 feature on Eclipse 2019-03
After you restart Eclipse, open your Java 12 project. You have likely already set up the JRE in the IDE. You just need to enable the proper JDK compliance settings to support Java 12. First, select the compliance level 12. Next, in the same dialog box, enable the preview features with the option “Enable preview features.” You might notice that Eclipse marks any code that uses the preview features as a warning by default. It’s easy to fix anything that appears with a yellow underline. Just select Ignore for the option “Preview features with severity level,” as shown in Figure 1-8.
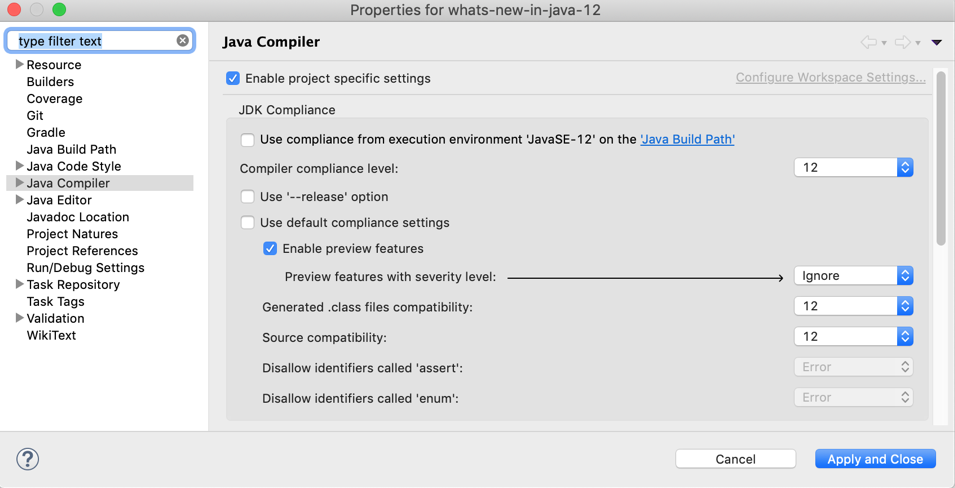
Figure 1-8. Configuring JDK 12 compliance and preview features in Eclipse 2019-03
You are now ready to test drive the latest Java 12 features from Eclipse. The next section identifies relevant features and APIs that have been removed from Java that could potentially affect your upgrade process from an earlier version.
Removed Features and APIs
As expected for a non-LTS release, Java 12 does not make drastic changes to the JDK’s feature set. All the APIs that were removed have been deprecated in an earlier version. In this chapter, I go through them one by one but will only concentrate on the most impactful ones. For more information, see the list of removed features and options.
Compiler Support for Java 6
To reduce the maintenance cost for very old and unsupported versions of Java, the JDK retires version 6, aka 1.6. In practice, this means that the compiler will fail with the following error message if you use Java 12 to compile the source code with version 6 via the command-line interface (CLI) options -source or -target:
error: Source option 6 is no longer supported. Use 7 or later.
error: Target option 6 is no longer supported. Use 7 or later.
You are effectively forced to run a program with a newer version of Java than version 6. Be aware that the use of Java 7 is already deprecated as indicated by the following compiler output. Your best bet is to upgrade to LTS version 8 at a minimum to avoid potential issues in the future.
warning: [options] source value 7 is obsolete and will be
                   removed in a future release
warning: [options] target value 7 is obsolete and will be
                   removed in a future release
Removal of finalize Methods
As of JDK 9, the finalize methods for the classes java.io.FileInputStream, java.io.FileOutputStream, java.util.zip.ZipFile, java.util.zip.Inflater, and java.util.zip.Deflater had been deprecated. Java 12 finally removes those methods.
If you haven’t changed your source code yet, now is the time to do so. Instead of calling finalize, close the FileInputStream or FileOutputStream by using the close method, as shown in Example 1-12, or a try-with-resources statement, which closes the resource automatically.
Example 1-12. Using the close method in lieu of finalize
FileInputStreamfis=null;try{fis=newFileInputStream(newFile("test.txt"));// read file}catch(IOExceptione){// handle exception}finally{try{if(fis!=null){fis.close();}}catch(IOExceptionex){// handle exception}}
As with previous Java versions, features and APIs go through a deprecation cycle before they are actually removed. We’ll have a look at features and APIs in that cycle in Java 12 in the next section.
Deprecated Features and APIs
Java 12 is extremely light on deprecations worth mentioning. That’s why I’ll keep the description extremely short.
The JVM flag -XX:+/-MonitorInUseLists, an option for tracking monitors for deflation, has been deprecated and might be removed in a future version. Furthermore, the keytool option -keyalg was marked deprecated, given that the Digital Signature Algorithm (DSA) is rarely used anymore and is not supported by newer protocols such as TLS 1.3.
That’s really about it. For more information, see the list of deprecated features and options. The last but very important chapter in this report covers performance and security.
Performance and Security
The Java core team is working meticulously to improve Java’s runtime performance. Java 12 has a bunch of improvements in store. They likely won’t affect how you work with Java as a developer on a day-to-day basis, but I’ll briefly touch on the improvements that have been made.
No doubt, security is one of the most important nonfunctional criteria in software. This section also talks about the changes to Crypto and TLS support.
Microbenchmark Suite for the JDK Source Code
JMH is the de facto harness for building, running, and analyzing benchmark tests written in Java. The tool has been on the OpenJDK distribution for many years and has been adopted by the Java team to continuously measure the runtime’s performance for different use cases.
With Java 12, the team set up an initial suite of microbenchmarks to the JDK source code with the following goals:
-
Compare performance results with previous JDK versions
-
Avoid performance regression going forward
-
Lay the groundwork for adding new tests to the suite
This work doesn’t really affect you as a Java developer. However, you can rest assured that Java does not become slower with any of the upcoming releases without reasonable functional or nonfunctional trade-offs. If you are interested in using JMH to measure the performance of your own project, check out the excellent tutorial “JMH - Java Microbenchmark Harness”.
Shenandoah: A Low-Pause-Time Garbage Collector
Java 11 introduced the experimental garbage collectors ZGC and Epsilon. Java 12 adds another experimental garbage collector called Shenandoah. Shenandoah’s garbage collection algorithm was developed by the Red Hat team and finally made its way into the OpenJDK distribution.
The garbage collector’s main feature is to reduce garbage collection (GC) pause times by performing more GC work concurrently with the running Java program. Although this experimental garbage collector is not “the one to rule them all” (that’s still the G1 garbage collector), it provides a welcome GC alternative to applications that must guarantee response times in the area of milliseconds.
You can enable the garbage collector by providing the VM options XX:+UnlockExperimentalVMOptions -XX:+UseShenandoahGC. It’s important to note that the implementation has also been backported to JDK 8 and JDK 11, so even if you are not ready to upgrade to Java 12, you can still give it a try. You can find more detailed information about the Shenandoah garbage collector’s features and configuration options on the OpenJDK Wiki.
Improvements to the G1 Garbage Collector
Speaking of garbage collectors, let’s have a look at the improvements that have been made to the default garbage collector, G1. GC pause times have been addressed in Java 12 as well.
G1 determines the amount of work that needs to be performed during GC (a so-called collection set) up front. After the garbage collector starts to work on it, there’s no way to stop the operation until all objects have been collected. As a result, GC pause times can take longer than necessary.
Java 12 improves this algorithm by introducing abortable mixed collections. The garbage collector can now discover issues with the selected regions picked for GC and split the collection set into two parts: a mandatory part and an optional part. The mandatory part must be collected at once; the optional portion can be collected at a later time. This algorithm reduces the pause times to a certain degree.
Another issue with G1 is that it returns memory only at either a full GC or during a concurrent cycle. Therefore, G1 reserves Java heap memory but rarely frees it up, even during times of underutilization. This behavior can be particularly disadvantageous (and more costly) in container environments in which you pay based on usage. Java 12 optimizes the algorithm by promptly returning unused committed memory at times of decreased usage.
Security Enhancements
As for security changes made in Java 12, although there’s no major feature sticking out, this release contains a whole slew of smaller improvements for the Crypto and TLS support as well as some of the related security tooling. The blog post “JDK 12 Security Enhancements” by Sean Mullan, the technical lead of the Java Security Libraries Team at Oracle, provides a concise and well-organized overview if you want to dive into the details.
Summary and Further Reading
After reviewing the latest features and changes in Java 12, the big question is, “Is it worth the upgrade?” Personally, I don’t think the API enhancements are strong enough to lead to a definitive answer. From my perspective, the biggest selling point of this release is the improvement of the G1 garbage collector—especially the ability to promptly return unused committed memory. And who doesn’t want to save money when running applications in a cloud infrastructure? This requires, though, that you run your application with Java 12 as the target version in production.
In this section, I summarize this report. You can find most of the code used in this report in the GitHub repository “What’s New in Java 12”, implemented as test cases. If you want to dive into the nitty-gritty, check out the JEP list.
Java 12 represents an incremental step toward the next LTS version, Java 14. It comes loaded with a couple of new APIs, the most notable being the teeing collector, String indentation and transformation APIs, an API to compare files, compact number formatting, and support for Unicode 11. None of these is groundbreaking, but they might come in handy to simplify your code.
You’ve learned that Java 12 also ships with a preview feature: switch expressions. Preview features have been introduced for the purpose of gathering feedback before making them stable in a later version of Java, and you enable them explicitly by passing a JVM flag. Keep that in mind with production systems because the API might change. Switch expressions are the next evolutionary step to switch statements as they provide for simplified and error-proof semantics.
This version of Java removes or deprecates only a few APIs and features. Look out for legacy applications that still need to compile or run with Java 6. Java 6 source and target compatibility is no longer supported.
Lastly, this report identified changes to performance and security. Java 12 introduces the experimental garbage collector called Shenandoah, which is optimized for reducing GC pause times. The default garbage collector, G1, received some love as well. It now frees up unused memory during times of underutilization and implements an algorithm to reduce pause times to a certain degree.
Java 13 is already under development, and I am looking forward to seeing raw string literals become a reality among other improvements and optimizations. That’s all for now. I hope to see you soon in the next edition of the What’s New in Java? report.