
7. Manage peripheral devices
In this chapter
If your computer is a desktop computer, you’ll need to connect a few peripheral hardware devices—such as a monitor, a keyboard, and a mouse—to it before you can use it. Other common peripheral devices are printers, speakers, scanners, fax machines, external storage drives, and external media drives such as DVD drives. Depending on your interests and how you use your computer, you might also use devices such as a microphone, webcam, fingerprint reader, joystick, touchpad, or drawing tablet. The point of all these devices, of course, is to make your computing experience more productive, more enjoyable, and (hopefully) simpler.
Many people now use laptops as their primary computer at home or at work. Laptops have the basic peripherals built in, but you can also connect an external monitor, keyboard, mouse, and other peripherals to your laptop to make it feel more like a desktop environment.
In this chapter, you’ll work with a computer’s most common external devices—the monitor, mouse, keyboard, printer, speakers, and microphone. In the process, you’ll learn about plug-and-play devices, device drivers, and ports.
This chapter guides you through procedures related to installing peripheral devices, locating device information, displaying your desktop on multiple screens, setting up audio devices, changing the way your mouse and keyboard work, and managing printer connections.
Understand peripheral devices
Peripheral devices are things that you can add to your computer to extend its functionality or power, or to serve as an interface between it and human users. There are two general types of peripheral devices:
Internal You install these inside your computer’s case and are likely to consider them part of the computer. Internal devices can come in the form of an expansion card, or a new hard drive or DVD drive. For example, you might install an additional video card to improve your computer’s graphics capabilities or support multiple displays.
External You attach these to your computer by connecting them to ports on the outside of your computer’s case.
Peripheral device terminology
Ports are outlets in your computer’s case through which various types of information can pass. Ports come in many shapes and sizes, each designed for a specific purpose. A typical modern computer has a VGA or HDMI port to which you can connect a monitor, an Ethernet port to which you can connect a network cable, and several USB ports to which you can connect a variety of devices. The computer might also support wireless connections through Wi-Fi, Bluetooth, and radio waves (typically used for wireless keyboards and mice).
An older computer might have a DVI monitor port, PS/2 keyboard and mouse ports, a parallel printer port, or an IEEE 1394 port to which you can connect high-speed devices such as digital video cameras. But you probably won’t be running Windows 10 on one of these computers.
If you find that you don’t have enough ports to connect all the devices you want to use with your computer, you don’t have to limit your device choices. Here are three options for expanding your connection capacity:
Install extra ports You can purchase an expansion card with more ports. After turning off your desktop computer and removing its cover, you insert the card into one of the available expansion slots. When you turn the power back on, Windows 10 detects and installs the new ports.
Use a hub You can connect a multiport hub to your computer and then connect multiple devices to the hub, enabling all the devices to share that single connection. Hubs are available for network, USB, and other connection types.
Use more wireless devices A wireless version of almost every external peripheral you might want to use is now available. You can connect to a printer, scanner, fax, keyboard, mouse, or hard drive without using a cable. You can listen to audio and use a microphone without plugging anything into your computer.
Install peripheral devices
Installing a new peripheral device is usually easy and intuitive, because most of these devices are now plug and play. Plug and play quite literally means that you can connect devices to the computer and begin using them. Plug-and-play devices include printers, external hard drives, flash drives, fingerprint readers, smart card readers, cameras, and many others.
When you connect a device to your computer, Windows 10 identifies the device and searches through its database of device drivers to locate the appropriate driver for the device. Device drivers are files that let Windows communicate with your device. Drivers can be specific to an individual device or to a family of devices (such as all HP LaserJet printers), and they are often specific to a certain version of Windows.
Windows 10 doesn’t automatically support all devices (no operating system does), but it natively supports more devices than any previous version. Sometimes old hardware is simply incompatible, or the manufacturer hasn’t chosen to provide an updated Windows 10 driver. You can check the compatibility of your current devices or one you are thinking about buying from the Hardware Compatibility Checker at www.microsoft.com/accessories/support/compatibility.
If Windows 10 doesn’t have a current driver for your device, it asks you to provide the driver. You might have the driver on an installation disc provided by the device manufacturer. Alternatively, Windows can search the internet for the driver, or you can visit the device manufacturer’s website.

TIP If your device is in the list of compatible devices in the Hardware Compatibility Checker, allowing Windows 10 to search for the drivers online is almost always the fastest and easiest way to get them.
Some devices come with installation software that expands the devices’ capabilities. For example, you might connect an all-in-one printer/scanner/fax/copy machine to your computer and be able to print, fax, and copy without installing additional software. However, to scan documents to electronic files, you might need to install the software provided with the device.
Boost your memory
If you want to upgrade your Windows 10 computer’s memory, you can do so without physically installing additional RAM in your computer case. The Windows ReadyBoost feature enables your Windows 10 computer to use a qualifying USB flash drive as a memory-expansion device. For best performance, you should use a USB drive (also referred to as a USB stick or thumb drive) with available space of at least double the amount of memory that is installed in your computer, and preferably four times as much memory. You can use up to eight flash memory devices synchronously (with a total of up to 256 gigabytes [GB] of memory) on one computer—if you have enough ports.
ReadyBoost is easy to use. Insert the USB drive in a USB port, right-click the drive in File Explorer, and select Properties. On the ReadyBoost tab of the Properties dialog box, Windows suggests the amount of flash drive memory you can dedicate to ReadyBoost, and you select the amount you want to use. When ReadyBoost is enabled, Windows 10 creates a file named ReadyBoost.sfcache in the root of the flash memory device.

TIP To use more than 4 GB on a single flash drive, format it with the NTFS file system.
If one or more solid-state drives (SSDs) are connected to your computer, ReadyBoost might be unavailable, because some solid-state drives are faster than flash memory devices and are unlikely to benefit from ReadyBoost.
Locate device information
You can display information about the devices that are connected to your computer from the Devices page of the Settings window. On this page, Windows 10 displays information about printers, scanners, projectors, the mouse or touchpad, the keyboard, Bluetooth and USB devices, and other devices that are connected to the computer.

The information that is available from this page is specific to the hardware and peripheral devices that are connected to your computer either directly or through a network.

SEE ALSO Display connections are managed from the System page of the Settings window. For information about displays, see “Customize device display settings” in Chapter 12, “Manage computer settings,” and “Display your desktop on multiple screens” later in this chapter.
You can add devices to your system by selecting the Add button at the top of the appropriate settings pane and following the steps described in the wizard to install the compatible device drivers on your computer. You can remove the connection to a device by selecting it in the list and then selecting Remove Device. Doing so doesn’t delete the device’s drivers from your computer, so if you add the device again later, the process is a bit simpler.
Adding a device means more than just connecting to the device physically or wirelessly; it means that Windows has confirmed that the drivers are correct and it can communicate with the device. What you are really adding it to is the list of available devices that are displayed when you choose to do something that requires a device. For example, when the Print dialog box is displayed, all the available printers are listed so you can choose the one you want. When you remove a device, you’re just removing it from that list.
When a device isn’t working properly, you can get information about the device and its drivers, and often troubleshoot the problem, from the Device Manager window.

You can double-click any device to display its Properties dialog box, in which you can explore detailed information about any device.
You can also display information about the hardware, software, and components that form your computer system, in the searchable System Information window.

To open the Settings window
Select the Start button, and then select Settings on the menu.
TIP When the Settings window opens, its icon is displayed on the taskbar. To make it easier to open this window in the future, you can right-click that icon and select Pin To Taskbar.
To display information about installed devices
Do either of the following to start Device Manager:
Right-click the Start button and then, on the Quick Link menu, select Device Manager.
Enter Device Manager in the taskbar search box, and then select the Device Manager Control Panel app.
TIP There are various ways to do almost everything in Windows 10. These procedures introduce different approaches. Always feel free to explore each approach more fully on your own.
In the Device Manager window, expand any category to display the devices in that category that are installed on your computer.
To display information about a specific device, double-click the device (or right-click the device, and then select Properties).

IMPORTANT Don’t change any of the settings unless you have the experience necessary to anticipate the consequences of the change.
To display information about hardware, software, and components
Enter system information in the taskbar search box and then, in the search results, select the System Information desktop app.
In the System Information window, expand any category to display information about the system components that are installed on your computer.
Display your desktop on multiple screens
A basic computer system includes one display that shows your Windows desktop. This is sufficient for many computing experiences. However, in some situations, you might find it convenient, or even necessary, to extend your desktop across multiple displays or duplicate your desktop on a secondary display (such as a remote monitor or video projector screen). You can easily add one, two, or more displays to your computer system.
You can physically connect as many displays as you have ports available; ports can be provided by video cards, a multiport video card, or USB ports. Windows 10 also natively supports Miracast—a wireless technology you can use to project a screen image from your Windows 10 device to a television, projector, or other device that also supports Miracast. Miracast does not require a wireless network or use your network bandwidth. Many modern internet-connected televisions support screen casting, so you can, for example, use this technology to play a slideshow or video (with audio) on televisions throughout your house during a get-together. (Or, for the video gamers in the house, to display your championship game on the big screen so your friends don’t have to watch over your shoulder.) No special app is required.
You connect the display to the computer by using a cable with the appropriate port connectors on it, or, if you are using Miracast, wirelessly. If you don’t have a cable with connectors that match the available ports, you can use an adapter to match the cable connector type to the port type. You then inform Windows where the displays are physically located so you can easily move on-screen objects between displays.

When you physically connect a secondary display to your computer, Windows 10 detects the device and, if your computer system already has the necessary drivers, automatically extends the desktop to the newly connected display.
After connecting the display, you can change the way Windows displays information on the devices. Options include:
Duplicate these displays The same content appears on both displays. This is useful when you are giving a presentation and are not facing the screen (for example, when standing at a podium facing an audience) or want to have a closer view of the content you’re displaying.
Extend these displays Your desktop expands to cover both displays. The Windows Taskbar appears only on the screen you designate as the primary display.
Show desktop only on Content appears only on the selected display. This is useful if you are working on a laptop or tablet that is connected to a second, larger display.
When you are working on a computer that is connected to two displays, Windows designates one as the primary display and the other as the secondary display. The Welcome screen and taskbar automatically appear on the primary display, as do most app windows when they first open. You can set the taskbar to appear on one or all displays, and drag selected windows between displays. You configure these settings separately, from the Taskbar pane of the Personalization settings page.
By default, Display 2 appears to the right of Display 1. When you move the mouse pointer horizontally from screen to screen, it should leave the right edge of the left screen and enter the left edge of the right screen at vertically the same point. If your displays are not physically the same size, are set to different screen resolutions, or are not placed level with each other, you can change the alignment of the displays so that the pointer moves cleanly between them.
To open the Display settings pane
In the Settings window, select System, and then select Display.
Right-click an empty area of the desktop, and then select Display settings.

TIP If a technical problem involving the connection between your computer and one display occurs when your desktop is extended across two or more displays, you might find yourself in the situation of having windows open on the inactive displays. To retrieve a hidden window, press Alt+Tab until the window you want to move is selected in Task view, and then press Shift+Win+Right Arrow (or Left Arrow) to move the active window to the next display.
To extend or duplicate your desktop across multiple displays
In the Display settings pane, select an option from the Multiple displays list (which is available only if a second display is connected), and then select Apply.
TIP If you later want to change the Multiple Display settings, you can do so quickly by pressing Win+P. A Project pane slides out from the right side of your main display, offering the same options to extend or duplicate the display.
To extend your screen to a TV or remote display by using a Miracast connection
Make sure the remote display is turned on and the dongle is connected (if applicable).
Display the Display settings pane.
In the Multiple displays sections, select Connect to a wireless display.
The Connect pane slides out from the right side of your screen and displays a list of wireless display and audio devices within range. Select the device you want to connect to.
TIP Wireless screen extensions are not made automatically, so they are a bit more effort to initially establish and must be reestablished each time you restart your computer. (Wired connections are restored with the previous settings each time you restart.) After setting up the connection, you can customize the display settings.

Accept any connection prompts that appear on the remote screen.
The remote screen displays a message telling you that it is connecting to the computer. After the connection is made, the desktop extends to the remote screen, and you can arrange the displays as you want.
To ascertain which screen is the primary display
In the Display settings pane, below the Select and rearrange displays preview area, select Identify to show the numbers from the display icons on the screens that they represent.
To change which display is designated as the primary
In the Display settings pane, in the Select and rearrange displays preview area, select the secondary display.
In the Multiple displays area, select the Make this my main display check box, and then select Apply.
To adjust the relative position of the displays
In the Display settings pane, drag the rectangle representing Display 2 to the location you want it to be in relation to Display 1. Try to align the display rectangles so that the arrangement resembles the alignment of the physical displays.

Select Apply.
TIP After rearranging the display icons, you can judge whether the displays are appropriately aligned by moving the pointer between the screens. Ideally, the pointer will remain on the same horizontal or vertical plane when you do so.
SEE ALSO For information about changing screen resolution and increasing the size of on-screen elements, see “Customize device display settings” in Chapter 12, “Manage computer settings.”
To specify the position of the taskbar on multiple displays
Right-click an empty area of the taskbar, select Taskbar settings to display the Taskbar pane of the Personalization settings page, and then scroll to the Multiple Displays section.
IMPORTANT The controls in the Multiple Displays section are active only when multiple displays are connected to your computer.
In the Multiple displays section of the Taskbar settings pane, do either of the following:
If you want to extend the taskbar across the screens, turn on Show taskbar on all displays.
In the Show taskbar buttons on list, select the location where you want to display the working taskbar content.

Set up audio devices
Computers are no longer devices used primarily to produce traditional business documents such as letters, reports, and worksheets. You can use your computer for multimedia activities such as listening to music, watching movies, or playing games, and you can create sound-enhanced documents such as presentations and videos. Even if you’re not likely to work with these types of files, your productivity might be diminished if you cannot hear the sound effects used by Windows 10 to alert you to events such as the arrival of email messages. And you’ll need speakers and a microphone if you want to participate in video conferences or use your computer to place telephone calls.
If you want to use external audio input and output devices, you can connect them to your computer either through the audio jacks, through USB ports, or through Bluetooth or wireless connections. USB-connected microphones generally produce cleaner audio because the processing is done externally to the PC, so the sound isn’t subject to as much electronic interference. This is particularly important in text-to-speech conversion.
Desktop computers have audio output jacks (usually found on the back of the computer case) and might also have dedicated headphone jacks (either on the front or on the back of the case). Laptop computers have headphone jacks and microphone jacks, or on rare occasions one jack that handles both output and input.
TIP The audio output jack might be indicated by a small speaker icon, an arrow symbol, or the words Audio or Audio/Out. On desktop computer cases that feature standard component color-coding, the audio output jack is light green, the headphone jack is light orange, and the audio input jack is pink. This color-coding simplifies the process of locating the correct jacks. Some audio device connection cables are color-coded to match.
With the rapid evolution of internet-based communications, digital video, and speech-to-text technologies, microphones are being used more commonly with business and home computer systems. Microphones come in a variety of types, such as the following:
Freestanding microphones
Headset microphones with built-in headphones that allow more private communication and consistent recording quality
Boom microphones with a single headset speaker
If you will be recording a lot of speech or using the Windows Speech Recognition feature, consider investing in a good-quality microphone. To get the highest quality sound, it’s critical that you choose the type of microphone that fits your needs. Headset and boom microphones maintain a constant distance between the microphone and your mouth, which helps to maintain a more consistent sound level than a stationary microphone.
The Speech Recognition feature in Windows 10 includes a very capable speech recognition engine. After you set up speech recognition, you can use it to control your computer and enter text into most apps where you would normally type it. Windows 10 also features Cortana, a service that is designed to be your new digital assistant and can respond to your voice instructions.
SEE ALSO For information about configuring your Windows 10 computer for Cortana, see Chapter 9, “Get assistance from Cortana,” and for speech recognition, see “Manage speech settings” in Chapter 12, “Manage computer settings.”
When you connect an audio device to your Windows 10 computer, a notification might appear briefly and then be stored with other notifications in the Action Center.

To switch between audio playback devices
In the notification area of the taskbar, right-click the Sound icon (labeled with a speaker), and then select Playback devices to display the Playback tab of the Sound dialog box.

Select the speakers, headphones, or other playback device you want to use, and then select Set Default.
To manage audio playback device settings
On the Playback tab of the Sound dialog box, select the device you want to manage, and then select Properties to display settings that you can configure manually.
Or
On the Playback tab of the Sound dialog box, select the device you want to manage, and then select Configure to start the Speaker Setup wizard.
TIP A configuration appears twice in the list if the audio channel has multiple speaker-arrangement options.

On the Choose your configuration page, select the appropriate audio channel, and select Test. Then select each speaker in the speaker setup diagram.
An image representing sound waves appears next to each speaker as the wizard plays a sound through that speaker. If a sound is not audible each time the sound waves appear, or if the sound plays through a speaker other than the one indicated in the wizard, verify that the speakers are properly connected and test again.
Select Next to display the Select Full-Range Speakers page.
In some configurations, the front left and right speakers, or the surround speakers, are full-range speakers that produce the entire audio range and include a subwoofer unit to enhance bass output. If your speaker configuration includes full-range speakers, select the check box for those speakers. Then select Next.
On the Configuration complete page, select Finish, and then select OK to close the Sound dialog box.
To switch between audio recording devices
In the notification area of the taskbar, right-click the Sound icon, and then Recording devices to display the Recording tab of the Sound dialog box.

Select the microphone, headset, or other recording device you want to use, and then select Set Default.
To manage audio recording device settings
On the Recording tab of the Sound dialog box, select the device you want to manage, and then select Properties to display settings that you can configure manually.
Or
On the Recording tab of the Sound dialog box, select the device you want to manage, and then select Configure to open the Speech Recognition window of Control Panel.

In the Speech Recognition window, select Set up microphone to start the Microphone Setup Wizard.
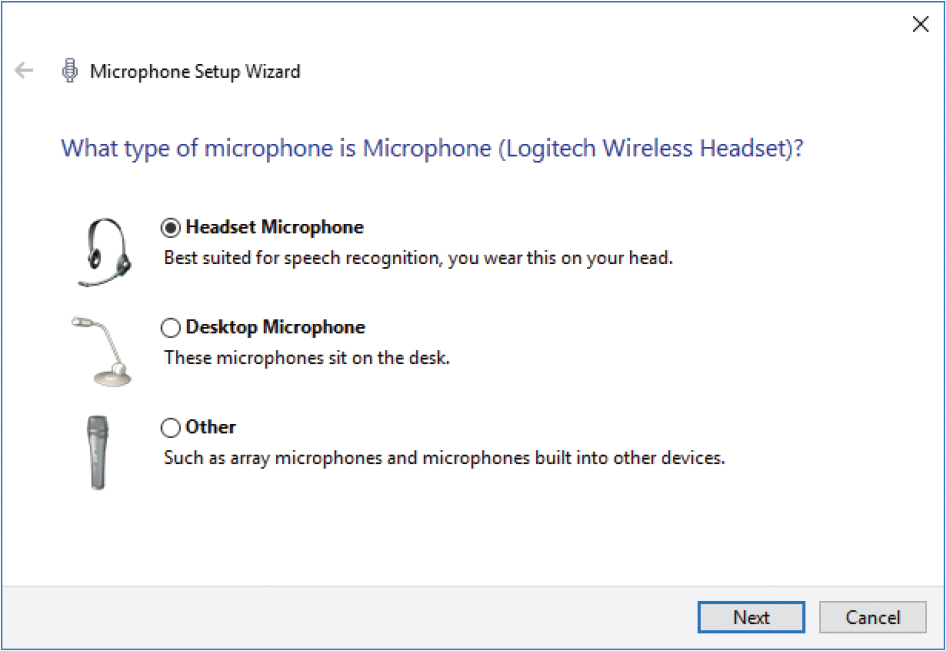
Select the type of microphone you are using, and then select Next.
TIP You can return to the previous wizard page at any time by selecting the arrow in the upper-left corner of the wizard.
On the Set up your microphone page, follow the instructions to correctly position the microphone, and then select Next.
On the Adjust the volume page, read the microphone test paragraph aloud in your normal speaking voice. Or, just for fun, you might try singing a couple of lines from your favorite song! Any audio input delivered at the volume you’ll usually use when using the microphone will work.

As you speak (or sing), the volume gauge moves in response to your voice.
TIP If the volume gauge does not move, your microphone might be incorrectly connected, malfunctioning, or incompatible with your computer. If this happens, hold the microphone close to your mouth and speak loudly; if the recording meter moves slightly, the connection is good, and the problem is compatibility between your microphone and your computer. You might be able to solve this problem by downloading new device drivers from the microphone manufacturer’s website, or it might be simpler to replace the microphone.
When you finish reading the paragraph, select Next.
If it seems necessary to repeat the input sample, do so. When you’re satisfied with the results, select Next on each page until the wizard confirms that the microphone is set up. On the last page of the wizard, select Finish.
Change the way your mouse works
In the beginning, a computer mouse consisted of a shell with one clickable button and a rubber ball on the bottom that correlated your mouse movements with a pointer on the screen. Nowadays, mice come in many shapes and sizes, employing a variety of functions, buttons, wheels, and connection methods.
Windows 10 offers enhanced wheel support that allows for smooth vertical scrolling and, on some mice, horizontal scrolling. Check the manufacturer’s documentation to see whether your mouse can take advantage of this technology. Even if it can’t, you can still customize your mouse settings in various ways to optimize the way it works with Windows.
You can change the function performed by each of the buttons and the wheel, if your mouse has one, in addition to the appearance of the pointer in its various states, and its functionality. If you want, you can allow the appearance of the mouse pointer in Windows 10 to be controlled by the visual theme.
TIP If you have a high-tech mouse, it might come with software you can install that extends its functionality beyond what the Settings window or Control Panel offer. Similarly, some mice and keyboards include custom management interfaces that augment or override the Windows settings. Look in the packaging for a CD/DVD or instructions for installing the software from the manufacturer’s website.
To set basic button and wheel options
In the Settings window, select Devices, and then select Mouse.
Configure any of the following settings:
To specify the normal functionality of the mouse buttons, in the Select your primary button area, select Left or Right.
If you select Right, you would select the right mouse button to select an item and select the left one to display a shortcut menu.
TIP This setting is useful if you are left handed, if you have injured your right hand, or if you want to switch your mousing hand to decrease wrist strain.

To set the distance scrolled when you move the scroll wheel, from the Roll the mouse wheel to scroll list, select either Multiple lines at a time or One screen. When you select Multiple Lines At A Time, you can specify how many lines to scroll at a time by dragging the slider.

Dragging the slider displays the number of lines in a small box above the slider. This number is approximate and varies depending on where the text is and how it is formatted.
To scroll an inactive window when you point to it, turn on Scroll inactive windows when I hover over them.
To change additional mouse button settings
At the bottom of the Mouse settings pane, select Additional mouse options to open the Mouse Properties dialog box.

On the Buttons tab, do either of the following:
In the Double-click speed area, double-click the folder image to test the speed at which Windows registers a double-click. Then, if necessary, drag the Speed slider to adjust the speed. (If you have changed the default primary button, use the right mouse button to double-click the folder and to drag the slider.)
To drag without holding down the mouse button, in the ClickLock area, select the Turn on ClickLock check box.
Select Apply to apply the changes but leave the dialog box open, or OK to apply the changes and close the Mouse Properties dialog box.
To change the appearance of the entire set of mouse pointers
In the Mouse Properties dialog box, select the Pointers tab.

In the Scheme list, select a different scheme to display the set of pointers associated with that scheme.

Select Apply to apply the changes and keep the dialog box open, or OK to apply the changes and close the Mouse Properties dialog box.
To change an individual pointer icon
In the Mouse Properties dialog box, display the Pointers tab.
In the Customize list, select any pointer icon, and then select Browse. The Browse dialog box opens, displaying the contents of the Cursors folder. (Cursor is another name for pointer.)
In the Browse dialog box, double-click any pointer icon to replace the one you selected in the Customize list.
TIP You can restore the selected pointer to the default for the original scheme at any time by selecting Use Default.
If you want to add a shadow to your pointers, select the Enable pointer shadow check box.
Select Apply to apply the changes and keep the dialog box open, or OK to apply the changes and close the Mouse Properties dialog box.
To change the mouse pointer functionality
In the Mouse Properties dialog box, select the Pointer Options tab.

Make any of the following changes:
To change the pointer speed, in the Motion section, drag the slider.
To speed up dialog-box operations, in the Snap To section, select the Automatically move pointer to the default button in a dialog box check box.
To make the pointer more visible on the screen, in the Visibility section, select or clear any of the three check boxes.
Select Apply to apply the changes and keep the dialog box open, or OK to apply the changes and close the Mouse Properties dialog box.
To change how the mouse wheel works
In the Mouse Properties dialog box, select the Wheel tab.

Here you can set the scroll distance just as you can in the Settings window. If you set this in either location, the change is reflected in the other location the next time you open it.
To control how much of the screen scrolls with each roll of the mouse wheel, in the Vertical Scrolling section, do either of the following:
Select The following number of lines at a time, and then enter or use the arrows to select the number of lines you want to scroll.
Select One screen at a time.
If your mouse supports horizontal scrolling, in the Tilt the wheel to scroll the following number of characters at a time box, enter or select the number of characters you want to scroll horizontally when you tilt the mouse wheel to the left or right.
Select Apply to apply the changes and keep the dialog box open, or OK to apply the changes and close the Mouse Properties dialog box.
Change the way your keyboard works
Regardless of the type of keyboard you have, all keyboards work in the same general way: Pressing each key or key combination generates a unique key code that tells the computer what to do. Pressing a key or key combination that gives a command always carries out that command.
You can change the keystrokes that Windows receives from a keyboard to those of another language. Chapter 12, “Manage computer settings,” reviews procedures for installing languages and switching among installed keyboards.
In the Typing pane of the Devices page of the Settings window, you can change settings that control the following text input features:
Spelling Choose whether to automatically correct and/or highlight misspelled words.
Typing Show text suggestions as you type, add a space when you insert suggested text, and add a period after you insert two spaces.
Touch keyboard Play key sounds as you type, capitalize the first letter of each sentence, turn on All Caps when you double-tap the Shift key, add the standard keyboard layout as a touch keyboard option, and automatically show the touch keyboard in windowed apps when there is no keyboard attached to your device.
You can configure options on the Speed tab of the Keyboard Properties dialog box, which is accessible from Control Panel or search, to change the speed at which you must press and release a key to input a single character.
To configure text input settings
Open the Settings window, select Devices, and then select Typing to display spelling, typing, and touch keyboard options.

Turn on or off each toggle button to configure the settings as you want them.
To change the key repeat delay and blink rate
Do either of the following to open the Keyboard Properties dialog box:
Display an Icons view of Control Panel, and then select Keyboard.
Enter keyboard in the taskbar search box, and then select the Keyboard Control Panel app.

To adjust how long you can hold down a key before Windows repeats its character, drag the Repeat delay slider.
To adjust the rate at which Windows repeats a character while you hold down its key, drag the Repeat rate slider.
TIP You can test the Repeat Delay and Repeat Rate settings in the box at the bottom of the Character Repeat area.
To adjust how fast the cursor blinks, drag the Cursor blink rate slider.
Select Apply or OK.
Manage printer connections
Previous editions of this book provided many pages of information about connecting printers to your computer. The good news is that modern printer connections are incredibly simple to complete.
If you have only one computer and one printer, you can connect them directly, by using a physical cable, or over a network. When you do, Windows searches for the printer driver. If you have an installation disc for your printer, you can install the printer drivers from the disc. However, the installation disc might contain out-of-date drivers. The more dependable option is to have Windows download the current list of printers that are supported by the drivers that are available through Windows Update. You can choose your printer in the list and immediately install the latest driver (this is an example of “plug and play”).
Printer driver discs frequently include printer management apps that provide an interface to information about your printer; you can also get that information by entering the IP address and port the printer is connected to into a browser window. If your computer doesn’t have an optical drive for the installation disc (which is becoming quite common with laptops and all-in-one computers), you can install the printer management software from the printer manufacturer’s website.
You manage installed printers from the Printers & Scanners pane of the Devices settings page.

Your computing environment might include one or more printers that are connected directly to the network through a wired or wireless network connection. These printers are called network printers. Network printers aren’t connected to any computer and are available on the network whenever they are turned on.
SEE ALSO For information about sharing printers and other resources with a homegroup, see “Share files on your network” in Chapter 8, “Manage network and storage resources.”
If Windows is unable to locate and automatically connect to a remote printer, you can help to identify it by providing either the path to the printer, if it’s connected to another computer, or the IP address, if it’s a network printer.
To install a local plug-and-play printer
In the Settings window, select Devices, and then Printers & scanners. The Printers & Scanners pane displays a list of the currently installed printers.
Connect the printer to the appropriate port on your computer.
Connect the printer to a power outlet, and then if necessary, turn it on.
Windows 10 locates and installs the appropriate device driver while displaying a progress bar in the Printers area. If the printer appears in the Printers section of the Printers & Scanners pane, your printer is installed and ready to use.
IMPORTANT If the printer wasn’t recognized or the drivers weren’t properly installed, continue with the next procedure.
To manually install a local printer
Display the Printers & scanners settings pane.
At the top of the pane, select Add a printer or scanner. Windows searches for any available printers that aren’t yet installed on your computer.

If the list includes the printer that you want to install, select it to have Windows locate and install the appropriate device driver.
If the search didn’t locate the printer you want to add, select The printer that I want isn’t listed to start the Add Printer wizard.

TIP A printer that is connected directly to your computer is called a local printer. A printer that is available to you through your network is called a network printer or remote printer.
On the first page of the Add Printer wizard, select Add a local printer or network printer with manual settings, and then select Next.
On the Choose a printer port page, select the port to which your printer is connected from the Use an existing port list. Then select Next to display the Install The Printer Driver page.
IMPORTANT It’s likely that the correct port will already be selected. If not, the installation instructions from your printer manufacturer will tell you which port you should use. Some manufacturers supply helpful drawings to guide you.

Do either of the following:
If your printer model is listed, select it.
If your printer is not listed, or if you want to be sure you have the latest driver, select Windows Update. Windows Update retrieves the current set of Windows 10 printer drivers from its online database and updates the Manufacturer and Printers lists. There are a lot of printer drivers, so this process can take a couple of minutes. In the updated list, select your printer.
Select Next to display the Type A Printer Name page.
IMPORTANT The Printers list is actually a list of drivers, rather than printers. Many printer drivers support multiple printers, and the supported printers might not all be in the Printers list. If the list doesn’t include your specific printer model, select a model with a similar name. Alternatively, download the necessary drivers from the manufacturer’s website, return to the Install The Printer Driver page, and select Have Disk to install the printer manually.
On the Type a printer name page, change the printer name or accept the suggested name. Then select Next.
A progress bar indicates the status of the driver installation. When the installation is complete, the Printer Sharing page appears.
On the Printer Sharing page, choose whether to share the printer through your computer with other printers on your network. Then select Next.
TIP To share a printer with other network computer users, the Network Discovery and File And Printer Sharing settings must be turned on for the current network profile. For information, see “Share files on your network” in Chapter 8, “Manage network and storage resources.”
The Add Printer wizard confirms that you’ve successfully added the printer. If you chose to share the printer, it is now available to other network computer users.
On the last page of the Add Printer wizard, select Print a test page. Your printer might require an additional step or two here to print the page. After Windows 10 sends the test page to the printer, a confirmation message box appears.
In the confirmation message box, select Close. Then in the Add Printer wizard, select Finish. An icon for the newly installed local printer appears in the Printers area of the Printers & Scanners window.
To display information about printer status
Display the Printers & scanners settings pane.
Select the printer you want to display status information for, and then in the pane that opens, select Open queue.
The printer-specific window displays information about the printer status and active print jobs. You can manage settings and print jobs from the Printer menu.

To manage printer settings
In the Printers & scanners settings pane, select the printer, and then select Manage to open a window that contains printer-specific configuration options.

Virtual printers
Some apps install printer drivers that you can use to “print” content to their default file type. Most notably, virtual printer drivers allow you to print to a PDF file, a text file, an XPS file, or Microsoft OneNote. When you install an app that has this capability, it usually automatically installs the appropriate driver and adds the virtual printer to the printer list.
You can print to a virtual printer just as you do to a real printer. Virtual printers are available in apps in the same locations as other printers.

Key points
You can connect peripheral devices to your computer, either through a cable or wirelessly through a USB or Bluetooth connection, to extend its capabilities. Keyboard and mice are the most common peripheral devices. Other examples are external monitors, drives, printers, smart card readers, and fingerprint readers. You can display information about the devices connected to your computer in Device Manager.
You can connect a Windows 10 computer to multiple displays through physical connections, or you can connect wirelessly to display devices (such as televisions) that support Miracast.
You can connect a variety of audio output and input devices to your computer and easily switch between devices to fit the requirements of a specific situation.
Whether you use a wired or wireless mouse, you can specify which button is the primary mouse button and the speed of action that constitutes a double click. If your mouse has a scroll wheel, you can specify the number of lines the screen content moves when you scroll.
You can set keyboard options to correct many common typing errors.
Windows 10 has built-in drivers for most device connections, which makes it easy to connect to a local or network printer.
 Practice tasks
No practice files are necessary to complete the practice tasks in this chapter.
Understand peripheral devices
There are no practice tasks for this topic.
Locate device information
Perform the following tasks:
Open the Settings window and display the Devices settings page. Review each pane of the page. Identify the devices that you can currently configure from this page.
Open Device Manager and familiarize yourself with the categories of installed devices. Then do the following:
If any device displays a warning symbol, open its Properties dialog box and on the Driver tab, select the Update Driver button to search for a new device driver.
Select each of the options on the View menu to display other ways of locating devices. Then return to the Devices By Type view.
If you want to, open the System Information window to locate technical information about the hardware, software, and components in your computer system.
Display your desktop on multiple screens
Perform the following tasks:
If you have multiple displays connected to your computer, do the following:
In the Settings window, select System, and then select Display. From the Display settings pane, identify the monitors by number.
If you want to, change the screen that is designated as the primary display.
Experiment with extending and duplicating the display. Consider the circumstances under which you might want to use each of these settings.
If your desktop is extended across displays, adjust the relative position of the displays, and then move the pointer across the displays and notice the effect.
In the Settings window, select Personalization, and then Taskbar. In the Multiple displays section, try each of the taskbar settings. Choose the one you like best, and then select OK.
Set up audio devices
Perform the following tasks:
Open the Sound dialog box.
Configure the settings for the playback device you want to use, manually or by using the wizard.
Configure the settings for the recording device you want to use, manually or by using the wizard.
Change the way your mouse works
Perform the following tasks:
Display the Mouse settings pane. Review the settings that you can manage in this pane, and configure them as you want them.
At the bottom of the Mouse settings pane, select Additional mouse options. In the Mouse Properties dialog box, review the settings that you can manage, and configure them the way you want them. Then select Apply.
Compare and contrast the settings in the open Mouse settings pane with those in the open Mouse Properties dialog box. Then close the dialog box.
Change the way your keyboard works
Perform the following tasks:
Display the Typing settings pane. Review the settings that you can manage in this pane, and configure them as you want them.
From Control Panel (or taskbar search), open the Keyboard Properties dialog box. Review the settings that you can manage in the dialog box, and configure them the way you want them. Then select Apply.
Compare and contrast the settings in the open Typing settings pane with those in the open Keyboard Properties dialog box. Then close the dialog box.
Manage printer connections
Perform the following tasks:
Display the Printers & scanners settings pane, and review the physical and virtual printers that are available in the window.
If you have a printer installed, display the printer-specific configuration options. Review the available options and configure them the way you want them. Then close the window.