
To Click or Double-Click?
As mentioned throughout this book, you may have to double-click icons to open them. Or you may have to click only once on an icon to open it. Whether you have to double-click or single-click is entirely up to you. The default is usually to double-click because that method allows you to select icons by clicking, which is easier for people who haven’t fully mastered the mouse.
You use the Folder Options dialog box to choose between the double-click and single-click methods. Here’s how:
FIGURE 27.28 The General tab of Folder Options

- Single-Click To Open An Item (Point To Select): Choose this option if you want to be able to open icons by clicking once. If you choose this option, also choose one of the following:
- Underline Icon Titles Consistent With My Browser: Choosing this option will usually make all icon names look like hyperlinks (blue and underlined).
- Underline Icon Titles Only When I Point At Them: Choosing this option leaves icon names alone so they look normal. The name only looks like a hyperlink when you touch it with your mouse pointer.
- Double-Click To Open An Item (Single-Click To Select): This is the more classical approach where you have to double-click icons to open them. If you’re new to computers or have difficulty using a mouse, this might be your best bet.
Personalizing folder behavior
The Folder Options dialog box offers many options in addition to double-click and single-click preferences. On the General tab, you can choose from the following options:
- Open Each Folder In The Same Window: This is the default behavior; each time you open a folder, the current instance of Explorer shows the contents of that folder.
- Open Each Folder In Its Own Window: Choosing this option causes each folder to open in a separate instance of Explorer so you end up with an instance of Explorer for each open folder.
- Show Favorites: This option turns on or off the Favorites folder in the File Explorer Navigation pane. By default it is turned on.
- Show All folders: This option in the Navigation pane group, when enabled, causes File Explorer to show additional icons in the Navigation pane, such as Control Panel and the Recycle Bin.
- Automatically Expand To Current Folder: This option, if enabled, causes File Explorer to automatically expand the Navigation pane to show the currently opened folder.
When two or more folders are open, you can right-click the clock and choose the options Cascade Windows, Show Windows Stacked, or Show Windows Side By Side to arrange them in different ways on the desktop. Use taskbar buttons or Alt+Tab to switch among them.
By default, the taskbar buttons for folder windows will collapse into a single taskbar File Explorer button. You can close them all in one fell swoop by right-clicking that taskbar button and choosing Close All Windows. You can also hover the mouse over the icon to see a preview of all windows in the group.
Options on the View tab
Clicking the View tab in the Folder Options dialog box takes you to a whole bunch of options for controlling folder behavior (see Figure 27.29). Most of the options are self-explanatory. If you open a folder that shows icons for pictures and a Navigation pane, you’ll be able to try out many on the fly. Just fill or clear a check box and click Apply to see how it affects that open folder.
FIGURE 27.29 The View tab of Folder Options
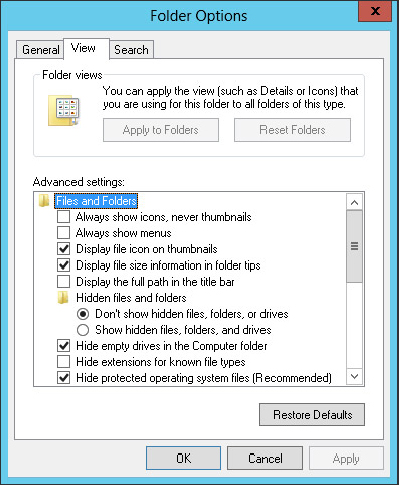
Some options aren’t quite so obvious. In the interest of being complete, we’ll run through them all in the following list:
- Always Show Icons, Never Thumbnails: If you choose this option, icons for pictures and videos will be generic icons rather than mini-pictures of the file’s contents. It might help speed things along on an extremely slow computer. But to see the picture in a file, you’ll need to open that picture. You won’t be able to see the picture in Explorer.
- Always Show Menus: Choose this option if you want the classic menu bar to open automatically with Explorer. If you don’t choose this option, the menu bar is hidden when you first open Explorer.
- Display File Icon on Thumbnails: If you choose this option, thumbnails will show the logo of the default program for opening the file. If you clear the option, thumbnails show without the logo.
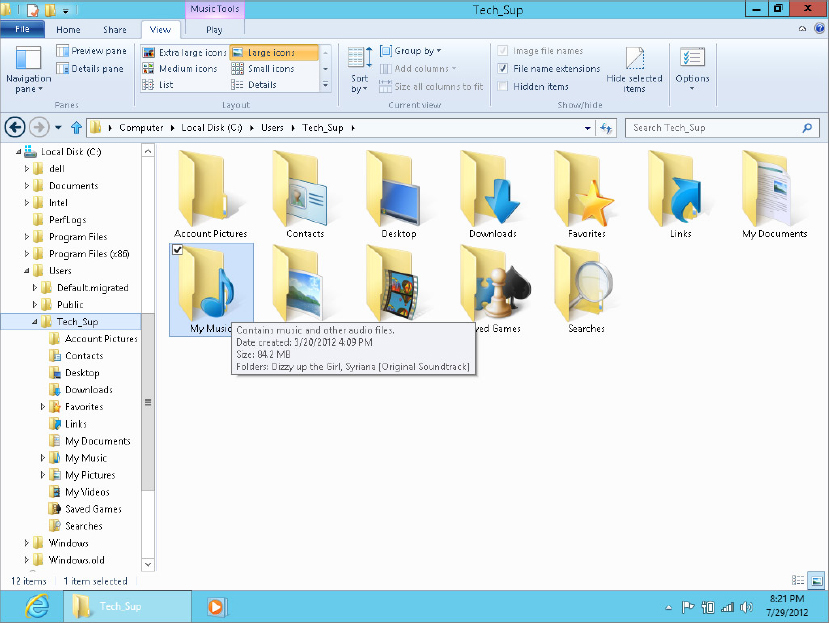
- Display File Size Information in Folder Tips: This option is about the size of files and folders in terms of how much disk space they use, not the visual size of the icon on the screen. When you choose this option, you’re telling Explorer to show a folder’s size when you point to (rest the mouse pointer on) a folder’s icon. That size is the sum of the sizes of all the files in the folder. For example, all the songs in the Music folder shown in Figure 27.30 are taking up 84.2MB of disk space. You can see that in the tooltip that appears under the mouse pointer.
FIGURE 27.30 Size of folder (84.2MB) in the folder’s tooltip
 If you clear this option, the tooltip shows only the Date Created for the folder.
 - Display the Full Path in the Title Bar: The title bar normally displays only the name of the folder you’re currently viewing, such as Music. If you choose this option, the title bar shows the complete path to the file, such as C:UsersYourUserAccountNameMy Music.
- Show Hidden Files and Folders: Hidden files are those that have the Hidden attribute checked on the Properties sheet. If you choose Don’t Show Hidden Files, Folders, And Drives, then files and folders that have the Hidden attribute checked won’t appear at all in Explorer. If you choose Show Hidden Files, Folders, And Drives, you’ll see those folders and files. But their icons are dimmed to distinguish them from items that aren’t marked as hidden.
TipTo get to the Properties sheet for a file or folder, right-click its icon and choose Properties.
- Hide Empty Drives in the Computer Folder: Choose this option to have Windows 8 hide drives that don’t contain media. For example, if the CD drive is empty, that drive will not appear under the Computer branch of the File Explorer Navigation pane.
- Hide Extensions for Known File Types: As mentioned earlier in this chapter, most files have a filename extension that indicates the file type. That extension also determines which program will open when you open the file. A known file is one for which you already have a default program installed and defined.
Choosing Hide Extensions For Known File Types hides filename extensions for known file types so you see only the filename without the extension for those kinds of files. Clearing that option displays filename extensions for all files.As always, choosing one option or the other is strictly a matter of personal preference. Sometimes it’s convenient to see filename extensions. Other times they might just seem to be adding unnecessary clutter. Of course, it only takes a few mouse clicks to turn them on or off, so you can easily change from one setting to the other just as conveniently.There’s a slight security risk to hiding filename extensions. Malware files delivered by e-mail sometimes have a dot in the filename, as in MyDocument.txt.exe. If filename extensions are hidden, you see only MyDocument.txt because the extension is the part that comes after the last dot in the name. Text (.txt) files are harmless, so you might open the file. Executable (.exe) files can contain malware. Of course, millions of .exe files are perfectly safe, but one where someone is trying to hide the .exe extension is certainly suspicious, and probably not safe. Then again, opening e-mail attachments from people you don’t know, in general, isn’t safe either!
- Hide Protected Operating System Files (Recommended): Protected operating system files are files that Windows 8 needs to do its job. These files are for the computer’s use. Choosing this option keeps those files hidden so you don’t see their icons. This is the recommended choice based on the “out of sight, out of mind” theory. If you can’t see files you shouldn’t be concerned with, you don’t have to wonder what they are. Nor can you do bad things, like delete or rename them, which could cause a lot of problems with your computer.
If you clear this option, those protected operating system files will be visible in Explorer. Do this at your own risk. If you mess with one of those files, you could render your computer inoperable.
- Launch Folder Windows in a Separate Process: This oddly named option really has nothing to do with processes listed in Task Manager. Typically, File Explorer sets aside a little bit of memory to store the contents of the currently selected folder. As you go from one folder to the next, it overwrites that portion of memory with the current folder’s contents.
If you choose this option, each folder’s contents are stored in a separate area in memory. This won’t change how things look on your screen. But if your computer crashes frequently while exploring folders, this setting might solve the problem.
- Show Drive Letters: By default, whenever you open your Computer folder, each drive’s icon displays both a friendly name and a drive letter (such as C). Choose this option if you want to hide the drive letters and see only the friendly name.
- Show Encrypted or Compressed NTFS Files in Color: The NTFS file system used in Windows 8 lets you encrypt and/or compress folders. Choose this option if you want the names of those folders to appear in color, to distinguish them from regular unencrypted, uncompressed folders. Names of encrypted folders will be green. Names of compressed folders will be blue.
NoteTo compress or encrypt a file, right-click its icon and choose Properties. Then, click the Advanced button in the Properties dialog box that opens. You can compress the folder (to reduce its size) or encrypt it to secure its contents. But you can’t do both.
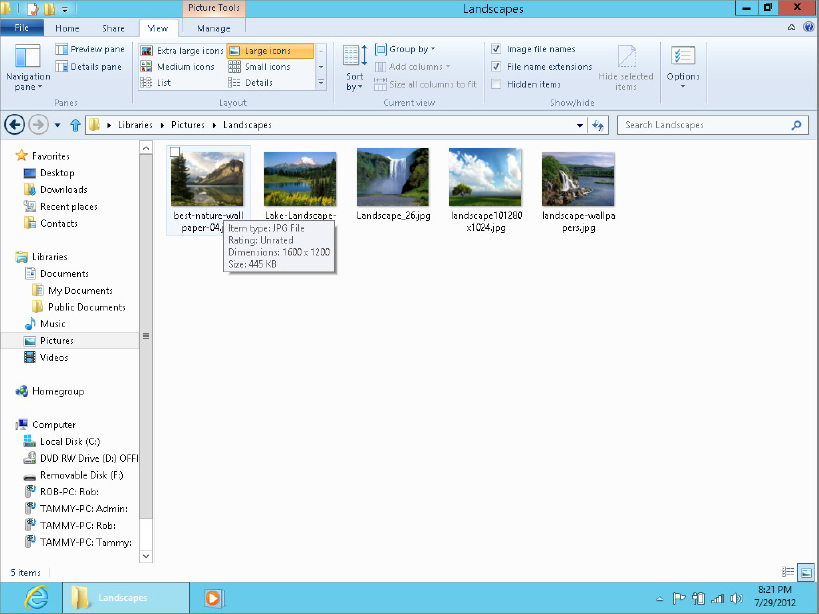
- Show Pop-up Description for Folder and Desktop Items: Selecting this option ensures that when you point to a file, folder, or desktop icon you see a tooltip like the example in Figure 27.31. If you clear this option, you won’t see a tooltip when pointing to such an icon (or anything else).
FIGURE 27.31 Pointing to a folder icon shows a description in a tooltip
- Show Preview Handlers in Preview Pane: When you select a file icon in Explorer, the Preview pane (if open) will attempt to show some content from that file. It doesn’t work with all file types, so often you’ll just see “No preview available.”
If you clear this option, the Preview pane will never attempt to show the contents of any file icon you select. If it takes too long to show the contents of a file, and that’s slowing you down, clearing this option will help speed things along. But you won’t see the contents of any file you select.
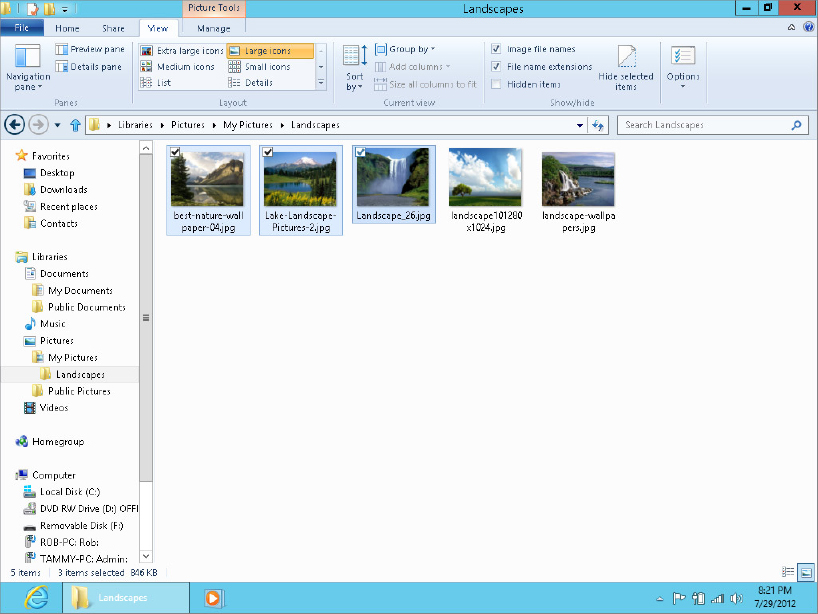
- Use Check Boxes to Select Items: Chapter 28 describes different ways you can select icons in a folder. If you find it difficult to use those techniques, choose this option to have each icon show a check box. Then you can select multiple icons by clicking their check boxes. You’ll also see a check box next to the Name column heading. Select (check) that one if you want to select all icons in the folder.
Figure 27.32 shows an example. The first three files in the list are selected, as indicated by highlighting and their checkmarks.
FIGURE 27.32 Use check boxes to select icons
- Use Sharing Wizard (Recommended): To share a folder or file with other users, you typically right-click the icon and choose Share, or select icons and click Share in Explorer’s toolbar. When you choose this option, the Sharing Wizard opens to help you through the sharing process.
If you clear this option, the Sharing Wizard won’t open when you click the Share button. Instead you’re taken to the folder’s Properties dialog box. There, you share the folder by choosing specific options rather than using the simpler wizard.
- When Typing into List View: The options in this group determine what happens when you start typing in a list view. The default behavior is to select the item that matches what you are typing. You can instead choose to have the text you type appear in the Search box instead.
- Restore Defaults: Click this button if you’ve experimented with settings and want to get things back the way they were originally set in Windows 8.
As always, be sure to click OK after changing options in the Folder Options dialog box.