
Chapter at a glance
Configure
Configure visual notifications, page 502
User
User Magnifier, page 506
Use
Use the On-Screen Keyboard, 512
Give
Give verbal commands, 515

IN THIS CHAPTER, YOU WILL LEARN HOW TO
Windows 8.1 offers several options to help you use your computer if you have any kind of impairment or disability. These are referred to cumulatively as Ease of Access features; there are many ease of access features and options from which to choose.
If you need to wear reading glasses to see what’s on the screen, you can take the glasses off and simply make the text larger; if you are visually impaired, you can turn on Narrator to have what’s on the screen read to you. If you have difficulty hearing, you can turn up the volume on your speakers or turn on text captions for spoken dialog; if you are unable to hear at all, you can turn on visual notifications with Sound Sentry. If you have difficulty using the mouse or keyboard, options exist to help you, including Toggle Keys, Sticky Keys, Filter Keys, and so on. You can also turn on and configure Windows Speech Recognition so that you can talk to your computer to give commands and perform tasks. Finally, if you have trouble entering a password to unlock Windows 8.1, you can log on without one (although this isn’t recommended due to security issues).
Practice Files
You do not need any practice files to complete this chapter. For more information about practice file requirements, see the section “Using the practice files” in the Introduction of this book.
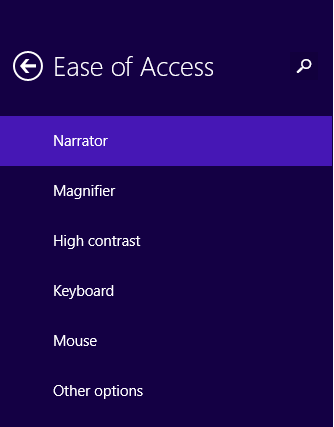
There are several ways to get to the Ease of Access options. You can search for a specific option on the Start screen; for instance, you can type High Contrast and then, from the results, click to open the options with which you can turn high contrast on or off. You can locate the Ease of Access options from PC Settings; you’ve explored many of the options there already, including personalizing the lock screen with your favorite picture and adding users. You can also get to the features from the Ease of Access Center, which offers all of the access options in one place and on the desktop (PC Settings doesn’t offer all of the options). Here are the options from PC Settings:
Tip
Many more accessibility settings are available than those in PC Settings. To see everything that’s available, open Control Panel and then click Ease Of Access. You can then select Ease Of Access Center or Speech Recognition. You’ll learn more about this later in the chapter.
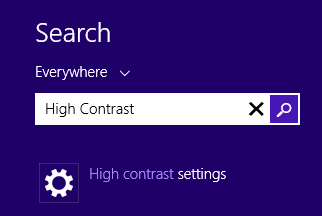
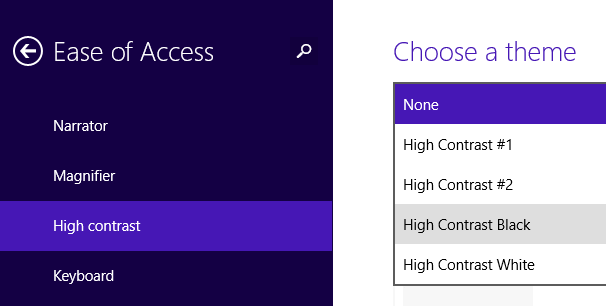
In this exercise, you’ll search for the High Contrast option from the Start screen and then open the PC Settings app and turn on High Contrast.
On the Start screen, type High Contrast.
Click High Contrast Settings.
In the Choose A Theme section, click the arrow next to None to display the list of available themes.
In the list, click High Contrast Black.
Click Apply.
Because you can’t access all the Ease of Access options from PC Settings, and because you might not even be sure what options to use, it’s often best to let Windows suggest the settings it deems best for you based on a series of questions you answer. The five questions are easy to understand, and after you answer them, options to turn on the suggested accessibility features are presented. For example, if you work through the wizard and state only that you are hard of hearing, Windows will suggest that you turn on Sound Sentry and choose a type of visual warning for when audio warnings are presented. (If you state that “it is often difficult for me to concentrate,” more options are presented.)
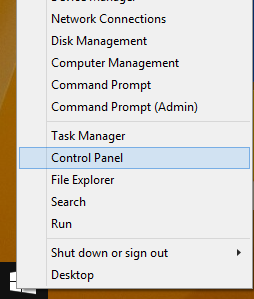
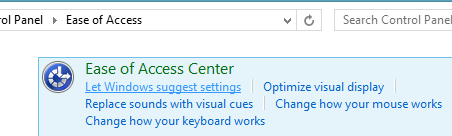
There are several ways to access the wizard that helps you decide which options are best for you, but the best way is to open Control Panel and then open Ease Of Access. You can access Control Panel by right-clicking the Start button that appears in the lower-left corner of the screen when you position your pointer there. After Control Panel is open, click Ease Of Access (not shown).
From Control Panel, click Ease Of Access, and in the Ease Of Access Center, you can select Let Windows Suggest Settings. The rest is simple; you just answer the questions as they pertain to you and let Windows figure out what needs to be turned on.
Here are a few of the items (and a few related items) that you might be prompted to turn on based on the answers you give in the wizard.
Narrator. Narrator reads aloud any text on the screen. You’ll need speakers. (You might also want to turn on audio descriptions to hear what’s happening on the screen when that feature is available for the items being viewed.)
Magnifier. Magnifier zooms in anywhere on the screen and makes everything in that area larger. You can move the magnifier around on the screen just as you would if you had a magnifying glass in your hand. (You might also want to turn on High Contrast, change the thickness of the cursor, adjust the color and transparency of the window borders, and so on if prompted to do so.)
On-Screen Keyboard. Use the On-Screen Keyboard to type by using the mouse, your finger (on a touch screen), or another pointing device, such as a joystick, by selecting keys that appear on the screen.
Speech Recognition. Use speech recognition to speak into a microphone to control the computer, open apps, and dictate text.
Mouse Keys, Sticky Keys, and Filter Keys. With Mouse Keys, you use the numeric keypad to move the mouse around the screen; with Sticky Keys, you press keyboard shortcuts such as Ctrl+Alt+Del one key at a time instead of all at once; enabling Filter Keys causes Windows to ignore or slow down brief or repeated keystrokes and adjust keyboard repeat rates. (You might also try Toggle Keys, which sound a tone when you press specific keys such as Caps Lock, Num Lock, or others.)
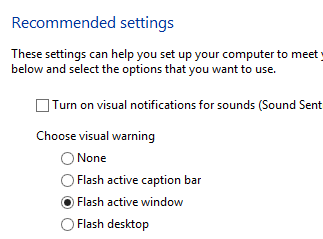
Visual Notifications and Time Limits. Sound Sentry provides visual notification for sounds, and you can enable visual warnings that flash on the screen when a notification is active. You can also turn off time limits and flashing visuals if you find it difficult to concentrate, or set how long Windows notification boxes should stay open. (You might also want to turn off unnecessary animations, prevent windows from being automatically arranged when you move them to the edges of the screen, or turn on caret browsing.)
You can turn on Magnifier from the Ease of Access Center in Control Panel, from the landing page. You can also type Magnifier on the Start screen to access the options to turn it on. Another way is to enable Magnifer in PC Settings.
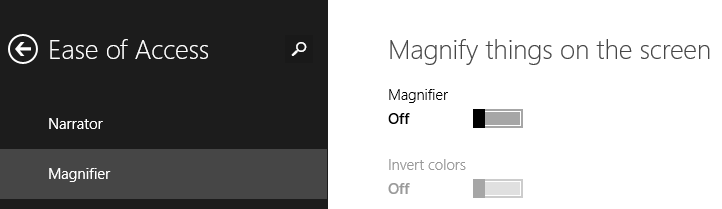
Whatever you choose, when you turn on Magnifier a window appears for a second or two that contains options to change the magnification level and how Magnifier shows its magnified data.
If you don’t immediately click any option from this window, it changes to a magnifying glass. (You click the magnifying glass to cause the window to reappear when you need it.) With the settings configured, you just move your cursor around the screen to use Magnifier. As you can see here, the image degrades and pixelates at higher settings.

Many keyboard shortcuts are available for Magnifier, including those you can use to start and exit it.
Start Magnifier. Windows key+Plus Sign
Zoom out or in while Magnifier is running. Windows key+Minus Sign or Windows key+Plus Sign
Exit Magnifier. Windows key+Esc
You’ll want to explore each available view in the Views list, and the settings available by clicking the Settings icon in the Magnifier window if you decide to use Magnifier regularly. One view is Full Screen. When you use it, the entire screen is magnified at the percentage you select, and you move around the screen with your mouse.
Docked view is another option. In this view and while on the desktop, you’ll see an area at the top of the screen that shows what’s being magnified (where you’ve placed your pointer). Docked is not an option on the Start screen or while using an app. Docked is available only on the desktop.
If you aren’t on the desktop but instead on the Start screen or in an app, you can choose between Lens and Full Screen. You’ve seen Full Screen; Lens offers a rectangle on the screen that holds the magnified data.
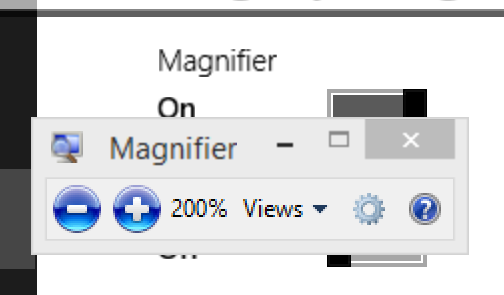
In this exercise, you’ll start Magnifier and use it at 200% and 300% in Full Screen view. You’ll then exit the Magnifier app.
On the Start screen, press Window key+Plus Sign.
Move the cursor over the Magnifier window or the magnifying glass (whichever is available).
If the Magnifier is available, click the right-facing double arrows.
Click the Views list arrow. Verify that Full Screen is selected.
If it disappears, click the magnifying glass icon, and then click the + button to zoom in.
Press Windows key+Esc to close Magnifier.

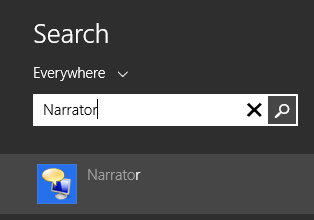
You can start Narrator from Ease of Access Center in Control Panel. As with Magnifier, you can start Narrator from PC Settings, too. You can also start Narrator on the Start screen. Just start typing Narrator and then, in the results, click Narrator when it appears.
Tip
If you have a touch-enabled screen, you can use Narrator Touch, a new feature that supports four-finger input. Otherwise, you can control and use Narrator with a keyboard and mouse.
Note
It’s best to open Narrator from PC Settings the first time you use it. This makes it possible for you see what options are available and when you’re finished using it, you can turn it off.
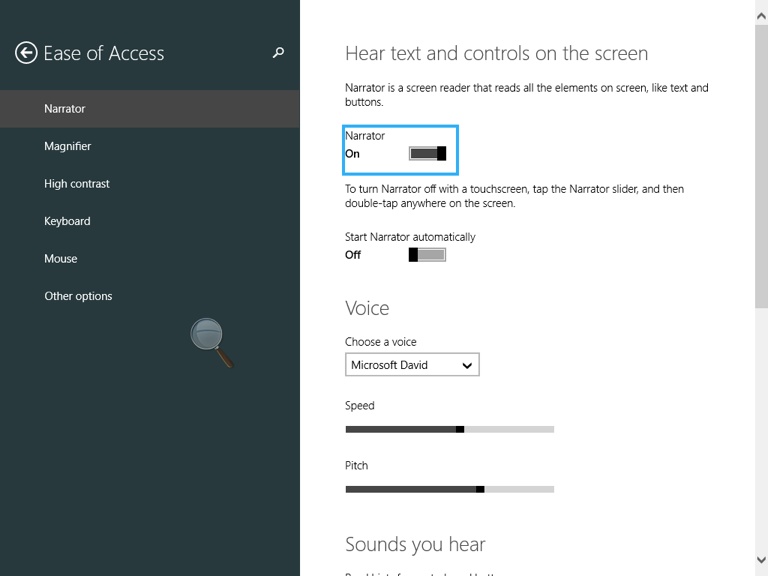
As you explore, you’ll discover that you can press any key on the keyboard to hear the name of the key. You can press Caps Lock+F1 to review and have read to you a full set of Narrator commands. You can also change the various settings, including the speed, pitch, and volume of the narrator, as well as how and when the app starts. Each time you click an option, you are prompted to save or discard the changes before you can return to the previous screen. To use Narrator, use the computer as you normally would, via the keyboard and mouse or the touch screen.
Understand that Narrator won’t read all of the content you encounter; however, it will always let you know what’s happening on the screen itself. It might read what’s on a webpage, and it will read URLs, dialog boxes, text entry boxes, and so on. When you start a app, Narrator will announce that you’ve opened a window, state the name of the app, and describe the available tooltips. It can’t tell you what’s on a Microsoft PowerPoint slide, though, or what a picture on the screen looks like. It will state which key you press on the keyboard, such as Print Screen (PrtSc), but it won’t describe what you’ve copied. Instead, it tells you when you start and exit desktop apps and apps, the commands available under your pointer, the commands you’ve selected, and other pertinent information.
Narrator does work with some apps. This is an ever-expanding technology, so you can expect more features and functionality in the future. As an example of what is available now, however, you can start the Weather app and click the current temperature; Narrator will read the temperature aloud to you if you place your pointer appropriately. If you open Calendar and create an event, it will read some of the information, such as the month you select, the number of hours you configure for the event, and so on.
If you decide to use Narrator regularly, you’ll need to spend some time exploring the features, configuring the settings, and learning about keyboard, mouse, and touch-screen shortcuts.
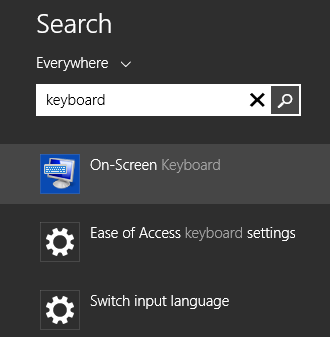
The On-Screen Keyboard is another accessibility option in the Ease Of Access Center. It is available on all computers, even those that do not support touch, and you can use the keyboard with a mouse or input device designed for people with disabilities. Start On-Screen Keyboard is an option in Control Panel and in the Ease Of Access Center. An easier way to open it is to type Keyboard on the Start screen and click On-Screen Keyboard in the results. The keyboard appears immediately when you do this. It offers a Minimize button so that you can easily hide it when you aren’t using it.
Tip
You can drag from the corners of the keyboard to make it larger and easier to use. You can configure it to be quite large.
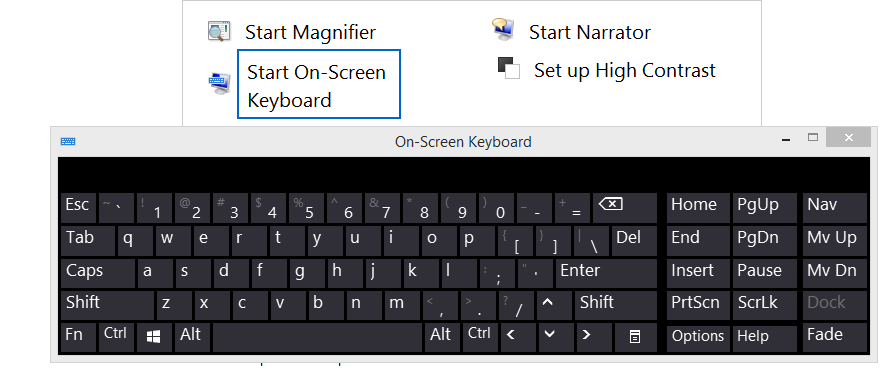
The keyboard is similar to most; you click or tap keys to use them, and there are even specialty keys such as Tab, Caps, and Shift; Alt, Ctrl, and Del; the Windows key; arrow keys; and PgUp, PgDn, PrtScn, and so on. In addition, the keyboard has a few extra entries such as Nav, Mv Up, Mv Dn, Dock, Fade, Help, ScrLk, and Options, among others. To get the most from the On-Screen Keyboard, you need to know how to use most of these extra entries.
Tip
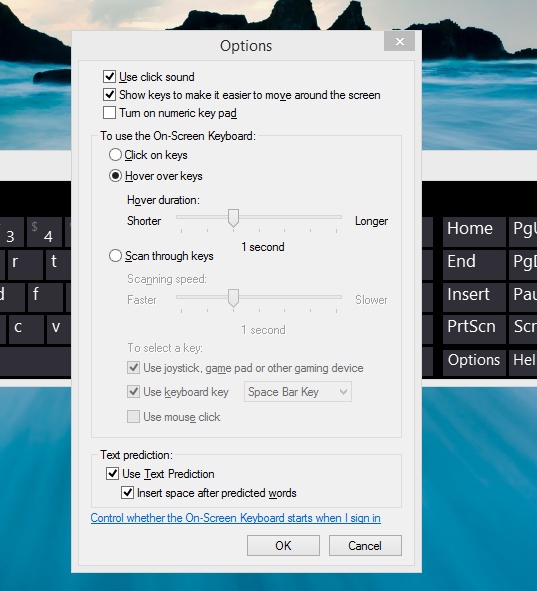
If you plan to use the On-Screen Keyboard regularly, on the keyboard click the Options key and configure the settings as desired.
The On-Screen Keyboard special keys include but are not limited to the following:
Nav. Use this to hide the full keyboard and show only the navigation options. Click General to return to the full On-Screen Keyboard.
Mv Up. Press this to reposition the On-Screen Keyboard near the top of the screen.
Mv Dn. Press this to reposition the On-Screen Keyboard near the bottom of the screen.
Dock. Use this to dock the On-Screen Keyboard to hide it, show it, or otherwise manage it. This option is not available (and dimmed) on computers but might be available on tablets.
Fade. Press this to make the keyboard transparent. Click Fade again to show it.
Help. Press this to get help using the On-Screen Keyboard.
ScrLk. This is the same as the Scroll Lock key you find on many keyboards. When the ScrLk key is enabled, it is white.
Options. Use this to configure options for the On-Screen Keyboard. These include but are not limited to setting a click sound when keys are pressed, turning on a numeric keypad, using text prediction, and turning on the option to hover over a key for a specific amount of time to use it (versus actually clicking the key with a mouse or other device).
Tip
To open the On-Screen Keyboard by using keyboard shortcuts, press Windows key+R and then, in the Run dialog box, type osk and press Enter.
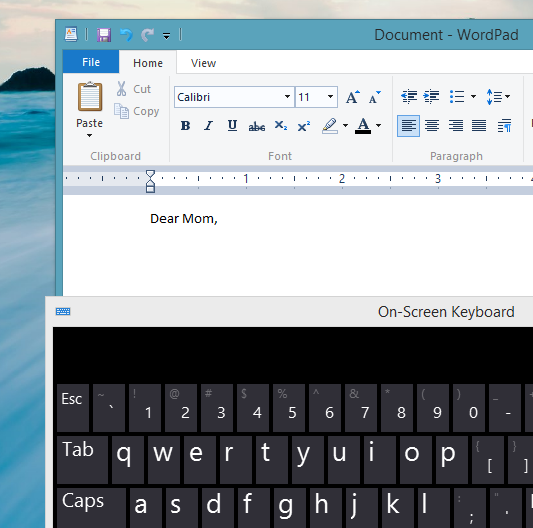
In this exercise, you’ll open the On-Screen Keyboard on the Start screen and use it to type a short note by using Microsoft WordPad.
On the Start screen, type Keyboard. From the results, click On-Screen Keyboard.
If desired, drag from any corner of the keyboard to enlarge it.
Position WordPad and the On-Screen Keyboard where you can access both easily.
Click inside WordPad to place your cursor there.
Use your mouse or another pointing device (such as your finger) to select keys on the keyboard. Note that they appear on the screen in WordPad.
Use the Shift and Enter keys as required.
Like Narrator, Windows Speech Recognition takes a little time to master. You have to set it up, train it to understand your voice, and then learn the commands for using it. You can then use Windows Speech Recognition to start and exit apps, open and select items from menus, click buttons and objects, and even dictate text. Just about everything you can do with a keyboard and mouse, you can do with only your voice.
The set up wizard can take a while to get through, so it’s best to start when you have at least 30 minutes for the process. You open Speech Recognition the same way you open any Ease of Access feature, by typing related keywords on the Start screen or by using Control Panel.

During the setup process, you are required to do the following:
Configure a microphone. You choose and test a microphone. This can be one built in to a headset, one that sits on the desk, or one built in to your computer (or device).
Enable document review. Speech Recognition will work better if you let it review the documents and email that have already been indexed for search by Windows. The computer can learn words and phrases you use often and can understand better when you speak.
Choose how to activate and deactivate the app. Start Listening and Stop Listening are the two commands you’ll learn to use first. You can choose what happens when you say these commands. You can configure it so that when you say “Stop listening,” Windows Speech Recognition closes (Manual), or you can configure it so that when you say “Stop listening,” it stays active and waits for you to use the Start Listening command to reactivate it.
Print the speech reference card. You can print the speech reference card if you have a printer so that you will always have a quick reference of the available commands. You can also view the reference sheet. If the sheet does not automatically appear, search for Controlling Your PC With Speech Recognition.
Run Speech Recognition at startup. If you know you’ll use Windows Speech Recognition every time you use your computer, turn on this feature; otherwise, turn it off.
Work through the tutorial. After Windows Speech Recognition is set up, work through the tutorial. It teaches you how to use Windows Speech Recognition and is well worth the time it takes to go through it.
After you’ve worked through the tutorial, you’re ready to use Windows Speech Recognition. You’ll see the Speech Recognition window on the desktop and Start screen when it’s running, and it will appear on top of any open windows (until you minimize it to the taskbar).
In this exercise, you’ll start Windows Speech Recognition, use it to access the desktop, and use it to open and close the Recycle Bin on the desktop.
Tip
If you did not print out the list of commands offered in the Windows Speech Recognition tutorial, you can access commands from www.microsoft.com. Search for Speech Recognition commands. You can also say, “What can I say?” while Windows Speech Recognition is listening.
On the Start screen, type Speech.
In the search results, click Windows Speech Recognition to open it.
Speech Recognition shows it is “listening”.
Say “Click desktop.”
Say “Double-click Recycle Bin.”
Say “Close Recycle Bin.”
Say “Stop listening.”
Finally, understand that there are multiple ways to configure Windows Speech Recognition. You can access the options by right-clicking the Speech Recognition dialog box on the screen, from which you can access many configuration options, including but not limited to the following:
Choosing how Windows Speech Recognition should start, stop, and listen.
Starting or restarting the Speech tutorial.
Getting help.
Performing steps to improve voice recognition.
Opening the Speech Dictionary and adding a word.
Exiting Windows Speech Recognition.
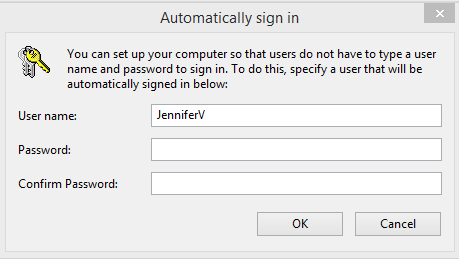
If you have trouble entering your password when you log on to windows, consider creating a PIN or a Picture Password. These might be easier for you than typing a longer, more complicated password. If you simply can’t log on with any of these due to a disability, it is possible to configure Windows 8.1 to let you in without one. Take note that this isn’t recommended, and you’ll have to go to great lengths to keep your computer safe if you do this. Without a password, anyone can access your device.
You’ll need to access the hidden options to disable the password you use on your computer. Do this by opening the User Accounts dialog box. On the Start screen type netplwiz. Click netplwiz in the results. Choose your user account in the list of users.
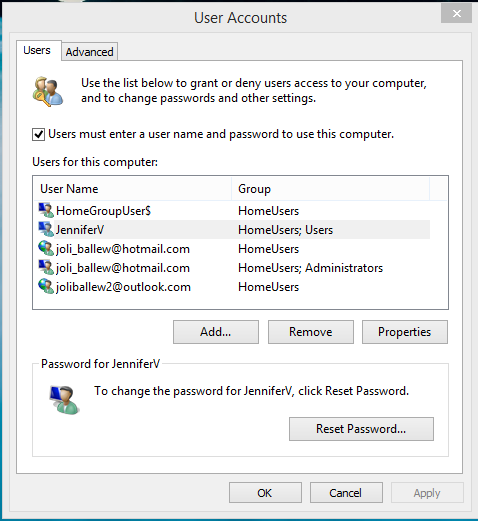
By default, the Users Must Enter A User Name And Password To Use This Computer check box is selected. Clear this check box and then Apply and enter your existing credentials. Click OK and then click OK in the remaining dialog box.
You can configure basic accessibility options in PC Settings.
If you’re unsure of which accessibility options are right for you, you can work through the available wizard to let Windows make suggestions.
To access all accessibility options, open the Ease of Access Center from Control Panel; this is the desktop version.
You can use Magnifier in various modes and views; you can choose the one that’s right for you.
Narrator can read what’s happening on the screen and inform you when you start or exit an app, name the URL of the website you’re visiting, and read what’s under your pointer. It can sometimes read content in apps, although that feature is expected to become more robust in the future.
The On-Screen Keyboard can be used with alternative input devices, with a mouse, and with touch (on compatible monitors).
By using Windows Speech Recognition, you can issue commands verbally such as, “Click desktop,” “Double-click Recycle Bin,” “Scroll up,” “Scroll down,” and so on.
It is possible to log on to Windows 8.1 without a password, but it isn’t recommended.