
Chapter at a glance
Check
Check for solutions using Action Center, page 621
Fix
Fix screen rotation problems, page 627
Get
Get Remote Assistance from a friend, page 636
Use
Use Task Manager to view resource allocation and usage, page 644
IN THIS CHAPTER, YOU WILL LEARN HOW TO
Your Windows 8.1 computer or device will likely run smoothly for quite some time. However, as your computer or device ages and you install new apps, acquire Windows and software updates, and save data and media to your computer’s hard drive, problems might begin to appear. Most problems can be fixed by applying common solutions such as restarting the computer or uninstalling problematic apps, but others can take a little more effort.
In this chapter, you’ll learn how to troubleshoot problems. In general, you should apply the techniques in this chapter in the order in which they are presented. Try to apply the most common solutions first and then see whether Windows can fix the problem for you. You can also look at Windows and Microsoft Help files, webpages, and forums, and use the Microsoft Fix It Solution Center if applicable. If none of that works, you might be able to resolve the problem by using the Advanced Startup boot menu, and boot to a repair disk or recovery drive. If you can’t find a solution on your own, you can ask for Remote Assistance from someone you know and trust. You can also experiment with advanced troubleshooting tools, and, finally, refresh or reset your computer or device.
Practice Files
You do not need any practice files to complete this chapter. For more information about practice file requirements, see “Using the practice files” in the Introduction of this book.
Most problems can be resolved (at least in the short term) with one of a few common solutions. Restarting your computer is the first thing you should try. Restarting often resolves a problem temporarily and might allow you to get back to work quickly. You’ll need to resolve the problem later and locate the root cause when you have more time.
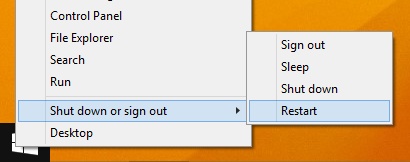
Although there are several ways to restart your computer, the best way is to right-click the Start button. Then, point to Shut down or Sign out and click Restart.
After you restart your computer, one of a few things will happen. Most likely, your computer will restart without incident, and the problem will be resolved. However, Windows 8.1 should run without incident, so whatever problem exists will still need to be resolved. If you’ve restarted the computer and you can access the Start screen, and you find that the problem persists, try these common fixes as they apply to your particular problem. (You’ll try other options if these don’t work.)
Note
If your computer won’t start at all, your only option is to boot to a Windows 8.1 DVD or an available restore disk or partition. When you do you can opt to perform an upgrade, a repair, a system restore, or choose a recovery option. If your computer is not configured to boot to a DVD or recovery disk or partition, you’ll need to change the boot order in the BIOS. Search the manufacturer’s website to see what you have to do to enter BIOS and perform this task.
Listed next are things you can try when your computer or network isn’t working correctly, and these are common and often successful solutions. Resetting devices, the first in the list, may help you resolve problems with peripherals such as printers and scanners. Restarting your network, the last in this list, may resolve connectivity problems among devices or to the internet.
Reset hardware devices. Turn off, disconnect, and then reconnect problematic sound devices, monitors, printers, scanners, and USB or FireWire devices. Turn the devices back on afterwards to see if the problem is resolved. Turn off Bluetooth devices and resync or relink them if the problem has to do with Bluetooth device connectivity.
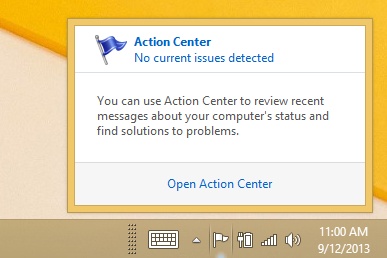
Check for solutions from the Action Center. Make sure Windows is up to date from the Action Center and let the Action Center check for solutions to problems it knows about already. See Chapter 15 for more information. To open the Action Center, on the desktop, click the flag that appears on the Taskbar in the Notification Center and then click Open Action Center. Anything in red means the Action Center needs your attention. (If you don’t see the flag in the Notification area on the taskbar, click the up arrow that appears on it. You’ll find the icon there.)
Update a driver with Device Manager. An internal piece of hardware may be causing a problem for your computer. You can use Device Manager to see if there are any problems with internal devices. Open Device Manager (type Device at the Start screen) and see whether specific hardware is the issue. If possible, install, reinstall, or roll back the device driver. If prompted, let Windows search for the appropriate driver.
Uninstall and reinstall a problematic desktop app. If you are sure an installed desktop app is causing the issue, uninstall it. If the problem resolves, you can try reinstalling the app. If the problem reappears, uninstall the app permanently. You can uninstall desktop apps from Control Panel.
Uninstall a Windows Update. Windows Updates can cause problems, although they rarely do. If you are sure an update is to blame (perhaps because you were informed so by a technician or by your computer manufacturer) you can uninstall it. At the Start screen type update, and click Windows Update Settings. From there you can view your update history and uninstall the problematic one.
Restart your network. Restart a problematic network by turning everything off and then turning hardware back on in the following order, letting each piece of hardware finish initializing before moving to the next one: turn on modems first, then routers, and then computers.


Tip
If you receive an error that says you are low on disk space, you’ll need to delete some files. Video files are the largest so start there. If the error says that you are low on memory, you’ll need to close open desktop apps, especially those that perform calculations and are resource-intensive. You may need to reboot your computer to resolve memory issues.
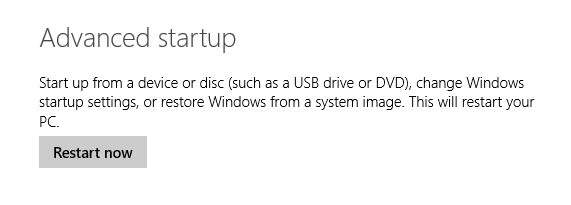
If your problem is not resolved by performing the tasks outlined in the previous bulleted list, you should reboot the computer and let Windows 8.1 run its own troubleshooting checks. You’ll need to access the Advanced Settings employ these checks. To start with advanced startup settings, type Advanced at the Start screen and choose Change Advanced Startup Options from the results available from Settings. PC Settings opens; under Advanced Startup click Restart Now.
Tip
If you need to restart your computer and access options that enable you to say, boot to a DVD or USB drive, you no longer press F8 during startup to do so. New computers may start too quickly to press F8 in time! Instead, use the Advanced Startup options in PC Settings, under Update and Recovery, from the Recovery tab.
After the computer restarts, you’ll have access to the following options.
Continue. Select this option to continue the start process. The only thing that happens is that the computer restarts.
Use A Device. Select this option to start the computer with an alternate hard drive or device such as a Windows recovery DVD or startable USB drive.
Troubleshoot. Select this option to reset or refresh your PC or to use Advanced Options. Advanced Options include options to use System Restore and Startup Repair, among others. Startup Repair will diagnose your PC and automatically fix problems it finds.
Important
You will encounter problems if your computer’s BIOS settings don’t allow you to (or aren’t configured to) start to a DVD or startable USB drive and you choose Use A Device in the advanced startup options. You might have to restart the computer again, enter BIOS settings (often by pressing F2 or some other key during startup), and change the start options so that you can start with the desired device.
In this exercise, you’ll restart the computer, access the advanced options, and choose Automatic Repair. This will not harm your computer.
From the Start screen, type Advanced.
Click Settings in the right pane and then click Change Advanced Startup Options.
Under Advanced Startup, click Restart Now.
From the boot options menu, click Troubleshoot and then Advanced Options.
Click Startup Repair. Wait while the computer restarts.
Tip
Read Chapter 14 to learn how to use features such as System Restore, the Action Center, and Windows Defender.
Display problems come in several forms. If the screen resolution isn’t set properly you can’t snap apps (so that two or more appear on the screen at the same time). Peek won’t work on the desktop if it isn’t enabled. The taskbar may disappear or appear on the side or top of the screen. The computer may boot directly to Apps view instead of the Start screen. Finally, a laptop may get stuck in portrait mode when you really need landscape. You can resolve these problems and more from a few distinct areas of Windows 8.1.
Here are the more common display problems and their solutions.
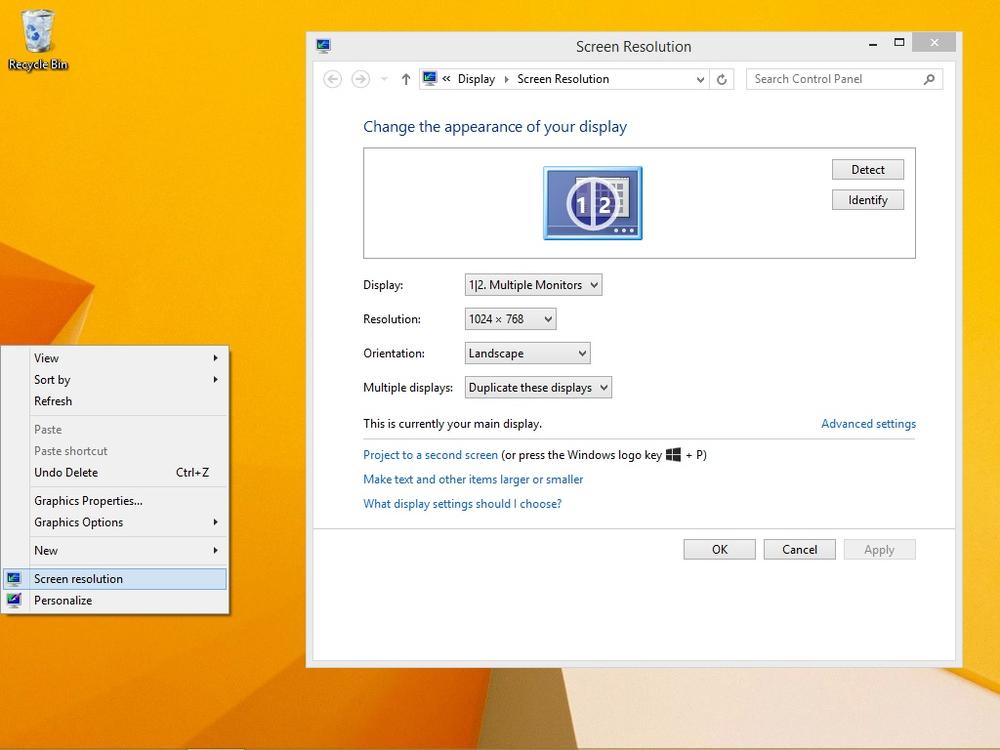
Snap Apps. To snap two apps to the screen so you can view both side by side at the same time, your screen resolution must be set to 1366 × 768. You can access screen resolution settings by right-clicking the desktop. To snap 3 or 4 apps, the screen resolution must be even higher. To see how many apps you can snap, configure the screen resolution to its highest setting and test it.
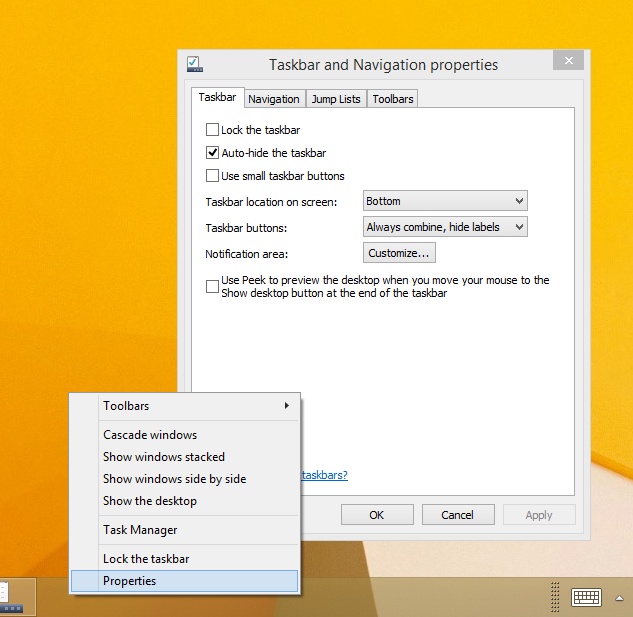
Enable Peek. Peek lets you position your cursor in the bottom right corner of the screen while on the desktop to see behind open windows. It must be enabled to work. To enable this, right-click the taskbar, click Properties, and from the Taskbar tab select Use Peek To Preview The Desktop When You Move Your Mouse To The Show Desktop Button At The End Of The Taskbar.
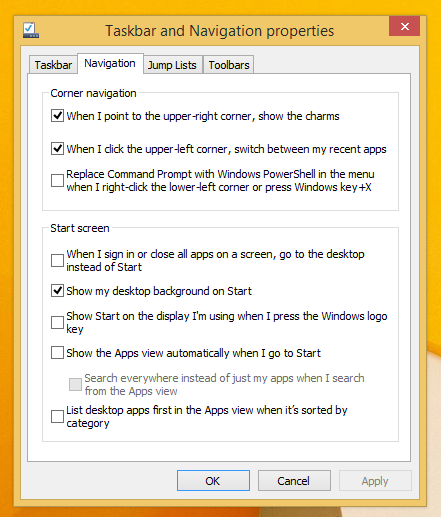
Move or show the Taskbar. The taskbar can be accidentally moved if it is unlocked. If this happens, simply drag the taskbar from wherever it is (left, right, or top) and move it to the desired position (probably the bottom of the screen). The taskbar will be hidden if the taskbar properties are configured to auto-hide it when not in use. You can prevent both of these by right-clicking the taskbar, clicking Properties, and from the Taskbar tab, select Lock The Taskbar and deselect Auto-hide The Taskbar.
Configure Start view. If you don’t see the Start screen when you power on your computer, and you want to, you’ll need to reconfigure the settings. To do this, right-click the taskbar and click Properties. Use the Navigation tab to configure the desired settings. To return to the defaults, deselect When I Sign In Or Close All Apps On A Screen, Go To The Desktop Instead Of Start, and deselect Show The Apps View Automatically When I Go To Start.
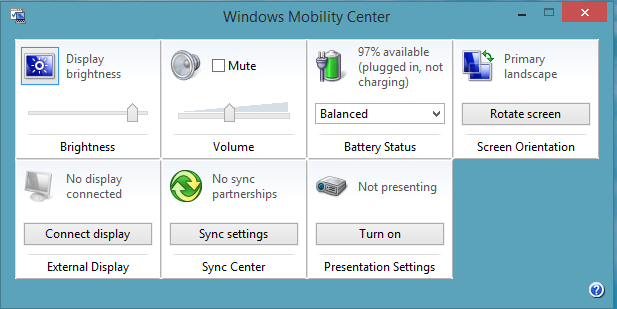
Fix a rotation problem. Occasionally a mobile computer will get stuck in the wrong mode. If this happens, open Windows Mobility Center and reset the Primary Landscape option.
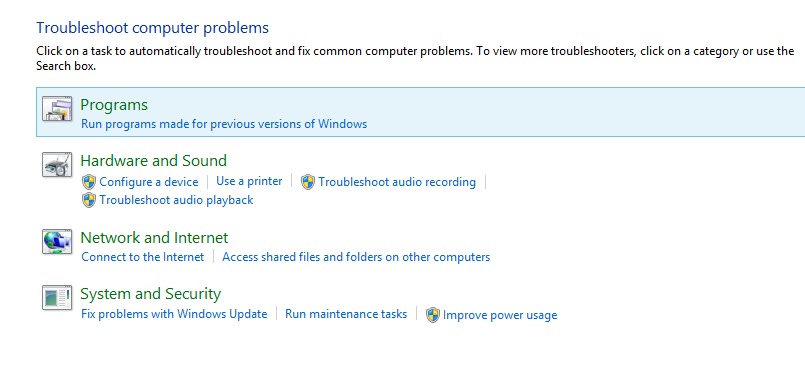
If you are experiencing problems that can’t be fixed by restarting the computer, device, or network, and reconfiguring related settings didn’t help, and if the problem doesn’t seem to have anything to do with the startup process, the troubleshooting options presented so far in this chapter probably didn’t help any. Sometimes a problem is very specific, like an inability to access a single computer in a Homegroup, an inability to print to a new printer you just installed, or using a program that appears to be incompatible with Windows 8.1. When this happens, your next step is to explore the available troubleshooting wizards. To access the wizards, type Find and fix problems at the Start screen, and from the Settings results, choose Find And Fix Problems.
The resulting screen in Control Panel shows four categories; when you click one of these categories, new options appear.
Programs. Choose this option to run programs (now called desktop apps) that were made for previous versions of Windows on your Windows 8.1 computer or device. This opens Program Compatibility Troubleshooter. Work through the wizard to select the problematic program and choose the operating system for which it was designed. This resolves almost all problems with earlier programs because it lets those programs run in their native operating system space.
Hardware And Sound. Click this option to access troubleshooting wizards that relate to hardware and sound. You can choose from Sound, Device, Network, Printing, and Media Player options. Continue to work your way through these wizards by selecting the associated entry in this window.
Network And Internet. Choose this option if you’ve restarted your network as detailed earlier but are still having problems. You can let Windows troubleshoot and fix advanced network problems, including those that deal with Internet connections, shared folders, homegroups, network adapters, incoming connections, and more. You can also troubleshoot network printer problems.
System And Security. Choose this option if you have problems with Internet Explorer, system maintenance, power, search and indexing, or Windows Update. As with the other options, when you open the desired wizard, it asks for input from you. Often, Windows will suggest a fix for your problem, and the fix will resolve it.
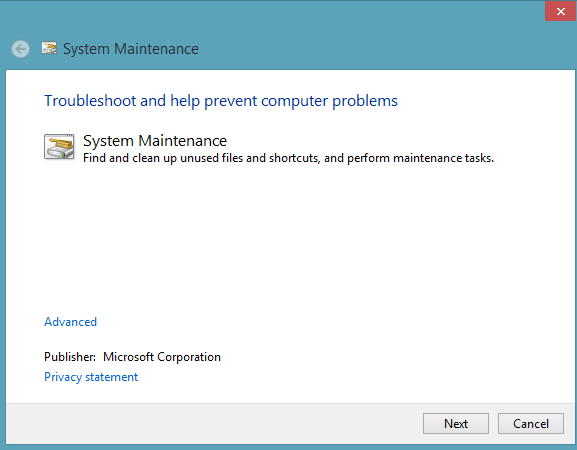
In this exercise, you’ll use a wizard to run a maintenance check.
From the Start screen, type Find and Fix Problems. Click Find And Fix Problems. Maximize the window if desired.
Under System And Security, click Run Maintenance Tasks.
Click Next.
If problems are found, let Windows 8.1 resolve them. Click Close.
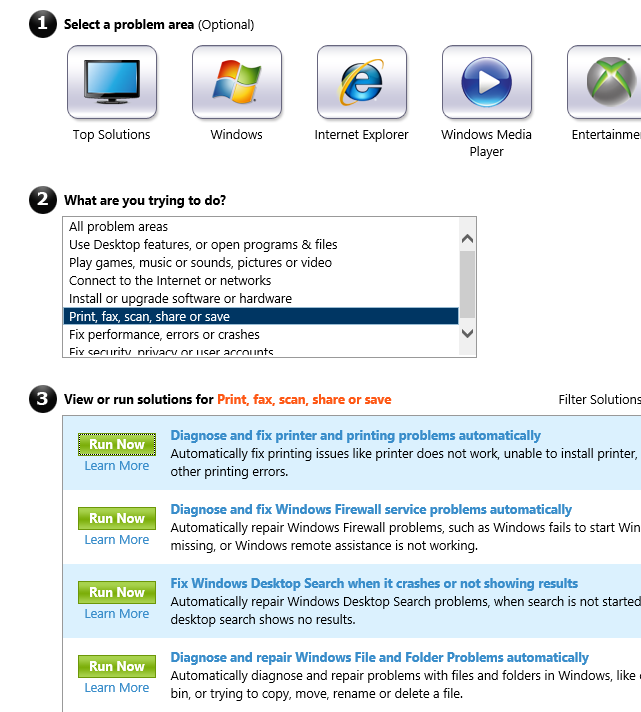
The Microsoft Fix It Solution Center can automatically fix some problems for you. To access this website, on the Start screen type Microsoft fix it solution center, and click it in the results. You can also navigate to it directly at http://www.support.microsoft.com/fixit.
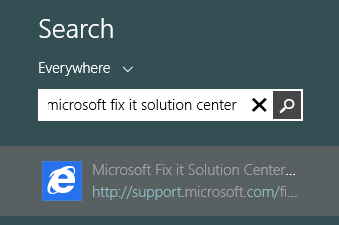
From the Microsoft Support website, choose the category for the type of problem you’re having or choose from a list of problems. In this example, Print, Fax, Scan, Share, Or Save is selected and four solutions are ready to run. All you have to do is click Run Now and click through the resulting screens as applicable.
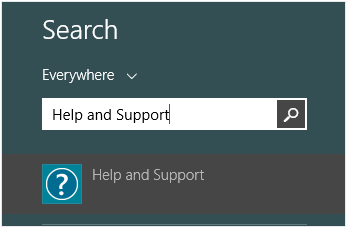
Your Windows 8.1 operating system comes with built-in Help files for common problems and issues. You can access these files by typing Help and Support on the Start screen.
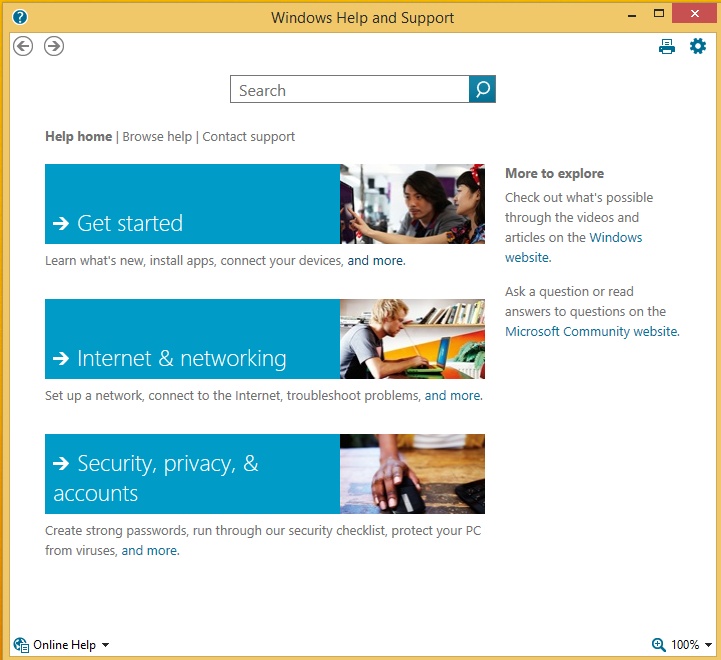
After clicking Help and Support in the results, the Windows Help and Support window opens on the desktop. By default, the Help And Support Center accesses online Help files so that the results you get are the latest available. To get the most from Help And Support, you should be connected to the Internet.
You search for information and solutions in the Help And Support Center the same way you’d search for them on the Internet: type your keywords in the Search window and click the Search icon. You can use the Back and Forward buttons and access web links to find more information. The Windows Help And Support Center offers access to both the Windows website and the Microsoft Community website.
You can use Help And Support to troubleshoot hardware, network, and security issues, just as you can with the wizards, although most people find the wizards easier to use. However, the Help And Support pages also offer information related to more general problems. Suppose your child keeps accessing your user account and you can’t figure out how to restrict such access. You can search Help And Support for information on how to create user accounts and create stronger passwords that your kids can’t easily guess. That’s a form of troubleshooting; it’s resolving a problem!
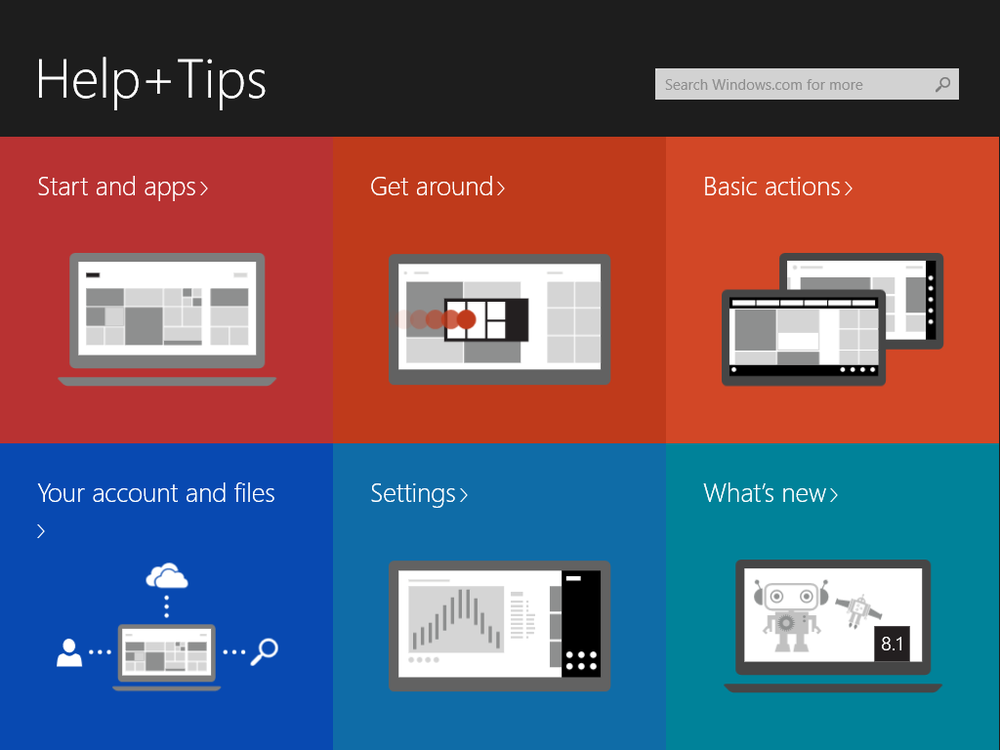
Windows also offers a Help + Tips tile on the Start screen. You click that tile to open a more graphical and user-friendly way to search for help and support. There are six categories: Start and apps, Get around, Basic actions, Your account and files, Settings, and What’s new. You’ll explore these in the exercise that follows.
In this exercise, you’ll browse the Help and Support files to learn how to secure your computer with a user account for every user as well as create strong passwords.
From the Start screen, type Help and Support.
Click Help And Support in the results.
Click Security, Privacy, & Accounts.
Click Create A User Account. Read the data and click the Back button.
In the Search window, type Strong passwords. Click the Search icon.
Review the results as desired.
Clean Up
Close the Help and Support window. There is also a Help + Tips app available from the Start screen.

The Help + Tips app offers information that can help you learn your way around Windows 8.1, create accounts and configure settings, learn what’s new, and more. You click any item in the Help + Tips app to go to that section, and you’ll have access to a back arrow to help you navigate your way back to the landing page. You can also right-click anywhere in the app to access the available toolbar, which offers access to the six categories you see here.
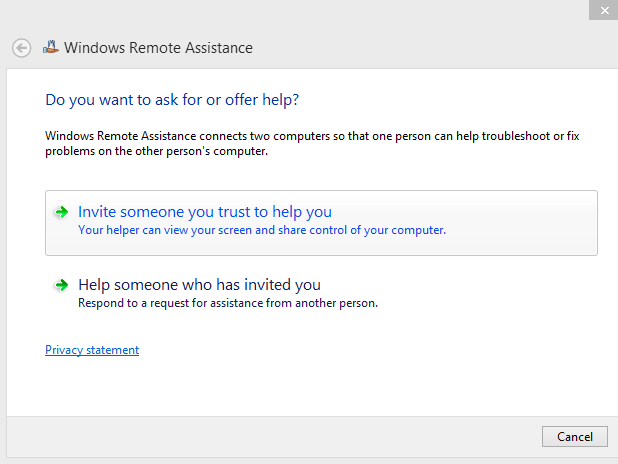
Remote Assistance is a feature available in Windows 8.1 (and previous operating systems) by which you can ask a friend, relative, colleague, or support professional for assistance in resolving a problem. You have to know someone who is willing to help, has a connection to the Internet, and also runs a compatible version of Windows. After you ask for assistance and the other person agrees to give it, the helper can view your computer screen to see the problem in action. (This happens over the Internet.) By viewing your computer screen and the problem, they can often help you figure out how to fix it. After you’re connected with a helper by Remote Assistance, you can also give them permission to take control of the computer screen and resolve the problem directly. It’s a technology that enables someone who is not physically close to you to access your computer as if he or she were sitting in front of it.
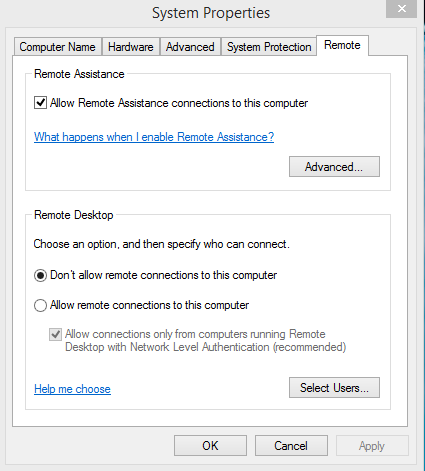
Before you can use Remote Assistance, you must verify that Remote Assistance invitations can be sent from your computer. By default, this feature is enabled, but it doesn’t hurt to check. To access this setting, type Remote Assistance at the Start screen and in the results click Allow Remote Assistance Invitations To Be Sent From This Computer. Verify that the option is enabled, and if it isn’t, select it and click OK.
Tip
Remote Desktop is different from Remote Assistance. Remote Desktop lets you access your computer remotely so that you can work from it, as if you were sitting at it, even when you are not. Remote Assistance lets others access your computer with your permission to resolve problems (while you are sitting at it).
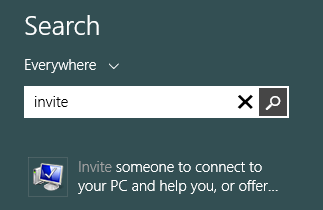
When you’re ready to send a Remote Assistance invitation, you must access the option to send an invitation. You can do this by typing Invite at the Start screen. Click Settings, and the option to Invite Someone To Connect To Your PC And Help You, Or Offer To Help Someone Else appears.
When the Windows Remote Assistance window opens, select Invite Someone You Trust To Help You and then follow the rest of the prompts as required.
There are three ways to send the required invitation to ask for help by using Remote Assistance.
Save This Invitation As A File. Choose this option to send your invitation as an attachment when you use a web-based email account such as Gmail or Yahoo!.
Use Email To Send An Invitation. Choose this option if you use a compatible email program on your computer, such as Microsoft Outlook or the Mail app, to send the invitation as an attachment.
Use Easy Connect. Choose this option if your helper also has access to Easy Connect. When you choose this option, you’ll receive an Easy Connect password, which you’ll relay to your helper by phone, email, fax, or text. (Try this option first and then work through the exercise offered later if this option doesn’t work.)
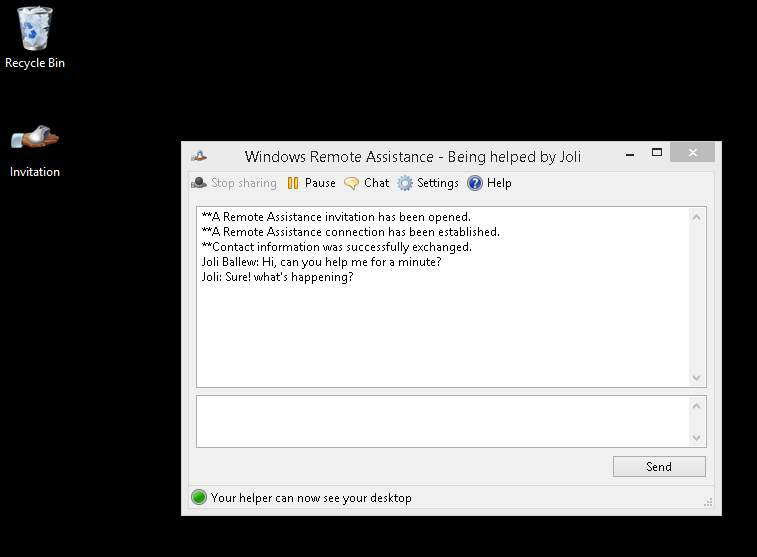
After your helper receives an invitation by email or as a message from you by another means, he or she will open Remote Assistance on that computer and type the password you’ve given him or her. You’ll be prompted to accept his or her help through Remote Assistance, a connection will be established, and the other user will be able to see your screen.
During the session, the helper can see and take control of your screen by using his or her own monitor and mouse. You can hold chats to relay the problem, stop sharing your screen (if you are), pause the session, and so on. You’re always in control and can stop the session at any time by clicking the red X in the Remote Assistance window.
In this exercise, you’ll create a Remote Assistance invitation code and relay that code to your helper by using your preferred method of communication.
Set Up
Start your computer and unlock the Lock screen. You need access to the Start screen. You also need someone available to help you, who has access to the Internet, and who runs a compatible version of Windows.
At the Start screen, type Invite.
Click Invite Someone To Connect To Your PC And Help You, Or Offer To Help Someone Else.
Click Invite Someone You Trust To Help You.
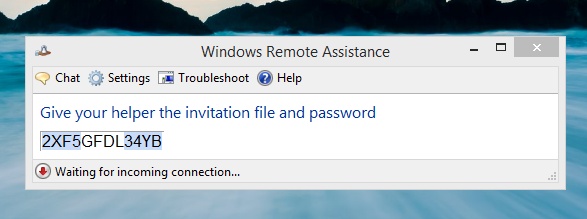
Click Save This Invitation As A File. In the Save As dialog box, click Desktop and then choose Save.
The invitation file and password opens.
Relay the information to your helper as desired.
The helper inputs the 12-character password he or she receives, and a session begins.
Follow the helper’s instructions to resolve your problem.
Windows 8.1 comes with many more troubleshooting tools than can be detailed here. You can access the tools from the Start screen by typing Troubleshooting, Diagnose, Performance, Repair, or similar keywords. These options can be more complex than you are ready for, such as using Task Manager to close processes or services or viewing and drawing conclusions from what you see in event logs, Performance Monitor, Resource Monitor, and similar programs. However, it’s important to know at least some of the advanced tools that are available in case your troubleshooting efforts continue to go unresolved or if a technician asks you to supply information you can get only by using these tools.
Tip
Although advanced tools are detailed here, it might be best to try to refresh or reset your PC before you spend too much time working with these tools if you don’t have professional help.
Here are a few of the tools you can use to troubleshoot difficult-to-diagnose problems.
Performance Options. To adjust visual effects for best appearance or performance; to choose allocate processor resources to either programs or background services; and to turn on Data Execution Prevention which helps protect against damage from viruses and other security threats. Access the Performance Options dialog box from System Properties (Advanced tab, Performance Settings button) Both are shown here. You’ll use this mostly when you need to enhance performance.
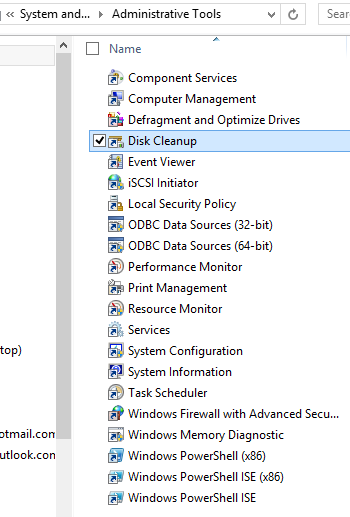
Administrative Tools. A window that offers access to the available administrative tools including but not limited to Disk Cleanup, Event Viewer, Performance Monitor, Resources Monitor, Task Scheduler and so on. Search for Administrative Tools from the Start screen to access this. You’ll use this to access advanced tools.
Disk Cleanup. To free disk space by deleting unnecessary files stored in the Recycle Bin, and those saved when you download programs, surf the internet, report errors to Microsoft, and more. Search Disk Cleanup from the Start screen to access this. You’ll use this when you need to free up disk space and you’ve already cleaned your personal file folders.
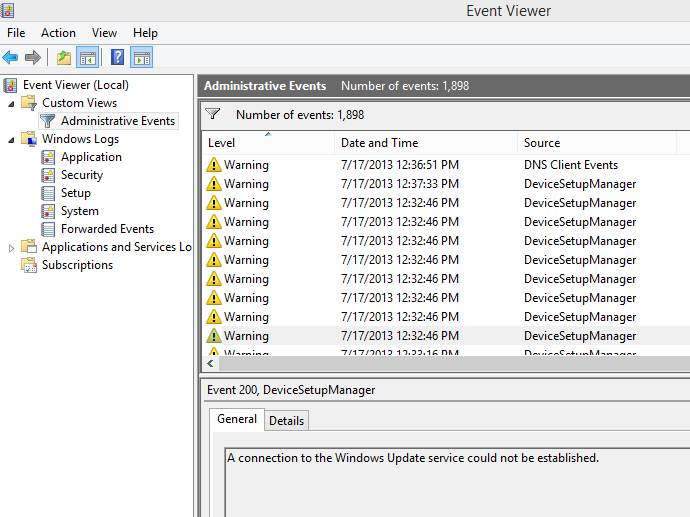
Event Viewer. To view information about errors that have occurred on your computer, warnings that have been generated, and critical events. Although the information here is rather cryptic, a technical support professional (or a good web search) might help you understand the information. You’ll use this when asked to by a support professional or to view a list of errors to try to self-diagnose the problem. Access this from Administrative Tools or by searching for it from the Start screen.
Performance Monitor. To view performance information in logs by configuring specific criteria detailing what you’d like to monitor. You can monitor memory, CPU, and other components. Access Performance Monitor when you think a specific component is causing problems, from Administrative Tools.
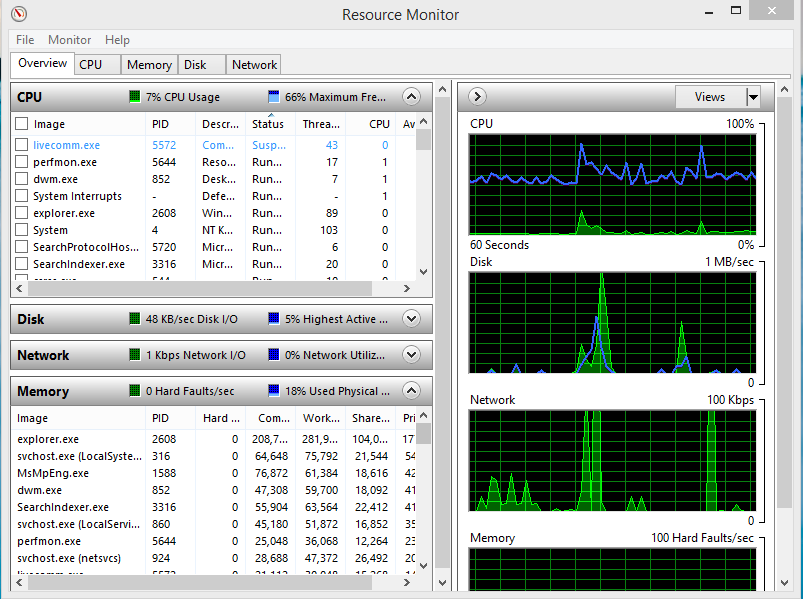
Resource Monitor. To view live information about how resources are currently being used along with other data regarding those resources. Access Resource Monitor when you think a specific component is causing problems, from Administrative Tools, to view the component live.
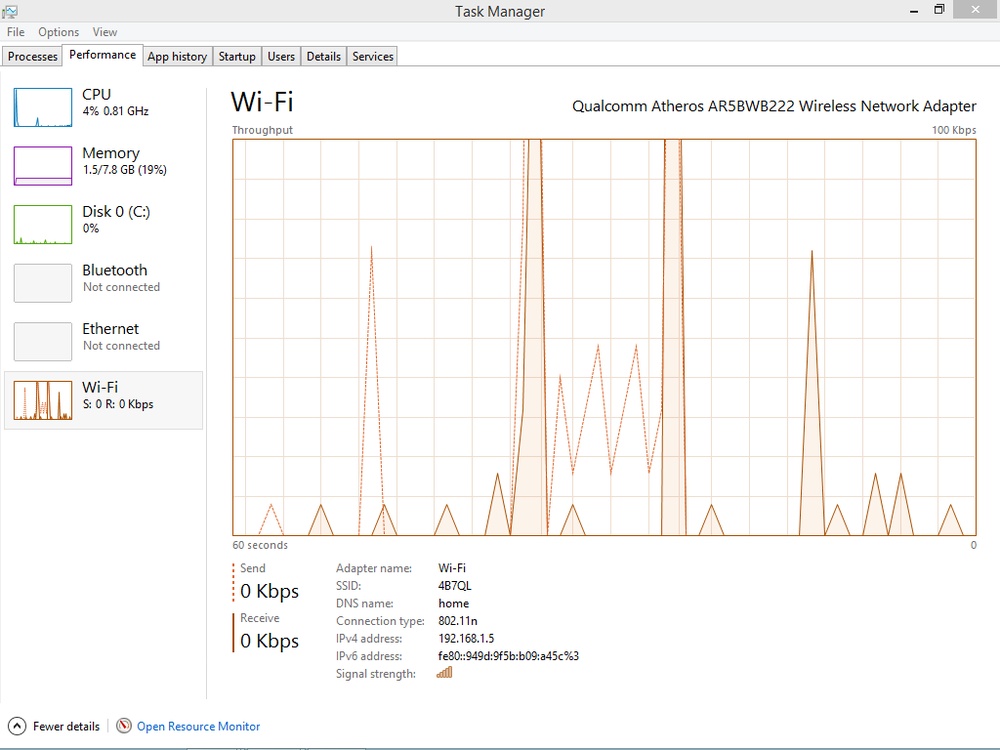
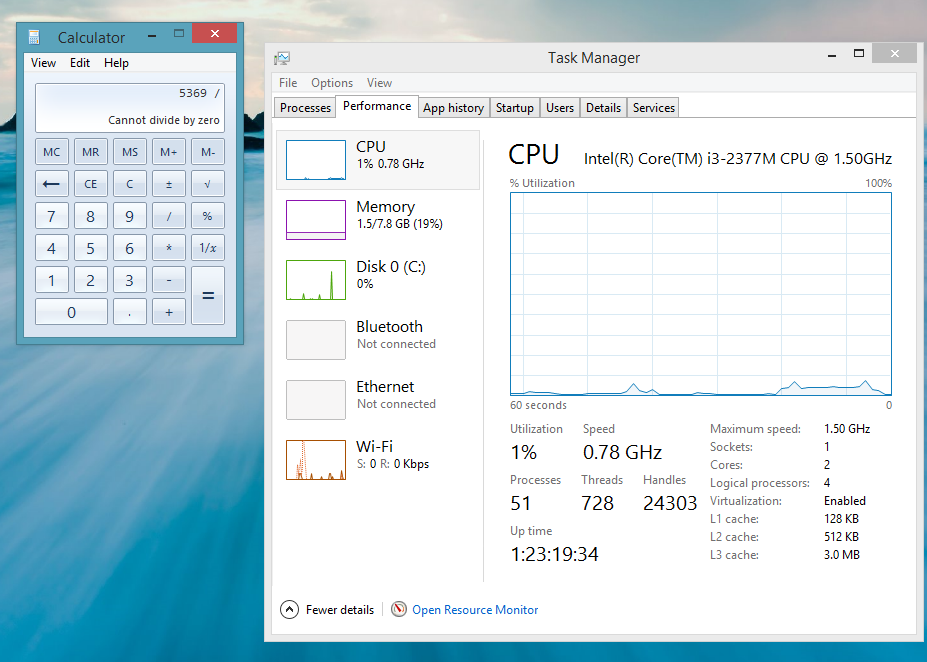
One specific tool with which you’ll want to become familiar is Task Manager. If you’ve used a computer running Windows before, you’re probably already familiar with it. After you open Task Manager, click More Details. Task Manager offers seven tabs, and each performs specific functions. You should access Task Manager when you want to review running processes, see how resources like RAM and CPU are being used, view the demands placed on your computer from running apps, limit what starts when you boot your computer, see information about logged in users’ allocated resources, view details about what’s running and the CPU and Memory usage of those items, and the services that are running.
Processes. To see which apps, background processes, and Windows processes are currently running. If an app is frozen, you can right-click it from this tab and end the task (close the app). You can also view how much of your computer’s resources the app is using. Likewise, if you know that a particular process is unresponsive, you can exit that process.
Performance. To see how your computer’s resources are currently being allocated. You have options for CPU, Memory, Disk, and likely Wi-Fi and Ethernet, although you might see others. You can use this information to find out which resource is being overworked or overwhelmed.
Tip
There are some general rules for deciding whether a resource is overwhelmed. For instance, average CPU usage when the computer is idle or only running a word processing program should be around 10 percent, and when average usage hits 90 percent or higher, the CPU is working hard to keep up with the demands placed on it. You can expect spikes for components at any time, however; spikes are normal.
App History. To view the total resources that your installed apps have used for the past month. You can use this tab to discover resource-intensive apps and uninstall them if you feel one app might be causing performance problems.
Startup. To see which applications start when your computer starts (and thus run in the background all the time). The more enabled apps you see here, the longer it will take the computer to start. You can right-click to disable any app so that it does not start when your computer starts to improve start time and computer performance.
Users. To view the users who are currently logged on and how many resources they are using.
Details. To view details about running apps and programs, including how much CPU and memory they use, their status, and their descriptions. You probably won’t make too many changes here; you’ll use other tabs to troubleshoot.
Services. To view the services that are currently running. Services run so that Windows features can work, including Plug and Play, Themes, Task Scheduler, and more. Programs and apps need services to run, so stopping a service could cause problems for the computer. Sometimes you can use this option to troubleshoot a nonworking service and start (or restart) the service if it’s inadvertently been stopped or is not working properly.

In this exercise, you’ll explore Task Manager and view CPU usage as you perform calculations.
From the Start screen, type Calculator. Click Calculator in the results to open it.
Press Ctrl+Alt+Del and then click Task Manager; click the Performance tab.
Under Performance, click CPU.
Position Calculator off to the side of the Task Manager window.
Perform several complex computations and note the change (if any) in the CPU’s performance graph.
To view additional resources, type keywords on the Start screen. Troubleshooting is a great keyword to try. Try Performance and Identify, too, as time allows.
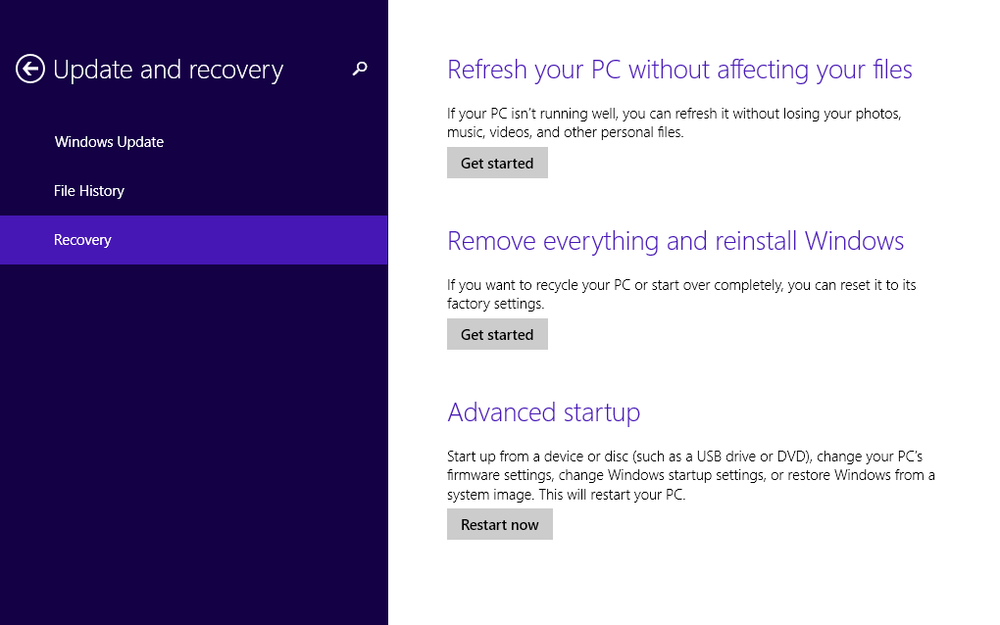
If your PC just isn’t running well, or if you have problems that you think are related to missing operating system files, third-party programs, malware, or some hard-to-fix Windows-related issue, you can refresh your PC. This is a good option if you’ve tried everything else and nothing seems to work. It isn’t a new install; it’s just a refresh of the operating system and a removal of potentially problematic third-party applications and add-ons.
A refresh will revert Windows 8.1 to its system defaults, while at the same time preserves quite a few things too, including user settings, user data, and apps purchased through the Windows Store. It keeps all your photos, music, documents, and videos. It keeps your personal settings, too. However, everything else is removed, including desktop programs you’ve installed. Toolbars for Internet Explorer will be uninstalled. Third-party software, such as software you might acquire with a new printer or scanner, will also be removed.
In this exercise, you’ll refresh your PC. Do not perform this exercise unless you have tried other troubleshooting techniques and you are sure this is the only option remaining.
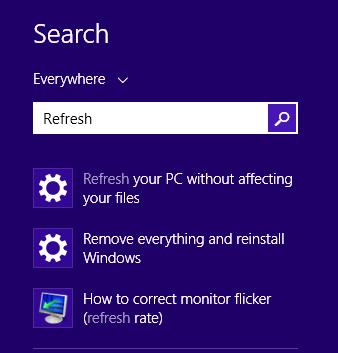
From the Start screen, type Refresh.
Click Refresh Your PC Without Affecting Your Files.
Under Refresh Your PC Without Affect Your Files, click Get Started.
Read the information and click Next.
Wait while the computer is prepared for the refresh and then follow any additional prompts.
When the process completes, enter your password on the Lock screen.
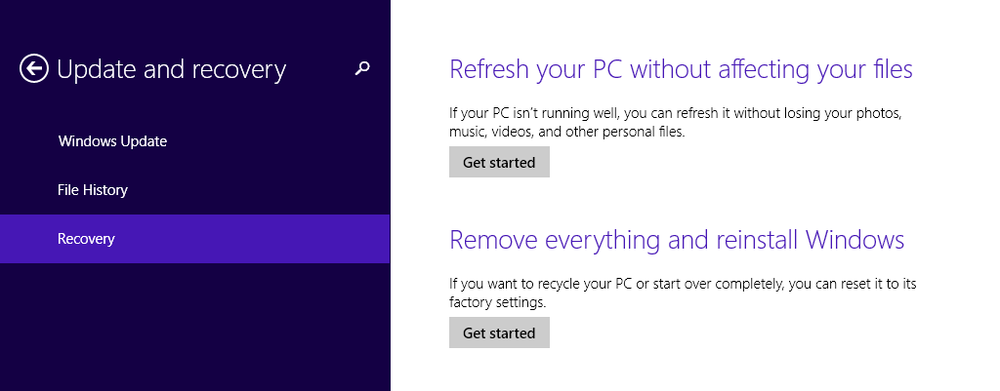
You reset your PC by using the same method you used to refresh it. Resetting is a good option if you’ve already tried all the other troubleshooting tips in this chapter and others, if you’ve refreshed your PC, and if you’ve been told by a professional that resetting is the only option (or if you plan to sell or give away your PC).
When you reset your PC, all your personal files, apps, and third-party programs are removed. All your personalization settings will be reset. Your network settings, Internet settings, installed hardware, and any other personalization you’ve made are erased, and all your PC settings are changed to their defaults. This option restores your computer to a like-new state. You’ll find the option to remove everything and reinstall Windows from PC Settings, in Update and Recovery, from the Recovery tab.
Restarting your computer will resolve many problems in the short term without further troubleshooting. However, you’ll need to get to the root of the problem to resolve it permanently.
Resetting devices or your network can easily resolve many related problems.
Advanced startup options are no longer available by pressing F8 during startup; instead, you restart the PC with Advanced Startup from PC Settings, Update and Recovery.
Troubleshooting wizards are available that can help you fix all kinds of problems, including those that are related to program, hardware, network, Internet, security, and so on.
The Windows Help + Tips app offers resources you can use to learn more about Windows 8.1. The Help and Support Center offers troubleshooting tools.
With Remote Assistance, you can easily ask a friend, colleague, relative, or other person for help.
When all else fails, there are myriad advanced troubleshooting tools to try.
Refresh and Reset are options to return your PC to a previous state.