Although most scripts are designed to run automatically, you will frequently find it useful to have your scripts interact with the user.
Note
The best way to get input from your user is through the arguments and parameters to your script or function. This lets your users run your script without having to be there as it runs!
If your script greatly benefits from (or requires) an interactive experience, PowerShell offers a range of possibilities. This might be simply waiting for a keypress, prompting for input, or displaying a richer choice-based prompt.
User input isn’t the only aspect of interaction, though. In addition to its input facilities, PowerShell supports output as well—from displaying simple text strings to much more detailed progress reporting and interaction with UI frameworks.
To obtain user input, use the Read-Host
cmdlet:
PS > $directory = Read-Host "Enter a directory name"
Enter a directory name: C:MyDirectory
PS > $directory
C:MyDirectory
The Read-Host cmdlet reads a single line of input
from the user. If the input contains sensitive data, the cmdlet supports
an -AsSecureString parameter to read
this input as a SecureString.
If the user input represents a date, time, or number, be aware that most cultures represent these data types differently. For more information about writing culturally aware scripts, see Write Culture-Aware Scripts.
For more information about the
Read-Host cmdlet, type Get-Help Read-Host. For an example of
reading user input through a graphical prompt, see the
Read-InputBox script included in this book’s code
examples. For more information about obtaining these examples, see Code Examples.
For most purposes, use the [Console]::ReadKey()
method to read a key:
PS > $key = [Console]::ReadKey($true)
PS > $key

                 KeyChar                   Key              Modifiers
                 -------                   ---              ---------
                       h                     H                    Alt
For highly interactive use (for example, when you care about key down and key up), use:
PS > $key = $host.UI.RawUI.ReadKey("NoEcho,IncludeKeyDown")
PS > $key

    VirtualKeyCode          Character    ControlKeyState      KeyDown
    --------------          ---------    ---------------      -------
                16                    ...ssed, NumLockOn         True

PS > $key.ControlKeyState
ShiftPressed, NumLockOnFor most purposes, the [Console]::ReadKey() is the best way to get a
keystroke from a user, as it accepts simple keypresses and more complex
keypresses that might include the Ctrl, Alt, and Shift keys. We pass the
$true parameter to tell the method to not display the
character on the screen, and only to return it to us.
The following function emulates the DOS pause command:
function Pause
{
    Write-Host -NoNewLine "Press any key to continue . . . "
    [Console]::ReadKey($true) | Out-Null
    Write-Host
}
If you need to capture individual key down and
key up events (including those of the Ctrl, Alt, and Shift keys), use
the $host.UI.RawUI.ReadKey()
method.
It is often useful to read input from the user but restrict input to a list of choices that you specify. The following script lets you access PowerShell’s prompting functionality in a manner that is friendlier than what PowerShell exposes by default. It returns a number that represents the position of the user’s choice from the list of options you provide.
PowerShell’s prompting requires that you include
an accelerator key (the & before a letter in the option description)
to define the keypress that represents that option. Since you don’t always
control the list of options (for example, a list of possible directories),
Example 13-1 automatically
generates sensible accelerator characters for any descriptions that lack
them.
Example 13-1. Read-HostWithPrompt.ps1
#############################################################################
##
## Read-HostWithPrompt
##
## From Windows PowerShell Cookbook (O'Reilly)
## by Lee Holmes (http://www.leeholmes.com/guide)
##
##############################################################################

<#

.SYNOPSIS

Read user input, with choices restricted to the list of options you
provide.

.EXAMPLE

PS >$caption = "Please specify a task"
PS >$message = "Specify a task to run"
PS >$option = "&Clean Temporary Files","&Defragment Hard Drive"
PS >$helptext = "Clean the temporary files from the computer",
>>              "Run the defragment task"
>>
PS >$default = 1
PS >Read-HostWithPrompt $caption $message $option $helptext $default

Please specify a task
Specify a task to run
[C] Clean Temporary Files  [D] Defragment Hard Drive  [?] Help
(default is "D"):?
C - Clean the temporary files from the computer
D - Run the defragment task
[C] Clean Temporary Files  [D] Defragment Hard Drive  [?] Help
(default is "D"):C
0

#>

param(
    ## The caption for the prompt
    $Caption = $null,

    ## The message to display in the prompt
    $Message = $null,

    ## Options to provide in the prompt
    [Parameter(Mandatory = $true)]
    $Pption,

    ## Any help text to provide
    $HelpText = $null,

    ## The default choice
    $Default = 0
)

Set-StrictMode -Version Latest

## Create the list of choices
$choices = New-GenericObject `
    Collections.ObjectModel.Collection `
    Management.Automation.Host.ChoiceDescription

## Go through each of the options, and add them to the choice collection
for($counter = 0; $counter -lt $option.Length; $counter++)
{
    $choice = New-Object Management.Automation.Host.ChoiceDescription `
        $option[$counter]

    if($helpText -and $helpText[$counter])
    {
        $choice.HelpMessage = $helpText[$counter]
    }

    $choices.Add($choice)
}

## Prompt for the choice, returning the item the user selected
$host.UI.PromptForChoice($caption, $message, $choices, $default)
For more information about running scripts, see Run Programs, Scripts, and Existing Tools.
Simply have your script output the string
information. If you like to be more explicit in your scripting, call the
Write-Output cmdlet:
PS > function Get-Information
{
    "Hello World"
    Write-Output (1 + 1)
}

PS > Get-Information
Hello World
2
PS > $result = Get-Information
PS > $result[1]
2Most scripts that you write should output richly structured data, such as the actual count of bytes in a directory (if you are writing a directory information script). That way, other scripts can use the output of that script as a building block for their functionality.
When you do want to provide output
specifically to the user, use the Write-Host, Write-Debug, and
Write-Verbose
cmdlets:
PS > function Get-DirectorySize
{
    $size = (Get-ChildItem | Measure-Object -Sum Length).Sum
    Write-Host ("Directory size: {0:N0} bytes" -f $size)
}

PS > Get-DirectorySize
Directory size: 46,581 bytes
PS > $size = Get-DirectorySize
Directory size: 46,581 bytes
If you want a message to help you (or the
user) diagnose and debug your script, use the Write-Debug cmdlet. If you want a message to
provide detailed trace-type output, use the Write-Verbose cmdlet, as shown in Example 13-2.
Example 13-2. A function that provides debug and verbose output
PS > function Get-DirectorySize
{
    Write-Debug "Current Directory: $(Get-Location)"

    Write-Verbose "Getting size"
    $size = (Get-ChildItem | Measure-Object -Sum Length).Sum
    Write-Verbose "Got size: $size"

    Write-Host ("Directory size: {0:N0} bytes" -f $size)
}

PS > $DebugPreference = "Continue"
PS > Get-DirectorySize
DEBUG: Current Directory: D:leeOReillyScriptsPrograms
Directory size: 46,581 bytes
PS > $DebugPreference = "SilentlyContinue"
PS > $VerbosePreference = "Continue"
PS > Get-DirectorySize
VERBOSE: Getting size
VERBOSE: Got size: 46581
Directory size: 46,581 bytes
PS > $VerbosePreference = "SilentlyContinue"
However, be aware that this type of output
bypasses normal file redirection and is therefore difficult for the user
to capture. In the case of the Write-Host cmdlet, use it only when your
script already generates other structured data that the user would want
to capture in a file or variable.
Most script authors eventually run into the problem illustrated by Example 13-3 when their script tries to output formatted data to the user.
Example 13-3. An error message caused by formatting statements
PS > ## Get the list of items in a directory, sorted by length
PS > function Get-ChildItemSortedByLength($path = (Get-Location))
{
    Get-ChildItem $path | Format-Table | Sort Length
}

PS > Get-ChildItemSortedByLength
out-lineoutput : Object of type "Microsoft.PowerShell.Commands.Internal.
Format.FormatEntryData" is not legal or not in the correct sequence. This is
likely caused by a user-specified "format-*" command which is conflicting
with the default formatting.
This happens because the Format-* cmdlets
actually generate formatting information for the Out-Host cmdlet to
consume. The Out-Host cmdlet (which
PowerShell adds automatically to the end of your pipelines) then uses
this information to generate formatted output. To resolve this problem,
always ensure that formatting commands are the last commands in your
pipeline, as shown in Example 13-4.
Example 13-4. A function that does not generate formatting errors
PS > ## Get the list of items in a directory, sorted by length
PS > function Get-ChildItemSortedByLength($path = (Get-Location))
{
    ## Problematic version
    ## Get-ChildItem $path | Format-Table | Sort Length

    ## Fixed version
    Get-ChildItem $path | Sort Length | Format-Table
}

PS > Get-ChildItemSortedByLength

(...)

Mode                LastWriteTime     Length Name
----                -------------     ------ ----
-a---         3/11/2007   3:21 PM         59 LibraryProperties.ps1
-a---          3/6/2007  10:27 AM        150 Get-Tomorrow.ps1
-a---          3/4/2007   3:10 PM        194 ConvertFrom-FahrenheitWithout
                                             Function.ps1
-a---          3/4/2007   4:40 PM        257 LibraryTemperature.ps1
-a---          3/4/2007   4:57 PM        281 ConvertFrom-FahrenheitWithLib
                                             rary.ps1
-a---          3/4/2007   3:14 PM        337 ConvertFrom-FahrenheitWithFunc
                                             tion.ps1
(...)
These examples are included as LibraryDirectory.ps1 in this book’s code examples. For more information about obtaining these examples, see Code Examples.
When it comes to producing output for the user, a common reason is
to provide progress messages. PowerShell actually supports this in a
much richer way, through its Write-Progress cmdlet.
For more information about the Write-Progress cmdlet, see Provide Progress Updates on Long-Running Tasks.
To provide status updates, use the Write-Progress cmdlet shown in Example 13-5.
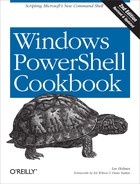
Example 13-5. Using the Write-Progress cmdlet to display status updates
##############################################################################
##
## Invoke-LongRunningOperation
##
## From Windows PowerShell Cookbook (O'Reilly)
## by Lee Holmes (http://www.leeholmes.com/guide)
##
##############################################################################

<#

.SYNOPSIS

Demonstrates the functionality of the Write-Progress cmdlet

#>

Set-StrictMode -Version Latest

$activity = "A long running operation"
$status = "Initializing"

## Initialize the long-running operation
for($counter = 0; $counter -lt 100; $counter++)
{
    $currentOperation = "Initializing item $counter"
    Write-Progress $activity $status -PercentComplete $counter `
        -CurrentOperation $currentOperation
    Start-Sleep -m 20
}

$status = "Running"

## Initialize the long-running operation
for($counter = 0; $counter -lt 100; $counter++)
{
    $currentOperation = "Running task $counter"
    Write-Progress $activity $status -PercentComplete $counter `
        -CurrentOperation $currentOperation
    Start-Sleep -m 20
}The Write-Progress cmdlet provides a way for you
to provide structured status information to the users of your script for
long-running operations (see Figure 13-1).
Like the other detailed information channels
(Write-Debug, Write-Verbose, and the other
Write-* cmdlets), PowerShell lets users
control how much of this information they see.
For more information about the Write-Progress cmdlet, type Get-Help
Write-Progress.
Writing culture-aware programs has long been isolated to the world of professional software developers. It’s not that users of simple programs and scripts can’t benefit from culture awareness, though. It has just frequently been too difficult for nonprofessional programmers to follow the best practices. However, PowerShell makes this much easier than traditional programming languages.
As your script travels between different cultures, several things change.
Most cultures have unique date, time, and
number formats. To ensure that your script works in all cultures,
PowerShell first ensures that its language primitives remain
consistent no matter where your script runs. Even if your script runs
on a machine in France (which uses a comma for its decimal separator),
you can always rely on the statement $myDouble = 3.5 to create a number halfway
between three and four. Likewise, you can always count on the
statement $christmas =
[DateTime]"12/25/2007" to create a date that represents
Christmas in 2007—even in cultures that write dates in the order of
day, month, year.
Culturally aware programs always display dates, times, and numbers using the preferences of that culture. This doesn’t break scripts as they travel between cultures and is an important aspect of writing culture-aware scripts. PowerShell handles this for you, as it uses the current culture’s preferences whenever it displays data.
Note
If your script asks the user for a date,
time, or number, make sure that you respect the format of the user’s
culture’s when you do so. To convert user input to a specific type
of data, use the [DateTime]::Parse() method:
$userInput = Read-Host "Please enter a date"
$enteredDate = [DateTime]::Parse($userInput)
So, to ensure that your script remains
culture-aware with respect to dates, times, and number formats, simply
use PowerShell’s language primitives when you define them in your
script. When you read them from the user, use Parse() methods when you convert them from
strings.
English is a rare language in that its alphabet is so simple. This leads to all kinds of programming tricks that treat user input and file content as arrays of bytes or simple plain-text (ASCII) characters. In most international languages, these tricks fail. In fact, many international symbols take up two characters’ worth of data in the string that contains them.
PowerShell uses the standard Unicode character set for all string-based operations: reading input from the user, displaying output to the user, sending data through the pipeline, and working with files.
Note
Although PowerShell fully supports
Unicode, the powershell.exe
command-line host does not
output some characters correctly, because of limitations in the
Windows console system. Graphical PowerShell hosts (such as the
Integrated Scripting Environment and the many third-party PowerShell
IDEs) are not affected by these limitations, however.
If you use PowerShell’s standard features
when working with user input, you do not have to worry about its
complexity. If you want to work with individual characters or words in
the input, though, you will need to take special precautions. The
System.Globalization.StringInfo
class lets you do this in a culturally aware way. For more information
about working with the StringInfo
class, see http://msdn.microsoft.com/en-us/library/7h9tk6x8.aspx.
So, to ensure that your script remains culturally aware with respect to user input, simply use PowerShell’s support for string operations whenever possible.
A common requirement in scripts is to compare user input
against some predefined text (such as a menu selection). You normally
want this comparison to be case insensitive, so that
"QUIT" and "qUiT" mean the same
thing.
A traditional way to accomplish this is to convert the user input to uppercase or lowercase:
## $text comes from the user, and contains the value "quit"
if($text.ToUpper() -eq "QUIT") { ... }
Unfortunately, explicitly changing the
capitalization of strings fails in subtle ways when run in different
cultures, as many cultures have different capitalization and
comparison rules. For example, the Turkish language includes two types
of the letter “I”: one with a dot and one without. The uppercase
version of the lowercase letter “i” corresponds to the version of the
capital “I” with a dot, not the capital “I” used in QUIT. That example causes the preceding
string comparison to fail on a Turkish system.
To compare some input against a hard-coded
string in a case-insensitive manner, the better solution is to use
PowerShell’s -eq operator without
changing any of the casing yourself. The -eq operator is case-insensitive and
culture-neutral by default:
PS > $text1 = "Hello"
PS > $text2 = "HELLO"
PS > $text1 -eq $text2
True
So, to ensure that your script remains culturally aware with respect to capitalization rules, simply use PowerShell’s case-insensitive comparison operators whenever possible.
Sorting rules frequently change between cultures. For example, compare English and Danish with the script given in Program: Invoke a Script Block with Alternate Culture Settings.
PS > Use-Culture en-US { "Apple","Æble" | Sort-Object }
Æble
Apple
PS > Use-Culture da-DK { "Apple","Æble" | Sort-Object }
Apple
Æble
To ensure that your script remains culturally aware with respect to sorting rules, assume that output is sorted correctly after you sort it—but don’t depend on the actual order of sorted output.
For other resources on writing culturally aware programs, see http://msdn.microsoft.com/en-us/library/h6270d0z.aspx and http://msdn.microsoft.com/en-us/goglobal/bb688110.aspx.
Use the Import-LocalizedData cmdlet, shown in
Example 13-6.
Example 13-6. Importing culture-specific strings for a script or module
Set-StrictMode -Version Latest

## Create some default messages for English cultures, and
## when culture-specific messages are not available.
$messages = DATA {
    @{
        Greeting = "Hello, {0}"
        Goodbye = "So long."
    }
}

## Import localized messages for the current culture.
Import-LocalizedData messages -ErrorAction SilentlyContinue

## Output the localized messages
$messages.Greeting -f "World"
$messages.GoodbyeThe Import-LocalizedData
cmdlet lets you easily write scripts that display different messages for
different languages.
The core of this localization support comes
from the concept of a message table: a simple mapping of
message IDs (such as a "Greeting" or
"Goodbye" message) to the actual message it
represents. Instead of directly outputting a string to the user, you
instead retrieve the string from the message table and output that.
Localization of your script comes from replacing the message table with
one that contains messages appropriate for the current language.
PowerShell uses standard hashtables to define message tables. Keys and values in the hashtable represent message IDs and their corresponding strings, respectively.
Note
The solution defines the default message
table within a DATA section. As with loading
messages from .psd1 files, this places
PowerShell in a data-centric subset of the full PowerShell language.
While not required, it is a useful practice for both error detection
and consistency.
After defining a default message table in your
script, the next step is to create localized versions and place them in
language-specific directories alongside your script. The real magic of
the Import-LocalizedData cmdlet comes from the
intelligence it applies when loading the appropriate message
file.
As a background, the standard way to refer to
a culture (for localization purposes) is an identifier that combines the
culture and region. For
example, German as spoken in Germany is defined by the identifier
de-DE. English as spoken in the United States is
defined by the identifier en-US, whereas English as
spoken in Canada is defined by the identifier en-CA.
Most languages are spoken in many regions.
When you call the
Import-LocalizedData cmdlet, PowerShell goes to the
same directory as your script, and first tries to load your messages
from a directory with a name that matches the full name of the current
culture (for example, en-CA or
en-GB). If that fails, it falls back to the
region-neutral directory (such as en or
de) and on to the other fallback languages defined by
the operating system.
To make your efforts available to the broadest
set of languages, place your localized messages in the most general
directory that applies. For example, place French messages (first) in
the "fr" directory so that all French-speaking
regions can benefit. If you want to customize your messages to a
specific region after that, place them in a region-specific
directory.
Rather than define these message tables in script files (like your main script), place them in .psd1 files that have the same name as your script. For example, Example 13-6 places its localized messages in Import-LocalizedData.psd1. PowerShell’s psd1 files represent a data-centric subset of the full PowerShell language and are ideally suited for localization. In the .psd1 file, define a hashtable (Example 13-7)—but do not store it in a variable like you do for the default message table.
If you already use a set of tools to help you
manage the software localization process, they may not understand the
PowerShell .psd1 file format. Another standard
message format is simple name-value mapping, so PowerShell supports that
through the ConvertFrom-StringData cmdlet:
ConvertFrom-StringData @'
Greeting = Guten Tag, {0}
Goodbye = Auf Wiedersehen
'@
Notice that the Greeting
message in Example 13-6 uses
{0}-style placeholders (and PowerShell’s string
formatting operator) to output strings with replaceable text. Using this technique is vastly preferable
to using string concatenation (e.g., $messages.GreetingBeforeName + " World " +
$messages.GreetingAftername) because it gives
additional flexibility during localization of languages with different
sentence structures.
To test your script under different languages, you can use Program: Invoke a Script Block with Alternate Culture Settings, as in this example:
PS > Use-Culture de-DE { Invoke-LocalizedScript }
Guten Tag, World
Auf Wiedersehen.
For more information about script
internationalization, type Get-Help about_Script_Internationalization.
Program: Invoke a Script Block with Alternate Culture Settings
Get-Help
      about_Script_Internationalization
Given PowerShell’s diverse user community, scripts that you share will often be run on a system set to a language other than English. To ensure that your script runs properly in other languages, it is helpful to give it a test run in that culture. Example 13-8 lets you run the script block you provide in a culture of your choosing.
Example 13-8. Use-Culture.ps1
#############################################################################
##
## Use-Culture
##
## From Windows PowerShell Cookbook (O'Reilly)
## by Lee Holmes (http://www.leeholmes.com/guide)
##
#############################################################################

<#

.SYNOPSIS

Invoke a script block under the given culture

.EXAMPLE

Use-Culture fr-FR { [DateTime]::Parse("25/12/2007") }
mardi 25 decembre 2007 00:00:00

#>

param(
    ## The culture in which to evaluate the given script block
    [Parameter(Mandatory = $true)]
    [System.Globalization.CultureInfo] $Culture,

    ## The code to invoke in the context of the given culture
    [Parameter(Mandatory = $true)]
    [ScriptBlock] $ScriptBlock
)

Set-StrictMode -Version Latest

## A helper function to set the current culture
function Set-Culture([System.Globalization.CultureInfo] $culture)
{
    [System.Threading.Thread]::CurrentThread.CurrentUICulture = $culture
    [System.Threading.Thread]::CurrentThread.CurrentCulture = $culture
}

## Remember the original culture information
$oldCulture = [System.Threading.Thread]::CurrentThread.CurrentUICulture

## Restore the original culture information if
## the user's script encounters errors.
trap { Set-Culture $oldCulture }

## Set the current culture to the user's provided
## culture.
Set-Culture $culture

## Invoke the user's script block
& $ScriptBlock

## Restore the original culture information.
Set-Culture $oldCulture
For more information about running scripts, see Run Programs, Scripts, and Existing Tools.
You want to interact with features in the user interface of the hosting application, but PowerShell doesn’t directly provide cmdlets for them.
To access features of the host’s user
interface, use the $host.UI.RawUI
variable:
$host.UI.RawUI.WindowTitle = (Get-Location)
PowerShell itself consists of two main components. The first is an engine that interprets commands, executes pipelines, and performs other similar actions. The second is the hosting application—the way that users interact with the PowerShell engine.
The default shell, PowerShell.exe, is a user interface based on the traditional Windows console. The graphical Integrated Scripting Environment hosts PowerShell in a graphical user interface. In fact, PowerShell makes it relatively simple for developers to build their own hosting applications, or even to embed the PowerShell engine features into their own applications.
You (and your scripts) can always depend on
the functionality available through the $host.UI variable, as that functionality
remains the same for all hosts. Example 13-9 shows the features
available to you in all hosts.
Example 13-9. Functionality available through the $host.UI property
PS > $host.UI | Get-Member | Select Name,MemberType | Format-Table -Auto

Name                   MemberType
----                   ----------
(...)
Prompt                     Method
PromptForChoice            Method
PromptForCredential        Method
ReadLine                   Method
ReadLineAsSecureString     Method
Write                      Method
WriteDebugLine             Method
WriteErrorLine             Method
WriteLine                  Method
WriteProgress              Method
WriteVerboseLine           Method
WriteWarningLine           Method
RawUI                    Property
If you (or your scripts) want to interact with
portions of the user interface specific to the current host, PowerShell
provides that access through the $host.UI.RawUI variable. Example 13-10 shows the features
available to you in the PowerShell console host.
Example 13-10. Functionality available through the default console host
PS > $host.UI.RawUI | Get-Member |
    Select Name,MemberType | Format-Table -Auto


Name                      MemberType
----                      ----------
(...)
FlushInputBuffer              Method
GetBufferContents             Method
GetHashCode                   Method
GetType                       Method
LengthInBufferCells           Method
NewBufferCellArray            Method
ReadKey                       Method
ScrollBufferContents          Method
SetBufferContents             Method
BackgroundColor             Property
BufferSize                  Property
CursorPosition              Property
CursorSize                  Property
ForegroundColor             Property
KeyAvailable                Property
MaxPhysicalWindowSize       Property
MaxWindowSize               Property
WindowPosition              Property
WindowSize                  Property
WindowTitle                 Property
If you rely on the host-specific features from
$host.UI.RawUI, be aware that your
script will require modifications (perhaps major modifications) before
it will run properly on other hosts.
Although the techniques provided in the rest of this chapter usually are all you need, it is sometimes helpful to provide a graphical user interface to interact with the user.
Since PowerShell fully supports traditional executables, simple programs usually can fill this need. If creating a simple program in an environment such as Visual Studio is inconvenient, you can often use PowerShell to create these applications directly.
In addition to creating Windows Forms applications through PowerShell scripts, two community projects (PowerBoots and WPK) let you easily create rich WPF (Windows Presentation Foundation) interfaces for your PowerShell scripts. For more information, search the Internet for “PowerShell PowerBoots” and “PowerShell WPK.”
Example 13-11 demonstrates the techniques you can use to develop a Windows Forms application using PowerShell scripting alone.
Example 13-11. Select-GraphicalFilteredObject.ps1
##############################################################################
##
## Select-GraphicalFilteredObject
##
## From Windows PowerShell Cookbook (O'Reilly)
## by Lee Holmes (http://www.leeholmes.com/guide)
##
##############################################################################

<#

.SYNOPSIS

Display a Windows Form to help the user select a list of items piped in.
Any selected items get passed along the pipeline.

.EXAMPLE

dir | Select-GraphicalFilteredObject

  Directory: C:

Mode                LastWriteTime     Length Name
----                -------------     ------ ----
d----         10/7/2006   4:30 PM            Documents and Settings
d----         3/18/2007   7:56 PM            Windows

#>

Set-StrictMode -Version Latest

$objectArray = @($input)

## Ensure that they've piped information into the script
if($objectArray.Count -eq 0)
{
    Write-Error "This script requires pipeline input."
    return
}

## Load the Windows Forms assembly
Add-Type -Assembly System.Windows.Forms

## Create the main form
$form = New-Object Windows.Forms.Form
$form.Size = New-Object Drawing.Size @(600,600)

## Create the listbox to hold the items from the pipeline
$listbox = New-Object Windows.Forms.CheckedListBox
$listbox.CheckOnClick = $true
$listbox.Dock = "Fill"
$form.Text = "Select the list of objects you wish to pass down the pipeline"
$listBox.Items.AddRange($objectArray)

## Create the button panel to hold the OK and Cancel buttons
$buttonPanel = New-Object Windows.Forms.Panel
$buttonPanel.Size = New-Object Drawing.Size @(600,30)
$buttonPanel.Dock = "Bottom"

## Create the Cancel button, which will anchor to the bottom right
$cancelButton = New-Object Windows.Forms.Button
$cancelButton.Text = "Cancel"
$cancelButton.DialogResult = "Cancel"
$cancelButton.Top = $buttonPanel.Height - $cancelButton.Height - 5
$cancelButton.Left = $buttonPanel.Width - $cancelButton.Width - 10
$cancelButton.Anchor = "Right"

## Create the OK button, which will anchor to the left of Cancel
$okButton = New-Object Windows.Forms.Button
$okButton.Text = "Ok"
$okButton.DialogResult = "Ok"
$okButton.Top = $cancelButton.Top
$okButton.Left = $cancelButton.Left - $okButton.Width - 5
$okButton.Anchor = "Right"

## Add the buttons to the button panel
$buttonPanel.Controls.Add($okButton)
$buttonPanel.Controls.Add($cancelButton)

## Add the button panel and list box to the form, and also set
## the actions for the buttons
$form.Controls.Add($listBox)
$form.Controls.Add($buttonPanel)
$form.AcceptButton = $okButton
$form.CancelButton = $cancelButton
$form.Add_Shown( { $form.Activate() } )

## Show the form, and wait for the response
$result = $form.ShowDialog()

## If they pressed OK (or Enter), go through all the
## checked items and send the corresponding object down the pipeline
if($result -eq "OK")
{
    foreach($index in $listBox.CheckedIndices)
    {
        $objectArray[$index]
    }
}
For more information about running scripts, see Run Programs, Scripts, and Existing Tools.
You want to interact with a user interface framework or other object that requires that the current thread be in single-threaded apartment (STA) mode.
PS > Add-Type -Assembly PresentationCore
PS > [Windows.Clipboard]::SetText("Hello World")
Exception calling "SetText" with "1" argument(s): "Current thread must be
set to single thread apartment (STA) mode before OLE calls can be made."
At line:1 char:29
+ [Windows.Clipboard]::SetText <<<< ("Hello World")
    + CategoryInfo          : NotSpecified: (:) [], MethodInvocationExcep
   tion
+ FullyQualifiedErrorId : DotNetMethodExceptionLaunch PowerShell with the
-STA switch. If you do this as part of a script or
helper command, also use the -NoProfile switch to
avoid the performance impact and side effects of loading the user’s
profile:
PS > PowerShell -NoProfile -STA -Command {
    Add-Type -Assembly PresentationCore
    [Windows.Clipboard]::SetText("Hello World")
}

PS > PowerShell -NoProfile -STA -Command {
    Add-Type -Assembly PresentationCore
    [Windows.Clipboard]::GetText()
}

Hello WorldThreading modes define an agreement between an application and how it interacts with some of its objects. Most objects in the .NET Framework (and thus, PowerShell and nearly everything it interacts with) ignore the threading mode and are not impacted by it.
Many user interface frameworks (such as WPF and WinForms) do require a specific threading mode, though, called single-threaded apartment. PowerShell uses a threading mode called multi-threaded apartment (MTA) by default, so you’ll sometimes run into an error similar to the code example shown in the problem.
If you frequently find that you need to use
STA mode, you can simply modify the PowerShell link on your start menu
to always load PowerShell with the -STA parameter. It
is incredibly rare for a component to require MTA mode rather than STA
mode, and always loading PowerShell with the -STA parameter has no
performance impact.
Note
You might wonder why we didn’t just change PowerShell’s default if it is so safe. Although it is very rare for a component to run into additional issues in STA mode, some advanced threading situations cease to work. Since components with these advanced requirements worked in version one of PowerShell, changing the default would have introduced compatibility issues.
If your entire script requires STA mode, you have two primary options: detect the current threading mode or relaunch yourself under STA mode.
To detect the current threading mode, you can
access the $host.Runspace.ApartmentState variable. If
its value is "STA“, the current threading mode is
STA.
If your script has simple parameter requirements, you may be able to relaunch yourself automatically, as in Example 13-12.
Example 13-12. A script that relaunches itself in STA mode
###########################################################################
##
## Invoke-ScriptThatRequiresSta
##
## From Windows PowerShell Cookbook (O'Reilly)
## by Lee Holmes (http://www.leeholmes.com/guide)
##
###########################################################################

<#

.SYNOPSIS

Demonstrates a technique to relaunch a script that requires STA mode.
This is useful only for simple parameter definitions that can be
specified positionally.

#>

param(
    $Parameter1,
    $Parameter2
)

Set-StrictMode -Version Latest

"Current threading mode: " + $host.Runspace.ApartmentState
"Parameter1 is: $parameter1"
"Parameter2 is: $parameter2"

if($host.Runspace.ApartmentState -ne "STA")
{
    "Relaunching"
    $file = $myInvocation.MyCommand.Path
    powershell -NoProfile -Sta -File $file $parameter1 $parameter2
    return
}

"After relaunch - current threading mode: " + $host.Runspace.ApartmentState
When you run this script, you get the following output:
PS > .Invoke-ScriptThatRequiresSta.ps1 Test1 Test2
Current threading mode: Unknown
Parameter1 is: Test1
Parameter2 is: Test2
Relaunching
Current threading mode: STA
Parameter1 is: Test1
Parameter2 is: Test2
After relaunch - current threading mode: STA
For more information about PowerShell’s command-line parameters, see Invoke a PowerShell Command or Script from Outside PowerShell. For more information about running scripts, see Run Programs, Scripts, and Existing Tools.