In the world of text-only system administration, managing structured files is often a pain. For example, working with (or editing) an XML file means either loading it into an editor to modify by hand or writing a custom tool that can do that for you. Even worse, it may mean modifying the file as though it were plain text while hoping to not break the structure of the XML itself.
In that same world, working with a file in comma-separated values (CSV) format means going through the file yourself, splitting each line by the commas in it. It’s a seemingly great approach, until you find yourself faced with anything but the simplest of data.
Structure and structured files don’t come only from other programs, either. When writing scripts, one common goal is to save structured data so that you can use it later. In most scripting (and programming) languages, this requires that you design a data structure to hold that data, design a way to store and retrieve it from disk, and bring it back to a usable form when you want to work with it again.
Fortunately, working with XML, CSV, and even your own structured files becomes much easier with PowerShell at your side.
Use PowerShell’s XML cast to convert the plain-text XML into a form that you can more easily work with. In this case, we use the RSS feed downloaded from the Windows PowerShell blog:
PS > $xml = [xml] (Get-Content powershell_blog.xml)
Note
See Download a File from the Internet for an example of how to use PowerShell to download this file!
Like other rich objects, PowerShell displays the properties of the XML as you explore. These properties are child nodes and attributes in the XML, as shown by Example 10-1.
If more than one node shares the same name (as in the item nodes of an RSS feed), then the property name represents a collection of nodes:
PS > ($xml.rss.channel.item).Count
15
You can access those items individually, like you would normally work with an array, as shown in Example 10-2.
Example 10-2. Accessing individual items in an XML document
PS > ($xml.rss.channel.item)[0]

title       : Windows Management Framework is here!
link        : http://blogs.msdn.com/powershell/archive/2009/10/27/windows-
              management-framework-is-here.aspx
pubDate     : Tue, 27 Oct 2009 18:25:13 GMT
guid        : guid
creator     : PowerShellTeam
comments    : {15, http://blogs.msdn.com/powershell/comments/9913618.aspx}
commentRss  : http://blogs.msdn.com/powershell/commentrss.aspx?PostID=9913
              618
comment     : http://blogs.msdn.com/powershell/rsscomments.aspx?PostID=991
              3618
description : <p>Windows Management Framework, which includes Windows Power
              Shell 2.0, WinRM 2.0, and BITS 4.0, was officially released
              to the world this morning.
(...)
You can access properties of those elements the same way you would normally work with an object:
PS > ($xml.rss.channel.item)[0].title
Windows Management Framework is here!
Since these are rich PowerShell objects, Example 10-3 demonstrates how you can use PowerShell’s advanced object-based cmdlets for further work, such as sorting and filtering.
Example 10-3. Sorting and filtering items in an XML document
PS > $xml.rss.channel.item | Sort-Object title | Select-Object title

title
-----
Analyzing Weblog Data Using the Admin Development Model
Announcing: Open Source PowerShell Cmdlet and Help Designer
Help Us Improve Microsoft Windows Management Framework
Introducing the Windows 7 Resource Kit PowerShell Pack
New and Improved PowerShell Connect Site
PowerShell V2 Virtual Launch Party
Remoting for non-Admins
Select -ExpandProperty <PropertyName>
The Glory of Quick and Dirty Scripting
Tonight is the Virtual Launch Party @ PowerScripting Podcast
Understanding the Feedback Process
What's New in PowerShell V2 -  By Joel "Jaykul" Bennett
What's Up With Command Prefixes?
Windows Management Framework is here!
XP and W2K3 Release Candidate Versions of PowerShell Are Now Available ...
PowerShell’s native XML support provides an excellent way to easily navigate and access XML files. By exposing the XML hierarchy as properties, you can perform most tasks without having to resort to text-only processing or custom tools.
In fact, PowerShell’s support for interaction
with XML goes beyond just presenting your data in an object-friendly
way. The objects created by the [xml]
cast in fact represent fully featured System.Xml.XmlDocument objects from the .NET
Framework. Each property of the resulting objects represents a System.Xml.XmlElement object from the .NET
Framework as well. The underlying objects provide a great deal of
additional functionality that you can use to perform both common and
complex tasks on XML files.
The underlying System.Xml.XmlDocument and System.Xml.XmlElement objects that support
your XML also provide useful properties in their own right:
Attributes, Name,
OuterXml, and more.
PS > $xml.rss.Attributes

#text
-----
2.0
http://purl.org/dc/elements/1.1/
http://purl.org/rss/1.0/modules/slash/
http://wellformedweb.org/CommentAPI/
Note
In PowerShell version one, PowerShell hid these underlying
properties by default. To access them in PowerShell version one, use
the PsBase property on any node.
The PsBase property works on any
object in PowerShell and represents the object underneath the
PowerShell abstraction.
For more information about using the underlying .NET objects for more advanced tasks, see Perform an XPath Query Against XML and Modify Data in an XML File.
For more information about working with XML in PowerShell, see Table F-11 in Appendix F.
Use PowerShell’s Select-Xml cmdlet to perform an XPath
query against a file.
For example, to find all post titles shorter than 30 characters in an RSS feed:
PS > $query = "/rss/channel/item[string-length(title) < 30]/title"
PS > Select-Xml -XPath $query -Path .powershell_blog.xml | Select -Expand Node

#text
-----
Remoting for non-Admins
Although a language all its own, the XPath
query syntax provides a powerful, XML-centric way to write advanced
queries for XML files. The Select-Xml cmdlet lets you
apply these concepts to files, XML nodes, or simply plain text.
Note
The XPath queries supported by the
Select-Xml cmdlet are a popular industry
standard. Beware, though. Unlike those in the rest of PowerShell,
these queries are case-sensitive!
The Select-Xml cmdlet generates a
SelectXmlInfo object. This lets you chain separate
XPath queries together. To retrieve the actual result of the selection,
access the Node property.
PS > Get-Content page.html
<HTML>
    <HEAD>
        <TITLE>Welcome to my Website</TITLE>
    </HEAD>
    <BODY>
        <P>...</P>
    </BODY>
</HTML>
PS > $content = [xml] (Get-Content page.html)
PS > $result = $content | Select-Xml "/HTML/HEAD" | Select-Xml "TITLE"
PS > $result

Node                     Path                     Pattern
----                     ----                     -------
TITLE                    InputStream              TITLE


PS > $result.Node

#text
-----
Welcome to my Website
This works even for content accessed through PowerShell’s XML support, as in this case, which uses the RSS feed downloaded from the Windows PowerShell blog:
PS > $xml = [xml] (Get-Content powershell_blog.xml)
PS > $xml | Select-Xml $query | Select -Expand Node

#text
-----
Remoting for non-Admins
If you are limited to PowerShell version one,
you can use the SelectNodes() method on
an XML result to perform the query. For example, to find all post titles
shorter than 30 characters:
PS > $xml.SelectNodes($query)

#text
-----
Remoting for non-Admins
For simpler queries, you may find PowerShell’s object-based XML navigation concepts easier to work with. For more information about working with XML through PowerShell’s XML type, see Table F-11 in Appendix F. For more information about XPath syntax, see Appendix C.
Use PowerShell’s ConvertTo-Xml cmdlet to
save the output of a command as XML:
$xml = Get-Process | ConvertTo-Xml
You can then use PowerShell’s XML support (XML
navigation, Select-Xml, and more) to work with the
content.
Although it is usually easiest to work with
objects in their full fidelity, you may sometimes want to convert them
to XML for further processing by other programs. The solution is the
ConvertTo-Xml cmdlet.
Note
PowerShell includes another
similar-sounding cmdlet called Export-CliXml. Unlike the
ConvertTo-Xml cmdlet, which is intended to
produce useful output for humans and programs alike, the
Export-CliXml cmdlet is designed for
PowerShell-centric data interchange. For more information, see Easily Import and Export Your Structured Data.
The ConvertTo-Xml cmdlet
gives you two main targets for this conversion. The default is an XML
document, which is the same type of object created by the
[xml] cast in PowerShell. This is also the format
supported by the Select-Xml cmdlet, so you can pipe the
output of ConvertTo-Xml directly into it.
PS > $xml = Get-Process | ConvertTo-Xml
PS > $xml | Select-Xml '//Property[@Name = "Name"]' | Select -Expand Node

Name                     Type                     #text
----                     ----                     -----
Name                     System.String            audiodg
Name                     System.String            csrss
Name                     System.String            dwm
(...)
The second format is a simple string, and it is suitable
for redirection into a file. To save the XML into a file, use the
-As parameter with String as the
argument, and then use the file redirection operator:
Get-Process | ConvertTo-Xml -As String > c: empprocesses.xml
If
you already have an XML document that you obtained from
ConvertTo-Xml or PowerShell’s [xml]
cast, you can still save it into a file by calling its Save() method:
$xml = Get-Process | ConvertTo-Xml
$xml.Save("c:	empoutput.xml")
For more information on how to work with XML data in PowerShell, see Access Information in an XML File.
To modify data in an XML file, load the file into PowerShell’s XML data type, change the content you want, and then save the file back to disk. Example 10-4 demonstrates this approach.
Example 10-4. Modifying an XML file from PowerShell
PS > ## Store the filename
PS > $filename = (Get-Item phone.xml).FullName
PS >
PS > ## Get the content of the file, and load it
PS > ## as XML
PS > Get-Content $filename
<AddressBook>
  <Person contactType="Personal">
    <Name>Lee</Name>
    <Phone type="home">555-1212</Phone>
    <Phone type="work">555-1213</Phone>
  </Person>
  <Person contactType="Business">
    <Name>Ariel</Name>
    <Phone>555-1234</Phone>
  </Person>
</AddressBook>
PS > $phoneBook = [xml] (Get-Content $filename)
PS >
PS > ## Get the part with data we want to change
PS > $person = $phoneBook.AddressBook.Person[0]
PS >
PS > ## Change the text part of the information,
PS > ## and the type (which was an attribute)
PS > $person.Phone[0]."#text" = "555-1214"
PS > $person.Phone[0].type = "mobile"
PS >
PS > ## Add a new phone entry
PS > $newNumber = [xml] '<Phone type="home">555-1215</Phone>'
PS > $newNode = $phoneBook.ImportNode($newNumber.Phone, $true)
PS > [void] $person.AppendChild($newNode)
PS >
PS > ## Save the file to disk
PS > $phoneBook.Save($filename)
PS > Get-Content $filename
<AddressBook>
  <Person contactType="Personal">
    <Name>Lee</Name>
    <Phone type="mobile">555-1214</Phone>
    <Phone type="work">555-1213</Phone>
    <Phone type="home">555-1215</Phone>
  </Person>
  <Person contactType="Business">
    <Name>Ariel</Name>
    <Phone>555-1234</Phone>
  </Person>
</AddressBook>In the preceding solution, you change
Lee’s phone number (which was the “text” portion of
the XML’s original first Phone node) from 555-1212 to 555-1214. You also change the type of the
phone number (which was an attribute of the Phone
node) from "home" to "mobile".
Adding new information to the XML is nearly as
easy. To add information to an XML file, you need to add it as a
child node to another node in the file. The easiest
way to get that child node is to write the string that represents the
XML and then create a temporary PowerShell XML document from that. From
that temporary document, you use the main XML document’s ImportNode() function to import the node you
care about—specifically, the
Phone node in this example.
Once we have the child node, you need to
decide where to put it. Since we want this Phone node
to be a child of the Person node for
Lee, we will place it there. To add a child node
($newNode in Example 10-4) to a destination
node ($person in the example), use
the AppendChild() method
from the destination node.
Note
The Save() method on the
XML document allows you to save to more than just files. For a quick
way to convert XML into a “beautified” form, save it to the
console:
$phoneBook.Save([Console]::Out)
Finally, we save the XML back to the file from which it came.
You have a set of data (such as a hashtable or array) and want to save it to disk so that you can use it later. Conversely, you have saved structured data to a file and want to import it so that you can use it.
Use PowerShell’s Export-CliXml cmdlet to
save structured data to disk, and the Import-CliXml cmdlet to
import it again from disk.
For example, imagine storing a list of your favorite directories in a hashtable, so that you can easily navigate your system with a “Favorite CD” function. Example 10-5 shows this function.
Unfortunately, the $favorites variable vanishes whenever you
close PowerShell.
To get around this, you could recreate the
$favorites variable in your profile,
but another approach is to export it directly to a file. This command
assumes that you have already created a profile, and it places the file
in the same location as that profile:
PS > $filename = Join-Path (Split-Path $profile) favorites.clixml
PS > $favorites | Export-CliXml $filename
PS > $favorites = $null
PS > $favorites
PS >
Once the file is on disk, you can reload it
using the Import-CliXml cmdlet, as
shown in Example 10-6.
PowerShell provides the Export-CliXml and Import-CliXml cmdlets to let you easily move
structured data into and out of files. These cmdlets accomplish this in
a very data-centric and future-proof way—by storing only the names,
values, and basic data types for the properties of that data.
Note
By default, PowerShell stores one level of
data: all directly accessible simple properties (such as the WorkingSet of a process) but a plain-text
representation for anything deeper (such as a process’s Threads collection). For information on how
to control the depth of this export, type Get-Help Export-CliXml and see the
explanation of the -Depth parameter.
After you import data saved by Export-CliXml, you again have access to the
properties and values from the original data. PowerShell converts some
objects back to their fully featured objects (such as System.DateTime objects), but for the most
part does not retain functionality (for example, methods) from the
original objects.
You want to store the output of a command in a CSV file for later processing. This is helpful when you want to export the data for later processing outside PowerShell.
Use PowerShell’s Export-Csv cmdlet to save the output of a
command into a CSV file. For example, to create an inventory of the
processes running on a system:
Get-Process | Export-Csv c: empprocesses.csv
You can then review this output in a tool such as Excel, mail it to others, or do whatever else you might want to do with a CSV file.
The CSV file format is one of the most common formats for exchanging semistructured data between programs and systems.
PowerShell’s Export-Csv cmdlet provides an easy way to
export data from the PowerShell environment while still allowing you to
keep a fair amount of your data’s structure. When PowerShell exports
your data to the CSV, it creates a row for each object that you provide.
For each row, PowerShell creates columns in the CSV that represent the
values of your object’s properties.
Note
If you want to use the CSV-structured data
as input to another tool that supports direct CSV pipeline input,
you can use the ConvertTo-Csv cmdlet to bypass the
step of storing it in a file.
If you want to separate the data with a
character other than a comma, use the -Delimiter parameter.
One thing to keep in mind is that the CSV file
format supports only plain strings for property values. If a property on
your object isn’t actually a string, PowerShell converts it to a string
for you. Having PowerShell convert rich property values (such as
integers) to strings, however, does mean that a certain amount of
information is not preserved. If your ultimate goal is to load this
unmodified data again in PowerShell, the Export-CliXml cmdlet provides a much better
alternative. For more information about the Export-CliXml cmdlet, see Easily Import and Export Your Structured Data.
For more information on how to import data from a CSV file into PowerShell, see Import CSV and Delimited Data from a File.
You want to import structured data that has been stored in a CSV file or a file that uses some other character as its delimiter.
Use PowerShell’s Import-Csv cmdlet to
import structured data from a CSV file. Use the -Delimiter parameter if fields are
separated by a character other than a comma.
For example, to load the (tab-separated) Windows Update log:
$header = "Date","Time","PID","TID","Component","Text"
$log = Import-Csv $env:WINDIRWindowsUpdate.log -Delimiter "`t" -Header $header
Then, manage the log as you manage other rich PowerShell output:
$log | Group-Object Component
As mentioned in Store the Output of a Command in a CSV or Delimited File, the CSV file format is one of the most common formats for exchanging semistructured data between programs and systems.
PowerShell’s Import-Csv cmdlet provides an easy way to
import this data into the PowerShell environment from other
programs. When PowerShell imports your data from the CSV, it creates a
new object for each row in the CSV. For each object, PowerShell creates properties on the
object from the values of the columns in the CSV.
Note
If the names of the CSV columns match parameter names, many commands let you pipe this output to automatically set the values of parameters.
For more information about this feature, see Automate Data-Intensive Tasks.
If you are dealing with data in a CSV format
that is the output of another tool or command, the
Import-Csv cmdlet’s file-based behavior won’t be of
much help. In this case, use the ConvertFrom-Csv
cmdlet.
One thing to keep in mind is that the CSV file format supports only plain strings for property values. When you import data from a CSV, properties that look like dates will still only be strings. Properties that look like numbers will only be strings. Properties that look like any sort of rich data type will only be strings. This means that sorting on any property will always be an alphabetical sort, which is usually not the same as the sorting rules for the rich data types that the property might look like.
If your ultimate goal is to load rich
unmodified data from something that you’ve previously exported from
PowerShell, the Import-CliXml cmdlet
provides a much better alternative. For more information about the
Import-CliXml cmdlet, see Easily Import and Export Your Structured Data.
For more information on how to export data from PowerShell to a CSV file, see Store the Output of a Command in a CSV or Delimited File.
Use PowerShell’s Export-Csv cmdlet to
save the output of a command in a CSV file, and then load that CSV in
Excel. If you have Excel associated with .CSV
files, the Invoke-Item cmdlet
launches Excel when you provide it with a .CSV file
as an argument.
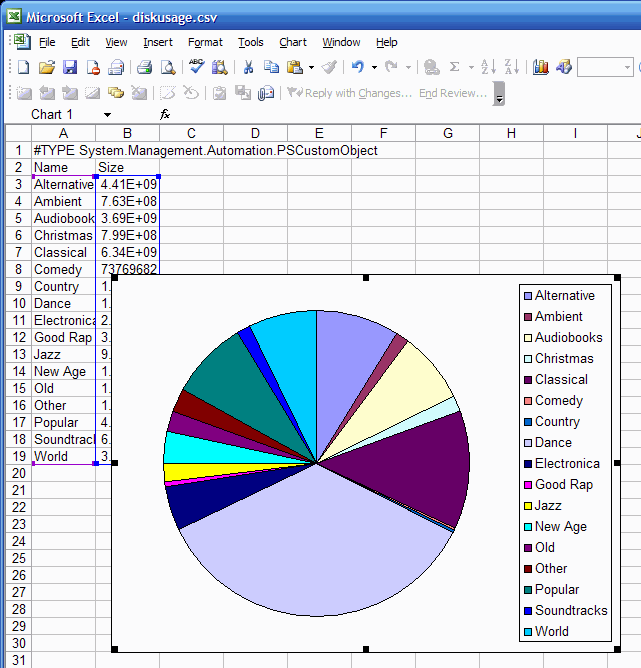
Example 10-7 demonstrates how to generate a CSV containing the disk usage for subdirectories of the current directory.
In Excel, you can manipulate or format the data as you wish. As Figure 10-1 shows, we can manually create a pie chart.
Although used only as a demonstration, Example 10-7 packs quite a bit into just a few lines.
The first Get-ChildItem line gets
a list of all the files in the current directory and uses the Where-Object cmdlet to
restrict those to directories. For each of those directories, you use
the Select-Object cmdlet to
pick out the Name and Size of that directory.
Directories don’t have a Size property, though. To get that, we use
Select-Object’s hashtable syntax to
generate a calculated property. This calculated
property (as defined by the Expression script block) uses the Get-ChildItem and Measure-Object cmdlets
to add up the Length of all files in
the given directory.
For more information about creating and working with calculated properties, see Add Custom Methods and Properties to Objects.
You want to access detailed structural and language-specific information about the content of a PowerShell script.
Use PowerShell’s Tokenizer API to convert the script into the same internal representation that PowerShell uses to understand the script’s structure.
PS > $script = '$myVariable = 10'
PS > $errors = [System.Management.Automation.PSParseError[]] @()
PS > [Management.Automation.PsParser]::Tokenize($script, [ref] $errors)


Content     : myVariable
Type        : Variable
Start       : 0
Length      : 11
StartLine   : 1
StartColumn : 1
EndLine     : 1
EndColumn   : 12

Content     : =
Type        : Operator
Start       : 12
Length      : 1
StartLine   : 1
StartColumn : 13
EndLine     : 1
EndColumn   : 14

Content     : 10
Type        : Number
Start       : 14
Length      : 2
StartLine   : 1
StartColumn : 15
EndLine     : 1
EndColumn   : 17
When PowerShell loads a script, one of its first steps is to tokenize that script. Tokenization determines which portions of the script represent variables, numbers, operators, commands, parameters, aliases, and more.
While this is a fairly advanced concept, the Tokenizer API exposes the results of this step. This lets you work with the rich structure of PowerShell scripts the same way that the PowerShell engine does.
Without the support of a Tokenizer API, tool authors are usually required to build complicated regular expressions that attempt to emulate the PowerShell engine. This was true of PowerShell version one. Although these regular expressions are helpful for many situations, they tend to fall apart on more complex scripts.
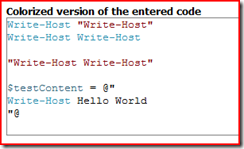
In the first line of Figure 10-2, "Write-Host" is an argument to the
Write-Host cmdlet, but gets parsed as a string. The
second line, while still providing an argument to the
Write-Host cmdlet, does not treat the argument the
same way. In fact, since it matches a cmdlet name, the argument gets
interpreted as another call to the Write-Host cmdlet.
In the here string that follows, the Write-Host
cmdlet name gets highlighted again, even though it is really just part
of a string.
Since the Tokenizer API follows the same rules as the PowerShell engine, it avoids the pitfalls of the regular-expression-based approach while producing output that is much easier to consume. When run on the same input, it produces the output shown in Example 10-8.
Example 10-8. Successfully tokenizing a complex script
PS > [Management.Automation.PsParser]::Tokenize($content, [ref] $errors) | ft -auto

Content                           Type Start Length StartLine StartColumn EndLine EndColumn
-------                           ---- ----- ------ --------- ----------- ------- ---------
Write-Host                     Command     0     10         1           1       1        11
Write-Host                      String    11     12         1          12       1        24
...                            NewLine    23      2         1          24       2         1
Write-Host                     Command    25     10         2           1       2        11
Write-Host             CommandArgument    36     10         2          12       2        22
...                            NewLine    46      2         2          22       3         1
...                            NewLine    48      2         3           1       4         1
Write-Host Write-Host           String    50     23         4           1       4        24
...                            NewLine    73      2         4          24       5         1
...                            NewLine    75      2         5           1       6         1
testContent                   Variable    77     12         6           1       6        13
=                             Operator    90      1         6          14       6        15
Write-Host Hello World          String    92     30         6          16       8         3
...                            NewLine   122      2         8           3       9         1
This adds a whole new dimension to the way you can interact with PowerShell scripts. Some natural outcomes are:
If the script contains any errors, PowerShell
captures those in the $errors collection you are
required to supply. If you don’t want to keep track of errors, you can
supply [ref] $null as the value for that
parameter.
For an example of the Tokenizer API in action, see Program: Show Colorized Script Content.