Traditionally, the most common use for Windows servers has been as file servers. No matter how advanced technology gets, people who work in an organization need a way to share files with each other that is less chaotic than emailing them or handing them over on USB drives. Even with cloud storage options such as SharePoint Online and OneDrive, many organizations still make use of the humble file server as a way of storing and sharing documents. Shared folders also provide a central location that can be backed up on a regular basis, something that gives them utility beyond just being a central location to store documents.
In this chapter, you’ll learn about how you can get more out of your Windows Server 2019 file server by taking advantage of the functionality of File Server Resource Manager, Distributed File System, and BranchCache. Azure File Sync, which allows you to take advantage of the cloud to assist with file tiering and replication, is covered in Chapter 17, “Azure IaaS and hybrid services.”
Shared folder permissions
The basic idea with shared folders is that you create a folder and assign permissions to a group, such as a department within your organization, and the people in that group use that space on the file server to store files to be shared with the group.
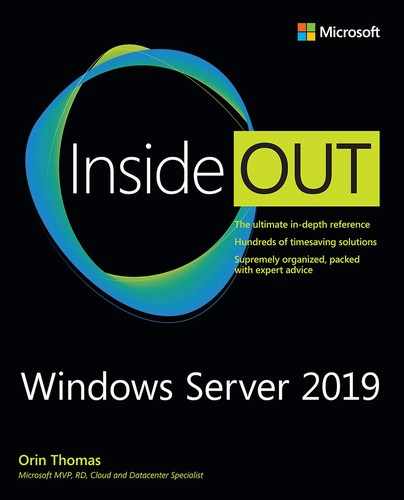
For example, you create a shared folder named Managers on a file server named FS1. Next, you set share permissions on the shared folder and file system permissions on the files and folders within the shared folder. Permissions allow you to control who can access the shared folder and what users can do with that access. For example, permissions determine whether they are limited to just read-only access or whether they can create and edit new and existing files.
When you set share permissions and file system permissions for a shared folder, the most restrictive permissions apply. For example, if you configure the Share permission so that the Everyone group has Full Control and then configure the file permission so that the Domain Users group has Read Access, a user who is a member of the Domain Users group accessing the file over the network has Read Access.
Things get a little more complicated when a user is a member of multiple groups; in this case, the most cumulative permission applies. For example, in a file where the Domain Users group has Read Access, but the Managers group has Full Control, a user who is a member of both Domain Users and Managers who accesses the file over the network has the Full Control permission. This is great for a certification exam question, but it can be needlessly complex when you’re trying to untangle permissions to resolve a service desk ticket.
Using File Explorer
You can create shared folders in a variety of ways. The way that many administrators do it—often out of habit—is by using the built-in functionality of File Explorer. If you are using File Explorer to share folders, you have two general options when it comes to permissions:
Simple Share Permissions. When you use the Simple Share Permissions option, you specify whether a user or group account has Read or Read/Write permissions to a shared folder. Figure 8-1 shows this for the Managers group. When you use Simple Share Permissions, both the share permissions and the file and folder-level permissions are set at the same time. It is important to note that any files and folders in the shared folder path have their permissions reset to match those configured through the File Sharing dialog box. This, however, doesn’t happen with other forms of share permission configurations.

Figure 8-1 Simple share permissions
Advanced Share Permissions. Advanced Share Permissions are what administrators who have been managing Windows file servers since the days of Windows NT 4 are likely to be more familiar with. With Advanced Permissions, you configure share permissions separately from file system permissions. You configure advanced share permissions through the Advanced Sharing button on the Sharing tab of a folder’s Properties dialog box. Figure 8-2 shows how you configure Advanced Sharing Permissions. When you configure Advanced Sharing Permissions, permissions are only set on the share and are not reset on the files and folders within the share. If you are using Advanced Sharing Permissions, you set the file system permissions separately.

Figure 8-2 Share Permissions dialog box
Windows Admin Center
Windows Admin Center (WAC) also provides basic file share–configuration functionality, though this is not currently as sophisticated as what can be accomplished through Server Manager or File Explorer. As WAC evolves, it’s likely that more file sharing functionality will be added to the tool. At the moment, file sharing is accessible through the Files node of WAC. To access the permissions of a share, you must select the host folder in the WAC interface and then use the More drop-down menu to view share permissions. Share Permissions for a folder named Shared-WAC are displayed in Figure 8-3.

Figure 8-3 Windows Admin Center Share Permissions dialog box
Server Manager
You can manage shares centrally through the Shares area of the Server Manager console, as shown in Figure 8-4. The advantage of the Server Manager console is that you can use it to connect to manage shares on remote servers, including servers running the Server Core installation option.

Figure 8-4 Server Manager for share management
When you edit the properties of a share through Server Manager, you can also edit the permissions, as shown in Figure 8-5. This functions in the same way as editing Advanced Share Permissions through File Explorer in that it won’t reset the permissions on the file system itself; permissions are only reset on the share.
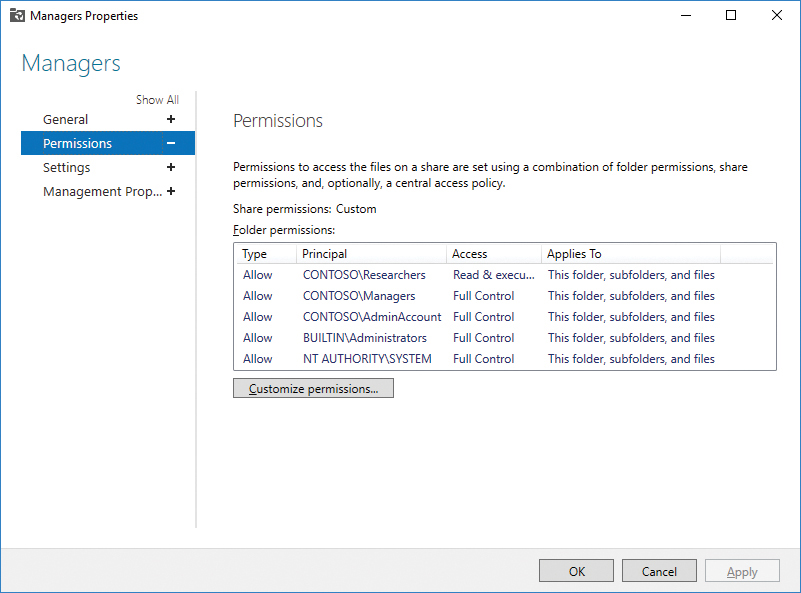
Figure 8-5 Server Manager Permissions management
You can also use the Server Manager’s share properties interface when File Server Resource Manager is installed to edit the following settings:
Enable Access-Based Enumeration. Enabled by default, this setting ensures that users can only see files and folders to which they have access. This is shown as enabled in Figure 8-6.

Figure 8-6 Server Manager share settings management
Allow Caching of Share. Allows files to be used offline. An additional setting, Enable BranchCache on the file share allows use of BranchCache if the appropriate group policies are applied. You’ll learn more about BranchCache later in this chapter. You can configure this option when the Settings tab is selected.
Encrypt Data Access. When you enable this option, traffic to and from the shared folder is encrypted if the client supports SMB 3.0 (Windows 8 and later). You can configure this option when the Settings tab is selected.
Specify Folder Owner Email Address. Setting the folder owner’s email address can be useful when resolving access-denied assistance requests. You can configure this when the Permission tab is selected.
Configure Folder Usage Properties. Folder-usage properties allow you to apply metadata to the folder that specifies the nature of the files stored there. You can choose between User Files, Group Files, Application Files, and Backup and Archival files. You can use folder usage properties with data classification rules.
File Server Resource Manager
File Server Resource Manager (FSRM) is a tool that allows you to perform advanced file server management. You can use FSRM to configure the following:
Quotas at the folder level
File screens
Storage reports
File classification
File management tasks
Access denied assistance
Folder level quotas
Quotas are important. If you don’t use them, file shares tend to end up consuming all available storage. Some users dump as much as possible onto a file share unless quotas are in place and unless you are monitoring storage; the first you’ll hear about it is when the service desk gets calls about people being unable to add new files to the file share.
NTFS has had rudimentary quota functionality since the Windows NT days. The reason that most Windows server administrators don’t bother with it is that it can’t be applied only to individual user accounts and it applies at the volume level. Needless to say, if you have 500 users for whom you want to configure quotas, you don’t want to have to individually configure a quota for each one. Even with command-line utilities, you still need to create an entry for each user.
Luckily, FSRM provides far more substantial quota functionality that makes quotas more practical to implement as a way of managing storage utilization on Windows file servers.
Quotas in FSRM can be applied on a per-folder basis and are not cumulative across a volume. You can also configure quotas in FSRM so that users are sent warning emails should they exceed a specific quota threshold, but before they are blocked from writing files to the file server. You manage quotas using FSRM by creating a quota template and then applying that quota template to a path.
Creating a quota template involves setting a limit, specifying a quota type, and then configuring notification thresholds. You can choose between the following quota types:
Hard Quota. Do Not Allow Users To Exceed Limit. A hard quota blocks users from writing data to the file share after the quota value is exceeded.
Soft Quota. Allow Users To Exceed Limit (Use For Monitoring). A soft quota allows you to monitor when users exceed a specific storage utilization value, but it doesn’t block users from writing data to the file share after the quota value is exceeded.
Notification thresholds allow you to configure actions to be taken after a certain percentage of the assigned quotas are reached. As shown in Figure 8-7, you can configure notifications via email, get an item written to an event log, run a command, or have a report generated.

Figure 8-7 Quota template
After you create the quota template, you apply it to a folder. To do this, select the Quotas node under Quota Management, and from the Action menu, click Create Quota. In the Create Quota dialog box, shown in Figure 8-8, select the path to which the quota applies and the quota template to apply. You then choose between applying the quota to the whole path or setting up an auto-apply template. Auto-apply templates allow separate quotas to be applied to any new and existing quota path subfolders. For example, if you applied a quota to the C:Example path using the 2 GB template, the quota would apply cumulatively for all folders in that path. If you chose an auto-apply template, a separate 2 GB quota would be configured for each new and existing folder under C:Example.

Figure 8-8 Create Quota dialog box
File screens
File screens allow you to block users from writing files to file shares based on file name extension. For example, you can use a file screen to stop people from storing video or audio files on file shares. File screens are implemented based on file name. Usually, this just means file screens are implemented by file extension, but you can configure file screens based on a pattern match of any part of a file name. You implement file screens using file groups and file screen templates.
File groups
A file group is a pre-configured collection of file extensions related to a specific type of file. For example, the Image Files file group includes file name extensions related to image files, such as .jpg, .png, and .gif. While file groups are usually fairly comprehensive in their coverage, they aren’t always complete. Should you need to, you can modify the list to add new file extensions.
The file groups included with FSRM are shown in Figure 8-9 and include the following:
Audio And Video Files Blocks file extensions related to audio and video files, such as .avi and .mp3
Backup Files Blocks file extensions related to backups, including .bak and .old files
Compressed Files Blocks file extensions related to compressed files, such as .zip and .cab
E-mail Files Blocks file extensions related to email storage, including .pst and .mbx files
Executable Files Blocks file extensions related to executable files and scripts, such as .exe or .ps1 extensions
Image Files Blocks file extensions related to images, such as .jpg or .png extensions
Office Files Blocks file extensions related to Microsoft Office files, such as .docx and .pptx files
System Files Blocks file extensions related to system files, including .dll and .sys files
Temporary Files Blocks file extensions related to temporary files, such as .tmp. Also blocks files starting with the ~ character
Text Files Blocks file extensions related to text files, including .txt and .asc files
Web Page Files Blocks file extensions related to webpage files, including .html and .htm files

Figure 8-9 File Groups
To edit the list of files in a file group, right-click the file group and click Edit File Group Properties. Using the dialog box shown in Figure 8-10, you can modify the list of files to include and exclude files based on file name pattern. For example, you can do a simple exclusion or inclusion based on the file name suffix, such as *.bak. You also have the option of creating a more complex exclusion or inclusion based on the file name, such as backup *.*, which would exclude all files with the word backup at the start of any extension.

Figure 8-10 File Group Properties
Exclusions allow you to add exceptions to an existing block rule. For example, you could configure a file screen to block all files that have the extension .vhdx. You might then create an exception for the name server2019.vhdx. When implemented, all files with the .vhdx extension would be blocked from being written to the share, except for files with the name server2019.vhdx.
While the NTFS and ReFS file systems are case sensitive, file screens are not case sensitive.
To create a new file group, right-click the File Groups node in the File Server Resource Manager console and click Create File Group. Provide the following information:
File Group Name The name for the file group.
Files To Include Provide patterns that match the names of files you want to block from being written to the file server.
Files To Exclude Provide patterns that match the names of files you want to exclude from the block.
File screen templates
File screen templates are made up of a screening type, a collection of file groups, and a set of actions to perform when a match is found. File screen templates support the following screening types:
Active Screening An active screen blocks users from writing files to the file share that have names that match those patterns listed in the file group.
Passive Screening A passive screen doesn’t block users from writing files to the file share that have names that match patterns listed in the file group. Instead, you use a passive screen to monitor such activity.
The actions you can configure include sending an email, writing a message to the event log, running a command, or generating a report. Figure 8-11 shows the Create File Screen Template dialog box.

Figure 8-11 Creating a template
After you have configured the appropriate file screen template, create the file screen by applying the template to a specific path. You can also create file screen exceptions, which exempt specific folders from an existing file screen. For example, you might apply a file screen at the root of a shared folder that blocks audio and video files from being written to the share. If you wanted to allow users to write audio and video files to one folder in the share, you could configure a file screen exception and apply it to that folder.
Storage reports
The Storage Reports functionality of FSRM allows you to generate information about the files stored on a particular file server. You can use FSRM to create the following storage reports:
Duplicate Files This report locates multiple copies of the same file. If you’ve enabled deduplication on the volume hosting these files, these additional copies do not consume additional disk space as they are deduplicated.
File Screening Audit This report allows you to view which users or applications are triggering file screens. For example, which users have tried to save music or video files to a shared folder.
Files By File Group This report allows you to view files sorted by file group. You can view files by all file groups, or you can search for specific files. For example, a report on .zip files stored on a shared folder.
Files By Owner This report allows you to view files by owner. You can search for files by all owners or run a report that provides information on files by one or more specific users.
Files By Property Use this report to find out about files based on a classification. For example, if you have a classification named Top_Secret, you can generate a report about all files with that classification on the file server.
Large Files This report allows you to find large files on the file server. By default, it finds files larger than 5 MB, but you can edit this to locate all files that are larger than a certain size.
Least Recently Accessed Files This report allows you to identify files that have not been accessed for a certain number of days. By default, this report identifies files that have not been accessed in the last 90 days, but you can configure this to any number that is appropriate for your organization.
Most Recently Accessed Files Use this report to determine which files have been accessed most recently. The default version of this report finds files that have been accessed in the last seven days.
Quota Usage Use this report to view how a user’s storage usage compares against the assigned quota. For example, you could run a report to determine which users have exceeded 90 percent of their quota.
You can configure storage reports to run and be stored locally on file servers. You also have the option of configuring storage reports to be emailed to one or more email addresses. You can generate storage reports in DHTML, HTML, XML, CSV, and text formats.
To run a storage report, perform the following steps:
In the File Server Resource Manager console, select the Storage Reports Management node, and then on the Action menu, click Generate Reports Now.
On the Settings page of the Storage Reports Task Properties dialog box shown in Figure 8-12, select the reports you want to run. You can click Edit Parameters to modify the properties of the report.

Figure 8-12 Storage reports
On the Scope tab of the Storage Reports Tasks Properties dialog box, you can configure which folders the report runs on.
On the Delivery tab of the Storage Reports Task Properties dialog box, you can configure the location where reports are saved and the email addresses to which the reports are sent.
File classification
File classification allows you to apply metadata to files based on file properties. For example, you can apply the tag Top_Secret to a file that has specific properties, such as who authored it or whether a particular string of characters appeared in the file.
The first step to take when configuring file classification is to configure classification properties. After you’ve done this, you can create a classification rule to assign the classification property to a file. You can also allow users to manually assign classification properties to a file. By specifying the values allowed, you limit which classification properties the user can assign.
Classification properties
You can configure the following file classification properties:
Yes/No Provide a Boolean value
Date-Time Provide a date and time
Number Provide an integer value
Multiple Choice List Allow multiple values to be assigned from a list
Ordered List Provide values in a specific order
Single Choice Select one of a selection of options
String Provide a text-based value
Multi-string Assign multiple text-based values
To configure a classification property, perform the following steps:
In the File Server Resource Manager console, navigate to the Classification Properties node under the Classification Management node.
On the Action menu, click Create Local Property.
In the Create Local Classification Property window, provide a Name, select a Property Type, and configure properties. Figure 8-13 shows a classification property named Sensitivity that gives a Single Choice property type and has the available values Top_Secret and Not_Sensitive. Click OK to save the new classification.

Figure 8-13 Create classification property
Classification rules
Classification rules allow you to assign classifications to files based on the properties of a file. You can configure three separate methods to classify a file:
Content Classifier When you choose this method of classification, you configure a regular expression to scan the contents of a file for a specific string or text pattern. For example, you could use the content classifier to automatically assign the Top_Secret classification to any file that contained the text Project_X.
Folder Classifier When you choose this method of classification, all files in a particular path are assigned the designated classification.
Windows PowerShell Classifier When you choose this method of classification, a PowerShell script is run to determine whether a file is assigned a particular classification.
You can configure classification rules to run against specific folders. When configuring a classification rule, you can also choose to recheck files each time the rule is run. This allows you to change a file’s classification in the event that the properties that triggered the initial classification change. When configuring reevaluation, you can also choose to remove user assigned classifications in case there is a conflict. Figure 8-14 shows the Evaluation Type tab of the Create Classification Rule dialog box, which allows you to configure these settings:

Figure 8-14 Evaluation Type
File management tasks
File management tasks are automated tasks that FSRM performs on files according to a schedule. FSRM supports three types of file management tasks. These are:
File Expiration This moves all files that match the conditions to a specific directory. The most common usage of a file expiration task is to move files that haven’t been accessed by anyone for a specific period, for example 365 days, to a specific directory.
Custom Allows you to run a specific executable against a file. You can specify which executable is to be run, any special arguments to be used when running the executable, and the service account permissions, which can be Local Service, Network Service, or Local System.
RMS Encryption Allows you to apply an RMS template or a set of file permissions to a file based on conditions. For example, you might want to automatically apply a specific set of file permissions to a file that has the Top_Secret classification or apply a specific RMS template to a file that has the Ultra_Secret classification.
When configuring a file management task, you also need to provide the following information:
Scope The path where the task is run.
Notification Any notification settings that you want to configure, such as sending an email, running a command, or writing an event to an event log. With file expiration, you can configure an email to be sent to each user who has files that are subject to the expiration task.
Report Generating a report each time that the task is run. A notification is sent to the user who owns the file; reports are sent to administrators.
Schedule When you want the file management task to be run.
Condition The condition that triggers the management task. For example, Figure 8-15 shows a task that is triggered when the Sensitivity classification property is set to Top_Secret.

Figure 8-15 Create File Management Task
Access-Denied Assistance
Access-Denied Assistance allows users to be informed why they don’t have access to a specific file. Access-Denied Assistance gives you the option of allowing the user to send an email message to the file owner so that they can, if appropriate, grant access to the file. You can configure Access-Denied Assistance using FSRM as shown in Figure 8-16, or by configuring group policy. You configure Access-Denied Assistance for a single server in FSRM by editing the FSRM options.
Figure 8-16 Access-Denied Assistance
If you want to use Access-Denied Assistance across all file servers in your organization, you can choose to use Group Policy. To configure Access-Denied Assistance using Group Policy, edit the policies located in the Computer ConfigurationPoliciesAdministrative TemplatesSystemAccess-Denied Assistance node. This node contains the following policies:
Customize Message For Access Denied Errors Use this policy to specify the message users see when they are blocked from accessing a file.
Enable Access-Denied Assistance On Client For All File Types When enabled, Access-Denied Assistance functions for all file types where the user is blocked from accessing the file.
Distributed File System
Distributed File System (DFS) has two advantages over a traditional file share. The first is that DFS automatically replicates to create copies of the file share and its content on one or more other servers. The second is that clients connect to a single UNC address, with the client directed to the closest server and redirected to the next closest server in the event that a server hosting a DFS replica fails. Azure File Sync provides most of the first functionality but does not provide the second functionality. You’ll learn more about Azure File Sync in Chapter 17, “Azure IaaS and hybrid services.”
Using DFS, you can push a single shared folder structure out across an organization that has multiple branch offices. Changes made to files on one file share replica propagate across to the other file share replicas, with a robust and built-in conflict-management system present to ensure that problems do not occur when users are editing the same file at the same time.
DFS namespace
A DFS namespace is a collection of DFS shared folders. It uses the same UNC pathname structure, except instead of \ServerNameFileShareName with DFS, it is \domainname with all DFS shared folders located under this DFS root. For example, instead of
\FS-1Engineering
\FS-2Accounting
\FS-3Documents
You could have
\Contoso.comEngineering
\Contoso.comAccounting
\Contoso.comDocuments
In this scenario, the Engineering, Accounting, and Documents folders could all be hosted on separate file servers and you could use a single namespace to locate those shared folders, instead of needing to know the identity of the file server that hosts them.
As shown in Figure 8-22, DFS supports the following types of namespaces:
Domain-Based Namespace Domain-based namespaces store configuration data in Active Directory. You deploy a domain-based namespace when you want to ensure that the namespace remains available even if one or more of the servers hosting the namespace goes offline.
Stand-Alone Namespace Stand-alone namespaces have namespace data stored in the registry of a single server and not in Active Directory as is the case with domain-based namespaces. You can only have a single namespace server with a standalone namespace. Should the server that hosts the namespace fail, the entire namespace is unavailable even if servers that host individual folder targets remain online.

Figure 8-22 Namespace Type
To create a DFS namespace, perform the following steps:
In the DFS console, click the Namespaces node. In the Action menu, click New Namespace.
On the Namespace Server page, select a server that has the DFS Namespaces feature installed. You can install this feature with the following PowerShell cmdlet:
Install-WindowsFeature FS-DFS-Namespace
On the Namespace Name And Settings page, provide a meaningful name for the namespace. This is located under the Domain name. For example, if you added the name Schematics and you were installing DFS in the contoso.internal domain, the namespace would end up as \contoso.internalSchematics. By default, a shared folder is created on the namespace server, although you can edit settings on this page of the wizard and specify a separate location for the shared folder that hosts content you want to replicate.
On the Namespace Type page, you should generally select domain-based namespace as this gives you the greatest flexibility and provides you with the option of adding additional namespace servers later on for redundancy.
To add an additional namespace server to an existing namespace, ensure that the DFS Namespace role feature is installed on the server you want to add, and then perform the following steps:
In the DFS Console, select the namespace to which you want to add the additional namespace server, and on the Action menu, click Add Namespace Server.
On the Add Namespace Server page, specify the name of the namespace server, or browse and query Active Directory to verify that the name is correct, and then click OK. This creates a shared folder on the new namespace server with the name of the namespace.
DFS replication
A replica is a copy of a DFS folder. Replication is the process that ensures each replica is kept up to date. DFS uses block-level replication, which means that only blocks in a file that have changed are transmitted to other replicas during the replication process.
You install the DFS replication feature by running the following PowerShell command:
Install-WindowsFeature FS-DFS-Replication
In the event that the same file is being edited by different users on different replicas, DFS uses a “last writer wins” conflict-resolution model. In the unlikely event that two separate users create files with the same name in the same location on different replicas at approximately the same time, conflict resolution uses “earliest creator wins.” When conflicts occur, files and folders that “lose” the conflict are moved to the Conflict And Deleted folder, located under the local path of the replicated folder in the DfsrPrivateConflictandDeleted directory.
Replicated folders and targets
One of the big advantages of DFS is that you can create copies of folders across multiple servers that are automatically updated. Each copy of that replica is called a folder target. Only computers that have the DFS replication role feature installed can host folder targets. A replicated folder can have multiple folder targets. For example, you might have a replicated folder named \contoso.comEngineering that you have configured targets for in Sydney on \SYD-FS1Engineering, Melbourne on \MEL-FS1Engineering, and Auckland on \AKL-FS1Engineering.
To create a new folder to replicate, perform the following steps:
In the DFS console, select the namespace to which you want to add the folder.
On the Action menu, click New Folder. In the New Folder dialog box, provide a folder name and click Add.
If you’ve already created a shared folder to host the target, enter that address in the Add Folder Target dialog box. Otherwise, click Browse, select the server you want to host the folder, and click New Shared Folder.
In the Create Share dialog box, shown in Figure 8-23, provide a share name, a local path, and the permissions that you want to apply. The advantage of using the DFS console to create the share is that it ensures all the appropriate folders are created and permissions are applied. You need an account that has local Administrator access on the server that hosts the share to perform these actions. Click OK until all dialog boxes are dismissed to create the new folder.

Figure 8-23 Create Share dialog box
To add a folder target to an existing folder, perform the following steps:
In the DFS console, select the folder under the namespace to which you want to add a folder target.
On the Action menu, click Add Folder Target.
If you’ve already created the share, enter the address of the shared folder. Otherwise, click Browse.
On the Browse For Shared Folders dialog box, click Browse again and use Active Directory to query for the address of the server that you want to have host the folder target. Remember that this server must have the DFS Replication role service installed on it.
Click New Shared Folder. In the Create Share dialog box, provide a share name, a local path, and the permissions that you want to apply. These should be the same as the permissions you’ve chosen for other replicas.
You need an account that has local Administrator access on the server that hosts the share to perform these actions. Click OK until all dialog boxes are dismissed to create the new folder target.
If this is the first additional target that you’ve created, you need to configure a replication topology and a replication group.
Replication topology
A replication group is a collection of servers that host copies of a replicated folder. When configuring replication for a replication group, you choose a topology and a primary member. The topology dictates how data replicates between the folders that each server hosts. The primary member is the seed from where file and folder data is replicated.
When creating a replication group, you can specify the following topologies as shown in Figure 8-24:
Hub And Spoke This topology has hub members where data originates and spoke members to the location in which data is replicated. This topology also requires at least three members of the replication group. Choose this if you have a hub-and-spoke topology for your organizational WAN.
Full Mesh In this topology, each member of the replication group can replicate with other members. This is the simplest form of replication group and is suitable when each member can directly communicate with the others.
No Topology When you select this option, you can create a custom topology where you specify how each member replicates with others.

Figure 8-24 Replication topology
Replication schedules
You use replication schedules to determine how replication partners communicate with each other. You use a replication schedule to specify when replication partners communicate and whether replication traffic is throttled so that it doesn’t flood the network.
You can configure replication to occur continuously and specify bandwidth utilization, with a minimum value of 16 Kbps and an upper value of 256 Mbps, with the option of setting it to Unlimited. If necessary, you can also set different bandwidth limitations for different periods of the day. Figure 8-25 shows that the cap set to 512 Kbps during work hours and to 64 Mbps after hours.

Figure 8-25 Edit Schedule dialog box
BranchCache
BranchCache speeds up access to files stored on shared folders that are accessed across medium to high latency WAN links. For example, several users in a company’s Auckland, New Zealand branch office need to regularly access several files stored on a file server in the Sydney, Australia head office. The connection between the Auckland and Sydney offices is low bandwidth and high latency. The files are also fairly large and need to be stored on the Sydney file server. Additionally, the Auckland branch office is too small for a DFS replica to make sense. In a scenario such as this, you would implement BranchCache.
BranchCache creates a locally cached copy of files from remote file servers that can be accessed by other computers on the local network, assuming the file hasn’t been updated at the source. In the example scenario, after one person in the Auckland office accesses the file, the next person to access the same file in the Auckland office accesses a copy that is cached locally, rather than retrieving it from the Sydney file server. The BranchCache process performs a check to verify that the cached version is up to date. If it isn’t, the updated file is retrieved and stored in the Auckland network’s BranchCache.
You add BranchCache to a file server by using the following PowerShell command:
Install-WindowsFeature FS-BranchCache
After installing BranchCache, you need to configure group policies that apply to file servers in your organization that allow them to support BranchCache. To do this, you need to configure the Hash Publication for BranchCache policy, located in the Computer ConfigurationPoliciesAdministrative TemplatesNetworkLanman Server node, as shown in Figure 8-26.

Figure 8-26 Hash Publication for BranchCache
You have three options when configuring this policy:
Allow Hash Publication Only For Shared Folders On Which BranchCache is enabled This option allows you to selectively enable BranchCache.
Disallow Hash Publication On All Shared Folders Use this option when you want to disable BranchCache.
Allow Hash Publication For All Shared Folders Use this option if you want to enable BranchCache on all shared folders.
Generally, there’s rarely a great reason not to enable BranchCache on all shared folders, but should you want to be selective, you do have that option. Should you choose to be selective and only enable BranchCache on some shares, you need to edit the properties of the share and enable BranchCache. You do this by clicking Caching in the Advanced Sharing page and then using the Offline Settings dialog box as shown in Figure 8-27.

Figure 8-27 Offline Settings dialog box
After you’ve configured your file server to support BranchCache, you need to configure client computers to support branch cache. You do this through configuring group policy in the Computer ConfigurationPoliciesAdministrative TemplatesNetworkBranchCache node of a GPO. Which policies you configure depends on how you want BranchCache to work at each branch office. You can choose between the following options:
Distributed Cache Mode When client computers are configured for Distributed Cache mode, each Windows 7 or later computer hosts part of the cache.
Hosted Cache Mode When you configure Hosted Cache mode, a server at the branch office hosts the cache in its entirety. Any server running Windows Server 2008 R2 or later can function as a hosted cache mode server.
To configure a branch office server to function as a hosted cache mode server, run the following PowerShell commands:
Install-WindowsFeature BranchCache
Start-Service BranchCache
Enable-BCHostedServer
PowerShell commands
While you can remotely manage file servers using the Remote Server Administration Tools, if you need to manage a large number of servers it is more efficient to use PowerShell. In the next few pages, you’ll learn which PowerShell cmdlets are available for managing Windows Server 2019 file servers.
Shared Folder cmdlets
Shared folder cmdlets are in the SmbShare PowerShell module. This is because traditional file shares use the SMB protocol. Sometimes, the documentation refers to SMB servers, which is another way of saying “file servers.” Table 8-1 lists the shared folder related cmdlets available in Windows Server 2019.
Table 8-1 Shared Folder cmdlets
Noun |
Verbs |
Functionality |
SMBBandwidthLimit |
Get, Remove, Set |
Manage shared folder bandwidth caps |
SMBClientConfiguration |
Get, Set |
View client SMB configuration |
SMBClientNetworkInterface |
Get |
View network interfaces used by client |
SMBConnection |
Get |
View connections from client to shared folders |
SMBDelegation |
Disable, Enable, Get |
Manage constrained delegation authorization for SMB clients |
SMBMapping |
Get, New, Remove |
Manage SMB mappings |
SMBMultiChannelConnection |
Get, Update |
Manage multichannel connections to SMB shares |
SMBMultichannelConstraint |
Get, New, Remove |
Manages SMB multichannel constraints on shared folders |
SMBOpenFile |
Get, Close |
Manage files that are open from shared folders |
SMBPathAcl |
Set |
Configure the ACL for the file system folder to match the ACL of the shared folder |
SMBServerConfiguration |
Get, Set |
Manage SMB server configuration |
SMBServerNetworkInterface |
Get |
View network interfaces used by SMB server |
SMBSession |
Get, Close |
View and terminate SMB sessions |
SMBShare |
Get, New, Remove, Set |
Manage shared folders |
SMBShareAccess |
Block, Get, Grant, Revoke, Unblock |
Manage permissions on shared folders |
File Server Resource Manager cmdlets
One of the challenges with FSRM is that you need to configure it on a per-server basis. Having complex FSRM configurations can make it challenging to deploy the same configuration across multiple servers. One way of simplifying the process of deploying FSRM across multiple file servers is to use PowerShell. By creating and running a PowerShell script, or by using DSC, you can apply the same FSRM settings across multiple file servers.
Table 8-2 lists the FSRM related cmdlets on the basis of PowerShell Noun, available verbs, and functionality.
Table 8-2 FSRM cmdlets
Noun |
Verbs |
Functionality |
FSRMAction |
New |
Create a new action, such as sending an email, creating an event log entry, running a command, or generating a report |
FsrmAdrSetting |
Get, Set |
Manage access-denied remediation settings, which display information for users when they are denied access to a file |
FSRMAutoQuota |
Get, New, Remove, Set, Update |
Manage auto apply quotas. Auto apply quotas are quota templates that you can apply at the volume or folder level |
FSRMClassification |
Get, Set, Start, Stop, Wait |
Manage classification processes, such as starting and stopping them |
FSRMClassificationPropertyDefinition |
Get, New, Remove, Set, Update |
Manage classification property definitions |
FSRMClassificationPropertyValue |
New |
Manage classification property values. |
FSRMClassificationRule |
Get, New, Remove, Set |
Manage classification property rules. |
FSRMEffectiveNamespace |
Get |
Provides a list of paths that match FSRM namespaces |
FSRMFileGroup |
Get, New, Remove, Set |
Manage FSRM file groups for file screens. |
FSRMFileManagementJob |
Get, New, Remove, Set, Start, Stop, Wait |
Manage FSRM file management jobs |
FSRMFileScreen |
Get, New, Remove, Reset, Set |
Manage FSRM file screens |
FSRMFileScreenException |
Get, New, Remove, Set |
Manage FSRM file screen exceptions |
FSRMFileScreenTemplate |
Get, New, Remove, Set |
Manage FSRM file screen templates |
FSRMFmjAction |
New |
Create file management job actions |
FSRMFmjCondition |
New |
Create file management job conditions |
FSRMFmjNotification |
New |
Create file management job notifications |
FSRMFmjNotificationAction |
New |
Create file management notification actions |
FSRMMacro |
Get |
Lists FSRM macros |
FSRMMgmtProperty |
Get, Remove, Set |
Manage FSRM management properties |
FSRMQuota |
Get, New, Remove, Reset, Set, Update |
Manage FSRM quotas |
FSRMQuotaTemplate |
Get, New, Remove, Set |
Manage FSRM quota templates |
FSRMQuotaThreshold |
New |
Manage FSRM quota thresholds |
FSRMRmsTemplate |
Get |
View available RMS templates that you can apply using FSRM |
FSRMScheduledTask |
New |
Create an FSRM Scheduled Task |
FSRMSetting |
Get, Set |
Manage FSRM settings |
FSRMStorageReport |
Get, Remove, New, Set, Start, Stop, Wait |
Manage FSRM storage reports |
FSRMTestEmail |
Send |
Send a test alert email using FSRM settings |
BranchCache Cmdlets
You can use the BranchCache cmdlets, available when you install the BranchCache feature, to configure and manage BranchCache on both file servers and clients. These cmdlets are listed in Table 8-3.
Table 8-3 BranchCache cmdlets
Noun |
Verbs |
Function |
BC |
Disable, Reset |
Disable or reset BranchCache |
BCAuthentication |
Set |
Configure BranchCache Computer Authentication mode |
BCCache |
Clear, Set |
Manage cache files |
BCCachePackage |
Export, Import |
Export and import cache packages |
BCClientConfiguration |
Get |
View client computer settings |
BCContentServerConfiguration |
Get |
View content server configuration |
BCDataCache |
Get |
Get information about the data cache |
BCDataCacheEntryMaxAge |
Set |
Manage the amount of time data can be stored in the cache |
BCDataCacheExtension |
Add, Get |
Manage cache storage space |
BCDistributed |
Enable |
Configure a computer to operate in distributed cache mode |
BCDowngrading |
Enable, Disable |
Manage whether computers can use Windows 7 BranchCache mode |
BCFileContent |
Publish |
Creates hashes for files on a file server that has BranchCache enabled |
BCHashCache |
Get |
View the BranchCache hash cache |
BCHostedCacheServerConfiguration |
Get |
View hosted cache server settings |
BCHostedClient |
Enable |
Configure BranchCache to function in hosted cache client mode |
BCHostedServer |
Enable |
Configure BranchCache to function in hosted cache server mode |
BCLocal |
Enable |
Enable BranchCache service to function in local caching mode |
BCMinSMBLatency |
Set |
Configure minimum latency requirement for activation of BranchCache functionality |
BCNetworkConfiguration |
Get |
View BranchCache network settings |
BCSecretKey |
Export, Import, Set |
Manage cryptographic key used for generation of BranchCache segment secrets |
BCServeOnBattery |
Disable, Enable |
Configure whether content discovery requests are responded to depending on whether a computer is running on battery |
BCStatus |
Get |
View BranchCache status and configuration information |
BCWebContent |
Publish |
Creates hashes for web content |
DFS Cmdlets
DFS cmdlets are available across two separate PowerShell modules. You use the first set of cmdlets, listed in Table 8-4, to manage DFS namespaces and namespace servers. You use the second set of cmdlets, listed in Table 8-5 to manage DFS replication and folder targets.
Table 8-4 DFS namespace cmdlets
Noun |
Verbs |
Function |
DfsnAccess |
Get, Grant, Remove, Revoke |
Manage permissions for DFS namespace folders |
DfsnFolder |
Get, Move, New, Remove, Set |
Manage DFS namespace folder settings |
DfsnFolderTarget |
Get, New, Remove, Set |
Manage DFS namespace folder target settings |
DfsnRoot |
Get, New, Remove, Set |
Manage settings for DFS roots |
DfsnRootTarget |
Get, New, Remove, Set |
Manage settings for DFS root targets |
DfsnServerConfiguration |
Get, Set |
Manage DFS namespace settings for DFSN root server |
Table 8-5 DFS Replication cmdlets
Noun |
Verbs |
Function |
DfsrBacklog |
Get |
Provides list of pending file updates between replication partners |
DfsrClone |
Export, Get, Import, Reset |
Manage a cloned DFS replication database |
DfsrConfigurationFromAD |
Update |
Updates the DFS Replication service by checking Active Directory database. |
DfsrConnection |
Add, Get, Remove, Set |
Manage connections between members of a replication group |
DfsrConnectionSchedule |
Get, Set |
Manage connection schedule between members of a replication group |
DfsrDelegation |
Get, Grant, Revoke |
Manage replication group permissions |
DfsReplicatedFolder |
Get, New, Remove, Set |
Manage replicated folders in a replication group |
DfsReplicationGroup |
Get, New, Remove, Set, Suspend, Sync |
Manage replication groups |
DfsrFileHash |
Get |
View a file hash |
DfsrGroupSchedule |
Get, Set |
Manage replication group schedules |
DfsrGuid |
ConvertFrom |
Translates GUIDs to friendly names for a specific replication group |
DfsrHealthReport |
Write |
Generates a replication health report that you can use for diagnostic purposes |
DfsrIdRecord |
Get |
View ID records for replicated files or folders from the DFS replication database |
DfsrMember |
Add, Get, Set |
Manage computer members of DFS replication group |
DfsrMembership |
Get, Set |
View and configure replication group membership settings |
DfsrPreservedFiles |
Get, Restore |
Manage preserved files and folders. Preserved files are ones where there has been a conflict or where files have been deleted |
DfsrPropagationReport |
Write |
Create reports based on the propagation of test files |
DfsrPropagationTest |
Remove, Start |
Manage propagation test files |
DfsrServiceConfiguration |
Get, Set |
Manage DFS Replication service settings |
DfsrState |
Get |
View the DFS Replication state for a member |