Windows Server 2019 is Microsoft’s most secure version of the Windows Server operating system, but you can configure the operating system to be far more secure than it is in a default deployment.
Hardening is the process of configuring security controls to improve security. The drawback of hardening a service such as Active Directory or Windows Server 2019 is that it reduces compatibility. Applying security controls is always a matter of balancing security with the requirements of the environment. For example, while you should disable older authentication protocols such as NTLM, doing so might block an older business-critical system in your environment from being able to authenticate against Active Directory.
Always perform hardening activities that are commensurate with your organization’s risk profile. If you’re managing the Active Directory environment for a federal government department, you have a substantially different risk profile than if you are managing the Active Directory environment for the local school district.
Hardening Active Directory
Active Directory controls the authentication, authorization, and the basic security configuration infrastructure of a Windows Server environment. You should make it as hard as possible for attackers to compromise your Active Directory infrastructure by enabling as many security controls as possible.
Hardening domain controllers
Domain controllers are the vaults that host the “crown jewels” of any Windows Server network. Attackers who can compromise a domain controller can compromise the Active Directory instance hosted on that domain controller. This gives attackers the ability to grant themselves any Active Directory domain privilege they desire. You want to ensure that your organization’s domain controllers are as secure as possible. Some obvious steps you can take to secure your organization’s domain controllers include:
Only run the Server Core installation option. The Server Core installation option of Windows Server has a smaller attack surface than the Server with Desktop Experience version of Windows Server.
Only host AD DS and DNS on domain controllers. Generally, you should also avoid hosting workloads other than DNS on a computer configured as a domain controller as a further way of minimizing the attack surface. The more workloads a domain controller hosts, the more components there are for an attacker to attempt to exploit to gain control of that computer.
Run the most recent version of Windows Server. Domain controllers should always run the most recent version of Windows Server. When a new version of Windows Server is released, the first thing you should do is deploy domain controllers running the new operating system and retire domain controllers running previous versions of Windows Server. Newer versions of Windows Server are inherently more secure than previous versions of Windows Server.
Stay up to date with monthly software updates. You should ensure that you keep domain controllers patched with the most recent software updates. You should aggressively update domain controllers. As you should not run workloads beyond Active Directory and DNS on a domain controller, you are unlikely to encounter compatibility problems with new software updates (though you should still test on one domain controller before rolling out to all of the others).
Enable Device Guard. Only authorized applications and processes should be able to run on an Active Directory domain controller. Application whitelisting is the process by which only authorized applications and processes can be run; any application or process that is not explicitly authorized will be unable to run. The most effective method of applying application whitelisting is enabling Device Guard. You’ll learn more about Device Guard in Chapter 20, “Security systems and services.”
Block domain controllers from directly communicating with hosts on the Internet. You should configure perimeter network firewalls so that domain controllers on internal networks can’t directly communicate with hosts on the Internet. Software updates from domain controllers should be obtained from sources on the internal network, such as a WSUS server.
Only accept administrative connections from authorized hosts. Domain Controllers should only accept RDP and remote PowerShell sessions from specific authorized hosts. These hosts should be privileged access workstations or jump servers, which you learned about in Chapter 1, “Administration tools.”
Keep domain controllers in domain controllers OU. Avoid moving domain controllers out of the default domain controllers OU because this can lead to unexpected configurations being assigned through group policy.
Ensure that Directory Services Restore Mode (DSRM) passwords are changed regularly. This password allows out-of-band access to a domain controller. Passwords should be different for each domain controller; passwords should be updated every couple of months; and passwords should be stored in a secure location, such as a safe.
Least privilege
Least privilege is the practice of assigning only the minimum required privileges to an account for the account to perform its assigned tasks. Put another way, accounts should not be assigned rights and privileges in excess of those required to perform the specific tasks for which the account is used.
The benefit of using least privilege is that in the event that an attacker manages to compromise an account, that attacker is limited to acting with the privileges assigned to that account. Least privilege also reduces the chance that damage might inadvertently be done to a system. For example, an account used for backup and recovery can’t be used to add or remove software from the server if that account doesn’t have permission to do anything beyond backup and recovery.
When it comes to assigning privileges, a very bad habit of many IT professionals is to simply add an account to the local Administrators group on the computer where the privilege is required. This is especially true with service accounts where proper procedure is to edit the local security group policies and assign very specific rights; however, many administrators take a quick shortcut and assign all necessary rights by adding the service account to the local Administrators group. This is one of the reasons that attackers go after service accounts, which often use a single, unchanging, and organization-wide password and that also are members of the local Administrator groups on which they are installed.
Role-Based Access Control
Role-Based Access Control (RBAC) operationalizes the least-privilege principle. Instead of having all-powerful administrator accounts that can perform any task on any system, you instead parcel out administrative privileges that limit what an account can do and where an account can do it.
For example, rather than giving help desk support staff the ability to reset the passwords of any user in the domain, you instead delegate them the right to only be able to reset the passwords of user accounts in a specific organizational unit. This way, you allow the support staff to reset the passwords of a specific class of user account; for example, you could grant support staff the authority to reset passwords that are used by people in one department without giving them the ability to reset the passwords of domain administrator accounts.
You delegate privileges for organizational units in Active Directory using the Delegation Of Control Wizard, as shown in Figure 19-1.

Figure 19-1 Delegating the reset password right
Password policies
Account policies include both password policies and account lockout policies. You configure the domain password and lockout policies by configuring the default domain GPO. You can override the domain policies for specific security groups or user accounts using fine-grained password policies. You configure fine-grained password policies using the Active Directory Administrative Center console.
Default password policy settings include:
Number Of Remembered Passwords. Users cannot change their passwords to a password remembered by the system. By default, Active Directory remembers the previous 24 passwords that have been used by an account.
Maximum Password Age. This is the maximum amount of time in days that a password can remain the same before it needs to be changed. The default value is 42 days.
Minimum Password Age. This is the minimum amount of time in days that a newly changed password must be kept. This policy prevents users from cycling through password changes to exceed the password history setting, so they can return to using the same password.
Minimum Password Length. This is the minimum number of characters required for a password. The default is 7. Services such as Azure now require a minimum of 12 characters for administrator account passwords on IaaS virtual machines.
Password Complexity Requirement. This setting determines whether passwords must include three of the four following characteristics: uppercase letters, lowercase letters, numbers, and symbols. This setting is enabled by default.
Lockout policy determines:
The period of time an account is locked out when a user enters a specific number of incorrect passwords in a specific amount of time. The default is that an account is not locked out when incorrect passwords are entered. This means that an attacker or someone who is just forgetful can brute-force guess passwords without any lockout occurring.
The number of incorrect passwords that trigger a lockout over a specific period of time. When configuring this policy, you should allow users to make a reasonable number of guesses. If you don’t, you’ll end up flooding the service desk with password reset calls.
The amount of time that must elapse before the account lockout counter is reset. A correctly entered password also resets the lockout counter.
Account security options
There are additional security options that you should consider configuring for highly privileged accounts. These include configuring the following settings:
Logon Hours. Use this setting to configure when users can use an account. AD DS does not authenticate someone attempting to sign in outside of these hours. By default, accounts are configured so that users can sign in at all times. Consider configuring privileged accounts so that users can use them only at specific times. This stops a user from signing in after hours, either specifically or with a compromised account, to get up to no good when they assume that no one is watching. Organizations that do need to use privileged accounts to perform after-hours maintenance tasks can create special accounts for those tasks, or they can temporarily modify an existing account.
Logon Workstations. Use this setting to limit the computers to which a particular account can sign in. By default, users can use an account to sign in to any computer in the domain. Use this setting to ensure that users can use privileged accounts only on specific, specially configured administrative workstations or certain servers. Limiting which computers’ users can use an account reduces the locations where that account can be used.
Password Never Expires. You should use this setting reluctantly when configuring privileged accounts because it absolves the account from the domain password policy. You can use products such as Microsoft Identity Manager to assist with password management for privileged accounts.
Smart Card Is Required For Interactive Logon. Use this setting to ensure that a smart card must be present for the account sign in to occur. In high-security environments, you should deploy smart cards and enable this option to ensure that only an authorized person who has both the smart card and the account credentials can use the privileged account.
Account Is Sensitive And Cannot Be Delegated. Use this setting to ensure that trusted applications cannot forward the account credentials to other services or computers on the network. Enable this setting for highly privileged accounts.
This Account Supports Kerberos AES 256 Bit Encryption. Use this setting to allow Kerberos AES 256-bit encryption. Where possible, you should configure this option for privileged accounts and have them use this form of Kerberos encryption over the AES 128-bit encryption option.
Account Expires. Use this setting to configure an expiration date for an account. Configuring privileged accounts with expiration dates ensures that privileged accounts do not remain available to use beyond when they are required.
When you join a computer to a domain for the first time, it creates a computer account in the Computers container. If you want to create an account in a specific container, you’ll need to pre-stage the computer account and place it in the appropriate OU. A pre-staged computer account must have a name that matches that of the computer that is joining the domain.
Computer accounts can be made members of the domain security group. This group membership influences how the Local System and Network Service accounts on the computer function. This is because, by default, these services use the computer’s credentials when interacting with resources on the network. This gives the computer account the rights and privileges assigned to any security group to which the computer is a member.
Computer accounts have automatically assigned passwords that are updated every 30 days. If a computer doesn’t connect to a domain within 30 days, a new password is assigned the next time a connection is established. If you disable a computer account, the computer cannot connect to the domain, and domain users are unable to sign in to the computer until the account is re-enabled.
Resetting a computer account removes the relationship between the computer and the domain. To fix this, you’ll need to either join the computer back to the domain, or reestablish the broken trust relationship using the following PowerShell command, specifying the credentials of a member of the Domain Administrator group:
Test-ComputerSecureChannel -credential <domain><admin> -Repair
If you delete a computer account, it’s necessary to rejoin the computer to the domain manually. When you delete a computer account, all information associated with the account is removed from Active Directory. You should only delete computer accounts once a computer has been decommissioned.
Protected accounts
The Protected Users group, shown in Figure 19-2, provides you with a method of protecting highly privileged user accounts from being compromised. It does this by blocking the use of less-secure security and authentication options.

Figure 19-2 Protected Users Properties
For example, credentials are not cached if an account that is a member of the Protected Users group signs in to a computer running Windows 8.1, Windows 10, Windows Server 2012 R2, Windows Server 2016, or Windows Server 2019. Additionally, accounts that are members of this group cannot use the following security options:
Default credential delegation (CredSSP)
Windows Digest
NTLM—NTOWF
Kerberos long-term keys
Sign in offline
If the domain functional level is Windows Server 2012 R2 or higher, user accounts that are members of the Protected Users group cannot:
Use NT LAN Manager (NTLM) for authentication
Use DES for Kerberos pre-authentication
Use RC4 cipher suites for Kerberos pre-authentication
Be delegated using constrained delegation
Be delegated using unconstrained delegation
Renew user tickets (TGTs) past the initial 240-minute lifetime
Only user accounts should be added to the Protected Users group. You should not add computer accounts or service accounts to this group. In secure environments, all privileged accounts should be members of this group, with exceptions occurring only when specific incompatibilities arise that cannot be resolved in another way.
Authentication policies silos
Authentication policy silos allow you to define relationships between the user, computer, and managed service accounts. A user, computer, and managed service account can only belong to a single authentication policy silo. This provides a more robust security method that goes beyond configuring log in restrictions and restricting which accounts can access specific servers in your environment.
Accounts in an authentication policy silo are associated with a silo claim. You can use this silo claim to control access to claims-aware resources. For example, you can configure accounts so that only accounts that are associated with a specific silo claim can access particularly sensitive servers. This means only accounts that are associated with a Certificate Services silo claim can sign in to a computer that has the Active Directory Certificate Services role installed.
Authentication policies allow you to configure settings, such as the TGT lifetime and access-control conditions, which specify conditions that must be met before a user can sign in to a computer. For example, you might configure an authentication policy that specifies a TGT lifetime of 120 minutes and limit a user account so that users can only use it with specific devices, such as privileged access workstations. You can only use authentication policies if you have configured the domain functional level at the Windows Server 2012 R2 or higher.
You configure authentication policies and authentication policy silos using Active Directory Administrative Center, as shown in Figure 19-3.

Figure 19-3 Authentication policies
Disable NTLM
NTLM (NT Lan Manager) is an older authentication protocol that is not as secure as Kerberos. You can disable NTLM by configuring the Network Security: Restrict NTLM: NTLM Authentication In This Domain policy in the default domain GPO and setting the policy to Disable, as shown in Figure 19-4. This policy can be found in the PoliciesWindows SettingsSecurity SettingsLocal PoliciesSecurity Options node of the default domain GPO. Prior to disabling NTLM authentication, you should configure the Network Security: Restrict NTLM: Audit Incoming NTLM Traffic policy to determine if and where the NTLM protocol is still being used in your organization’s environment.
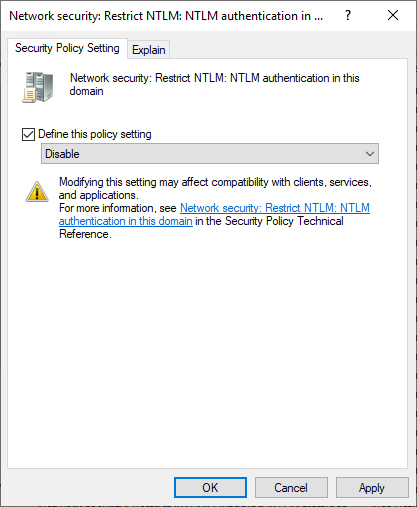
Figure 19-4 Disable NTLM
Block server operators from scheduling tasks
Configuring the Domain Controller: Allow Server Operator To Schedule Tasks policy as disabled, as shown in Figure 19-5, will block someone who is signed in to a server using the AT command to configure scheduled jobs. By default, AT jobs run under the SYSTEM account, and attackers often exploit the AT command to elevate privileges. If you configure this policy, it will be necessary to specify account credentials when configuring a scheduled task.

Figure 19-5 Block task scheduling using AT
Enable Local Security Authority protection
There are multiple techniques that you can employ to reduce the chance of an attacker successfully executing a “pass the hash” attack. Enabling LSA protection makes it more difficult for the Local Security Authority to be compromised. To configure LSA protection on a domain controller:
Open the Registry Editor (RegEdit.exe) and navigate to the registry key that is located at: HKEY_LOCAL_MACHINESYSTEMCurrentControlSetControlLsa.
Create (or set the value of) this registry key: "RunAsPPL"=dword:00000001.
Restart the computer.
KRBTGT account password
While you should definitely change the KRBTGT account password if your domain is compromised by an attacker or when someone who has had Domain Admin privileges leaves the organization, it is also good security hygiene to change the KRBTGT account password every six months. Changing the KRBTGT password involves an initial password change, waiting for replication to occur, and then changing the password again. Many people wait 24 hours between the first and second changes. You must perform the password operation twice because of the way the password history of the KRBTGT account functions. Updating the KRBTGT password twice means that replication cannot occur using an older password. If you only do it once, and the domain has been compromised, an attacker might leverage the second stored password.
You can reset the KRBTGT account password by performing the following steps:
Open Active Directory Users And Computers.
In the View menu, click Advanced Features.
In the Users container of the domain, click the KRBTGT user account, as shown in Figure 19-6.

Figure 19-6 KRBTGT account
From the Action menu, select Reset Password. You should then type in and confirm a new password. The password you enter in this dialog box isn’t important because Active Directory will trigger the creation of a separate strong password that is independent of the password you configure.
Enhanced Security Administrative Environment forest
Enhanced Security Administrative Environment (ESAE) forests are an approach to Active Directory privileged access design in which you deploy a dedicated administrative Active Directory forest to host privileged accounts, privileged groups, and privileged access workstations for a production forest. In this design, the ESAE forest is configured with a one-way trust relationship with a production forest. A one-way trust relationship means that accounts from the ESAE forest can be used in the production forest; however, accounts in the production forest cannot be used in the ESAE forest.
The production forest is the Active Directory forest in which an organization’s day-to-day activities occur. You configure the production forest so that administrative tasks in the production forest can only be performed by using accounts that the ESAE forest hosts.
The ESAE forest design provides the following benefits:
Locked-down accounts. A standard non-privileged user account in the ESAE forest can be configured as a highly privileged user account in the production forest. For example, you make a standard user account in the ESAE forest a member of the Domain Admins group in a domain in the production forest. You can lock down the standard user account hosted in the ESAE forest so that it cannot sign in to hosts in the ESAE forest and can only be used to sign in to hosts in the production forest. Should the account be compromised, the attacker cannot use that account to perform administrative tasks in the ESAE forest.
Selective authentication. ESAE forest design allows you to leverage a trust relationship’s selective authentication feature. For example, you can configure sign-ins from the ESAE forest so that they can only occur on specific hosts in the production forest. One strategy is to configure selective authentication so that privileged accounts can only be used on privileged access workstations or jump servers in the production forest.
A simple way to improve security. ESAE forest design provides substantive improvement in the security of existing production forests without requiring a complete rebuilding of the production environment. The ESAE forest approach has a small hardware/software footprint and only affects IT users. In this design, standard user accounts remain hosted in the production forest. Only privileged administrative accounts are hosted in the ESAE forest. As part of the transition to the ESAE forest model, you eventually remove almost all privileged accounts that are native to the production forest. Because they are hosted in a separate forest, privileged administrative accounts can be subject to more stringent security requirements than standard user accounts in the production forest.
An ESAE forest design should have the following properties:
Limit the function of the ESAE forest to hosting accounts of administrative users for the production forest.
Do not deploy applications or additional resources in the ESAE forest. An exception to this is when you deploy technologies such as Microsoft Identity Manager, which is used to increase security when implementing Privileged Access Management (PAM).
The ESAE forest should be a single-domain Active Directory forest. The ESAE forest only hosts a small number of accounts that need to have strict security policies applied.
Only use one-way trusts. You should only configure a one-way trust where the production forest trusts the ESAE forest. This means that accounts from the ESAE forest can be used in the production forest but that accounts from the production forest cannot be used in the ESAE forest. Accounts used for administrative tasks in the production forest should be standard user accounts in the ESAE forest. If an account is compromised in the production forest, it cannot be used to elevate privileges in the ESAE forest.
Configure ESAE forest servers in the following ways:
Validate installation media. Use the available checksums to validate that the media hasn’t been modified.
All servers should run the most recent version of the Windows Server operating system.
Servers should be updated automatically with security updates.
Security configuration toolkit baselines should be used as the starting point for server configuration.
Servers should be configured with secure boot, BitLocker volume encryption, Credential Guard, and Device Guard.
Servers should be configured to block access to USB storage.
Servers should be on isolated networks. Inbound and outbound Internet connections should be blocked.
Hardening Windows Server
Just as you should harden Active Directory, you should secure Windows Server hosts as much as possible without triggering compatibility issues. Beyond the advice offered in this chapter, multiple third-party guides exist that list recommended security configurations for Windows Server. These guides are extremely lengthy and provide an excellent way of understanding exactly which security controls are available to harden Windows Server. The two most important organizations providing guides are:
Center for Internet Security. Benchmarks exist for Microsoft Exchange, Microsoft SQL Server, and Windows Server 2019. You can find out more at https://www.cisecurity.org/cis-benchmarks.
Defense Information Systems Agency (DISA). DISA Security Technical Implementation Guide (STIG) is a respected security benchmark. You can access benchmarks for workloads including Active Directory, .NET Framework, Microsoft Exchange, Microsoft SharePoint, Microsoft SQL Server, and Windows Server 2019. You can find out more at https://public.cyber.mil/stigs/downloads/.
In Chapter 20, “Security systems and services,” you’ll also learn about the Security Configuration Toolkit, which allows you to assess the security of your Windows Server workloads against some existing security benchmarks.
User rights
Rather than adding a user or service account to the local Administrators group, you should use Group Policy to assign the specific rights that a user account needs to perform the tasks it needs to perform. Assign rights as close to the object as possible. For example, don’t give a user account the ability to log in through Remote Desktop Services to all computers in an OU if the user account only needs remote desktop access to one or two computers. You can use Group Policy to configure the rights outlined in Table 19-1.
Table 19-1 User rights assignment policy
User rights assignment policy |
Function |
Access Credential Manager As A Trusted Caller |
Used by Credential Manager during backup and restore. Do not assign this privilege to user accounts. |
Access This Computer From The Network |
Specifies which accounts and groups may connect to the computer from the network. Does not affect Remote Desktop Services. |
Act As Part Of The Operating System |
Allow a process to impersonate an account without requiring authentication. Processes that require this privilege are often assigned the Local System account. |
Add Workstations To Domain |
Grants the ability to join workstations to the domain. |
Adjust Memory Quotas For A Process |
Configures which security principals can adjust the maximum amount of memory assigned to a process. |
Allow Log On Locally |
Specify which accounts can sign in locally to a computer. Alter this policy on privileged access workstations to remove members of the Users group. This limits which accounts can sign in to a computer. By default, any authenticated user can sign in to any workstation or server except for a domain controller. |
Allow Log On Through Remote Desktop Services |
Determines which accounts and groups can sign in remotely to the computer using Remote Desktop. Configure this policy to allow users to access enhanced session mode for Hyper-V VMs. |
Back Up Files And Directories |
Grant permission to back up files, directories, registry, and other objects that the user account wouldn’t normally have permission to. Assigning this right gives indirect access to all data on a computer. A person who holds the right can back up that data and then recover it in an environment over which they have complete control. |
Bypass Traverse Checking |
Gives users with this right the ability to traverse directories on which they don’t have permission. Does not allow the user to list the contents of that directory. |
Change The System Time |
Accounts with this right can alter the system time. System time is separate from the computer’s time zone. |
Change The Time Zone |
Accounts with this right can alter the time zone but not the system time. |
Create A Pagefile |
Allows the account assigned this right the ability to create and modify the page file. |
Create A Token Object |
Specifies which accounts can be used by processes to create tokens that allow accesses to local resources. You should not assign this right to any user who you do not want to give complete control of the system. This privilege can be used to elevate to local Administrator privileges. |
Create Global Objects |
Determines which accounts can create global objects that are available to all sessions. You should not assign this right to any user who you do not want to give complete control of the system. This privilege it can be used to elevate to local Administrator privileges. |
Create Permanent Shared Objects |
Specify which accounts can create directory objects by using the object manager. |
Create Symbolic Links |
Specify which accounts can create symbolic links from the computer they are signed in to. Assign this right only to trusted users because symbolic links can expose security vulnerabilities in apps that aren’t configured to support them. |
Debug Programs |
Specify which accounts can attach a debugger to processes within the operating system kernel. Only required by developers writing new system components. Rarely, if ever, necessary for developers writing applications. Removing the default Administrator from this account will substantially limit the likelihood that utilities, such as Mimikatz, can be used to scrape credentials. |
Deny Access To This Computer From The Network |
Blocks specified accounts and groups from accessing the computer from the network. This setting overrides the policy that allows access from the network. |
Deny Log On As A Batch Job |
Blocks specified accounts and groups from signing in as a batch job. Overrides the Log On As A Batch job policy. |
Deny Log On As A Service |
When assigned, blocks service accounts from registering a process as a service. Overrides the Log On As A Service policy. Does not apply to Local System, Local Service, or Network Service accounts. |
Deny Log On Locally |
When assigned, blocks accounts from signing on locally. This policy overrides the Allow Log On Locally policy. |
Deny Log On Through Remote Desktop Services |
When assigned, blocks accounts from signing in by using Remote Desktop Services. This policy overrides the Allow Sign In Through Remote Desktop Services policy. |
Enable Computer And User Accounts To Be Trusted For Delegation |
Determines whether you can configure the Trusted For Delegation setting on a user or a computer object. |
Force Shutdown From A Remote System |
Accounts assigned this right are allowed to shut down computers from remote locations on the network. |
Generate Security Audits |
Determines which accounts can use processes to add items to the security log. Because this right allows interaction with the security log, it presents a security risk when you assign this to a user account. |
Impersonate A Client After Authentication |
Allows apps running on behalf of a user to impersonate a client. This right can be a security risk, and you should assign it only to trusted users. |
Increase A Process Working Set |
Accounts assigned this right can increase or decrease the number of memory pages visible to the process in RAM. |
Increase Scheduling Priority |
Accounts assigned this right can change the scheduling priority of a process. |
Load And Unload Device Drivers |
Accounts assigned this right can dynamically load and unload device drivers into kernel mode. This right is separate from the right to load and unload Plug and Play drivers. Assigning this right is a security risk because it grants access to the kernel mode. |
Lock Pages In Memory |
Accounts assigned this right can use a process to keep data stored in physical memory, blocking that data from being paged to virtual memory. |
Log On As A Batch Job |
Accounts assigned this right can be signed in to the computer by means of a batch-queue facility. This right is only relevant to older versions of the Windows operating system, and you should not use it with newer versions, such as Windows 10 and Windows Server 2016. |
Log On As A Service |
Allows a security principal to sign in as a service. You need to assign this right to any service that is configured to use a user account, rather than one of the built-in service accounts. |
Manage Auditing And Security Log |
Users assigned this right can configure object access auditing options for resources such as files and AD DS objects. Users assigned this right can also view events in the security log and clear the security log. Because attackers are likely to clear the security log as a way of hiding their tracks, you should not assign this right to user accounts that would not normally be assigned local Administrator permissions on a computer. |
Modify An Object Label |
Users assigned this right can modify the integrity level of objects, including files, registry keys, or processes owned by other users. |
Modify Firmware Environment Values |
Determines which users can modify firmware environment variables. This policy is used primarily for modifying the boot configuration settings of Itanium-based computers. |
Perform Volume Maintenance Tasks |
Determines which accounts can perform maintenance tasks on a volume. Assigning this right is a security risk because it might allow access to data stored on the volume. |
Profile Single Process |
Determines which accounts can leverage performance monitoring tools to monitor nonsystem processes. |
Profile System Performance |
Determines which accounts can leverage performance-monitoring tools to monitor system processes. |
Remove Computer From Docking Station |
When assigned, the user account can undock a portable computer from a docking station without signing in. |
Replace A Process Level Token |
When assigned, the account can call the CreateProcessAsUser API so that one service can trigger another. |
Restore Files And Directories |
Allows users assigned this right the ability to bypass permissions on files, directories, and the registry, so that they can overwrite these objects with restored data. This right represents a security risk because a user account assigned this right can overwrite registry settings and replace existing permissions. |
Shut Down The System |
Assigns the ability for a locally signed-in user to shut down the operating system. |
Synchronize Directory Service Data |
Assigns the ability to synchronize AD DS data. |
Take Ownership Of Files Or Other Objects |
When assigned, the account can take ownership of any securable object, including AD DS objects, files, folders, registry keys, processes, and threads. Represents a security risk because it allows an assigned user the ability to take control of any securable object. |
Service accounts
Service accounts allow services running on a computer to interact with the operating system as well as resources on the network. Windows Server 2019 uses three types of built-in service accounts, each of which is suitable for a specific set of circumstances. These accounts are as follows:
The Local System (NT AUTHORITYSYSTEM) account has privileges that are equivalent to those assigned to a user account that is a member of the local Administrators group on the computer. A service that uses this account can act by using the computer account’s credentials when interacting with other resources on the network.
The Local Service (NT AUTHORITYLocalService) account has privileges that are equivalent to those assigned to a user account that is a member of the local Users group on the computer. A service that uses this account can access resources on the network without credentials. You use this account when a service does not need to interact with resources on the network and does not need local Administrator privileges on the computer on which it is running.
The Network Service (NT AUTHORITYNetworkService) account has privileges that are equivalent to those assigned to a user account that is a member of the local Users group on the computer. A service that uses this account accesses resources on the network by using the computer account’s credentials.
In the past, when you’ve needed to create a custom service account, you’ve probably created a user account and then assigned it an appropriate set of permissions. The challenge with this type of account is password management. Many organizations configure custom service accounts with passwords that never expire.
A Group Managed Service Account (gMSA) is a special type of account that has AD DS manage its password. The password of a gMSA is updated every 30 days. You don’t need to know the password of a gMSA, even when configuring a service to use that password, because gMSA accounts provide you with a domain-based service account identity without all the hassle of service account password management.
You can only use a gMSA if the forest is running at the Windows Server 2012 functional level or higher. You also must have deployed the master root key for AD DS. You can deploy the master root key by running the following command using an account that is a member of the Enterprise Admins group:
Add-KdsRootKey -EffectiveTime ((get-date).addhours(-10))
You create the gMSA using the New-ADServiceAccount cmdlet. When creating the account, you specify a hostname as well as service principle names. These should be associated with the purpose for which you are creating the gMSA. For example, run this command to create a new gMSA named SYD-SVC1 that is associated with the hostname SYD-SVC1.adatum.com:
New-ADServiceAccount SYD-SVC1 -DNSHOSTNAME SYD-SVC1.adatum.com
gMSAs are stored in the Managed Service Accounts container, which you can view using Active Directory Administrative Center, as shown in Figure 19-7.

Figure 19-7 Managed Service Accounts container
Once the gMSA is created, you need to configure permissions for specific computers to be able to install and use the account. The simplest way to do this is to create a security group, and then use the Set-ADSeviceAccount cmdlet to assign the group permissions to the account. You then add computers to the group. For example, to allow computers in the SYD-SVRS group to use the SYD-SVC1 gMSA, run this command:
Set-ADServiceAccount -Identity SYD-SVC1 -PrincipalsAllowedToRetrieveManagedPassword
SYD-SVRS
Once you’ve added a computer to the group that you’ve given permission to retrieve the account, you can install the account on the computer using the Install-ADServiceAccount cmdlet. Once the account is installed, you can assign it to a service by setting the Log On As settings for the service, as shown in Figure 19-8. You only need to specify the account name and can browse to the account. You don’t need to specify the password setting because the password is managed by Active Directory.

Figure 19-8 Group managed service account
A virtual account is the computer local equivalent of a group Managed Service Account. You can create a virtual account by editing the properties of a service and setting the account name to NT SERVICE<ServiceName>. As with a gMSA, you don’t need to specify a password because this is managed automatically by the operating system.
Just Enough Administration
Just Enough Administration (JEA) allows you to implement Role-Based Access Control (RBAC) functionality through Windows PowerShell remoting. JEA allows you to specify which PowerShell cmdlets and functions can be used when connected to a specific endpoint. You can go further and specify which parameters within those cmdlets and functions are authorized and even specify which values can be used with those parameters.
For example, you could create a JEA endpoint where a user is able to run the Restart-Service command, but only where the Name parameter is set to DHCPServer. This would allow the user to restart the DHCPServer on the computer they connected to, but it would not restart any other service on the computer.
You can also configure a JEA endpoint to allow other command-line commands to be run, such as whoami.exe, though the drawback of this is that you don’t have the same level of control when restricting how that command can be run.
JEA endpoints can leverage virtual accounts. This means that activities performed on the computer through the endpoint use a special temporary virtual account rather than the user’s account. This temporary virtual account has local Administrator privileges but is constrained to only using the cmdlets, functions, parameters, and values defined by JEA. The benefits of this include:
The user’s credentials are not stored on the remote system. If the remote system is compromised, the user’s credentials are not subject to credential theft and cannot be used to traverse the network to gain access to other hosts.
The user account used to connect to the endpoint does not need to be privileged. The endpoint simply needs to be configured to allow connections from specified user accounts.
The virtual account is limited to the system on which it is hosted. The virtual account cannot be used to connect to remote systems. Attackers cannot use a compromised virtual account to access other protected servers.
The virtual account has local administrator privileges but is limited to performing only the activities defined by JEA. You have the option of configuring the virtual account with the membership of a group other than the local Administrators group to further reduce privileges.
JEA works on Windows Server 2019, Windows Server 2016, and Windows 10. It also functions on previous versions of Windows client and server as long as Windows Management 5.0 is installed. Virtual accounts are not available when using JEA on Windows 7 or Windows 2008 R2, and all activities are performed using the privileges assigned to the account connecting to the JEA endpoint.
Role-capability files
A role-capability file is a special file that allows you to specify what tasks can be performed when connected to a JEA endpoint. Only tasks that are explicitly allowed in the role-capability file can be performed.
You can create a new blank role-capability file by using the New-PSRoleCapabilityFile cmdlet. Role-capability files use the .psrc extension. For example, run this command to create a new role capability file for a role that allows someone to manage a DNS server:
New-PSRoleCapabilityFile -Path .DNSOps.psrc
Once the .psrc file is created, you edit the role-capability file and add the cmdlets, functions, and external commands that are available when a user is connected to the endpoint. You can allow entire Windows PowerShell cmdlets or functions or list which parameters and parameter values can be used.
You can edit a role-capability file in PowerShell ISE, as shown in Figure 19-9. Editing the file involves commenting out the appropriate sections and filling them in with the configuration items that you want to set.

Figure 19-9 JEA role-capability file
Table 19-2 describes the different options that you can configure in a role-capability file.
Table 19-2 Role-capability files
Capability |
Description |
ModulesToImport |
JEA auto-loads standard modules, so you probably don’t need to use this unless you need to import custom modules. |
VisibleAliases |
Specifies which aliases to make available in the JEA session. Even if an aliased cmdlet is available, the alias won’t be available unless it’s here. |
VisibleCmdlets |
Lists which Windows PowerShell cmdlets are available in the session. You can extend this by allowing all parameters and parameter values to be used, or you can limit cmdlets to particular parameters and parameter values. For example, use the following syntax if you wanted to allow the Restart-Service cmdlet to only be used to restart the DNS service: |
VisibleFunctions |
This field lists which Windows PowerShell functions are available in the session. You can choose to list functions, allowing all parameters and parameter values to be used, or you can limit functions to particular parameters and parameter values. For example, if you wanted to allow the Add-DNSServerResourceRecord, Get-DNSServerResourceRecord, and Remove-DNSServerResource functions to be used, you would use the following syntax: |
VisibleExternalCommands |
This field allows users who are connected to the session to run external commands. For example, you can use this field to allow access to c:windowssystem32whoami.exe so that users connected to the JEA session can identify their security context by using the following syntax: |
VisibleProviders |
This field lists Windows PowerShell providers that are visible to the session. |
ScriptsToProcess |
This field allows you to configure Windows PowerShell scripts to run automatically when the session is started. |
AliasDefinitions |
This field allows you to define Windows PowerShell aliases for the JEA session. |
FunctionDefinitions |
This field allows you to define Windows PowerShell functions for the JEA session. |
VariableDefinitions |
This field allows you to define Windows PowerShell variables for the JEA session. |
EnvironmentVariables |
This field allows you to specify environment variables for the JEA session. |
TypesToProcess |
This field allows you to configure Windows PowerShell type files to load for the JEA session. |
FormatsToProcess |
This field allows you to configure Windows PowerShell formats to load for the JEA session. |
AssembliesToLoad |
This field allows you to specify which assemblies to load for the JEA session. |
Session-configuration files
Session-configuration files determine which role capabilities are mapped to specific security groups. For example, if you wanted to allow only members of the CONTOSDNSOps security group to connect to the JEA endpoint that is defined by the DNSOps role-capability file, you would configure this in the session configuration file.
You use the New-PSSessionConfigurationFile cmdlet to create a session configuration file. These files use the .pssc extension. For example, to create a new session configuration file for the DNSOps role, run the following command:
New-PSSessionConfigurationFile -Path .DNSOps.pssc -Full
Session configuration files include the elements described in Table 19-3.
Table 19-3 Session configuration files
Field |
Explanation |
SessionType |
This field allows you to configure the session’s default settings. If you set this to RestrictedRemoteServer, you can use the Get-Command, Get-FormatData, Select-Object, Get-Help, Measure-Object, Exit-PSSession, Clear-Host, and Out-Default cmdlets. The session execution policy is set to RemoteSigned. |
RoleDefinitions |
You use the RoleDefinitions entry to assign role capabilities to specific security groups. These groups do not need to have any privileges and can be standard security groups. |
RunAsVirtualAccount |
When enabled, this field allows JEA to use a privileged virtual account created just for the JEA session. This virtual account has local Administrators privileges on member servers and is a member of the Domain Admins group on a domain controller. Use this option to ensure that credentials are not cached on the server that hosts the endpoint. Remember that you can configure the virtual account to be a member of groups other than the local Administrators group. |
TranscriptDirectory |
This field allows you to specify the location where JEA activity transcripts are stored. |
RunAsVirtualAccountGroups |
If you do not want the virtual account to be a member of the local Administrators group (or Domain Admins on a domain controller) you can instead use this field to specify the groups in which the virtual account is a member. |
JEA endpoints
A JEA endpoint is a Windows PowerShell endpoint that you configure so that only specific authenticated users can connect to it. When those users do connect, they only have access to the Windows PowerShell cmdlets, parameters, and values defined by the appropriate session-configuration file that links security groups and role capabilities. When you use endpoints with virtual accounts, the actual activity that a user performs on the server that hosts the endpoint occurs using the virtual account. This means that no domain-based administrative credentials are stored on the server that hosts the endpoint.
A server can have multiple JEA endpoints, and each JEA endpoint can be used for a different administrative task. For example, you could have a DNSOps endpoint to perform DNS administrative tasks and an IISOps endpoint to perform Internet Information Server related administrative tasks. Users are not required to have privileged accounts that are members of groups, such as the local Administrators group, to connect to an endpoint. Once connected, users have the privileges assigned to the virtual account configured in the session-configuration file.
You create JEA endpoints by using the Register-PSSessionConfiguration cmdlet. When using this cmdlet, you specify an endpoint name and a session-configuration file hosted on the local machine.
For example, to create the endpoint DNSOps using the DNSOps.pssc session-configuration file, enact the following command and then restart the WinRM service:
Register-PSSessionConfiguration -Name DNSOps -Path .DNSOps.pssc
You can use the Get-PSSessionConfigurationFile to determine which endpoints are present on a computer. A user wanting to connect to a JEA session endpoint uses the Enter-PSSession cmdlet with the ConfigurationName parameter. For example, to connect to the DNSOps JEA endpoint on server MEL-DNS1, you would use the command:
Enter-PSSession -ComputerName MEL-DNS1 -ConfigurationName DNSOps
Once you’ve verified that JEA works, you’ll need to lock down the default PowerShell endpoint. By default, only members of the local Administrators group can connect to this default endpoint, and if you’ve implemented JEA properly, this group shouldn’t need to have very many members anyway.
Privileged Access Management
Privileged Access Management (PAM), also known as Just In Time (JIT) Administration, works on the concept that users can be granted permission for a finite amount of time rather than permanently. It uses temporary membership of a security group that has been delegated privileges, rather than permanent membership of a security group that has been delegated privileges, to accomplish this goal.
For example, a user named Rooslan requires that his password be reset and submits a ticket to Oksana, who works at the service desk, to have Oksana perform this task. In a traditional environment, Oksana would use an account that is a member of a security group that has been delegated the reset-password privilege. In a PAM environment, Oksana requests the privilege to change Rooslan’s user account password. The PAM process adds Oksana’s user account temporarily to a group that has been delegated the reset password privilege on Rooslan’s user account. Oksana then resets Rooslan’s user account password. After a certain period of time has elapsed, the PAM process removes Oksana’s account from this group, removing the reset-password privilege for Rooslan’s user account from Oksana’s user account.
Privileges are assigned temporarily rather than permanently. Rather than assigning the IT Operations team privileged accounts, the IT Operations team members have standard accounts that are assigned privileges only when those privileges are required. PAM can be configured so that privileges are assigned when requested, assigned only after approval has been sought and granted, or a mixture of these methods depending on which privilege is being requested. For example, requesting permission to reset the password of a non-privileged user account might occur automatically, whereas permission to add a domain controller to the domain might require approval.
PAM benefits
When properly implemented, PAM can provide the following security improvements:
You can configure your environment so that all accounts that the IT Operations team uses are standard user accounts. Privileges are only granted to these accounts after being requested and approved, and they are temporary. If a user account used by a member of the IT Operations team becomes compromised, the attacker gains no additional privileges beyond those assigned to a standard user account because any privileges that the account might hold are only ever assigned on a temporary basis.
All requests for privileges are logged. In high-security environments, privilege use can be further tracked, with the activities of a user account granted temporary privileges written to a log file.
Once privileges are granted, a user needs to establish a new session by opening a new Windows PowerShell session or by signing out and signing in again to leverage the new group memberships configured for their account.
PAM components
A PAM deployment consists of the following elements:
Administrative forest. This is an ESAE forest in which you have deployed Microsoft Identity Manager (MIM) 2016. Accounts from this forest are used to perform administrative tasks. Also known as the Bastion forest.
A production forest. This is the forest that hosts the resources used on a daily basis by the organization.
Shadow principals. A shadow principal is a copy of an account or group that exists in the production or source forest. Shadow security groups that are used in PAM use a process called SID History mirroring. SID History mirroring allows the shadow security group in the administrative forest to have the security identifier of the security group in the production or source forest. When a user is added to a PAM role, MIM adds the user’s shadow account in the administrative forest to the shadow group in the administrative forest. When a user logs in by using this account, the user’s Kerberos token then includes a security identifier that matches the security identifier of the original group from the production forest. This functionally makes the user a member of the group that the shadow group is mirroring.
PAM Client. This client includes a collection of Windows PowerShell cmdlets or a custom solution that interacts with the PAM REST API to allow a PAM user to query and interact with the MIM PAM functionality. The PAM client is only required on computers where it is necessary to request access to a PAM role.
MIM Service. The MIM server manages the privileged account management process, including adding and removing shadow principals from shadow groups when a PAM role is granted and when it expires.
MIM Portal. The MIM Portal is a SharePoint site. It provides management and configuration functionality. For example, IT Operations users can sign in to this site to request privileges.
MIM Service Database. The MIM service database can be hosted on SQL Server 2012 or later. This database holds configuration and identity information that the MIM service uses.
PAM Component Service. This manages the role-expiration process, removing the shadow account from the shadow group in the administrative forest.
PAM Monitoring Service. This monitors the production forest and duplicates changes to the administrative forest or the MIM service.
PAM REST API. This can be used to enable a custom client to interact with PAM.
PAM users and groups
You use the New-PAMUser cmdlet, which is available when you install Microsoft Identity Manager, to create a shadow user. When doing this, an existing PAM-created trust relationship between the ESAE forest and the production must exist. You must also specify the source domain and source account name. For example, to create a new shadow user based on the Oksana account in the Adatum.com domain, you would use the following command:
New-PAMUser –SourceDomain Adatum.com –SourceAccountName Oksana
You use the New-PAMGroup cmdlet, available when you install Microsoft Identity Manager, to create a shadow group. When creating a shadow group, you need to specify the source group name, the source domain, and a source domain controller in the source domain. For example, to create a new shadow group for the CorpAdmins group in the Adatum.com domain by using the mel-dc1.adatum.com domain controller, issue the following command:
New-PAMGroup –SourceGroupName "CorpAdmins" –SourceDomain adatum.com
–SourceDC mel-dc1.adatum.com
PAM roles
A PAM role represents the privileged role to be requested. For example, you might configure a specific PAM role for performing password resets or another for configuring Active Directory Certificate Services. You can configure PAM role settings by viewing the properties of the PAM role in the MIM web interface. A PAM role consists of the following options:
Display Name. This is the name of the PAM role.
PAM Privileges. This is a list of security groups to which a user who is granted access to the role is temporarily added. This does not list the privileges actually assigned to this group. For example, if you delegate the Reset User Password privilege to the CorpAdmins group, this dialog box does not indicate that this privilege has been delegated. This dialog box also lists the name of the shadow principal rather than the group in the original domain.
PAM Role TTL(sec). This is the maximum amount of time that the member can be granted this role. The default is 3,600 seconds (1 hour). You should configure the maximum lifetime for a Kerberos user ticket in line with the Time To Live (TTL) value to ensure that a user’s ticket is updated to reflect the change in group membership after the PAM Role TTL expires.
MFA Enabled. MIM’s PAM functionality can be integrated with Azure Multifactor Authentication. When you enable this option, requests for a PAM role require two forms of authentication. This second form of authentication can include a text message or a telephone call to a registered number. When a text message is sent, the requesting user must enter the code sent to him or her. When a telephone call is made, the user must enter a PIN that he or she has previously configured.
Approval Required. PAM roles can be configured so that PAM role membership is only granted if a PAM administrator approves the request. You configure PAM administrators by adding a user to the PAM Admins set. This can be done through the Sets section under Management Policy Rules in the MIM web console.
Availability Window Enabled. When you configure an availability window for a role, the PAM role can only be used during certain hours. This provides an additional layer of security for a PAM role. For example, you might configure a role that allows modification to sensitive groups to only be used during business hours.
Description. Use this option to provide a description of the PAM role.
Local Administrator Password Solution
Local Administrator Password Solution (LAPS) is a tool that you can use to manage the passwords of local administrator accounts of each domain-joined computer in your environment. LAPS allows you to avoid the problem where a common default local Administrator account password is set for every computer in the domain and that password is set to never expire.
Local Administrator passwords are unique on each computer managed by LAPS.
Local Administrator passwords are randomized and changed on a regular basis.
LAPS stores local Administrator passwords and secrets securely within AD DS.
Access to passwords and secrets is controlled by configurable permissions.
Passwords retrieved by LAPS are transmitted to the client in a secure encrypted manner.
You install the LAPS agent on each computer that you wish to manage. The LAPS agent is then managed through a Group Policy Client Side Extension. Installing LAPS requires an update to the Active Directory schema. You perform this update by running the Update-AdmPwdADSchema cmdlet, which is included in a PowerShell module made available when you install LAPS on a computer. To run this update, the account running the cmdlet must be a member of the Schema Admins group, and this cmdlet should be run on a computer that is in the same Active Directory site as the computer that holds the Schema Master role for the forest.
When a group policy refresh occurs, LAPS does the following:
LAPS checks whether the password of the local Administrator account has expired.
If the password hasn’t expired, LAPS does nothing.
If the password has expired, LAPS performs the following steps:
Changes the local Administrator password to a new random value based on the configured parameters for local Administrator passwords.
Transmits the new password to AD DS, where it is stored in a special confidential attribute associated with the computer account of the computer that has had its local Administrator Account password updated.
Transmits the new password expiration date to AD DS, where it is stored in a special confidential attribute associated with the computer account of the computer that has had its local Administrator account password updated.
By default, accounts in the Domain and Enterprise Administrators group can retrieve local Administrator accounts. Domain and Enterprise Administrators also can trigger a local Administrator password change on a specific computer.
To configure computers so that their passwords are managed by LAPS, perform the following steps:
Move computer accounts of computers that you want to use LAPS to manage passwords to an OU.
Install LAPS on the computers for which you want to manage the local Administrator password. You’ll also need to install LAPS on an administrative computer on which you can use to install the necessary template.
Install the GPO templates into AD DS. You can do this by running the installer and selecting the PowerShell module and the GPO Editor templates installation option.
Use the Set-AdmPwdComputerSelfPermission cmdlet to assign computers in an OU the ability to update the password of their local Administrator account when it expires. For example, for computers in the Adelaid OU, run the command:
Set-AdmPwdComputerSelfPermission -Identity “Adelaide”
Once installed, you’ll be able to configure the following policies:
Enable Local Admin Password Management. This policy enables LAPS and allows you to manage the local Administrator account password centrally.
Password Settings. This policy allows you to configure the complexity, length, and maximum age of the local Administrator password. The default is that upper and lowercase letters, numbers, and special characters are used. The default password length is 14 characters, and the default password maximum age is 30 days.
Do Not Allow Password Expiration Time Longer Than Required. When enabled, the password is updated according to domain password expiration policy.
Name Of Administrator Account To Manage. Use this policy to identify custom local Administrator accounts.
To view local Administrator passwords, you can use the client that comes with the LAPS installer, the Get-AdmPwdPassword cmdlet, or view a computer's ms-Mcs-AdmPwd attribute.
Advanced auditing
There are two sets of audit policies in a Group Policy Object (GPO): traditional audit policies and advanced audit policies. The traditional audit policies are located in the Computer ConfigurationPoliciesWindows SettingsSecurity SettingsLocal PoliciesAudit Policies node. These are the audit policies that have been available with the Windows Server operating system since Windows 2000. The drawback of these policies is that they are general, and you can’t be specific in the way you configure auditing. When you use these policies, you not only audit the events that you’re interested in, but you also end up auditing many events that you don’t need to know about.
The advanced audit policies enable you to be more specific in the types of activity you audit. The advanced audit policies are located under the Computer ConfigurationPoliciesWindows SettingsSecurity SettingsAdvanced Audit Policy Configuration node.
There are 10 groups of audit policy settings and 61 individual audit policies available through Advanced Audit Policy Configuration. The audit policy groups contain the following settings:
Account Logon. You can audit credential validation and Kerberos-specific operations.
Account Management. You can audit account management operations, such as changes to computer accounts, user accounts, and group accounts.
Detailed Tracking. You can audit encryption events, process creation, process termination, and RPC events.
DS Access. You can audit Active Directory access and functionality.
Logon/Logoff. You can audit logon, logoff, and other account activity events, including IPsec and Network Policy Server (NPS) events.
Object Access. You can audit access to objects including files, folders, applications, and the registry.
Policy Change. You can audit changes to audit policy.
Privilege Use. You can audit the use of privileges.
System. You can audit changes to the security subsystem.
Global Object Access Auditing. You can configure expression-based audit policies for files and the registry.
Expression-based audit policies
Traditional object audit policies involve specifying a group and configuring the type of activities that trigger an event to be written to the security log. For example, you can specify that an audit event is written each time a member of the Managers group accesses a file in a specific folder.
Expression-based audit policies enable you to go further. These policies enable you to set conditions for when auditing might occur. For example, you might want to configure auditing so that tracking only occurs for members of the Managers group who have access to sensitive files when they access those files from computers that aren’t part of the Managers_Computers group. This way, you don’t bother tracking access when members of this group access sensitive files from within the office, but you do track all access to those sensitive files when members of this group are accessing them from an unusual location.
You can integrate expression-based audit policies with Dynamic Access Control (DAC) to create targeted audit policies based on user, computer, and resource claims. Instead of just adding claims based on user or device group membership, the claim can be based on document metadata, such as confidentiality settings and site location. You can configure expression-based audit policies at the file or folder level or apply them through Group Policy by using policies in the Global Object Access Auditing node of Advanced Audit Policy Configuration.
File and folder auditing
After you configure object access auditing either through traditional or advanced audit policies, you can configure auditing at the file and folder level. The simplest way to configure auditing is at the folder level because you can configure all folders and subfolders to inherit those auditing settings. If you change the auditing settings at the folder level, you can use the Replace All Child Object Auditing Entries option to apply the new auditing settings to the folder’s child files and folders.
You can configure auditing for a specific file and folder through the Advanced button on the Security tab of the object’s properties. You can configure basic success and failure auditing. You can also configure expression-based auditing so that a specific security group member’s activity is audited only if other conditions, such as membership of other security groups, are also met.
The advantage of using Global Object Access Auditing is that when you configure it, you can use file classification to apply metadata to files and then automatically have auditing enabled for those files. For example, by using file classification and DAC, you can configure a Windows Server 2019 file server so that all files containing the phrase “code secret” are marked as Sensitive. You can then configure Global Object Access Auditing so that all attempts to access files marked as Sensitive are automatically audited. Instead of having an administrator track down all the files that are sensitive and configuring auditing on those files, the process is automatic. All that needs to happen to trigger the audit is that the phrase “code secret” is included in the file.
Using auditpol.exe with auditing
Auditpol.exe is a command-line utility that you can use to configure and manage audit policy settings from an elevated command prompt. You can use auditpol.exe to perform the following tasks:
View the current audit policy settings with the /Get subcommand
Set audit policy settings with the /Set subcommand
Display selectable policy elements with the /List subcommand
Back up and restore audit policies using the /Backup and /Restore subcommands
Delete all per-user audit policy settings and reset the system policy settings using the /Clear subcommand
Remove all per-user audit policy settings and disable all system policy settings using the /Remove subcommand
For example, to enable success and failure auditing for the File System subcategory of Object Access, execute the following command:
Auditpol.exe /set /subcategory:"File System" /success:Enable /failure:Enable
To view the current audit policy settings for all audit policies, issue the following command:
Auditpol.exe /get /category:*
To view the current audit policy settings for a specific category, such as Object Access, issue the following command:
Auditpol.exe /get /category:"Object Access"
Windows Firewall with Advanced Security
Windows Firewall with Advanced Security (WFAS) is a bidirectional, host-level firewall. This means that not only can you set it to protect a host from incoming traffic, but you can also have it block all or specific outgoing traffic. Generally, you can control outbound traffic only on very sensitive hosts. Controlling outbound traffic minimizes the chance of malware infecting the server that is phoning home. On sensitive hosts, you should allow outbound traffic on a per-application rule. For example, you should create a rule to allow a specific browser to communicate with the Internet rather than just allowing outbound traffic on port 80.
WFAS allows for the creation of rules based on program, port, or predefined rules. There are 45 predefined rules, which include categories such as Remote Desktop, Windows Firewall Remote Management, File and Printer Sharing, and Core Networking. One of the useful things about WFAS is that it generally enables the appropriate firewall rules when you enable a specific role, role service, or feature. These default rules are appropriate most of the time, but you may wish to edit the properties of these rules to make them more secure.
Firewall profiles
Firewall profiles allow you to treat traffic differently depending on the network to which the computer is connected. For example, the same server might be connected to the following:
A remote site through a VPN connection that has the private profile applied
A perimeter network by a network adapter, where the connection has the public profile applied
The organization’s internal network through a second adapter that has the domain profile applied
The advantage of separate profiles is that each one allows you to have separate sets of firewall rules applied. You might allow Distributed File System (DFS) traffic on one profile, web traffic on another, and SMTP traffic on a third.
Profiles are independent of each other; the settings that you configure for one profile do not apply to other profiles. You can configure the following properties for each profile:
Firewall State. You can set this to On (default) or Off.
Inbound Connections. You can set this to Block (default), Block All, or Allow. The Block All setting means firewall rules that allow connections are ignored.
Outbound Connections. You can set this to Block or Allow (default).
Settings. This allows you to configure whether notifications are displayed, whether unicast responses are transmitted to multicast or broadcast traffic, and whether to merge rules when rules apply both locally and through Group Policy.
Logging. This allows you to specify logging settings.
Firewall logs are written to the %systemroot%system32LogFilesFirewallpfirewall.log file. The default settings do not log dropped packets or successful connections, which means that, unless you change the defaults, nothing is logged. Firewall logging is most useful when you’ve determined that a particular service is unavailable to the network because of the firewall.
You can turn on firewall logging on a per profile basis by clicking the Customize button next to Logging on each profile’s properties page. This displays the Customize Logging Settings dialog box shown in Figure 19-10. You can then enable logging for dropped packets and successful connections. If you are having trouble with a newly installed service on a server, enable the logging of dropped packets to determine the properties of the packets dropped, so that you can create a firewall rule that allows your service to be accessed from the network.

Figure 19-10 Custom logging settings
Inbound rules
Inbound rules are based on program, port, or one of 45 predefined categories, such as BranchCache Content Retrieval or Network Policy Server. You can also create custom rules that include a mixture of these, where you specify a program and a port as well as a rule scope. For example, you can use a custom rule to block all incoming traffic on port 80 to a particular application but not block port 80 traffic to other applications on the server. The basic aspects of creating a firewall rule involve:
Specifying a program or port. When you specify a port, you must choose whether the rule applies to TCP or UDP traffic.
Specifying what action should be taken. You can allow the connection, in which case all traffic that matches the rule is allowed by the firewall. You can allow the connection if it is authenticated, in which case traffic that meets the IPsec authentication requirements and the connection security rules is allowed, but traffic that is not properly authenticated according to these conditions is dropped.
Specifying the network profiles in which the rule applies. In general, rules should apply in all profiles, but there might be circumstances for which you want to allow traffic from an interface connected to a domain network but block the same traffic if it comes from an interface connected to a public network.
After you have created the rule, you can then edit the rule’s properties. Editing the rule’s properties allows you to configure more advanced options than are present in the Rule Creation Wizard. By editing a rule’s properties, you can:
Configure a rule to apply to a service rather than just a program.
Limit the computers that can make authenticated connections. By default, if you configure the Allow Traffic If The Connection Is Authenticated option, any computer that can authenticate is able to successfully transmit traffic. By editing a firewall’s rules, you can limit traffic to specific computers rather than all authenticated computers. You can do the same with user accounts, limiting successful connections to specific users when authentication has successfully occurred.
Edit the rule’s scope, which is the local and remote IP address ranges to which the rule applies. You can also do this when you create a custom rule.
Configure whether the rule applies to specific network interfaces, instead of just network profiles. For example, if your computer has two network adapters, you can configure a rule to apply so that it allows traffic on one adapter but not the other when both adapters have the same profile set.
Configure whether to allow packets that have passed across a Network Address Translation (NAT) device.
Creating outbound rules
Default settings for Windows Firewall with Advanced Security do not block outbound traffic. In high-security environments, you should consider using outbound rules to block all but authorized outbound traffic.
The process for creating an outbound rule is almost identical to the process for creating an inbound rule. You specify the rule type on the New Outbound Rule Wizard, you specify whether the connection is blocked, allowed, or allowed only if authenticated, and you specify the network profiles in which the rule is active. By editing the properties of the rule after the rule is created, you can configure all the advanced options configurable for inbound rules, such as rule scope, specific network interfaces, and to which computers or users the rule allows outbound connections.
Configuring IPsec
The IPsec Settings tab of Firewall Properties allows you to configure how IPsec is used when applied in connection security rules. On the tab itself, shown in Figure 19-11, you can configure whether you want to customize the IPsec defaults, exempt Internet Control Message Protocol (ICMP) traffic from IPsec, and whether you want to configure IPsec tunnel authorization.

Figure 19-11 IPsec settings
Exempting ICMP traffic can be useful for diagnostic purposes because many administrators use the ping utility to diagnose whether a host has network connectivity. If connection security rules are enabled, the default IPsec settings mean that a successful IPsec negotiation must occur prior to an ICMP response being sent. If the IPsec negotiation is the problem, enabling ICMP response allows you to verify that there is network connectivity and that the problem just lies a bit further up the network stack.
If you click the Customize button next to the IPsec defaults, you can change the Key Exchange, Data Protection, and Authentication Method (see Figure 19-12). The default key exchange uses Diffie-Hellman Group 2 key exchange algorithm with a key lifetime of 480 minutes. You can modify these settings so that they use more secure methods, but this may reduce the ability to interact with some third-party devices.

Figure 19-12 Customize IPsec defaults
The data protection settings allow you to configure the algorithms used for data integrity and encryption. Normally, there isn’t much reason to change this; however, if you feel you need the strongest encryption possible to protect your organization’s network traffic, you can use a different algorithm, such as AES-CBC with a 256-bit key length. In general, the stronger the encryption, the greater the resources needed to support that encryption. Although you can make the protection a lot stronger, the benefit of doing so might be only marginal given the value of the data being protected.
The default authentication method used for IPsec connections is Computer (Kerberos V5). This means that a domain controller must be present to verify the identity of each computer before an IPsec session can be established. You can also use Computer (NTLMv2), a computer certificate from this certification authority (CA), or a pre-shared key to authenticate IPsec connections. A pre-shared key is not a recommended method of authentication, but it might be necessary if there is not a certificate services infrastructure and computers aren’t members of a domain.
Connection security rules
Connection security rules are a more intelligent type of firewall rule than a simple port-based rule. An interesting adaption to firewalls has been an increase of traffic through ports traditionally used for common applications. Connection security rules are about trusting incoming connections based on the identity of the remote host rather than the remote host’s network address or the communication port it uses.
Authentication exemptions Authentication exemptions allow you to create very specific holes in connection security rules. These are useful in the event that you want to remotely manage a server, but all the servers that would normally authenticate your connection, such as certificate servers or domain controllers, are unavailable. Authentication exemptions override existing connection security rules.
When you create an authentication exemption, you define the exemption on the basis of the source computer’s IP address. As Figure 19-13 shows, you do this using a single IPv4 or IPv6 address, an IP address range, or a predefined set of computers. For security reasons, you should limit the number of IP addresses for which you create authentication exemptions to one or two specific privileged access workstations.

Figure 19-13 Authentication exemption
To create an authentication exemption, perform the following steps:
In Windows Firewall With Advanced Security, right-click the Connection Security Rules node and then click New Rule. This opens the New Connection Security Rule Wizard. Select Authentication Exemption.
In the Exempt Computers dialog box, click Add. In the IP Address dialog box, enter the IP address, subnet, or IP address range of the computers that you wish to exempt from connection security rules. You can also choose from a list of predefined addresses, including the Default Gateway, DHCP servers, the local subnet, or DNS servers.
Select the profile to which you want the rule to apply and specify a rule name.
Isolation rules Isolation rules allow you to limit communication so that a server or computer communicates only with computers that have authenticated with it. Sometimes, these are called domain isolation policies because they limit hosts to only communicating with other servers that are members of the same Active Directory forest. When you configure an isolation rule, it applies to all traffic from all hosts; this is unlike tunnel or server-to-server rules, which apply to traffic to and from specific hosts.
To create an isolation rule, perform the following steps:
In Windows Firewall With Advanced Security, right-click the Connection Security Rules node and then click New Rule. This opens the New Connection Security Rule Wizard. Select Isolation and then click Next.
On the Requirements page, as shown in Figure 19-14, choose one of the following:
Request Authentication For Inbound And Outbound Connections
Require Authentication For Inbound Connections And Request Authentication For Outbound Connections
Require Authentication For Inbound And Outbound Connections
Requiring authentication on both inbound and outbound connections is the strongest form of protection because it means that communication can be performed only with authenticated hosts.
Choose the authentication method. The default is to use the authentication method specified on the IPsec Settings tab of Firewall Properties. You can also choose between computer and user leveraging Kerberos version 5, or you can configure advanced authentication options, which include certificate-based authentication. It is also possible, though not recommended, to use a pre-shared key for authentication, which is useful when you need to communicate with computers running third-party operating systems.
The final step in setting up a connection security rule is to configure the profiles in which the rule applies. Unless there is a good reason to do otherwise, you should apply connection security rules in all profiles.

Figure 19-14 Connection security rule
Server-to-server rules Server-to-server rules are used to authenticate communication between two groups of computers. This can be a rule authenticating and encrypting a single computer-to-computer connection, such as between a web server and a database server or between computers on two separate subnets. Server-to-server rules differ from isolation rules; isolation rules apply to communication from all hosts, whereas server-to-server rules apply to specific hosts.
To create a server-to-server rule, perform the following steps:
In Windows Firewall With Advanced Security, right-click the Connection Security Rules node and then click New Rule. This opens the New Connection Security Rule Wizard. Select the Server-To-Server rule.
In the Endpoints dialog page, enter the IP addresses of the computers that are at one end of the connection and the IP addresses of the computers that are at the other end of the connection. Figure 19-15 shows a rule defining one endpoint as the subnet 192.168.15.0/24, and the other endpoint as subnet 192.168.16.0/24.

Figure 19-15 Connection security rule endpoints
On the Requirements page, specify how you want authentication to occur. If you want only this computer to communicate on the profile using encrypted and authenticated connections, select Require Authentication For Inbound And Outbound Connections.
Specify the authentication method. The default is to use a computer certificate issued by a designated CA. You can also specify computer-based Kerberos, NTLMv2, or a pre-shared key.
Specify the firewall profiles in which this connection security rule applies and add a name for the rule.
Tunnel rules Tunnel rules allow client computers to communicate with computers on a secure network behind a remote gateway. For example, if you have a single server located at a branch office that you want to connect to an internal network at another office, using a tunnel rule, you specify the location of a host that functions as a gateway to that secure network. This allows you to create an IPsec tunnel through which secure communication can occur.
To create a tunnel rule, perform the following steps:
In Windows Firewall With Advanced Security, right-click the Connection Security Rules node and then click New Rule. This opens the New Connection Security Rule Wizard. Select Tunnel Rule.
On the Tunnel Type page, as shown in Figure 19-16, determine the type of tunnel that you want to create. To create the type of rule outlined above, select Client-To-Gateway.

Figure 19-16 Tunnel Type
Choose whether you wish to require authentication for inbound and outbound connections.
Specify the address of the computer that functions as the gateway to the secure network.
Specify the authentication method. The default is to use a computer certificate issued by a designated CA. You can also specify computer-based Kerberos, NTLMv2, or a pre-shared key.
Specify the firewall profiles in which this connection security rule applies and add a name for the rule.
Shielded VMs
Shielded VMs are a special type of virtual machine configuration that are protected against attacks originating from the virtualization fabric. A virtualization fabric attack is one that comes from the infrastructure that hosts the virtual machine itself. Attacks that come from the virtualization infrastructure include:
Virtual machine export attacks. Rather than compromise a running virtual machine, an authorized administrator can simply use Hyper-V’s built in export functionality to export a virtual machine. Once exported, administrators can then examine the contents of the exported virtual machine at their leisure without any evidence existing of their access. Anything that can be done by an authorized administrator can also be done by a nefarious third party who has gained access to the administrator’s account or has local Administrator access on Hyper-V host. For example, someone with the appropriate privileges can export a virtualized domain controller, extract the ntds.dit Active Directory file, and then run an offline brute force analysis of that file to extract username and password data. They could then use that username and password data to gain administrative privileges and access that domain and its resources in a manner that seemed completely legitimate.
Virtual machine movement attacks. Rather than exporting a virtual machine, an attacker might attempt to move a shielded VM to an untrusted host. The intention in doing so would be to remove the protection associated with the VM. However, with shielded VMs, if the new host is not recognized as trusted based on an identifier related to the host’s TPM, the shielded VM does not function and the contents of the VM remain protected.
When you are thinking about shielded VMs, you separate the owner and operator of the VM—called the tenant—from the owner and operator of the virtualization fabric. (In most cases, this is you as the Hyper-V virtualization administrator.) Shielded VMs allow VM operators to run their workloads without the concern that anyone with local Administrator privileges on the Hyper-V host server can access the data and applications stored on that virtual machine.
Shielded VMs include the following security features and requirements:
Secure Boot must be present and enabled. This protects the boot environment of the VM from attacks that might modify the environment to introduce malware. This malware could be leveraged to gain access to the virtual machine.
Virtual TPM must be present and enabled. Virtual TPMs function in a manner similar to hardware-based TPMs in that they provide a secure location for the storage of cryptographic keys and secrets.
VM must have BitLocker enabled. BitLocker protects the integrity of the boot environment and ensures that the VM’s virtual hard disks are encrypted. If the virtual hard disk file was copied, it would be inaccessible unless the person attempting to access it had the necessary BitLocker recovery keys.
Only certain integration components are allowed. Tools such as PowerShell Direct and Data Exchange are blocked. Blocking these integration services components blocks a Hyper-V administrator from indirectly accessing data stored in the virtual machine.
Virtual Machine Connection (console) cannot be enabled for the VM. Access must be through remote access methods enabled within the VM operating system, such as PowerShell remote sessions or Remote Desktop. The only way to access the content of the VM is where the VM operating system has granted access to that content.
Restricted keyboard and mouse access. Human Interface Devices, such as keyboards and mice, are disabled for the VM and can’t be used to interact with it. For example, this means that an administrator couldn’t interrupt the VM’s boot process or use another attack to inject code into the VM in the way they might do so when attacking a physically deployed computer.
COM/serial ports. Access through other virtual ports to the VM is disabled. This blocks a nefarious administrator using out-of-band management tools to access the VM.
Debugger access. A debugger cannot be attached to the VM process on a shielded VM.
The following operating systems support being run as shielded VMs:
Windows Server 2019, Windows Server 2016, Windows Server 2012 R2, and Windows Server 2012
Windows 10, Windows 8, and Windows 8.1
Shielded VMs can only be hosted on specially configured Windows Server 2016 and Windows Server 2019 Hyper-V servers that are part of a shielded fabric. Shielded VMs must use virtual hard disks in VHDX format that have the following properties:
Configured as GPT disks.
Must be basic rather than dynamic disks.
Disk that hosts operating systems must be configured with at least two partitions. One partition stores the Windows operating system; the other stores the active partition, which includes the bootloader.
Volumes on the disk must be formatted as NTFS.
While it’s possible to convert an existing VM to a shielded VM, Microsoft recommends that shielded VMs be deployed from scratch from trusted installation media or digitally signed VM templates.
Guarded fabric
Before you can deploy a shielded VM, you must configure a guarded fabric on which to deploy the VM. A guarded fabric is a special cryptographically secure virtualization host environment. A guarded fabric is made up of one Host Guardian Service (HGS), usually a cluster of three nodes, a number of guarded virtualization hosts, and the shielded VMs that run on those hosts.
Host Guardian Service
The Host Guardian Service (HGS) is a Windows Server 2019 role that manages attestation and the Key Protection Service (KPS). The KPS stores and is responsible for securely releasing keys to shielded VMs. One of the keys that the KPS stores is the transport key. The transport key is used to encrypt a shielded VM’s virtual TPM. Microsoft recommends that you deploy the HGS role on a physically secure physical server running the Server Core operating system.
Validating a Hyper-V host involves verifying both its identity and configuration. Once the attestation service verifies both its identity and configuration, the KPS provides the transport key to that host that is required to unlock and run shielded VMs on that host.
Configuring a HGS server involves the deployment of a dedicated single-domain AD DS forest. An HGS cluster comprises at least three nodes, and each HGS cluster node is a domain controller for the root domain of this dedicated AD DS forest. Deploying an HGS cluster is different from a traditional domain controller deployment, and you don’t go through the traditional AD DS promotion process. Instead, you take a standalone server, install the HGS role on that server, and then run the Initialize-HgsServer PowerShell cmdlet.
Running the Initialize-HgsServer PowerShell cmdlet triggers the process of configuring the server as a domain controller for the newly created single-domain AD DS forest. The trusted Hyper-V hosts need to either be a member of the HGS forest or a member of a domain that has a one-way trust relationship with the forest. This second configuration must be even more secure because a compromised virtualization host won’t be able to make any modifications to the HGS forest because the trust relationship goes only in the opposite direction.
TPM and admin-trusted attestation
Trusted attestation allows a shielded VM to verify that it is running on a virtualization host that participates in a guarded fabric. There are two methods that you can use to provide trusted attestation. The method that you provide depends on the hardware that you have available. Table 19-4 lists the different trusted attestation types.
Table 19-4 Attestation types
Attestation type |
Functionality and benefits |
TPM-trusted |
|
Host key attestation |
|
Admin-trusted |
|
Encryption-supported VMs
An encryption-supported VM is a VM that can run in a semi-protected manner on a guarded fabric but doesn’t have the stringent security requirements of a shielded VM. A virtualization administrator has a greater level of access to an encryption-supported VM. This makes the deployment less secure than a shielded VM. Encryption-supported VMs may be more appropriate for organizations where the VM administrator would normally have access to the VMs anyway, but for compliance reasons VMs need to be run in a manner in which the contents of virtual hard disks are encrypted.
Table 19-5 outlines how encryption-supported VMs differ from shielded VMs.
Table 19-5 Differences between encryption-supported and shielded VMs
Security setting |
Encryption-supported VM |
Shielded VM |
Secure Boot |
Required but configurable |
Required and enforced |
vTPM |
Required but configurable |
Required and enforced |
Encrypted VM state |
Required but configurable |
Required and enforced |
Live migration traffic encryption |
Required but configurable |
Required and enforced |
Integration components including PowerShell Direct |
Configurable by fabric administrator with PowerShell Direct and Data Exchange allowed |
Data Exchange and PowerShell Direct blocked |
Virtual Machine Connection |
Allowed |
Disabled (Can be enabled with Windows Server version 1803 and later) |
Keyboard, mouse, HID devices |
Allowed |
Disabled |
COM/Serial ports |
Supported |
Disabled |
Attach debugger to VM process |
Supported |
Disabled |
Shielding data file
The shielding data file (also called the provisioning data file, or PDK file) is a special encrypted file that stores the following secrets:
Administrator credentials.
Answer file (unattend.xml).
Security policy that determines whether VMs created using this shielded data file will be fully shielded VMs or encryption-supported VMs.
An RDP certificate. This allows secure RDP communication with the VM.
A volume signature catalog. This contains a list of trusted and signed template disk signatures from which a VM can be created. A shielded template disk is a template virtual hard disk that has a digital signature. This ensures that the template hard disk from which a new VM is deployed is trustworthy. During provisioning, the signature of the disk is computed and checked against a list of trusted and shielded template disk signatures stored in the catalog. If the signatures match, deployment continues. If the signatures do not match—indicating that the shielded template disk has been modified—the deployment fails.
A Key Protector. This specifies which guarded fabrics a shielded VM generated from this shielding data file is authorized to run on.
Tenant keys protect this file, and the tenant uploads the shielding data file to the secure fabric. Because tenant keys protect the file, the virtualization administrator doesn’t have access to the contents of the shielding data file. This means that the virtualization administrators do not have access to the local Administrator password used with virtual machines deployed on the fabrics that they manage.
The shielding data file ensures that any VMs are explicitly created with the parameters specified by the tenant. The virtualization administrator can’t swap in their own template hard disks, answer files, or administrator passwords. Should a template hard disk be swapped out or modified by the virtualization administrator, it won’t match the cryptographic signature of any authorized template hard disk listed in the shielding data file.