Supported upgrade and migration paths
Active Directory Certificate Services
In most cases, organizations that are deploying Windows Server 2019 will be deploying the operating system into an existing Windows Server environment. While initial prototype and proof-of-concept deployments are likely to involve a small number of servers, at some point organizations will want to upgrade or migrate their existing Windows Servers and the workloads hosted on those servers to Windows Server 2019.
While some organizations deploy a new server operating system and upgrade existing servers as soon as possible, and other organizations wait until their current servers reach the end of extended support before planning a move, most organizations take a middle-ground approach. New workloads are deployed on the newest version of the operating system, while existing workloads are left on the platform they were deployed to unless there is a pressing reason to upgrade.
In this chapter, you’ll learn about upgrading or migrating several core Windows Server roles and features from previous supported versions of the Windows Server operating system to Windows Server 2019.
Supported upgrade and migration paths
A general rule about supported upgrade and migration paths is that you need to ensure that the product that you are upgrading from is still within Microsoft’s extended support window and that you’ve applied all released service packs and software updates to the workload before attempting migration or upgrade. The difference between migration and upgrade is as follows:
Migration. More common than an upgrade, a migration involves moving roles and data from an existing server running a supported version of Windows Server to a freshly deployed server running Windows Server 2019. Migration is Microsoft’s preferred option and fits better with the “treat servers as cattle and not as pets” philosophy of systems administration. This philosophy dictates that installation and configuration be as automated as possible, so instead of painstakingly crafting the configuration of an individual server, administrators can apply complex configurations quickly so that server upgrade or replacement is considered an uncomplicated routine operation rather than one that requires painstaking attention to arcane and not entirely understood processes.
Upgrade. Sometimes called an in-place upgrade, this usually involves running the Windows Server 2019 setup routine from within an existing Windows Server 2012 R2 or Windows Server 2016 deployment. You cannot perform a direct upgrade to Windows Server 2019 from Windows Server 2012, Windows Server 2008 R2, or Windows Server 2008. You perform upgrades when you need the new OS to use the same hardware or VM as the source OS, and you want to keep the roles and data that are on the source instance for the upgraded instance. Upgrades are only supported for certain roles. Upgrades are most often used in smaller organizations where the small number of servers means that the time required to build automated deployment and configuration tools and processes exceeds the time needed to deploy the organization’s infrastructure manually.
An in-place upgrade is supported for certain editions of Windows Server 2012 R2 and Windows Server 2016 to Windows Server 2019. When you perform an in-place upgrade, all the applications, data, roles, and features that were present on the source server remain available on the upgraded server. While the applications, data, roles, and features will remain present, that doesn’t mean that they will all be functional. Prior to attempting an in-place upgrade, you should check whether applications that are hosted on the source operating system are compatible with Windows Server 2019.
Whether you can perform an upgrade depends on the edition of Windows Server that is the source and the target of the upgrade. Upgrading the operating system is supported in the cases listed in Table 22-1.
Table 22-1 Supported edition upgrades
Source Edition |
Can be upgraded to |
Windows Server 2012 R2 Standard |
Windows Server 2019 Standard or Datacenter |
Windows Server 2012 R2 Datacenter |
Windows Server 2019 Datacenter |
Windows Server 2016 Standard |
Windows Server 2019 Standard or Datacenter |
Windows Server 2016 Datacenter |
Windows Server 2019 Datacenter |
Windows Server 2012 R2 Essentials |
Windows Server 2019 Essentials |
Windows Server 2016 Essentials |
Windows Server 2019 Essentials |
Upgrading roles and features
Table 22-2 lists which server roles and features can be directly upgraded and which server roles and features, if migrated, require the role or feature be taken offline for a period of time.
Table 22-2 Upgrades and migration
Role |
Direct upgrade from Windows Server 2012 R2 or Windows Server 2016 |
Migration involves downtime? |
AD CS |
Yes |
Yes |
AD DS |
Yes |
No |
AD FS |
No |
Yes |
AD LDS |
Yes |
No |
AD RMS |
Yes |
Yes |
DHCP |
Yes |
No |
DNS |
Yes |
No |
Failover Clusters |
Cluster rolling upgrade supported for Windows Server 2012 R2 and Windows Server 2016 |
No |
File and Storage Servers |
Yes |
No |
Hyper-V |
When a member of a Windows Server 2012 R2 failover cluster or a Windows Server 2016 failover cluster |
No for Server 2012 R2 and Server 2016 with the scale-out file server role |
Print and Fax Services |
No |
Yes |
Web Server (IIS) |
Yes |
Yes |
WSUS |
Yes |
Yes |
Work Folders |
Yes |
No |
Upgrades are constrained by the following additional limitations:
Upgrades from one language to another are not supported. For example, you can’t upgrade a French edition of Windows Server 2012 R2 to a German edition of Windows Server 2019.
You cannot upgrade a Server Core installation to a Server with a Desktop installation. If the source operating system is running Windows Server 2012 R2, you can get around this by changing from Server Core to Server with a Desktop prior to performing the upgrade.
You cannot upgrade a Server with a Desktop installation to a Server Core installation. If the source operating system is running Windows Server 2012 R2, you can get around this by converting to Server Core prior to performing the deployment.
You cannot upgrade from a licensed version of a Windows Server operating system to an evaluation edition. Microsoft recommends that you only install evaluation editions as clean installations.
Converting evaluation version to licensed version
Although it is far from best practice, many organizations that deploy the 180-day evaluation version of Windows Server as part of a project prototype find, several months later, that the prototype has morphed into a critical component in the organization’s workflow. Rather than reinstall Windows Server and migrate the prototype deployment to a properly licensed, long-term production platform, it is instead possible to convert an evaluation version of Windows Server 2019 to a properly licensed version by performing the following steps:
From an elevated command prompt, run the command slmgr.vbs /dlv. This will display the current computer’s licensing information as shown in Figure 22-1.

Figure 22-1 Software licensing information
Determine the current edition by running the command DISM /online /Get-CurrentEdition. This will display the edition ID, such as ServerStandard or ServerStandardCore. You will need this edition ID for the next step.
Once you’ve determined the edition, run the command DISM /online /Set-Edition:<editionID> /ProductKey:XXXXX-XXXXX-XXXXX-XXXXX-XXXXX /AcceptEula.
Upgrading editions
You can also use DISM to upgrade from one edition of Windows Server 2019 to another. For example, if you want to upgrade from the Standard edition of Windows Server 2019 to the Datacenter edition, specify the ServerDatacenter or ServerDatacenterCore product edition and enter the appropriate product key using the DISM /online /Set-Edition:<editionID> /ProductKey:<productkey> command.
You can use slmgr.vbs to switch between a retail license and a volume-license. To do this from an elevated prompt use the command slmgr.vbs /ipk <key> where <key> is the volume license key. If you are trying to convert an evaluation version of Windows Server 2019 to a volume licensed version, you must switch to a retail version, as described earlier.
Windows Server Migration Tools
The Windows Server Migration Tools (WSMT) is a Windows Server 2019 feature that you can use to migrate a specific set of server roles, features, shared folders, operating system settings, and data from a source computer running the Windows Server 2008, Windows Server 2008 R2, Windows Server 2012, Windows Server 2012 R2, or Windows Server 2016 operating systems to a computer running Windows Server 2019.
You can use the WSMT to migrate the following roles and features:
Active Directory Certificate Services
Active Directory Federation Services
Active Directory Rights Management Services
File and storage services
Hyper-V
Network Policy Server
Remote Desktop Services
Windows Server Update Services
Cluster Roles
DHCP Server
Web Server (IIS)
The WSMT supports:
Migration from physically deployed operating systems to virtually deployed operating systems.
Server Core and Server with a GUI installation option on Windows Server 2008 R2, Windows Server 2012, Windows Server 2012 R2, Windows Server 2016, or Windows Server 2019 as the source operating system.
Server Core and Server are supported with a GUI installation option for Windows Server 2019 as the destination operating system.
You can’t use WSMT with Server Core on Windows Server 2008 because the .NET framework is not available on the Server Core installation option of Windows Server 2008.
WSMT can only be used if the source and destination operating system are using the same UI language. The system UI language is the one used when setting up the operating system.
The WSMT has the following requirements:
Must be deployed using an account that has local administrator privileges on the source and destination server.
The source server must have at least 23 MB of free space to store the WSMT deployment folder.
The source server must have the .NET Framework 3.51 installed.
Windows PowerShell must be present on the source server. By default, PowerShell is included with Windows Server 2008 R2, Windows Server 2012, Windows Server 2012 R2, and Windows Server 2016. By default, PowerShell is not included on servers running the Windows Server 2008 operating system, though it’s likely that it has been installed at some point prior to the deployment of that operating system in your environment.
You should always use the most recent version of the WSMT.
Installing the WSMT
You can install the WSMT on the destination server using the Install-WindowsFeature Migration PowerShell command or by installing the role using the Add Roles And Features Wizard, as shown in Figure 22-2. When you do this, the WSMT is deployed in the %WinDir%System32ServerMigrationTools folder on the destination server.

Figure 22-2 Windows Server Migration Tools
Once you’ve installed the WSMT, you need to configure a deployment folder from which you will deploy the appropriate version of the WSMT. Rather than deploying a generic version of the tools, deploy a version tailored for the source operating system. For example, to create a set of tools for a source computer running Windows Server 2012 R2, issue the command as shown in Figure 22-3:
Smigdeploy.exe /package /architecture amd64 /os WS12R2 /path <path to share>

Figure 22-3 Create migration tools package
You can either copy the contents of the deployment folder to the source computer or enact the tools remotely over a network connection by running smigdeploy.exe from an elevated command prompt. Installing the tools on a source server running the GUI option will give you a special migration tools PowerShell session, as shown in Figure 22-4.

Figure 22-4 Server Migration Tools running on Windows Server 2012 R2
If you are running the tools on a computer that is configured with the Server Core installation option, open an elevated PowerShell session, and run the following command to add the WSMT cmdlets:
Add-PSSnapin Microsoft.Windows.ServerManager.Migration
Active Directory
Microsoft’s recommended strategy for upgrading domain controllers in a domain or forest to Windows Server 2019 is to
Add member servers running Windows Server 2019 to a domain
Promote those member servers to domain controller
Transfer FSMO roles across to the domain controllers running Windows Server 2019 from the domain controllers running previous versions of the Windows Server operating system
Demote those domain controllers running the older version of the operating system
In some circumstances, you might need to perform an upgrade of a domain controller rather than using the recommended strategy. Prior to attempting the upgrade, manually run adprep /forestprep and adprep /domainprep from the supportadprep folder of the Windows Server 2019 installation media.
You should upgrade the domain controllers in the forest root domain and then upgrade domain controllers in any child domains. Once you’ve upgraded all the domain controllers in your organization, you can then raise the domain functional level of each domain in the forest to Windows Server 2016 using the Active Directory Domains and Trusts console, as shown in Figure 22-5. Remember that unlike previous versions of Windows Server, the highest domain and forest functional level that you can configure for Windows Server 2019 domain controllers is Windows Server 2016.

Figure 22-5 Domain functional level
Once you have raised the domain functional level of each domain in the forest to Windows Server 2016, you can raise the forest functional level to Windows Server 2016 using the Active Directory Domains and Trusts console, as shown in Figure 22-6. Remember, there is no Windows Server 2019 functional level.

Figure 22-6 Forest functional level
FRS to DFSR migration
Depending on the age of your organization’s Active Directory deployment—especially if a domain once functioned at the Windows Server 2003 functional level—and how diligently Active Directory upgrades were performed, it’s possible that SYSVOL replication is configured to use the older inefficient File Replication Service, rather than the more efficient Distributed File System.
You can check whether SYSVOL replication is configured to use FRS or DFS using the dfsrmig.exe utility with the /globalstate parameter. If the output state of the command shows Eliminated, as in Figure 22-7, then SYSVOL already uses DFS for replication.

Figure 22-7 SYSVOL migration state
If the output of dfsrmig.exe instead shows that migration has yet to be initialized, you should update the SYSVOL replication. You should only use FSR for SYSVOL replication if your organization still has domain controllers running the Windows Server 2003 or Windows Server 2003 R2 operating systems. At this stage, it really shouldn’t be running those OS versions, should it?
To upgrade SYSVOL replication to DFS from FRS, perform the following steps:
Sign in to a domain controller with credentials that are a member of the Domain Admin or Enterprise Admin groups.
Start PowerShell and then run the command dfsrmig /setglobalstate 1. Depending on the number of domain controllers in the domain, it can take more than an hour to reach the prepared state. You can verify that the prepared state has been reached by running the command dfsrmig /getmigrationstate. When preparation is completed, the utility will report that the global state is Prepared.
Next, set the DFSR state to Redirected. You do this using the command dfsrmig /setglobalstate 2. You use dfsrmig /getmigraitonstate to verify that the DFSR state is set to Redirected.
Once the DFSR state is set to Redirected, run the command dfsrmig /setglobalstate 3. This will finalize the transition of SYSVOL to the Eliminated state, and DFS will be used for replication instead of FRS.
Migrating to a new forest
Many organizations have had their current Active Directory environment for more than a decade. The older an Active Directory environment is, the more likely it is to have an inefficient domain and OU structure, derelict user and computer accounts, unutilized sites, and forgotten group policy objects and groups. Just as Microsoft recommends performing fresh installations rather than in-place upgrades for individual computers, it may make more sense to migrate to a new forest than it does to remain with an existing Active Directory forest. This is especially true if an organization is considering moving toward a secure administrative model where the privileged accounts in a production forest are unprivileged standard accounts in the secure administrative forest.
The Active Directory Migration Tool (ADMT) is a special tool that you can use to migrate Active Directory objects to and from any Active Directory environments, from moving accounts within a forest, to migrating accounts to a new Active Directory forest.
You can use ADMT to perform an interforest restructure or an intraforest restructure. An intraforest restructure allows you to modify your current domain and forest structure to reduce complexity. An interforest restructure involves creating a brand new, simplified forest structure using Active Directory objects from your existing forest.
Table 22-3 lists the differences between each restructure type.
Table 22-3 Migration differences
Consideration |
Interforest restructure |
Intraforest restructure |
Object preservation |
Objects, such as accounts, will be cloned. The original object remains in the source forest. |
User and group objects are migrated and are no longer present in the source location. Computer and managed service account objects are copied and remain in the source location. |
SID history maintenance |
SID history maintenance is optional. |
SID history is mandatory for user, group, and computer accounts. It is not required for managed service accounts. |
Password retention |
Password retention is optional. |
Passwords are always retained. |
Profile migration |
Local profiles can be migrated using ADMT. |
Local profiles are automatically migrated, and account GUID is preserved. |
The Active Directory Migration Tool requires that you have access to a SQL Server instance. This can be a full SQL Server deployment, or a local SQL Server express instance. The ADMT includes the following wizards, shown in Figure 22-8.

Figure 22-8 Active Directory Migration Tool
User Account Migration Wizard. Allows you to perform an intraforest or interforest migration of user account objects.
Group Account Migration Wizard. Allows you to perform an intraforest or interforest migration of group account objects, including group membership information.
Computer Migration Wizard. Allows you to perform an intraforest or interforest migration of computer account objects.
Security Translation Wizard. Wizard that allows you to transfer security permissions during object migration.
Reporting Wizard. Generates the following reports:
Migrated Users, Groups And Managed Service Accounts report. Summarizes result of the migration of user, group, and managed service accounts.
Expired Computers Report. List of computers found that have expired computer account passwords.
Account References Report. List of accounts that have been assigned permissions for resources on a specific computer.
Name Conflicts Report. A list of user accounts and groups that are present in both the source and target domains.
Service Account Migration Wizard. Allows you to perform intraforest or interforest service account migration.
Managed Service Account Migration Wizard. Allows you to perform intraforest or interforest managed service account migration.
Password Migration Wizard. Allows you to perform intraforest or interforest password migration.
Active Directory Certificate Services
You can use WSMT to migrate an AD CS deployment from one server to another. The WSMT method works best when you are migrating a standalone root or subordinate CA. Prior to performing AD CS migration, you need to be aware of the following:
It will be necessary to either turn off the source CA or stop the source server’s certificate services service.
The destination CA must have the same name as the source CA. The CA name is separate from the computer name.
While the computer name of the destination CA does not need to match that of the source CA, the destination CA name must not be identical to the name assigned to the destination computer. For example, ContosoRootCA is the name of the source CA which is hosted on a computer named MEL-CA. When migrated, the destination CA will be called ContosoRootCA and might be hosted on a computer named MEL-NEW-CA. The destination computer just cannot be named ContosoRootCA.
During migration, the CA will be unable to issue certificates or publish CRLs.
To ensure that revocation status checking can occur, ensure that a CRL is published prior to migration that will remain valid to a point in time after the expected completion of the migration.
Ensure that at least one of the CRL distribution points specified for existing certificates remains available during migration. Enterprise CAs publish to Active Directory, but standalone CAs may only publish to the local server. If the CRL distribution point is unavailable, clients will be unable to perform revocation checks.
The Authority Information Access (AIA) and CRL distribution point extensions of previously issued certificates may reference the name of the source CA. This is the default setting and will only be different if you explicitly changed it.
If migrating an enterprise CA or standalone CA on a computer that is a member of a domain, the account used to perform the migration must be a member of the Enterprise Admins or Domain Admins group.
CA migration can be carried out in three general phases:
Preparation
Migration
Verification and post migration tasks
Preparation
To prepare the source server, perform the following steps:
Export the CA templates list. This is the list of templates that the CA is configured to issue. The master list of templates is stored within Active Directory. You can export this list from the Certificate Services console by right-clicking the Certificate Templates node and selecting Export. You can also do this using the command certutil.exe -catemplates > catemplates.txt command.
Make a note of the CA’s Cryptographic Service Provider (CSP) and which signature algorithm is used. This is visible on the CA’s Properties dialog box, as shown in Figure 22-9. You can also do this using the command certutil.exe -getreg cacsp* > csp.txt.

Figure 22-9 CSP and signature algorithm
Back up the source server CA, including the private key, CA certificate, Certificate Database, and Certificate Database Log. You can do this using the Certification Authority Backup Wizard, as shown in Figure 22-10. Copy the contents of the backup folder to a location that will be accessible to the destination server.

Figure 22-10 CA Backup Wizard
Stop the Certificate Services service. You can do this using the Services console, as shown in Figure 22-11, or by using the Stop-Service certsvc Windows PowerShell command. This will block the current certificate server from issuing additional certificates.
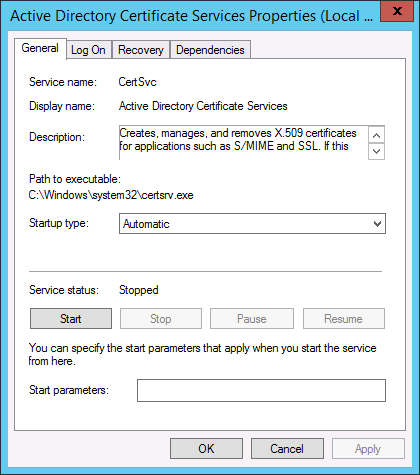
Figure 22-11 Stop certificate services service
Back up the registry settings of the CA using the following command, and place it in a location that is accessible to the destination server:
reg export HKLMSYSTEMCurrentControlSetServicesCertSvcConfiguration
<output file>.reg
If the source CA uses a custom CAPolicy.inf file, you should copy this file to a location that is accessible to the destination server.
Migration
Once you have performed the necessary preparation steps, you should perform the following steps to complete the migration of the CA:
Once you have backed up the source CA and its registry settings, remove the CA role service from the source server. This is important because removing the role service from the server will also clean up data stored in Active Directory associated with the CA. If you don’t perform this clean up, you will encounter problems when introducing the migrated CA that shares the original CA’s name.
Removing the role service from the CA does not delete the CA database, private key, or CA certificate. This means that if the migration fails, you will be able to restore the CA by reinstalling the certificate services role on the server.
Microsoft also recommends manually removing the source server from the domain prior to deploying the destination server. This is especially important if the source and destination server share the same computer name.
Change the name of the destination server to match the name of the source server.
Join the destination server to the domain.
Import the CA certificates into the local computer’s Personal certificate store.
Once the computer is domain joined, add the CA role service to the destination server. Ensure that you install the server in the same manner, such as installing an Enterprise Root or Standalone Subordinate CA, depending on the properties of the original source CA. During the installation routine on the Set Up Private Key page, utilize the Use Existing Private Key option, and select the existing private key. Complete the setup wizard.
Use the Certification Authority snap-in to restore both the certificate database and the certificate database log from the backup taken on the source server. You will need to restart the certificate services server.
Import the registry settings exported from the source CA. If the source CA and the destination CA share the same name and the same file paths, then this can be done without modification. If the source CA has a different name from the destination CA or uses different file paths, you’ll need to manually alter these registry settings. Prior to importing the registry, stop the certificate services service. Use the command reg import backup.reg to import the registry file. Restart the certificate service.
Import the list of CA templates that are issued from the CA using the command certutil -setcatemplates, and then provide a list of templates that you backed up from the source server in comma-separated format.
Verification and post migration tasks
To verify that the CA has migrated successfully, verify that you can successfully request and enroll a new certificate. You should also verify that you can successfully publish a CRL. Performing these tasks is covered in Chapter 12, “Active Directory Certificate Services.”
DNS
The simplest way to migrate DNS is where DNS zones are Active Directory integrated. In that scenario, you add member servers running Windows Server 2019 to an existing domain, promote those servers to domain controllers, and make sure that you add the DNS role. Any existing AD integrated zones that are configured to replicate to other domain controllers in the domain will replicate to the newly promoted domain controller. Remember to add custom partitions if you have AD integrated zones that only replicate to specific domain controllers.
The trick to migrating primary zones from one DNS server to another is to first configure the destination server to host a secondary zone of the primary zone. Once the zone has replicated to the intended destination server, convert the zone from a secondary zone to function as a primary zone. You can do this by performing the following steps:
On the General tab of the secondary zone Properties, shown in Figure 22-12, click Change.

Figure 22-12 Zone General Properties tab
In the Change Zone Type dialog box, shown in Figure 22-13, select Primary Zone and then click OK.

Figure 22-13 Change Zone Type
DHCP
You can use the WSMT to migrate a DHCP server, scopes, and settings from computers running both the Server Core and Server with a GUI installation options of Windows Server 2008, Windows Server 2008 R2, Windows Server 2012, Windows Server 2012 R2, Windows Server 2016, and Windows Server 2019 to Windows Server 2019.
To perform a migration of a DHCP server using WSMT, you need access to accounts with the following permissions:
Permission to authorize the DHCP server in Active Directory
Membership of the local Administrator group on the computers that are both source and destination DHCP servers
Permission to write data to the WSMT migration store location
DHCP migration follows the following general steps:
Preparation
Migration
Verification and post migration tasks
Preparing to migrate DHCP
Before you start the process of migrating a DHCP server and its associated scopes and settings to Windows Server 2019, you’ll need to perform several preparation steps.
Determine which current DHCP servers you wish to migrate and which servers running Windows Server 2019 will host the migrated DHCP server roles, associated scopes, and settings.
Ensure that all critical updates, update rollups, and service packs have been installed on the source and destination servers.
Deploy the Windows Server Migration Tools (WSMT) on the source and destination servers.
Install the DHCP role service on the destination server. This service must be present on the destination server prior to beginning the migration.
Ensure that the source and destination servers have the same number of network adapters. Determine which subnet each network adapter is bound to on the source server and ensure that the destination server has network adapters bound to the same subnets. This will ensure that the migrated DHCP server can service the same subnets as the source DHCP server.
Determine the IP address strategy for the destination server. DHCP servers should use static IP addresses on network interfaces that are used by the DHCP server service to manage DHCP traffic. Options include:
Assigning the destination server different static IP addresses that are on the same subnets as the static IP addresses assigned to network interfaces on the source server. Doing this will allow you to perform the migration with both the source and destination server online.
Assign the destination server the same IP addresses that are used for network interfaces for the source server. While this is possible, it will mean that the source and destination server cannot be online at the same time without causing IP address conflicts, or it would require extensive preparation of network virtualization. Because existing clients will be able to renew their IP address information after migration from a destination server with a new IP address on the same subnet, you should only keep the same IP addresses on the source and destination server if there are substantive reasons for doing so.
If the source server does not use the default path for the DHCP server database, such as having the database stored on a separate volume, the destination server will need to have a volume configuration that matches that of the source server. For example, if the DHCP database is stored on volume H: of the source server, the destination server will need a properly formatted volume H: for migration to be successful.
Ensure that the migration store location is accessible to both the source and destination servers.
Ensure that both the source and destination servers have network access to the AD DS environment.
Perform a backup of the DHCP server from the DHCP console, rather than the Windows Server Backup, as shown in Figure 22-14. You can do this by right-clicking the DHCP server node, selecting Backup, and specifying a location for the backup.
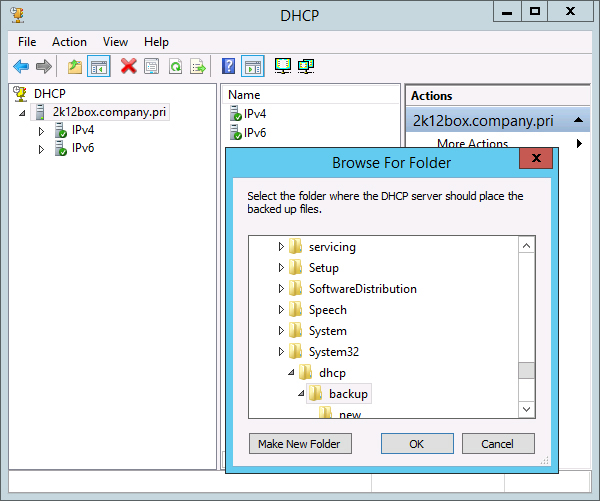
Figure 22-14 Backup DHCP database
Once the backup is complete, stop the DHCP service on the source and the destination server, either by using the Services console as shown in Figure 22-15, or by running the Stop-Service DHCPserver Windows PowerShell cmdlet.

Figure 22-15 Stop DHCP Server service
Migration
Once the source and destination servers are prepared, the next step is to open the Windows Server Migration Tools PowerShell session. You perform the migration using the Export-SmigServerSetting PowerShell cmdlet. Specific parameters of the Export-SmigServerSetting cmdlet that are relevant to DHCP server migration include:
Use the FeatureID DHCP to specify that the DHCP server role is what you want to migrate.
Use the Users parameter if the DHCP administrators group includes local user accounts. Use the Group parameter to migrate all members of the DHCP administrators group that don’t include local user, but does include domain users and groups.
You can use the IPConfig parameter if you want to export the IP address configuration of the source server to the destination server.
Use the Path parameter to specify the location of the svrmig.mig file. If you don’t specify a network location, you’ll need to manually transfer this file to a location that is accessible to the destination server.
Considerations for using the Import-SmigServerSetting cmdlet on the destination server include:
Use the FeatureID DHCP to specify that the DHCP server role is what you are importing. While the Import-SmigServerSetting cmdlet will install the DHCP server role if it is not already present on the destination server, Microsoft recommends installing the service and then placing it in a stopped state before importing data using the WSMT.
Use the Users parameter if the DHCP Administrators group on the destination server will include local users. Use the Group parameter if the DHCP administrators group contains domain users and groups.
Use the Path parameter to specify the location of the svrmig.mig file. This file can be stored on an accessible network share or stored locally.
Once migration is complete, start the DHCP server service using the Start-Service DHCPServer cmdlet.
If you haven’t done so already, you’ll need to authorize the DHCP server in Active Directory before it will function.
Verification and post migration tasks
Once the migration has occurred, ensure that the DHCP server service on the source server remains in a stopped state, as well as on a client release, and then renew an IP address to verify that the DHCP server service on the destination server is functioning properly. You should also manually check that the scopes and settings that were present on the source server are also present on the destination server. Once you have verified that the migration has completed successfully, remove the DHCP server service from the source computer.
File and storage servers
You can use both the WSMT and Storage Migration Service to migrate file servers to Windows Server 2019. Storage Migration Service is a newer tool, and you should attempt migration using this tool first and fall back to WSMT only if you encounter a scenario that Storage Migration Service does not support.
Migrate file servers using Storage Migration Service
Storage Migration Service is a new service included in Windows Server 2019 that leverages Windows Admin Center to allow you to inventory the settings and data of a source file server, transfer the files and settings to a destination server, and then configure the destination server with the settings and identity that were present on the source server. The advantage of Storage Migration Service over WSMT is that it can:
Inventory multiple servers and the data they store
Quickly transfer files, file shares, and security settings from source servers
Apply the identity of the source server to the destination server, including name and IP address settings so that users and applications do not have to alter their existing behavior and configuration
While copying files and their permissions has always been something that most administrators could generally figure out how to do fairly quickly, it was often a bit more challenging to copy the settings of the shared folders that hosted those files. Storage Migration Service allows you to migrate all the flags, settings, and security settings of SMB file shares. The flags that Storage Migration Service migrates include:
Share State
Availability Type
Share Type
Folder Enumeration Mode (also known as Access-Based Enumeration or ABE)
Caching Mode
Leasing Mode
SMB Instance
CA Timeout
Concurrent User Limit
Continuously Available
Description
Encrypt Data
Identity Remoting
Infrastructure
Name
Path
Scoped
Scope Name
Security Descriptor
Shadow Copy
Special
Temporary
There are some limitations to what you can transfer using Storage Migration Service. These include not allowing you to migrate the following folders and files:
Windows, Program Files, Program Files (x86), Program Data, Users, $Recycle.bin, Recycler, Recycled, System Volume Information, $UpgDrv$, $SysReset, $Windows.~BT, $Windows.~LS, Windows.old, boot, Recovery, Documents and Settings, pagefile.sys, hiberfil.sys, swapfile.sys, winpepge.sys, config.sys, bootsect.bak, bootmgr, and bootnxt
Any file or folder on the source server that conflicts with folders assigned the exclusion designation folders on the destination server
You can’t use Storage Migration Service to migrate file servers that are members of separate domains. You also can’t use Storage Migration Service to migrate file servers between workgroups.
Deploy Storage Migration Service
Storage Migration Service Orchestrator servers manage the migration process. It’s important to note, especially if you are building your own test lab, that you can’t deploy the Storage Migration Service Orchestrator from a host installed using the Evaluation version of Windows Server 2019. To install the Orchestrator service on a computer, Open Windows Admin center and click on Storage Migration Service as shown in Figure 22-16.

Figure 22-16 Install Storage Migration Service
Storage Migration Service requires that the following rules are enabled within Windows Firewall:
File and Printer Sharing (SMB-In)
Netlogon Service (NP-In)
Windows Management Instrumentation (DCOM-In)
Windows Management Instrumentation (WMI-In)
If you are using a third-party firewall product, ensure that you open TCP ports 135, 445, and 1025–65535. The service ports are TCP 28940 for the Orchestrator and TCP 28941 for the Proxy.
To perform a migration, you need access to the credentials of accounts with the following permissions:
Administrator permission on the source and destination computer
Administrator permissions on the computer that hosts the Storage Migration Service Orchestrator role
Inventory source servers
The first step in migrating file shares from one server to another is to inventory the source servers to discover what shares are present, what files and folders are present, and all the identity information related to the source server. To do this, perform the following steps:
With Storage Migration Services selected in Windows Admin Center, click New Job. Provide a name for the job as shown in Figure 22-17 and then click OK.

Figure 22-17 Create inventory job
On the next page of the Inventory wizard, provide the credentials of an account with administrative privileges. This page also allows you to choose whether to migrate the contents of administrative shares, as shown in Figure 22-18.

Figure 22-18 Inventory job credentials
Click Add to start the Add A Device wizard. In this wizard, provide the hostname for the server that hosts the files that you wish to migrate. You can use the Add button to add multiple source servers on this page.
When you are finished adding source servers, click Start Scan. Storage Migration Services will generate an inventory of the listed servers.
After the inventory completes, you can click the server and view the server shares, configuration, network adapters, and volumes, as shown in Figure 22-19.

Figure 22-19 Inventory job results
Once you have reviewed the information generated by the inventory scans, click Next to begin the data copy process.
Copy data
The data copy process copies data from the source to the destination server. Although this process is sometimes termed the Transfer process, it’s important to note that the data is only copied, and it is not actually moved from one server to another. This means that if something goes wrong, you still have the original source server in its pre-migration condition.
To begin the copy process, perform the following steps:
Ensure that the firewall rules listed earlier are configured on the destination server.
Provide the credentials of an account that has administrative rights on the destination server.
Provide the address of the destination device, as shown in Figure 22-20. You can do this using the IP address or FQDN. Click Scan Device and the destination server will be inventoried. If the scan doesn’t work, verify that the firewall rules are configured correctly.

Figure 22-20 Add destination device
On the Adjust Transfer Settings page, select checksum settings for transmitted files, the maximum duration of the transfer job, how many retries to attempt for files that fail to transfer properly, and the delay between transfers.
On the Validate Source And Destination Devices page, click Validate and review any warnings.
On the Start The Transfer page, click Start The Transfer. You can monitor the progress of the transfer, as shown in Figure 22-21.

Figure 22-21 Monitor transfer
When the transfer completes, you can check the error log to determine which, if any, files and settings failed to transfer.
Cut over to new servers
The cut over phase is an optional phase that allows you to configure the destination server to assume the name and identity of the source server. This is one of the coolest parts of this technology because it means that you can have Storage Migration Service create a Windows Server 2019 clone of a Windows Server 2003 server, with the Windows Server 2019 server assuming the network identity of the server it is replacing; this means users and applications aren’t aware that any change has occurred. To perform the cutover, perform the following steps:
On the Enter Credentials page, provide administrative credentials for the source and destination devices.
On the page with the source server name, specify how you want network identity information transferred from the source to the destination server. Figure 22-22 shows the address information assigned to the Ethernet adapter on the source computer being applied to the Ethernet adapter on the destination computer. You can also configure the source computer to be assigned a random name during the cutover process, or you can have it choose a new name to ensure that there are no conflicts once the destination server assumes the source server’s identity.

Figure 22-22 Configure cutover identity information
After validating settings and providing any credentials required to update the Active Directory information for the computers that are being managed, you can perform one final validation, as shown in Figure 22-23.

Figure 22-23 Validate cutover configuration
You then begin the cutover by clicking Start Cutover. When the cutover completes, click Finish.
Migrate file and storage servers using WSMT
While you should use Storage Migration Service to migrate file servers to Windows Server 2019, should you really want to, you can use the WSMT to migrate the following file and storage services information from a computer running Windows Server 2008, Windows Server 2008 R2, Windows Server 2012, Windows Server 2012 R2, Windows Server 2016, and Windows Server 2019 to Windows Server 2019:
Server identity information
Local users and groups
Data and shared folders
Shadow copies of Shared Folders
Data Deduplication
DFS Namespaces
DFS Replication
File Server Resource Manager (FSRM)
Group Policy settings related to SMB
Group Policy settings for Offline Files
iSCSI Software Target settings
Network File System (NFS) shares
Remote Volume Shadow Copy Service
The following migration scenarios are supported for file and storage services:
The file server is a member of a domain.
The file server is a member of a workgroup.
File server data and shares are located on an external storage location, such as a SAN or on direct attached storage, as long as either storage medium preserves data permissions and file-share permissions.
It is important to note that file migration using the WSMT is aimed at moving data sets smaller than 100 GB, because only one file at a time is copied over a HTTPS connection. When moving larger data sets, Microsoft recommends using the robocopy.exe utility included with Windows Server 2019.
Migration permissions
Depending on the type of migration that you want to perform, a variety of permissions are necessary. If you are going to migrate data and shared folders, you must use an account that has local administrator permissions on the destination server.
Migration of DFS can be performed if an account is a member of a Domain Admins group. Alternatively, if there is more than one namespace server, the account used doesn’t have to be a member of the Domain Admins group as long as it has permission to administer all namespaces on the source server and is a member of the local Administrators group on the source and destination server.
Users who trigger migration of DFS replicas must either be members of the Domain Admins group or must have been delegated permission to the appropriate replication groups and replication members. If the user account is used to perform this action, it must be a member of the local Administrators group on the source and destination servers.
Preparing to migrate
To prepare to migrate the file and storage services role and data from a source server to a destination server, perform the following steps:
Ensure that the source and destination server have their time correctly set. If the clocks on the source and destination server are out of synchronization, the migration will fail.
Ensure that the same File Services role services are present on both the source server and the destination server.
Ensure that Windows Server Migration Tools are deployed on both the source server and the destination server.
Configure a firewall rule to allow traffic on TCP and UDP port 7000 between the source server and the destination server on both the source and destination server. TCP and UDP port 7000 is used by the Send-SmigServerData and Receive-SmigServerData cmdlets when establishing data migration connections. TCP and UDP ports 7001 and 7002 are also used if the migration occurs across subnets.
Ensure that the destination path has sufficient disk space to migrate data. If you have a configured NTFS quota or folder management, ensure that the quota limit will allow the migration of data.
If migrating File Server Resource Manager data and settings, ensure that the destination server has the same volume configuration as the source server.
While file and folder permissions are preserved during migration, remember that migrated files and folders inherit permission from parent folders. You should ensure that parent folders on the destination server have permissions that match those on the source server.
If you are performing a DFS migration, ensure that the DFS Namespaces role service is installed and configured on the destination server. The DFS Namespace service must be running prior to commencing migration.
If you are migrating DFS namespaces, back up the source server using a system state or full server backup. If the DFS namespaces are integrated into AD DS, it will be necessary to back up the system state on a domain controller to ensure that the AD DS configuration information for DFS namespaces is backed up.
Ensure that the Server service on the destination computer is set to use the Automatic startup type as shown in Figure 22-24.

Figure 22-24 Server service settings
You can back up the configuration information of a domain-based DFS namespace using the following command:
dfsutil.exe root export <\<DomainName>NameSpace> <BackupFileName>
Migrating File and Storage Services
Once you have completed the migration preparation steps, use the Export-SmigServerSetting cmdlet to capture the following settings on the source server so that you can import them on the destination server using the Import-SmigServerSetting cmdlet:
SMB (Server Message Block) settings
Offline Files settings
DFS Namespaces configuration
File Server Resource Manager settings
Shadow Copies of Shared Folders
Running the cmdlet will generate the migration file svrmig.mig, which you’ll need to then transfer to and import on the destination server. If you want to migrate local users and groups from the source server to the destination server, use the User All and Group parameters with the Export-SmigServerSetting cmdlet. Remember to specify the same parameters with the Import-SmigServerSetting cmdlet on the destination server.
Once settings have been transferred from source server to destination server, use the Send-SmigServerData and the Receive-SmigServerData cmdlets to transfer data between the source and destination servers.
For example, to send data to the computer named MEL-FS-2K16, of files that are located under the e:fileshare folder on the source computer to the f:fileshare folder on the destination computer, you would run the command:
Send-SmigServerData -ComputerName MEL-FS-2K16 -SourcePath e:fileshare -DestinationPath
f:fileshare -Recurse -Include All -Force
You must start the Receive-SmigServerData cmdlet in an elevated session on the destination server within five minutes of it being executed on the source server. Data transfer between the source and the destination server is encrypted.