
Chapter 1
Overview of Windows Server 2022 Networking
IN THIS CHAPTER
![]() Examining the Network and Sharing Center
Examining the Network and Sharing Center
![]() Controlling your network settings
Controlling your network settings
![]() Configuring TCP/IP on Windows Server 2022
Configuring TCP/IP on Windows Server 2022
![]() Understanding DHCP and why you need it
Understanding DHCP and why you need it
![]() Understanding DNS and how it makes your life easier
Understanding DNS and how it makes your life easier
Aserver can’t do its fundamental job without a solid and reliable network to support it. The network you’ll support will most likely be an Ethernet network. Ethernet networks use an unshielded twisted pair (UTP) cable. There are different categories of Ethernet cable, but the most common ones are Category 5e (Cat5e) and Category 6 (Cat6). As you go up in category, you gain speed and, in some cases, distance.
If your organization occupies a single building or a small office space, you’ll probably be supporting a local area network (LAN), and your organization will most likely own all the network components. If your organization is larger and more geographically dispersed, you may be supporting a wide area network (WAN); in this case, your organization will own some of the network equipment, but an Internet service provider (ISP) will likely own some of the copper or fiber that your traffic is crossing.
In this chapter, I explain how to network in Windows Server 2022. I introduce you to the Network and Sharing Center, and fill you in on how to configure TCP/IP, DNS, and DHCP (all of which I explain in greater detail in the pages that follow).
Getting Acquainted with the Network and Sharing Center
In Windows Server 2022, the Network and Sharing Center gives you a central location to start from for all your networking needs. This utility has been in previous versions of Windows, so if you’re a long-time system administrator, this interface will be comfortable for you.
To access the Network and Sharing Center, right-click the Start menu and choose Network Connections. On the Status page, scroll down to Network and Sharing Center.
On the Network and Sharing Center screen (shown in Figure 1-1), you get access to a few of the useful utilities all in one spot.
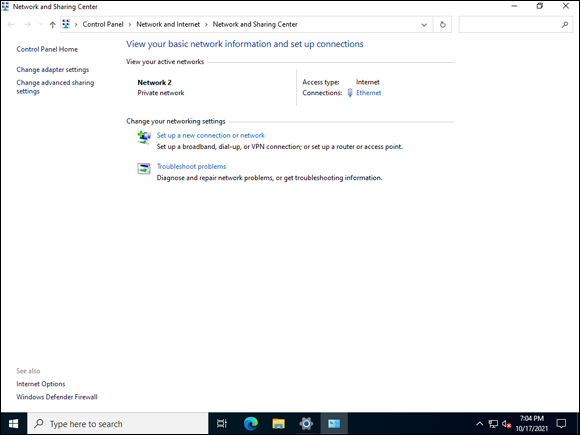
FIGURE 1-1: The Network and Sharing Center in Windows Server 2022.
In the “View Your Active Networks” section, you can see at a glance if your connection is enabled and whether you have Internet connectivity. If you don’t have Internet connectivity, the Access Type will say, “No Internet.”
On the left side of the screen, you see the Change Adapter Settings link. When you click that link, you’re presented with a list of all the network adapters present on your system. Right-click the adapter and choose Properties (see Figure 1-2).
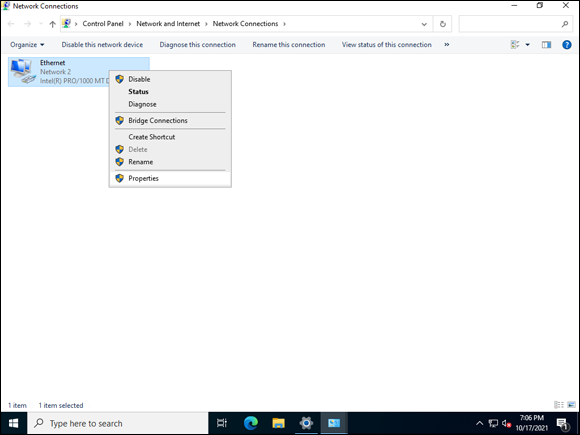
FIGURE 1-2: Getting to the network adapter properties screen.
The Properties screen is where the majority of the TCP/IP configuration takes place. For more on this subject, turn to the “Configuring TCP/IP” section, later in this chapter.
The final section of the Network and Sharing Center that I want to draw your attention to is the Troubleshoot Problems utility. When you click the Troubleshoot Problems link (refer to Figure 1-1), you’re taken to the Troubleshoot area. From here, you can click Internet Connections (see Figure 1-3) and get a wizard-based utility that can help you identify and resolve issues.
If the system doesn’t think there is a problem, you may need to click Additional Troubleshooters to get the option you need. From there, you can select Internet Connections or choose from a plethora of other troubleshooting options.
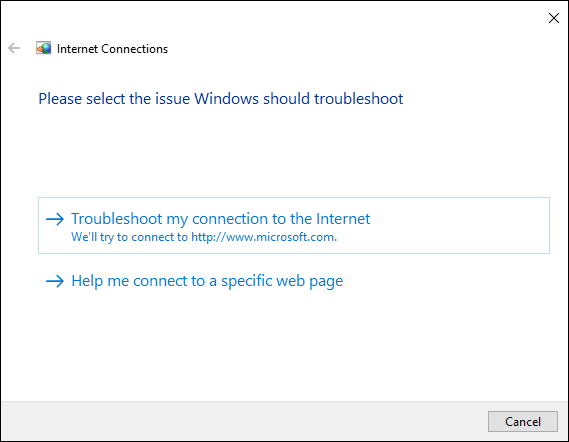
FIGURE 1-3: Troubleshooting your Internet connection with the built-in troubleshooting utility.
Using the Network Connections Tools
In Windows Server 2022, there is a section that allows you to control all your network settings. You can access these tools by right-clicking the Start menu and choosing Network Connections. Alternatively, you can click Start, click Settings (the gear icon), and then click Network & Internet.
Status
The Status page is the default page you start with when you get into the Network & Internet area. It gives you many of the same options you have in the Network and Sharing Center, as well as the status of your network connection (see Figure 1-4).
 At the bottom of the page, you can see the “Change Adapter Options” link and the “Network Troubleshooter” link, just as you did in the Network and Sharing Center. My guess is that this screen will eventually replace the Network and Sharing Center because the toolset on this screen is identical.
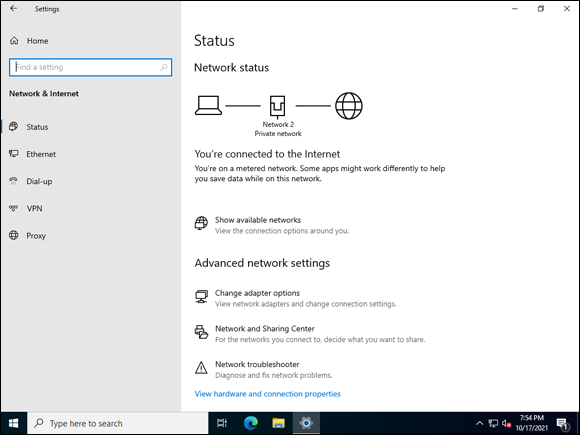
FIGURE 1-4: The Status screen in the Network & Internet section of Settings.
Ethernet
When you click the Ethernet link on the left-hand menu of the Network & Internet area, you’re presented with options specific to the Ethernet connection (see Figure 1-5):
- Change Adapter Options: If you click this link, you get a list of all the adapters installed on the system. You can choose which adapters you want to work with from there.
- Change Advanced Sharing Options: If you click this link, you can change the network discovery and file and printer sharing settings for your network profiles.
- Network and Sharing Center: Clicking this link opens the good old-fashioned Network and Sharing Center.
- Windows Firewall: Clicking this link opens the newer Firewall & Network Protection screen, shown in Figure 1-6. From here, you can allow specific applications through the firewall, enable or disable the firewall for the different profiles, and tweak the notifications the firewall will make. You can also enter the Advanced Settings area, which lets you specify more granular rules by Internet Protocol (IP), port number, and so on.

FIGURE 1-5: The Ethernet screen in the Network & Internet section of Settings.
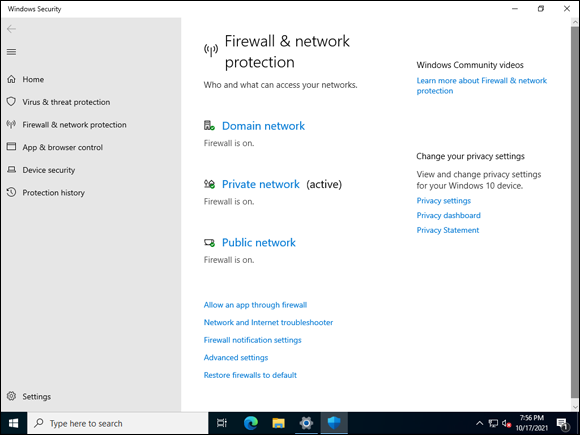
FIGURE 1-6: The Firewall & Network Protection screen in the Network & Internet section of Settings.
Dial-up
When you click the Dial-up link on the left-hand menu of the Network & Internet area, you can create a new connection if you have a modem attached to your system. A wizard guides you to set the number you need to dial out to for service.
VPN
When you click the VPN link on the left-hand menu of the Network & Internet area, you can create a virtual private network (VPN) connection (see Figure 1-7). By default, the only VPN provider available is built into Windows. You need to name the connection and then tell it the address of the VPN server that you’re connecting to.

FIGURE 1-7: The VPN screen in the Network & Internet section of Settings.
Proxy
When you click the Proxy link on the left-hand menu of the Network & Internet area, you can set up the proxy settings — which you’ll need to do if your organization uses a proxy server (see Figure 1-8). If you’re using an automatic configuration script, you can turn on the Automatically Detect Settings switch and the Use Setup Script switch.
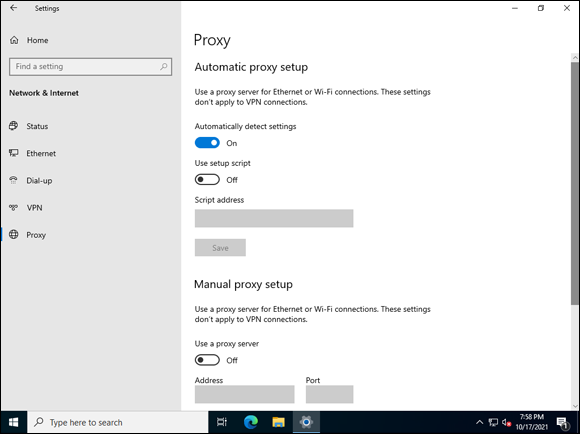
FIGURE 1-8: The Proxy screen in the Network & Internet section of Settings.
If you need to set things manually, you can use the “Manual Proxy Setup” section to specify the IP address and the port of the proxy server.
Configuring TCP/IP
Transmission Control Protocol/Internet Protocol (TCP/IP) is a whole suite of protocols that allow devices to communicate over a network. Working with the TCP/IP configuration on your server is one of the basic tasks that you’ll be expected to know how to do as a system administrator.
Before I explain how to configure TCP/IP, I need you make sure you understand a few terms:
- IP address: An IP address is a number that uniquely identifies a system on a network. There are two versions of IP addresses:
- IPv4: A 32-bit address that identifies a system on an IPv4 network (for example, 192.168.10.10)
- IPv6: A 128-bit address that identifies a system on an IPv6 network (for example, FE80:0000:0000:0000:0202:B2EF:FC4B:5749)
- Domain Name System (DNS): Translates hostnames to IP addresses using forward lookup zones, and IP addresses to hostnames with reverse lookup zones.
- Windows Internet Name Service (WINS): Responsible for converting NetBIOS names to IP addresses. WINS was primarily used in older versions of Windows (Windows 2000, Windows XP, and Windows Server 2003).
Now that you know the key terms, let’s assign an IP address to a system. Follow these steps to walk through the settings you can change:
- Right-click the Start menu, and choose Network Connections.
- Click Change Adapter options.
Right-click one of the adapters and choose Properties.
The Properties dialog box for the adapter appears.
Select Internet Protocol Version 4 (TCP/IPv4) and click the Properties button (as shown in Figure 1-9).
The Internet Protocol Version 4 (TCP/IPv4) Properties dialog box appears. By default, this is set to obtain an Internet Protocol (IP) and Domain Name Server (DNS) address automatically. You can see in Figure 1-10 that the server has static addresses set. This is because it’s a DNS server and domain controller.
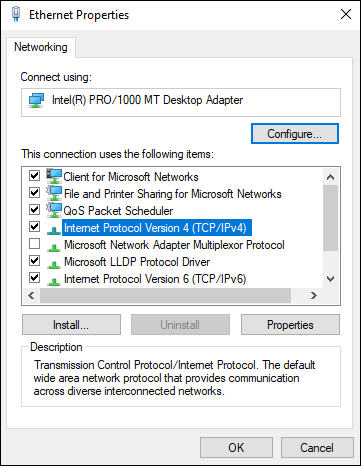
FIGURE 1-9: Selecting which network protocol you want to work with in the adapter’s Properties dialog box.
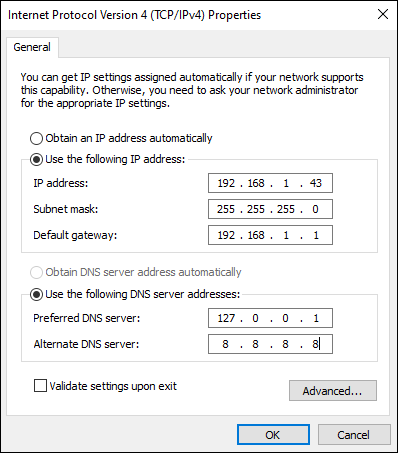
FIGURE 1-10: Statically set IP and DNS server settings are common on servers serving critical infrastructure services.
You can configure additional, more advanced settings as well. In the Internet Protocol Version 4 (TCP/IPv4) Properties dialog box (refer to Figure 1-10), click the Advanced button. The Advanced TCP/IP Settings dialog box has three tabs that allow you to make more advanced configurations in relation to your IP addressing, DNS servers, and WINS servers, shown in Figure 1-11.
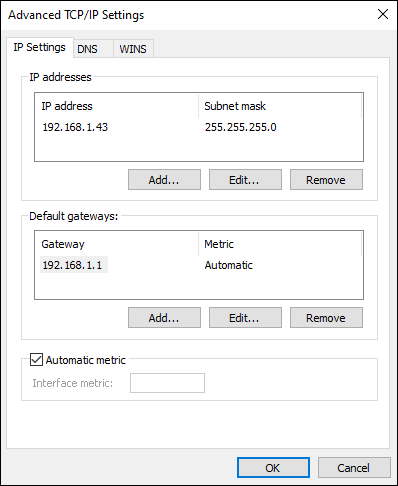
FIGURE 1-11: The Advanced TCP/IP Settings dialog box lets you perform more advanced configuration tasks.
The IP Settings tab can be used to add, edit, or remove IP addresses or gateways. The DNS tab allows you to add, edit, or remove DNS servers. (The basic configuration screen allows two servers to be configured, but from this tab you can configure additional servers if you need to.) If you’re using WINS, the WINS tab allows you to specify WINS servers that are available in the network.
Understanding DHCP
Dynamic Host Configuration Protocol (DHCP) makes your life easier by automatically assigning an IP address to a system. It manages addresses that are in use and ensures that duplicate IP addresses are never issued. By default, an address is leased for eight days, at which point the lease can be renewed or the IP address can be reassigned to another system.
DHCP shifts the burden of assigning and tracking IP addresses from the system administrator and a manual spreadsheet to a more automated process. Especially for large organizations, DHCP ensures that the available IP address space is utilized more efficiently. If a device with a lease is removed from the network or is offline, the lease is removed when it expires, and the IP address is made available to another device.
Automating the provisioning of IP addresses is desirable, but there will be instances when you need to set a static IP address that won’t change. Systems that host major infrastructure services like DNS, DHCP, and Active Directory should have static IP addresses. You can still manage the static IP addresses in DHCP by setting a reservation so that the IP address is accounted for but DHCP will not re-issue it.
DHCP can provide configuration other than simply issuing IP addresses. By using DHCP options, you can set things like the default gateway, the name servers for a network, imaging servers that are available, and more.
So, how does DHCP work? One of the easiest ways to remember is with the DORA acronym; DORA stands for Discover, Offer, Request, and Acknowledge:
Discover.
A DHCP client requests an IP address by sending a DHCPDiscover message out to its local subnet as a broadcast.
Offer.
The DHCP server makes an offer to the client using a DHCPOffer message, which contains the IP address and configuration information, including the lease time.
Request.
The DHCP client broadcasts a DHCPRequest to indicate that it has accepted what was sent.
Acknowledge.
As a last step, the DHCP server broadcasts a DHCPAck message, which lets the client know that the lease has been finalized.
DHCP uses ports UDP/67 and UDP/68. UDP/67 is used as the destination port on the DHCP server, and UDP/68 is used by the DHCP client.
Defining DNS
Domain Name System (DNS) is the service that is used to map human-friendly names like www.dummies.com to an IP address, which is how a computer addresses locations.
You need to understand a few terms to understand how DNS breaks down addresses:
- Top-level domain: The top-level domain is used to indicate the country of origin or the type of organization. For example, a commercial organization might use
.com, or a website in Brazil might use.br. Common top-level domains include.com(commercial).edu(educational institutions).org(usually used by not-for-profit organizations).net(an alternative to.com).gov(government sites).mil(military sites)- Country codes like
.us,.br,.tk,.cn, and so on
- Second-level domain: A second-level domain is registered to either an individual or an organization. For instance,
dummies.comis a second-level domain. - Subdomain: Subdomains are additional names that an organization chooses to register. An example of a subdomain would be the
wwwinwww.dummies.com.
Zones in DNS are used to separate administrative boundaries within a common DNS namespace (like sometestorg.com). Multiple subdomains can exist within the same zone, and multiple zones can exist on the same DNS server. For example, I may have three subdomains: hr.sometestorg.com, sales.sometestorg.com and legal.sometestorg.com. My HR and Sales subdomains are managed by the same group of people, so they are in the same zone. My Legal domain is managed by a different group of people, so it is in its own zone. Each zone stores its information in a DNS zone file. The DNS zone file contains all of the records that exist in the zone.
DNS records are stored in DNS zones. There are several types of DNS records you may find in a zone, and the record type defines what kind of record you're using. Subdomains, for example, are typically defined by an A record. Table 1-1 lists common DNS record types.
TABLE 1-1 DNS Record Types
Record Type | Description |
|---|---|
SOA | Start of Authority defines the primary DNS server name, refresh intervals, and time-to-live settings. |
A or AAAA | A records are host records for IPv4 addresses; AAAA records are host records for IPv6 addresses. This record provides a mapping of a hostname to an IP address. |
PTR | Maps an IP address to a hostname and is used for reverse DNS lookups. |
NS | Defines name servers for the DNS zone. |
MX | Defines the mail exchange server’s DNS record. |
CNAME | CNAMEs are used to create an alias record. For example, you might have |
Now that you know all this, you may be asking, “But how does DNS work?” The simple answer: DNS queries. When a DNS client needs to resolve a record, it sends a DNS query to a local DNS server. If that server knows the address, it responds with the IP address. If it doesn't know the address, it can query another server.
Let’s use the following example: You want to reach www.dummies.com because you’re no dummy. You type the address into your browser and behind the scenes, this is what happens:
- The DNS client queries the local DNS server if it knows who
www.dummies.comis. The local server does not know, so it sends a query to the root server to get an authoritative DNS server for
.com.It receives a referral for the
.comDNS servers.- The local server queries the
.comservers forwww.dummies.com. - The
.comserver may not know the address, but it provides the address in a referral for the DNS server fordummies.com. - From there, the local server can query the
dummies.comDNS server forwww.dummies.com, and will receive a valid IP address back as an answer to the original query.
This all happens within the span of the few seconds that it takes for you to reach the website. The answer is cached by the DNS client for however long the time to live (TTL) is set, so future requests can be answered by the cache on the local system instead of having to go through the queries again.
DNS uses port 53 to communicate. Regular DNS queries are made over UDP/53; however, larger queries like IPv6 and DNSSEC queries need TCP/53. TCP/53 is also used for zone transfers, which is why it was historically blocked by organizations at the firewall. However, if your organization plans on using IPv6 or DNSSEC, you need to allow it.
Creating a DNS zone
At some point in your career, it’s highly likely that you’ll be asked to create a zone. When I was explaining zones earlier, I had mentioned the use case of having one zone with two subdomains: a Sales subdomain and an HR subdomain. In that example, I had mentioned needing a new zone for the Legal subdomain. Here are the steps involved in setting up the new zone:
- From Server Manager, choose Tools⇒ DNS.
- Right-click Forward Lookup Zones and click on New Zone.
- In the Welcome to the New Zone Wizard, click Next.
On the Zone Type screen, select the radio button next to Primary Zone, and click Next.
On the Zone Type screen, you’re prompted to check the Store the Zone in Active Directory check box. You must be on a writeable domain controller to select this option. I suggest selecting this to get the fault tolerance of Active Directory integrated zones.- On the Active Directory Zone Replication Scope screen, select the radio button next to To All DNS Servers Running on Domain Controllers in This Domain: <domain_name>, shown in Figure 1-12.
- Click Next.
On the Zone Name screen, enter the name of the zone that you want to create and click Next.
In this example, I’ll enter legal.sometestorg.com.
On the Dynamic Update screen, you have three options. If you opted to store the DNS zone in Active Directory all three options will be available. If you chose not to store the DNS zone in Active Directory, you won’t be able to select Allow Only Secure Dynamic Updates.
- Select Allow Only Secure Dynamic Updates and click Next.
- On the Completing the New Zone Wizard screen, click Finish.

FIGURE 1-12: Selecting the replication scope for the new zone is important; in this case, the scope is at the domain level.
If you’ve followed along with these steps, your screen should look similar to Figure 1-13. You can see the new zone for the subdomain of legal.sometestorg.com.
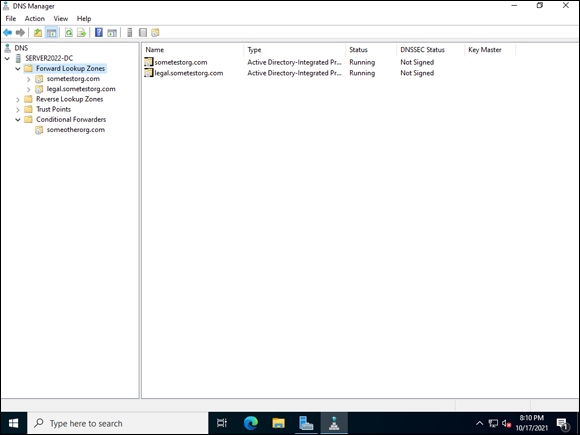
FIGURE 1-13: The legal.sometestorg.com zone provides a separate administrative boundary from the sometestorg.com zone.
DNS and Active Directory
To install Active Directory, you must either have DNS installed ahead of time or install it at the same time as Active Directory. You may wonder why you need DNS to be able to use Active Directory. There a couple of reasons:
- DNS assists systems on the network in locating a domain controller by using locator records, which help the workstations and servers by providing the location of the domain controllers. Without locator records, your systems wouldn’t be able to authenticate, because they wouldn’t have a location to send authentication traffic.
- Domain controllers rely on DNS to find other domain controllers to replicate their zone data to.
Making DNS fault tolerant
When you create a DNS server, you specify whether it will be the primary DNS server or the secondary DNS server for a zone. There can only be one primary DNS server for a zone, but you can have multiple secondary DNS servers on a zone. The primary DNS server for the zone serves queries that come in and, more important, accepts changes and additions to zone records. Secondary DNS servers can service queries but can’t accept additions or changes to the zone records. They contain a read-only copy of the zone that is copied from the primary DNS server. If the primary DNS server for the zone goes down, you can promote the secondary DNS server for the zone to the primary. This is not an automatic process — as the server administrator, you must initiate it.
If you’re using Active Directory Integrated DNS zones, you’re automatically fault tolerant. DNS zones that are Active Directory integrated store their records in Active Directory. The DNS servers that are considered authoritative for those zones exist in a multi-master configuration. If one of the DNS servers was to go down, the other DNS servers would continue to service queries without any issues. Just remember that to be fault tolerant, you need at least two DNS servers that are authoritative for the Active Directory integrated zone.